


Create successful ePaper yourself
Turn your PDF publications into a flip-book with our unique Google optimized e-Paper software.
B o o k c a s e<br />
Step 4<br />
Applying the front<br />
trim, top and feet<br />
12<br />
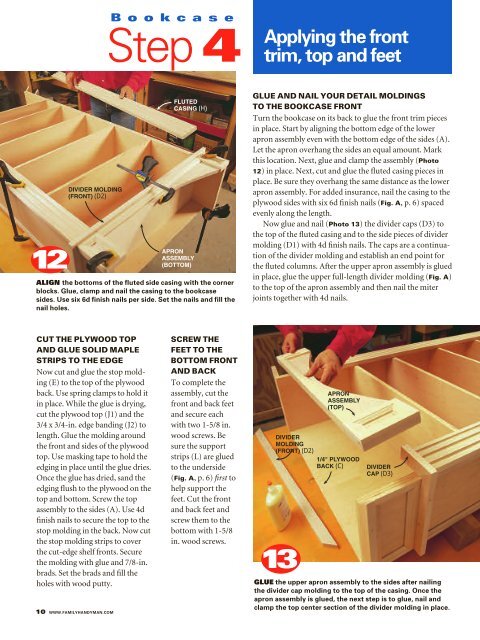
DIVIDER MOLDING<br />
(FRONT) (D2)<br />
FLUTED<br />
CASING (H)<br />
APRON<br />
ASSEMBLY<br />
(BOTTOM)<br />
ALIGN the bottoms of the fluted side casing with the corner<br />
blocks. Glue, clamp and nail the casing to the bookcase<br />
sides. Use six 6d finish nails per side. Set the nails and fill the<br />
nail holes.<br />
GLUE AND NAIL YOUR DETAIL MOLDINGS<br />
TO THE BOOKCASE FRONT<br />
Turn the bookcase on its back to glue the front trim pieces<br />
in place. Start by aligning the bottom edge of the lower<br />
apron assembly even with the bottom edge of the sides (A).<br />
Let the apron overhang the sides an equal amount. Mark<br />
this location. Next, glue and clamp the assembly (Photo<br />
12) in place. Next, cut and glue the fluted casing pieces in<br />
place. Be sure they overhang the same distance as the lower<br />
apron assembly. For added insurance, nail the casing to the<br />
plywood sides with six 6d finish nails (Fig. A, p. 6) spaced<br />
evenly along the length.<br />
Now glue and nail (Photo 13) the divider caps (D3) to<br />
the top of the fluted casing and to the side pieces of divider<br />
molding (D1) with 4d finish nails. The caps are a continuation<br />
of the divider molding and establish an end point for<br />
the fluted columns. After the upper apron assembly is glued<br />
in place, glue the upper full-length divider molding (Fig. A)<br />
to the top of the apron assembly and then nail the miter<br />
joints together with 4d nails.<br />
CUT THE PLYWOOD TOP<br />
AND GLUE SOLID MAPLE<br />
STRIPS TO THE EDGE<br />
Now cut and glue the stop molding<br />
(E) to the top of the plywood<br />
back. Use spring clamps to hold it<br />
in place. While the glue is drying,<br />
cut the plywood top (J1) and the<br />
3/4 x 3/4-in. edge banding (J2) to<br />
length. Glue the molding around<br />
the front and sides of the plywood<br />
top. Use masking tape to hold the<br />
edging in place until the glue dries.<br />
Once the glue has dried, sand the<br />
edging flush to the plywood on the<br />
top and bottom. Screw the top<br />
assembly to the sides (A). Use 4d<br />
finish nails to secure the top to the<br />
stop molding in the back. Now cut<br />
the stop molding strips to cover<br />
the cut-edge shelf fronts. Secure<br />
the molding with glue and 7/8-in.<br />
brads. Set the brads and fill the<br />
holes with wood putty.<br />
10 WWW.FAMILYHANDYMAN.COM<br />
SCREW THE<br />
FEET TO THE<br />
BOTTOM FRONT<br />
AND BACK<br />
To complete the<br />
assembly, cut the<br />
front and back feet<br />
and secure each<br />
with two 1-5/8 in.<br />
wood screws. Be<br />
sure the support<br />
strips (L) are glued<br />
to the underside<br />
(Fig. A, p. 6) first to<br />
help support the<br />
feet. Cut the front<br />
and back feet and<br />
screw them to the<br />
bottom with 1-5/8<br />
in. wood screws.<br />
APRON<br />
ASSEMBLY<br />
(TOP)<br />
DIVIDER<br />
MOLDING<br />
(FRONT) (D2)<br />
1/4" PLYWOOD<br />
BACK (C)<br />
13<br />
DIVIDER<br />
CAP (D3)<br />
GLUE the upper apron assembly to the sides after nailing<br />
the divider cap molding to the top of the casing. Once the<br />
apron assembly is glued, the next step is to glue, nail and<br />
clamp the top center section of the divider molding in place.