


Create successful ePaper yourself
Turn your PDF publications into a flip-book with our unique Google optimized e-Paper software.
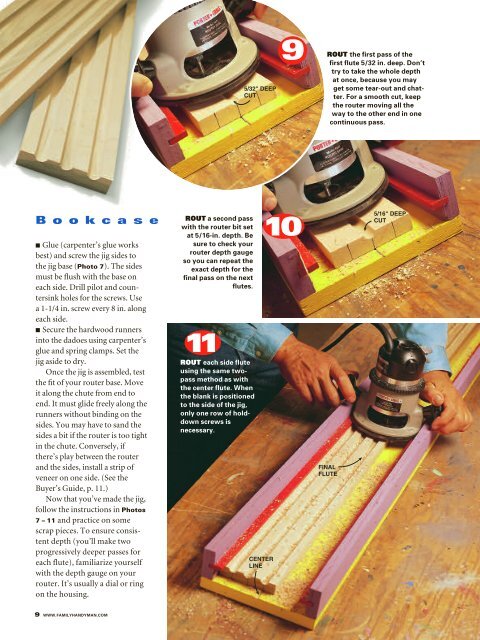
5/32" DEEP<br />
CUT<br />
9<br />
ROUT the first pass of the<br />
first flute 5/32 in. deep. Don’t<br />
try to take the whole depth<br />
at once, because you may<br />
get some tear-out and chatter.<br />
For a smooth cut, keep<br />
the router moving all the<br />
way to the other end in one<br />
continuous pass.<br />
B o o k c a s e<br />
■ Glue (carpenter’s glue works<br />
best) and screw the jig sides to<br />
the jig base (Photo 7). The sides<br />
must be flush with the base on<br />
each side. Drill pilot and countersink<br />
holes for the screws. Use<br />
a 1-1/4 in. screw every 8 in. along<br />
each side.<br />
■ Secure the hardwood runners<br />
into the dadoes using carpenter’s<br />
glue and spring clamps. Set the<br />
jig aside to dry.<br />
Once the jig is assembled, test<br />
the fit of your router base. Move<br />
it along the chute from end to<br />
end. It must glide freely along the<br />
runners without binding on the<br />
sides. You may have to sand the<br />
sides a bit if the router is too tight<br />
in the chute. Conversely, if<br />
there’s play between the router<br />
and the sides, install a strip of<br />
veneer on one side. (See the<br />
Buyer’s Guide, p. 11.)<br />
Now that you’ve made the jig,<br />
follow the instructions in Photos<br />
7 – 11 and practice on some<br />
scrap pieces. To ensure consistent<br />
depth (you’ll make two<br />
progressively deeper passes for<br />
each flute), familiarize yourself<br />
with the depth gauge on your<br />
router. It’s usually a dial or ring<br />
on the housing.<br />
ROUT a second pass<br />
with the router bit set<br />
at 5/16-in. depth. Be<br />
sure to check your<br />
router depth gauge<br />
so you can repeat the<br />
exact depth for the<br />
final pass on the next<br />
flutes.<br />
11<br />
ROUT each side flute<br />
using the same twopass<br />
method as with<br />
the center flute. When<br />
the blank is positioned<br />
to the side of the jig,<br />
only one row of holddown<br />
screws is<br />
necessary.<br />
CENTER<br />
LINE<br />
10<br />
FINAL<br />
FLUTE<br />
5/16" DEEP<br />
CUT<br />
9 WWW.FAMILYHANDYMAN.COM<br />
THE FAMILY HANDYMAN APRIL 1999 9