PIP Video Processor - Ambery
PIP Video Processor - Ambery
PIP Video Processor - Ambery

Create successful ePaper yourself
Turn your PDF publications into a flip-book with our unique Google optimized e-Paper software.
<strong>PIP</strong> <strong>Video</strong> <strong>Processor</strong><br />
User Manual<br />
Design IN USA<br />
[Model Number: MPV-100]
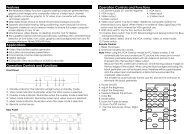
Safety and Notice<br />
The MPV-100 Picture-In-Picture <strong>Video</strong> <strong>Processor</strong> has been tested for conformity to safety regulations and<br />
requirements, and has been certified for international use. However, like all electronic equipments, the MPV-100 should be<br />
used with care. Please read and follow the safety instructions to protect yourself from possible injury and to minimize the<br />
risk of damage to the unit.<br />
Follow all instructions and warnings marked on this unit.<br />
Do not attempt to service this unit yourself, except where explained in this manual.<br />
Provide proper ventilation and air circulation and do not use near water.<br />
Keep objects that might damage the device and assure that the placement of this unit is on a stable surface.<br />
Use only the power adapter and power cords and connection cables designed for this unit.<br />
Do not use liquid or aerosol cleaners to clean this unit. Always unplug the power to the device before cleaning.
Chapter 1 Introduction 1<br />
General 1<br />
Features 2<br />
Specifications<br />
Package Contents<br />
3<br />
4<br />
Inputs and Outputs 5<br />
Chapter 2 Hardware Installation 6<br />
Safety Precautions 6<br />
Installation Procedures 6<br />
Operations<br />
IR Remote Control<br />
8<br />
9<br />
On Screen Display Menu 10<br />
Chapter 3 Software Operation 12<br />
System Requirement and Precautions 12<br />
Instruction of Software Connection 12<br />
Instruction of Software Operation 14<br />
Chapter 4 Troubleshooting 18<br />
Appendix Supported Resolution 23
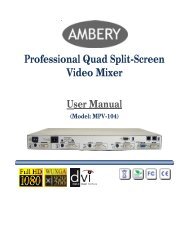
General<br />
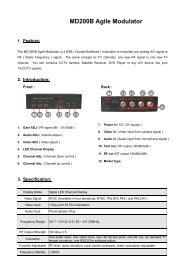
MPV-100 Picture-In-Picture <strong>Video</strong> <strong>Processor</strong> is an advanced video processor for multimedia presentations. It is an<br />
ideal solution for applications where two video signals must be displayed simultaneously on the same screen display. It<br />
supports up to four video inputs for computer RGB or HD/SD type videos. Any two inputs will be synchronized for output in<br />
Picture-In-Picture (<strong>PIP</strong>) or Picture-Aside-Picture (PAP) modes. The MPV-100 video processor allows users to manipulate<br />
output images, wherever position and whatever sizes desired for viewing two computer screens or two video screens or a<br />
combination of both showing on the display.<br />
The embedded video scaler inside the MPV-100 can also cross converts input source video signals to both analog and<br />
digital formats and easily match the native resolution of monitors, flat panel displays, projectors. Dual outputs are provided<br />
in both analog (VGA) and digital (DVI) format, one is connected to remote display and the other is connected to on-site<br />
display for real time monitoring with user-selectable output settings up to WUXGA at 1920x1200 pixels or HD resolution up<br />
to 1080p.<br />
Figure 1: Configuration Diagram<br />
~ 1 ~
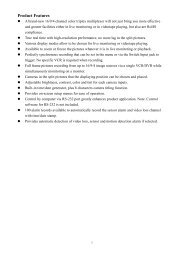
Product Features<br />
Multi-Function digital video scaler and <strong>PIP</strong> video generator.<br />
Professional multi-view video mixer with simultaneous digital DVI-D and analog VGA outputs.<br />
Dual HD video scaling engines built in for easy cross conversion between different video formats. Converts DVI, VGA,<br />
HD component YPbPr video and SD composite video to both DVI-D and VGA type for output up to 1920x1200 pixels<br />
or 1080p.<br />
High-performance analog-to-digital and digital-to-analog video format converter designed to output in a wide range of<br />
digital resolution. Any SD/HD input can up-scaled or down-scaled in a selectable HD or computer RGB video<br />
resolution and match the native resolution/format of users’ displays for highest picture quality.<br />
Supports computer DVI-D and VGA type RGB inputs from 640x480 to 1920x1200 pixels.<br />
Supports HD Component YPbPr and Composite video inputs from 480i to 1080i/1080p.<br />
Full control of Picture-In-Picture, PAP and full screen modes via IR remote control or a RS232 link with a PC.<br />
Adjustable <strong>PIP</strong>/PAP video window sizes and position through the RS232 software.<br />
Supports independent image freeze controls on both main channel and sub video channel, enabling video frames to<br />
be paused or captured for extended period of time for detailed presentation.<br />
Supports easy SWAP function for interchanging video channels. The main video channel and the <strong>PIP</strong> sub window can<br />
be swapped effortlessly and instantly showing on the screen display through the “SWAP” push button on the remote<br />
controller.<br />
Selectable video windows sizing, positioning, horizontal/vertical flip, zoom/pan and blend functions for output video.<br />
Easy on-screen OSD setup menu for user friendly configuration and operation.<br />
Featured with multiple-level control of adaptive deinterlacing and noise reduction functions for output video.<br />
Image parameters adjustable (brightness, contrast, color temperature, etc) and layouts are automatically saved in<br />
flash memory and can be recalled for later use.<br />
All image adjustment parameters and layouts can be saved in files and can be loaded for later use.<br />
Full-featured IR remote controller included.<br />
Supports advanced control and distance operation through the RS-232 console port.<br />
RS232 control software supports Win98/2000/Vista/Me and Win7.<br />
Automatically power-saving mode.<br />
~ 2 ~
Product Specifications<br />
Technical<br />
Role of usage<br />
Multiplexer / video processor<br />
<strong>Video</strong> Inputs<br />
VGA In x 2 + DVI In x 1 + Component YPbPr x 1 + Composite In x 1 + 1x RS-232<br />
<strong>Video</strong> Output DVI-D Out x 1 + VGA Out x 1<br />
HDCP Compliance No<br />
DVI-D [Single-link 4.95Gbps]<br />
<strong>Video</strong> Bandwidth<br />
VGA [165MHz]<br />
Component YPbPr [30MHz]<br />
Composite <strong>Video</strong> [13.5MHz]<br />
Max <strong>Video</strong> Resolution 1080P/60Hz Or 1920x1200@75Hz<br />
Audio Support<br />
No<br />
Distance Control RS-232 and IR remote control<br />
Split Screen Mode <strong>PIP</strong> / PAP<br />
Input TMDS signal 1.2 Volts [peak-to-peak]<br />
ESD protection<br />
Human body model — ±15kV [air-gap discharge] & ±8kV [contact discharge]<br />
PCB stack-up 6-layer board [impedance control — differential 100; single 50]<br />
IR remote control Electro-optical characteristics: = 25 / Carrier frequency: 38kHz<br />
DVI connector<br />
DVI-I [29-pin female, digital only]<br />
VGA connector<br />
HD-15 [15-pin D-sub female]<br />
RS-232 connector DE-9 [9-pin D-sub female]<br />
RCA connector<br />
75<br />
Mechanical<br />
Housing<br />
Metal enclosure<br />
Dimensions (L x W x H) 180 x 103 x 23mm [7.1”x4”x0.9”]<br />
Fixedness Wall-mounting case<br />
Power supply<br />
5V 4A DC<br />
Power consumption 10 Watts [max]<br />
Operation temperature 0~40C [32~104F]<br />
Storage temperature -20~60C [-4~140F]<br />
Relative humidity 20~90% RH [no condensation]<br />
1x MPV-100<br />
Package Contents<br />
1x DVI to DVI/VGA breakout cable<br />
1x VGA to component breakout cable 1x<br />
VGA to DVI adapter<br />
1x 5V power adapter<br />
1x IR remote controller<br />
1x Installation software CD<br />
1x User Manual<br />
~ 3 ~
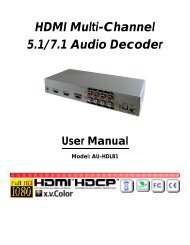
Package Contents<br />
1. MPV-100 2. DVI To DVI / VGA Breakout Cable<br />
3.VGA To YPbPr Breakout Cable<br />
4. DVI To VGA Adapter<br />
5. 5V DC Power Adapter 6.IR Remote Controller<br />
7. RS232 Console Control 8. User Manual<br />
Software CD<br />
~ 4 ~
Inputs and Outputs<br />
The MPV-100 supports total of 4 video inputs for all computer RGB and HD type video signals from desktop/laptop<br />
computers, workstation, DVR, and all NTSC/PAL analog video sources. Users can use this product to generate dual<br />
channel display on one screen by selecting any two out of the four video input sources connected for visual presentation.<br />
With one video input reserved for main video window and the other video input used for the <strong>PIP</strong> sub video channel, this <strong>PIP</strong><br />
video generator will combine both video inputs in sync for output in split screen or overlay screen. Figure 2 shows all the<br />
video connectors of the back panel from a MPV-100 and Table 1 illustrates how users can connect video devices and<br />
display through the MPV-100.<br />
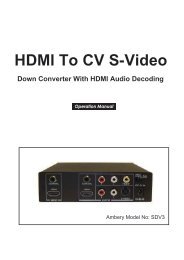
Figure 2: Rear Panel 4<br />
1. Power connector 4. Composite input<br />
2. DVI / VGA output 5. DVI / VGA / HD Component input<br />
3. VGA input 6. DIP switch* (for firmware & system reset)<br />
*Reset to default values: Turn on the MPV-100 unit then turn both dials on the DIP switch<br />
simultaneously up and down to reset the unit back to the factory default mode.<br />
*These IO ports support various computer RGB resolution from 640x480 up to 1920x1200, for<br />
more detail of the supported modes, please refer to the Appendix – Supported Resolution.<br />
Input Connector<br />
DVI-IN<br />
VGA<br />
Composite<br />
Output Connector<br />
DVI-I OUT<br />
Table 1: I/O Connectors<br />
<strong>Video</strong> Source<br />
Option [1]: DVI input via the DVI cable<br />
Option [2]: VGA input via using a DVI-to-VGA adapter<br />
Option [3]: HD Component (YPbPr) input via the combination of using a DVI-to-VGA adapter<br />
and a VGA-to-component breakout cable<br />
Option [4]: DVI input + VGA input via using a DVI-to-DVI/VGA breakout cable<br />
Option [5]: DVI input + Component (YPbPr) input via the combination of using a<br />
DVI-to-DVI/VGA breakout cable for DVI IN and a VGA-to-component breakout cable for<br />
component YPbPr IN.<br />
2 nd VGA input via using a VGA cable<br />
Analog composite video input via using a RCA A/V cable<br />
Display<br />
[1] DVI display<br />
[2] VGA display — with a DVI-to-VGA adapter<br />
[3] 1x DVI display + 1x VGA display — with a DVI to DVI/VGA breakout cable<br />
~ 5 ~
Safety Precautions<br />
I. To prevent fire or shock hazards, do not expose this device to rain or moisture.<br />
II.<br />
III.<br />
IV.<br />
When connecting other products such as DVD players, and personal computers, you should turn off the power of this<br />
product for protection against electric shocks.<br />
The product should be placed more than one foot away from heat sources such as radiators, heat registers, stoves,<br />
and other products (including amplifiers) that produce heat. In addition, do not cover any material or devices on the top<br />
of the device.<br />
Do not use immediately after moving from a low temperature to high temperature, as this causes condensation,<br />
V. Do not place this product on an unstable cart, stand, or table. The product may fall, causing serious injury to a child or<br />
adult and serious damage to the product.<br />
VI.<br />
VII.<br />
<br />
Unplug this product from the wall outlet before cleaning. Do not use liquid cleaners or aerosol cleaners. Use a damp<br />
cloth for cleaning.<br />
Do not allow the same still picture to be projected for a long time or an abnormally bright video picture to be<br />
projected. The video image could be burned in to the display device.<br />
Installation Procedures<br />
Unpacking<br />
Remove the MPV-100 from the shipping container and examine it for any signs of shipping damage or missing items<br />
(check with package contents above). All shipping items should be saved if the product is to be moved or returned for<br />
service. Shipping unit back to dealers for service not in the original box may result in voiding warranty or additional cost.<br />
Placement<br />
The unit uses convection to cool. A fan is not needed, so do not block the sides of this device or stack another device<br />
on the top or bottom of the MPV-100.<br />
Connections<br />
1. Switch off the MPV-100 and all video source devices that you want to connect with MPV-100.<br />
2. CV Input: Connect your composite video device to composite RCA input of the MPV-100.<br />
3. VGA Input: [Option 1] Connect your VGA device such as laptop directly into the VGA input of MPV-100. The 15-pin<br />
D-sub input on the MPV-100 is the 2 nd VGA input. [Option 2] Connect your VGA device to the VGA end of the DVI to<br />
DVI/VGA breakout cable. The VGA input via using the DVI to DVI/VGA breakout is considered the 1 st VGA input.<br />
Note: you can always connect 2 video sources mixed with either DVI, VGA or Component YPbPr type together into<br />
the DVI input of MPV-100 with the help of combining the DVI-to-DVI/VGA breakout cable for DVI/VGA IN and a<br />
VGA-to-component breakout cable for component YPbPr IN.<br />
~ 6 ~
4. Component YPbPr Input: Use the supplied DVI to DVI/VGA breakout cable to plug into DVI input of MPV-100 first so<br />
there will be a DVI end and VGA end for inputs. Then plug in the supplied VGA to component YPbPr adapter cable to<br />
the VGA end of the breakout cable for connection with your component YPbPr video device.<br />
5. DVI Input: [Option 1] Connect the DVI source directly into the DVI input of MPV-100. [Option 2] Connect the DVI<br />
device to the DVI end of the DVI to DVI/VGA breakout cable if used for necessity of hookups with more video input<br />
devices.<br />
6. DVI Output: [Option 1] Connect your DVI monitor, projector, LCD TV or other compatible digital display directly into<br />
DVI output of MPV-100. [Option 2] Connect your DVI monitor display to the DVI end of a DVI to DVI/VGA breakout<br />
cable if dual outputs needed. Note: You can always use additional DVI to DVI/VGA breakout cable on the DVI output<br />
port of MPV-100 for connecting with one DVI display and one VGA display at the same time.<br />
7. VGA Output: [Option 1] Connect your VGA monitor, projector, LCD TV or other compatible digital display directly into<br />
DVI output of MPV-100 using a DVI to VGA adapter. [Option 2] Connect your VGA monitor display to the VGA end of<br />
a DVI to DVI/VGA breakout cable if dual outputs needed for connecting with one DVI display and one VGA display at<br />
the same time.<br />
8. RS232 Console Port: This connection is optional. This connection is only needed for advanced console control or<br />
distance operation using a Windows-based PC for controlling the operation the MPV-100. You can use a 9-pin RS-232<br />
serial port cable or a USB to RS232 adapter cable for connection between MPV-100 unit and a PC for advanced<br />
console control or distance operation. After the RS232 serial connection is well established, please install the RS232<br />
application software from the cd disc included in the package to the PC for manual control and operation use.<br />
Figure 3: Connection Diagram<br />
~ 7 ~
Operations<br />
1. Use the supplied power adapter to connect your MPV-100 unit and the AC power outlet on the wall.<br />
2. Complete all the cable connections as instructed for the needed application setup. Refer to the instructions in the<br />
above paragraph.<br />
3. Power on all source devices connected first then switch on your MPV-100 video processor and lastly power on<br />
your video displays.<br />
4. Press “menu” button from the IR remote controller to display OSD menu.<br />
5. Press the down arrow key from the remote controller to drop down the sub-menu and select the video source input<br />
for the Main Channel display.<br />
6. Once finishing selecting the video source for the main video channel, press the “EXIT” key from the remote<br />
controller to exit the sub-menu, and then move right to the next item of OSD menu, which allows you to select the<br />
video input source for the second channel display (Sub Channel).<br />
For detailed IR remote control operation, please refer to next paragraph for the On Screen Display menu and IR<br />
operating instruction.<br />
~ 8 ~
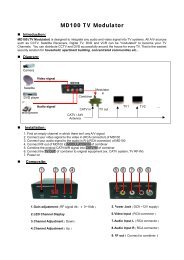
IR Remote Control<br />
The MPV-100 is shipped with a compact IR remote controller that allows for direct access to most commands used to<br />
control the video processor.<br />
(1) Power Power on/off the device<br />
(2) <strong>PIP</strong> Border Display the border of small image (under <strong>PIP</strong> mode)<br />
(3) Up Button Move to the upper titles<br />
(4) Source Press to select a source for main channel<br />
(5) Reset Factory Reset<br />
(6) Right Button Move to the right titles<br />
(7) Menu Display OSD menu<br />
(8) Left Button Move to the left titles<br />
(4)<br />
(8)<br />
(12)<br />
(3)<br />
(7)<br />
(11)<br />
(2)<br />
(6)<br />
(10)<br />
(1)<br />
(5)<br />
(9)<br />
(13)<br />
(9) Logo Display a logo<br />
(10) Exit Move back to previous option or exit OSD menu<br />
(11) Down Button Move to the lower titles<br />
(17) (16)<br />
(21) (20)<br />
(15)<br />
(19)<br />
(14)<br />
(18)<br />
(12) Enter Press to drop down sub-menus or confirm the selection<br />
(13) Blank Blank out the screen<br />
(14) Color Automatically configure the main channel color<br />
(15) Auto Automatically configure the main channel position<br />
(16) V Flip Flip the screen vertically<br />
(17) H Flip Flip the screen horizontally<br />
(18) SWAP<br />
Swap between main channel and sub-channel<br />
(only works in <strong>PIP</strong> or PAP mode)<br />
(19) <strong>PIP</strong> Change modes among full screen, <strong>PIP</strong>, PAP<br />
(20) Sub Pause Freeze the images on the <strong>PIP</strong> channel<br />
(21) Main Pause Freeze the images on main channel<br />
~ 9 ~
On Screen Display Menu<br />
Menu<br />
Down<br />
Button<br />
Main Sub OSD Language Factor Resolutio<br />
Control Selection y<br />
n<br />
Reset Selection<br />
Down Button<br />
Main<br />
Sourc<br />
e<br />
Enter Button<br />
Main Control<br />
Sub Source<br />
Enter Button<br />
Sub Control<br />
Displa<br />
y<br />
Positio<br />
n<br />
<strong>PIP</strong><br />
Contro<br />
l<br />
Borde<br />
r<br />
Imag<br />
e<br />
Color<br />
Logo<br />
~ 10 ~
Main Source: Select an input source for the main channel (VGA / YPbPr, DVI, Composite, VGA)<br />
Main Control:<br />
Display<br />
Brightness (Slider) Hue (Slider) Saturation (Slider)<br />
Contrast (Slider)<br />
Flesh-tone (Button: Off, Weak, Soft, Strong)<br />
Image<br />
Scaling (1:1, Fill, Aspect, Panor)<br />
Adaptive Deinterlacing (Button: Off, Level 1, Level 2, Level 3)<br />
Noise Reduction (Button: Off, Low, Med, High)<br />
Angle Filtering (Button: Off, On)<br />
Film Mode Detect (Button: Off, On)<br />
Sharpness (Slider)<br />
Position<br />
Zoom(Button: In, Out)<br />
Zoom Vertical Pan (Button: Down, Up)<br />
Zoom Horizontal Pan (Button: Left, Right) Vertical (Slider) Horizontal (Slider)<br />
Color<br />
RGB (Button: Off, On Cl.BA)<br />
Gamma Correction (Button: Off, 2.2, 2.4)<br />
Color Temperature (Button: User, 6500K, 9300K)<br />
Red (Slider)<br />
Green (Slider)<br />
Blue (Slider)<br />
<strong>PIP</strong> Control<br />
<strong>PIP</strong> Mode (Off, Single, PAP) Vertical (Slider) Blend (Slider)<br />
<strong>PIP</strong> Size (Small, Medium, Large)<br />
Horizontal (Slider)<br />
Logo (Off, On)<br />
Border (Off, On)<br />
Red (Slider) Green (Slider) Blue (Slider) Width (Slider)<br />
Sub Source: Select an input source for sub-channel (VGA/component, DVI, composite, VGA)<br />
Sub Control: The same as Main Control<br />
OSD Control: Vertical (Slider) Horizontal (Slider) Blend (Slider)<br />
Time out (Slider)<br />
OSD Zoom (On, Off)<br />
Language Selection: English and Traditional Chinese<br />
Factory Reset: Reset the device back to default values<br />
Resolution Selection: Press Down Button to select an output resolution and then press enter to confirm that selection.<br />
800×600 @60Hz 1280×768 @60Hz 1440×900 @60Hz 1920×1080 @50Hz<br />
1024×768 @60Hz 1280×1024 @50Hz 1400×1050 @50Hz 1920×1080 @60Hz<br />
1152×864 @75Hz 1280×1024 @60Hz 1400×1050 @60Hz 1920×1200 @50Hz<br />
1280×720 @50Hz 1366×768 @60Hz 1600×1200 @60Hz 1920×1200 @60Hz<br />
1280×720 @60Hz<br />
~ 11 ~
System Requirement and Precautions<br />
1. The MPV-100 provides a software control program which runs under Microsoft Windows 98/2000/XP/Vista/Win 7<br />
through the RS-232 terminal control.<br />
2. Before you click on the icon of the software, make sure you have secured the connection between your computer<br />
COM port and the MPV-100 and switched on the MPV-100 with green LED light.<br />
3. MPV-100 can be commanded by using the remote controller and RS232 software control. To make sure all information<br />
shown in the software is synchronized with those in the device, please click “Connect” to acquire the latest data from<br />
the MPV-100 after you press any key on the remote control.<br />
Instruction of Software Connection<br />
1. Power up the MPV-100 and you can see both red and green LEDs on the front panel blink. Make sure the serial port<br />
(RS-232) connection secure.<br />
2. The first step after running the software is to automatically detect if the device responses correctly through RS-232<br />
port. The process takes 15-20 seconds. If the response is not accurate, a warning window will show up as the figure<br />
below.<br />
The possible reasons causing this failure could be:<br />
The MPV-100 is not supplied with power or the MPV-100 enters deep sleep state. Please check the current<br />
status, and reboot the MPV-100<br />
The serial connection through RS-232 is not well established or some other software has taken the available<br />
serial ports. Please make sure the RS-232 cable is well connected and the available serial port is free to be used<br />
by the MPV-100.<br />
~ 12 ~
3. If the serial connection is well established, you can see similar work window as below.<br />
4. While you move the mouse’s cursor near the borders, in either red or blue, the icon of the cursor will change as the<br />
figure below.<br />
~ 13 ~
Instruction of Software Operation<br />
File<br />
a. Connect: This will synchronize the status of the MPV-100 with that of the<br />
software, especially after IR commands sent.<br />
b. Save Setting: This will save current user preferred settings such as the<br />
positions and sizes of the videos, the width or color of border etc. into your<br />
favorite setting files.<br />
c. Load Setting: The function will load the favorite settings from the previously<br />
saved file.<br />
d. IR Control: This will enable or disable the IR remote control.<br />
e. Auto Sleep: This decides if the MPV-100 enters the deep sleep mode if the video signal cannot be detected in the<br />
main channel.<br />
f. Factory Reset: This will restore all the system values back to the factory default.<br />
g. Exit: Quit the software.<br />
Background<br />
a. Resolution: Change the output resolution.<br />
b. Layout: The preset layout for main & sub channels.<br />
~ 14 ~
c. HFlip: Horizontally flip the output video.<br />
d. VFlip: Vertically flip the output video.<br />
e. SWAP: Swap the main and sub channel.<br />
f. Color: The background color selection.<br />
g. Custom Size 1-3: Save or read main/sub channel size, position, visible and Layer.<br />
~ 15 ~
Main<br />
a. Input Source: Select a video/graphic input of the<br />
main channel.<br />
b. Visible: Display the main channel or not.<br />
c. Border: Display the main channel’s border.<br />
d. Label: Display the main channel’s label. Users can<br />
define the content of the label.<br />
e. Layer: This will make the main channel overlays the<br />
sub channel.<br />
f. Pause: Freeze the display of the main channel.<br />
g. Full Screen: Display the main channel full screen.<br />
h. Color Balance: Automatically do the color balance<br />
while the main channel’s input is from<br />
VGA/component.<br />
i. Auto Config.: Automatically do the auto adjustment<br />
while the main channel’s input is from<br />
VGA/component.<br />
Sub<br />
a. Input Source: Select a video/graphic input of the<br />
sub-channel.<br />
b. Visible: Display the sub-channel or not.<br />
c. Border: Display the sub-channel’s border.<br />
d. Label: Display the sub-channel’s label. Users can<br />
define the content of the label.<br />
e. Layer: This will make the sub-channel overlays the<br />
main channel.<br />
f. Pause: Freeze the display of the sub channel.<br />
~ 16 ~
Control- Setting Dialog<br />
Border<br />
Select main or sub channel for further setting.<br />
PAP mode only<br />
1. Border Color: Setup border’s color by clicking on “Color<br />
setting”.<br />
2. Border Width: Input border’s width.<br />
3. Border Type: The placement of border has two types: Option<br />
Inside means the added border is fully inside the video. Option<br />
Outside means the added border is completely outside the<br />
video and this added border can overlay the other video input.<br />
4. Text Color: Select the color of the label by clicking on “Color<br />
Setting” button.<br />
5. Text Auto: While selecting “Text Auto”, the label on the<br />
screen for each channel will display its corresponding input<br />
channel type. While unselecting “Text Auto”, users can input<br />
the desired string to be displayed.<br />
Only 15 English characters can be displayed at most.<br />
~ 17 ~
6. Duty Cycle: The duty cycle of blinking of OSD borders and<br />
labels.<br />
7. Frequency: How fast the blink.<br />
Image<br />
1. Choose the scaling type for the main channel at full screen display.<br />
2. While Blend is selected, users can use the slider to control the degree of blending.<br />
There is a short period of slight blinking while the MPV-100 processes the blending of the two input videos.<br />
~ 18 ~
Color<br />
1. Select the main or sub channels.<br />
2. Reset: Restore all the setting on this page back to their<br />
default values.<br />
Zoom<br />
A. Select the main or sub channel.<br />
B. Default: Restore the selected channel without zoom<br />
effect.<br />
B<br />
A<br />
~ 19 ~
A. This scroll bar controls the ratio of Zoom.<br />
B. The workplace for controlling the displayed area after<br />
zooming the selected video.<br />
A<br />
B<br />
Pattern<br />
1. While “Pattern Model” is chosen, the output will display the selected<br />
pattern. While unselecting this item, the output display works normally.<br />
2. The orange border indicates which pattern is currently selected. Users can<br />
choose one of the provided patterns by moving cursor and clicking at the<br />
desired one.<br />
3. Define the pattern’s color by clicking at the rectangle inside the ellipse, and<br />
then use the sliders for choosing R, G, B depths.<br />
~ 20 ~
HS / VS Delay<br />
1. Select the main or sub channel.<br />
2. Adjust Main /Sub Channel size and position<br />
3. The fine movement of the selected channel.<br />
EDID Code<br />
1. Save: Save the read back EDID Content in PC.<br />
2. Setting: Automatically setup the output resolution according to<br />
the content of EDID.<br />
This setting is according to the content of EDID, and<br />
the optimum resolution for the monitor might be<br />
different because of the limited information of the<br />
acquired EDID info.<br />
~ 21 ~
Problem<br />
No power<br />
Recommendations<br />
Check if you are using 5V DC adapter and it is firmly plugged into the MPV-100<br />
If you are recovering from power outage, accidentally unplug the adapter or other<br />
power surge conditions, leave the device off for a while and then power it on again.<br />
No/ Erratic video<br />
Make sure all cables are in good working condition and properly connected to the<br />
MPV-100 and displays.<br />
Configure the output video resolution so that it doesn’t excess the native resolution of<br />
the display. ( in this case, the message of “out of range” is usually showed on your<br />
screen)<br />
Make sure a video source is selected to the main channel. (press “Menu” and check if<br />
the first item has a video source selected or press “Source” to select a video source<br />
for the main channel)<br />
Poor quality<br />
We suggest that don’t use T-connectors to split your video source into to images<br />
displayed on two different screens. That will lower output video quality. Use a<br />
distribution amplifier instead of T-connectors.<br />
Make sure the video source is not compressed and maintains the highest native<br />
resolution.<br />
Image position shifted<br />
Press “Auto” key on the remote control.<br />
Auto color configuration only works at VGA and component inputs.<br />
Wrong color<br />
Press “Color” key for auto color configuration.<br />
Auto color configuration only works at VGA and component inputs.<br />
~ 22 ~
DVI VGA YPbPr Component <strong>Video</strong> Input<br />
<br />
Supported Mode<br />
NTSC/480I/525I<br />
PAL/576I/625I<br />
480P/525P<br />
480P (16:9)<br />
576P/625P<br />
(HDTV) 720p<br />
(HDTV) 720p<br />
(HDTV) 1080i<br />
(HDTV) 1080i<br />
(HDTV) 1080p<br />
VESA<br />
VESA<br />
VESA<br />
IBM<br />
IBM<br />
IBM<br />
IBM<br />
VESA<br />
MAC<br />
VESA<br />
VESA<br />
VESA<br />
VESA<br />
VESA<br />
VESA<br />
VESA<br />
VESA<br />
Resolution<br />
720x240 @60Hz<br />
720x288 @50Hz<br />
720x483 @60Hz<br />
960x483 @60Hz<br />
720x756 @50Hz<br />
1280x720 @50Hz<br />
1280x720 @60Hz<br />
1920x1080 @50Hz<br />
1920x1080 @60Hz<br />
1920x1080 @30Hz<br />
720x400 @85Hz<br />
640x350 @85Hz<br />
640x400 @85Hz<br />
720x400 @70Hz<br />
720x350 @70Hz<br />
640x350 @70Hz<br />
640x400 @70Hz<br />
640x480 @60Hz<br />
640x480 @67Hz<br />
640x480 @72Hz<br />
640x480 @75Hz<br />
640x480 @85Hz<br />
800x600 @56Hz<br />
800x600 @60Hz<br />
800x600 @72Hz<br />
800x600 @75Hz<br />
800x600 @85Hz<br />
Supported Mode Resolution<br />
MAC 832x624 @75Hz<br />
VESA 1024x768 @60Hz<br />
MAC 1024x768 @60Hz<br />
VESA 1024x768 @70Hz<br />
IBM 1024x768 @72Hz<br />
VESA 1024x768 @75Hz<br />
MAC 1024x768 @75Hz<br />
VESA 1024x768 @85Hz<br />
VESA 1152x864 @75Hz<br />
MAC 1152x870 @75Hz<br />
SUN 1152x900 @66Hz<br />
SUN 1152x900 @76Hz<br />
VESA 1280x960 @60Hz<br />
VESA 1280x960 @85Hz<br />
VESA 1280x1024 @60Hz<br />
HP 1280x1024 @60Hz<br />
IBM 1280x1024 @67Hz<br />
HP 1280x1024 @72Hz<br />
VESA 1280x1024 @75Hz<br />
SUN 1280x1024 @76Hz<br />
VESA 1600x1200 @60Hz<br />
VESA 1920x1200 @60Hz<br />
~ 23 ~
VGA Input 2<br />
Supported Mode<br />
VESA<br />
VESA<br />
VESA<br />
VESA<br />
VESA<br />
VESA<br />
Resolution<br />
640x480 @60Hz<br />
800x600 @60Hz<br />
1024x768 @60Hz<br />
1280x1024 @60Hz<br />
1600x1200 @60Hz<br />
1920x1200 @60Hz<br />
DVI/VGA Output<br />
Supported Mode<br />
(HDTV) 720p<br />
(HDTV) 720p<br />
(HDTV) 1080p<br />
VESA<br />
VESA<br />
VESA<br />
VESA<br />
VESA<br />
VESA<br />
VESA<br />
VESA<br />
VESA<br />
VESA<br />
VESA<br />
VESA<br />
VESA<br />
VESA<br />
Resolution<br />
1280x720 @50Hz<br />
1280x720 @60Hz<br />
1920x1080 @60Hz<br />
640x480 @60Hz<br />
800x600 @60Hz<br />
1024x768 @60Hz<br />
1152x864 @75Hz<br />
1280x1024 @60Hz<br />
1280x1024 @50Hz<br />
1280x768 @60Hz<br />
1366x768 @60Hz<br />
1400x1050 @60Hz<br />
1400x1050 @50Hz<br />
1152x864 @75Hz<br />
1600x1200 @60Hz<br />
1920x1200 @50Hz<br />
1920x1200 @60Hz<br />
~ 24 ~