S1000D-compliant illustrations - ISTC
S1000D-compliant illustrations - ISTC
S1000D-compliant illustrations - ISTC

You also want an ePaper? Increase the reach of your titles
YUMPU automatically turns print PDFs into web optimized ePapers that Google loves.
38 Tools<br />
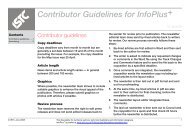
Figure 3. Setting up a custom index<br />
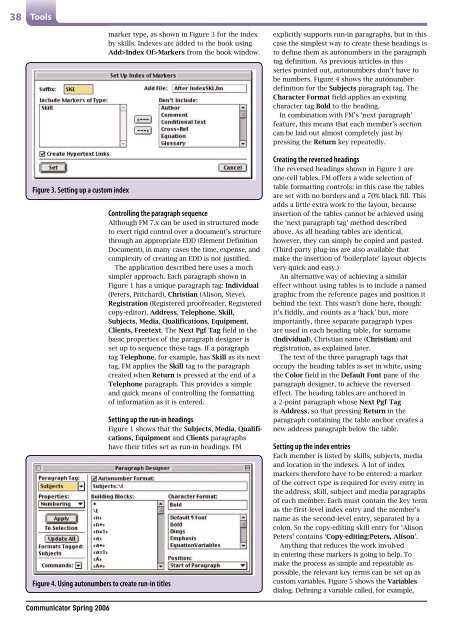
Figure 4. Using autonumbers to create run-in titles<br />
marker type, as shown in Figure 3 for the index<br />
by skills. Indexes are added to the book using<br />
Add>Index Of>Markers from the book window.<br />
Controlling the paragraph sequence<br />
Although FM 7.x can be used in structured mode<br />
to exert rigid control over a document’s structure<br />
through an appropriate EDD (Element Definition<br />
Document), in many cases the time, expense, and<br />
complexity of creating an EDD is not justified.<br />
The application described here uses a much<br />
simpler approach. Each paragraph shown in<br />
Figure 1 has a unique paragraph tag: Individual<br />
(Peters, Pritchard), Christian (Alison, Steve),<br />
Registration (Registered proofreader, Registered<br />
copy-editor), Address, Telephone, Skill,<br />
Subjects, Media, Qualifications, Equipment,<br />
Clients, Freetext. The Next Pgf Tag field in the<br />
basic properties of the paragraph designer is<br />
set up to sequence these tags. If a paragraph<br />
tag Telephone, for example, has Skill as its next<br />
tag, FM applies the Skill tag to the paragraph<br />
created when Return is pressed at the end of a<br />
Telephone paragraph. This provides a simple<br />
and quick means of controlling the formatting<br />
of information as it is entered.<br />
Setting up the run-in headings<br />
Figure 1 shows that the Subjects, Media, Qualifications,<br />
Equipment and Clients paragraphs<br />
have their titles set as run-in headings. FM<br />
explicitly supports run-in paragraphs, but in this<br />
case the simplest way to create these headings is<br />
to define them as autonumbers in the paragraph<br />
tag definition. As previous articles in this<br />
series pointed out, autonumbers don’t have to<br />
be numbers. Figure 4 shows the autonumber<br />
definition for the Subjects paragraph tag. The<br />
Character Format field applies an existing<br />
character tag Bold to the heading.<br />
In combination with FM’s ‘next paragraph’<br />
feature, this means that each member’s section<br />
can be laid out almost completely just by<br />
pressing the Return key repeatedly.<br />
Creating the reversed headings<br />
The reversed headings shown in Figure 1 are<br />
one-cell tables. FM offers a wide selection of<br />
table formatting controls: in this case the tables<br />
are set with no borders and a 70% black fill. This<br />
adds a little extra work to the layout, because<br />
insertion of the tables cannot be achieved using<br />
the ‘next paragraph tag’ method described<br />
above. As all heading tables are identical,<br />
however, they can simply be copied and pasted.<br />
(Third-party plug-ins are also available that<br />
make the insertion of ‘boilerplate’ layout objects<br />
very quick and easy.)<br />
An alternative way of achieving a similar<br />
effect without using tables is to include a named<br />
graphic from the reference pages and position it<br />
behind the text. This wasn’t done here, though:<br />
it’s fiddly, and counts as a ‘hack’ but, more<br />
importantly, three separate paragraph types<br />
are used in each heading table, for surname<br />
(Individual), Christian name (Christian) and<br />
registration, as explained later.<br />
The text of the three paragraph tags that<br />
occupy the heading tables is set in white, using<br />
the Color field in the Default Font pane of the<br />
paragraph designer, to achieve the reversed<br />
effect. The heading tables are anchored in<br />
a 2-point paragraph whose Next Pgf Tag<br />
is Address, so that pressing Return in the<br />
paragraph containing the table anchor creates a<br />
new address paragraph below the table.<br />
Setting up the index entries<br />
Each member is listed by skills, subjects, media<br />
and location in the indexes. A lot of index<br />
markers therefore have to be entered: a marker<br />
of the correct type is required for every entry in<br />
the address, skill, subject and media paragraphs<br />
of each member. Each must contain the key term<br />
as the first-level index entry and the member’s<br />
name as the second-level entry, separated by a<br />
colon. So the copy-editing skill entry for ‘Alison<br />
Peters’ contains ‘Copy-editing:Peters, Alison’.<br />
Anything that reduces the work involved<br />
in entering these markers is going to help. To<br />
make the process as simple and repeatable as<br />
possible, the relevant key terms can be set up as<br />
custom variables. Figure 5 shows the Variables<br />
dialog. Defining a variable called, for example,<br />
Communicator Spring 2006