Sakura Interaction Margin - Elephant Dental
Sakura Interaction Margin - Elephant Dental
Sakura Interaction Margin - Elephant Dental

You also want an ePaper? Increase the reach of your titles
YUMPU automatically turns print PDFs into web optimized ePapers that Google loves.
SAKURA<br />
1<br />
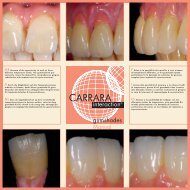
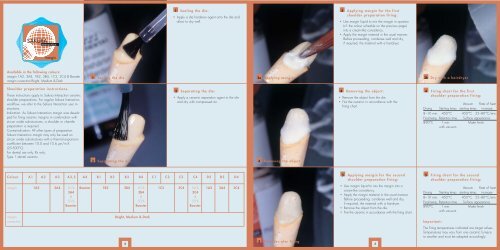
Sealing the die:<br />
• Apply a die hardener agent onto the die and<br />
allow to dry well.<br />
3<br />
Applying margin for the first<br />
shoulder preparation firing:<br />
• Use margin liquid to mix the margin in question<br />
(cf. the colour schedule on the previous page)<br />
into a cream-like consistency.<br />
• Apply the margin material in the usual manner.<br />
Before proceeding, condense well and dry,<br />
if required, the material with a hairdryer.<br />
Available in the following colours:<br />
margin 1A2, 3A4, 1B2, 3B4, 1C2, 3C4 & Booster<br />
margin correction Bright, Medium & Dark<br />
1<br />
Sealing the die<br />
3a<br />
Applying margin<br />
3b<br />
Dry with a hairdryer<br />
Shoulder preparation instructions.<br />
These instructions apply to <strong>Sakura</strong> <strong>Interaction</strong> ceramic<br />
shoulder preparations. For regular <strong>Sakura</strong> <strong>Interaction</strong><br />
workflow, we refer to the <strong>Sakura</strong> <strong>Interaction</strong> user instructions.<br />
Indication: As <strong>Sakura</strong> <strong>Interaction</strong> margin was developed<br />
for firing ceramic margins in combination with<br />
zircon oxide sub-structures, a shoulder or chamfer<br />
preparation is required.<br />
Contraindication: All other types of preparation.<br />
<strong>Sakura</strong> <strong>Interaction</strong> margin may only be used on<br />
zircon oxide sub-structures with a thermal expansion<br />
coefficient between 10.0 and 10.6 µm/m.K<br />
(25-500°C).<br />
For dental use only, Rx only,<br />
Type 1 dental ceramic.<br />
2<br />
Separating the die<br />
interaction<br />
Vacuum Rate of heat<br />
margin<br />
2 Separating the die:<br />
4 Removing the object:<br />
• Apply a ceramic separation agent to the die<br />
and dry with compressed air.<br />
4<br />
Removing the object<br />
• Remove the object from the die.<br />
• Fire the ceramic in accordance with the<br />
firing chart.<br />
4<br />
Firing chart for the first<br />
shoulder preparation firing:<br />
Drying Starting temp. starting temp. increase<br />
8–10 min. 450°C 450°C 55–80°C/min.<br />
Final temp. Retention time Surface appearance<br />
890°C 1 min. Matte finish<br />
with vacuum<br />
Colour A1 A2 A3 A3,5 A4 B1 B2 B3 B4 C1 C2 C3 C4 D2 D3 D4<br />
5<br />
Applying margin for the second<br />
shoulder preparation firing:<br />
5<br />
Firing chart for the second<br />
shoulder preparation firing:<br />
margin 1A2 3A4 50 % Booster 1B2 3B4 50 % 1C2 3C4 50 % 1A2 3A4 3C4<br />
3A4 3B4 3C4<br />
& & &<br />
50 % 50 % 50 %<br />
Booster Booster Booster<br />
margin<br />
correction<br />
Bright, Medium & Dark<br />
• Use margin liquid to mix the margin into a<br />
cream-like consistency.<br />
• Apply the margin material in the usual manner.<br />
Before proceeding, condense well and dry,<br />
if required, the material with a hairdryer.<br />
• Remove the object from the die.<br />
• Fire the ceramic in accordance with the firing chart.<br />
Vacuum Rate of heat<br />
Drying Starting temp. starting temp. increase<br />
8–10 min. 450°C 450°C 55–80°C/min.<br />
Final temp. Retention time Surface appearance<br />
890°C 1 min. Matte finish<br />
with vacuum<br />
Important:<br />
2<br />
5<br />
Shoulder afer firing<br />
3<br />
The firing temperatures indicated are target values.<br />
Temperatures may vary from one ceramic furnace<br />
to another and must be adapted accordingly.
6 Processing:<br />
6 Firing chart for margin corrections<br />
Correcting the ceramic shoulder preparation using<br />
margin correction:<br />
Bright, Medium, Dark:<br />
Vacuum Rate of heat<br />
• Use margin liquid to mix margin correction into a Drying Starting temp. starting temp. increase<br />
cream-like consistency.<br />
8 min. 450°C 450°C 55–80°C/min.<br />
• Apply margin correction to the location to be<br />
Final temp. Retention time Surface appearance<br />
corrected and condense well.<br />
780°C 1 min. Silky gloss<br />
Before proceeding, dry with a hairdryer.<br />
with vacuum<br />
• Remove the object from the die.<br />
• Fire the ceramic in accordance with the firing chart.<br />
• After the firing process, the correction layer should<br />
be polished mechanically, using silicone polishing<br />
instruments and diamond paste.<br />
After the firing process, the correction layer<br />
should be polished mechanically.<br />
6<br />
Applying margin correction<br />
Pictures: ZTM Jan Schünemann (Bielefeld, Germany)<br />
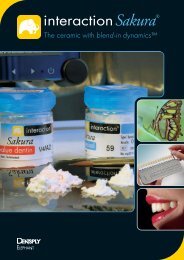
SAKURA<br />
interaction<br />
margin<br />
User instructions<br />
<strong>Elephant</strong><br />
We support your success.<br />
dental health products<br />
<strong>Elephant</strong> <strong>Dental</strong> B.V.<br />
Verlengde Lageweg 10<br />
1628 PM Hoorn, The Netherlands<br />
Tel. +31 229 25 90 00<br />
Fax +31 229 25 90 99<br />
E-mail export@elephant.nl<br />
www.elephant-dental.com<br />
ISO 6872<br />
Made in Holland<br />
0344<br />
01- sep -2005<br />
4