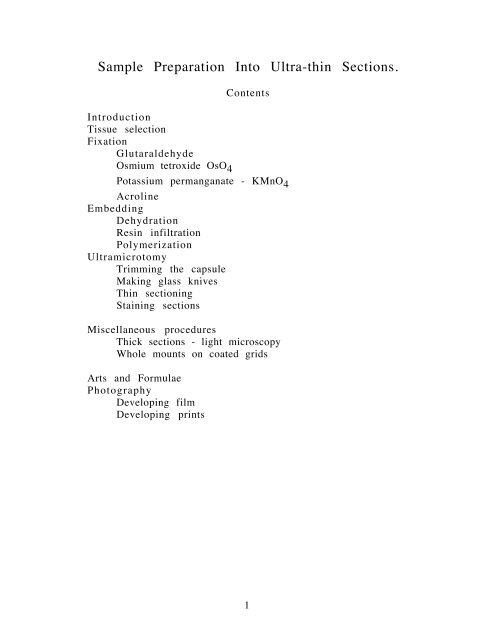
Sample Preparation Into Ultra-thin Sections.
Sample Preparation Into Ultra-thin Sections.
Sample Preparation Into Ultra-thin Sections.

You also want an ePaper? Increase the reach of your titles
YUMPU automatically turns print PDFs into web optimized ePapers that Google loves.
<strong>Sample</strong> <strong>Preparation</strong> <strong>Into</strong> <strong>Ultra</strong>-<strong>thin</strong> <strong>Sections</strong>.<br />
Contents<br />
Introduction<br />
Tissue selection<br />
Fixation<br />
Glutaraldehyde<br />
Osmium tetroxide OsO 4<br />
Potassium permanganate - KMnO 4<br />
Acroline<br />
Embedding<br />
Dehydration<br />
Resin infiltration<br />
Polymerization<br />
<strong>Ultra</strong>microtomy<br />
Trimming the capsule<br />
Making glass knives<br />
Thin sectioning<br />
Staining sections<br />
Miscellaneous procedures<br />
Thick sections - light microscopy<br />
Whole mounts on coated grids<br />
Arts and Formulae<br />
Photography<br />
Developing film<br />
Developing prints<br />
1
Introduction.<br />
The Electron Microscope was developed from the coalescence of<br />
several scattered ideas and hypotheses. The electron itself was discovered<br />
at about 1897 and was shown to have wave properties in 1924. Much of<br />
the early work with electrons centered on how to generate electrons and<br />
how to deflect or aim them. Various "lens" were contrived and by 1931,<br />
two German scientists were demonstrating the "first" EM which was largely<br />
a modified oscillograph. No specimens could be viewed but it was<br />
predicted that an electron microscope would have much better resolution<br />
than the light microscope. By the late 1930's and early 1940, commercial<br />
EMs were available with moderate resolution. These were used mainly to<br />
study electron optics and to make improvements. Procedures for specimen<br />
preparation came much later.<br />
For the biologist, the EM is one of the most powerful tools available<br />
for cell and tissue studies. It should be realized that electron microscopy is<br />
not a science on its own, but merely a technique or tool. A thorough<br />
understanding of the EM and of cells and their ultrastructures are an asset<br />
to understanding most other areas of biology.<br />
There are now many types of electron microscopes, but the two most<br />
common types are the transmission electron microscope (TEM or just EM)<br />
and the scanning electron microscope (SEM). Simply put, the SEM scans<br />
the surface of coated specimens with an electron beam and by detecting<br />
electrons scattered (reflected) by the object, forms an image on a TV like<br />
monitor. This image is usually aesthetically pleasing and has a resolution<br />
of 50 µ and up. The TEM transmits a beam of electrons through a<br />
specimen and forms an image based on the removal of electrons from the<br />
beam by the specimen (basically a high resolution shadow). Resolution can<br />
attain
of the tungsten filament (what happens if you crack the globe of an<br />
incandescent light bulb?). This vacuum is usually in the range of 10 -6 to<br />
10 -7 µ of mercury and is achieved using a "diffusion" pump. For all<br />
practical purposes, living tissues or cells cannot be viewed under the TEM<br />
since the specimens are subjected to such high vacuum, heat and intense<br />
radiation from the electron beam. This would suffice to kill the cells either<br />
by volatilization of water (and other low melting point substances),<br />
denaturation from heat, or ionizing radiation. In addition, the radiation<br />
undoubtedly causes many chemical changes to occur. Polymers often<br />
become insoluble and sublimation may occur.<br />
The most popular and useful procedure used with EM is the <strong>thin</strong><br />
sectioning technique. This technique can be broken down into the<br />
following sections and each will be dealt with separately.<br />
1. Tissue isolation<br />
2. Fixation with glutaraldehyde, OsO 4 and occasionally KMnO 4<br />
3. Embedding in a plastic resin<br />
4. <strong>Ultra</strong>microtomy<br />
5. Post-staining of <strong>thin</strong> sections<br />
TISSUE SAMPLES:<br />
Tissues must be killed and fixed in a way to stabilize their structures<br />
in the EM environment and to accurately reflect the true structure of the<br />
tissue. The time between isolation of the tissue (e.g., dissection) and<br />
addition of fixative should be minimized so as to avoid post-mortem<br />
changes. The tissue size should be kept small. Blocks should be cut to less<br />
than 1mm 3 in order to ensure thorough and quick penetration of fixatives<br />
and embedding solutions. Such size concerns are not pertinent to cell<br />
suspensions. It is usual practice to suspend the cells in the preparative<br />
solutions and to pellet the cells by centrifugation between steps. However,<br />
if a tissue block is too large, fixatives and embedding resins will usually<br />
not penetrate to the middle. Some tissues of low density (e.g., lung, root<br />
tips) are the exception. In the dense tissues, one can often note a "halo"<br />
effect.<br />
3
Cut in half<br />
HALO EFFECT<br />
Dark with<br />
Osmium<br />
TISSUE BLOCK<br />
Pale or White<br />
No Osmium<br />
Animal tissues pose a few unique problems for optimum preparation.<br />
Lacking rigid cell walls, the tissue is often limp and difficult to cut into<br />
small blocks (e.g., liver). This can be overcome by allowing larger pieces to<br />
be fixed for a short period of time in the primary fixative (glutaraldehyde,<br />
10-15 minutes). The tissue will then be somewhat more firm and easily<br />
cut into smaller pieces.<br />
Some tissues are hard and mineralized (e.g., bone) and must be<br />
demineralized with chelating or acidic solutions. This is fairly rare<br />
however, and tissues such as hair and nails can be prepared without<br />
special treatment. Some animal tissues are fairly dense and longer<br />
treatment times may be necessary. This determination is made by<br />
experience and/or trial and error.<br />
Plant tissues also present some unique problems during preparation.<br />
There is usually a higher water content with most mature plant cells<br />
having a large central vacuole. This necessitates attention to the<br />
dehydration step of embedding. Another problem often encountered is the<br />
presence of wax on certain plant surfaces which may retard the<br />
penetration of fixatives and embedding solution. It may also cause the<br />
separation of the tissue from the surrounding plastic upon trimming and<br />
sectioning. The waxes (cutin and suberin) may be partially removed with<br />
organic solvents (acetone, ether) prior to processing. It is not necessary to<br />
remove all wax in that the solvents tend to make the waxy surface less of<br />
a barrier and more tenacious to the plastic (similar to cleaning and<br />
4
abrading a surface before painting or gluing).<br />
problems since they are hydrophilic gels.<br />
Cell walls pose no special<br />
FIXATION<br />
As mentioned earlier, living tissues cannot be viewed with the<br />
Electron Microscope. The goal of specimen preparation is to preserve the<br />
tissue in a form which hopefully represents its' natural, in vivo form.<br />
Fixation serves to "kill" the cells, and to stabilize and preserve them and<br />
their structures during subsequent preparation steps. Throughout the last<br />
three decades, several chemical fixatives have been studies for use in<br />
specimen preparation. Out of this, two fixatives have emerged as virtually<br />
"universal" and will be described here.<br />
Glutaraldehyde - a five carbon structure<br />
with an active aldehyde on each end.<br />
GLUTARALDEHYDE<br />
Glutaraldehyde is referred to as a bifunctional<br />
fixative due to the two terminal<br />
aldehydes and is usually used as the first of two fixatives. It is fairly<br />
stable in concentrated form and at cold temperatures (-20°C). At room<br />
temperature and especially when diluted to working strength (1-3%), it is<br />
unstable and impurities and polymers accumulate. Oxidation to glutaric<br />
acid is the usual consequence but this reaction is inhibited by low pH<br />
which is produced by the oxidation. Thus, it is somewhat of a self-limiting<br />
process, but also explains why buffered (pH 7) solutions are so unstable.<br />
The stock solution of glutaraldehyde (even when purchased new) should<br />
be checked often for impurities. This is easily done spectrophotometrically<br />
with a 0.5-1% solution. The aldehyde has an absorption maximum of about<br />
280 nm while impurities absorb maximally at 235 nm. The impurity peak<br />
should be half the height of the aldehyde peak. The pH of the stock<br />
solution should be above 3.5 as well. If impurities have accumulated to<br />
unacceptable levels, the glutaraldehyde can be easily redistilled in a<br />
vented fume hood with the distillate collected at 100 O C in small fractions<br />
until the pH of the distillate is less than 4.0. It is then convenient to freeze<br />
several aliquots at -20°C at which it is chemically stable for many months.<br />
Glutaraldehyde is relatively safe to use. Avoid skin and eye contact<br />
and never pipette by mouth. Use in a well ventilated area since strong<br />
fumes can irritate and mildly fix the epithelial lining of the<br />
nasopharyngeal tissues.<br />
5
Fixation and stabilization are due to the cross linking of structures<br />
that are reactive with aldehydes. Structures that are composed of proteins<br />
(enzymes, etc.), glycoproteins, nucleoproteins, lipoproteins, glycogen, and<br />
starch (occasionally) will react with the aldehydes. Most structures wi<strong>thin</strong><br />
the cell have these components. Membranes loose their fluidity and<br />
usually become very permeable. Structures that do not react with<br />
glutaraldehyde will then tend to diffuse out of the cell. It is important to<br />
follow this fixation step (often called a pre-fixation) with a second step<br />
(often called post-fixation) using another fixative (see next).<br />
Glutaraldehyde fixation does not cause significant shrinkage and can be<br />
carried out at room temperature. Cold temperatures cause much of the<br />
cytoskeleton of the cell to "dissolve" or disassemble, thus altering the<br />
ultrastructural representation. A 1-3% buffered solution (pH 7) is<br />
recommended and fixation should not exceed 60 minutes unless the tissue<br />
is naturally dense or impermeable (e.g., some insects and plant tissues).<br />
The choice of buffer is important. Veronal buffers (containing barbitals)<br />
should not be used with aldehyde fixatives and phosphate buffering may<br />
form a precipitate in the presence of calcium and uranyl ions. If the<br />
specimen is known to contain these ions, use a different buffer (e.g., Tris,<br />
Hepes, cacodylate). Also, the use of phosphate buffers with the<br />
glutaraldehyde fixative occasionally causes a precipitin to form during the<br />
second fixation step with osmium tetroxide. To prevent this, wash the<br />
specimen with saline or water after the first fixation so as to remove all<br />
traces of the phosphate. This problem rarely arises however and its cause<br />
is not understood.<br />
Osmium tetroxide - OsO 4<br />
Note: Osmium is extremely dangerous, the crystals, liquid<br />
and vapors are all hazardous. The vapors can fix the cornea and lens<br />
of the eye and both vapors and liquid are absorbed rapidly and act as a<br />
nerve gas (it was in fact used as this in the World Wars) and attacks the<br />
CNS. Use only with proper ventilation (e.g., fume hood). It<br />
usually is purchased in crystalline form in preweighed sealed glass<br />
ampoules. Always prepare the fixative solution in a fume hood. Report<br />
any and all accidents immediately.<br />
Usually a 1-2% buffered solution (see appendix) is used as the second<br />
fixative and the fixation should be complete in 60-90 minutes since the<br />
osmium molecule is small and penetrates rapidly. Most workers agree that<br />
osmium works by saturating double (or triple) bonds since it is such a<br />
strong oxidizing agent. For this reason, it is deposited at lipoidal sites quite<br />
6
heavily thus causing them to look dark. Thus, membranes and lipid<br />
droplets usually "stain" darkly with the osmium. It should be noted also<br />
that since osmium is used as an aqueous solution, it has a tendency to not<br />
reach the middle hydrophobic region of some membranes. This gives a<br />
tri-layered appearance (dark-light-dark) to these membranes and is easily<br />
seen at higher magnifications. The tissue specimen will begin to turn black<br />
almost immediately upon the addition of the osmium. The more dense the<br />
tissue, the darker it will appear. (That's how you will know if you get it on<br />
you, your skin, clothes, etc. will turn black. If you do spill some on<br />
yourself, don't panic, wash it off with lots of water and immediately notify<br />
your instructor or health office). The tissue often becomes brittle when<br />
over fixed in osmium. It is advisable to use this fixation at refrigeration<br />
temperatures so as to decrease the volatility of the solution. The unused<br />
solution should be stored at 4°C in a scrupulously clean, foil wrapped 50ml<br />
volumetric flask that is tightly corked (do not use ground glass or rubber<br />
stoppers - they leak). The long narrow neck of the flask retards<br />
evaporation of the fixative and offers a "handle" to the user. Use a long<br />
tipped Pasteur pipette, taking care not to draw the osmium up into the<br />
pipetting bulb (bippy). The flask should be stored in a refrigerator, and be<br />
sure it is well stoppered. If it leaks, the interior of the refrigerator will<br />
gradually turn black and there is a possibility that the osmium vapors can<br />
accumulate in the confined space to dangerous levels. The osmium<br />
solution will appear purple or violet in color when degraded or<br />
"exhausted". It should be carefully pipetted into a flask containing 95%<br />
ethanol. This will degrade the osmium for later disposal. Keep this waste<br />
flask in the fume hood at all times.<br />
Potassium permanganate - KMnO 4<br />
Occasionally, an investigation may center on the study of<br />
membranous structures and the cytoplasmic matrix is not of interest. In<br />
this circumstance, a 1-2% buffered solution of KMnO 4 can be used as the<br />
sole fixative or in tandem with OsO 4 (wash in between the two - they react<br />
together). This is a rapid process and KMnO 4 may also be used as a post<br />
stain to enhance contrast from the Glutaraldehyde/OsO 4 preparation. This<br />
is usually not necessary however.<br />
Most non-membranous structures are washed away in subsequent<br />
embedding steps. The time required for the fixation is usually 30 minutes<br />
and the KMnO 4 kills the cells quickly, being a strong oxidizing agent. It<br />
will permanently stain skin and clo<strong>thin</strong>g but it is not as hazardous as the<br />
7
other fixatives. In fact, it is often used to treat fungal infections of the<br />
skin. That doesn't mean that you can drink it however, so it should not be<br />
pipetted by mouth. It is chemically stable when kept at 4°C. It binds to<br />
the same structures as does OsO 4 but is not as electron dense.<br />
Acroline<br />
A very toxic, flammable and volatile substance, it penetrates very<br />
rapidly and is thus good for fixing large and dense tissues. It is not<br />
thought of as a "common" fixative since it is potentially hazardous to use.<br />
In addition, it does not fix lipids (in fact it dissolves them), denatures most<br />
enzymes to inactive form and does not preserve the cytoskeletal network<br />
very well. If it is deemed absolutely necessary to use this aldehyde, best<br />
results are obtained by combining it with other aldehydes and following<br />
with osmium post-fixation. Partially degraded and polymerized solutions<br />
appear to be as effective as fresh or redistilled acroline. Use extreme care<br />
when handling acroline. It is included here as a precaution to those who<br />
choose to use it and to those who read reference to it.<br />
EMBEDDING<br />
The fixatives as well as most cellular components are aqueous. The<br />
plastic resins that are used for embedding tissues are not miscible with<br />
water. Thus, an intermediate solvent that is miscible with both water<br />
and plastic resin is needed. Although there are many to choose from,<br />
acetone is probably the best. Some microscopists prefer ethanol, often out<br />
of habit from light microscopic procedures. Ethanol reacts with unbound<br />
OsO 4 to form a fine dense precipitate thus extensive washing after osmium<br />
fixation is needed. Acetone, which does not react, requires only minimal<br />
washing to remove the osmium and buffer salts. Methanol is less reactive<br />
than ethanol but has no advantage over acetone. In essence, water is<br />
replaced by solvent and solvent will be replaced with plastic.<br />
DEHYDRATION<br />
Use glass vials (or centrifuge tubes) since acetone can dissolve many<br />
plastics. Although a graded series of acetone solutions is commonly used -<br />
it is unnecessary. A three step dehydration process is adequate, -50%,<br />
95%, and two changes of 100% acetone (re-distilled - stored with molecular<br />
drying sieves, see appendix). It is essential that all water diffuses out of<br />
the tissue, otherwise holes will be created in the sections when viewed<br />
with the EM since residual water will vaporize under the extreme vacuum.<br />
8
Two changes of 100% acetone are a precautionary measure. As water<br />
diffuses into the first 100% acetone, it is no longer absolute. A second<br />
change dilutes out the water molecules even more. Use a Pasteur pipette<br />
to add and remove the acetone solutions to and from your specimen vial<br />
(as opposed to transferring the tissue block to a new vial with the next<br />
solution).<br />
Dehydration may cause some changes in the secondary and tertiary<br />
structures of macromolecules and usually causes some shrinkage of the<br />
tissue. The shrinkage is usually proportional to the water content of the<br />
specimen. Fixation lessens this effect. Do not let the tissue dry in air.<br />
Make transfers rapidly but neatly. During dehydration as during fixation<br />
and embedding steps, keep the vials capped. 100% acetone is hydroscopic<br />
and will absorb water from the air. Acetone will often dissolve unfixed or<br />
poorly fixed components of cells such as saturated lipids (which do not<br />
react with osmium) and chlorophyll and other lipoidal membrane<br />
components. Starch is difficult to fix but is often so highly polymerized<br />
and cross-linked in vivo that it is often "naturally fixed". However, it will<br />
occasionally be leached out during dehydration.<br />
RESIN INFILTRATION<br />
There are many types of plastic resins available for embedding<br />
tissue, each having attributes. The three principle types of resins used are<br />
the epoxy resins, polyester resins and methacrylate resins. The most<br />
commonly used resins are the epoxides Epon (Epon is no longer made but<br />
other similar resins are available with similar names e.g., Epox) and<br />
Araldite. They have adequate viscosity, are fairly stable under the intense<br />
electron beam, and are of very fine grain. The purpose of the embedding<br />
medium is to provide a stable, hard matrix throughout a tissue or cell in<br />
order that very <strong>thin</strong> sections may be cut, usually on the order of 400-800<br />
A. Wax such as the light microscopist paraffin is not firm enough for such<br />
<strong>thin</strong>ness and it will melt under the electron beam. Epon and Araldite are<br />
both epoxide resins and when polymerized are virtually indestructible and<br />
insoluble (as are tissues embedded in them). Remember that water is<br />
replaced with acetone and acetone is replaced by plastic.<br />
Note - Epoxys can be irritating to skin and eyes; use with caution. Many<br />
epoxides are known to be carcinogenic. The polymerized capsule however<br />
is not carcinogenic. Use acetone on a cloth or wipe to remove any resins<br />
from your skin. For eye contact - flush with warm (not hot) water.<br />
9
Do not pipette resins. They are viscous enough that pipetting is<br />
inaccurate. Simply pour the components into a 50ml disposable beaker<br />
according to the formula given. The plastic mixture to be used contains<br />
both epon and araldite along with DDSA (Dodecenyl succinic anhydride)<br />
and NMA (nadic methyl anhydride) which are curing agents, and increased<br />
amount of DDSA will result in softer plastic when polymerized. A<br />
polymerizing catalyst or accelerator, DMP-30 (dimethyl aminomethyl<br />
phenol) is used to speed the polymerization process.<br />
A four (4) step series of plastic concentrations is used for the<br />
embedding process:<br />
1. 3 part acetone - 1 part plastic mixture (w/o DMP-30)<br />
2. 1 part acetone - 1 part plastic mixture (w/o DMP-30)<br />
3. 1 part acetone - 3 parts plastic mixture (add 4 drops DMP-30<br />
for every 10ml used<br />
4. Pure plastic mixture with DMP-30 (two changes)<br />
The plastic mixture is:<br />
16 ml of a mixture of 5 parts Epon and 3 parts Araldite (506)<br />
9 ml NMA<br />
10 ml DDSA<br />
Total = 35 ml - stir exhaustively<br />
For pure plastic mixture steps of embedding (step 4) add 15-17<br />
drops of DMP-30 to the above mixture using a disposable Pasteur pipette.<br />
DMP-30 is kept refrigerated. Allow it to warm to room temperature prior<br />
to use to avoid condensation of water into the bottle. Epoxy resins,<br />
especially araldite are also somewhat hydroscopic. Be sure to stir the<br />
mixture well. It will quickly turn amber in color but will lighten to nearly<br />
colorless during polymerization if done slowly. Two changes of the pure<br />
plastic mixture with DMP-30 is recommended in order to ensure that all of<br />
the acetone is removed (i.e., replaced) in the tissue. Since the pure plastic<br />
mixture is viscous it is easier to remove the tissue block with a hooked<br />
needle (dissecting) and place it in a fresh vial containing the pure plastic.<br />
This will minimize the carryover of any acetone that had diffused into the<br />
first pure plastic step. Keep the vials capped during embedding.<br />
The times for each step will vary depending upon the density and<br />
permeability of the tissue. For most tissues a 30 minute period for each<br />
step is adequate. It is better to have each step longer than necessary than<br />
shorter than necessary - residual acetone can result in poor sections.<br />
10
For the final step, use the 00 size polyethylene capsule molds<br />
available. Fill them to about 2mm from the top and place your tissue block<br />
to the bottom of the mold. Place a small paper label (written in pencil)<br />
around the top perimeter of the mold. For cell suspensions, pellet the cells<br />
with centrifugation in the pure plastic mixture after the allotted time.<br />
Using a Pasteur pipette, draw off the pellet as a cell slurry and place 2-3<br />
drops of the slurry in the capsule molds. Layer pure plastic mixture over<br />
this to wi<strong>thin</strong> 2mm of the top and centrifuge the capsule mold in a tabletop<br />
clinical centrifuge on a setting of 5 or 6 until the cells are concentrated<br />
at the tip of the mold. Then place a label around the top rim of the<br />
capsule.<br />
POLYMERIZATION:<br />
Allow the tray(s) of capsules to stand (wrapped in aluminum foil)<br />
overnight at room temperature and then place the capsules in an oven at<br />
60°C for 2-3 days. If the correct amount of DMP-30 has been used, the<br />
capsules should be adequately polymerized wi<strong>thin</strong> 3 days and the plastic<br />
will have lost most of the amber color. A good test for correct<br />
polymerization is to try and dent one of the side ridges of the tip of the<br />
capsule with a fingernail (after removing the capsule from the mold of<br />
course). If there is an indentation from the fingernail the polymerization<br />
at 60°C should continue until the capsule is hard enough to show no<br />
indentations. To remove the capsule from the mold, carefully cut the mold<br />
lengthwise with a razor blade and peel the cut edges from the top (not the<br />
tip) of the capsule. The capsule can then be easily removed. If the side<br />
facets near the tip show cracks and/or bulging, it usually indicates too<br />
rapid polymerization.<br />
OTHER RESINS:<br />
Relatively recently, a new monomeric resin called LR-White has been<br />
introduced from England. It is a single solution that is stable at 4°C and is<br />
used with 4 to 6 changes after dehydration which must be carried out with<br />
absolute ethanol. Acetone can not be used since it generates free radicals<br />
which interfere with the polymerization reaction. Using ethanol<br />
necessitates that excess osmium be thoroughly removed by washing. The<br />
capsules may be polymerized by heating to 50°C overnight but<br />
polyethylene capsule molds should not be used since they are permeable<br />
to oxygen which also interferes with polymerization. The result will be<br />
"tacky" capsules and this may be avoided by using gelatin capsules as a<br />
11
mold. Their only drawback is that the ends are rounded and are more<br />
difficult to trim for sectioning.<br />
The LR-White resin is a general purpose embedding medium that can<br />
be used for light microscopy preparations. Under the electron microscope,<br />
the tissues have a tendency to look washed out or leached and they don't<br />
take up the post-strains (e.g., lead citrate) as well as the epoxy resins<br />
described above. Except for the convenience of not having to mix together<br />
the plastic resin components, there is no overriding advantage apparent<br />
for choosing LR-White. The same number of steps are needed for<br />
adequate infiltration. It is not as irritating or toxic as the epoxides,<br />
however, and this concern may merit its use for general studies or<br />
teaching.<br />
ULTRAMICROTOMY<br />
Now that the messy part is over with, it is time to master the skills of<br />
electron microscopy that require precision and perfection. Although it is<br />
most convenient to hire technicians to do the microtomy and microscopy,<br />
you will not have an adequate appreciation for the results unless it is<br />
learned first hand and it is truly one of the few procedures that are most<br />
easily learned correctly by doing them and making mistakes. This is due<br />
to the large number of variables that affect the quality of the result, i.e.,<br />
the micrograph. The steps needed to master this section include: trimming<br />
the capsule so as to expose the tissue for proper sectioning, making glass<br />
knife edges fitted with a water boat (for sections to float on when cut from<br />
the tissue (capsule) "face", the actual sectioning using the ultramicrotome<br />
and placing the sections on "grids".<br />
TRIMMING THE CAPSULE<br />
This is easier to demonstrate than to explain in written form. Excess<br />
plastic surrounding the tissue must be trimmed away in a fashion that will<br />
yield a square or rectangular section. The capsule mold produced a 1mm 2<br />
face on the tip (see figure). This must be trimmed to a pyramid where the<br />
pyramid tip and sides are exposed tissue. The angle of the pyramid sides<br />
(called facets) should be about 45°. Too steep of an angle will not allow<br />
enough lateral support when sectioning while too flat (or low) of an angle<br />
will cause the "face" being sectioned to enlarge too quickly during<br />
sectioning. The tip of the pyramid may be a point (giving square sections)<br />
or a ridge (giving rectangular sections).<br />
12
TRIMMING<br />
Top view<br />
Side view<br />
Gives rectangular gives square<br />
<strong>Sections</strong><br />
sections<br />
Trim the capsule while viewing under the dissecting microscope using old<br />
glass knives or knives not suitable for sectioning. Use smooth slicing (not<br />
chiseling) strokes that cut through the plastic in one stroke. Take very<br />
<strong>thin</strong> slices so as to leave a smooth side surface (important for good<br />
sectioning). Your instructor will demonstrate.<br />
MAKING GLASS KNIVES<br />
Although most electron microscope laboratories have automatic knife<br />
makers, it is good practice to learn the art of making knives by hand. Not<br />
all types of glass are suitable for knives and despite occasional claims,<br />
hardware store plate glass is rarely adequate. In theory, a semi-liquid<br />
13
knife edge is made by bringing two natural fractures to a 45° apex. The<br />
quality (smoothness, sharpness and durability) of the edge depends upon<br />
the density, temper and composition of the glass. For these reasons, most<br />
labs purchase good quality glass from vendors of EM supplies. The glass<br />
usually comes as one inch wide strips varying in thickness; usually 1/4,<br />
5/16, or 3/8 inches. The strips must be scrupulously cleaned with acetone<br />
or alcohol. The glass can then be scored using a diamond glass scribe<br />
either free hand or by using a simple Plexiglas scoring guide. Two scores<br />
are made, one across (perpendicular to the length) the glass strip to yield a<br />
1" square piece and one diagonal score towards the first score. Both scores<br />
are made at the same time and should be made with enough pressure so as<br />
to just see and "hear" the score. Be sure to align the edge of the diamond<br />
scribe flush with the guide edges to ensure a straight and precisely placed<br />
score.<br />
14
Use the glaziers pliers to first make the cross (perpendicular) fracture and<br />
then the diagonal fracture. Do not touch the knife edge or sides with your<br />
fingers. The contaminants of the fingerprint will prevent adhesion of the<br />
water boat to be mounted on the knife. Examine the knife edge for its<br />
shape and horizontal angle. Note the size of the spur, fracture ridge (burr<br />
line) and curve of the edge (see the diagram).<br />
The boat can be made with short sections of black vinyl electrical tape cut<br />
in half lengthwise. Wrap the tape around the knife (diagonal side) so that<br />
the top edge of the boat is perpendicular with the vertical side of the knife.<br />
Do not leave a gap at the back of the boat and use your fingernail to seal<br />
the adhesive against the glass sides (air bubbles disappear). Seal the back<br />
and sides of the boat with nail polish and allow to dry. The knife may then<br />
be used or stored under cover. It is not a good practice to store knives for<br />
long periods of time (no more than 2-3 days) since they have a tendency<br />
to clutter up the microtome area and to get dull.<br />
THIN SECTIONING<br />
(using the Sorvall Porter-Bloom MT-1 ultramicrotome)<br />
<strong>Ultra</strong>microtomy is one of the most difficult techniques to master<br />
since there are many variables contributing to the cutting process. Some<br />
of these are:<br />
plastic hardness<br />
knife quality<br />
knife angle<br />
boat water level<br />
trimmed edge smoothness<br />
vibration<br />
temperature<br />
humidity<br />
cutting speed<br />
tongue in wrong position<br />
15
A good deal of patience is necessary along with steady hands. First,<br />
read the instruction manual for the ultramicrotome and memorize each<br />
control and component. It is convenient to begin a microtomy session by<br />
resetting the specimen holder arm to the rearmost position. Remove the<br />
knife holder and secure the specimen capsule in the collet holder. Be sure<br />
that the knurled ring securing the ball and socket pivot is tight. This<br />
should be done with the specimen arm hook clamp in place so as to not<br />
damage the lead alloy threaded advancing rod inside the microtome. A<br />
new knife may be secured in the holder and placed in its locking<br />
mechanism. You should not have to move or adjust the cool light source<br />
which may be turned on at the start of the session. Unhook the specimen<br />
arm and rotate the sectioning knob to bring the specimen to knife edge<br />
height. Then manually advance the knife stage to wi<strong>thin</strong> 1-2 mm of the<br />
specimen. Both should now be in view through the dissecting microscope.<br />
Adjust the microscope to the highest magnification and focus. Add fresh,<br />
clean distilled water to the boat so as to have a silver reflection from the<br />
surface. This will occur with the water surface slightly concave and the<br />
water should be adjacent to the knife edge.<br />
Once the knife and specimen are roughly aligned manually the upper<br />
half of the knife stage may be advanced manually using the course and<br />
fine advance controls until cutting the first sections from the tip of the<br />
specimen. With the first piece of plastic section (it will probably be fairly<br />
thick) the knife may then be advanced using the fine advance adjustment<br />
which is calibrated in microns. Advance the fine control one half micron at<br />
a time to create a "face". If done correctly, each time the face comes into<br />
view under the microscope it should appear mirror-like. At this point it is<br />
advisable to back the knife edge away from the specimen using the fine or<br />
coarse adjustment control and to move the knife edge laterally to a new<br />
area. Secure the knife using the locking lever and slowly advance the<br />
knife to the specimen face once more. If the light and water level are<br />
adjusted correctly, as you advance the knife you should eventually see the<br />
reflection of the knife edge in the mirror-like face. The knife edge and its<br />
reflection can be thought of as two lines which should be parallel. If they<br />
are parallel, it will ensure that the first section that is taken by the new<br />
knife edge will not section only part of the face. Although it is difficult to<br />
have the lines exactly parallel one can usually come close by adjusting the<br />
specimen block using the ball socket pivot. It is extremely important that<br />
the first section using the new area of the knife be as <strong>thin</strong> as possible.<br />
Otherwise the knife edge will dull. Most problems arise with beginning<br />
microtomy due to improper water level, too fast a cutting stroke, wrong<br />
knife angle (this should be about 5°) and a dull knife edge. Unfortunately,<br />
16
this technique is one which is learned most rapidly by doing it and making<br />
mistakes. Your instructor will help you understand the problems as they<br />
arise.<br />
If you are successful at getting good sections they will appear gold or<br />
silver. The thickness of the sections is determined by their refractive color<br />
as calibrated on the thickness chart provided with the microtome. Gold<br />
sections are 800-900 A thick, yield better contrast but slightly less<br />
resolution. If maximum resolution is needed, gray sections on the order of<br />
300-400 A can be attempted. This, however, is extremely difficult and<br />
requires a good deal of experience in attaining.<br />
The sections should float on the water and should adhere to one<br />
another in the form of a ribbon. As the knife edge cuts through the plastic,<br />
it causes the sections to become compressed. This may be alleviated by<br />
exposing the sections to vapors of organic solvents such as chloroform or<br />
ether. This is done by merely dipping a long handled cotton swab in the<br />
solvent and holding it close to but not in contact with the sections near the<br />
knife edge while viewing through the microscope. The sections will appear<br />
to become smooth and large and this will be very noticeable to the eye.<br />
The sections are then ready to be maneuvered to the center of the boat to<br />
be picked up on the grids.<br />
PLACING SECTIONS ON GRIDS<br />
If a noticeable amount of water has evaporated from the boat<br />
causing a more concave surface, it is advisable to add a small amount of<br />
water to the boat so the surface is nearly level before moving the sections.<br />
The sections may be maneuvered using a fine needle (a 0000 stainless<br />
steel insect mounting pin slightly bent at the tip pressed onto a wooden<br />
handle is convenient.) After centering the sections they may be adhered to<br />
the proper grid by grasping the grid in fine tweezers (Pick up the grid only<br />
by the very edge) and bending the grid against the bottom of the petri<br />
dish so that it may be placed dull side down on the surface of the water<br />
and sections. Be careful as you touch down on the surface of the sections<br />
that they are oriented in the middle of the grid. Do not push hard enough<br />
that you break the surface tension of the water. You need only to barely<br />
touch the surface and the sections along with a small drop of water will<br />
adhere to the grid. If the water droplet does not spread out evenly on the<br />
grid it signifies that the grids are dirty. If this is the case you will usually<br />
find that the sections have become wrinkled and do not span over the<br />
holes. If this is the case the grids must be cleaned (see appendix). The<br />
sections on the grids are now ready to be stained.<br />
17
STAINING<br />
Additional contrast of the EM image can be gained by staining the<br />
tissue sections with heavy metals. The strains most commonly used are<br />
uranyl acetate and lead citrate. Both metals apparently bind at sites of<br />
osmium deposition and lead also binds with (i.e. stains) nucleic acids and<br />
glycogen.<br />
Lead Citrate<br />
Lead citrate (Reynold's) is perhaps the best stain available since it<br />
can be used at a high pH and stains a wide variety of cellular components<br />
including nuclear components, ribosomes, membranes, microfilaments and<br />
glycogen. The precise chemical nature of the binding is not well<br />
understood. Care must be taken since lead citrate will react with<br />
atmospheric CO 2 to form a fine precipitate of lead carbonate.<br />
To Stain <strong>Sections</strong>:<br />
Pour a generous amount of either sodium or potassium hydroxide<br />
pellets around the perimeter of a plastic disposable petri dish. Place the<br />
cover on the dish. Carefully place (don't drop) a 2-3 mm drop of lead<br />
citrate (one for each grid to be stained) on the center surface using a<br />
Pasteur pipet and lifting the plate cover just enough to give the pipet<br />
clearance. The drops will not spread but will remain as droplets. Place the<br />
grids, with section side down, on top of the droplets and cover the plate.<br />
The grids will float. Do not breath onto the petri dish while placing grids<br />
on the drops of stain. Stain for 15-20 minutes. Remove the grids and<br />
immediately but gently dip and stir them in a weak NaOH solution (or KOH<br />
- one or two pellets in 30-40 ml dHOH in a small beaker). Only a few<br />
seconds are needed. Rinse the grids in distilled water by gently dipping<br />
and stirring; blot dry by pressing the surface of the grid not having<br />
sections on a piece of filter paper. This will "wick" most of the water away.<br />
Also blot (wick) away the water between the tweezer tips so the grid can<br />
be placed in a holder without being wetted by a fountain pen-like action.<br />
The grid will air dry quickly and is ready for viewing under the EM.<br />
Throw the petri dish away after taping it shut.<br />
18
Uranyl Acetate<br />
Uranyl acetate may be used during the dehydration process by<br />
making the 50% acetone up to 2% with the stain. Uranyl acetate is not<br />
soluble in pure acetone. An aqueous solution of 2% concentration can be<br />
used to float or dip sections mounted on grids. Epon and Araldite do not<br />
take up aqueous stains well unless they are alkaline. Organic solvent<br />
solutions will usually leave a fine precipitate on the sections and is not<br />
often used. Rinse the solutions well with distilled water. Caution - uranyl<br />
acetate is radioactive. Do not pipette by mouth or spill.<br />
Phosphotungstic acid<br />
May be used as a "negative" stain in that it does not bind particularly<br />
well to any<strong>thin</strong>g but instead caused areas other than cellular (organic)<br />
material to appear dark. It is especially useful for viewing molecules such<br />
as proteins (e.g., antibody, DNA) and suspensions of subcellular structures<br />
such as membranes (e.g., mitochondria - elementary particles, etc.) Usually<br />
a 1-2% aqueous solution is used to stain a tissue block during dehydration<br />
for about 30 minutes.<br />
OTHER PROCEDURES<br />
Thick <strong>Sections</strong>:<br />
It is generally not advisable to begin a structure oriented study at<br />
the electron microscope level. Some form of light microscopy is usually<br />
performed to become familiar with the general structure, orientation and<br />
on occasion, to locate a specific site wi<strong>thin</strong> the specimen. Specimens<br />
prepared for the electron microscope can be thick sectioned and<br />
appropriately stained for light microscopic examination with ease.<br />
The trimmed specimen capsule is mounted in the ultramicrotome the<br />
same as for <strong>thin</strong> sectioning. A knife is also secured and may or may not<br />
have a boat. The "face" is formed in the usual manner and thick sections<br />
(2-3 µ) are made using the fine advance adjustment control. The sections<br />
often have a tendency to roll up like a scroll. This can be prevented by<br />
using a new knife edge and a slow smooth cutting stroke. The sections are<br />
then placed on a clean microscope slide with enough water present to<br />
permit positioning of the sections in an orderly arrangement. The slide is<br />
dried, lightly heat fixed and stained for 5 minutes with Toluidine blue.<br />
Excess dye is rinsed off with distilled water and the sections are then<br />
destained (excess stain in the sections) with ethanol (90-95%) for 2<br />
19
minutes. The slide is dried and a cover slip is secured with a small drop of<br />
the pure plastic mixture used for the embedding procedure. A vial of this<br />
mixture (with DMP-30 added) may be kept for several months in the<br />
freezer (-20°C). The section may be viewed to see if they are of<br />
appropriate quality and can be labeled and stored after curing the plastic<br />
mixture (used for mounting the cover slip) on a warming plate set at 60°C.<br />
Place a weight on the cover slip to insure that it will press the sections flat<br />
against the glass slide.<br />
Whole mounts:<br />
It is often necessary to view a whole or solid object such as a<br />
bacteria, virus, or molecules. For this, it is routine to place the specimen on<br />
a film-coated grid and to coat the object with a <strong>thin</strong> film of metal. The<br />
grids are usually coated with a Formvar film of varying thickness. A 0.25%<br />
solution in anhydrous ethylene dichloride is kept in a tightly sealed<br />
volumetric. Water will cause holes in the film. A small drop of the<br />
solution is gently laid onto the convex (mounded) surface of distilled water<br />
in a petri dish. The Formvar will spread into a very <strong>thin</strong> film and the<br />
solvent will evaporate almost immediately. Carefully place clean grids<br />
onto the film surface dull side down using tweezers. The film is thicker at<br />
the center of the dish. Do not allow vibrations while making the film. The<br />
coated grids can be recovered from the plate surface by carefully dropping<br />
a piece of filter paper onto (over) the surface allowing it to wet completely.<br />
Then remove the paper, invert it (grids face up) and place it on absorbent<br />
towels to blot excess water away. After the paper has dried, the grids may<br />
be recovered by raising them straight up off of the paper using sharp<br />
tweezers. The grids may then be used or stored.<br />
Specimens are usually applied to the coated grids by aspiration or by<br />
placing a small drop of water suspension on the surface and allowing it to<br />
dry.<br />
20
Arts and Formulae<br />
PBS -phosphate buffered saline, use either potassium or sodium phosphate.<br />
(9.0 g NaC1, 2.7 g KH 2 PO 4 , d HOH to 1 L, adjust pH)<br />
Formvar resin solution for coating EM grids<br />
0.25% dissolved in ethylene dichloride (0.157 g in 50ml = 0.25%)<br />
Glutaraldehyde<br />
23 ml PBS<br />
2 ml 25% Glut.<br />
OsO 425<br />
ml PBS, 0.5 g OsO4 crystals<br />
CAUTION<br />
Lead Citrate Post Stain:<br />
1.33g Lead nitrate (Pb(NO3)2)<br />
1.76g Sodium citrate (Na 3 (C 6 H 5 O 7 )2H 2 O<br />
30 ml dHOH in 50ml volumetric<br />
Shake vigorously for 2 min. then at intervals for 1/2 hr.<br />
8 ml of 1 N NaOH_ (0.4g/10ml dHOH-fresh)<br />
Dilute to 50 ml w dHOH clear, pH=12<br />
KMnO 4<br />
- 1 g in 50 ml PBS<br />
Plastic Mixture:<br />
16 ml of a 5:3 Epon:Araldite mixture<br />
9 ml NMA<br />
10 ml DDSA<br />
35 ml total - stir exhaustively<br />
15-17 drops DMP-30 - stir again, will turn dark amber.<br />
Toluidine blue for thick sections<br />
1 g borax (sodium carbonate)<br />
100 ml HOH-dissolve<br />
1 g Toluidine blue dye<br />
Stir - filter if necessary<br />
21
Cleaning copper grids<br />
Immerse grids in a 2-4 N HC1 solution for 5 minutes (a drop of detergent<br />
will help the grids sink)<br />
Rinse with distilled water and then acetone in a filter funnel attached to a<br />
vacuum flask. Use filter paper in the funnel and allow the grids to air dry.<br />
Place grids in a covered glass (paper bottom) petri dish (plastic allows<br />
static charge to occur).<br />
Specimen <strong>Preparation</strong> with L. R. White<br />
I. Fixation<br />
A. Dissect tissue into 1mm 3 cubes shortly after procurement.<br />
B. Place cubes in Phosphate Buffered Saline (PBS) for a 10 minute<br />
wash.<br />
C. Transfer to a solution of 2% glutaraldehyde in Phosphate<br />
Buffered Saline. (60 min.)<br />
D. Wash in PBS for 10 minutes.<br />
E. Transfer blocks of tissue to an osmium tetroxide solution;<br />
consisting of the following: (60-90 minutes)<br />
1. 5 ml. of PBS<br />
2. 5 ml. of 0.1 N HC1<br />
3. 15 ml. of distilled HOH<br />
4. 0.5g OsO 4 crystals<br />
II.<br />
Dehydration<br />
A. Transfer blocks to 50% ethanol (15 min.)<br />
B. Transfer blocks to 75% ethanol (15 min.)<br />
C. Transfer blocks to 95% ethanol (15 min.)<br />
D. Transfer blocks to 100% ethanol (Twice) (15-20 min./switch)<br />
III. Infiltration<br />
A. Transfer blocks to L.R. White resin (45 min.) four (4) times in<br />
oven at 60° C.<br />
B. Place blocks in gelatin capsules (1/cap.) and fill to rim with L.<br />
R. White resin.<br />
IV.<br />
Polymerization<br />
A. Polymerize 20-24 hours at 60°C.<br />
B. Remove the capsule when fully polymerized.<br />
22
Photography<br />
Making negatives:<br />
The films should be exposed according to the instructions in the EM<br />
operating manual. Generally speaking, contrast is enhanced by longer<br />
exposures with low illumination. However, exposures longer than 1 second<br />
are more prone to blurring from vibration in the building, thus negating<br />
the fine resolution of the EM. It is desirable to have as much contrast in<br />
the recorded image as possible. It is often advantageous to slightly over<br />
expose the film so as to have a "dense" negative. In this case, you would<br />
adjust the illumination (with the condenser lens control) to indicate just<br />
less than a 1 second exposure on the exposure meter and expose (timer<br />
set) for 1 second.<br />
Film development:<br />
The 35mm film is developed as follows:<br />
Dektol (D-72 straight) = 2 minutes<br />
Water (tepid)= 2 changes<br />
Hypo (Fixer)= 5 minutes (save hypo)<br />
Water wash= 5 minutes<br />
Distilled water rinse - dry<br />
Plate film is developed in trays or tanks as follows:<br />
D-19 (2:1 water:D-19)= 4 minutes<br />
Water wash (stop bath)= 10 seconds<br />
Hypo (Fixer - save)= 8 minutes<br />
Water wash= 5 minutes<br />
Printing - Black and White<br />
Additional contrast can be gained during the printing process by<br />
using high contrast paper or polycontrast paper and high contrast filters.<br />
Also, a certain amount of contrast can be gained by again using a longer<br />
exposure with low illumination.<br />
The exposure and illumination settings can be determined by using<br />
"test strips" or an exposure guide on a test print. This consumes a sizeable<br />
quantity however, and it is best to acquire a "feel" for proper exposures by<br />
practice. Most print papers have a generously wide exposure latitude but<br />
the exposure should be such so as to allow the image to develop wi<strong>thin</strong> 1-<br />
23
1.5 minutes in developer. Among the most often used print papers is<br />
Kodak Kodabromide polycontrast RCII paper in E or F surface. RC stands<br />
for "resin coated" which eliminates the need for a print dryer and it<br />
shortens processing as well. The E and F surfaces differ in that the E<br />
surface is a "matte" surface and the F surface is more "glossy".<br />
Paper development is as follows:<br />
Dektol (D-72, 2:1, water:D-72)= 1-1.5 min.<br />
Stop bath (indicator)= 10-15 sec.<br />
Hypo (can be used)= 3-5 min.<br />
Water wash= 5 min.<br />
Squeegee and air dry<br />
The instructor will demonstrate the use of the photographic enlarger.<br />
It is fairly straight-forward. Take care to remove dust from the negative<br />
and lenses. Always leave the darkroom clean. Wipe up hypo spills since<br />
dry hypo is a fine white powder and can easily contaminate surfaces of<br />
negatives and lenses.<br />
Rinse hands well before handling paper or touching the enlarger or<br />
light switch. It is alright to transfer paper and hands from developer to<br />
stop bath to hypo but it is not good practice to go the other way. Rinse<br />
hands thoroughly of hypo before going back to the developer or stop bath.<br />
Prints may be conveniently labeled using transfer letters and<br />
numbers available in most office supply stores. These transfer markings<br />
are virtually permanent but can be removed by gently scraping with a<br />
scalpel or razor blade.<br />
Magnification (recorded when the film was exposed) can be<br />
multiplied by the magnification factor of the enlarger and represented by<br />
a "micron" or other unit measure on the print as a line or bar.<br />
Prints should be stored out of direct sunlight in a dry environment.<br />
There may be a tendency for the prints to curl or roll up due to absorption<br />
of moisture by the paper backing while the emulsion remains relatively<br />
moisture free (since it is fairly <strong>thin</strong>). The prints may be mounted on<br />
various types of poster board by glue adhesives or by heat sensitive "dry<br />
mounting" sheets (essentially a wax that melts and adheres to the print<br />
and mount). The print image is virtually permanent if stored or cared for<br />
properly.<br />
24