Fitting Instructions For Twin Headlamp Conversion - MX5 Parts
Fitting Instructions For Twin Headlamp Conversion - MX5 Parts
Fitting Instructions For Twin Headlamp Conversion - MX5 Parts

Create successful ePaper yourself
Turn your PDF publications into a flip-book with our unique Google optimized e-Paper software.
<strong>Fitting</strong> <strong>Instructions</strong> for <strong>Twin</strong> <strong>Headlamp</strong><br />
<strong>Conversion</strong><br />
Art.Nr. IL527<br />
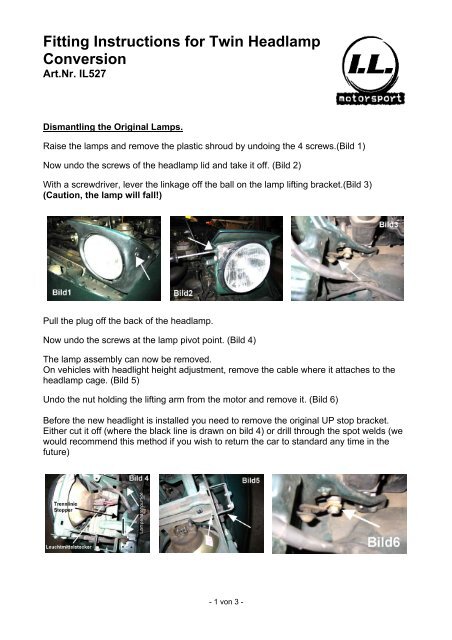
Dismantling the Original Lamps.<br />
Raise the lamps and remove the plastic shroud by undoing the 4 screws.(Bild 1)<br />
Now undo the screws of the headlamp lid and take it off. (Bild 2)<br />
With a screwdriver, lever the linkage off the ball on the lamp lifting bracket.(Bild 3)<br />
(Caution, the lamp will fall!)<br />
Pull the plug off the back of the headlamp.<br />
Now undo the screws at the lamp pivot point. (Bild 4)<br />
The lamp assembly can now be removed.<br />
On vehicles with headlight height adjustment, remove the cable where it attaches to the<br />
headlamp cage. (Bild 5)<br />
Undo the nut holding the lifting arm from the motor and remove it. (Bild 6)<br />
Before the new headlight is installed you need to remove the original UP stop bracket.<br />
Either cut it off (where the black line is drawn on bild 4) or drill through the spot welds (we<br />
would recommend this method if you wish to return the car to standard any time in the<br />
future)<br />
- 1 von 3 -
Installing the New Lamps<br />
Caution, ensure the headlamp lift motors are not operated while you are working on<br />
the assembly, and set the lights to the off position and as if the lights were down.<br />
Remove the wiring from its mounting point on the body. (Bild 7)<br />
Mount the new headlamp top stop to the body. (Bild 8)<br />
Mount the new operating arm to the motor but leave the nut loose at this stage.(Bild 9)<br />
If necessary, mount the ball fitting to the headlamp assembly.(Bild 10)<br />
Mount the new headlamp assembly into the vehicle and attach with the original bolts.(Bild<br />
11)<br />
Now connect the operating lever to the new cage. You now need to make sure the arm on<br />
the motor is parallel with the arm to the cage, now tighten the nut on the motor. (Bild 12)<br />
Remove the upper stop rubber from the original cage and mount this onto the new<br />
cage(Bild 13).<br />
Now raise the lights with the motor and set the upper stop. This should be tightend with<br />
light pressure. If excessive vibration is experienced when driving the car later you can<br />
increase the pressure on the stop to remove this. (Bild 13)<br />
Now connect the wires from the new lamps to the wiring harness and check for correct<br />
function. (the outer lamps are the dip beam and the inner lamps are the main beam.<br />
(Bild 14)<br />
- 2 von 3 -
Now refit the headlamp lid.<br />
Carefully lower the lights and check and adjust the fit of the lid so that all the shut lines are<br />
as even as you can get them. This is really a matter of trial and error and is probably the<br />
most time consuming part of the installation! Adjustment is made by bending the tabs on<br />
the bottom of the lid.<br />
Set the headlight with a professional beam setter. Your local MOT station will<br />
usually do this for you at very little cost.<br />
If you require further assistance, please do not hesitate to contact us.<br />
- 3 von 3 -