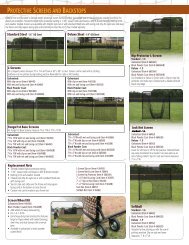
Premier XS Post with Brass Hardware - Douglas Sports Nets and ...
Premier XS Post with Brass Hardware - Douglas Sports Nets and ...
Premier XS Post with Brass Hardware - Douglas Sports Nets and ...

Create successful ePaper yourself
Turn your PDF publications into a flip-book with our unique Google optimized e-Paper software.
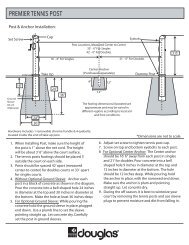
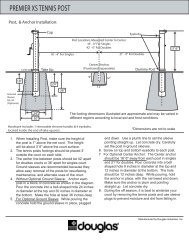
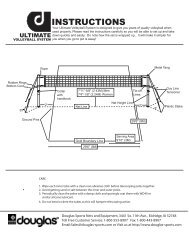
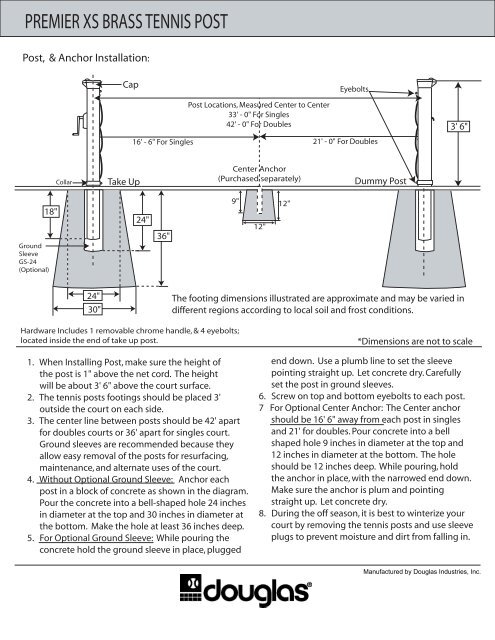
PREMIER <strong>XS</strong> BRASS TENNIS POST<br />
<strong>Post</strong>, & Anchor Installation:<br />
Cap<br />
Eyebolts<br />
<strong>Post</strong> Locations, Measured Center to Center<br />
33' - 0" For Singles<br />
42' - 0" For Doubles 3' 6"<br />
16' - 6" For Singles 21' - 0" For Doubles<br />
Collar<br />
Take Up<br />
Center Anchor<br />
(Purchased separately)<br />
Dummy <strong>Post</strong><br />
Ground<br />
Sleeve<br />
GS-24<br />
(Optional)<br />
18"<br />
24"<br />
36"<br />
9"<br />
12"<br />
12"<br />
24"<br />
30"<br />
The footing dimensions illustrated are approximate <strong>and</strong> may be varied in<br />
different regions according to local soil <strong>and</strong> frost conditions.<br />
<strong>Hardware</strong> Includes 1 removable chrome h<strong>and</strong>le, & 4 eyebolts;<br />
located inside the end of take up post.<br />
1. When Installing <strong>Post</strong>, make sure the height of<br />
the post is 1" above the net cord. The height<br />
will be about 3' 6" above the court surface.<br />
2. The tennis posts footings should be placed 3'<br />
outside the court on each side.<br />
3. The center line between posts should be 42' apart<br />
for doubles courts or 36' apart for singles court.<br />
Ground sleeves are recommended because they<br />
allow easy removal of the posts for resurfacing,<br />
maintenance, <strong>and</strong> alternate uses of the court.<br />
4. Without Optional Ground Sleeve: Anchor each<br />
post in a block of concrete as shown in the diagram.<br />
Pour the concrete into a bell-shaped hole 24 inches<br />
in diameter at the top <strong>and</strong> 30 inches in diameter at<br />
the bottom. Make the hole at least 36 inches deep.<br />
5. For Optional Ground Sleeve: While pouring the<br />
concrete hold the ground sleeve in place, plugged<br />
*Dimensions are not to scale<br />
end down. Use a plumb line to set the sleeve<br />
pointing straight up. Let concrete dry. Carefully<br />
set the post in ground sleeves.<br />
6. Screw on top <strong>and</strong> bottom eyebolts to each post.<br />
7 For Optional Center Anchor: The Center anchor<br />
should be 16' 6" away from each post in singles<br />
<strong>and</strong> 21' for doubles. Pour concrete into a bell<br />
shaped hole 9 inches in diameter at the top <strong>and</strong><br />
12 inches in diameter at the bottom. The hole<br />
should be 12 inches deep. While pouring, hold<br />
the anchor in place, <strong>with</strong> the narrowed end down.<br />
Make sure the anchor is plum <strong>and</strong> pointing<br />
straight up. Let concrete dry.<br />
8. During the off season, it is best to winterize your<br />
court by removing the tennis posts <strong>and</strong> use sleeve<br />
plugs to prevent moisture <strong>and</strong> dirt from falling in.
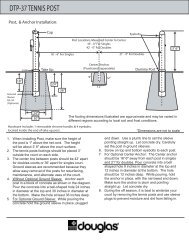
Net Installation<br />
*net is not included <strong>with</strong> post, sold separately<br />
1. Stretch out the net across the court.<br />
2. Since the <strong>Premier</strong><strong>XS</strong> is an internally wound post, cut off the loop at one end of the cable for the take up side.<br />
Leave some excess in order to allow for several turns around the internal mechanism. Now, insert the plain cable<br />
into the hole on the gear.<br />
3. Attach the loop on the other end of the cable to the hook half way down the outside of the “dummy” post.<br />
4. Turning the h<strong>and</strong>le clockwise, crank up cable so center of net is approximately 38". DO NOT OVERWIND.<br />
5. Insert dowels (provided) through the end side tapes.<br />
6. Attach the headb<strong>and</strong> to posts <strong>with</strong> the white cord provided, tie off at top eyebolt.<br />
7. Square up the net <strong>and</strong> lace it to the post using the provided black lacing cord. Use the side grommets on the net to<br />
accept the lacing cords. Tie off at at the bottom eye bolt.<br />
8. Measure the depth of the net in the center <strong>and</strong> adjust the optional center strap to make the net 36” at the center line<br />
of the courts.<br />
9. Your installation is now complete <strong>and</strong> your net should sit comfortable but somewhat tightly between the two posts<br />
Dowel<br />
White Cord, tie<br />
off at eye bolt<br />
Headb<strong>and</strong><br />
Cable<br />
Cable<br />
Hook<br />
Side Tape<br />
Top<br />
Eyebolt<br />
Grommet<br />
36"<br />
Center Strap (optional, purchased separately from net)<br />
Black Cord<br />
Cable<br />
Gear<br />
Turn<br />
Clockwise<br />
Bottom<br />
Eyebolt<br />
Dummy <strong>Post</strong><br />
Bottom B<strong>and</strong><br />
Center Strap<br />
hooked to optional<br />
center anchor<br />
Take Up <strong>Post</strong><br />
Remove tennis net cable loop<br />
on wind up side only<br />
*Drawings are not to scale