October 2012 - MicrobeHunter.com
October 2012 - MicrobeHunter.com
October 2012 - MicrobeHunter.com

You also want an ePaper? Increase the reach of your titles
YUMPU automatically turns print PDFs into web optimized ePapers that Google loves.
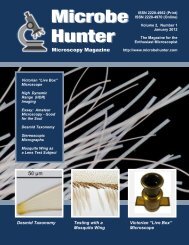
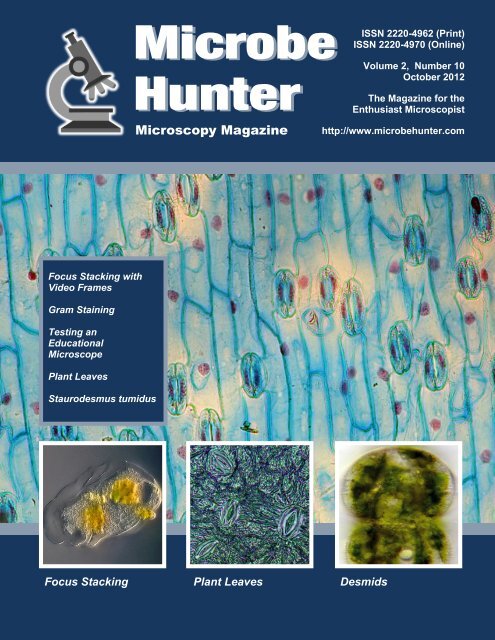
Microbe<br />
Hunter<br />
Microscopy Magazine<br />
ISSN 2220-4962 (Print)<br />
ISSN 2220-4970 (Online)<br />
Volume 2, Number 10<br />
<strong>October</strong> <strong>2012</strong><br />
The Magazine for the<br />
Enthusiast Microscopist<br />
http://www.microbehunter.<strong>com</strong><br />
Focus Stacking with<br />
Video Frames<br />
Gram Staining<br />
Testing an<br />
Educational<br />
Microscope<br />
Plant Leaves<br />
Staurodesmus tumidus<br />
Focus Stacking Plant Leaves Desmids<br />
<strong>MicrobeHunter</strong> Microscopy Magazine - <strong>October</strong> <strong>2012</strong> - 1
ABOUT<br />
Microbehunter Microscopy Magazine<br />
The magazine for the enthusiast microscopist<br />
<strong>MicrobeHunter</strong> Magazine is a non-<strong>com</strong>mercial project.<br />
Volume 2, Number 10, <strong>October</strong> <strong>2012</strong><br />
ISSN 2220-4962 (Print)<br />
ISSN 2220-4970 (Online)<br />
Download: Microbehunter Microscopy Magazine can be downloaded<br />
at: http://www.microbehunter.<strong>com</strong><br />
Print version: The printed version can be ordered at:<br />
http://microbehunter.magcloud.<strong>com</strong><br />
Publisher and editor:<br />
Oliver Kim, Ziegeleistr. 10-3, A-4490 St.Florian, Austria<br />
Email: editor@microbehunter.<strong>com</strong><br />
Web: http://www.microbehunter.<strong>com</strong><br />
Tel.: +43 680 2115051<br />
Images and Articles by:<br />
ANNOUNCEMENT<br />
Visit the Forum!<br />
It is now possible to discuss the individual articles<br />
of the magazine. Every issue has a separate subforum<br />
for discussion.<br />
www.microbehunter.<strong>com</strong>/forum<br />
Facebook<br />
Do you have any microscopy links to share?<br />
Do it here on facebook:<br />
www.facebook.<strong>com</strong>/microbehunter<br />
Oliver Kim, Luca Monzo, R. Nassar, Mike Guwak.<br />
Copyright: By submitting articles and pictures, the authors<br />
have confirmed that they are the full copyright owners of the material,<br />
unless specified otherwise. Authors are ersponsible for<br />
obtaining permission for copyrighted work that they do not own.<br />
Creative <strong>com</strong>mons and public domain images are indicated with<br />
a small text next to the image or in the caption. The copyright of<br />
all other images is with the author of the article (unless specified).<br />
You are not allowed to distribute this magazine by email,<br />
file sharing sites, web sites or by any other means. If you want to<br />
have a copy of this magazine, either order one from Magcloud<br />
(see link above) or vistit www.microbehunter.<strong>com</strong>.<br />
Editorial: Article and image submissions are wel<strong>com</strong>e and<br />
should be sent to: editor@microbehunter.<strong>com</strong>.<br />
For submission guidelines, consult the website at:<br />
http://www.microbehunter.<strong>com</strong>/submission<br />
Disclaimer: Articles that are published in Microbehunter Microscopy<br />
Magazine and the blog do not necessarily reflect the position<br />
or opinion of the publisher. The publication of these articles<br />
does not constitute an endorsement of views they may express.<br />
Advice provided in Microbehunter Microscopy Magazine is provided<br />
as a service and neither the authors nor the publisher can<br />
be held liable and responsible for any errors, omissions or inaccuracies,<br />
or for any consequences (health, hardware, etc.) arising<br />
from the use of information of this magazine and the blog (or<br />
anything else). Conduct all lab work and (microscopy) hardware<br />
modifications at your own risk and always follow the instructions<br />
of the manufacturers.<br />
Front Cover:<br />
Large image: Oliver Kim<br />
Left image: R. Nassar<br />
Middle image: Oliver Kim<br />
Right image: Mike Guwak<br />
CONTRIBUTE!<br />
Write for Microbehunter!<br />
Please contribute both articles and pictures. Share your experiences,<br />
problems and microscopic adventures. If you are a<br />
researcher using microscopes, tell the readers what your research<br />
is about. Please contribute, even if you consider yourself<br />
inexperienced. If you are a struggling beginner, tell us<br />
something about the problems that you encountered. If you<br />
are an active enthusiast microscopist then share your projects,<br />
experiences and observations. Are you a teacher or lecturer?<br />
Share your microscopic experiences from school or<br />
university. This magazine is made by an enthusiast microscopist<br />
for other enthusiasts. Let‘s work together to make this<br />
project a successful one.<br />
Please send all contributions to:<br />
editor@microbehunter.<strong>com</strong><br />
You must own the copyright of the contributions and you retain<br />
the copyright of all submitted articles and pictures. While<br />
we are not able to pay you for your efforts, we will, of course,<br />
give you full credit for your contributions.<br />
Guest Bloggers! Yes, guest blogging is also a possibility.<br />
Write microscopy-related blog posts, send them to me and I<br />
will publish them on the web site. Naturally, I’ll put a link to<br />
your blog. Condition: it must be original content and you must<br />
be the copyright holder of the text (obviously). When submitting<br />
articles, please indicate if you want to have them published<br />
on the blog or in the magazine (or both).<br />
Before submitting anything, please read the submissions<br />
page on the website: www.microbehunter.<strong>com</strong>/submissions.<br />
2 - <strong>MicrobeHunter</strong> Microscopy Magazine - <strong>October</strong> <strong>2012</strong>
CONTENTS<br />
4 Focus Stacking with Video Frames<br />
A method for obtaining a rapid focus stack from a<br />
slowly moving amoeba under the microscope.<br />
R. Nassar<br />
4<br />
6 Some Thoughts on Gram Staining<br />
Gram staining is a quite powerful staining technique,<br />
but requires careful standardization of the bacterial<br />
culture.<br />
Oliver Kim<br />
8 Testing a Low-cost Educational Microscope<br />
Yes, there are some low-cost microscopes around,<br />
which do perform.<br />
Oliver Kim<br />
8<br />
12 Observing Plant Leaves<br />
Clear nail polish can be used to make impressions of<br />
plant leaves.<br />
Oliver Kim<br />
17 Staurodesmus tumidus<br />
Mike Guwak<br />
19 Gallery<br />
Images by Luca Monzo<br />
12<br />
17<br />
22<br />
Answer to the puzzle (back cover):<br />
Plant leaf<br />
<strong>MicrobeHunter</strong> Microscopy Magazine - <strong>October</strong> <strong>2012</strong> - 3
Technique<br />
Focus Stacking<br />
A method for obtaining a rapid focus stack from a slowly moving amoeba<br />
under the microscope.<br />
R. Nassar<br />
In astronomy, image stacking is used<br />
to make faint stars visible by adding<br />
(or averaging) several images in<br />
order to increase signal-to-noise ratio<br />
[1]. In macro photography and photomicrography,<br />
depth of field is extremely<br />
limited, and image stacking is used to<br />
<strong>com</strong>bine several images (in the form of<br />
a focus stack) that are focused on the<br />
subject at different depths in order to get<br />
the whole subject in focus.<br />
A stack of still images can be used<br />
when the subject is stationary. For a<br />
slowly moving subject, video stacking<br />
has been used where frames from a<br />
video clip are extracted and the resulting<br />
images are stacked [2,3,4,5].<br />
1<br />
I wanted to get images of an amoeba<br />
for a focus stack. But even an amoeba's<br />
very slow movement was too fast for a<br />
stack of still images: recording one image,<br />
then refocusing the microscope by<br />
a few micrometers and repeating the<br />
procedure took too long. In this case I<br />
used a video stack by focusing the microscope<br />
sufficiently quickly while recording<br />
a video clip. I set the<br />
microscope focus well below the bottom<br />
of the amoeba and, using the coarse<br />
focus knob, focused rapidly well beyond<br />
the top. This ensured that the<br />
zones of acceleration and deceleration<br />
of the microscope stage occurred outside<br />
the range of focus of interest and<br />
that the focusing speed was nearly constant<br />
when any parts of the amoeba<br />
were in focus, thus ensuring approximately<br />
equally spaced planes of focus<br />
of the successive video frames. I then<br />
picked several successive frames (in<br />
this case 8) that spanned the depth of the<br />
amoeba and stacked them using CombineZP.<br />
At the video rate of 30 frames/s,<br />
the 8 frames would have been recorded<br />
in about 1/3 second, fast enough for a<br />
slow-moving amoeba. A slightly slower<br />
movement of the stage during focusing<br />
would have allowed me to obtain<br />
more images for the stack at smaller<br />
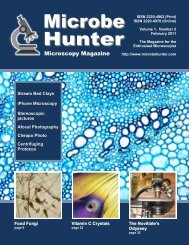
Figure 1: The resulting stack is<br />
shown below.<br />
4 - <strong>MicrobeHunter</strong> Microscopy Magazine - <strong>October</strong> <strong>2012</strong>
Focus Stacking<br />
Technique<br />
2<br />
6<br />
3<br />
7<br />
4<br />
8<br />
5<br />
9<br />
Figure 2-9: The individual video frames used to make the stack.<br />
<strong>MicrobeHunter</strong> Microscopy Magazine - <strong>October</strong> <strong>2012</strong> - 5
Technique<br />
Gram Staining<br />
distance increments, but would have<br />
taken longer and risked more movement<br />
of the amoeba between the individual<br />
images and possible difficulty in obtaining<br />
a good stack. If you try this method,<br />
please make sure that you are focusing<br />
in a direction of increasing the distance<br />
between the objective and the slide in<br />
order to avoid colliding them together<br />
accidentally and possibly causing severe<br />
damage to the objective. The eight<br />
video frames <strong>com</strong>prising the stack are<br />
shown in figures 2-9.<br />
■<br />
References<br />
1. Wikipedia. "Speckle imaging". http://en.wikipedia.org/wiki/Speckle_imaging.<br />
2. Walker, D. Video microscopy trials with the USB Live View output of a DLSR camera. Micscape<br />
Magazine, June 2008.<br />
3. Cypionka, H. Videostacking.<br />
http://www.mikroskopie.de/mikforum/read.php?2,48956,48956#msg-48956, July 26, 2008.<br />
4. Cypionka, H. Videostacking.<br />
http://www.mikroskopie-forum.de/index.php?topic=9190.0<br />
May 18, 2011.<br />
5. Krebs, C. Netzelia, testate amoeba, ingesting alga.<br />
http://www.photomacrography.net/forum/viewtopic.php?t=15584<br />
January 01, <strong>2012</strong>.<br />
Gram staining is a quite powerful staining technique, but requires careful standardization<br />
of the bacterial culture.<br />
Oliver Kim<br />
Gram staining is one of the most<br />
well-known staining procedures<br />
for bacteria. It was discovered<br />
by the Danish scientist Hans<br />
Christian Gram (1850–1938). Gram accidentally<br />
discovered this staining procedure<br />
while he was working with Carl<br />
Fiedländer (who discovered the bacterial<br />
cause of pneumonia in 1882).<br />
Gram staining allows for the differentiation<br />
of bacteria in to Gram positive<br />
and Gram negative bacteria. The Gram<br />
positive bacteria stain dark blue or purple,<br />
while the Gram negative bacteria<br />
display a red color. The staining properties<br />
are due to the properties of the cell<br />
wall. Gram positive bacteria have a<br />
thick cell wall, which is able to retain<br />
the blue-black color <strong>com</strong>plexes inside<br />
the cell. The Gram negative bacteria<br />
have a much thinner cell wall, which<br />
allows the <strong>com</strong>plexes to be washed out<br />
by alcohol. For this reason, the Gram<br />
stain was for many years a central technique<br />
in bacterial identification. While<br />
molecular techniques have largely taken<br />
over the identification process, Gram<br />
staining remains a popular technique for<br />
microbiological education.<br />
In his 1884 publication, Gram described<br />
the method as a means to selectively<br />
stain pneumonia bacteria of lung<br />
tissue sections. The surrounding lung<br />
tissue was not stained, making the bacteria<br />
much easier to locate. In his publication<br />
from 1884, he states the<br />
advantage of this staining procedure:<br />
“In my procedure the nucleus and other<br />
tissue elements remain unstained, while<br />
the cocci are strongly stained. This makes<br />
them much easier to locate than previously,<br />
since in ordinary preparations from<br />
pneumonia patients, where such a large<br />
amount of exudate occurs, they are impossible<br />
to see.”<br />
Figure 1: Gram stain of Staphylococcus<br />
aureus (Gram positive cocci),<br />
staining blue-purple and Escherichia<br />
coli (Gram negative bacilli), staining<br />
red from the safranin counter-stain.<br />
Image credit: Creative Commons by Y tambe.<br />
6 - <strong>MicrobeHunter</strong> Microscopy Magazine - <strong>October</strong> <strong>2012</strong>
Gram Staining<br />
Technique<br />
The procedure<br />
The bacteria are taken either from a<br />
liquid culture or agar medium. Christian<br />
Gram took the samples directly from<br />
lung tissue. The bacteria are then<br />
smeared on a microscope slide, airdried<br />
and heat-fixed. For heat-fixing,<br />
the slide is pulled 2 times through the<br />
flame of a Bunsen burner, with the sample<br />
pointing away from the flame. This<br />
process "bakes" the bacteria to the glass<br />
slide and prevents them from being<br />
washed away during the staining process.<br />
The primary stain crystal violet is<br />
then applied to the fixed bacteria for 1-3<br />
minutes. Gram's iodine solution is then<br />
added. The iodine causes the formation<br />
of stained <strong>com</strong>plexes inside of the bacterial<br />
cells. The bacteria are then carefully<br />
rinsed with alcohol. The alcohol is<br />
able to dissolve these <strong>com</strong>plexes, but is<br />
only to wash out the dye in bacteria<br />
which have a thin cell wall (Gram negative).<br />
Cells with a thick cell wall retain<br />
the dye (Gram positive). Last, the cells<br />
are counter-stained with a deep red safranin<br />
dye to make the cells visible again,<br />
which have lost the color in the washing<br />
step.<br />
Gram negative bacteria have a thin<br />
cell wall between two membranes,<br />
while Gram positive species have a<br />
thick cell wall outside of a single cell<br />
membrane. The Gram positive bacteria<br />
represent a distinct line in the phylogenetic<br />
tree of life, which was established<br />
using genetic studies. The Gram staining<br />
procedure therefore differentiates<br />
the bacteria based on their phylogenetic<br />
relatedness.<br />
Personal experiences<br />
During my work in the microbiological<br />
laboratory, I have performed countless<br />
Gram stains, with varying success.<br />
I have discovered, that the reproducibility<br />
of the procedure depends much on<br />
the age of the culture. Some bacteria<br />
behave differently depending on whether<br />
the bacterial culture is still actively<br />
growing or stationary. Gram positive<br />
cells that are too old might appear as<br />
being Gram negative. I even remember<br />
one instance in which a pure culture of<br />
a bacterial species had cells which<br />
stained both Gram positive and Gram<br />
negative. Evidently some of the cells in<br />
the culture were already too old to retain<br />
the stain, while others were still young<br />
enough to stain as expected.<br />
Sometimes the optics of the microscope<br />
also <strong>com</strong>plicated the matter.<br />
Phase contrast optics generally made<br />
the cells appear darker and occasionally<br />
it was difficult to identify the true color<br />
of the cells. In bright-field systems,<br />
closing the condenser diaphragm too<br />
much also introduces refractive patterns<br />
around the cells, especially if the refractive<br />
index of the bacteria is very different<br />
from the surrounding medium. This<br />
too made the staining reaction difficult<br />
to see.<br />
Impatience is also a problem. It is<br />
not advisable to speed up the drying<br />
process of the bacterial suspension by<br />
heating the slide. This will cause the<br />
cells to burst and they will stain Gram<br />
negative because the blue–purple color<br />
<strong>com</strong>plex can then be washed out of the<br />
cells.<br />
Last, some bacterial strains are<br />
Gram-indeterminate. This means that<br />
they do not respond well to the staining<br />
procedure and can not be distinguished<br />
this way. With all of these uncertainties,<br />
it is not surprising that molecular methods,<br />
such as DNA analysis, have gained<br />
so much popularity in recent years.<br />
References<br />
Gram, C. 1884. Über die isolierte Färbung der<br />
Schizomyceten in Schnitt- und Trockenpraparaten.<br />
Fortschritte der Medicin, Vol. 2, pages<br />
185-189.<br />
English translation of the article:<br />
http://www.microbelibrary.org/images/stories/M<br />
L_2.0/1884p215.pdf<br />
■<br />
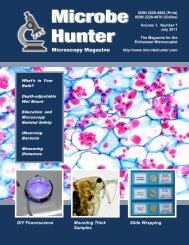
Figure 2: The Phylogenetic Tree of Life. Genetic studies have shown that the Gram positive bacteria (circled) form a distinct<br />
branch in the tree of life. The Gram staining procedure corresponds to the genetic results and is therefore useful for identification<br />
purposes. Image: Public Domain by Eric Gaba (based on a NASA image)<br />
<strong>MicrobeHunter</strong> Microscopy Magazine - <strong>October</strong> <strong>2012</strong> - 7
TESTING<br />
Comparing objectives<br />
Yes, there are some low-cost microscopes around, which do perform.<br />
Oliver Kim<br />
Here, right on my desk: A lowcost<br />
educational microscope<br />
(BMS 136 series) with four objectives<br />
(4x, 10x, 40x, 100x oil). Monocular,<br />
10x eyepiece. A single 0.5W<br />
LED (corresponding to 20W halogen),<br />
powered and with rechargeable batteries<br />
(2x AA). Equipped with a 1.25 NA<br />
condenser with an aperture diaphragm,<br />
pre-centered. Mechanical stage. Mostly<br />
metal construction. No Köhler illumination.<br />
Price: just over EUR 200. Mass:<br />
3544g. Variations of the microscope do<br />
exist, such as the inclusion of a halogen<br />
light instead of a LED, or binocular<br />
versions.<br />
The microscope was obtained for<br />
evaluation purposes to check it it proves<br />
1<br />
to be useful for classroom use. The<br />
ability for the microscope to be battery<br />
operated was considered as being critical,<br />
as electrical power supplies are not<br />
available for every desk in the classroom<br />
(the microscope had to be operated<br />
outside of a lab, in regular<br />
classrooms). All parts of the microscope<br />
were "student-proof". It was therefore<br />
not possible to remove the eyepieces<br />
and condenser without special tools. It<br />
was also not possible to detach the rotating<br />
tube (which carries the eyepiece) of<br />
the microscope. The only exception<br />
were the objectives. These were of the<br />
160mm DIN standard, could be unscrewed<br />
easily and and could therefore<br />
also be fitted on my more expensive<br />
Olympus CH40 microscope. I wanted<br />
to take advantage of this possibility and<br />
<strong>com</strong>pare the optics of the two instruments<br />
by fitting the objectives of the<br />
educational microscope on the Olympus.<br />
The Olympus objectives were achromatic<br />
bright-field objectives, the<br />
objectives of the educational microscope<br />
were of unknown correction (I<br />
suppose also achromatic).<br />
The CH40 was also equipped with a<br />
digital camera and associated reduction<br />
optics. I could therefore easily <strong>com</strong>pare<br />
the quality of the different optics. With<br />
the exception of the objectives, everything<br />
thus remained the same. The condenser<br />
aperture diaphragm was set to<br />
the value which corresponded to the<br />
value printed on the objective. Both, the<br />
Olympus objectives as well as the objectives<br />
of the educational microscope<br />
had the same numerical aperture (N.A.)<br />
values. I have also made s few afocal<br />
photographs through the eyepiece using<br />
a separate <strong>com</strong>pact camera in order to<br />
obtain the full field of view (figures<br />
4-6).<br />
Despite the relatively low price of<br />
the educational microscope, I was positively<br />
surprised that the objectives produced<br />
quite usable images. A quality<br />
difference was visible for sure, but not<br />
to the extent that I expected. The biggest<br />
problem was a blurriness towards<br />
the side of the field of view (figures<br />
Figure 1: The Olympus CH40 microscope<br />
(left) and a low-cost educational<br />
microscope on the right. Both<br />
microscopes use the 160mm DIN<br />
standard and therefore allow for an<br />
exchange of the objectives. The objectives<br />
of the educational microscope<br />
were mounted on the Olympus<br />
and the quality of the optics could<br />
thus be <strong>com</strong>pared.<br />
8 - <strong>MicrobeHunter</strong> Microscopy Magazine - <strong>October</strong> <strong>2012</strong>
Comparing objectives<br />
TESTING<br />
4-6). This effect is more disturbing<br />
when taking pictures, but not a big<br />
problem when only working visually.<br />
By operating the fine focus knob, one<br />
could also bring these areas into focus.<br />
Figure 6 shows a picture through the<br />
eyepiece of the educational microscope<br />
itself. There is much less blurriness.<br />
Probably the smaller field of view that<br />
the eyepiece produced eliminated the<br />
critical areas at the side.<br />
I also used the attached camera to<br />
take pictures through the trinocular<br />
head. This camera did not capture the<br />
full field, but rather a rectangular section<br />
from the center of the field of view.<br />
Therefore the blurry sides were eliminated<br />
from the picture. Some loss of<br />
quality is still visible in the <strong>com</strong>parison<br />
pictures, however (figures 2-3 and 6-9).<br />
The 4x objective resulted in the worst<br />
image quality at the sides, probably also<br />
because of its wide field of view.<br />
The short verdict<br />
If you are looking for a low-cost<br />
microscope, either for yourself or as a<br />
present for your children, then I would<br />
say that microscope that I tested can be<br />
seen as a good reference on what to<br />
expect from a EUR 200-250 microscope.<br />
The microscope is definitely not<br />
a toy and sufficiently solid to be taken<br />
seriously. The image quality of the objectives<br />
was generally <strong>com</strong>parable to<br />
those of my CH40 microscope, at least<br />
in the center of the field of view. People<br />
who want to start with the hobby of<br />
microscopy and who do not want to<br />
invest too much money might consider<br />
such a device. It is true that used microscopes<br />
from more well-known manufacturers<br />
(Zeiss, etc.) can also be<br />
obtained in this price range. These microscopes<br />
frequently can provide more<br />
value for the money and even a greater<br />
resale value. Used microscopes, however,<br />
do pose a certain risk for those people<br />
who do not know what to look out<br />
for.<br />
In recent years many large microscope<br />
manufacturers have moved away<br />
from the 160mm DIN standard (finite<br />
optics) for the objectives, in favor of the<br />
more modern infinity systems. One of<br />
the nice things about the traditional 160<br />
mm system is the ability to exchange<br />
the objectives between the microscopes.<br />
In contrast to infinity optics, the traditional<br />
DIN standard is manufacturer<br />
independent and there are plenty of<br />
cheaper second hand objectives available,<br />
should one or the other of them<br />
break (which is a possibility in educational<br />
settings).<br />
When buying low-cost microscopes<br />
the presence of standardized optics is<br />
probably one important indicator on<br />
whether the microscope fulfills minimum<br />
quality considerations. Many toy<br />
microscopes do not have standardized<br />
optics and may therefore be distin-<br />
Figures 2 and 3: 4x objective <strong>com</strong>parison.<br />
The left image is from the Olympus,<br />
the right image from the<br />
educational microscope. While the<br />
overall image quality is similar, the<br />
objectives of the educational microscope<br />
does show some blurring at<br />
the corners.<br />
2 3<br />
<strong>MicrobeHunter</strong> Microscopy Magazine - <strong>October</strong> <strong>2012</strong> - 9
TESTING<br />
Comparing objectives<br />
4 5<br />
6<br />
Figures 4 and 5: Afocal photograph through the 4x objective<br />
(left Olympus objective, right educational microscope objective).<br />
The images shows the fluff of a thistle plant. The objective<br />
of the educational microscope does show a<br />
significant blurriness towards the sides, which only be<strong>com</strong>es<br />
strongly evident when using a wide-field eyepeice.<br />
Figure 6: Afocal photograph through the 4x objective and<br />
the native eyepiece of the microscope. The eyepiece produced<br />
a lower field of view and therefore eliminated some of<br />
the blurry areas at the sides. The black line is a pointer.<br />
Figures 7 and 8: Comparison of the 10x objective (left Olympus<br />
objective, right BMS 136 objective). The image shows<br />
the cross section of a pine flower.<br />
Figures 9 and 10: Comparison of the 40x objective (left<br />
Olympus objective, right BMS 136 objective). Pine flower.<br />
The circular ring-shaped structures appear to be the vascular<br />
tissue. The objectives <strong>com</strong>pared quite well.<br />
guished from the better microscopes<br />
this way.<br />
The harsh reality is, that microscopes<br />
which are used for educating<br />
students are exposed to significant<br />
stress. Students do make mistakes, this<br />
is part of the learning process, and unfortunately<br />
some of the mistakes may<br />
result in damaged equipment. Despite<br />
warnings and instructions, I have encountered<br />
students who use non-oil immersion<br />
objectives with immersion oil.<br />
The front lenses of objectives were<br />
cracked because they were crashed into<br />
the specimen slide. I also remember one<br />
objective, which had a spring-loaded<br />
front. The whole spring-loaded front<br />
part was pushed in and was stuck. There<br />
was mounting medium all over the objective,<br />
causing the spring-loaded front<br />
to be glued in place. Evidently the student<br />
who used this microscope was not<br />
patient enough to wait for the mounting<br />
medium to dry and rotated the objective<br />
right into it.<br />
With these realities in mind, I think<br />
that it is better to use very cheap objectives<br />
for educational use. Dust and dirt<br />
will soon reduce the image quality anyway.<br />
Higher quality objectives might<br />
not show the optical aberrations of lower<br />
cost objectives, but I seriously doubt<br />
if this is worth the extra cost considering<br />
the other factors that reduce image<br />
quality. And let’s be honest about it: I<br />
doubt that the students even notice the<br />
blurriness at the sides of the field of<br />
view.<br />
■<br />
10 - <strong>MicrobeHunter</strong> Microscopy Magazine - <strong>October</strong> <strong>2012</strong>
Comparing objectives<br />
TESTING<br />
7 8<br />
9 10<br />
<strong>MicrobeHunter</strong> Microscopy Magazine - <strong>October</strong> <strong>2012</strong> - 11
OBSERVATIONS<br />
Plant Leaves<br />
Observing Plant Leaves<br />
Clear nail polish can be used to make impressions of plant leaves.<br />
The leaves are the photosynthetic<br />
organs of a plant. The cells are<br />
packed with chloroplasts, which<br />
convert CO 2 gas from the atmosphere<br />
and water to glucose, using the energy<br />
of sunlight. The produced glucose is<br />
then either respired and used as an energy<br />
source, or it is converted to other<br />
organic substances needed for plant<br />
growth. The cells of a leaf also produce<br />
molecular oxygen (O 2 gas) as a waste<br />
product. This gas is either given off into<br />
the atmosphere, or stored inside the leaf<br />
for the night, to be used for cell respiration.<br />
The Stomata<br />
In order to provide the cells of the<br />
leaf with sufficient CO 2 and to allow for<br />
the escape of O 2, the bottom side of the<br />
leaves contain countless openings, the<br />
stomata. Each stoma can be opened and<br />
closed by the expanding and contracting<br />
action of two guard cells. The stomata<br />
open during the day to allow for the free<br />
movement of gases into and out of the<br />
leaf. At night, when photosynthesis<br />
does not take place, the guard cells<br />
close the stomata to minimize the loss<br />
of water. Exceptions do exist, such as<br />
the CAM (Crassulacean acid metabolism)<br />
plants, which grow in hot and dry<br />
environments. These plants close the<br />
stomata during the day to further reduce<br />
the water loss. These plants then open<br />
the stomata at night to allow CO 2 to<br />
enter the leaves. The CO 2 is fixed and<br />
the product is stored in vacuoles to be<br />
used for photosynthesis during day.<br />
The stomata and associated guard<br />
cells can be made visible in several<br />
ways. Thin leaves can be placed directly<br />
Oliver Kim<br />
on the slide for observations. The light<br />
intensity must be sufficiently high to<br />
pass through the leaf. The distinctive<br />
shape of the stomata and guard cells can<br />
then be seen, but the quality of the image<br />
is naturally not high. Carefully microtoming<br />
the leaf would be another<br />
possibility, but this can be<strong>com</strong>e a problem,<br />
especially when leaf observation is<br />
to be done with students or children,<br />
when safety issues start to play a role.<br />
Making leaf impressions is probably<br />
one of the least <strong>com</strong>plicated and easiest<br />
methods to make the surface texture of<br />
the leaves visible.<br />
Figure 1: Leaf impressions of the<br />
lower epidermis. Many stomata are<br />
visible (the oval structures).<br />
1<br />
12 - <strong>MicrobeHunter</strong> Microscopy Magazine - <strong>October</strong> <strong>2012</strong>
Plant Leaves<br />
OBSERVATIONS<br />
2<br />
Figure 2: Some clear nail polish is<br />
applied to the bottom side of a leaf<br />
and allowed to dry over night. I applied<br />
the nail polish several times<br />
over each other, in order to make the<br />
film of thicker and more stable. Painting<br />
over the leaf veins makes removal<br />
difficult, however.<br />
Figure 3: The dried nail polish is<br />
carefully removed by first lifting the<br />
corner with a knife and then peeling it<br />
off using your fingers.<br />
Figure 4: The nail polish in oblique<br />
illumination. Stomata are clearly visible.<br />
3 4<br />
Making leaf impressions<br />
Some glue or clear nail polish is<br />
applied to the bottom side of a leaf and<br />
allowed to dry <strong>com</strong>pletely. One should<br />
not apply the glue over the leaf veins, as<br />
this makes it more difficult for the glue<br />
to be separated after drying. The film is<br />
allowed to dry <strong>com</strong>pletely (one day)<br />
and then carefully peeled off and<br />
mounted on a slide for microscopic investigation.<br />
It may be necessary to use<br />
a sharp object to start peeling away the<br />
nail polish, the rest of the dried nail<br />
polish should <strong>com</strong>e off quite easily as<br />
the waxy cuticle on the surface of the<br />
leaves prevents the nail polish adhering<br />
to the cells. it goes without saying, that<br />
the solvent in the nail polish harms the<br />
leaves so that it is advisable to use the<br />
fallen leaves from a tree. Alternatively<br />
one can use water-based white wood<br />
glue, which should be less problematic<br />
in this respect. I found out that the white<br />
wood glue is more flexible than the nail<br />
polish and may deform more during the<br />
peeling process.<br />
The thin film of nail polish is then<br />
carefully pressed against the glass slide<br />
to reduce warping. It is then observed<br />
microscopically in the form of a dry<br />
mount.<br />
Making leaf impressions, while<br />
much easier than trying to cut the leaf<br />
into thin sections, does have the disadvantage<br />
that individual cell organelles,<br />
such as the green chloroplasts in the<br />
guard cells, naturally are not visible.<br />
Leaf impressions that are obtained<br />
this way are, naturally, low in contrast<br />
and require you to close the condenser<br />
aperture diaphragm. The leaf-impressions<br />
are, however, very suitable for<br />
observation in oblique illumination.<br />
This technique allows light to strike the<br />
specimen (i.e. the piece of glue carrying<br />
the leaf impression) only from one side,<br />
resulting in a characteristic 3-dimensional<br />
appearance (figure 4).<br />
The next obvious step would be the<br />
making of a permanent mount of the<br />
nail polish impressions. This is likely to<br />
be difficult, as the organic solvent of<br />
mounting media is likely to soften or<br />
<strong>MicrobeHunter</strong> Microscopy Magazine - <strong>October</strong> <strong>2012</strong> - 13
OBSERVATIONS<br />
Plant Leaves<br />
5<br />
14 - <strong>MicrobeHunter</strong> Microscopy Magazine - <strong>October</strong> <strong>2012</strong>
Plant Leaves<br />
OBSERVATIONS<br />
even dissolve the impression. It is also<br />
important that the refractive index of the<br />
mounting medium is different from the<br />
refractive index of the nail polish impression,<br />
otherwise the structures will<br />
not be visible. Evidently there are still<br />
many opportunities for experimentation.<br />
Other leaf tissues<br />
6<br />
UE<br />
A typical deciduous plant leaf is<br />
<strong>com</strong>posed of several layers. The top<br />
most layer of a leaf is a cell-free layer of<br />
wax, the cuticle. Its function is to reduce<br />
the loss of water from the cells. The<br />
waxy cuticle is produced by the upper<br />
epidermis. This layer of cells does not<br />
contain chloroplasts in order to allow<br />
sunlight to pass through unhindered.<br />
The palisade mesophyll is a layer of<br />
packed cells beneath the upper epidermis.<br />
The cells are arranged vertically<br />
and contain many chloroplasts. Their<br />
vertical arrangement and high density<br />
makes them an efficient layer for photosynthesis.<br />
Spaces between the individual<br />
palisade cells allow for the diffusion<br />
of CO 2 gas. Beneath the palisade mesophyll,<br />
one can find the spongy mesophyll.<br />
It is a loosely packed layer of<br />
cells, containing (as the name "spongy"<br />
suggests) many air spaces. This is the<br />
place where the gases CO 2 and O 2 are<br />
stored. Many cells are in contact with<br />
the air spaces and therefore the total<br />
surface area to loose water is also quite<br />
high. The lower epidermis is a single<br />
layer of cells on the bottom part of the<br />
leaf. It is the plant tissue which contains<br />
the guard cells and the stomata. With<br />
the exception of the guard cells, the<br />
lower epidermis is free of chloroplasts<br />
(figure 6).<br />
■<br />
Figure 5 (opposite page): This image<br />
shows a stack of the nail polish impression<br />
of the leaf surface.<br />
Figure 6: Cross section through a<br />
leaf. Abbreviations: UE: upper epidermis;<br />
P: palisade mesohyll, S: spongy<br />
mesophyll, LE: lower epidermis.<br />
Figures 7 and 8 (next page): The epidermis<br />
of a tulip leaf.<br />
LE<br />
S<br />
P<br />
<strong>MicrobeHunter</strong> Microscopy Magazine - <strong>October</strong> <strong>2012</strong> - 15
OBSERVATIONS<br />
Plant Leaves<br />
7<br />
8<br />
16 - <strong>MicrobeHunter</strong> Microscopy Magazine - <strong>October</strong> <strong>2012</strong>
Desmids<br />
REFERENCE PLATE<br />
Staurodesmus tumidus<br />
Mike Guwak<br />
Full name: Staurodesmus tumidus<br />
(Brébisson ex Ralfs)<br />
Teiling 1967: 578<br />
Shape: The cells are large and<br />
wider than they are long. The<br />
semicells can be elliptical or<br />
strongly rounded in a hexagonal<br />
arrangement. The septum is<br />
rounded in the center and strongly<br />
widened towards the sides. The<br />
cell wall contains scattered pores.<br />
According to Meindl (1987), the<br />
desmid may belong to the genus<br />
Pleurenterium, based on the position<br />
of the chloroplasts and other<br />
cell organelles in the cell.<br />
Size: 110-130mm<br />
Occurrence: This is a freshwater<br />
species.<br />
<strong>MicrobeHunter</strong> Microscopy Magazine - <strong>October</strong> <strong>2012</strong> - 17
REFERENCE PLATE<br />
Desmids<br />
References<br />
"Species Detail :: Algaebase." Algaebase :: Listing the World's Algae. N.p., n.d. Web. 31 Oct. <strong>2012</strong>.<br />
http://www.algaebase.org/search/species/detail/?species_id=35537<br />
Lenzenweger, R. (1997). Desmidiaceenflora von Österreich Teil 2. Bibliotheca Phycologica 102: 1-216, 44 pls.<br />
Image Credit<br />
Image copyright Mike Guwak (<strong>2012</strong>).<br />
http://www.mikroskopie-main-taunus.de<br />
mike.guwak@mikroskopie-main-taunus.de<br />
18 - <strong>MicrobeHunter</strong> Microscopy Magazine - <strong>October</strong> <strong>2012</strong>
Rotifers<br />
GALLERY<br />
Rotifers found in the bottom of my aquarium,<br />
possibly Ptygura sp. Camera: Optikam B1<br />
by Luca Monzo.<br />
Send images to editor@microbehunter.<strong>com</strong> - <strong>MicrobeHunter</strong> Microscopy Magazine - <strong>October</strong> - March <strong>2012</strong> - 19
GALLERY<br />
Annelid:<br />
Pictures of Aeolosoma sp.<br />
Camera: Optikam B1 at 1,3 MP and<br />
10xachromatic objective<br />
By Luca Monzo<br />
20 - <strong>MicrobeHunter</strong> Microscopy Magazine - March <strong>October</strong> <strong>2012</strong> - Send images to editor@microbehunter.<strong>com</strong>
Annelid:<br />
GALLERY<br />
Send images to editor@microbehunter.<strong>com</strong> - <strong>MicrobeHunter</strong> Microscopy Magazine - <strong>October</strong> - March <strong>2012</strong> - 21
GALLERY<br />
Water life<br />
These pictures show of microalgae and<br />
cyanobacteria found near the lights of<br />
my aquarium.<br />
Bottom right: water flea<br />
(Chydorus sp.)<br />
Single images were taken with a<br />
microscope camera Optikam B1 at full<br />
resolution (1280 x 1024 pixels)<br />
22 - <strong>MicrobeHunter</strong> Microscopy Magazine - March <strong>October</strong> <strong>2012</strong> - Send images to editor@microbehunter.<strong>com</strong>
Amoeba<br />
GALLERY<br />
Two specimens of what I think is Thecamoeba,<br />
an amoeba that appears to<br />
possess a voracious appetite.<br />
Objective: 20x; illumination: DIC; exposure:<br />
1/13s (top image) and 1/25 s (bottom<br />
image), at 200 ISO.<br />
By R. Nassar<br />
Thanks goes to all contributors for giving<br />
their permission to republish their images.<br />
Send images to editor@microbehunter.<strong>com</strong> - <strong>MicrobeHunter</strong> Microscopy Magazine - <strong>October</strong> - March <strong>2012</strong> - 23
What’s this? Answer on page 3.<br />
24 - <strong>MicrobeHunter</strong> Microscopy Magazine - <strong>October</strong> <strong>2012</strong>