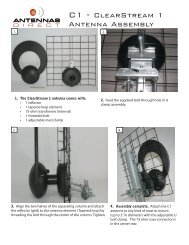
CPA19 Installation instructions - Antennas Direct
CPA19 Installation instructions - Antennas Direct
CPA19 Installation instructions - Antennas Direct

Create successful ePaper yourself
Turn your PDF publications into a flip-book with our unique Google optimized e-Paper software.
<strong>CPA19</strong><br />
<strong>Installation</strong><br />
<strong>instructions</strong><br />
Clearstream Pre- Amplifier Kit<br />
Congratulations! You have purchased a powerful low noise signal amplifier. Typically, if you have a long cable run<br />
(100+ ft.) from your antenna to your TV and/or utilize signal splitters in the run, a low noise amplifier such as the <strong>CPA19</strong><br />
is your best choice. While an amplifier cannot create a signal that isn’t present, you can overcome signal loss caused by<br />
these factors with the CPA 19 amplifier.<br />
The CPA 19 Includes:<br />
• Low noise amplifier<br />
• Low loss power inserter<br />
• 3 foot coaxial cable<br />
• 12v DC power supply (for Antenna to<br />
amplifier connection)<br />
• 3 foot coaxial cable (for Power inserter to TV,<br />
TV/Digital receiver or set-top box connection)<br />
• Mast clamp (not pictured)<br />
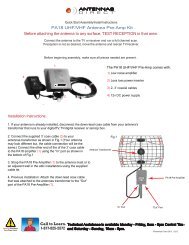
Full installation diagram for<br />
CPA 19<br />
Illustration 1<br />
Before you install this Amplifier:<br />
Ensure you have chosen the best antenna for your location and that it is aligned correctly for best reception. If you<br />
have not already done so or if you wish to confirm the antenna you have is right for your location, visit http://www.<br />
antennapoint.com for more information and <strong>instructions</strong> on locating local transmitting towers in your area.<br />
An amplifier works best when amplifying the signal at its strongest point, which is to install it as close to the antenna<br />
as possible either in the attic or on the antenna mast on the roof. Your CPA 19 amplifier will perform best when<br />
connected properly.<br />
<strong>Installation</strong> Instructions:<br />
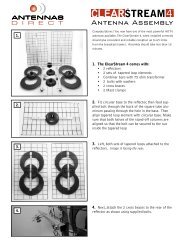
1.) If your antenna is already installed, disconnect the down-lead coax cable from your antenna’s transformer that<br />
runs to your TV,/Digital receiver or set-top box.<br />
2.) Connect the supplied 3’ cable to your antenna’s transformer as shown at the top of illustration 2.
(Your antenna may look different, but the cable connection will be the same.)<br />
Connect the other end of the 3’ cable to the amplifier unit from the kit using<br />
the “In” port as shown at the bottom of Illustration 2.<br />
3.) Attach the amplifier to the antenna mast using the supplied mast clamp.<br />
4.) Previous <strong>Installation</strong>: Attach the down-lead cable that was<br />
attached to the antenna’s transformer to the “Out” port of the<br />
amplifier. You’re finished!<br />
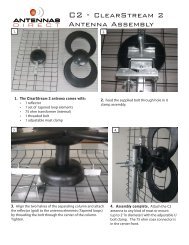
For new installation:<br />
Install your down-lead (not supplied) cable which leads to your TV, TV/Digital<br />
receiver or set-top box. Connect the down-lead from the amplifier to the<br />
RIGHT SIDE port of the power inserter.<br />
See illustration 3 below: “To Amplifier”. Do not reverse the connection!!<br />
5.) Using the second supplied 3’ cable, connect the left port labeled<br />
“To Receiver” on the power inserter (illustration 3) to your TV, AV receiver or set-top box. Do not reverse the<br />
connection!!<br />
6.) Connect the 12v power supply’s screw-on f-connector to the bottom connection of the power<br />
inserter (illustration 3)<br />
7.) Insert the wall plug into any 110 volt AC power source (wall outlet or power strip) close to the TV and ensure<br />
that the 110v wall outlet is live – not switched off.<br />
NOTE: there is an internal fuse in the power supply which is designed to blow in the event of a short on the coax<br />
cable. If your amplifier quits working for no apparent reason, it is likely the power supply overloaded and blew its<br />
fuse. Double check the cables and any junctions for corrosion or a loose strand of braiding that may have come into<br />
contact with the copper center conductor, before replacing the power supply.<br />
To Receiver<br />
To Amplifier<br />
Important: The power inserter sends power UP your down-lead<br />
to drive the amplifier mounted on or near your antenna. The<br />
power inserter can be located anywhere in your house, but<br />
is usually near your TV. The down-lead also brings the digital<br />
antenna signal into your house and the signal passes through<br />
the inserter to your TV/Digital Receiver. This eliminates any need<br />
for a 110VAC wall power source close to your antenna.<br />
Illustration 3<br />
WARNING: TO PREVENT FIRE OR SHOCK HAZARD, DO<br />
NOT EXPOSE POWER SUPPLY TO RAIN OR MOISTURE<br />
877-825-5572<br />
1699 West Fifth Street<br />
Eureka, MO 63025<br />
www.antennasdirect.com