LCD-Monitor Belinea 1705 G1 Handbuch Manual Ma ... - ECT GmbH
LCD-Monitor Belinea 1705 G1 Handbuch Manual Ma ... - ECT GmbH
LCD-Monitor Belinea 1705 G1 Handbuch Manual Ma ... - ECT GmbH

You also want an ePaper? Increase the reach of your titles
YUMPU automatically turns print PDFs into web optimized ePapers that Google loves.
ENGLISH<br />
Configuration<br />
➧ <strong>Monitor</strong> setup under Windows ® 9x/ME/2000<br />
and XP:<br />
If using the monitor under Windows ® 9x/ME/2000 or<br />
XP, we strongly recommend installing the <strong>Belinea</strong> configuration<br />
file. You can obtain this file from your <strong>Belinea</strong><br />
dealer or download it from the MAXDATA FTP server at<br />
ftp.maxdata.com.<br />
Here, click the “<strong>Belinea</strong>_Treiber_Driver” directory and<br />
download the <strong>Belinea</strong>.inf and README_<strong>Belinea</strong>.TXT<br />
files. Follow the installation instructions in the README_<br />
<strong>Belinea</strong>.TXT file.<br />
➧ <strong>Monitor</strong> setup under Windows ® NT 4.0:<br />
Under Windows ® NT 4.0 no separate setup file is<br />
required. Select the vertical frequency and the number<br />
of colors directly from within the “Settings” “Control<br />
Panel” “Display” “Settings” menu.<br />
Basic Setup<br />
Automatic Image Adjustment..................................<br />
You can adjust the image settings (such as image position,<br />
phase, etc.) manually or by using the <strong>LCD</strong> monitor’s<br />
automatic image adjustment feature. This will adjust the<br />
image parameters to their optimal settings for the current<br />
graphics mode. Press AUTO ( in fig. 4) to launch<br />
the automatic adjustment. The process will take a short<br />
while until completed.<br />
Locking and Unlocking the OSD............................<br />
To lock and unlock the OSD menu, hold down the button<br />
combination < ( in fig. 4) and MENU ( in fig. 4) until<br />
a corresponding message is displayed.<br />
Shortcut for adjusting contrast and brightness...<br />
You can adjust contrast and brightness directly by pressing<br />
the < button ( in fig. 4) while the OSD menu is not<br />
displayed. Press the > button ( in fig. 4) to increase<br />
the contrast/brightness or the < button ( in fig. 4) to<br />
decrease it.<br />
image settings using the osd menu<br />
The OSD menu is a window on your screen that allows<br />
you to view and change display settings. To change an<br />
OSD setting:<br />
1. Press the button MENU ( in fig. 4) to display the<br />
OSD menu on the screen.<br />
2. There are a total of 5 OSD submenus divided by<br />
categories. Select the desired submenu by pressing<br />
the OSD button < or > ( and in fig. 4; see<br />
section “OSD Menu Functions”).<br />
<br />
3. Press the button MENU ( in fig. 4) to activate the<br />
selected function or associated submenu.<br />
4. If you selected a submenu, now select the subfunction<br />
you want using the OSD buttons < or > ( and<br />
in fig. 4) .<br />
5. Set the desired value using the OSD buttons < or ><br />
( and in fig. 4).<br />
6. The current settings are automatically saved when<br />
you return to the previous level or exit the OSD menu.<br />
Repeat steps 2–5 to make further adjustments as<br />
needed.<br />
7. The OSD menu automatically disappears if no<br />
changes are made for more than 45 seconds (default<br />
setting). The current settings will be saved. You can<br />
close it manually by pressing the button AUTO (<br />
in fig. 4).<br />
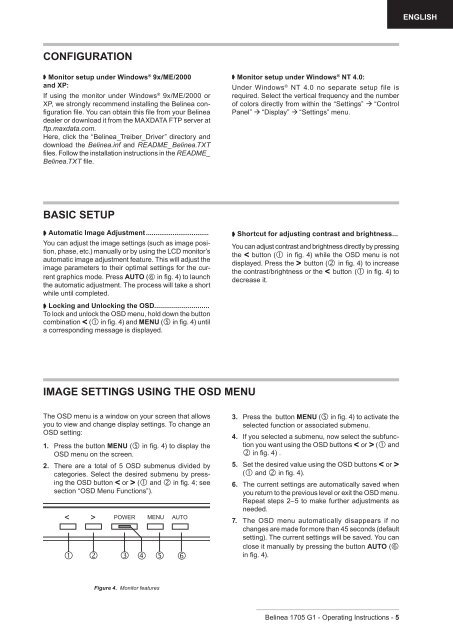
Figure 4. <strong>Monitor</strong> features<br />
<strong>Belinea</strong> <strong>1705</strong> <strong>G1</strong> - Operating Instructions - 5
![[Belinea 10 19 05] - ECT GmbH](https://img.yumpu.com/50665528/1/184x260/belinea-10-19-05-ect-gmbh.jpg?quality=85)

![[Belinea 10 80 35] - ECT GmbH](https://img.yumpu.com/49769177/1/184x260/belinea-10-80-35-ect-gmbh.jpg?quality=85)