a free printable "Hope" Christmas Ornament pattern. - Better Cross ...
a free printable "Hope" Christmas Ornament pattern. - Better Cross ...
a free printable "Hope" Christmas Ornament pattern. - Better Cross ...

Create successful ePaper yourself
Turn your PDF publications into a flip-book with our unique Google optimized e-Paper software.
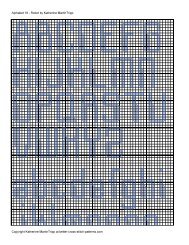
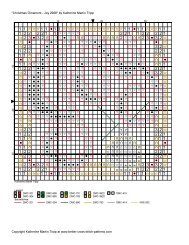
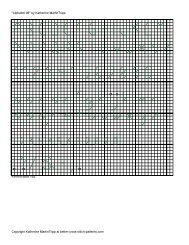
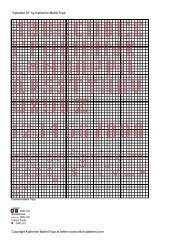
"<strong>Christmas</strong> <strong>Ornament</strong> - Hope 2008" by Katherine Martin TrippCopyright Katherine Martin Tripp at www.better-cross-stitch-<strong>pattern</strong>s.com11sss11"11ssssssssssssss11"11sss11122221122221122221s23"32>>>2ŒŒŒŒŒ>>>>>>>>32>>>23"32ss"ŒxxxxxŒŒŒŒŒŒŒŒ"ss23'ŒxxxxxxŒŒŒ'Œxxxxx32s122ŒxxxxxŒŒŒŒxxx22111>'xxxŒŒxxŒx>11">ŒŒŒŒŒxxŒxx>"11>ŒŒŒxxŒŒŒŒŒŒŒŒŒŒŒ>11122ŒŒxxxxx'xŒŒŒŒŒŒŒxxxxŒŒŒ221s23Œxxxx''xxŒŒŒŒ'ŒŒxxxxxxŒŒ2ssŒxx'''xx'''ŒŒxxxxŒxssŒxx''ª'''''ª'xŒŒŒxxxssŒxx'ª×ªª'ת'xxxxŒŒŒ'xxssŒx''ªª×××ת'xxxxŒŒ>ssŒx''ªª×××תª'xxxŒŒŒ>ssŒŒŒŒ''ªª×××ת'xxŒŒŒ>ssŒxxŒŒ'ª×ªª'ת'ŒxxxxŒŒ>ss>ŒŒŒŒŒ'ª'''''ª'ŒŒŒxxxŒŒss>'ŒŒxxxx'''ŒŒŒ'''ŒŒxŒxxŒxss>Œxxx''xxŒxxx'xxŒxŒŒxss>Œxx'Œx'ŒxxŒŒxss>ŒxxŒŒxŒxŒxxss23ŒŒxxŒxxŒŒŒŒŒŒŒŒxx2s122ŒŒŒŒŒŒŒxxŒŒŒxxŒŒxŒŒŒxx22111>xxxxxxxŒxxŒxxŒxxxxx>11">'xxxxxŒxxŒxŒx>"11>ŒxxŒxŒx>11122Œxx'ŒxŒx221s23'ŒxŒxŒxx'32ss"ŒxxŒxxŒxx"ss23"32>>>23>>ŒŒŒŒxx>>Œx32>>>23"32s122221122xxxx22112222111sss11"11ssssssssssssss11"11sss1110 20 30102030Legend:1 DMC-890 " DMC-321 3 DMC-701 × DMC-783 > DMC-798 x DMC-550ª DMC-3820 2 DMC-909 ' DMC-3822 s DMC-796 Œ DMC-552Backstitches:DMC-321 DMC-783 KRE-002 DMC-796 DMC-550
<strong>Christmas</strong> <strong>Ornament</strong> - Hope 2008Author:Company:Copyright:Website:Fabric:Grid Size:Design Area:Katherine Martin TrippExtra Mile MercantileKatherine Martin Trippwww.better-cross-stitch-<strong>pattern</strong>s.comAida or Evenweave36W x 36H2.50" x 2.43" (35 x 34 stitches)Legend:1 DMC 890 pistachio green - ul dk 3 DMC 701 christmas green - lt > DMC 798 delft blue - dkª DMC 3820 straw - dk ' DMC 3822 straw - lt Œ DMC 552 violet - md" DMC 321 christmas red × DMC 783 topaz - md x DMC 550 violet - vy dk2 DMC 909 emerald green - vy dk s DMC 796 royal blue - dkBackstitch Lines:DMC-321 christmas red KRE-002 Gold DMC-550 violet - vy dkDMC-783 topaz - mdDMC-796 royal blue - dkIn the Photograph:I embroidered "<strong>Christmas</strong> <strong>Ornament</strong> - Hope" on 14-count Aida with DMC 6-strand cotton floss, accented it with gold Kreinik Metallicfloss. The front and back are stitched on two separate squares, then connected with half stitches. The ornament is padded, thenfinished off with a gold ribbon hanger and surrounding fringe.You get the best of both worlds with this set of ornaments--beautiful and sophisticated designs that are quick and easy to complete.This is a great project for beginners or youth, while experienced stitchers will be thrilled with how many they can complete in a shortamount of time. These are perfect gifts for coworkers, teachers, friends, family--either singly or as a set.Stitch Complexity:Full cross stitches, half stitches, backstitches, straight stitches, and French knots. Sparkle is added to the star with metallic halfstitches on top of the cross stitches. For detailed stitch diagrams, return to Home and click on the "How to" button.How to <strong>Cross</strong> Stitch this Design:If you already know how to cross stitch, the checklist below will get you on your way. Just learning? Simply return to "Home" and clickon the "Getting Started" button on the left. There, you will find links to additional instructions and diagrams.Quick StartStep 1 - Review this ChartEliminate surprises by reading these instructions and reviewing the chart thoroughly before you begin stitching. Identify and learn anyunfamiliar stitches listed in "Stitch Complexity" above.There are three <strong>pattern</strong> pages:• One charts the front design . . .• a second charts the back. To allow for the fringe, both of these include an extra half inch of fabric on all four sides of the the stitcheddesign (increase this if you'd like longer fringe; reduce it for shorter fringe).• The third page shows the star detail. It is first stitched with full cross stitches in the DMC cotton floss. Next, it is stitched over with halfstitches using the Krenik metallic floss. Use only the half stitch diagram that matches the direction of the top diagonal of theunderlying DMC stitches.Step 2 - Select and Prepare Your FabricTo stitch the design exactly as it is in the photgraph, simply use the materials described. If you decide to us a fabric other than 14-count, consider how large you want the finished ornament to be (be sure to include the fringe in these measurements). If you are usingthe design on a greeting card or in a frame, you can eliminate the fringe and simply add enough around the edges for mounting. Begenerous--it's easy enough to cut away unwanted fabric after the stitching is done.Bright white Aida really stands out on a green tree. But if you like your decorations to have an "antique" feel, try using off-white orcream fabric.If you are indeed making this design into an ornament, there is no need to treat the edges. You will want the edges to "fray" easilywhen making them into fringe.If this is not your first cross stitch project, this design is still small enough to eliminate the gridlines. Review our page on "PreparingFabric" for other tips and techniques.Step 3 - Select and Prepare Your Floss
Use the colors listed above or substitute ones of your own. If using fabric with a different thread count, you may need to adjust thenumber of strands of floss you'll use. To help you decide, click the "How To..." button on the left menu. At the bottom of the page, you'llfind a Floss Coverage link. This page shows cross stitch examples using from one to six strands on fabric with different thread counts.Still uncertain? Work a few sample stitches in the corner of your fabric.DMC Floss: As you use each of the DMC cotton floss colors, cut the floss into strips 15" to 18" long. For fuller and thicker stitches,separate all six strands and then recombine them into the number of strands you will ultimately use.Kreinik Metallic Floss: Cut the Kreinik Metallic floss into strips 12" to 15" long, as metallics tend to separate and break after prolongedstitching. Do not use the sewing method with metallic floss. To stitch over areas already cross-stitched with DMC floss, switch to aslightly larger needle. This makes a bigger hole for the metallic floss to slip through. Because there is less friction on the metallic floss,it will separate and break less often.Because of this floss, this design is not meant to be stitched on fabric that will be worn, washed or ironed. However, if you do want touse it in this manner (napkins, bread cloths, clothing, etc.), simply eliminate the metallic floss overstitching.Step 4 - Stitch the DesignEach square containing a symbol represents one stitch; the legend indicates which color to use.I like the stability and strength of Aida for these ornaments. But if you prefer something with an obvious over-under weave (like linen),the placement of the first stitch is critical. To prevent puckering and to provide stability, the first diagonal of the first stitch must startand end where a vertical fabric thread crosses over a horizontal thread.Use the following number of strands for the front and back designs:<strong>Cross</strong> stitches - 2 strandsBackstitches (outlining w/DMC floss) - 1 strandHalf stitches (join sides) - 2 strandsHalf stitches (star w/Krenik floss) 2 strandsStraight stitches (rays of star) - 2 strandsFrench knot (colon after "from") - 2 strandsBackstitch text on back of ornament - see belowFollow this order when stitching:• <strong>Cross</strong> stitch the entire front design, except for the star and rays, and outline with backstitches where indicated. Do not backstitch thesmall stars dotting the background.• Star: Fill in the star with cross stitches using DMC floss. Then, using 2 strands of the Krenik gold metallic floss, overstitch the starwith backstitches. Choose the <strong>pattern</strong> where the backstitches are slanted in the same direction as the top diagonal of the underlyingcross stitch. Outline the star with backstitches, and use straight stiches to create the rays extending from the star's tips and outward.• <strong>Cross</strong> stitch the corners on the back design as charted.• Backstitch the letters:2 strands in purple for Merry <strong>Christmas</strong> (using Alphabet 06)2 strands in gold DMC for the year (using Alphabet 06)1 strand in metallic gold stitched on top of the year1 strand in green for the "to" name (using Alphabet 02)1 strand in red for the "from" name (using Alphabet 02)Select the "Graph Paper" button on the left menu to print blank graph paper. Next, select the "Free Alphabets" button to print<strong>pattern</strong>s for the lettering. Click on "Alphabet 123's for help with lettering.Step 5 - Assemble the <strong>Ornament</strong>Align the corners of the front and back designs, wrong sides together. Using half stitches in the fabric row immediately surroundingthe design, stitch across the top of the ornament. See detailed diagrams and instructions by clicking "Join Sides" from the buttons onthe left.Thread a narrow ribbon through a larger needle in the same way you thread floss. Bring your needle up through the top center hole ofthe ornament front. Then go down through the top center hole of the ornament back. Adjust the length of the loop, then tie the rawends together (these knotted ends will ultimately be inside the ornament).Stitch the remaining sides together. Stop when you have only one half of one side left open. Lightly stuff the inside with batting or otherfiller to about 1/2 inch thick.Stitch the ornament closed. Bury the end of the floss by running your needle into the center of the stuffed ornament, then out again.Pull the floss taut, and cut. Flatten the ornament, and the ends should disappear back into the center of the ornament padding.Leave the fabric edges the length they are, or trim them to your preference. Pull away the horizontal rows of cloth on each side tomake the fringe. See detailed diagrams and instructions by clicking "Make Fringe" from the buttons on the left.
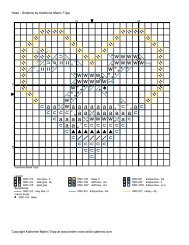
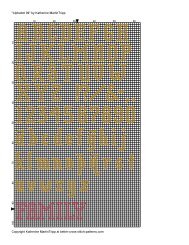
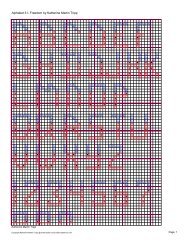
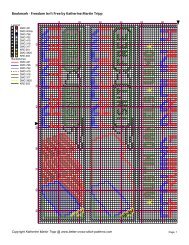
"<strong>Christmas</strong> <strong>Ornament</strong> - Hope 2008" by Katherine Martin Tripp10 20 30101111"1112222112223"3223"2312211"11122232312211"1112223"23"32231222211221111"11302011"11112211222213223"32"3222111"1122132¬¬3222111"1122132"3223"3222112222111"1111Legend:1 DMC-890 " DMC-321 2 DMC-909 3 DMC-701Backstitches:DMC-3820 DMC-321 DMC-909 DMC-552French Knots:¬DMC-304Copyright Katherine Martin Tripp at www.better-cross-stitch-<strong>pattern</strong>s.com
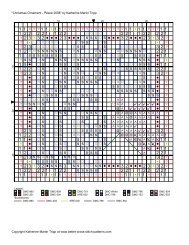
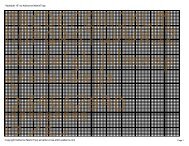
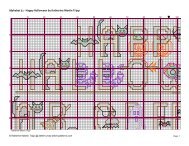
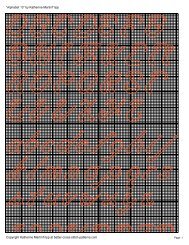
<strong>Christmas</strong> <strong>Ornament</strong> - Hope 2008 by Katherine Martin Tripp10 20 30 40 5010' ''''''''''ª'''''ª'ª' ª ª 'ª ª× תª'ת'''ª×××ת'''ª×××תª''ª×××ת'ªª'ת''ª'''''ª'''''''''''# ###################################################################################### # #####################################################################################Legend:# KRE-002 ' DMC-3822 ª DMC-3820 × DMC-783Backstitches:KRE-002DMC-783Copyright Katherine Martin Tripp at www.better-cross-stitch-<strong>pattern</strong>s.com
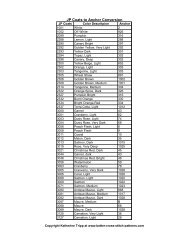
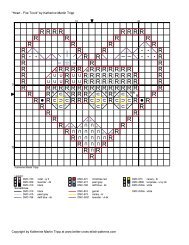
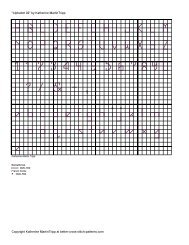
"<strong>Christmas</strong> <strong>Ornament</strong> - Hope 2008" by Katherine Martin Tripp10 20 30302010Legend:DMC-890 DMC-321 DMC-701 DMC-783 DMC-798 DMC-550DMC-3820 DMC-909 DMC-3822 DMC-796 DMC-552Backstitches:DMC-321 DMC-783 KRE-002 DMC-796 DMC-550Copyright Katherine Martin Tripp at www.better-cross-stitch-<strong>pattern</strong>s.com