MS 1002 Washing machine control gear
MS 1002 Washing machine control gear
MS 1002 Washing machine control gear

Create successful ePaper yourself
Turn your PDF publications into a flip-book with our unique Google optimized e-Paper software.
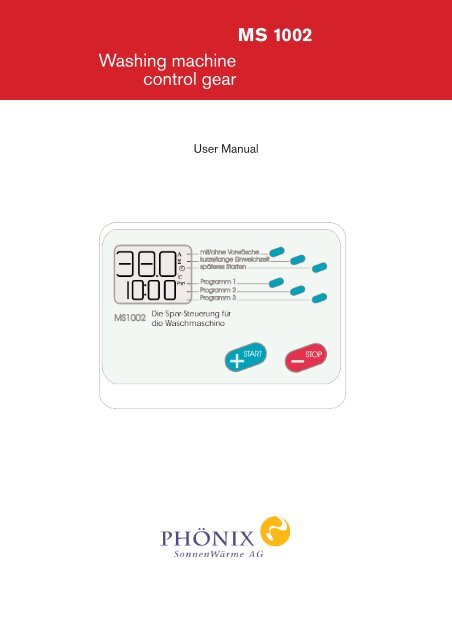
<strong>MS</strong> <strong>1002</strong>3. Explanations12345DisplayEnter keysOn/off switchPower cord 230 VConnection cold water valve (blue)Connection hot water valve (red)Connection feeler gauge at the mixing chamberConnection humidity sensor<strong>MS</strong> <strong>1002</strong> - 5
<strong>MS</strong> <strong>1002</strong>4. Display12345678910111213Display for temperature and amount of breaksPrewash onPrewash off (only main washing program)Short time for soakingLong time for soakingStarting later°CProgramm1 activeProgramm2 activeProgramm3 activeDisplay for hot water magnetic valveDisplay for cold water magnetic valveDisplay for duration of soaking, starting later, setting parameter an remaining time6- <strong>MS</strong> <strong>1002</strong>
<strong>MS</strong> <strong>1002</strong>5. Shipment <strong>MS</strong><strong>1002</strong>1 piece <strong>MS</strong><strong>1002</strong> (operating unit) with adapterplug1 piece hot water hose 1,5 m length, ¾",60 °C1 piece mixing chamber, consisting ofconnection bracket, Y-piece and brass sleevewith temperature sensor.2 pieces magnetic valve 24 V with return flowinhibitor and connection for water tap ¾"1 piece humidity sensor with fixing by avacuum cup2 pieces dowels 6 mm and bolts5 pieces gaskets (rubber)6. Assembly <strong>MS</strong> <strong>1002</strong>1. Mark the position of the holes on the wall byusing the drilling jig (horizontal).2. Drill a hole for the dowels by using a 6 mmstone drill and put the dowels succinct in it.(Dowels are suitable with brickwork, finery, andconcrete). When assembling at cavity walls, forexample plasterboard, please use specialdowels for cavity walls.3. Turn the bolts in until a gap of 3-4 mm betweenwall and bolt headinside is reached.4. Hook <strong>MS</strong><strong>1002</strong> in.5. Establish the electric connection between themagnetic valves an the <strong>MS</strong><strong>1002</strong> (Attach plug fixon the connection clip).6. Put the humidity sensor via the vacuum cup atthe washing <strong>machine</strong> in the way that the plastichousing contact the floor (pins faced downwardsto the floor).7. Plug in the power plug (adapter plug) of the<strong>control</strong> <strong>gear</strong> in the power socket.8. Put the washing-<strong>machine</strong> plug in the adapterplug of the <strong>control</strong> <strong>gear</strong>.9. At first starting, check all compression couplingsfor leak tightness and if necessary retighten.10. If your washing <strong>machine</strong> uses "Aqua-Stop",it´s necessary to order an extra hose connectorand an extra hose.<strong>MS</strong> <strong>1002</strong> - 7
<strong>MS</strong> <strong>1002</strong>7. Initiation <strong>MS</strong><strong>1002</strong>1. Turn on <strong>MS</strong><strong>1002</strong> by using the on/offswitch Now program 1 without prewash ischosen2. Press button "mit/ohne Vorwäsche" to switchpre-wash on or off (A = on, B = off).. choose the washing program (Programm 1,Programm 2, Programm 3)3. Fill your washing <strong>machine</strong> like you are usedto do (Put laundry in, fill washing agent in, adjustyour washing <strong>machine</strong> and switch it on)4. Press the start button on the <strong>MS</strong><strong>1002</strong>. Thewashing <strong>machine</strong> starts now. The <strong>MS</strong> <strong>1002</strong> <strong>control</strong>snow with the standard settings .After about 26 min. delay at the main washingprogramm (without breaks) the hot water valveclose itself and the cold water valve will be openedat least for 2 hours. Soonest now a 2 hourremaining time will be showen at the display.After that the display will show "Aus", whatmeans that the <strong>MS</strong><strong>1002</strong> is finished but thepower is still on. The programm for your washing<strong>machine</strong> will end earlier so you can at that timetake your clothes out of the washing <strong>machine</strong>.Now you can press the "Stop" button andswitch the device out or press the "Stop" buttonand continue washing clothes. If you forget topress "Stop" after the washing <strong>machine</strong> hasended its programm before switching the<strong>MS</strong><strong>1002</strong> off, at the next start the error code E-6will appear but you can delete this error by pressingthe "Stop" button.8. Urgent notes for programming <strong>MS</strong><strong>1002</strong>1. If the display is flashing, you´re at the programmingmode.2. Programmed values will only be saved if atleast one stage of the washing program hasbeen finished before the device is switchedoff.3. The soaking time arise from setted time of breaksmultiplied with the sum of breaks.Example: 10 min x 4 breaks = 40 min soakingtime.Please program not more than 4 breaks.Positioning of pre-wash temperatureAt factory setting a temperature of 5 °C is set in"Programm 1" and a temperature of 30 °C is setin "Programm 2" and "Programm 3"If you want to change the temperature please dothe following:1. Press and hold button"mit/ohne Vorwäsche".2. Press and hold button "Programm 1".3. Change value by pressing buttons +/-.4. Release buttons and press "Stop".flashingThe programmed value is the same for "Programm1", "Programm 2 and "Programm 3".Positioning of main-wash temperatureAt factory setting a temerature of 30°C is set in"Programm 1" a temperature of 40°C is set in"Programm 2" and a temperature of 60°C is setin "Programm 3"If you want to change the temperature please dothe following:1. Press and hold button "Programm 1".2. Change value by pressing buttons +/-.3. Release buttons and press "Stop".temperatureflashing8- <strong>MS</strong> <strong>1002</strong>
<strong>MS</strong> <strong>1002</strong>If you want to change settings in "Programm 2"and "Programm 3" then repeat the Steps 1 to 3by pressing the corresponding button. The temperaturesetting is changed in 1°C steps.Positioning "späteres Startens" (=”startinglater”)At factory setting the time for starting later (späteresStarten) is 0 minutes The delay you wantthe <strong>machine</strong> starting later is expressed in hoursand minutes For example 9:45 means that 9hours and 45 minutes will pass before the washing<strong>machine</strong> will start.If you want to change the time please do the following:1. Press and hold button "späteres Starten".2. Change value by pressing buttons +/- insteps of 5 minutes.3. Release buttons and press "Stop".flashingThe programmed value is the same for "Programm1", "Programm 2 and "Programm 3".If “starting later” is active you can see a clock inthe display. If you want to activate starting laterpress the button "späters Starten". If you wantto start the <strong>machine</strong> immediatly after you´ve firsttime pressed the button press button a secondtime. (There will be no more clock showed in thedisplay).Turning into the emergency program (deviceswitches into the emergency program after ablackout itself)If there is a error or defect part at any time, youcan turn the Ms<strong>1002</strong> into a emergency program,so you can use your washing <strong>machine</strong>, like the<strong>MS</strong><strong>1002</strong> weren´t installed. In this program thecold water valve is open and the power isalways on.To activate the emergency program, just pressthe buttons "Programm 1", "Programm 2" and"Programm3" at the same time.ResetWith that, all parameter will be restoredto the default settings.1. Switch of <strong>MS</strong><strong>1002</strong>2. Press button "Start" and "Stop" at thesame time and hold both3. Switch <strong>MS</strong><strong>1002</strong> back on again and waituntil the display will appear again4. Release the buttonsComplete displayis flashingErrorcodesE-1 = Short-circuitE-2 = The connection to the temperature sensorhas been cut, for example the plugisn´t installed properly.E-3 = Humidity sensor has triggeredE-6 = Emergency program or after a blackoutE-7 = Short-circuit in the magnetic valve(s)Remedy the error and press the "Start"button before restarting, to delete theerror-message.If the water is colder than 5°C the temperaturesensor has to be deactivated, or the error code“E" will appear. For that switch off the <strong>MS</strong><strong>1002</strong>,press and hold the "Programm 2" key, andswitch the <strong>MS</strong><strong>1002</strong> back on. Release the buttonnot until the temperature is shown in the display.After 60 seconds the setting is saved. Press,while a programmis running, the button "Programm2"to switch the temperature sensor off.An "A" will appear in the lower half of thedisplay, which means that the temperature sensoris switched off. The temperature sensor caneven be activated by doing that steps again.Complete displayis flashingOnly the coldwater valve is opened<strong>MS</strong> <strong>1002</strong> - 9
<strong>MS</strong> <strong>1002</strong>9. Technical data<strong>MS</strong><strong>1002</strong>:VDE-certified Nr. 119634Voltage 230 V, 50 HzWattage 0,6-13 W, casing IP44Breaking capacity 16 AMeasures:180 mm x 140 mm x 58 mm, weight 1,8 kgMagnetic valve:24 V AC, 5 W, ¾ ´´ threadTechnical claim:There must exist an automatic circuitbreaker 16 A.All changes, serve the technical advance,reserved.Water tapFast couplerMagnetic valve (in directoryto be installed)Return flow inhibitorWater hose10 - <strong>MS</strong> <strong>1002</strong>
<strong>MS</strong> <strong>1002</strong>Drilling jig<strong>MS</strong> <strong>1002</strong> - 11
<strong>MS</strong> <strong>1002</strong>PHÖNIX SonnenWärme AGOstendstraße 112459 BerlinFax.: 030 - 53 000 717info@sonnenwaermeag.dewww.sonnenwaermeag.de Last update: Oct. 2007