FA1000 layout - FineScale Modeler
FA1000 layout - FineScale Modeler
FA1000 layout - FineScale Modeler

You also want an ePaper? Increase the reach of your titles
YUMPU automatically turns print PDFs into web optimized ePapers that Google loves.
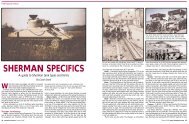
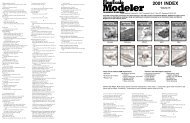
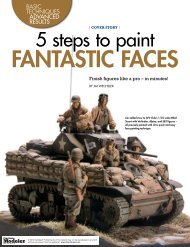
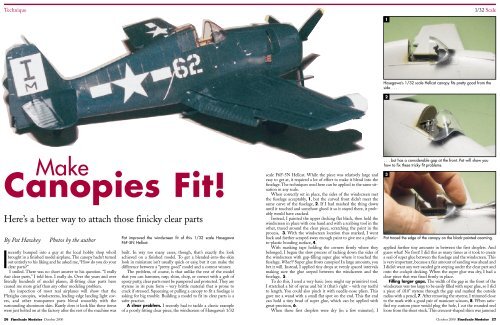
Technique1/32 Scale1Hasegawa’s 1/32 scale Hellcat canopy fits pretty good from theside . . .2MakeCanopies Fit!Here’s a better way to attach those finicky clear partsBy Pat Hawkey Photos by the authorIrecently bumped into a guy at the local hobby shop who’dbrought in a finished model airplane. The canopy hadn’t turnedout entirely to his liking and he asked me, “How do you do yourclear parts?”I smiled. There was no short answer to his question. “I reallyhate clear parts,” I told him. I really do. Over the years and overliterally hundreds of model planes, ill-fitting clear parts havecaused me more grief than any other modeling problem.An inspection of most real airplanes will show that thePlexiglas canopies, windscreens, leading-edge landing light covers,and other transparent parts blend smoothly with thesurrounding aluminum skin. Rarely does it look like these itemswere just bolted on at the factory after the rest of the machine was26 <strong>FineScale</strong> <strong>Modeler</strong> October 2000Pat improved the windscreen fit of this 1/32 scale HasegawaF6F-5N Hellcat.built. In way too many cases, though, that’s exactly the lookachieved on a finished model. To get a blended-into-the-skinlook in miniature isn’t usually quick or easy, but it can make thedifference between a “pretty good” model and a contest winner.The problem, of course, is that unlike the rest of the modelthat you can hammer, rasp, shim, chop, or correct with a gob ofepoxy putty, clear parts must be pampered and protected.They arestyrene in its pure form – very brittle material that is prone tocrack if stressed. Squeezing or pulling a canopy to fit a fuselage isasking for big trouble. Building a model to fit its clear parts is asafer practice.A clear problem. I recently had to tackle a classic exampleof a poorly fitting clear piece, the windscreen of Hasegawa’s 1/32scale F6F-5N Hellcat. While the piece was relatively large andeasy to get at, it required a lot of effort to make it blend into thefuselage. The techniques used here can be applied to the same situationin any scale.When correctly set in place, the sides of the windscreen metthe fuselage acceptably, 1, but the curved front didn’t meet thesame curve of the fuselage, 2. If I had mashed the thing downuntil it touched and somehow glued it so it stayed there, it probablywould have cracked.Instead, I painted the upper decking flat black, then held thewindscreen in place with one hand and with a scribing tool in theother, traced around the clear piece, scratching the paint in theprocess, 3. With the windscreen location thus marked, I wentback and further scraped away enough paint to give me a plasticto-plasticbonding surface, 4.With masking tape holding the corners firmly where theybelonged, I began the slow process of tacking down the sides ofthe windscreen with gap-filling super glue where it touched thefuselage. What!? Super glue frosts canopies! In large amounts, youbet it will. Instead, I applied tiny drops at evenly spaced intervalsmaking sure the glue seeped between the windscreen and thefuselage, 5.To do this, I used a very basic (one might say primitive) tool.I stretched a bit of sprue and bit it (that’s right – with my teeth)to length. You could also pinch it with needle-nose pliers. Thisgave me a wand with a small flat spot on the end. This flat endcan hold a tiny bead of super glue, which can be applied withgreat precision, 6.When these first droplets were dry (in a few minutes), I. . . but has a considerable gap at the front. Pat will show youhow to fix these tricky fit problems.3Pat traced the edge of the canopy on the black-painted coaming.applied further tiny amounts in between the first droplets. Andguess what! No frost! I did this as many times as it took to createa seal of super glue between the fuselage and the windscreen. Thisis very important, because a fair amount of sanding was ahead andI didn’t want any wet-sanded grit seeping under the clear part andonto the cockpit decking. When the super glue was dry, I had aclear piece that was fixed firmly in place.Filling larger gaps. The width of the gap in the front of thewindscreen was too large to be easily filled with super glue, so I slida piece of .010" styrene through the gap and marked the outsideradius with a pencil, 7. After removing the styrene, I trimmed closeto the mark with a good pair of manicure scissors, 8. When satisfiedmy custom piece would plug the hole, I cut the rounded endloose from the sheet stock. This crescent-shaped shim was jammedOctober 2000 <strong>FineScale</strong> <strong>Modeler</strong> 27
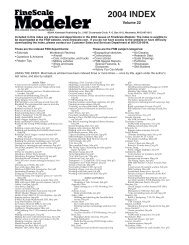
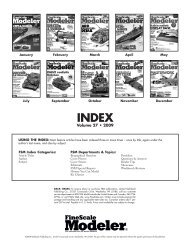
471013Scraping away paint improves the glue’s adhesion.The gap in front is too large for super glue, so it must be filledwith sheet styrene.Any excess styrene is trimmed away with a sharp blade.After a primer coat, Pat removes the mask to check the joint.581114Tiny drops of super glue won’t frost the clear parts.Pat cuts the traced outline of the windscreen edge from the sheet.The super glue and styrene fillers are carefully smoothed out witha fine riffler file.The smooth joint between the canopy and fuselage is ready forfinal color coats.691215Biting the end of stretched styrene sprue produces a handy superglue applicator.The thin sheet styrene crescent is wedged into the gap between thecanopy and the fuselage.With the clear windows masked, Pat fills any remaining gaps withfiller putty.After masking, Pat applies the interior framing color (InteriorGreen). The exterior color is sprayed next.into the gap, 9, and glued in place with liquid cement applied verycarefully with a 000 or finer paint brush. (They’ll have to chisel thiswindscreen off.) When the liquid glue dried, I trimmed the excessstock away with a good No. 11 blade, 10.Now the blending begins. If you don’t trust the steadiness ofyour hand holding a file around a big clear part, you might wantto cover critical not-to-be-scratched areas with masking tape now.With the excess super glue dry and hardened, I file off the shimand any high edges of the windscreen, with a round riffler file, 11.It leaves scratches, but that’s OK. That’s what putty is for.I carefully covered all the exposed area with masking tape,because an accidental smear of body putty across the windshieldwould ruin my day. I pressed and smoothed the putty (the Stuccobrand from Italy is my favorite) firmly into the scratched areaswith a toothpick, 12, and when dry, sanded it smooth with 600-grit wet sandpaper. After priming the sanded area to revealhidden glitches, I removed the masking tape to see how thingswere looking, 13.At this point, I added the small bullet-shaped fairings missingfrom the bottom corners of the windscreen. With used 600-gritpaper, I sanded the primed area smooth, up to and including thebottom edges of the windscreen, 14. After polishing the entire area– including windscreen – with plastic polish, I wiped things downwith rubbing alcohol to remove any polish residue that might keepmasking tape from sticking. Now it’s off to the paint shop.Inside on the outside. I masked the clear panels forpainting, leaving the framing exposed. In 1/32 scale, the interiorcolor of the canopy frames is clearly visible, so I first shot thewindscreen and adjoining fuselage panel Interior Green toeliminate any overspray pattern that may be detectable underthe smooth gloss blue finish to follow, 15. This can only beseen when viewing things from the cockpit.With the paint job finished, the dramatic moment came whenI pulled off the masking tape, 16 ...wow! Does that windscreenlook like part of the airplane, or what? I’m sure there’ll be voicesout there saying “Man, that’s a lot of work. Why doesn’t he justuse Future floor polish and white glue like I do?” I’d have to replythat I’m kinda stuck in my ways. And if somebody out there canget these results with white glue, I’d love to see them. FSMPat Hawkey of Richmond Township, Michigan, builds models onconsignment and contributes frequently to <strong>FineScale</strong> <strong>Modeler</strong>.16The finished canopy looks like it was built into the fuselage of theF6F-5N night fighter Hellcat.28 <strong>FineScale</strong> <strong>Modeler</strong> October 2000October 2000 <strong>FineScale</strong> <strong>Modeler</strong> 29