Bombed-out - FineScale Modeler
Bombed-out - FineScale Modeler
Bombed-out - FineScale Modeler
- No tags were found...

Create successful ePaper yourself
Turn your PDF publications into a flip-book with our unique Google optimized e-Paper software.
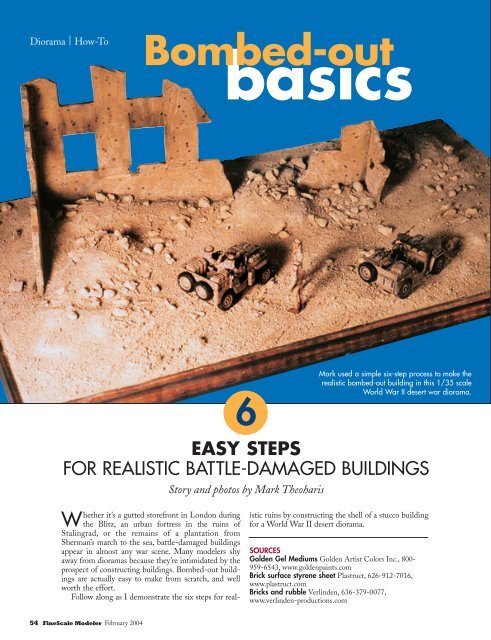
Diorama | How-To<strong>Bombed</strong>-<strong>out</strong>basics6Mark used a simple six-step process to make therealistic bombed-<strong>out</strong> building in this 1/35 scaleWorld War II desert war diorama.EASY STEPSFOR REALISTIC BATTLE-DAMAGED BUILDINGSStory and photos by Mark TheoharisWhether it’s a gutted storefront in London duringthe Blitz, an urban fortress in the ruins ofStalingrad, or the remains of a plantation fromSherman’s march to the sea, battle-damaged buildingsappear in almost any war scene. Many modelers shyaway from dioramas because they’re intimidated by theprospect of constructing buildings. <strong>Bombed</strong>-<strong>out</strong> buildingsare actually easy to make from scratch, and wellworth the effort.Follow along as I demonstrate the six steps for realisticruins by constructing the shell of a stucco buildingfor a World War II desert diorama.SOURCESGolden Gel Mediums Golden Artist Colors Inc., 800-959-6543, www.goldenpaints.comBrick surface styrene sheet Plastruct, 626-912-7016,www.plastruct.comBricks and rubble Verlinden, 636-379-0077,www.verlinden-productions.com54 <strong>FineScale</strong> <strong>Modeler</strong> February 2004
1/35 ScalePLANNING1Before you buy a scrap of wood orinvest in any materials, the first step isplanning. Complete the diorama’s othermajor elements (armor, aircraft, or figures)first to get a feel for the overalldimensions of the space. Study photographsto get an idea of the appropriatesize for your structure. Scale is important:Walls that look <strong>out</strong> of proportion withother elements will be obvious giveawayson the finished product.Using scrap cardboard, scissors, andtape, make cardboard mockups of thebuildings, 1A, and position them on thediorama base. Experiment with differentplacements before settling on a final lay<strong>out</strong>.Don’t do any groundwork yet; addthat after the building shell is attached tothe base. When you’re completely satisfiedwith the lay<strong>out</strong> of your mock-up,you’re ready to commit to materials.A2 MATERIALS AND PATTERNSThe best material for making walls isbasswood or plywood. For 1/35 scalebuildings, 3 ⁄16"- or 1 ⁄4"-thick sheet usuallyworks best.Your cardboard mockup is now goingto serve as your pattern. Using a pen,draw lines on the mockup that divide itinto fairly uniform pieces with as fewcomplex edges as possible, 2A. Label thepieces with letters or numbers, then makea diagram of the mockup on a sheet ofpaper with the labels written on the patternpieces; this will be your blueprintlater on during assembly. Cut <strong>out</strong> thepieces, 2B, and lay them <strong>out</strong> to determinehow much wood you’ll need, 2C. For myexample, I used a 4" x 24" x 3 ⁄16" piece ofbasswood.Trace the patterns on the wood, 2D,and use a jig-saw or coping saw to cut <strong>out</strong>the pieces, 2E. Don’t cut too close to thepattern lines; leave a little extra <strong>out</strong>sidethe lines so there’s room to sand thepieces to their final shapes.ACDEB3 ASSEMBLYABTest-fitting along the way, sand or filethe pieces that are too big. Absolute precisionisn’t necessary – the pieces justneed to fit well enough so you can gluethem into place.Join the pieces with small-diameterdowel rods or round toothpicks: Line upadjacent pieces and, using a straightedge,mark across them the best locations todrill pilot holes, 3A. Make sure the holesdon’t interfere with each other.Mark your drill bit with a piece ofmasking tape, 3B, so the pilot holes willall be the same depth. Cut off lengths ofdowel that are slightly shorter than twicethe depth of the holes. For example, if theFebruary 2004 www.finescale.com 55
C D Eholes are 1 ⁄2" deep, cut the dowel intopieces a little less than 1". On side pieces,drill the hole completely through thepiece, run the dowel through it, and sawoff the excess after the glue has dried.Put a bit of wood glue or white glue inthe pilot holes and insert the dowel rods,3C. Let the pieces dry for a few minutes,then put glue in the matching holes andon the joint edges. Apply enough glue tothe edges to make a solid bond when theparts are joined, but don’t overdo it. Wipeoff excess glue with a damp cloth.After the glue has dried, 3D, trim anyprotruding dowels, 3E, and fill the seamswith model or wood putty. Let this dryovernight.4 TEXTURINGAn easy way to give the walls texture isto use acrylic gel mediums. They can befound in most art-supply stores in varyingthicknesses, colors, and grains. For simulatingstucco and concrete, I use GoldenGel Mediums fine or very fine pumicegels. Be careful not to select a grit toocoarse for your diorama’s scale. These gelscan be colored with acrylic paints, and ifthey get too thick, they are easily thinnedwith water.I decided to apply the gel beforeattaching the walls to the base, butdepending on a project’s needs, it can bedone later. I also chose not to color the gelbecause I intended to paint and weathermy building.Spread the gel over the surface evenlyAwith a small putty knife or rubber spatula,4A. It’s difficult to remove excess gelonce it’s dried, so don’t apply it too thick,4B. If it turns <strong>out</strong> to be too thin, you canalways go back and add more.Simulate cracks in the surface with ascribe or awl when the gel is still soft, butafter it has dried for several hours. Studypictures or actual damaged structuresbeforehand to get a good idea of whatBthese imperfections should look like.After drying overnight, the gel shouldbe firm but still slightly spongy. Trimexcess with a hobby knife or razor blade,or add additional layers as needed (just besure the layer you’re applying them over iscompletely dry). Depending on conditionsin your workplace, it may take oneor two days for the gel to dry completely.5 PAINTING AND MINOR BATTLE-DAMAGEA B C56 <strong>FineScale</strong> <strong>Modeler</strong> February 2004I prefer to paint with oil-based paintsbecause water-based paints can re-wetand soften the gel, making it difficult towork on.Apply a base color to the entire structure,5A; it can range from light tan towhite to ugly gray, depending on the dioramasetting. After the base coat is dry,you can add bullet holes and shrapneldamage using a drill bit in a motor tool.At medium to high speed, tap the drillgently against the surface, 5B, makingrandom holes in the gel. Use differentdiameter bits to simulate damage fromdifferent caliber weapons, 5C.