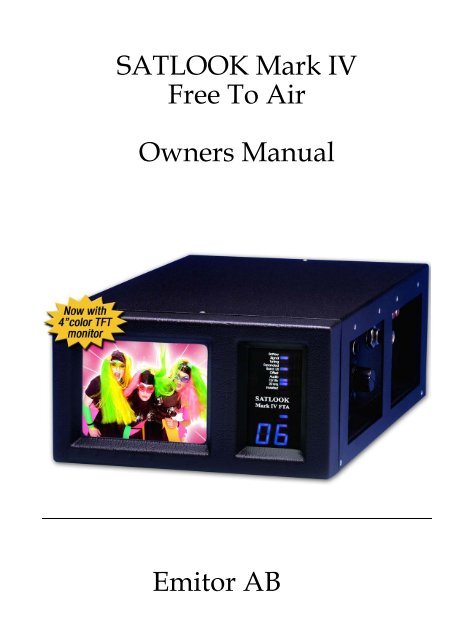
SATLOOK Mark IV Free To Air - Emitor International AB
SATLOOK Mark IV Free To Air - Emitor International AB
SATLOOK Mark IV Free To Air - Emitor International AB

Create successful ePaper yourself
Turn your PDF publications into a flip-book with our unique Google optimized e-Paper software.
<strong>SATLOOK</strong> <strong>Mark</strong> <strong>IV</strong><br />
<strong>Free</strong> <strong>To</strong> <strong>Air</strong><br />
Owners Manual<br />
<strong>Emitor</strong> <strong>AB</strong>
Owner's Manual<br />
Thank You for purchasing a <strong>Emitor</strong> <strong>SATLOOK</strong> <strong>Mark</strong> <strong>IV</strong> FTA instrument.<br />
This manual covers the operation and maintenance of the <strong>SATLOOK</strong> <strong>Mark</strong> <strong>IV</strong> FTA-instrument.<br />
All information in this publication is based on the latest product information available at the<br />
time of printing.<br />
<strong>Emitor</strong> <strong>AB</strong> reserves the right to make changes at any time without notice and without incurring<br />
any obligation.<br />
No part of this publication may be reproduced without written permission.<br />
This manual should be considered a permanent part of the instrument and should remain with<br />
it if it is resold.<br />
If a problem should arise, or if You have any questions about the instrument, consult an<br />
authorized <strong>Emitor</strong> dealer.<br />
! Notice !<br />
Operating a <strong>SATLOOK</strong> <strong>Mark</strong> <strong>IV</strong> FTA instrument requires special skills. Please read this<br />
Owner's Manual thoroughly before operating the instrument.<br />
Contents:<br />
1. Description<br />
2. Operation<br />
3. Functions<br />
4. Digital <strong>Free</strong> <strong>To</strong> <strong>Air</strong> receiver<br />
5. Maintenance<br />
6. Technical Specification<br />
DiSEqC is a trademark of EUTELSAT
1. Description:<br />
EMITOR <strong>SATLOOK</strong> <strong>Mark</strong> <strong>IV</strong> FTA is a measuring-instrument developed and<br />
manufactured in Sweden for exact alignment and adjustment of satellite-dishes.<br />
The instrument is provided with a 4.5" TFT-color monitor which either shows Digital FTA<br />
/ Analog TV-channel or the frequency spectrum 920-2150 MHz (normal or expanded<br />
mode).<br />
It's very easy to detect satellite signals in the spectral-mode and the spectrum can be<br />
expanded for correct adjustment of the polarisation.<br />
Channel search is done with a large knob on the side of the instrument and by help of the<br />
two digit LED-display on the front-panel.<br />
Switching between spectrum/Digital/Analogue-mode are made easy by pushing a button.<br />
Soundfrequencies between 5.5 – 8.5 MHz can be tuned in and listened to.<br />
The polarisation of the LNB is switchable with a 22 kHz-tone and/or with 13V/18V.<br />
DiSEqC-accessories (like switches) can also be controlled. The instrument is protected<br />
from short-circuit when connecting the LNB.<br />
The main functions of the Digital <strong>Free</strong> <strong>To</strong> <strong>Air</strong> receiver are controlled on the instrument´s<br />
key-pad but can also be fully controlled with the attached remote-control.<br />
Power to the instrument is supplied by a built in, rechargeable battery.<br />
The battery is recharged from the external battery charger or the car-adaptor.<br />
Even though the instrument has a lot of functions it is still very flexible and easy to use.<br />
<strong>SATLOOK</strong> <strong>Mark</strong> <strong>IV</strong> FTA weights only about 5,5kg incl. the battery and carrying-case.
2. Operation:<br />
A. Unpacking.<br />
Start with unpacking the instrument and check that the following items are in the cardboard<br />
box:<br />
1. <strong>SATLOOK</strong> <strong>Mark</strong> <strong>IV</strong> FTA instrument.<br />
2. Nylon carrying case with shoulder strap.<br />
3. Car-adaptor 12v.<br />
4. External power supply 220v/13.5v.<br />
5. Remote control for the Digital FTA receiver.<br />
6. Adaptor BNC-male/F-female.<br />
7. Owner's Manual.<br />
The instrument keypad and the close by the connections for coaxial- and power- cables are<br />
illustrated in the picture below<br />
Mainswitch, power On/Off.<br />
The big knob has functions for; tuning, marker-control, and to move the expanded spectrum.<br />
The two small knobs adjust volume and audio-frequency 5.5-8.5 MHz.<br />
Frontdisplay:<br />
LED 1 Batterycheck<br />
LED 2 Signalstrength<br />
LED 3 Tuningdisplay<br />
LED 4 Expanded spectrum<br />
LED 5 Band I/II<br />
LED 6 Offset<br />
LED 7<br />
LED 8 13/18v<br />
LED 9 22 KHz<br />
LED 10 Inverted video<br />
LED 11-20 Shows signalstrength
B. Batterycheck.<br />
As the instrument has been stored for some time before transportation it is important to check<br />
the battery-condition.<br />
<strong>To</strong> do this turn the mainswitch On.<br />
When starting the instrument, the monitor turns on in spectrum-mode and LED nr 2 on the<br />
front-display will be lit. The two digit LED-display indicates "SP" for spectrum.<br />
The loudspeaker is switched off when the instrument is turned on.<br />
Push the No 6 button on the keypad to read the battery condition. The condition is indicated on<br />
the two digit LED-display with a value between LO, 1-9, HI.<br />
If the battery needs recharging, use the power-supply enclosed.<br />
NOTE, The instrument should be turned off when the battery is recharged.<br />
The two digit LED-display (automatically turned on when recharging) shows "CH", for<br />
charging, while recharging.<br />
Recharging from discharged battery to about 85% capacity takes aprox.3 hours.<br />
C. Connection and installing a satellite dish.<br />
When the battery is charged the instrument is ready to use.<br />
Connection of coaxial-cable and LNB is preferably done when the instrument is turned off. In<br />
case of connecting when the instrument is On and if a short-circuit occur, it's no harm done due<br />
to the fact that the instrument is protected against such a failure and will automatically turn off<br />
itself.<br />
After correcting the problem, restart the instrument and it will operate normally.<br />
The instrument starts in the spectrum-mode which makes it easy to detect the satellite/s You're<br />
looking for. If You want to switch on the loudspeaker function (beeper), press the No 8 button<br />
(on/off).<br />
When a satellite is received, the monitor immediately show white "peaks" which are getting<br />
bigger when the signal is increasing, see picture.
If the loudspeaker (beeper function, button nr 8) is switched On there are higher and higher<br />
tones when the signal level is getting stronger.<br />
Audio carriers can be tuned in when pushing button nr #. The two small knobs below the<br />
keypad adjust the volume and the audio-frequency between 5.5 and 8.5 MHz.<br />
Both the beeper- and the audio- function can be operational at the same time.<br />
If You want to see what satellite You're receiving (and view some TV-channels), change to<br />
picture-mode with button No 1 for analogue channels and with button No 3 for Digital<br />
channels.<br />
It is advisable that You, before switching between spectrum and picture, use the knob on the<br />
side of the instrument which controls the marker on the monitor. Put the marker on a suitable<br />
peak and switch to picture with button No 1.<br />
As there are different transmission standards and coding systems etc. it is not certain that a<br />
satellite immediately can be identified. Push button No 4 and use the knob for tuning in the<br />
frequency-range and try to find a certain channel for identification.<br />
If the LNB is of a Universal type, change polarity by pushing button Nr 0 (13/18v) and<br />
Hi-Lo band with button nr * (22 kHz).<br />
Both functions are indicated with LED´s on the front-panel.<br />
The instrument does also support the DiSEqC level 1.0 standard. Activate the function by<br />
pressing the nr 5 button and the corresponding digit for the DiSEqC-function wanted (see<br />
below).<br />
Push button Nr 2 to return to the spectrum-mode.<br />
If you chose to use Digital channels to identify the satellite you are receiving, this is the method:<br />
Have you never used digital channels transmitted on the satellite you are looking for, you need<br />
to do a channelsearch.<br />
In the channelsearch menu, choose with satillite you would like to search for and searchmode<br />
(second from buttom), then press “OK”.(see 4. for more info.) When channelsearch is ready exit<br />
the menusystem and view List. Choose your satellite, and one of the channels that are now<br />
displayed in the channellist.<br />
If you already have done channelsearch on the satellite that you are locking for, just choose the<br />
satellite from the List followed by a channel.<br />
When the required satellite is found, maximize the incoming signal by the following methods:<br />
1. Max lengths on peaks in spectrum-mode.<br />
2. Max value on the two digit LED-display.<br />
3. Max height on LED-bar.<br />
4. Highest tone from the loudspeaker.<br />
5. Max Digital signal in Digital FTA mode (button nr 3 followed by nr 1).<br />
If the incoming signal is so strong that the displays show max-values, reduce the incoming<br />
signal by pushing button Nr 7 (offset).<br />
When using the expanded spectrum-function (button nr 2), it is easy to see the suppression of<br />
the polarity. This function is consequently used for adjustment of the right polarisation.
3. Functions:<br />
Keypad, normal mode:<br />
1. Picture/Invert.<br />
2. Spectrum/Expanded spectrum (on/off)<br />
3. Digital <strong>Free</strong> <strong>To</strong> <strong>Air</strong> Receiver. ----------------------------------- See below 3.<br />
4. Tuning, display 00-99 on/off.<br />
5. DiSEqC-mode. ----------------------------------------------------See below 5.<br />
6. Batterycondition, display LO,0-9,HI.<br />
7. Signalstrength offset, on/off.<br />
8. Beeper, on/off.<br />
9. Freq.band I/II.<br />
0. 13/18v.<br />
*. 22 KHz on/off.<br />
#. Audio on/off.<br />
1. Is used for switching to picture-mode. If the instrument is equipped with the optional<br />
inverted video, push the button for a couple of seconds and the picture will be inverted. <strong>To</strong> go<br />
back to normal video, repeat the pressing of the button.<br />
2. This function is used for showing the frequency-spectrum. In this mode the knob on the side<br />
of the instrument controls the marker of the monitor.<br />
Another push on the button will expand the spectrum. It is a good help for adjusting the right<br />
polarisation.<br />
Return to full spectrum by pushing the button again.<br />
When this mode is switched on it is indicated by LED 4 On.<br />
3. Digital <strong>Free</strong> <strong>To</strong> <strong>Air</strong> Receiver.<br />
Turn the Digital receiver On/off when pushing button nr 3. When Digital receiner is swithed on<br />
it is indicated by the right point in the LED digits.<br />
The keypad has the following functions when the Digital receiver is On.<br />
1. Info/signal On/off<br />
2. Up Arrow<br />
3. Digital <strong>Free</strong> <strong>To</strong> <strong>Air</strong> Receiver off<br />
4. Left Arrow<br />
5. Ok<br />
6. Right Arrow<br />
7. List<br />
8. Down Arrow<br />
9. Page up<br />
* Exit<br />
0 Menu<br />
# Page down<br />
Learn about the Digital FTA manual later in this document and get full description of the<br />
functions.
4. Normally, the instrument present signal-strength on the two digit LED-display. Pressing<br />
button nr 4 activates the tuning indication with a value from 00-99.<br />
Pressing the button again returns to the signal-strength mode.<br />
5. Activates the DiSEqC-mode. Press the nr 5 button and the corresponding command-button<br />
(ex. for LNB 1, press button nr 5 and button nr 1). Short-list for the different DiSEqC-commands<br />
is printed above and also as a sticker in the carrying-case.<br />
DiSEqC-mode:<br />
1. LNB 1<br />
2. LNB 2<br />
3. LNB 3<br />
4. LNB 4<br />
5.<br />
6.<br />
7. Hi LO<br />
8. Horizontal<br />
9. <strong>To</strong>neburst A<br />
0. Vertical<br />
*. Lo LO<br />
#. <strong>To</strong>neburst B<br />
6. Shows for a couple of seconds the battery condition with a value between LO, 1-9, HI.<br />
7. This function is used when the incoming signal is so strong that the instrument shows maxvalues<br />
when the dish has not been maximized. The offset-function reduces the incoming<br />
signal. The function is indicated by LED 6 when switched On.<br />
8. Turn the loudspeaker on/off. Increasing signal level is indicated by higher pitch tones.<br />
9. For switching between the two frequency-bands: 950-1750 MHz and 950-2150 MHz.<br />
0. For switching the polarity with 13/18v in the coaxial-cable. 13/18v is also indicated on the<br />
front-display with LED 8, On/off.<br />
*. For switching the 22 Khz-tone on/off.<br />
#. Turns the audio on/off. The audio is tuneable from 5.5 to 8.5 MHz. Volume and audiofrequency<br />
between 5.5 and 8.5 MHz are adjusted with the two small knobs below the keypad.
4. Digital free to air reciever:<br />
Press the MENU key on your RCU or button ’0’ on the keypad to see the main menu on the<br />
screen.<br />
When you select one of the highlighted (or colorful) icons by LEFT/RIGHT key at menu , a<br />
sub-menu item will be shown on the TV screen. And then when you press the OK key, you can<br />
see the sub-menu of each selected item. Press EXIT or MENU key again to leave the menu.<br />
Key Functions<br />
A. SIGNAL key<br />
You can see the signal level or sensitivity of the current channels by pressing the SIGNAL key.<br />
B. Satellite and Channel List<br />
When you press LIST key of the RCU or button ‘7’ on the keypad.<br />
you first can see the satellite list and you<br />
must select the satellite which you want by pressing the OK key. Then, you will see the channel<br />
list of selected satellite<br />
C. All Channel List<br />
When you press the OK key, the channel list window will be displayed at right corner. The top<br />
line of this menu indicates satellite of the current channel.
D. Favorite Channel List<br />
When you press the FAV key, the favorite channel list window will be displayed at right corner<br />
( like OK key).<br />
The favorite channels can be selected at FAV item of the TV or Radio Edit Channel menu.<br />
E. INFO KEY<br />
You can see the current channel information by press INFO key. The information include<br />
satellite, transponder number, symbol rate, polarization, video PID, audio PID and pcr PID.
F. EPG key<br />
Provides a short information about program’s name, time and schedule. When you press EPG<br />
key, you can see EPG window as left. If the service provider broadcasts the EPG information, it<br />
will be displayed as guide information in EPG window. Press Left or Right key to switch<br />
between the current/next program schedule. And if information is very long line, you press<br />
UP/DOWN key. Then the information of sub EPG window will be scrolled.<br />
G. TTX key<br />
When you want to display teletext information at TV, press the TTX key.<br />
(In STB(OSG) option, you can see the teletext information as OSG, but in VBI option, your TV<br />
must support the teletext function)<br />
H. A.CH / A.MODE key<br />
(Audio channel, Audio mode)<br />
If the current channel has the 2 audio channel or more, you can select the audio channel by<br />
pressing A.CH key and select the audio mode by pressing A.MODE key.<br />
The audio mode is rotated as STEREO, LEFT<br />
and RIGHT<br />
System Setting<br />
This menu contains 6 items :<br />
Menu Language, Menu Color, OSD Mixing<br />
Ratio, Local Timer, Video Mode, LNB Pass,<br />
Channel Mode.<br />
You can change the parameter by pressing the<br />
LEFT/RIGHT key or press numeric key.
A. Menu Language : You can choose between 9 languages.<br />
(English, France, German,Italian,Turkey, Spanish, Polish, Arabic, Persia )<br />
B. OSD Mixing Ratio : Allows you to customize appearance of the OSD<br />
C. Local Timer : Allows you to select the local time relative to GMT by LEFT or Right Key.<br />
D. Video Mode : you can choose video output mode as RGB or Composite Signal.<br />
E. LNB Pass : Not available.<br />
F. Channel Mode : you can choose channel list which you want as FTA or CAS<br />
Channel Search & DiSEqC Positioner & USALS System<br />
This menu is used to change information as the transponder, satellite, transponder number,<br />
transponder frequency, symbol rate and polarization for searching the channels.<br />
Press the OK key or LEFT/RIGHT key or numeric key on RCU to change as desired parameter<br />
to search new channels.<br />
For your reference, you can see signal receiving status diagram on the menu as signal level or<br />
number. If the signal receiving status is shown as bad, you may need to change some options in<br />
this menu to improve signal receiving.<br />
A. Antenna Configuration<br />
If you press OK key on satellite Item of channel search, you will see this menu.<br />
Here, you can change the Antenna<br />
Information : Antenna Name, LNB Type, LNB Frequencies, DiSEqC Switch, DiSEqC Positioner,<br />
USALS, Position, 22KHz <strong>To</strong>ne, and LNB Power.<br />
Press the LEFT/RIGHT key or the corresponding numeric key on RCU to change the required<br />
parameters.<br />
Alternatively, you can adjust the settings by checking the signal receiving diagram.
B. Channel Search<br />
For example, if you want to search channels of the transponder or satellite, After selecting<br />
searching method, press the OK key at the “Search” item. it will automatically trace available<br />
channels of the transponder or satellite and display the searching status by showing processing<br />
rate and the result of channel list captured<br />
C. Search Manual (one of search methods)<br />
Use this command when DSR can not receive the search parameters like Video, Audio, PCR<br />
PID from satellite broadcaster. This lets you find the services manually by selecting "Search<br />
Manual“ item.<br />
The Search Manual includes the "Channel Number", "Channel Name", "Video PID",<br />
"Audio PID" and "PCR PID". The channel number will be automatically inputted as the next<br />
number of the last channel number.<br />
When you press OK key at "Channel Name", you will see a keyboard panel. Then, select the<br />
character and press OK key. After all information is entered, it will be automatically created the<br />
new channel and be saved in channel list.
D. DiSEqC Positioner (Version 1.2)<br />
Use this menu to setup position of the antenna,<br />
if you have the DiSEqC positioner and control it, press the OK key at satellite name item.<br />
First, you must select the satellite and transponder which you want to tune by LEFT/RIGHT<br />
key. And then you can adjust the position of the antenna by press LEFT/RIGHT key. If it<br />
approach at position which you want by monitoring the signal level, then you can press OK key<br />
in “Save Position” item to save the current position of the antenna.<br />
E. Menu USALS<br />
If you want to set USALS (Universal Satellite Automatic Location System), you must enter<br />
your longitude and latitude value, and you must set USALS item to “ON” and enter position<br />
value at Antenna Configuration Menu.<br />
The DiSEqC code value will be automatically sended to Motor. If you also set DiSEqC<br />
Positioner to “ON”, because it is more high priority, the USALS function will not work.
Edit Channel<br />
The “TV or Radio Channel Edit” menu has 6 items : Favorite, Lock, Edit Channel Name,<br />
Delete, Move, Sort. If you select one of the icons by LEFT/RIGHT key and press the OK key,<br />
the corresponding submenu functions will be operated.<br />
A. Set Favorite Channel (FAV)<br />
This menu is used to choose your favorite channels. Press OK key to select a channel and<br />
press OK key once again to cancel selection. And then, when you press the FAV key, you can<br />
see the selected channel lists in Channel List.
B. Lock Channel (LOCK)<br />
This command allows you to lock specified channel and prevent others from viewing it. Press<br />
OK key to lock the selected channel and press OK key once again to cancel selection.<br />
C. Edit Channel Name (EDIT)<br />
The channel names are automatically<br />
captured when you search them at Channel<br />
Search menu. But if no names are available<br />
or you do not like it, you can use this sub<br />
menu to modify the current searched channel<br />
name as the meaningful channel name.<br />
Select a Channel and press OK key, then<br />
editing panel will appear.(see the keyboard<br />
panel at right)<br />
D. Delete Channel (DEL)<br />
This menu allows you to delete channels.<br />
Press OK key to select channels to be<br />
deleted and press OK key to cancel<br />
operation. Finally, when you exit this menu,<br />
The selected channels will be deleted,
E. MOVE Channel (MOVE)<br />
This menu is used to change the order of<br />
displayed channels.<br />
Press OK key to select a channel which you<br />
want to move and move it to the other<br />
position. Press OK key again, and then the<br />
Channel will be moved.<br />
Press EXIT key to cancel operation.<br />
F. SORT Channel (SORT)<br />
The channels is listed by searched order,<br />
When you want to list by Character order,<br />
if you press OK key, your channel list will be<br />
re-ordered by Character order.
Parental Control and more.<br />
In this menu, you can create the censorship setting by using special secret code. This menu has<br />
System Lock, Change Password, Clear TV Channel, Clear RADIO Channel, Clear All<br />
Channel , Factory Restore .<br />
If you select one of the highlighted titles and press the OK key, a sub menu will be shown on<br />
the TV screen. Each of them is described in detail below.<br />
A. System Lock<br />
Press LEFT/RIGHT key to select lock or unlock. If the “System Lock” is set to “LOCK”, you<br />
will be requested to enter your password, when entering Parental Control menu (in this menu).<br />
The default password is “0000”<br />
You must remember it, if you changed your password.<br />
B. Change Password<br />
This menu is used for you to change from current password code to other. Initially the default<br />
password code is “0000”. If you want to change the current password, type “0000”. And then,<br />
“New Password” message will be displayed. And enter your new password code number.<br />
Finally, you will get a message of “Verify Password”. If you enter the same code with new<br />
password, the new password is updated at internal memory of DSR. Please memorize it or<br />
keep it in secure place to avoid system access denial and any hassle.
C. Clear TV Channel<br />
Use this sub-menu to clear the all TV Channel that you do not want to use anymore.<br />
You must use this menu carefully.<br />
D. Clear RADIO Channel<br />
Use this sub-menu to clear the all Radio Channel.<br />
You must use this menu carefully.<br />
E. Clear All channel<br />
Use this sub-menu to delete all programmed channels in channel list.<br />
You must use this menu carefully. (include C. and D.)<br />
F. Factory Restore<br />
Use with extreme caution when selecting this command, because it wipes out all custom<br />
settings. All information about channels, antenna and transponder will be replaced with default<br />
as the unit was shipped from the factory. If you are sure about your intentions, press OK key<br />
and select YES or NO.
5. Maintenance.<br />
The instrument is equipped with a rechargeable battery and it is important that the battery is<br />
maintained.<br />
Recharging should be done with a car-adaptor (enclosed) or with an external power supply of<br />
at least 12v,2 Amp, center-pin -plus and chassi -earth.<br />
Note, do not use other methods. The instrument may be damaged or its life-span<br />
may be shortened.<br />
Note, the instrument can be operated, for shorter periods of time, by an external<br />
power supply which must be of at least 12v/2 Amp.<br />
Contact Your dealer for more information.<br />
Adjustments for vertical hold, brightness and contrast are located under the instrument.<br />
Contact Your dealer for proper adjustments.<br />
<strong>SATLOOK</strong> <strong>Mark</strong> <strong>IV</strong> FTA is designed for outside use in rough conditions but it should not be<br />
exposed for rain or snow as this can damage or shorten the lifetime of the instrument.
6. Technical Specification:<br />
EMITOR <strong>SATLOOK</strong> <strong>Mark</strong> <strong>IV</strong> <strong>Free</strong> <strong>To</strong> AIR.<br />
Input frequency: 950-2150 MHz.<br />
Input level: 30-100 dBuV.<br />
Input impedance: 75 ohm, BNC-kontakt.<br />
Monitor type: Color-TFT, 4.5" PAL, NTSC.<br />
Audio bandwidth: Tuneable 5.5 to 8.5 MHz, Mono. Volume control.<br />
Demodulation method: QPSK demodulation<br />
Input Symbol Rate: 1 – 45MS/s<br />
FEC: 1/2, 2/3, 3/4, 5/6 and 7/8<br />
Measuring method: 1. Full spectrum, normal or expanded mode.<br />
2. Color-TFT 4.5" -monitor with full picture.<br />
3. Levelcheck on single channel with two digit LED display.<br />
4. Levelcheck on single channel with LED-bar display.<br />
5. Levelcheck with audio from loudspeaker.<br />
6. FTA Digital signal readout.<br />
Max-level: Spectral with max peaks.<br />
Two digit LED-display with max value.<br />
LED-bar with max indication.<br />
Highest tone from loudspeaker.<br />
FTA Digital max signal.<br />
Supply voltage LNB: 13v/18v, switchable.<br />
<strong>To</strong>ne switch: 22 KHz. On/Off.<br />
DiSEqC: Standard DiSEqC according to level 1.0.<br />
Operational: Aprox. 1 hour.<br />
Weight: Aprox. 5.5 kg incl. battery.<br />
Powersupply: Internal rechargeable battery 12 volt 3.0 Amp.<br />
External power supply, In: 100-230V, Out: 13.5 V DC.<br />
Car-adaptor.<br />
Accessories: Nylon carrying-case.<br />
Adaptor BNC/F-connector.<br />
Remote-control for FTA set-top box.<br />
Manual.<br />
DiSEqC is a trademark of EUTELSAT