Thermocouple Replacement Instructions - American Water Heaters
Thermocouple Replacement Instructions - American Water Heaters
Thermocouple Replacement Instructions - American Water Heaters

Create successful ePaper yourself
Turn your PDF publications into a flip-book with our unique Google optimized e-Paper software.
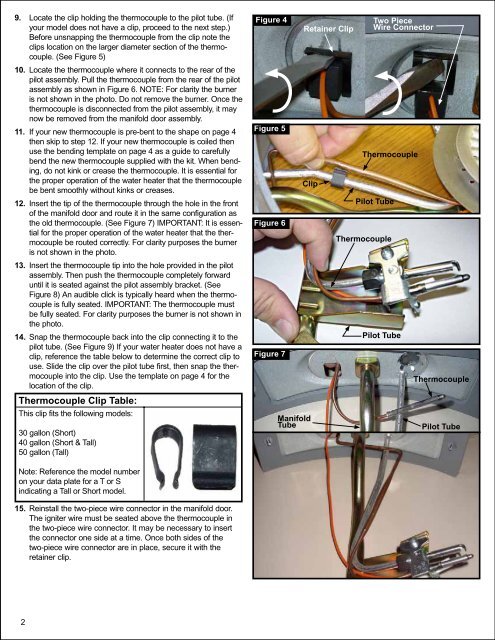
9. Locate the clip holding the thermocouple to the pilot tube. (Ifyour model does not have a clip, proceed to the next step.)Before unsnapping the thermocouple from the clip note theclips location on the larger diameter section of the thermocouple.(See Figure 5)10. Locate the thermocouple where it connects to the rear of thepilot assembly. Pull the thermocouple from the rear of the pilotassembly as shown in Figure 6. NOTE: For clarity the burneris not shown in the photo. Do not remove the burner. Once thethermocouple is disconnected from the pilot assembly, it maynow be removed from the manifold door assembly.11. If your new thermocouple is pre-bent to the shape on page 4then skip to step 12. If your new thermocouple is coiled thenuse the bending template on page 4 as a guide to carefullybend the new thermocouple supplied with the kit. When bending,do not kink or crease the thermocouple. It is essential forthe proper operation of the water heater that the thermocouplebe bent smoothly without kinks or creases.12. Insert the tip of the thermocouple through the hole in the frontof the manifold door and route it in the same configuration asthe old thermocouple. (See Figure 7) IMPORTANT: It is essentialfor the proper operation of the water heater that the thermocouplebe routed correctly. For clarity purposes the burneris not shown in the photo.13. Insert the thermocouple tip into the hole provided in the pilotassembly. Then push the thermocouple completely forwarduntil it is seated against the pilot assembly bracket. (SeeFigure 8) An audible click is typically heard when the thermocoupleis fully seated. IMPORTANT: The thermocouple mustbe fully seated. For clarity purposes the burner is not shown inthe photo.14. Snap the thermocouple back into the clip connecting it to thepilot tube. (See Figure 9) If your water heater does not have aclip, reference the table below to determine the correct clip touse. Slide the clip over the pilot tube first, then snap the thermocoupleinto the clip. Use the template on page 4 for thelocation of the clip.<strong>Thermocouple</strong> Clip Table:This clip fits the following models:30 gallon (Short)40 gallon (Short & Tall)50 gallon (Tall)Figure 4Figure 5Figure 6Figure 7Retainer ClipClipManifoldTubeTwo PieceWire Connector<strong>Thermocouple</strong>Pilot Tube<strong>Thermocouple</strong>Pilot Tube<strong>Thermocouple</strong>Pilot TubeNote: Reference the model numberon your data plate for a T or Sindicating a Tall or Short model.15. Reinstall the two-piece wire connector in the manifold door.The igniter wire must be seated above the thermocouple inthe two-piece wire connector. It may be necessary to insertthe connector one side at a time. Once both sides of thetwo-piece wire connector are in place, secure it with theretainer clip.2