MANUAL DE UTILIZARE RADIO CU CEAS AR 150D
MANUAL DE UTILIZARE RADIO CU CEAS AR 150D
MANUAL DE UTILIZARE RADIO CU CEAS AR 150D

Create successful ePaper yourself
Turn your PDF publications into a flip-book with our unique Google optimized e-Paper software.
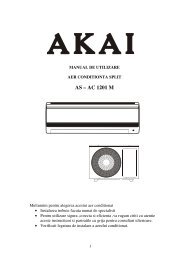
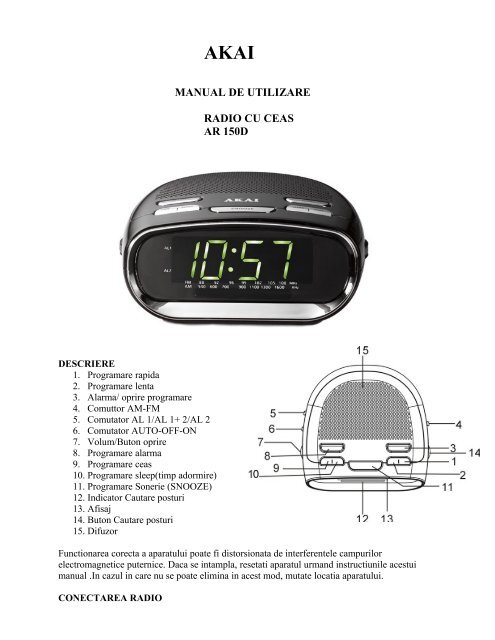
<strong>DE</strong>SCRIPTION1. FAST SET2. SLOW SET3. AL<strong>AR</strong>M/OFF SET4. AM-FM SWITCH5. AL1/ALI+2/AL2 SWITCH6. AUTO-OFF-ON SWITCH7. VOLUME/OFF KNOB8. AL<strong>AR</strong>M SET9. TIME SET10. SLEEP SET11. SNOOZE SET12. DIAL POINTER13. DISPLAY14. TUNING KNOB15. SPEAKERTHE NORMAL FUNCTION OF THE PRODUCT MAYBE DISTURBED BY STRONG ELECTRO MAGNETIC INTERFERENCE. IF SO,SIMPLY RESET THE PRODUCT TO RESUME NORMAL OPERATION BY FOLLOWING THE INSTRUCTION <strong>MANUAL</strong>. IN CASETHE FUNCTION COULD NOT RESUME, PLEASE USE THE PRODUCT IN OTHER LOCATION.CONNECTING THE <strong>RADIO</strong>PLUG THE AC CORD INTO THE POWER OUTLET. WHEN ELECTRICAL POWER HAS BEEN INTERRUPTED AND RESTORED,THE CLOCK DISPLAY WILL BLINK. MAKE SURE TO RESET BOTH THE CORRECT TIME AND AL<strong>AR</strong>M TIME FOR PROPEROPERATION. THE AC MAINS PLUG IS USED AS THE DISCONNECT <strong>DE</strong>VICE, THE DISCONNECT <strong>DE</strong>VICE SHALL REMAINREADILY OPERABLE.TIME SETTINGPRESS AND HOLD THE TIME SET (9). KEEP PRESSING THE SLOW SET (2) OR FAST SET (1) TO SET THE CLOCK DISPLAY TOTHE CORRECT TIME.PRESS FAST SET (1) THE TIME WILL ADVANCE FAST FORW<strong>AR</strong>D, PRESS THE SLOW SET (2) THE TIME WILL ADVANCESLOWLY. RELEASE THE FAST SET (1) OR SLOW SET (2) WHEN FINISHED THE SETTING.<strong>RADIO</strong> OPERATIONSLI<strong>DE</strong> THE “AUTO-OFF-ON” SWITCH (6) TO "ON" AND TURN ON THE VOLUME. SLI<strong>DE</strong> THE “AM-FM” SWITCH (4) TO “AM” OR“FM” POSITION. ADJUST TUNING KNOB (14) AND VOLUME/OFF (7) FOR THE <strong>DE</strong>SIRED FREQUENCY AND LISTENING LEVEL.SLEEP TO MUSICSLI<strong>DE</strong> THE “AUTO-OFF-ON” (6) TO EITHER "OFF" OR "AUTO". PRESS THE SLEEP SET (10) ONCE. YOU CAN HAVE 59MINUTES PLAYING THE <strong>RADIO</strong> TO ACCOMPANY YOU TO SLEEP. SET FOR A <strong>DE</strong>SIRED PERIOD OF SLEEP, SIMPLY PRESSAND HOLD SLEEP SET (10) AND THEN PRESS FAST SET (1) OR SLOW SET (2) TO SET THE <strong>DE</strong>SIRED PERIOD OF THE SLEEPFUNCTION. IF YOU WANT TO TURN OFF THE <strong>RADIO</strong> BEFORE SLEEP TIME HAS EXPIRED, PRESS SNOOZE SET (11) ONCE.AL<strong>AR</strong>M TIME SETTINGAL1 OR AL2 SETTING: SLI<strong>DE</strong> THE AUTO-OFF-ON SWITCH (6) TO “AUTO” POSITION. SLI<strong>DE</strong> THE “AL1/AL1+2/AL2” SWITCH (5)TO “AL1” POSITION OR “AL2” POSITION. KEEP PRESSING THE AL<strong>AR</strong>M SET, AND THEN PRESS THE SLOW SET (2) OR FASTSET (1) TO SET THE AL<strong>AR</strong>M TIME.DUAL AL<strong>AR</strong>M SETTING: REPEAT THE ABOVE STEPS (AL1 OR AL2 SETTING) TO SET THE AL<strong>AR</strong>M 1 TIME AND AL<strong>AR</strong>M 2TIME, THEN SLI<strong>DE</strong> THE “AL1/AL1+2/AL2” SWITCH (5) TO “AL1+2” POSITION. PRESS AL<strong>AR</strong>M SET (8) THE DISPLAY WILL SHOWTHE AL<strong>AR</strong>M 2 TIME.WAKE TO MUSIC1. SLI<strong>DE</strong> THE FUNCTION SWITCH (6) TO “ON” POSITION. SET THE “AM-FM” SWITCH TO “AM” OR “FM” POSITION. ADJUSTTHE TUNING KNOB (14) AND VOLUME KNOB (7) TO A <strong>DE</strong>SIRED FREQUENCY AND LISTENING LEVEL.2. SET THE AL<strong>AR</strong>M TIME AS SHOWN ABOVE.3. THE <strong>RADIO</strong> WILL PLAY AUTOMATICALLY AT THE PRESET TIME.6
WAKE TO BUZZER AL<strong>AR</strong>M1. SET THE AL<strong>AR</strong>M TIME AS SHOWN ABOVE.2. TURN OFF THE VOLUME.YOU WILL BE AWAKENED BY THE BUZZER AL<strong>AR</strong>M.SNOOZE OPERATIONWHEN THE AL<strong>AR</strong>M IS ON, PRESS SNOOZE SET (11) ONCE. AFTER 7 MINUTES, THE AL<strong>AR</strong>M WILL BE ON AGAIN.TURN THE AL<strong>AR</strong>M OFFPRESS AL<strong>AR</strong>M/OFF SET (3) ONCE TO STOP THE AL<strong>AR</strong>M AND AL<strong>AR</strong>M WILL RESUME IN 24 HOURS (THE OTHER DAY). TOSTOP THE AL<strong>AR</strong>M COMPLETELY, SLI<strong>DE</strong> THE FUNCTION SWITCH (6) TO “OFF” POSITION.TO GO TO SLEEP AND WAKE TO MUSICREPEAT THE STEPS OF "WAKE TO MUSIC". PRESS SLEEP SET (10) TO SET FOR A <strong>DE</strong>SIRED PERIOD OF <strong>RADIO</strong> PLAYINGBEFORE SLEEP. THE <strong>RADIO</strong> WILL STOP AUTOMATICALLY AND WILL ST<strong>AR</strong>T AGAIN AT THE PRESET WAKE UP TIME.BATTERY BACKUPTHIS CLOCK HAS A BACKUP POWER SYSTEM TO ENSURE CONTINUOUS OPERATION DURING POWER FAILURE. INSERTONE 9-VOLT BATTERY AND THE CLOCK MECHANISM WILL CONTINUE TO MAINTAIN THE <strong>CU</strong>RRENT TIME AND AL<strong>AR</strong>MPROGRAM.DRIPPING & VENTILATION W<strong>AR</strong>NINGTHE PRODUCT SHALL NOT BE EXPOSED TO DRIPPING OR SPLASHING AND THAT NO OBJECTS FILLED WITH LIQUIDS,SUCH AS VASES, SHALL BE PLACED ON THE PRODUCT. THE NORMAL VENTILATION OF THE PRODUCT SHALL NOT BEIMPE<strong>DE</strong>D FOR INTEN<strong>DE</strong>D USE.Disposal of Used Electrical & Electronic EquipmentThe meaning of the symbol on the product, its accessory or packaging indicates that thisproduct shall not be treated as household waste. Please, dispose of this equipment at yourapplicable collection point for the recycling of electrical & electronic equipments waste. Inthe European Union and Other European countries which there are separate collectionsystems for used electrical and electronic product. By ensuring the correct disposal of thisproduct, you will help prevent potentially hazardous to the environment and to humanhealth, which could otherwise be caused by unsuitable waste handling of this product. Therecycling of materials will help conserve natural resources. Please do not therefore disposeof your old electrical and electronic equipment with your household waste. For moredetailed information about recycling of this product, please contact your local city office,your household waste disposal service or the shop where you purchased the product.Importer AKAI Benelux – Elmarc B.V.Information : www.akai.euPower consumption: 5W (wattage: Back up 9V)Standby power consumption: 1WCorrosion, oxidation, battery-leakage and any other gradually acidic defect of this nature will invalidate the guarantee.7