Mechanical Refrigera-
Mechanical Refrigera-
Mechanical Refrigera-

Create successful ePaper yourself
Turn your PDF publications into a flip-book with our unique Google optimized e-Paper software.
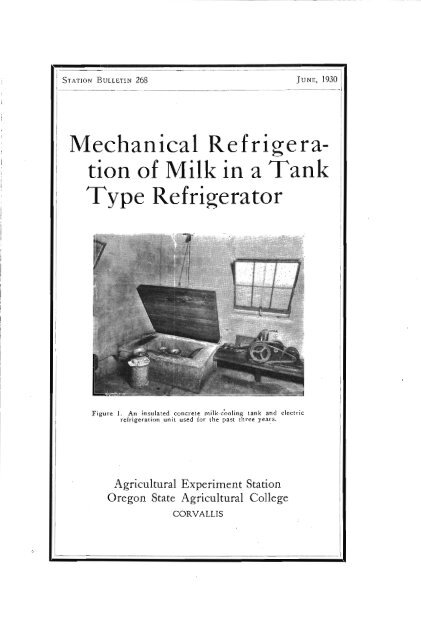
STATION BULLETIN 268<br />
<strong>Mechanical</strong> <strong>Refrigera</strong>tion<br />
of Milk in a Tank<br />
Type <strong>Refrigera</strong>tor<br />
L<br />
Figure 1. An insulated concrete milk-cooling tank and electric<br />
refrigeration unit used for the past three years.<br />
Agricultural Experiment Station<br />
Oregon State Agricultural College<br />
CORVALLIS<br />
JUNE, 1930
OREGON STATE BOARD OF HIGHER EDUCATION<br />
Hon. Herman Oliver<br />
Canyon City<br />
Hon. C. C. Colt Portland<br />
Hon. B. F. Irvine<br />
Portland<br />
lion, C. L, Starr<br />
Portland<br />
Hon. E. C. Sanimons<br />
Portland<br />
Hon. Albert Burch Medford<br />
Hon. E. C. Pease<br />
The Dalle.t<br />
Hon. F. E. Callister Albany<br />
Hon. Aubrey Watzek<br />
Portland<br />
STAFF OF AGRICULTURAL<br />
'AT. J. Kerr, D.Sc., LL.D<br />
J. 1'. Jardine, B.S<br />
H. P. Bans, S.M Plant Pat hologist in<br />
Charge<br />
F. D. Bailey, M.S...Asso. Pathologist, ln.cecticide<br />
and Fun gicide Bd., U. S. D. of A.<br />
ft. S. Pease, M.S As.tociate in Farm<br />
Management<br />
F. M. Bolin, D.V.M...Assistant Veterinarian<br />
W. II. Bollen, Phi) Ass'! Bacteriologist<br />
A. G. Bouquet, P.S Horticulturist<br />
(Vegetable Gardening)<br />
P. M. Brandt, A.M....Dairy Husband,nan in<br />
Chor//e<br />
E. N. Bressman, M.S Assoc. Agronomist<br />
G. G. Brown, P.S..... Horticulturist. Hood<br />
River Branch Exp. Station, Hood River<br />
W. S. Brown, M.S Horticulturist<br />
in Charge<br />
P. E. Ilullis, M.S Assistant Chemist<br />
Letha D. Punting, A.M Jr. Botanist Seed<br />
Lab., U. S. Dept. of Agric. (Seed Analyst)<br />
A. S. hurrier, M.S Assistant in<br />
Farm Management<br />
Leroy Childs, A.fl Superintendent Hood<br />
River Branch Exp Station, Hood River<br />
P. Cooter Orchard Foreman<br />
C. V. Copson, M.S..Bacteriologist in Charge<br />
H. K. Dean, B.S Superintendent<br />
U,natilla Branch Exp. Station, Hermistan<br />
M. Dickinson, D.V.M Assistant<br />
Poultry Pathologi.st<br />
'iV. H. Dreesen, Ph.D Ag'l Economist<br />
T. P. Dykstra. M.S Assistant Plant<br />
Pathologist, U. S. Dept. of Agriculture<br />
M. Edwards, P.S Asst. Animal Bus.<br />
bandinan, East. Ore. Br. Lxii. Sta., Union<br />
A. E. Enghretsoo, P.S Superintendent<br />
John Jacob Astor Br. ExI'. .Sta., Astoria<br />
L. G. 0. Gentner, B.S Associate Entomologist.,<br />
So. Ore. Br. Exp. Station, Talent<br />
L. N. Goodding, BA., P.S.....Associate Plant<br />
Pathologist, U. S. Departiiient of Agric.<br />
P. M. Goode, B.A Associate Editor<br />
J. ft. Haag, Ph.D Chemist<br />
(Animal Nutritiin)<br />
H. Hartn,an, M.S Horticulturist (Pout.)<br />
F. M. Harvey, Ph.D Horticulturist<br />
(Physiology)<br />
P. P. Hill, M.S Assistant Agronomist<br />
C. J. Hard, M.S .. Ass't Ag'! Engineer<br />
ft. E. Hutchinson, ll.S Assistant to Supt.<br />
of Harney Valley Br. Exp. Sta., Burns<br />
C. ft. Hyslop. P.S Agronomist in Charge<br />
\V. T. Johnson, DV.M. Poultry Pathologist<br />
I. R. Jones, Ph.D...Assoc. Dairy Husband'n<br />
J. S. Jones, M.S.A Chemist in Charge<br />
F. I.. Knowlton, 11.5 Poultry Husbandman<br />
G. W. T
TABLE OF CONTENTS<br />
Pages<br />
Summary 4<br />
Introduction 5-11<br />
<strong>Refrigera</strong>tor Box Used 59<br />
<strong>Refrigera</strong>tor Equipment Used 9<br />
General Procedure in Handling Milk 9-10<br />
Method of Taking Temperatures 10<br />
Methods of Cooling Studied 10-11<br />
The Tubular Cooler 11<br />
Rate of Cooling 11-20<br />
Dry-storage Tests 11<br />
Wet-storage Tests 11-13<br />
'Water Circulator 13-17<br />
The Effect of Stirring the Milk on Rate of Cooling 17-18<br />
Bacterial Increase in Milk During Cooling 18-19<br />
Cost of Cooling of Milk with Ice Versus Electric <strong>Refrigera</strong>tors 21-24<br />
Ice Required to Cool Milk 22<br />
Cost of Cooling Milk with Electric <strong>Refrigera</strong>tion 22-23<br />
Temperature Rise of Milk in Ten-gallon Cans 23-24<br />
Building an Insulated Concrete Milk-cooling Tank 24-27<br />
Construct the Forms 25<br />
Reinforcement 25<br />
Water-tight Concrete 25<br />
Pouring the Concrete 26<br />
Remove and Reconstruct the Inner Forms 26<br />
Finish the Concrete 26<br />
Place the Insulation 27<br />
Remove the Forms and Finish the Concrete 27<br />
Construct the Tank Rim and Cover 27
SUMMARY<br />
The milk-refrigeration experiments reported herewith I<br />
are applicable to the dairy farm where the milk is mar- I<br />
keted in five- or ten-gallon cans.<br />
The type of dairy refrigeration equipment and insulated<br />
boxes or tanks described are the least expensive now<br />
available for use on the dairy farm, and range in price<br />
from $400 to $600.<br />
Milk in ten.gallon cans will cool from 95° F. to 60° F. or<br />
below in 1 hour and to 56° F. in 2 hours when set in<br />
35° to 40° F. water.<br />
When the milk is precooled with a tubular surface cooler<br />
to 67° F., it will cool to 55° F. in 1 hour and to 52° F.<br />
in 2 hours in ten-gallon cans when set in 35° to 40° F.<br />
water.<br />
Milk in ten-gallon cans will cool from 95° F. to below 50°<br />
F. in 1 hour and to 42° F. in 2 hours when set in 35° F.<br />
water that is circulated around the cans.<br />
When the milk is precooled with a tubular surface cooler<br />
to 67° F., it will cool to 44° F. in 1 hour and to 42° F.<br />
in 2 hours in ten-gallon cans when set in circulated<br />
water at 35° F.<br />
The bacterial content of milk will not increase during<br />
the first 12 hours when kept in ten-gallon cans in a<br />
tank of 35° F. to 40° F. water.<br />
Stirring milk in ten-gallon cans set in 35° to 40° F. water<br />
does not materially increase the rate of cooling.<br />
Plans are given for an insulated concrete milk-cooling<br />
tank.<br />
Three inches of corkboard or its equivalent should be<br />
used in insulating a dairy refrigerator box.<br />
The annual average power requirement to cool 100<br />
pounds of milk below 50° F. in an insulated-tank type<br />
cooler is approximately 1 kilowatt-hour.<br />
It is less expensive to cool milk below 50° F. in a tank<br />
type cooler with mechanical refrigeration using electricity<br />
at 3 per kilowatt-hour than with ice at per<br />
pound.
<strong>Mechanical</strong> <strong>Refrigera</strong>tion of Milk<br />
in a Tank Type <strong>Refrigera</strong>tor*<br />
By<br />
F. E. PRIcE, C. J. HURD, and G. V. CopsoNt<br />
INTRODUCTION<br />
A milk-cooling experiment was started in 1929 to determine what resuits<br />
could be obtained when using mechanical refrigeration and a topopening<br />
refrigerator box in cooling and storing milk on the farm. The<br />
storage involved holding the afternoon milking over night for shipment<br />
with the milk produced the following morning.<br />
In applying mechanical refrigeration to milk cooling there are many<br />
problems that arise in addition to purely mechanical problems of cooling<br />
the milk. Aside from flavor and odor, the quality of milk is determined almost<br />
entirely by the number of bacteria present. The purpose of cooling the<br />
milk is to reduce the temperature to a point where there will be little or no<br />
multiplication of bacteria.<br />
The following questions are often asked. How soon must the milk be<br />
cooled after milking? What effect does immediate cooling have on bacterial<br />
multiplication as compared to slower rates of cooling? Can milk be<br />
cooled in ten-gallon milk cans? Is it necessary to stir the milk when cooling<br />
in cans? What does it cost to build a well-insulated refrigerator box<br />
for 4 or 6 ten-gallon milk cans? What will it cost to operate an electric<br />
refrigerator of sufficient size to cool 60 to 100 gallons of milk per day?<br />
This bulletin reports the results obtained through experiments in an<br />
effort to answer these questions for dairy farmers, refrigerator manufacturers,<br />
bureaus of public health, milk inspectors, and agricultural leaders.<br />
<strong>Refrigera</strong>tor box used. The top-opening refrigerator box used in this<br />
experiment was designed and built by the authors for the purpose of<br />
determining construction problems and the cost of the material. This<br />
refrigerator box was designed to be used in cooling milk in ten-gallon cans<br />
by setting the cans in the refrigerator box or insulated cooling tank that<br />
has sufficient water to maintain a height of 20 inches when the cans are<br />
in the box. The water was kept at 35° to 40° F. by an electric refrigeration<br />
unit.<br />
The box has a water-tight inside lining of 18-gauge galvanized iron<br />
with 3 inches of cork for insulation on the sides and bottom. The outside<br />
°The preparation of this bulletin and the experimental work on which it is based have<br />
been in cooperation with the Oregon Committee on Relation of Electricity to Ariculture.<br />
This committee is made up of farmers, business nten, and representatives of the State College,<br />
Grange, Farmers' Union, public utilities and equipment companies. Its purpose is 'to<br />
determine and disseminate facts re5arding -the use of electricity for profit and convenience<br />
on Oregon farrns."James T. Jardine, Director, Agricultural Experiment Station Chairman,<br />
Oregon Committee on Relation of Electriciiy to Agriculture.<br />
tLiberal cooperation and assistance have been given by Professor P. M. Brandt and<br />
Dr. G. Wilster of the Dairy Husbandry department in conducting this experiment and-in<br />
preparing this publication.<br />
5
6 AGRICULTURAL EXPERIMENT STATION BULLETIN 268<br />
is made of i-inch plywood on the sides and i-inch plywood on the bottom.<br />
The cork was dipped into hot asphaltum to keep out moisture and was put<br />
on in two courses, with broken joints. Two inches of cork insulation was<br />
used in the top.<br />
This experimental box is 36 inches wide, 60 inches long, and 28 inches<br />
deep, inside dimensions, and provides ample room for refrigerator coils<br />
and 6 ten-gallon milk cans. The cost of the material for this refrigerator is<br />
listed below. The only labor cost listed is for the tinsniith, the metal<br />
work requiring skilled labor. The carpenter work and assembbng of the<br />
box would require two or three days' time of 2 men capable of doing farm<br />
carpentry work.<br />
I<br />
Figure 2. Home-made insulated tank type box with metal lining and wood exterior. The<br />
motor and water circulator pulley are shown at the end of the box.
MECHANICAL REFRIGERATION OF MILK 7<br />
It is recommended that the under side of the lid be of metal instead of<br />
wood as shown in Figure 2 so as to reduce the weight. The lid may be<br />
made in two sections as shown in plans for the concrete box (Figure 8).<br />
Cork and asphaltum ------ $24.02<br />
Lumber .. 23.18<br />
Galvanized iron for lining(18 gauge)._ 13.20<br />
Hardware 4.53<br />
Varnish 3.15<br />
Total cost of material $68.08<br />
Tinsmith labor 14.40<br />
Total cost $82.48<br />
The mets around the top of the box should be of very heavy gauge, or<br />
wood may be substituted as shown for the concrete box. A loose metal<br />
cap can then be used to cover the wood where the wear is excessive.<br />
This type of insulated milk-cooling box or tank is recommended as a<br />
portable home-made box. If it is not necessary that it be portable an insulated<br />
concrete milk-cooling tank may be preferred (see Figure 1).<br />
Very gocd insulated milk-cooling tanks are now available on the<br />
market as shown in figures 4 and 7.<br />
A good milk-cooling tank can be made by having the outside and inside<br />
walls of the Lox of concrete with 3 inches of corkboard dipped into hot<br />
asphaltum beween the concrete walls. A similar box can be made by<br />
substituting a galvanized iron lining for the inner concrete wall, but it<br />
Figure 3. Propeller type water circulator used to circulate the refrigerated water. Cost of<br />
construction $11.00.
8 AGRICULTURAL EXPERIMENT STATION BULLETIN 268<br />
will be less permanent than concrete. A concrete tank should be built so<br />
that not more than one-half of its height is above the floor level. This<br />
makes it much easier to lift the ten-gallon cans into the box.<br />
Figure 4. Four-can insulated milk-cooling tank showing cut-out to install a refrigerator<br />
coil. Manufactured by Victor Products Corporation, Hagerstown, Maryland.<br />
TABLE I. INSULATED-TANK TYPE OF DAIRY REFRIGERATORS<br />
For Ten-Gallon Cans<br />
Approximate prices of insulated<br />
tanksf Contract<br />
All-metal prices of<br />
Inoide dimensions . tank fob, concrete<br />
Capacity Length Width Deptht Portland tank<br />
snchc.s inches inches<br />
4 cans<br />
6 cans ...<br />
8 cans<br />
44<br />
60<br />
80<br />
35<br />
35<br />
35<br />
28<br />
28<br />
28<br />
$150<br />
175<br />
210<br />
$ 75<br />
90<br />
110<br />
The refrigerator should be built to hcld ten-gallon cans even though the milk or<br />
cream may be marketed in five-gallon cans at present.<br />
Bottom and sides have 3-inch corkboard. Top has 2-inch corkboard.<br />
Hf lid drops into the box slightly the depth should be increased accordingly.
F'<br />
MECHANICAL REFRIGERATION OF MILK 9<br />
Under no conditions should an uninsulated cooling box or tank be<br />
used for cooling milk below 500 F. with ice or an electric refrigerator.<br />
Three inches of corkboard or its equivalent is necessary to prevent excessive<br />
refrigeration losses through the walls of the refrigerator. Any<br />
insulation material such as corkboard loses its efficiency as a heat insulator<br />
when it becomes damp. It is therefore very important that the insulating<br />
material be dipped into hot asphaltum.<br />
<strong>Refrigera</strong>tion equipment used. A full automatic model 0 Frigidaire<br />
compressor with a horse-power electric motor and two model 58-F<br />
expansion coils were used to supply the refrigeration. The two coils of<br />
this type were used because wet storage and dry storage tests were made<br />
and these coils were used for both tests. A standard installation of this<br />
make at the present time would be the same compressor with a model 21-X<br />
coil in a brine tank approximately 32 inches long by 24 inches high by 8 to<br />
12 inches wide extending across the tank. Most othermakes of refrigeration<br />
equipment extend the coils around the walls of the tank. This is a<br />
very good arrangement as the ice that is formed is distributed around the<br />
box.<br />
Figure 5. Six-can insulated milk-cooling tank. Small lids with handles show openings in<br />
brine tank for Tnaklng 50 pounds of ice per day. Manufactured by<br />
A. W. Curry Company, Portland, Ore.<br />
General procedure in handling the milk. In conducting this experiment<br />
the milk production of the 35-cow herd of the Dairy Husbandry department<br />
was cooled in the milk room adjacent to the milking barn. The
10 AGRICULTURAL EXPERIMENT STATION BULLETIN 268<br />
daily production during the period of this test was 700 to 850 pounds of<br />
milk per day or 4 to 5 ten-gallon cans at each milking.<br />
The milking was completed by six o'clock. The evening milk was<br />
placed in the refrigerator box as it was produced and held until the morning<br />
milking was ready for cooling. The evening milk was then removed<br />
from the refrigerator and the morning milk placed there for cooling in<br />
ten-gallon cans until the next milking. This method permitted the morning<br />
milk to be held for a 12-hour cooling storage test also.<br />
Samples of milk were taken at the beginning and end of each cooling<br />
and storage test for bacterial counts.<br />
Method of taking temperatures. Temperature measurements were<br />
made with copper-constanstan thermo-couples and a Type P-Leeds-Northrup<br />
galvanometer. This allowed for temperature readings accurate to onetenth<br />
of 1° F. By using thermo.couples it was possible to keep the refrigerator<br />
door closed and take temperature readings without opening or in<br />
any way disturbing the conditions of the box or milk.<br />
Methods of cooling studied. There are several possible and practical<br />
methods of using a dairy refrigerator of the type described in this publication.<br />
The Dairy Husbandry department has followed the practice of allowing<br />
the milk to pass over a tubular cooler, cooled by 60° F. tap water. In<br />
the summer time the milk is cooled to 65° to 67° F. by this method. The<br />
milk was then cooled in cans in the refrigerator box by (1) setting the<br />
ten-gallon cans into the tank of refrigerated water which was at a temperature<br />
of 35° to 40° F., or (2) placing the cans in the tank of refrigerated<br />
water, which was circulated by a propeller-type agitator and was at 33° to<br />
36° F.<br />
In other tests the milk was poured into ten.gallon cans at 95° F. and<br />
cooled either in the uncirculated refrigerated water or in the circulated<br />
water as described above.<br />
The cans were usually filled as they floated in the refrigerated water,<br />
They were kept vertical by drawing the can into one corner of the box<br />
by means of- a hook attached to one handle of the can, the hook in turn<br />
being attached to a door spring suspended from the ceiling. As the can<br />
was filled the spring allowed the can to float deeper until it rested on the<br />
bottom of the box. The can was then moved to one side to make room for<br />
filling the next can in the same way. It was found that by filling the cans<br />
while being suspended in the refrigerated water, the average temperature<br />
of the milk in the can was 75° to 85° F. when the can was filled. The usual<br />
rate of delivery of milk to the milk room required 15 to 25 minutes to fill<br />
a ten-gallon can. This hastens the rate of cooling slightly and eliminates<br />
lifting the can into the box.<br />
Dry-storage tests were made in which the milk was cooled over a<br />
tubular surface cooler to 65° to 67° F. and placed in the same refrigerator<br />
box as was used for wet storage. The dry box was cooled by two fin-type<br />
coils (Frigidaire 58-F). Both natural circulation and force circulation<br />
using an 8-inch electric fan were tested as to rate of cooling and bacterial<br />
growth of the milk.<br />
Special tests were made to determine the effect of stirring the milk in<br />
the ten-gallon cans on the rate of cooling.<br />
No tests were made by passing the milk over a double-unit tubular<br />
cooler, cooled by both tap water and the refrigerated water as this is un-
MECHANICAL REFRIGERATION OF MILK 11<br />
necessary owingto the rapid rate of cooling of milk in cans in refrigerated<br />
water.<br />
The tubular cooler. The purpose of the tubular-surface cooler for milk<br />
has not been clearly established. According to some authorities, the only<br />
reason for using a tubular cooler is to cool the milk. Others contend that<br />
it is necessary to allow the milk to flow over a surface cooler to aerate the<br />
milk for the purpose of improving its flavor in addition to the cooling.<br />
The experiments reported in this publication include both can-cooled<br />
milk and milk precooled over a tubular cooler with final cooling in cans.<br />
Forty-nine ten-gallon cans of milk were cooled without the use of a surface<br />
cooler or aerator. The initial bacterial counts of 97 samples of this milk<br />
were consistently low. The average was 2,080, and when the milk was 14<br />
hours old the average count was 2,530. This shows there was practically<br />
no increase in the bacteria during the holding period (see Table IX). No<br />
objectionable flavors or odors were detected in the milk.<br />
It appears that milk of good flavor and of a low bacterial content can<br />
be produced either by tubular-surface cooling with well water followed by<br />
can cooling in 350 to 40° F. water, or by can cooling only in 35° to 40° F.<br />
water. The choice between the two methods appears to be one of economics<br />
and convenience depending on the cost of the necessary amount of cool<br />
water as compared to the additional investment in the larger refrigeration<br />
unit required and the additional power required for operation for can cooling.<br />
When a surface cooler is used it adds to the amount of equipment to be<br />
washed and sterilized and it offers an additional opportunity for contamination<br />
of the milk.<br />
The capacity of the refrigeration unit should be thoroughly understood<br />
by the purchaser. He should know how many gallons per milking<br />
the unit will cool from 950 F. to the desired temperature. He should know<br />
also how many gallons per milking can be cooled from the 70° F. where<br />
the milk is precooled by a tubular water cooler. Usually an electric dairy<br />
refrigerator will cool double the amount of milk below 50° F. if the milk<br />
is precooied to 70° F. by tap water.<br />
RATE OF COOLING<br />
Dry-storage tests. In the dry-storage tests the same refrigeratpr and<br />
refrigeration equipment were used as has been previously described. Milk<br />
was precooled by a tap-water surface cooler to 65° to 67° F.<br />
With natural air circulation the milk was cooled to 58° F. in 6 hours<br />
and to 500 F. in 12 hours.<br />
With forced air circulation using an electric fan the milk was cooled to<br />
51° F. in 6 hours and to 42° F. in 12 hours.<br />
These two methods of cooling milk in ten-gallon cans do not appear<br />
practical owing to their slow rate of cooling. There would not be sufficient<br />
time in the morning to cool the morning milk to any satisfactory shipping<br />
temperature.<br />
Wet-storage tests. The wet-storage tests included milk precooled over<br />
a tubular-surface cooler by water, and milk that was poured directly into
12 AGRICULTURAL EXPERIMENT STATION BULLETIN 268<br />
the ten-gallon cans as it was received in the milk room. The cans of milk<br />
were cooled by setting them in still refrigerated water or in circulated<br />
refrigerated water.<br />
The non-surface cooled milk entered the box at 95° F. The temperature<br />
of the milk dropped to 75° or 85° F. by the time the can was filled.<br />
The surface-cooled milk was cooled to about 65° F. before being placed<br />
in the refrigerator.<br />
The temperature of the still refrigerated water was from 35° to 45° F.<br />
and the circulated water 33° to 36° F.<br />
80<br />
70<br />
IE<br />
M/LH PRECOOLED-IVOT STIRRED<br />
... ;<br />
....<br />
--<br />
, I..<br />
I.. U.... .....<br />
30<br />
.<br />
2<br />
2 4 6 8 I0<br />
TIME IN HOURS<br />
Fig. 6. Time temperature curves. Cooling milk in ten-gallon cans in dry storage. Top-opening<br />
refrigeratorshowing average rate of cooling of 40 gallons of milk.<br />
The rate of cooling of these four methods is shown graphically in<br />
Figure 7.<br />
The 95° F. milk was cooled to 59° F. in one hour when the cans were<br />
kept in still water (35° to 45° F.) and to 46° F. in one hour when the water<br />
was circulated around the cans. At two hours the milk in the still water<br />
cooled to 56° F., and with circulated water it cooled to 42° F. (see Table<br />
II).
When the milk was precooled by a tubular tap-water cooler to 66° F.<br />
before being placed in refrigerated water, it cooled to 450 F. in one hour<br />
when the water was circulated and to 550 F. in one hour when the water<br />
was not circulated (see Table II).<br />
This greatly increased rate of cooling when the water was circulated<br />
may be of particular advantage as a simple way of hastening the cooling of<br />
the morning milk before shipping to market.<br />
Water circulator. The water was agitated or circulated by a small<br />
propeller mounted on a shaft which extended through the side of the tank<br />
I0<br />
9<br />
8<br />
5<br />
4<br />
3<br />
4J<br />
i'<br />
..<br />
.<br />
MECI-TANICAL REFRIGERATION. OF MILK 13<br />
wer<br />
WWer C,rco/ateo<br />
? 4-Mi/k Precco/ed)<br />
(ê<br />
MILK<br />
N,#<br />
C,rcv/ated,<br />
NOT<br />
33-3eP.<br />
STIRRED<br />
3545'f<br />
2 4 6 8 I0 12<br />
TIME IN HOURS<br />
Figure 7. Time temperature curves. Cooling milk in ten-gallon cans in refrigerated water.<br />
Average rate of cooling of 40 to 10 gallons. Milk temperature at center of cans.
FORMS FOR BUILDiNG OUTER WALL OF TANK<br />
iii llIIIIIIltlIII<br />
f<br />
MiI/<br />
Reinforcing Ba'<br />
3'Corkbcard<br />
SECT/ON CUT OUT TO SHOW CONSTP<br />
PERSPECTIVE VIEW OF COOLING TANK<br />
Figure 8. Plans far constructing an
irning<br />
LA5e Floor<br />
noN<br />
Tar<br />
Paper<br />
1U<br />
ilated concrete milk-cooling tank.<br />
INNER FORM FOR OUTER WALL<br />
OF INSULATED TANK<br />
T6 Sheafhinq<br />
MI/k House Wa/I<br />
45<br />
0;<br />
;& Al<br />
:0<br />
: :-o-<br />
!iii<br />
''UI<br />
H<br />
IlIllIllIlkIl<br />
'pening /x/"c/ed<br />
with brick or cobb/es<br />
loosely p/aced using a<br />
weak mortar.<br />
DETAIL OF CORNER OF FORM<br />
/Corkbocyrd<br />
6Ga .a/i Iron 0<br />
Côrkboam' -<br />
ho//s<br />
Drain<br />
CROSS SECTION OF TANK<br />
I<br />
2 Be/I<br />
trap<br />
Nc,,! heads left<br />
projecting<br />
6 Grat.'e/ or C,ndes
16 AGRICULTURAL EXPERIMENT STATION BULLETIN 268<br />
in a brass bushing (see figures 2 and 3). The propeller was made of<br />
16-gauge galvanized iron and the blades twisted to give the desired pitch.<br />
A packing nut on the outside of the tank prevented a loss of water and<br />
allowed the shaft to rotate in the water which served as a lubricant. The<br />
pulley on the propeller shaft was 10 inches in diameter and was driven by a<br />
TABLE II. COOLING MILK IN TEN-GALLON CANS IN REFRIGERATED<br />
WATER<br />
Average Rate of Cooling of 40 to 50 Gallons of Milk-Temperature at Center of Cans<br />
Time<br />
Milk precooled over tubular cooler Milk not precooled received at<br />
with tap water to 65° to 67° F. 90° to 95° F.<br />
Water not circu- Water not circu-<br />
The milk cooled from 90° to 95° F to 80° F. while filling the cans.<br />
NoTEs:<br />
Three gallons of water and ice to one gallon of milk.<br />
The water temperatures were kept as low as possible for each method.<br />
The milk was not stirred in the cans.<br />
TABLE III. COOLING MILK IN TEN-GALLON CANS IN DRY STORAGE.<br />
TOP-OPENING REFRIGERATOR<br />
Showing Average Rate of Cooling of 40 Gallons of Milk<br />
°Fan turned off.<br />
Water circulated<br />
in refrigerator<br />
Milk Water<br />
degi-ee.s<br />
F.<br />
degrees<br />
F.<br />
lated in refrigerator<br />
Milk Water<br />
degrees degrees<br />
F. F.<br />
Water circulated<br />
in refrigerator<br />
Milk Water<br />
degrees<br />
F°<br />
lated in refrigerator<br />
Milk Water<br />
degrees degrees degrees<br />
F. F. F.<br />
0 ..._.. .... 66.0° 34.0° 67.5° 36.0° 80.0° 32.0° 80.0° 37.0°<br />
15 minutes_ 55.0° 35.5° 64.0° 37.0° 64.5° 35.5° 70.0° 41.0°<br />
30 minutes 49.0° 36.0° 61.0° 39.0° 54.0° 36.0° 64.0° 45.0°<br />
45 minutes 45.0° 36.0° 58.0° 39.0° 48.0° 36.0° 45.0°<br />
I hour_ 44.0° 36.0° 55.0° 38.0° 46.0° 36.0° 59.0° 45.0°<br />
2 hours 41.5° 34.5° 52.0° 38.0° 42.0° 35.0° 56.0° 43.0°<br />
3 hours 40.0° 34.0° 50.0° 38.0° 40.0° 34.0° 53.0° 42.0°<br />
4 hours......... 38.5° 34.0° 48.0° 36.0° 38.5° 33.5° 50.0° 40.0°<br />
5 hours 37.0° 33.0° 46.0° 35.5° 37.0° 33.0° 48.5° 38.5°<br />
6 hours 36.0° 32.5° 44.0° 35.0° 36.0° 32.0° 46.5° 38.0°<br />
7 hours 35.5° 32.0° 42.5° 35.0° 35.5° 32.0° 45.0° 37.5°<br />
8 hours 35.0° 32.0° 41.0° 35.0° 35.0° 32.0° 43.0° 36.0°<br />
9 hours 34.5° 32.0° 40.0° 35.0° 34.5° 32.0° 42.0° 35.0°<br />
10 hours 34.0° 32.0° 39.0° 35.0° 34.0° 32.0° 41.0° 35.0°<br />
11 hours._ 34.0° 32.0° 38.0° 35.0° 34.0° 32.0° 39.5° 35.0°<br />
12 hours 34.0° 32.0° 37.0° 35.0° 34.0° 32.0° 38.5° 35.0°<br />
Time<br />
Dry box-no<br />
Surface-cooled<br />
milk temper-Box temperature<br />
ature<br />
fan Dry box-fan circulation-<br />
Surf ace-cooled<br />
milk temper- Box temperature<br />
ature<br />
hrs. degrees F. degrees F. degrees F. degrees F.<br />
0 67.50° 52.0° 67.5° 38.0°<br />
:15 67.00° 52.0° 67.0° 42.0°<br />
:30 66.50° 52.0° 66.5° 42.0°<br />
:45 66.25° 52.0° 66.0° 42.0°<br />
1:00 66.00° 52.0° 65.0° 40.0°<br />
2:00<br />
64.00°<br />
51.0°<br />
62.0°<br />
38.0°<br />
3:00<br />
62.75°<br />
51.0°<br />
60.0°<br />
36.0°<br />
4:00 61.00° 50.0° 57.0° 34.0°<br />
5:00 59.50° 48.0° 53.5° 31.0°<br />
6:00 58.00° 47.5° 51.0° 29.0°<br />
7:00<br />
56.00°<br />
47.0°<br />
48.5°<br />
27.O°<br />
8:00<br />
55.00°<br />
46.0°<br />
46.0°<br />
32.0°<br />
9:00<br />
53.50°<br />
45.0°<br />
45.0°<br />
32.0°<br />
10:00<br />
52.25°<br />
44.5°<br />
44.0°<br />
31.0°<br />
11:00<br />
51.00°<br />
44.0°<br />
43.0°<br />
31.0°<br />
12:00<br />
50.00°<br />
43.0°<br />
42.0°<br />
30.0°
small 1800-r.p.m. electric motor having a 2-inch pulley. The power demand<br />
of the motor when turning the propeller in the water was 100 watts. With<br />
no load on the motor the power demand was 86 watts. Operating the propeller<br />
in the water therefore required only 14 watts.<br />
The entire propeller assembly and 10-inch wood pulley were made<br />
locally at a total cost of $11.00.<br />
The effect of stirring the milk on rate of cooling. It is a very common<br />
recommendation that when cooling milk in cans in a tank of water, stirring<br />
the milk increases the rate of cooling. A number of tests were made to<br />
determine to wha.t degree stirring milk in ten-gallon cans would hasten<br />
the cooling when the cans were placed in water at 33° to 40° F. In all of<br />
these tests the cooling water was approximately level with the milk in the<br />
cans.<br />
The following milk-stirring tests were made:<br />
Stirred at 5-minute intervals for U hours.<br />
Stirred at 15-minute intervals for l hours.<br />
One stirring at 10 minutes.<br />
Stirred at 5, 10, and 15 minutes.<br />
Table IV gives the cooling data for the stirring and non-stirring tests.<br />
All temperatures were taken at the center of the ten-gallon cans.<br />
TABLE IV. EFFECT OF STIRRING MILK IN TEN-GALLON CANS ON RATE<br />
OF COOLING<br />
Method 1<br />
Not stirred.....<br />
Stirred once<br />
at 10 minutes<br />
Stirred at 5,<br />
10 and 15<br />
minutes ..<br />
Not stirred....<br />
Stirred every<br />
15 minutes<br />
for l hours<br />
Stirred every<br />
5 minutes for<br />
4 hours<br />
Method 2<br />
MECHANICAL REFRIGERATION OF MILK 17<br />
Water temperature<br />
Maximum Minimum<br />
Start<br />
Milk temperature<br />
30 minutes 1 hour 2 hours 3 hours 4 hours<br />
degrees degrees<br />
F. F.<br />
36.5° 33.5°<br />
degrees<br />
F.<br />
61.0°'<br />
degrees<br />
F.<br />
50.0°<br />
degrees degrees<br />
F. F.<br />
46.0° 43.0'<br />
degrees degrees<br />
F. F.<br />
40.0° 38.0°<br />
36.0° 33.0° 68.0'' 51.0° 49.0° 45.0° 41.0° 38.0°<br />
35.5° 33.5° 59.0°' 47.0° 44.0' 42.5' 39.0° 37.0'<br />
40.0° 33.0' 80.0' 55.0' 46.0° 42.0' 40.0°<br />
40.0' 33.0° 80.0' 55.0° 47.0' 40.0° 39.0°<br />
40.0° 33.0° 80.0° 55.0° 46.0' 39.0° 37.0'<br />
Not stirred....<br />
Stirred every<br />
5 minutes for<br />
4 hours ..<br />
42.0°<br />
41.0°<br />
36.5°<br />
37.0°<br />
80.0°<br />
84.5'<br />
64.0°<br />
68.0°<br />
59.0°<br />
59.0°<br />
56.0°<br />
54.0°<br />
53.0°<br />
53.5°<br />
50.0'<br />
51.5°<br />
Method 1. Milk placed in refrigerated circulated water.<br />
Procedure in handling milk Received from milking barn at 95° F.<br />
Poured into the cans which were suspended in the refrigerated water. By<br />
the time the cans were full the average temperature was about 80 F.<br />
The non-tubular cooled milk was therefore cooled from 95° F. in the refrigerated<br />
water.<br />
'Precooled by tubular cooler.<br />
Method 2. Same handling as Method 1 except the water was not circulated in the cooling<br />
lank.
18 AGRICULTURAL EXPERIMENT STATION BULLETIN 268<br />
Stirring the milk was found to be of no practical value in increasing<br />
the rate of cooling. Stirring the milk caused a maximum of 3° lower temperature<br />
in the center of the cans, but usually the temperature of the milk<br />
was influenced less than 3° by stirring.<br />
Since the stirring rod and the removal of the lids of the cans may<br />
cause additional bacterial contamination it is apparent that stirring may<br />
well be omitted.<br />
Bacterial increase in milk during cooling. The number of bacteria<br />
present in milk is generally accepted as one of the most important factors<br />
in determining the quality of the milk. As the temperature of the milk is<br />
reduced from body temperature after milking the rate of bacterial growth<br />
is decreased. When milk is cooled to below 50° F., bacterial increase is<br />
practically stopped for a period of from 12 to 24 hours, but for longer<br />
storage a temperature near 32° F. must be maintained to prevent bacterial<br />
increase. Standard laboratory methods have been developed for determining<br />
the number of bacteria present in one cubic centimeter of milk, and<br />
this is generally referred to as the bacterial count of the milk. All bacterial<br />
counts in this experiment were made by the Macroscopic Colony-count<br />
method."<br />
Samples of each can of milk were taken for bacterial count as the cans<br />
were filled and another sample was taken 12 to 14 hours later. All samples<br />
were plated in duplicate. By this method the bacterial increase in milk<br />
held over night for shipment was determined for the various methods of<br />
cooling. A tabular summary of the bacterial counts is given in tables V to<br />
x. The samples of milk having initial bacterial counts of less than 5,000<br />
were grouped together for each method of cooling. Similarly, samples<br />
having initial counts of 5,000 to 10,000 were grouped together. Simple<br />
averages of the initial bacteria counts and those of the milk after twelve<br />
hours were then calculated. This system of grouping was adopted after<br />
having calculated the average of the bacterial counts by several other<br />
methods. This system avoids excessively high averages of all samples from<br />
one or two samples that may have 100,000 bacteria per cubic centimeter<br />
when most of the milk has 2,000 to 4,000 bacteria per cubic centimeter.<br />
The authors believe a sufficient number of samples of milk were included<br />
in the averages of the bacterial counts to be reasonably accurate.<br />
The smallest number for any method of cooling was 26 samples and the<br />
largest number was 157 samples.<br />
A study of the bacteria-count data may be confusing to any one not<br />
familiar with the usual variations in bacterial counts of milk. Certain groups<br />
of samples of milk actually showed a decrease in the numbers of bacteria<br />
present during the first 12 hours. All of these increases or decreases were<br />
so slight that all of the methods of cooling and holding the milk for the<br />
first 12 hours may be considered satisfactory in preventing increase in the<br />
number of bacteria present in the milk with the exception of the test in<br />
which milk was cooled over a tubular cooler and held in a tank of water at<br />
50° to 65° F. without refrigeration. In this test the bacteria increased<br />
189 percent in 12 hours and 4,487 percent in 24 hours.<br />
The results of the experiment in cooling milk from 95° F. in ten-gallon<br />
cans in non-circulated water at 35° to 45° F. are of special interest. There<br />
°Standard Methods of Milk Analysis of the American Public Health Association.
were 97 samples of milk with an average initial bacterial count of 2,080 per<br />
cubic centimeter. The average bacterial count at the end of 14 hours<br />
storage was 2,530 or an increase of 450 per cubic centimeter, which ts of<br />
little or no significance.<br />
A study of the rate of cooling by this method shows that this milk<br />
cooled to approximately 60° F. in 1 hour, 55° F. in 2 hours, and 50° F. in<br />
4 hours. This is further evidence that it is not necessary to cool milk<br />
immediately to below 50° F. to maintain a low bacterial count.<br />
Bacterial<br />
grouping<br />
TABLE V. EFFECT OF REFRIGERATION UPON BACTERIAL<br />
CONTENT OF MILK<br />
Dry Box. Baftle Circulation<br />
Box Temperature 43° F. - 52° F.<br />
Temperature Milk Entering Box-65° - 67° F. (Tubular Cooler)<br />
Number of<br />
samples<br />
Average of bacterial counts<br />
Initial Held 14 hours<br />
Bacterial<br />
increase<br />
TABLE VI. EFFECT OF REFRIGERATION UPON BACTERIAL<br />
CONTENT OF MILK<br />
Dry Box. Forced Air Circulat son<br />
Average Box Temperature 27° to 42° F.<br />
Temperature Milk Entering Box-65° to 67° F. (Tubular Cooler)<br />
Bacterial Number of Average of bacterial counts Bacterial Percentage of<br />
grouping samples Initial Held 14 hours increase increase<br />
TABLE VII. EFFECT OF REFRIGERATION UPON BACTERIAL<br />
CONTENT OF MILK<br />
<strong>Refrigera</strong>ted Water Not Circulated<br />
Water Temperature 35° to 45° F.<br />
Temperature Milk Entering Box, 65° to 67° F. (Tubular Cooler)<br />
Percentage of<br />
increase<br />
0<br />
5,000 36 4,070 3,808 -262 -6.4<br />
5,001<br />
10,000 75 7,430 7,780 +350 +4.7<br />
10,001<br />
20,000 38 12.800 12,250 -550 -4.3<br />
20,001<br />
30,000 4 23,450 19,475 -3,975 -16.2<br />
30,001<br />
40,000 4 34,175 23,900 -10,275 -30.1<br />
Bacterial<br />
grouping<br />
MECHANICAL REFRIGERATION OF MILK 19<br />
0<br />
5,000 24 3,100 2,780 -320 -10.3<br />
10,001<br />
20,000 2 10,100 7,400 -2,700 -26.7<br />
Number of<br />
samples<br />
Average of bacterial counts<br />
Initial Held 12 hours<br />
Bacterial<br />
increase<br />
Percentage of<br />
increase<br />
0<br />
5,000 109 1.350 1,565 +215 +15.9<br />
5,001<br />
10,000 12 6,340 9,130 +2,790 +44.0<br />
10,001<br />
20,000 12 14,350 12,850 -1,500 -10.5
20 AGRICULTURAL EXPERIMENT STATION BULLETIN 268<br />
Bacterial<br />
grouping<br />
TABLE VIII. EFFECT OF REFRIGERATION UPON BACTERIAL<br />
CONTENT OF MILK<br />
Refri,erated Water Circulated<br />
Water Temperature 32 to 36 F.<br />
Temperature Milk Entering Box, 55 to 60 F. (Tubular Cooler)<br />
Number of<br />
samples<br />
Average of bacterial counts<br />
Initial Held 12 hours<br />
Bacterial<br />
increase<br />
TABLE IX. EFFECT OF REFRIGERATION UPON BACTERIAL<br />
CONTENT OF MILK<br />
Refriertsted Water Not Circulated<br />
Water Temperature 35 to 45 F.<br />
Temperature of Milk Entering Box, 95 F.<br />
Milk Cooled in Ten-gallon Cans<br />
Bacterial Number of Average of bacterial counts Bacterial Percentage of<br />
grouping samples Initial Held 14 hours increase increase<br />
0<br />
5,000 97 2,080 2,530 +450 +21.6<br />
TABLE X. EFFECT OF COOLING UPON BACTERIAL<br />
CONTENT OF MILK<br />
Cans of Milk Kept in Open Tank of Tap Water<br />
Water Temperature 5Y to 6Y F.<br />
Temperature of Milk Entering Box, 55 to 65 F. (Tubular Cooler)<br />
Percentage of<br />
increase<br />
0<br />
5,000 96 2,600 3,035 +435 +16.7<br />
5,001<br />
10,000 46 6,600 6,330 -270 -4.1<br />
10,001<br />
20,000 6 13,900 10,116 -3,784 -27.2<br />
20,001<br />
30,000 2 22,000 29,700 +7,700 +35.0<br />
Bacterial Number of Average ol bacterial counts Percentage of increase<br />
grouping samples Initial Held 12 hours Held 24 hours 12 hours 24 hours<br />
0<br />
5,000 46 1,930 5,570 88,500<br />
%<br />
+1S9 +4,487<br />
5,001<br />
10,000 2 6,950 28,500 89,000 +310 +1,180<br />
10,001<br />
20,000 4 14,800 51,025 750,000 +245 4,970<br />
Note: Many farms do not have water as cold as was used in this test (50 to 55 F.).
COST OF COOLING OF MILK WITH ICE VERSUS<br />
ELECTRIC REFRIGERATORS<br />
There are no mysteries in mechanical refrigeration equipment. If certain<br />
gases are compressed to a liquid state, and this liquid is then allowed to<br />
expand to a gas again, heat will be absorbed by the expanding gas.<br />
This is what is done by a mechanical refrigerator. The compression of<br />
the gas is accomplished by a mechanical compressor outside the box,and<br />
the gas is allowed to expand through coils inside the refrigerator, thereby<br />
cooling the inside of the box.<br />
Ice can be used to duplicate mechanical refrigeration in cooling milk<br />
in cans in refrigerated water with an insulated tank. A water temperature<br />
of 350 F. can be obtained and if a mechanical circulator, as described on<br />
page 13, is used, the temperature can be reduced to 32° F., thereby having<br />
the same rate of cooling the milk as is shown in Figure 5.<br />
The amount of ice necessary to cool 100 pounds of milk will determine<br />
the cost of cooling by this method. Tests were made to determine the<br />
amount of ice required to cool non-tubular cooled and tubular cooled milk.<br />
3' o<br />
MECHANICAL REFRIGERATION OF MILK<br />
L -I<br />
0%<br />
2 O'-4--- 2' ,O 2 23<br />
SINK &<br />
WATER SINK a DRajN<br />
Drain<br />
©-._- __:'<br />
4 PeRTA..LE<br />
INSULATED MILK<br />
COOL/KR TAt//I'<br />
SPACE I' R,Rio-<br />
ERA TOE CoMneE<br />
AND Mcwo<br />
&tMN -OUT<br />
Figure 9. Milk-room floor plan showing equipment arrangement including a mechanical<br />
refrigeration unit and a four-can portable insulated cooling tank;<br />
&- 0<br />
SPACeroR<br />
/ 'I<br />
SrERILlz2 ,' /<br />
I'<br />
1'<br />
21
22 AGRICULTURAL EXPERIMENT STATION BULLETIN 268<br />
Ice required to cool milk.<br />
80 gallons of milk per dayNon-tubular cooled milk.<br />
Evening milk cooled from 95 to 35U F.<br />
Morning milk cooled from 9U to 45 F.<br />
Total ice consumption including box loss-292 pounds.<br />
Ice consumption per 100 pounds of milk-45.6 pounds.<br />
Ice cost per tOO pounds of milk at 22.8.<br />
80 gallons of milk per dayTubular cooled milk to 70 F.<br />
Evening milk cooled from 70U to 35 F.<br />
Morning milk cooled from 70 to 35 F.<br />
Total ice consumption including box loss-181.4 pounds<br />
Ice consumption per 100 pounds of milk-28.4 pounds.<br />
Ice Cost per 100 pounds of milk at 14.2.<br />
Cost of cooling milk with electric refrigeration. Under average conditions<br />
1 kilowatt-hour is required to cool 100 pounds of milk with electric<br />
refrigeration equipment of the type described in this bulletin. Tltiz would<br />
cost 3ft at the usual power rate. A liberal allowance for interest, depreciation,<br />
and repairs on an electric refrigerator of sufficient capacity to cool<br />
I<br />
I<br />
.Y 9 2' ü 4.-- 2' O 2'J"<br />
4Voncsen<br />
3 onCnrr<br />
I I I<br />
SINk & ON<br />
5,twc &<br />
6 cAN 1N.5ULATD C,-.oEr<br />
Misx COOLING TANk<br />
51N1<<br />
4 D,A,wp,ee-<br />
r --<br />
-.<br />
SURFACe<br />
C0OCON<br />
SPACE FOR 24 5Z"<br />
EEFRJ6tRATOR CoMps'r,55c&e<br />
Awo MoTo,e<br />
Figure 10. Milk-room floor plan showing equipment arrangement including mechanical<br />
refrigeration unit and a six-can insulated concrete cooling tank.<br />
0<br />
0,4<br />
1<br />
LL
80 gallons of milk per day shbuld not exceed 20 per day, which would be<br />
about 3 per 100 pounds of milk, making a total cost of 6t per 100 pounds<br />
of milk.<br />
Ice at per pound would cost 14.2 to cool 100 pounds of milk as<br />
shown above so that the electric refrigeration equipment is less expensive.<br />
It is also more convenient.<br />
Temperature rise of milk in ten-gallon cans. Table XI gives the results<br />
of the test to determine the rate of temperature rise in milk in ten-gallon<br />
cans after being removed from the refrigerator under conditions somewhat<br />
similar to those when shipping to market. The milk was at 36° F. when it<br />
was taken from the refrigerator. The test was made in a room 10 feet by<br />
12 feet which was heated to as near 80° F. as it was possible to maintain.<br />
The temperature of the room varied from 74° to 87° F. The cans were not<br />
protected from the heat of the room. Two cans were stirred every 15<br />
minutes and two cans were not stirred. The temperature was taken at the<br />
centers of the cans. At 4 hours the average temperature of the milk that<br />
was stirred was 51.5° F. and of the unstirred milk 506° F.<br />
Table XII gives the results of a test to determine the rate of temperature<br />
rise of milk in ten-gallon cans when covered with insulation as compared<br />
to no insulation. The insulation jackets were of i-inch hair-felt<br />
covered with canvas.<br />
These jackets kept the milk below 50° F. 2 times as long as the milk<br />
in the cans that were not protected from the 80° F. room. The milk in the<br />
cans that were jacketed remained below 50° F. for 8 hours and in the cans<br />
that were not protected for only 3 hours.<br />
TABLE XI. TEMPERATURE RISE IN MILK IN TEN-GALLON CANS<br />
Non-insulated<br />
Time Room temperature<br />
MECHANiCAL REFRIGERATION OF MILI 23<br />
Can 1<br />
Temperature taken at center of cans.<br />
Cans 1 and 2-Stirred every 15 minutes.<br />
Cans 3 and 4-Not stirred for 4 hours.<br />
Milk temperature<br />
Can 2 Can 3 Can 4<br />
hours minutes degrees F. degrees F. degrees F. degrees F. degrees F.<br />
0:0 76° 36.0° 36.0° 36.0° 36.0°<br />
:30 78° 40.0° 425° 38.0° 40.4°<br />
:45 82° 42.3° 41.3° 40.2° 41.5°<br />
1:00 80° 43.6° 42.0° 39.5° 42.5°<br />
1 :15 76° 43.9° 43.1° 42.0° 43.3°<br />
1:30 74° 44.9° 44.9° 43.1° 44.6°<br />
1:45 76° 46.7° 45.7° 43.9° 44.1°<br />
2:00 76° 47.0° 45.7° 43.9° 43.9°<br />
2:15 78° 48.5° 47.5° 43.9° 47.5°<br />
2:30 78° 49.3° 47.8° 45.7° 48.0°<br />
2:45 87° 50.1° 48.8° 44.6° 496°<br />
3 :00 80° 50.9° 49.3° 47.5° 50.4°<br />
3:15 80° 50.9° 496° 48.5° 50.9°<br />
3:30 76° 51.4° 50.1° 49.3° 51.7°<br />
3:45 76° 51.7° 50.1° 50.1° 51.7°<br />
4:00 74° 52.2° 50.9° 50.4° 51.9°
24 AGRICULTURAL EXPERIMENT STATION BULLETIN 268<br />
Time°<br />
TABLE XII. TEMPERATURE RISE IN MILK IN TEN-GALLON CANS<br />
IN APPROXIMATELY 80° F. ROOM TEMPERATURE<br />
Insulated and non-insulated<br />
Room temperature<br />
Height from floor<br />
1 ft. 5 ft.<br />
Cans riot insulated<br />
Can ii Can 2f<br />
inch hair-felt insulation<br />
jacket over cans<br />
Can 39 Can 4? Can 40<br />
mittfirs.<br />
sites degrees F degrees F. degrees F. degrees F. degrees F. degrees F. degrees F.<br />
0:0 76° 89° 38.3° 37.7° 38.3° 38.3° 41.9°<br />
:15 77° 90° 394° 39.0° 38.7° 38.5° 41.3°<br />
:30 77° 92° 39.9° 39.4° 39.2° 38.9° 41.3°<br />
:45 78° 93° 40.8° 39.5° 39.2° 39.4° 41.4°<br />
1:00 79° 94° 42.1° 40.8° 39.2° 39.5° 41.5°<br />
1:15 80° 95° 43.1° 42.6° 39.4° 39.9° 41.6°<br />
1:30 80° 95° 44.7° 43.3° 39.5° 40.2° 41.6°<br />
2:30 82° 93° 49.0° 48.4° 40.4° 41.4° 43.5°<br />
3:00 82° 92° 50.6° 49.8° 41.3° 41.9° 44.0°<br />
3:30 82° 2° 52.0° 5 1.5° 41.8° 42.8° 44.7°<br />
4:00 83° 92° 53.7° 53.0° 43.0° 43.8° 45.5°<br />
4:30 83° 92° 55.2° 54.5° 43.5° 44.7° 46.4°<br />
5:00 83° 92° 56.4° 56.0° 44.0° 45.4° 46.9°<br />
5:30 84° 91° 57.7° 57.4° 44.9° 46.0° 47.7°<br />
7:00 83° 88° 46.7° 48.6° 49.1°<br />
8:30 82° 85° 48.6° 50.0° 51.5°<br />
8:45 Jackets removed and milk stirred 49.8° 5 1.6° 5 1.7°<br />
°Required 15 minutes in the 76° F. room to set thermo-couples arid put on the jackets<br />
before starting the experiment.<br />
fTemperature at the center of the can.<br />
ITernperature 1 inch from the side of the can.<br />
BUILDING AN INSULATED CONCRETE MILK-<br />
COOLING TANK*<br />
An insulated concrete milk-cooling tank may be built entirely of concrete<br />
and corkboard or it may have an outer wall of concrete, the insulation<br />
and inner wall being of galvanized iron. The following instructions<br />
are for the construction of a tank having inner walls of concrete.<br />
The location having been selected, the excavation should be completed<br />
to the required depth. The bottom of the tank must not be lower<br />
than the drainage level. Where the ground is subject to heaving or where<br />
the drainage is questionable, a fill of small field-stone or gravel 12 inches<br />
in depth is recommended.<br />
TABLE XIII. QUANTITIES OF MATERIALS FOR INSULATED<br />
CONCRETE TANKS<br />
(All tanks 36 inches wide, 28 inches deep, inside dimensions)<br />
Materials<br />
Length of tank<br />
Unit of measurement 4 feet 6 feet 8 feet<br />
3-inch corkboard Square feet 66 84 102<br />
Asphalt Pounds 80 100 120<br />
Roofing felt or cotton fabric Square yards......._ 9 11 13<br />
Reinforcing rods °'._ ----_...._..--------_Feet 66 81 93<br />
Cement -- Sacks 12 15 18<br />
Sand Cubic feet 24 30 36<br />
Pebbles Cubic feet 24 30 36<br />
NOTE: Other materials needed include lumber for forms, lumber for cover, insulation<br />
for cover, tar paper, hinges, handles, nails. All estimates based on tanks 36 inches wide on<br />
the inside. Asphalt weighs approximately 8.3 pounds per gallon. A i-inch reinforcing rod,<br />
10 feet long, weighs about 3 pounds.<br />
°Acknowledgment of the assistance of the Portland Cement Company in preparing<br />
these plans and instructions is hereby given.
MECHANICAL REFRIGERATION OF MILK 25<br />
Construct the forms. The outer form of the tank is first constructed.<br />
Where it is desired to utilize the outer walls of the building for the tank<br />
forms, one or two thicknesses of waterproof building paper or roofing<br />
felt should be placed against the walls so that their settlement or upheaval<br />
from frost action will not injure or disturb the tank.<br />
The inner form of the outer tank should next be constructed and be<br />
ready for use before the concreting commences. It is usual in small-tank<br />
construction to hang the inner form from cross-pieces which are in turn<br />
slung from some outer support such as the outer form, stakes, or side walls<br />
of the building.<br />
Nailing and bracing should always be such that the forms can be<br />
easily released and withdrawn. Nails should be driven with the heads left<br />
projecting about inch. Beveling the ends of the boards slightly will aid<br />
in their removal.<br />
The wall forms should be securely braced both at the bottom and the<br />
top. The correct distance between the inner and outer forms can be maintained<br />
by means of spreaders and by tying the tops of the forms by means<br />
of wooden cleats. The spreaders are removed during the concreting. Form<br />
construction and bracing, as described above, will keep the forms from<br />
springing.<br />
If the form lumber of the outer tank is to be used again for the inner<br />
form of the inner tank, the cover, or other purposes, a coating of oil will<br />
aid in keeping it in good condition. Worn crankcase oil from an automobile<br />
or from a tractor is good for this purpose. It is possible to utilize<br />
practically all of the form lumber to construct the cover.<br />
Reinforcement. Reinforcement may often be eliminated in whole or in<br />
part. VThere there will be no settlement or upheaval from frost, there is<br />
small probability that the outer tank will be ruptured. Where the reinforcement<br />
is omitted, one or two reinforcing rods or heavy wires should<br />
be used near the upper part of the tank wall.<br />
Water-tight concrete. In the construction of tanks to hold liquids it is<br />
imperative that they be water-tight. This means that certain precautions<br />
must be followed in making the concrete.<br />
The sand must be clean and contain not more than 5 percent of silt by<br />
volume. It must also be free from all vegetable or organic matter.<br />
The sand should be coarse, with large-sized grains predominating.<br />
Bank-run gravel should not be used until screened. The maximum size of<br />
pebbles or stone allowable for walls of this thickness is 1 inch. It should<br />
then be rcmixed by measuring out and using I sack of cement to 2 cubic<br />
feet of sand and about 3 cubic fee of screened gravel or crushed stone.<br />
The concrete should be thoroughly mixed, using not more than 6 gallons<br />
of water per sack of cement.<br />
The first batch for the side walls should be of mortar only. This will<br />
fill all corners with a minimum amount of spading and will aid in making<br />
future batches more plastic when deposited in the forms.<br />
Where a machine is used, the mixing should be continued at least II<br />
minutes after the last of the ingredients have been placed in the mixer.<br />
Where hand-mixing is employed the ingredients should be thoroughly<br />
and completely turned and spread in thin layers.
26 AGRICULTURAL EXPERIMENT STATION BULLETIN 268<br />
Pour the concrete. The floor of the outer tank is first constructed,<br />
using a rather stiff mixture. The concrete should be brought to the same<br />
height as the lower edge of the inner form would be, when it is hung in<br />
place. It is then struck off level and smoothed with a steel trowel or<br />
wood float.<br />
Upon completion of the floor the inner form of the outer tank is set<br />
and its position checked for accuracy. The concreting should be resumed<br />
when the mixture has stiffened sufficiently to prevent the concrete of the<br />
side walls from flowing beneath the inner form.<br />
Care should be taken to see that the reinforcement, if used, is covered<br />
with at least 1 inch of concrete at every place. Any thickness of concrete<br />
less than this will give insufficient protection against rusting to the reinforcing<br />
steel.<br />
As the concrete is placed for the side walls of the tank, care must be<br />
taken to keep the level of the concrete even in all four walls in order to<br />
prevent displacement of the form from unequal side pressure. The concrete<br />
should be placed in courses about 6 inches in depth, running each<br />
course entirely around the tank.<br />
It may be well to note here that, in the making of water-tight concrete,<br />
the sand and pebbles must not be allowed to segregate or separate.<br />
Placing the concrete in one end of the tank and expecting it to flow<br />
any considerable distance laterally may separate the cement and the sand<br />
from the pebbles. Each course must be spaded in order to settle the concrete<br />
in the forms and eliminate any air that may be entrapped in the mix<br />
ture. A sidewalk cleaner or thin-edged board may be used to spade the<br />
con crete.<br />
After the side walls are completed, the position of the forms should be<br />
checked again. Eight of the bolts should be inserted in the concrete and<br />
spaced in the rim of the tank by hanging from a wooden cleat, leaving<br />
about 1 inches of each bolt projecting above the level of the finished<br />
concrete.<br />
Remove and reconstruct the inner forms. It is not advisable to remove<br />
the forms too soon after the concreting is completed. The sharp corners<br />
might be broken or the side walls of the tank ruptured. In warm weather<br />
about two days should be allowed before attempting to remove the inner<br />
forms.<br />
The nails should be carefully withdrawn and the forms for the end<br />
walls removed first. The side-wall forms should next be removed. They<br />
should immediately be cleaned and reolled.<br />
The inner form of the outer tank should be cut down to the inner<br />
dimensions of the finished tank. The outer forms may be left in place for a<br />
longer period to protect the concrete against injury and premature drying.<br />
Finish the concrete. Upon removal of the forms, all voids or honeycombing,<br />
if any, should be filled with a 1:2 mortar well troweled. After the<br />
mortar has hardened sufficiently to remain in place, the surface of the tank<br />
should be washed with a brush coat of cement and water, mixed to the<br />
consistency of thin cream. This wash is advisable to fill any pores that<br />
may exist in the concrete.
MECHANICAL REFRIGERATION OF MILK 27<br />
Place the insulation. If moisture enters the insulation material, its<br />
efficiency is greatly reduced. The insulation must be sealed with<br />
asphaltum to prevent the entrance of moisture.<br />
The inner walls and floor of the outer tank should be mopped with hot<br />
asphaltum. Care must be taken to see that the entire surface is covered.<br />
Three inches of corkboard, or its equivalent, provides good insulation<br />
but no less should be installed. Two layers of U-inch corkboard is preferable<br />
to one 3-inch layer if the joints are made in different places in each<br />
layer. Three inches of cork for a 6-can box will cost about $30.00.<br />
Corkboard, previously cut to size, dipped and thoroughly brushed in<br />
hot asphaltum, is then erected against the side walls. The material for the<br />
floor should next be cut, dipped, brushed, and placed. Corkboard may<br />
easily be cut by means of a carpenter's saw.<br />
In order to avoid any condensation in the corkboard, caused by leakage<br />
of water through the inner tank or through the asphaltum coat, it is<br />
strongly recommended that the additional precaution of further waterproofing<br />
the corkboard be taken. This may be done by means of a membrane,<br />
as single-ply tar roofing paper or felt, mopped with hot asphaltum to<br />
the inner side of the corkboard lining and again mopped to seal the exposed<br />
side. This last coat should be allowed to dry or harden slightly;<br />
otherwise, if any excess is used, it will strike through the concrete floor<br />
owing to the lesser density of the asphaltum.<br />
The inner tank is constructed similarly to the outer tank except that<br />
the floor surface is finished so that it will drain quickly and entirely. A<br />
steel trowel should be used for finishing.<br />
The inner form is next hung, the concrete placed for the side walls,<br />
and the remainder of the bolts, four in number, inserted in the concrete,<br />
as described above.<br />
Remove the forms and finish the concrete. This operation is similar to<br />
that described for the outer tank.<br />
The concrete should be allowed to harden for a few days before the<br />
cover is placed. Proper hardening of the concrete can be obtained by<br />
thorough curing, which consists in keeping the concrete moist for several<br />
days.<br />
Construct the tank rim and cover. The first operation in the construction<br />
of a cover is to construct the rim and fasten it to the tank. After<br />
the pieces of the rim are fitted, they should be pressed on to a bed of<br />
mortar so that the joint will be thoroughly sealed. This mortar bed should<br />
not extend over the corkboard or a leakage of heat will result. The nuts in<br />
the mortised recesses of the rim should be turned down firmly, but not so<br />
far that the bolts will start or turn in the green or uncured concrete.<br />
The cover should then be constructed as shown in Figure 8. If the<br />
box is of tile 4-can size, the lid may be made in one piece. The cover and<br />
rim should then be painted with at least two coats of white lead and oil.