LinkUp Wifi Router Manual - LED Lighting
LinkUp Wifi Router Manual - LED Lighting
LinkUp Wifi Router Manual - LED Lighting

You also want an ePaper? Increase the reach of your titles
YUMPU automatically turns print PDFs into web optimized ePapers that Google loves.
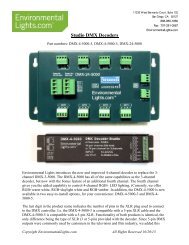
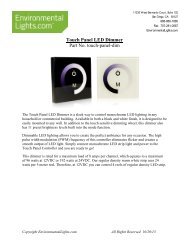
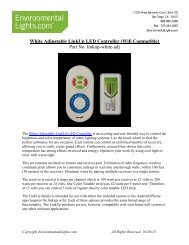
11235 West Bernardo Court, Suite 102San Diego, CA 92127888-880-1880Fax: 707-281-0567EnvironmentalLights.com<strong>LinkUp</strong> <strong>Wifi</strong> <strong>Router</strong>Part No. linkup-wifiThe <strong>LinkUp</strong> <strong>Wifi</strong> <strong>Router</strong> is an innovative product which will bring your home and commerciallighting into the internet age. Control multiple types of lighting from a single interface – on youriPhone, iPad or Android device! This <strong>Wifi</strong> router is compatible with the entire <strong>LinkUp</strong> family:<strong>LED</strong> Light BulbsDimmable Warm White <strong>LinkUp</strong> Multizone <strong>LED</strong> Light Bulb Kit (linkup-ww-bulb-kit)White Adjustable <strong>LinkUp</strong> Multizone <strong>LED</strong> Light Bulb Kit (linkup-wa-bulb-kit)RGB <strong>LinkUp</strong> <strong>LED</strong> Light Bulb Kit (linkup-rgb-bulb-kit)RGB <strong>LinkUp</strong> <strong>LED</strong> Light Bulb (linkup-rgb-bulb)<strong>LED</strong> ControllersDimmable <strong>LinkUp</strong> <strong>LED</strong> Controller (linkup-dim)White Adjustable <strong>LinkUp</strong> <strong>LED</strong> Controller (linkup-white-adj)RGB <strong>LinkUp</strong> <strong>LED</strong> Controller (linkup-rgb)RGB ColorPlus <strong>LinkUp</strong> <strong>LED</strong> Controller (linkup-rgbw)The wifi router can be powered by either USB (cord included) or power adapter, and acts as astandalone unit. Simply connect the lights you wish to control into the appropriate receiver,download the app to an iPhone, iPad, or Android device, and get started. An unlimited number ofreceivers and bulbs can be controlled by a single unit, making it great for homes and businesses.Copyright EnvironmentalLights.com All Rights Reserved 10/20/13
ii. <strong>Wifi</strong> Controller 2* by Mingjie Lin: https://itunes.apple.com/us/app/wificontroller-2/id589762495?mt=81. Unless you are using linkup-dim or linkup-white-adj, <strong>Wifi</strong>Controller 2 is the recommended app to use.2. When you open <strong>Wifi</strong> Controller 2 for the first time you will beprompted to enter a Name, IP Address and Port. The username canbe any, the IP Address is 192.168.1.100, and Port is 50000. Thesesettings can be edited at any time by pressing the house icon in thetop left corner of the screen.b. Android Device:i. <strong>Wifi</strong> Controller 2* by Sunny:https://play.google.com/store/apps/details?id=com.cdy.client.remoteLed&feature=search_result#?t=W251bGwsMSwxLDEsImNvbS5jZHkuY2xpZW50LnJlbW90ZUxlZCJdii. When you open <strong>Wifi</strong> Controller 2 for the first time you will be promptedto enter a Name, IP Address and Port. The username can be any, the IPAddress is 192.168.1.100, and Port is 50000. These settings can be editedat any time by pressing the house icon in the top left corner of the screen.c. *NOTE: <strong>Wifi</strong> Controller 2 works with all receivers except linkup-dim and linkupwhite-adj.3. Connect smartphone to the wifi network, default name “wifi-socket”.Anytime you wish to control the lights you must be connected to the wifi network and have theapplication running. For more detail on how to use each interface, please see the specific manualof the <strong>LinkUp</strong> product you wish to control.Please note that RGB and RGB ColorPlus <strong>LinkUp</strong> receivers are controlled by the same interface,however the preprogrammed modes on both interfaces are not identical. In other words, if youare controlling both RGB and RGB ColorPlus lighting, the modes will not match when youtoggle through the available pre-set programs.Copyright EnvironmentalLights.com 3 All Rights Reserved 10/20/13
<strong>Wifi</strong> Controller InterfacesRGB Bulb/RGB Controller/RGB ColorPlus Controller Top buttons turn all lights on/off. Color wheel allows user to select any color of their choice. Brightness (B) and Speed (S) can be increased or decreased, andMode (M) can be used to select the next or previouspreprogrammed mode in series. To pair bulb(s)/receiver(s), remove power to the receiver. Whenpower is restored, press the S+ button. Lights will blink toconfirm.Dimmable Bulb/White Tunable Bulb Top buttons turn all lights on/off Control wheel allows user to adjust brightness (up/down)and color temperature (left/right)for white tunable bulb. Fordimmable bulb, both up and right increase brightness, whileboth down and left decrease brightness. Buttons labeled 1-4 allow the user to control each zoneindividually To pair bulb(s), remove power to the bulbs. When power isrestored, press the Zone On button. Lights will blink toconfirm.Dimmable Receiver Top buttons turn all lights on/off Middle row adjusts lights to preset standards: highest, medium andlowest brightness. Touch sensitive wheel can be used to create the perfect brightnessfor any situation. To pair receiver(s), remove power to the receiver. When power isrestored, press the Brightest button. Lights will blink to confirm.White Tunable Receiver Top buttons turn all lights on/off. Middle row adjusts brightness to presets standards: highest,medium and lowest. Touch sensitive wheel adjusts color temperature (right side)and brightness (left side). To pair receiver(s), remove power to the receiver. Whenpower is restored, press the Brightest button.Copyright EnvironmentalLights.com 5 All Rights Reserved 10/20/13
<strong>Wifi</strong> Controller 2 InterfacesWhen you first open the <strong>Wifi</strong> Controller 2 app, you will be prompted to create a username, asshown. Ensure that your login IP is listed as 192.168.1.100 and Port Number is 50000.Usernames can be created or adjusted at any time by pressing the house icon at the top left of thescreen while using the <strong>Wifi</strong> Controller 2 app.RGB Bulb Top buttons turn all lights on/off. Color wheel allows user to select any color of their choice. Brightness (B) and Speed (S) can be increased or decreased,and Mode (M) can be used to select the next or previouspreprogrammed mode in series. To pair bulb(s)/receiver(s), remove power to the receiver.When power is restored, press the S+ button. Lights willblink to confirm.Dimmable Bulb/White Tunable Bulb Top buttons turn all lights on/off Control wheel allows user to adjust brightness (up/down) andcolor temperature (left/right)for white tunable bulb. Fordimmable bulb, both up and right increase brightness, whileboth down and left decrease brightness. Buttons labeled 1-4 allow the user to control each zoneindividually To pair bulb(s), remove power to the bulbs. When power isrestored, press the Zone On button. Lights will blink toconfirm.Copyright EnvironmentalLights.com 6 All Rights Reserved 10/20/13
InstructionsPlease take the following precautions:1. This equipment, like all electrical equipment, should be installed by a qualified person.2. Do not expose these <strong>LED</strong>s, dimmers or power supplies to intense electro-magnetic fields,including lightning.3. The controllers and power supplies are not waterproof. Keep them dry.4. Always observe proper polarity.When installing <strong>LED</strong> lighting, it is a good idea to follow this “dry-run” procedure:1. Be sure you have everything you need before you start.2. Lay out your lights and power supply on the floor or table.3. There is some resistance in the <strong>LED</strong> lighting. If you see any color fading or dimming atthe end of a long run, you may have too many <strong>LED</strong>s for your power supply and youmight need a bigger supply or shorter runs. Use a bus structure as described inrgb_manual.pdf. Call if you need assistance with larger projects.4. Connect everything and test it to be sure it works and you have it connected properly. It isunlikely, but possible, that some part of your system is defective or was damaged duringshipment. If that is the case, it will be very helpful to you to know that before you do allthe work involved in installing custom <strong>LED</strong> lighting systems. You will also know if youdamage anything during installation, which is really helpful in trouble-shooting becausemanufacturing defects and installation damage typically have very different solutions.Once you have tested the system successfully, you are ready to install it. We recommend youinstall <strong>LED</strong>s, electronic controls and dimmers in such a way that you have access to them in casethey fail. All electrical components can fail.Copyright EnvironmentalLights.com 7 All Rights Reserved 10/20/13