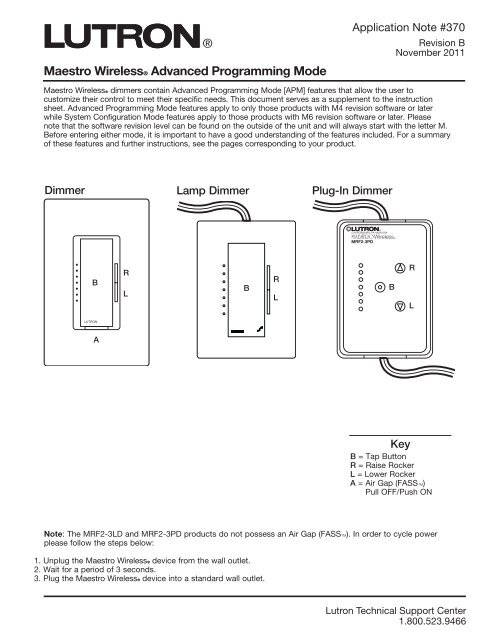
Maestro Wireless Advanced Programming Mode - LED Lighting
Maestro Wireless Advanced Programming Mode - LED Lighting
Maestro Wireless Advanced Programming Mode - LED Lighting

Create successful ePaper yourself
Turn your PDF publications into a flip-book with our unique Google optimized e-Paper software.
Selecting the “On” Fade TimeApplication Note #3701. While in Main Menu <strong>Mode</strong>, press the Raise/Lower Rocker until <strong>LED</strong> 2 is blinking.2. Press the Tap Button once. A quickly flashing <strong>LED</strong> will indicate which fade time has been selected(refer to picture below). <strong>LED</strong> 1 is the default setting.3. Press the Raise/Lower Rocker to adjust the quickly blinking <strong>LED</strong> to the position that represents the desired fadetime.4. Press the Tap Button once to return to the Main Menu.Note: The default “On” Fade Time is 0.75 seconds. The fade speed for Raise and Lower operations are notaffected by any “On” Fade Time modification.<strong>LED</strong> 5: Slowest “On” Fade Time<strong>LED</strong> 1: Fastest “On” Fade Time<strong>LED</strong>Position“On” Fade Time*Single Tap“On” Fade Time*Double Tap5 15 seconds 5 seconds4 5 seconds 3 seconds3 3 seconds 2.5 seconds2 2.5 seconds 0.75 seconds1 0.75 seconds 0.75 seconds*Time from Off to Maximum light level.Selecting the “Off” Fade Time1. While in Main Menu <strong>Mode</strong>, press the Raise/Lower Rocker until <strong>LED</strong> 3 is blinking.2. Press the Tap Button once. A quickly flashing <strong>LED</strong> will indicate which fade time has been selected (refer to picturebelow). <strong>LED</strong> 2 is the default setting.3. Press the Raise/Lower Rocker to adjust the quickly blinking <strong>LED</strong> to the position that represents the desired fadetime.4. Press the Tap Button once to return to the Main Menu.Note: The default “Off” Fade Time is 2.5 seconds. The fade speed for Raise and Lower operations are not affectedby any “Off” Fade Time modification.<strong>LED</strong> 5: Slowest “Off” Fade Time<strong>LED</strong> 1: Fastest “Off” Fade Time<strong>LED</strong>Position “Off” Fade Time*5 15 seconds4 5 seconds3 3 seconds2 2.5 seconds1 0.75 seconds*Time from Maximum light level to Off.How to Save Settings and Exit Main Menu <strong>Mode</strong>1. Press and Hold the Tap Button for 4 seconds to exit and save the Main Menu. Note: If you wait 1 minute thedimmer will automatically exit from <strong>Advanced</strong> <strong>Programming</strong> <strong>Mode</strong>, however settings will not be saved.4 Lutron Technical Support Center1.800.523.9466
Application Note #370Setting Low End Trim1. While in Main Menu <strong>Mode</strong>, press the Raise/Lower Rocker until <strong>LED</strong> 6 is blinking.2. Press the Tap Button once.3. Press the Raise/Lower Rocker to adjust to the desired minimum light level. Please note that any incremental ordecremental steps between <strong>LED</strong>s will cause the percentage of the load to vary between the percentages listed inthe table below.4. Press the Tap Button once to return to the Main Menu <strong>Mode</strong>.<strong>LED</strong> 3: HighestLow End Trim<strong>LED</strong> 1: LowestLow End TrimRaise Light LevelLower Light Level<strong>LED</strong>Position Low End Trim*3 34% of load2 17% of load1 1% of load*In some applications the low end trimmay need to be adjusted to achieve themaximum allowable range of dimming.Setting High End Trim1. While in Main Menu <strong>Mode</strong>, press the Raise/Lower Rocker until <strong>LED</strong> 7 is blinking.2. Press the Tap Button once.3. Press the Raise/Lower Rocker to adjust to the desired maximum light level. Please note that any incremental ordecremental steps between <strong>LED</strong>s will cause the percentage of the load to vary between the percentages listed inthe table below.4. Press the Tap Button once to return to the Main Menu <strong>Mode</strong>.<strong>LED</strong> 7: HighestHigh End Trim<strong>LED</strong> 5: LowestHigh End TrimRaise Light LevelLower Light Level<strong>LED</strong>Position High End Trim*7 100% of load (default)6 84% of load5 67% of load*Desired high end limit of the load.How to Save Settings and Exit Main Menu <strong>Mode</strong>1. Press and Hold the Tap Button for 4 seconds to exit and save the Main Menu. Note: If you wait 1 minute thedimmer will automatically exit from <strong>Advanced</strong> <strong>Programming</strong> <strong>Mode</strong>, however settings will not be saved.6 Lutron Technical Support Center1.800.523.9466
Application Note #370Vacancy Light Level Preset (Available for products with M6 revision software or later):1. Press the Raise/Lower Rocker until <strong>LED</strong> 4 begins to blink.Note: <strong>LED</strong> 7 will also be blinking indicating that the product is in System Configuration <strong>Mode</strong>.2. Press the Tap Button once in order to determine the current preset setting. An <strong>LED</strong> will begin to blink quicklyindicating the current preset setting.3. Press the Raise/Lower Rocker to adjust the preset setting. The position of the quickly blinking <strong>LED</strong> will moveindicating the selected preset setting. Please note that any incremental or decremental steps between <strong>LED</strong>s willcause the percentage of the load to vary between the percentages listed in the table below. In order to set thepreset to off press the Raise/Lower Rocker until <strong>LED</strong> 1 begins to blink then release. Next press the Raise/LowerRocker and continue holding for a period of five seconds. <strong>LED</strong>s 1, 2 and 3 will begin scrolling indicating that thepreset has been set to off.4. Press the Tap Button once to return to the System Configuration Menu.<strong>LED</strong> 7: System Configuration <strong>Mode</strong><strong>LED</strong> 4: Highest Vacancy Light Level<strong>LED</strong> 1: Lowest Vacancy Light Level<strong>LED</strong>VacancyPositionLight Level Preset4 50% of Load3 34% of Load2 17% of Load1 1% of LoadScrolling 1, 2, 3 Off (Default)To Unlock the Vacancy Light Level Preset:1. Press the Lower Rocker until the bottom <strong>LED</strong> is quickly flashing. Release the lower button and press and hold thelower button again for approximately 3 seconds or until <strong>LED</strong>s 1, 2, and 3 start scrolling. Please note that the lightwill remain at its minimum output when you perform this action.2. Press the Tap Button once to return to the System Configuration Menu.How to Save Settings and Exit System Configuration <strong>Mode</strong>1. Press and Hold the Tap Button for 4 seconds to exit and save the <strong>Advanced</strong> <strong>Programming</strong> <strong>Mode</strong>. Note: If youwait 1 minute the dimmer will automatically exit from <strong>Advanced</strong> <strong>Programming</strong> <strong>Mode</strong>, however settings will not besaved.8 Lutron Technical Support Center1.800.523.9466
Application Note #370Restoring Factory DefaultsIf you would like to return the dimmer/switch to its original factory settings, please do the following:Restoring Factory DefaultsOut-of-box the Dimmer/SwitchNote: If you perform the out-of-box sequence you will not only default your APM settings but you will alsoremove any PicoR wireless controllers, occupancy, vacancy, and/or daylight sensors from the dimmer/switch.a. Press the Tap Button three times in quick succession and holding on the third press. Continue to hold the TapButton until the <strong>LED</strong>(s) and Load begin to cycle.b. Quickly press the Tap Button three more times in quick succession and release after the third press.c. Confirmation: The <strong>LED</strong>(s) and Load will cycle three times then turn on.Note: The Tap Button MUST continue to be held until the second sequence of three presses is begun or the unitwill exit the mode and the out-of-box procedure WILL NOT be successful.Removing One Transmitter from Specific Dimmers/Switches within RangeNote: If the transmitter is associated with multiple devices, any device within listening range will also remove itsassociation to that particular transmitter.a. To avoid dissociation of the transmitter from any device within listening range, pull the Air Gap (FASST) ofthat device into the “Off” Position or Unplug the <strong>Maestro</strong> <strong>Wireless</strong>R device from the wall outlet.b. Press the “On” Button on the transmitter three times in quick succession and continue holding the button onthe third press. Please refer to the transmitter’s instructions for the appropriate response.c. Test the transmitter to verify that all of the appropriate devices have been dissociated from the transmitter.d. Upon confirming success in the previous step, push the Air Gap (FASST) into the “On” Position or Plug the<strong>Maestro</strong> <strong>Wireless</strong>R device into a standard wall outlet for any remaining devices with an association to thetransmitter.Setting Unaffected <strong>Mode</strong>The user has the option of associating a Radio Powr SavrT occupancy sensor to multiple <strong>Maestro</strong> <strong>Wireless</strong>Rdimmers/switches, and set up the system so that only selected loads automatically turn on. Other loads wouldrequire the user to manually turn on the load. When the room is vacant, all loads turn off.Selecting the Unaffected Dimmer*1. Turn off the dimmer.2. Press the Lower Rocker Button for 3 seconds or until the middle three <strong>LED</strong>s illuminate.3. Press and hold the “Test” Button on the Radio Powr SavrT occupancy sensor until the dome flashes.Selecting the Unaffected Switch*1. Turn off the switch.2. Pull the Air Gap (FASST) into the “Off” Position.3. Press and Hold the Tap Button of the product while pushing the Air Gap to the “On” Position until the <strong>LED</strong> onthe switch starts to blink.4. Press and hold the “Test” Button on the occupancy sensor until the dome flashes.* Does not require entering into Main Menu <strong>Mode</strong> or System Configuration <strong>Mode</strong>.10 Lutron Technical Support Center1.800.523.9466