2011 1 Series Owner's Manual without iDrive - Irvine BMW
2011 1 Series Owner's Manual without iDrive - Irvine BMW
2011 1 Series Owner's Manual without iDrive - Irvine BMW

Create successful ePaper yourself
Turn your PDF publications into a flip-book with our unique Google optimized e-Paper software.
<strong>Owner's</strong> <strong>Manual</strong>for VehicleThe UltimateDriving Machine
128i135i<strong>Owner's</strong> <strong>Manual</strong> for VehicleCongratulations, and thank you for choosing a <strong>BMW</strong>.Thorough familiarity with your vehicle will provide you withenhanced control and security when you drive it. We thereforehave this request:Please take the time to read this <strong>Owner's</strong> <strong>Manual</strong> and familiarizeyourself with the information that we have compiled for youbefore starting off in your new vehicle. It contains important dataand instructions intended to assist you in gaining maximum useand satisfaction from your <strong>BMW</strong>'s unique range of technical features.The manual also contains information on maintenancedesigned to enhance operating safety and contribute to maintainingthe value of your <strong>BMW</strong> throughout an extended servicelife.This manual is supplemented by a Service and Warranty InformationBooklet for US models or a Warranty and Service GuideBooklet for Canadian models.We wish you an enjoyable driving experience.<strong>BMW</strong> AG
© 2010 Bayerische Motoren WerkeAktiengesellschaftMunich, GermanyReprinting, including excerpts, only with thewritten consent of <strong>BMW</strong> AG, Munich.US English II/10Printed on environmentally friendly paper,bleached <strong>without</strong> chlorine, suitable for recycling.
ContentsThe quickest way to find special topics is toconsult the index starting on page 162.Using this <strong>Owner's</strong> <strong>Manual</strong>4 Notes7 Reporting safety defectsAt a glance10 DashboardControls18 Opening and closing35 Adjustments45 Transporting children safely48 Driving62 Controls overview70 Technology for driving comfort andsafety81 Lamps86 Climate92 Practical interior accessoriesDriving tips104 Things to remember when drivingMobility112 Refueling114 Wheels and tires122 Under the hood126 Maintenance128 Care132 Replacing components138 Giving and receiving assistance143 Indicator and warning lampsReference156 Technical data162 Everything from A to ZReference MobilityDriving tipsControlsAt a glance
NotesNotesUsing this <strong>Owner's</strong> <strong>Manual</strong>We have tried to make all the information in this<strong>Owner's</strong> <strong>Manual</strong> easy to find. The fastest way tofind specific topics is to refer to the detailedindex at the back of the manual. If you wish togain an initial overview of your vehicle, you willfind this in the first chapter.Should you sell your <strong>BMW</strong> some day, pleaseremember to hand over the <strong>Owner's</strong> <strong>Manual</strong> aswell; it is an important component of your vehicle.Additional sources of informationShould you have any other questions, your<strong>BMW</strong> center will be glad to advise you at anytime.Information on <strong>BMW</strong>, e.g. on technical aspects,can also be found on the Internet atwww.bmwusa.com.Symbols usedIndicates precautions that must be followedprecisely in order to avoid the possibilityof personal injury and serious damage tothe vehicle.Indicates information that will assist youin gaining the optimum benefit from yourvehicle and enable you to care more effectivelyfor your vehicle.Refers to measures that can be taken tohelp protect the environment.< Marks the end of a specific item of information.* Indicates special equipment, country-specificequipment and optional accessories, aswell as equipment and functions not yet availableat the time of printing.Symbols on vehicle componentsIndicates that you should consult the relevantsection of this <strong>Owner's</strong> <strong>Manual</strong> forinformation on a particular part or assembly.4
The individual vehicleWhen you ordered your <strong>BMW</strong>, you chose variousitems of equipment. This <strong>Owner's</strong> <strong>Manual</strong>describes the entire array of options and equipmentavailable with a specific <strong>BMW</strong> model.Please bear in mind that the manual may containinformation on accessories and equipmentthat you have not specified for your own vehicle.Sections describing options and special equipmentare marked by asterisks * to assist you inidentifying possible differences between thedescriptions in this manual and your own vehicle'sequipment.If equipment in your <strong>BMW</strong> is not described inthis <strong>Owner's</strong> <strong>Manual</strong>, please refer to the accompanyingSupplementary <strong>Owner's</strong> <strong>Manual</strong>s.Editorial notice<strong>BMW</strong> pursues a policy of continuous, ongoingdevelopment that is conceived to ensure thatour vehicles continue to embody the highestquality and safety standards combined withadvanced, state-of-the-art technology. For thisreason, it is possible in exceptional cases thatfeatures described in this <strong>Owner's</strong> <strong>Manual</strong>could differ from those on your vehicle.For your own safetyMaintenance and repairAdvanced technology, e.g. the use ofmodern materials and powerful electronics,requires specially adapted maintenanceand repair methods. You should therefore havethe corresponding work on your vehicle performedonly by your <strong>BMW</strong> center or at a workshopthat works according to <strong>BMW</strong> repair procedureswith correspondingly trainedpersonnel. If this work is not carried out properly,there is a danger of subsequent damageand related safety hazards.
NotesCalifornia Proposition 65 warningCalifornia law requires us to issue the followingwarning:Engine exhaust and a wide variety ofautomobile components and parts,including components found in the interior furnishingsin a vehicle, contain or emit chemicalsknown to the State of California to cause cancerand birth defects and reproductive harm. Inaddition, certain fluids contained in vehicles andcertain products of component wear contain oremit chemicals known to the State of Californiato cause cancer and birth defects or otherreproductive harm.Battery posts, terminals and related accessoriescontain lead and lead compounds. Washyour hands after handling.Used engine oil contains chemicals that havecaused cancer in laboratory animals. Alwaysprotect your skin by washing thoroughly withsoap and water. New Vehicle Limited Warranty> Rust Perforation Limited Warranty> Federal Emissions System Defect Warranty> Federal Emissions Performance Warranty> California Emission Control System LimitedWarrantyDetailed information about these warranties islisted in the Service and Warranty InformationBooklet for US models or in the Warranty andService Guide Booklet for Canadian models.Your vehicle has been specifically adapted anddesigned to meet the particular operating conditionsand homologation requirements in yourcountry and continental region in order todeliver the full driving pleasure while the vehicleis operated under those conditions. If you wishto operate your vehicle in another country orregion, you may be required to adapt your vehicleto meet different prevailing operating conditionsand homologation requirements. Youshould also be aware of any applicable warrantylimitations or exclusions for such country orregion. In such case, please contact CustomerRelations for further information.6
Reporting safety defectsFor US customersThe following only applies to vehicles ownedand operated in the US.If you believe that your vehicle has a defectwhich could cause a crash or could cause injuryor death, you should immediately inform theNational Highway Traffic Safety Administration,NHTSA, in addition to notifying <strong>BMW</strong> of NorthAmerica, LLC, P.O. Box 1227, Westwood,New Jersey 07675-1227, Telephone1-800-831-1117.If NHTSA receives similar complaints, it mayopen an investigation, and if it finds that a safetydefect exists in a group of vehicles, it may ordera recall and remedy campaign. However,NHTSA cannot become involved in individualproblems between you, your center, or <strong>BMW</strong> ofNorth America, LLC.To contact NHTSA, you may call the VehicleSafety Hotline toll-free at 1-888-327-4236(TTY: 1-800-424-9153); go tohttp://www.safercar.gov; or write to: Administrator,NHTSA, 400 Seventh Street, SW.,Washington, DC 20590. You can also obtainother information about motor vehicle safetyfrom http://www.safercar.govFor Canadian customersCanadian customers who wish to report asafety-related defect to Transport Canada,Defect Investigations and Recalls, may call1-800-333-0510 toll-free from anywhere inCanada or 1-613-993-9851 from the Ottawaregion and from other countries, or contactTransport Canada by mail at: TransportCanada, ASFAD, Place de Ville, Tower C,330 Sparks Street, Ottawa, ON, K1A 0N5.You can also obtain other information aboutmotor vehicle safety from http://www.tc.gc.ca7Reference MobilityDriving tipsControlsAt a glance
At a glanceThis overview of buttons, switches and displaysis intended to familiarize you with your vehicle'soperating environment. The section will alsoassist you in becoming acquainted with thecontrol concepts and options available foroperating the various systems.
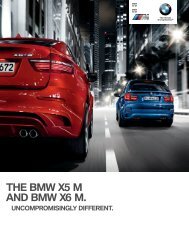
DashboardDashboardAround the steering wheel: controls and displays1 Convertible: opening and closingwindows jointly 282 Convertible: opening and closingrear windows 283 Opening and closing frontwindows 274 Folding exterior mirrors in and out* 425 Adjusting exterior mirrors, automatic curbmonitor* 426Parking lamps 81Low beams 81Automaticheadlamp control* 81Adaptive light control* 83High-beam assistant* 8310
78Fog lamps* 84Turn signals 57High beams, headlamp flasher 83High-beam assistant* 83Changing the radio stationInterrupting a traffic bulletinSelecting a music trackScrolling through the redial listNext entertainment sourceRecirculated-air mode 90At a glanceRoadside parking lamps* 83Computer 63Settings and information about thevehicle 659 Instrument cluster 1210Windshield wipers 5814Steering wheel heating* 4415 Horn, entire surface16 Adjusting the steering wheel 4317Cruise control* 6018 Releasing the hood 12219 Opening the trunk lid 23ControlsRain sensor* 5811 Switching the ignition on/off andstarting/stopping the engine 4812 Ignition lock 4813 Buttons on the steering wheelTelephone*:Accepting and ending a call; dialing*the selected phone number;redialing if no phone number isselectedDriving tipsVolumeMobilityVoice commands for telephone*11Reference
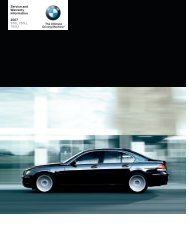
DashboardInstrument cluster1 Speedometer135i: with fuel gauge2 Indicator lamps for turn signals3 Indicator and warning lamps 134 Tachometer 625 Fuel gauge 63135i: engine oil temperature 636 Display for> Clock 62> Outside temperature 62> Indicator and warning lamps 687 Display for> Position of automatic transmission* 50> Gear indicator in 7-gear Sports automatictransmission with doubleclutch* 53> Computer 63> Date of next scheduled service, andremaining distance to be driven 66> Odometer and trip odometer 62> High-beam assistant* 83> Initializing the Flat Tire Monitor* 72> Resetting the Tire Pressure Monitor 74> Checking the oil level 123> Settings and information 658 Resetting the trip odometer 6212
Indicator and warning lampsThe conceptMobilityDriving tipsAt a glanceIndicator and warning lamps can light up in avariety of combinations and colors.Several of the lamps are checked for properfunctioning and light up temporarily when theengine is started or the ignition is switched on.ControlsReferenceWhat to do in case of a malfunctionA list of all indicator and warning lamps, as wellas notes on possible causes of malfunctionsand on how to respond, can be found startingon page 143.13
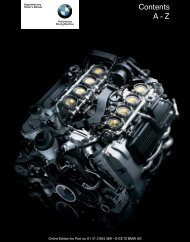
DashboardAround the center console: controls and displays14
1 Coupe: microphone for telephone* inhands-free modeConvertible: microphone on steering column2 SOS: initiating an Emergency Requestcall* 1383 Reading lamps* 854 Coupe: glass roof, electric* 295 Interior lamps 856 Passenger airbag status lamp 787 Dynamic Traction Control DTC 718 Hazard warning flashers9 Central locking system 2210 Radio, refer to separate <strong>Owner's</strong> <strong>Manual</strong>11 Heating and ventilation, air conditioner* orautomatic climate control*Air distribution for heating 87Air distribution to thewindshield* 89Air distribution to the upper bodyarea* 89Air distribution to the footwell* 89Automatic air distributionand flow rate* 90Defrosting windows* 91Rear window defroster 91Heated seats* 4012 Convertible: open convertibletop 31Convertible: close convertibletop 31At a glanceControlsDriving tipsCooling function* 91Automatic recirculated-air controlAUC* and recirculated-airmode 90Recirculated-air mode 87Maximum cooling* 89ALL program* 90MobilityAir volume 87, 9015Reference
ControlsThis chapter is intended to provide you withinformation for complete control of your vehicle.All features and accessories that are useful fordriving and your safety, comfort andconvenience, are described here.
Opening and closingOpening and closingRemote controlEach remote control contains a rechargeablebattery that is automatically recharged when itis in the ignition lock while the car is beingdriven. Use each remote control at least twice ayear for longer road trips in order to maintain thebatteries' charge status. In cars with ComfortAccess*, the remote control contains areplaceable battery, refer to page 27.The settings called up and implemented whenthe car is unlocked depend on which remotecontrol is used to unlock the car, refer to PersonalProfile, next column.In addition, information about service requirementsis stored in the remote control, refer toService data in the remote control, page 126.New remote controlsYour <strong>BMW</strong> center can supply new remote controlswith integrated keys as additional units oras replacements in the event of loss.Personal ProfileThe conceptYou can set many of your <strong>BMW</strong>'s functions tosuit your personal needs and preferences.Without any action on your part, Personal Profileensures that most of these settings arestored for the remote control currently in use.When you unlock the car, the remote controlused for the purpose is recognized and the settingsstored for it are called up and implemented.This means that your personal settings will beactivated for you, even if in the meantime yourcar was used by someone else with anotherremote control and the corresponding settings.The individual settings are stored for a maximumof four remote controls. They are storedfor two remote controls if Comfort Access* is inuse.Integrated keyPress button 1 to release the key.The integrated key fits the following locks:> Driver's door, refer to page 22> Convertible: glove compartment, refer topage 95Personal Profile settingsFor more information on specific settings, referto the specified pages.> Response of the central locking systemwhen the car is unlocked, refer to page 19> Automatic locking of the vehicle, refer topage 22> Automatic call-up* of the driver's seat position,refer to page 40> Triple turn signal activation, refer topage 5718
Settings for the display in the instrumentcluster:> 12h/24h format of the clock, refer topage 66> Date format, refer to page 66> Units of measure for fuel consumption,distance covered/remaining distances,and temperature, refer to page 66> Light settings:> Pathway lighting, refer to page 81> Daytime running lights, refer to page 82> High-beam assistant*, refer to page 83> Automatic climate control*: AUTO program,cooling function and automatic recirculated-aircontrol activation/deactivation,temperature, air volume and distribution,refer to page 89> Entertainment:> Speed-dependent volume control, referto separate <strong>Owner's</strong> <strong>Manual</strong>Central locking systemThe conceptThe central locking system functions when thedriver's door is closed.The system simultaneously engages andreleases the locks on the following:> Doors> Trunk lid> Fuel filler flapOperating from outside> Via the remote control> Via the door lock*> In cars with Comfort Access*, via the handleson the driver's and front passengerdoorsIn addition, if the remote control is used, thewelcome lamps*, interior lamps and the door'scourtesy lamps* are switched on or off. Thealarm system* is also armed or disarmed.For further details on the alarm system*, referto page 24.Operating from insideBy means of the button for central locking, referto page 22.In the event of a sufficiently severe accident, thecentral locking system unlocks automatically. Inaddition, the hazard warning flashers and interiorlamps come on.Opening and closing:Using the remote controlPersons or animals in a parked vehiclecould lock the doors from the inside. Youshould therefore take the remote control withyou when you leave the vehicle so that the lattercan be opened from outside.
Opening and closing3. Press button 2.4. Briefly press button 1 in the turn signal/highbeam lever down repeatedly until the symbolappears in the display.Hold the button down.The windows and the convertible top areopened provided that the doors are closed.If you continue pressing the button, the windowsmove up.Watch during the opening process toensure that no one is injured. Releasingthe button interrupts the opening process.
Confirmation signalsYou can activate or deactivate the confirmationsignals.For operating principle refer to page 65.1. Switch on the ignition, refer to page 48.2. Briefly press button 1 in the turn signal/highbeam lever up or down repeatedly until thesymbol appears in the display, accompaniedby the word "SET".3. Press button 2.4. Briefly press button 1 in the turn signal/highbeam lever down repeatedly until thedesired symbol appears in the display.> Confirmation signal during unlocking> Confirmation signal during locking5. Press button 2.6. Use button 1 to select:>The hazard warning flashers light upduring unlocking/locking.>The function is deactivated.7. Press button 2.The setting is stored.MalfunctionsThe remote control may malfunction due tolocal radio waves. If this occurs, unlock and lockthe car at the door lock with the integrated key.Coupe: in vehicles <strong>without</strong> an alarm system* orComfort Access*, only the driver's door can beunlocked and locked using the integrated key inthe door lock.If the car can no longer be locked with a remotecontrol, the battery in the remote control is discharged.Use the remote control on anextended trip to recharge the battery, refer topage 18. The remote control for ComfortAccess contains a battery that may have to bechanged, refer to page 27.For US owners onlyThe transmitter and receiver units comply withpart 15 of the FCC/Federal CommunicationsCommission regulations. Operation is governedby the following:FCC ID:LX8766SLX8766ELX8CASCompliance statement:This device complies with part 15 of the FCCRules. Operation is subject to the following twoconditions:> This device must not cause harmful interference,and> this device must accept any interferencereceived, including interference that maycause undesired operation.Any unauthorized modifications orchanges to these devices could void theuser's authority to operate this equipment.
Opening and closingOpening and closing:Using the door lockYou can set the way in which the car isunlocked, refer to page 19.CoupeIn vehicles <strong>without</strong> an alarm system* orComfort Access*, only the driver's doorcan be locked via the door lock. press down the lock button of the frontpassenger door and close the door fromthe outside.Convenient operation*Coupe: if the vehicle is equipped with an alarmsystem* or Comfort Access*, you can alsooperate the windows and glass roof* via thedoor lock.Convertible: you can operate the windows andconvertible top via the door lock.Hold the key in the position for unlocking orlocking.During each closing procedure, and whenopening the convertible top, watch theprocess and ensure that no one becomestrapped. Releasing the key stops the operation.
4. Briefly press button 1 in the turn signal/highbeam lever down repeatedly until the symbolappears in the display.5. Press button 2.6. Use button 1 to select:>The central locking system automaticallylocks the vehicle after some time ifno door has been opened.>The central locking system automaticallylocks the vehicle as soon as youdrive off.>The central locking system automaticallylocks the vehicle after some time ifno door has been opened, or as soon asyou drive off.>The central locking system remainsunlocked.7. Press button 2.The setting is stored for the remote controlcurrently in use.Unlocking and opening doors> Either unlock the doors together using thebutton for the central locking system andthen pull the door handle above the armrestor> pull on the door handle of each door twice:the first time unlocks the door, the secondtime opens it.Locking> Use the central locking button to lock all ofthe doors simultaneously, or> press down the safety lock button of a door.To prevent you from being locked out, theopen driver's door cannot be locked usingthe lock button.Persons or animals in a parked vehiclecould lock the doors from the inside. Youshould therefore take the remote control withyou when you leave the vehicle so that the lattercan be opened from outside.
Opening and closingIn the event of a malfunction, please contactyour <strong>BMW</strong> center or a workshop thatworks according to <strong>BMW</strong> repair procedureswith correspondingly trained personnel. To movements inside the vehicle: interiormotion sensor, refer to page 25> When the car's inclination changes, forinstance if an attempt is made to jack it upand steal the wheels or to raise it prior totowing away: tilt alarm sensor, refer topage 25> When there has been an interruption ofpower supply from the batteryDepending on the market-specific version, thealarm system briefly signals unauthorized entryattempts by:> An acoustic alarm> Switching on* the hazard warning flashersArming and disarmingWhen you lock or unlock the vehicle, either withthe remote control or at the door lock, the alarmsystem is armed or disarmed at the same time.24
You can open the trunk lid using the buttonof the remote control even if the alarm system isarmed, refer to page 20. The lid is locked andmonitored again as soon as it is closed.Panic modeYou can trigger the alarm system if you findyourself in a dangerous situation.Press the button for at least three seconds.To switch off the alarm: press any button.Switching off an alarm> Unlock the car with the remote control, referto page 19, or> insert the remote control all the way into theignition lock.Indicator lamp displays> The indicator lamp under the inside rearviewmirror flashes continuously: the systemis armed.> The indicator lamp flashes after locking:doors, hood or trunk lid are not properlyclosed. Even if you do not close the alertedarea, the system begins to monitor theremaining areas, and the indicator lampflashes continuously after approx.10 seconds. The interior motion sensor andthe tilt alarm sensor are not activated.> The indicator lamp goes out after unlocking:your vehicle has not been disturbed whileyou were away.> If the indicator lamp flashes after unlockinguntil the remote control is inserted in theignition, but for no longer than approx.5 minutes: your vehicle has been disturbedwhile you were away.Tilt alarm sensorThe tilt of the vehicle is monitored. The alarmsystem reacts, e.g. to attempts to steal a wheelor tow the vehicle.Interior motion sensorCoupeIn order for the interior motion sensor to functionproperly, the windows and glass roof mustbe completely closed*.ConvertibleThe interior of the car is monitored up to theheight of the seat cushions. Thus the alarm systemis activated together with the interiormotion sensor even if the convertible top isopen. An alarm can be triggered unintentionallyby falling objects such as leaves, refer to Avoidingunintentional alarms.Avoiding unintentional alarmsThe tilt alarm sensor and interior motion sensormay be switched off at the same time. This preventsunintentional alarms, e.g. in the followingsituations:> In duplex garages> During transport on car-carrying trains,boats/ships or on a trailer> When animals are to remain in the vehicleSwitching off tilt alarm sensor andinterior motion sensorPress the button on the remote controlagain as soon as the vehicle is locked.The indicator lamp lights up briefly and thenflashes continuously. The tilt alarm sensor andthe interior motion sensor are switched off untilthe next time the vehicle is unlocked and subsequentlylocked again.25Reference MobilityDriving tipsControlsAt a glance
Opening and closingComfort Access*Comfort Access enables you to enter your vehicle<strong>without</strong> needing to hold the remote controlin your hand. All you need to do is wear theremote control close to your body, e.g. in yourjacket pocket. The vehicle detects the correspondingremote control within the immediatevicinity or in the passenger compartment.Comfort Access supports the following functions:> Unlocking/locking the vehicle> Unlocking the trunk lid separately> Engine starting> Convenient closingFunctional requirement> The vehicle or the trunk lid can only belocked when the vehicle detects that theremote control currently in use is outside ofthe vehicle.> The vehicle cannot be locked or unlockedagain until after approx. 2 seconds.> The engine can only be started when thevehicle detects that the remote control currentlyin use is inside the vehicle.UnlockingGrasp the handle on the driver's or front passengerdoor completely, arrow 1. This correspondsto pressing the button.LockingTouch the surface, arrow 2, with your finger forapprox. 1 second. This corresponds to pressingthe button.To preserve the battery, please makesure that the ignition and all electricalconsumers are switched off before locking thevehicle.
Switching on radio readinessRadio readiness is switched on by pressing thestart/stop button, refer to page 48.Do not depress the brake or the clutch;otherwise, the engine will start immediately.
Opening and closingCoupe: opening, closing> Press the switch to the resistance point:The window opens as long as you press theswitch.> Press the switch beyond the resistancepoint:The window opens automatically. Press theswitch again to stop the opening movement.You can close the windows in the same mannerby pulling the switch.Convertible: opening, closingWindow operation with Comfort Access, referalso to page 20.To close the side windows while driving,either close the rear windows first or allfour windows together; otherwise, the windowsmay not close tightly at high speeds. Press the switch to the resistance point:All windows open as long as you press theswitch.> Press the switch beyond the resistancepoint:All windows open automatically. Press theswitch again to stop the opening movement.> Pull the switch:All windows close as long as you pull theswitch.After switching off the ignitionWhen the remote control is removed or the ignitionis switched off, you can still operate thewindows for approx. 1 minute as long as nodoor has been opened.> Press the switch to the resistance point:The window opens as long as you press theswitch.> Press the switch beyond the resistancepoint:The window opens automatically. Press theswitch again to stop the opening movement.28Convenient operationFor information on Convenient operation via theremote control or the door lock, refer to page 19or 22. For information on Convenient closingwith Comfort Access, refer to Locking onpage 26.Pinch protection systemIf the closing force exceeds a specific value as apower window closes, the closing action isinterrupted and the window reopens slightly.Despite the pinch protection systemcheck and clear the window's travel pathprior to closing it; otherwise, the safety system
might fail to detect certain kinds of obstructions,such as thin objects, and the windowwould continue closing.Do not install any accessories that might interferewith window movement. Otherwise, thepinch protection system could be impaired.Convertible: the rear windows are not equippedwith pinch protection. Therefore, watch themclosely when closing to avoid personal injury. Press the switch backwards past the resistancepoint.The glass roof and the sliding visor openautomatically. Briefly press the switch againto stop the opening movement.You can close the glass roof in a similar mannerby pressing the switch forwards. The slidingvisor remains open and can be closed by hand.For information on Convenient operation via theremote control or the door lock, refer to page 19or 22. For information on Convenient closingwith Comfort Access, refer to Locking onpage 26.After switching off the ignitionWhen the remote control is removed or the ignitionis switched off, you can still operate the rooffor approx. 1 minute as long as no door hasbeen opened.Pinch protection systemIf the glass roof encounters an obstruction duringclosing from approximately the middle ofthe opening in the roof, or during closing fromthe raised position, the closing movement isinterrupted and the glass roof is opened againslightly.Despite the pinch protection systemcheck and clear the roof's travel path priorto closing it; otherwise, the safety system mightfail to detect certain kinds of obstructions, suchas very thin objects, and the roof would continueclosing.
Opening and closingClosing <strong>without</strong> pinch protectionIf there is an external danger, press the switchforward past the resistance point and hold itthere. The roof closes <strong>without</strong> pinch protection.Following interruptions in electricalpower supplyAfter a power failure, there is a possibility thatthe glass roof can only be raised. The systemmust be initialized. <strong>BMW</strong> recommends havingthis work done by your <strong>BMW</strong> center.Closing manually*In the event of an electrical malfunction, you canmove the glass roof manually:1. Unclip the front of the cover of the interiorlamps using the screwdriver from theonboard vehicle tool kit, refer to page 132.4. Unplug the motor. Considerably less effortwill be required for manual operation.5. Insert the Allen wrench* supplied with theonboard vehicle tool kit, refer to page 132,into the opening provided. Move the glassroof in the desired direction.6. Reattach the lamp cover and reinstall thecontrol unit.2. On both sides, use the screwdriver to presson the clip inside the opening.3. Remove the control unit.Convertible: topThe fully automatic top combines reliableweather protection with simple and easy-touseoperation.The following tips will enhance your drivingpleasure in your Convertible:> It is advisable that you close the convertibletop when you park the vehicle. Not onlydoes the closed top protect the vehicle interioragainst unanticipated weather damage,it also offers a certain amount of theft protection.However, even when the top isclosed, valuables should only be stored inthe locked cargo area.> Do not attach roof-mounted luggage systemsto the convertible top.30
If the top is opened while it is wet, e.g. afterdriving in the rain, water may drip into thecargo area. If necessary, remove items fromthe cargo area beforehand to avoid waterstains or soiling.At temperatures below +147/–106, donot move the convertible top as this couldresult in damage.Do not keep the convertible top in the convertibletop box for longer than one day if it is wet;otherwise, the moisture may cause damage.Do not place objects on the convertible top, asotherwise they may fall off when you operatethe convertible top and cause damage or injury.Never move the convertible top when the rolloverprotection system is in the activated position.Always fully complete a convertible top movement.Driving with the convertible top incompletelyopened or closed can result in damageor injury.Do not reach into the mechanism during theopening or closing procedure. Keep childrenaway from the opening/closing path of the convertibletop.For safety reasons, only move the convertibletop when the vehicle is stationary, if possible. Ensure that the cargo area partition isfolded down and engaged on both sides,refer to page 98; otherwise, it will not bepossible to open the convertible top.> Ensure that the cargo does not pressagainst the cargo area partition from below.> Ensure that the trunk lid is closed.Opening and closingConvertible top operation with Comfort Access,refer also to page 20.As of radio readiness, refer to page 48:If possible, conserve the battery by onlyoperating the convertible top when theengine is running.Before closing the convertible top, remove allforeign objects from the windshield frame asthese could prevent the hardtop from closingproperly.
Opening and closingLEDs> While the convertible top is being operated,the left LED lights up green. It goes out assoon as the top is fully opened or closed.> If the right-hand LED flashes red when yourelease the button, the opening or closingaction has not yet finished.> If the right-hand LED lights up red when thebutton is pressed, the cargo area partition israised, the trunk lid is not closed or there is amalfunction. The convertible top cannot bemoved.InterruptionThe automatic sequence of movements isinterrupted if the button for the convertible topoperation is released. The sequence can becontinued in the desired direction by pushing orpulling the buttons.If the opening or closing procedure is interruptedfor an extended period, the convertibletop remains in the raised position for approx.10 minutes and then slowly moves to a stableposition.A convertible top that is not fully openedor closed is a safety hazard.
do not close the convertible top box covercompletely.4. Lift out the front part of the convertible top,arrows 4, on both sides and swing it forward.At the same time keep the convertibletop box cover from closing, e.g. using yourshoulder.5. Position the rear convertible top frameupright, arrow 5, and close the convertibletop box cover, arrow 6. Then lower the rearconvertible top frame.6. Together with another person, press downthe front convertible top frame from the outsideand on both sides as far as possible.7. Carefully remove the cover in the center ofthe front convertible top frame using apointed object.Take the Allen wrench out of the onboardliterature pouch.8. Attach the handle of the screwdriver to theAllen wrench and insert the wrench into theopening provided.9. Turn the Allen wrench all the way to the left,arrow 7, until the front convertible top frameis locked to the windshield frame. The rearconvertible top frame is automaticallypressed down onto the convertible top boxcover and is sealed tight under tension.The closing procedure must be fully completed;otherwise, injury or damage mayoccur.
Opening and closing2. Press together the top and bottom parts ofthe wind deflector until the catch engages,arrow 2.3. Position both locking pins of one side at theopenings provided for them.4. Press the wind deflector into the openings,arrows 3, overcoming the tension in thesprings, and push the free locking pin in thesame direction, arrow 4.5. Position the free locking pins at the correspondingopenings and let the spring tensionlock the wind deflector in place,arrow 5.FoldingSlide the red release lever towards the middle ofthe wind deflector and push the two halvesapart.6. Fold up the top section of the wind deflector,arrow 6.With the wind deflector installed: do notrecline the front-seat backrests too far ifthe seat is to be slid all the way back, as thiswould damage the wind deflector.
AdjustmentsSitting safelyThe ideal sitting position can make a vital contributionto relaxed, fatigue-free driving. In conjunctionwith the safety belts, the headrestraints and the airbags, the seated positionhas a major influence on your safety in the eventof an accident. To ensure that the safety systemsoperate with optimal efficiency, westrongly urge you to observe the instructionscontained in the following section.For additional information on transporting childrensafely, refer to page 45.AirbagsAlways maintain an adequate distancebetween yourself and the airbags. Alwaysgrip the steering wheel on the rim, with yourhands in the 3 o'clock and 9 o'clock positions,to minimize the risk of injury to the hands orarms in the event of the airbag being triggeredoff.No one and nothing should come between theairbags and the seat occupant.Do not use the cover of the front airbag on thefront passenger side as a storage area. Makesure that the front passenger is sitting correctly,i.e. not resting feet or legs on the dashboard;otherwise, leg injuries can occur if the front airbagdeploys.Make sure that passengers keep their headsaway from the side airbag and do not leanagainst the cover of the head airbag; otherwise,serious injuries can result if the airbagdeploys.
AdjustmentsSeatsNote before adjustingNever attempt to adjust your seat whilethe vehicle is moving. The seat couldrespond with unexpected movement, and theensuing loss of vehicle control could lead to anaccident.On the front passenger seat as well, do notincline the backrest too far to the rear while thevehicle is being driven; otherwise, there is adanger in the event of an accident of slidingunder the safety belt, eliminating the protectionnormally provided by the belt.
Electrical adjustment*Observe the adjustment instructionsabove to ensure the best possible personalprotection. Increase or decrease curvature: press theswitch at the front or rear, respectively.> Shift curvature up or down: press the switchat the top or bottom, respectively.Backrest width*You can change the width of the backrest to suityour individual preferences by adjusting the lateral-supportpads.Press the front or rear end of the switch.Backrest width decreases or increases accordingly.To move the front seats forward or backwardfrom outside or from one of the rear seats: withthe door open, press the front end 1 or rear end2 of the switch.37Reference MobilityDriving tipsControlsAt a glance
AdjustmentsHead restraintsCorrectly adjusted head restraintA correctly adjusted head restraint reduces therisk of neck injury in the event of an accident.Adjust the head restraint in such a waythat its center is at approx. ear level. Otherwise,there is an increased risk of injury in theevent of an accident. Only remove a headrestraint if no one will be sitting on the seat inquestion. Reinstall the head restraint beforetransporting anyone on that seat. Otherwise,the passenger will be <strong>without</strong> protection fromthe head restraint. To raise: pull up.> To lower: press the button, arrow 1, andslide the head restraint down.Convertible: raising and loweringOnly lower the head restraints if there areno passengers in the rear. Raise all loweredhead restraints before transporting passengersin the rear. To raise: pull up.> To lower: press the button, arrow 1, andslide the head restraint down.Removing1. Pull it up as far as it will go.2. Press the button, arrow 1, and pull the headrestraint all the way out.> To raise: pull up.> To lower: press the button, arrow 1, andslide the head restraint down, arrow 2.Removing1. Pull it up as far as it will go.2. Press the button, arrow 1, and pull the headrestraint all the way out.38
Coupe: folding head restraint down andup*Depending on your vehicle's equipment, it maycontain foldable head restraints.Folding down:Press the button, arrow 1.Folding up:Pull the head restraint.Only fold down the head restraints if thereare no passengers in the rear. Fold up thehead restraints again before transporting passengersin the rear.
AdjustmentsHeated seats*StoringDepending on the vehicle's equipment, pressone of the buttons labeled 1 or 2 here.Press the button once per temperature level.Three LEDs indicate the highest temperature.To switch off:Press button longer.If you continue driving within approx.15 minutes, the seat heating is automaticallyactivated at the previously set temperature.The temperature is lowered or the heating isswitched off entirely to save on battery power.The LEDs stay lit.Seat and mirror memory*You can store and call up two different combinationsof driver's-seat and exterior-mirrorpositions.Settings for the backrest width and lumbar supportare not stored in memory.1. Switch on radio readiness or the ignition,refer to page 48.2. Adjust the seat and exterior mirrors to thedesired positions.3. Press the button.The LED in the button lights up.4. Press the desired memory button 1 or 2: theLED goes out.Call-upDo not call up the memory while you aredriving; otherwise, unexpected seatmovement could result in an accident.
Call-up with the remote controlThe driver's seat position last set is stored forthe remote control currently in use.You can select whether or not the seat is resetto that position automatically.When this Personal Profile function isused, first make sure that the footwellbehind the driver's seat is free of obstacles.Failure to do so could cause injury to persons ordamage to objects as a result of a rearwardmovement of the seat.Call-up when the vehicle is unlocked.>Call-up when the driver's door isopened.>Switch off automatic function.6. Press button 2.The setting is stored.Safety beltsObserve the adjustment instructions onpage 35 to ensure the best possible personalprotection.
Adjustments"Fasten safety belts" reminder for frontseatsThe indicator lamps light up and anacoustic signal sounds. Checkwhether the safety belt has been fastenedcorrectly.The "Fasten safety belts" reminder is issued aslong as the driver's safety belt has not been fastened.The "Fasten safety belts" reminder isalso issued above approx. 5 mph/8 km/h if thefront passenger safety belt has not been fastened,if there are objects on the front passengerseat or if the driver or front passengerunfasten their safety belts.Damage to safety beltsIf the safety belts are damaged orstressed in an accident: have the belt system,including any belt tensioners or childrestraint systems, replaced and the beltanchors checked. Have this work done only byyour <strong>BMW</strong> center or at a workshop that worksaccording to <strong>BMW</strong> repair procedures with correspondinglytrained personnel. Otherwise, it isnot guaranteed that the safety devices will functionproperly.
Passenger-side mirror tilt function –automatic curb monitor*Interior and exterior mirrors, automaticdimming feature*Activating1. Push the switch to the position for thedriver's side mirror, arrow 1.2. Shift into reverse or move the selector leverinto the R position.The glass of the mirror on the passengerside tilts slightly down. This allows thedriver to see the area immediately adjacentto the vehicle, e.g. a curb, when backing intoa parking space.DeactivatingPush the switch to the position for the passenger-sidemirror, arrow 2.Interior rearview mirrorTurn the knob to reduce glare from the headlampsof cars behind you when driving at night.The automatic dimming feature of the interiorand exterior mirrors* is controlled by two photocells in the interior rearview mirror. One photocell is in the mirror frame, see arrow; the other ison the back of the mirror.In order to ensure that the system functionscorrectly, keep the photo cells clean, do notcover the area between the interior rearviewmirror and windshield, and do not affix adhesivelabels or stickers of any kind to the windshielddirectly in front of the mirror.Steering wheelAdjustmentsDo not adjust the steering wheel positionwhile the car is in motion; otherwise, thereis a risk of an accident due to unexpected movement.
AdjustmentsDo not use force to swing the leverback up; otherwise, the mechanismwill be damaged.
Transporting children safelyThe right place for childrenDo not leave children unattended in thevehicle; otherwise, they could endangerthemselves and/or other persons by openingthe doors, for example.
Transporting children safelyChild seat securityThe rear safety belts and the front passengersafety belt can be prevented from being pulledout in order to fasten child restraint systems.To lock the safety belt1. Secure the child restraint system with thebelt.2. Pull the belt strap all the way out.3. Allow the belt strap to retract and pull it tautagainst the child restraint system.The safety belt is locked.restraint system is resting firmly against thebackrest; otherwise, the protective function ofthe seat may be compromised.
CoupeUse the top tether anchors to secure childrestraint systems only; otherwise, theanchors could be damaged.
DrivingDrivingIgnition lockInsert the remote control into theignition lockStart/stop buttonInsert the remote control all the way into theignition lock.> Radio readiness is switched on.Individual electrical consumers can operate.Comfort Access*If the car is equipped with Comfort Access, onlyinsert the remote control into the ignition lockunder special circumstances, refer to page 26.Removing the remote control from theignition lockDo not forcibly pull the remote control outof the ignition lock as this may causedamage. The ignition is switched off if it was on.Automatic transmissionYou cannot take out the remote control unlessthe selector lever is in the P position: interlock.Pressing the start/stop button switches radioreadiness or the ignition on or off.<strong>Manual</strong> transmission If you press thestart/stop button and depress the clutch,the engine starts.Automatic transmission and Sports automatictransmission with double clutch: if you pressthe start/stop button and depress the brakepedal, the engine starts. When the remote control is removed fromthe ignition lock> In cars with Comfort Access*, by touchingthe surface above the door lock, refer toLocking on page 26Ignition onAll electrical consumers can operate. Theodometer and trip odometer are displayed inthe instrument cluster.When the engine is off, please switch offthe ignition and any unnecessary electricalconsumers in order to preserve the battery.
Radio readiness and ignition offAll indicator and warning lamps as well as displaysin the instrument cluster go out.The starter operates automatically for a certaintime, and stops automatically as soon as theengine has started.Starting the engineDo not run the engine in enclosed areas;otherwise, the inhalation of toxic exhaustgases can cause loss of consciousness anddeath. The exhaust gases contain carbon monoxide,an odorless and colorless, but highlytoxic gas. Never leave an unattended vehiclewith the engine running; otherwise, such a vehiclerepresents a potential safety hazard.Before leaving the car with the engine running,place the transmission in neutral or move theselector lever to position P and forcefully applythe parking brake to prevent the car from moving.
Driving3. Forcefully apply the parking brake.4. Removing the remote control from the ignitionlock, refer to page 48.Sports automatic transmission withdouble clutch1. With the car at a standstill, press the start/stop button.If the transmission is shifted into N when theengine is switched off, you will be notifiedvisually and acoustically of this fact.2. Forcefully apply the parking brake.3. Remove remote control from the ignitionlock, refer to page 48. The transmission isautomatically shifted into transmissionposition P.In exceptional cases, if the parking brakehas to be used to slow or stop the car, donot pull the lever up too hard. In doing so, continuouslypress the button of the parking brakelever.Otherwise, excessive force on the parkingbrake can lock up the rear wheels and cause therear of the car to swerve.
Vehicle parkingTo prevent the vehicle from rolling,always select position P and apply theparking brake before leaving the vehicle withthe engine running. With the ignition switched on or the enginerunning, the selector lever can be movedout of position P.> Before moving the lever away from P or Nwith the vehicle stationary, first depress thebrake; otherwise, the selector lever will beprevented from moving: shiftlock.To prevent the vehicle from creepingafter you select a driving position,depress the brake until you are ready tostart.
DrivingSport program and manual operationM/S> When you use the shift paddles on thesteering wheel to shift gears in automaticmode, the transmission switches to manualmode.> If you do not accelerate or shift gears usingthe shift paddles for a certain amount oftime, the transmission switches back toautomatic mode.If the selector lever is in the M/S gearplane, manual mode remains active. To upshift, briefly pull the right shiftpaddle +.> To downshift, briefly pull the left shift paddle–.Upshifts and downshifts are executed onlywhen they will result in a plausible combinationof engine and vehicle speed; thus, for example,a downshift that would cause the engine tooverrev will not be executed by the system.The gear selected is briefly displayed in theinstrument cluster, followed again by the gearactually in use.Overriding selector lever lockIf the selector lever will not move out ofposition P even though the ignition is switchedon, the brake is depressed, and the button onthe selector lever is pressed, the selector leverlock can be overridden:52
1. Unclip the sleeve of the selector lever.2. Pull the sleeve up over the selector leveruntil the sleeve is inside out.3. Using the screwdriver from the onboardvehicle tool kit, refer to page 132, press thered lever, see arrow, while moving theselector lever to the desired position.7-gear Sports automatictransmission with doubleclutch*The conceptThe 7-gear Sports automatic transmission withdouble clutch is an automated manual transmissionwith two clutches and secondary gearsets in which the clutching and shifting is handledby an electrohydraulic system.With the 7-gear Sports automatic transmissionwith double clutch, the gears are shifted <strong>without</strong>an interruption in driving power.You operate the 7-gear Sports automatic transmissionwith double clutch using the selectorlever and two shift paddles on the steeringwheel.It offers you the following functions:> either manual or automatic mode: sequentialmode or drive mode> automatic downshifting and protectionagainst incorrect gear selection, even insequential mode> Acceleration assistant, Launch Control,refer to page 57.System limitationsThe 7-gear Sports automatic transmission withdouble clutch has an overheating protectionthat protects the clutch from extreme loads.The indicator lamp lights up in yellow ifthe transmission becomes to warm.Avoid high engine loads and frequentaccelerations from zero. If the transmission isoverheated, the indicator lamp lights up in redand the power flow to the motor is interrupted. Itis only possible to continue driving once thetransmission has cooled down.Avoid frequent powerful accelerations fromzero and do not ride the clutch by acceleratingslightly with a slipping clutch; otherwise, thetransmission may overheat.Selector lever positionsP R N D M/S + –The selector lever position and the engagedgear are displayed, e.g. M4.Engaging selector lever positions> The selector lever can be moved out ofposition P only with the engine running:interlock.> Before moving the lever away from P or Nwith the vehicle stationary, first depress thebrake; otherwise, the desired shift will notbe executed: shiftlock.53Reference MobilityDriving tipsControlsAt a glance
DrivingShifting into N, D, RBriefly push the selector lever in the desireddirection, overcoming a resistance point if necessary.When shifting out of P or into R, simultaneouslypress the button 1The engaged selector lever position is also displayedon the selector lever.As soon as you release the selector lever, itreturns to the center position.Shifting into PR ReverseSelect this only when the vehicle is stationary.N idle positionYou can select this at a car wash, for example.The vehicle can roll.After the engine is switched off, the transmissionremains in N if you leave theremote control in the ignition lock. You can usethis function at a car wash, for example, refer topage 129.
In the following situations, the 7-gear Sportsautomatic transmission with double clutchdoes the thinking for you:> Upshifts and downshifts are executed onlywhen they will result in a plausible combinationof engine and vehicle speed; thus, forexample, a downshift that could cause theengine to overrev will not be executed bythe system.> At a stop, the transmission is automaticallyshifted down to the first gear.> Shortly before the speed falls below a geardependentminimum speed, the transmissionautomatically downshifts <strong>without</strong> yourintervention.Quick downshifting: even in sequential mode,you can skip over several gears in order toachieve an optimum acceleration. To do so,depress the accelerator past the resistancepoint.To return to automatic mode, push the selectorlever to the right.Gear shiftingUpshift or downshift using the selector lever orthe shift paddles. You do not have to let off ofthe gas to do this.Using the selector lever> To upshift, pull the selector lever toward therear.> To downshift, push it toward the front.Using the shift paddles on the steeringwheelYou can also shift manually using two shift paddleson the steering wheel. The shift paddlesallow you to shift gears quickly since bothhands can remain on the steering wheel.> When you use the shift paddles on thesteering wheel to shift gears in automaticmode, the transmission switches to manualmode.> If you do not accelerate or shift gears usingthe shift paddles for a certain amount oftime, the transmission switches back toautomatic mode if the selector lever is inposition D.> To upshift, briefly pull the right shiftpaddle +.> To downshift, briefly pull the left shift paddle–.Driving dynamics controlThe driving dynamics control permits you, atthe push of a button, to have your <strong>BMW</strong> react inan even more sporty fashion when driving:> Optimal use is made of the engine's speedrange.> Gear changes occur more quickly.> The engine reacts more spontaneously toaccelerator pedal movements.Activating the systemPress the SPORT button.The LED in the button lights up.Deactivating the system> Press the SPORT button again> Switch off engineThe LED in the button goes out.55Reference MobilityDriving tipsControlsAt a glance
Driving<strong>Manual</strong>ly unlocking parking lockIn the event of a power supply interruptionsuch as a discharged or disconnectedbattery or an electrical malfunction, theparking lock must be manually unlocked; otherwise,the rear wheels are immobilized and thevehicle cannot be towed.
Launch ControlLaunch Control enables an optimum accelerationwhen starting off on a road surface withgood traction.Do not use Launch Control too often; otherwise,the powerful stresses on the vehiclewill lead to premature component wear.
Driving1. Switch on the ignition, refer to page 48.2. Briefly press button 1 in the turn signal/highbeam lever up or down repeatedly until thesymbol appears in the display, accompaniedby the word "SET".Wiper system3. Press button 2.4. Briefly press button 1 in the turn signal/highbeam lever down repeatedly until the symbolappears in the display.1 Switching on wipers2 Switching off wipers or brief wipe3 Activating/deactivating intermittent wipe orrain sensor*4 Cleaning windshield and headlamps*5 Setting speed for intermittent wipe, or sensitivityof the rain sensorSwitching on wipersPress the lever upward, arrow 1.The lever automatically returns to its initial positionwhen released.5. Press button 2.6. Use button 1 to select:>Turn signals flash once.>Triple turn signal.7. Press button 2.The setting is stored for the remote controlcurrently in use.Normal wiper speedPress once.The system switches to operation in the intermittentmode when the vehicle is stationary.Fast wiper speedPress twice or press beyond the resistancepoint.The system switches to normal speed when thevehicle is stationary.Intermittent wipe or rain sensor*If the car is not equipped with a rain sensor, theintermittent-wipe time is a preset.If the car is equipped with a rain sensor, the timebetween wipes is controlled automatically anddepends on the intensity of the rainfall. The rainsensor is mounted on the windshield, directly infront of the interior rearview mirror.58
Activating intermittent wipe or rainsensorPress the button, arrow 3. The LED in the buttonlights up.Setting speed for intermittent wipe orsensitivity of the rain sensorTurn the thumb wheel 5.Deactivating intermittent wipe or rainsensorPress the button again, arrow 3.The LED goes out.Deactivate the rain sensor before enteringan automatic car wash. Failure to doso could result in damage caused by undesiredwiper activation.
DrivingCruise control*The conceptYou can use the cruise control feature beginningat approx. 20 mph/30 km/h. The car thenstores and maintains the speed that you specifyusing the lever on the steering column.Do not use cruise control when driving atconstant speed is prevented by adverseconditions, e.g. winding roads, dense traffic orpoor road conditions due to, e.g. snow, rain, iceor loose surfaces. Otherwise, you could losecontrol of the vehicle and cause an accident as aresult. When you select the neutral position N withthe Sports automatic transmission withdouble clutch> When the vehicle travels faster or slowerthan the set speed for an extended period,e.g. when the accelerator is depressed> When you activate DTC or deactivate DSC> When DSC is intervening60
Resuming a speed stored beforehandPress the button, arrow 4.The last stored speed is resumed and maintained.The stored speed is briefly displayed in theinstrument cluster.The stored speed is cleared when the ignition isswitched off.Display in the instrument clusterWhen the speed at which the vehicle is travelingis stored or when a stored speed is called up,the speed is briefly displayed in the instrumentcluster.61Reference MobilityDriving tipsControlsAt a glance
Controls overviewControls overviewOdometer, outsidetemperature display, clock1 Knob in the instrument cluster2 Outside temperature and clock3 Odometer and trip odometerKnob in the instrument cluster> To reset the trip odometer while the ignitionis switched on> To display the time, outside temperatureand odometer briefly while the ignition isswitched offroads, for example; otherwise, there is anincreased risk of an accident.
Coolant temperatureA warning lamp will come on if the coolant, andtherefore the engine, becomes too hot.Check coolant level, refer to page 125.Engine oil temperature*When the engine is at normal operating temperature,the engine oil temperature is betweenapprox. 2107/1006 and approx. 3007/1506.If the engine oil temperature is too high, a warninglamp comes on in the instrument cluster.Fuel gaugeFuel tank capacity: approx. 14 US gallons/53 liters.You can find information on refueling onpage 112.If the tilt of the vehicle varies for a longer period,when you are driving in mountainous areas, forexample, the indicator may fluctuate slightly.Fuel display 135i: in speedometer.ReserveOnce the fuel level has fallen to the reservezone, the indicator lamp lights up briefly and thecruising range for the remaining amount of fuelis displayed. The indicator lamp remains oncontinuously when the remaining cruisingrange is less than approx. 30 miles/50 km.Refuel as soon as possible once yourcruising range falls below 30 miles/50 km; otherwise, engine functions are notensured and damage can occur.
Controls overviewThe following items of information are displayedin the order listed:> Cruising range> Average speed> Average fuel consumption> Current fuel consumption> No informationTo set the corresponding units of measure,refer to Formats and units of measure onpage 66.Current fuel consumptionDisplays the current fuel consumption. Thisallows you to see whether your current drivingstyle is conducive to fuel economy with minimumexhaust emissions.Cruising rangeDisplays the estimated cruising range availablewith the remaining fuel. The range is calculatedon the basis of the way the car has been drivenover the last 18 miles/30 km and the amount offuel currently in the tank.It is important that you refuel as soon aspossible once your cruising range fallsbelow 30 miles/50 km; otherwise, engine functionsare not ensured and damage can occur.
Settings and informationOperating principleCertain settings and information can only bemade or called up when the ignition is switchedon. A number of settings cannot be made whiledriving.1 Button for:> Selecting display> Setting values2 Button for:> Confirming selected display or set values> Calling up computer information 633 When the lights are on: instrument lightingbrightness 854 Calling up Check Control 685 Checking oil level 1236 Initializing the Flat Tire Monitor 72Resetting the Tire Pressure Monitor 747 Setting the time 688 Setting the date 689 Viewing service requirement display 6610 Setting formats and units of measure,resetting to factory settings 6611 Adjusting settings> Confirmation signals when locking andunlocking the vehicle 21> Response during unlockingprocedure 19> Automatic locking 22> Pathway lighting 81> Daytime running lights 82> Triple turn signal activation 57> Seat and mirror memory* 40Exiting displaysThe outside temperature reading and the timereappear when you press button 2 or if youmake no entries within approx. 15 seconds. Ifrequired, complete the current setting first.65Reference MobilityDriving tipsControlsAt a glance
Controls overviewFormats and units of measureYou can set formats and units of measure.For operating principle refer to page 65.1. Switch on the ignition, refer to page 48.2. Briefly press button 1 in the turn signal/highbeam lever up or down repeatedly until thesymbol appears in the display, accompaniedby the word "SET".Resetting to factory settingsYou can reset the formats and units of measureto the default settings.1. Briefly press button 1 in the turn signal/highbeam lever up or down repeatedly until thesymbol appears in the display, accompaniedby the word "SET".3. Press button 2.4. Use button 1 to select desired format ordesired unit of measure, e.g. for fuel consumption.2. Press button 2.3. Use button 1 to select "RESET".> Fuel consumption: mpg, km/l,l/100km> Distance covered: mls, km> Time: 12h, 24h format> Date: day.month dd.mm,month/day mm/dd> Temperature: 7, 65. Press button 2.6. Use button 1 to make the setting.7. Press button 2.The setting is stored for the remote controlcurrently in use.664. Press button 2 until is displayed.The settings are reset.The setting is stored for the remote controlcurrently in use.Service requirementsThe remaining driving distance and the date ofthe next scheduled service are displayed briefly
Controls overviewClockSetting the timeIn the instrument clusterTo set the 12h/24h format, refer to Formats andunits of measure on page 66.1. Push button 1 in the turn signal/high beamlever up or down repeatedly until the appropriatesymbol appears in the display,accompanied by the time and the word"SET".2. Press button 2.3. Use button 1 to set the hours.4. Press button 2 to confirm the entry.5. Use button 1 to set the minutes.6. Press button 2 to confirm the entry.7. Press button 2.The system accepts the new time.4. Press button 2 to confirm the entry.5. Set the month and the year in the same way.6. Press button 2.The system stores the new date.Check ControlThe conceptThe Check Control monitors vehicle functionsand alerts you to any malfunctions in the systemsmonitored. Such a Check Control messageincludes indicator or warning lamps in theinstrument cluster and, in some circumstances,an acoustic signal.DateSetting the dateIn the instrument clusterTo set the dd/mm or mm/dd date format, referto Formats and units of measure on page 66.Indicator and warning lamps can light up in avariety of combinations and colors.Several of the lamps are checked for properfunctioning and light up temporarily when theengine is started or the ignition is switched on.1. Push button 1 in the turn signal/high beamlever up or down repeatedly until the appropriatesymbol appears in the display,accompanied by the date and the word"SET".2. Press button 2.3. Use button 1 to set the day of the month.indicates that Check Control messages havebeen stored. These Check Control messagescan be viewed again later, refer to page 69.68
What to do in case of a malfunctionThe meaning of each lamp in the event of a malfunctionand tips on how to respond are listedstarting on page 143.Hiding Check Control messagesPress the button on the turn signal/high beamlever.> Some Check Control messages are displayedcontinuously and remain visible untilthe malfunction has been rectified. If severalmalfunctions occur at once, the messagesare displayed consecutively.These messages can be hidden for approx.8 seconds. After this, they are displayedagain automatically.> Other Check Control messages are hiddenautomatically after approx. 20 seconds.They are stored and can be displayed againlater.Displaying stored Check Controlmessages1. Push button 1 in the turn signal/high beamlever up or down repeatedly until the appropriatesymbol appears in the display,accompanied by the words "CHECK".2. Press button 2."CHECK OK" appears if there are no CheckControl messages. If a Check Control messagehas been stored, the correspondinglamp comes on.3. Push button 1 to check for other messages.4. Press button 2.The display again shows the outside temperatureand the time.69Reference MobilityDriving tipsControlsAt a glance
Technology for driving comfort and safetyTechnology for driving comfort and safetyPark Distance Control PDC*The conceptThe PDC assists you with maneuvering in tightparking spaces. Acoustic signals warn you ofthe presence of an object behind your vehicle.Four ultrasonic sensors in the bumper measurethe distance.An acoustic warning does not sound until anobject is closer than approx. 2 ft/60 cm to thecorner sensors, or closer than approx. 5 ft/1.50 m to the center sensors.PDC is a parking aid that can indicateobjects when they are approachedslowly, as is usually the case when parking.Avoid approaching an object at high speed; otherwise,physical circumstances may lead to thesystem warning being issued too late. If you stop in front of an object that has beendetected by only one of the corner sensors> If you are driving parallel to a wallMalfunctionThe indicator lamp in the instrumentcluster comes on. PDC is malfunctioning.Have the system checked.To avoid this problem, keep the sensors cleanand free of ice or snow in order to ensure thatthey will continue to operate effectively. Whenusing a high-pressure cleaner, do not spray thesensors for extended periods of time and onlyfrom a distance of at least 1 ft/30 cm.System limitationsEven with PDC, final responsibility forestimating the distance between thevehicle and any obstructions always remainswith the driver. Even when sensors are provided,there is a blind spot in which objects canno longer be detected. The system is also subjectto the physical limits that apply to all formsof ultrasonic measurement, such as thoseencountered with trailer towbars and hitches,thin or wedge-shaped objects, etc. Low objectsthat have already been displayed, e.g. curbs,can disappear again from the detection area ofthe sensors before or after a continuous tonesounds. Higher, protruding objects, e.g. ledges,cannot be detected. Loud sound sources outsideor inside the car can drown out the PDCsignal. Therefore, always drive cautiously; otherwise,there is a risk of personal injury or propertydamage.
Antilock Brake System ABSABS prevents locking of the wheels duringbraking. Safe steering response is maintainedeven during full braking. Active safety is thusincreased.The ABS is operational every time you start theengine. Braking safely, refer to page 106.Electronic brake-force distributionEBVThe system controls the brake pressure in therear wheels to ensure stable braking behavior.Dynamic Brake Control DBCWhen you apply the brakes rapidly, this systemautomatically produces the maximum brakingforce boost and thus helps to achieve the shortestpossible braking distance during full braking.This system exploits all of the benefits providedby ABS.Do not reduce the pressure on the brake for theduration of the full braking application.Dynamic Stability Control DSCDSC prevents the driving wheels from losingtraction when you pull away from rest or accelerate.The system also recognizes unstabledriving conditions, for example if the rear of thecar is about to swerve or if momentum is actingat an angle past the front wheels. In thesecases, DSC helps the vehicle maintain a safecourse within physical limits by reducing engineoutput and through braking actions at the individualwheels.The laws of physics cannot be repealed,even with DSC. An appropriate drivingstyle always remains the responsibility of thedriver. Therefore, do not reduce the additionalsafety margin again by taking risks, as this couldresult in an accident.
Technology for driving comfort and safety> When driving uphill on snow-covered roads,in slush or on unplowed, snow-coveredroads> When rocking a stuck vehicle free or startingoff in deep snow or on loose ground> When driving with snow chainsActivating DTCPress the button; the indicator lamps for DTC inthe instrument cluster come on.For better controlIf the indicator lamp flashes:DTC is regulating the drive and brakingforces.If the indicator lamps are on:DTC has been activated.Deactivating DTCPress the button again; the DTC indicatorlamps in the instrument cluster go out.Drive-off assistantThe drive-off assistant enables you to drive offsmoothly on uphill gradients. It is not necessaryto use the parking brake for this.1. Hold the car in place by depressing thebrake.2. Release the brake and drive off <strong>without</strong>delay.The drive-off assistant holds the car inplace for approx. 2 seconds after thebrake is released. Drive off <strong>without</strong> delay afterreleasing the brake. Otherwise, the drive-offassistant will no longer hold the car in placeafter approx. 2 seconds and the car will start toroll backwards. Driving on snowy or slippery road surface> Performance-oriented style of driving: slipin the drive wheels, high lateral acceleration> Driving with snow chains*InitializationIn the initialization, the set inflation pressuresare adopted as reference values for the detectionof a flat tire. The initialization is begun byconfirmation of the inflation pressures.72
Do not initialize the system while snow chainsare attached.For operating principle refer to page 65.1. Start the engine immediately before pullingaway, but do not drive off yet.2. Briefly press the button 1 in the turn signal/high beam lever repeatedly until the correspondingsymbol and "RESET" appear.3. Press button 2 to confirm your choice of theFlat Tire Monitor.4. Press button 2 for approx. 5 seconds, untilthe reading shown below is displayed:5. Start driving.The initialization is completed during driving,which can be interrupted at any time.When driving resumes, the initialization is continuedautomatically. With a full load:4 persons, cargo area full:approx. 30 miles/50 kmDrive cautiously and do not exceed aspeed of 50 mph/80 km/h.When there is a tire pressure loss, the handlingcharacteristics change, e.g. there will bereduced directional stability during braking,braking distances will be longer, and self-steeringresponse will change.
Technology for driving comfort and safetyTire Pressure Monitor TPM*The conceptCheck the inflation pressure in the four installedtires. The system notifies you if there is a significantloss of pressure in one or more tires.Functional requirementThe system has to have been reset at the correctinflation pressure; otherwise, a reliablereporting of a flat tire is not assured.Always use wheels with TPM electronics toassure a trouble-free function of the system.Each time a tire inflation pressure hasbeen corrected or a wheel or tire has beenchanged, reset the system. when other systems or devices that use thesame radio frequency interfere with TPM.1. Start the engine, but do not start driving.2. Briefly press the button 1 in the turn signal/high beam lever repeatedly until the correspondingsymbol and "RESET" appear.3. Press button 2 to confirm your choice of theTire Pressure Monitor. The following displayappears:4. Press button 2 for approx. 5 seconds, untilthe reading shown below is displayed:Resetting the systemEach time a tire inflation pressure has been correctedor a wheel or tire has been changed,reset the system.For operating principle refer to page 65.745. Start driving.After several minutes of driving time, theadjusted inflation pressures will be adopted asnominal values. The resetting is completedautomatically as you drive. The indicator lampgoes out after the system reset is completed.You can stop driving at any time. The resettingcontinues automatically when you resume driving.
Message for low tire inflation pressureThe warning lamps come on in yellowand red. In addition, a signal sounds.> There is a flat tire or substantial loss of tirepressure.> The system was not reset after a wheelchange and will thus issue warnings at thelast initialized inflation pressures.Cautiously reduce speed to below 50 mph/80 km/h. Avoid sudden braking and steeringmaneuvers. Do not exceed a speed of 50 mph/80 km/h.Do not continue driving if the vehicle isnot equipped with run-flat tires, refer topage 120; continued driving could result in asevere accident. With a light load:1 to 2 persons <strong>without</strong> luggage:approx. 155 miles/250 km> With a medium load:2 persons, cargo area full, or 4 persons<strong>without</strong> luggage:approx. 95 miles/150 km> With a full load:4 persons, cargo area full:approx. 30 miles/50 kmDrive cautiously and do not exceed aspeed of 50 mph/80 km/h.When there is a tire pressure loss, the handlingcharacteristics change, e.g. there will bereduced directional stability during braking,braking distances will be longer, and self-steeringresponse will change. A wheel <strong>without</strong> TPM electronics has beeninstalled:Have it checked by your <strong>BMW</strong> center.> Interference from systems or devices thatuse the same radio frequency:The system automatically becomes activeagain when the vehicle moves out of theinterference zone.Declaration according to NHTSA/FMVSS 138Tire Pressure Monitoring SystemsEach tire should be checked monthly when coldand inflated to the inflation pressure recommendedby the vehicle manufacturer on thevehicle placard or tire inflation pressure label. Ifyour vehicle has tires of a different size than thesize indicated on the vehicle placard or tire inflationpressure label, you should determine theproper tire inflation pressure for those tires. Asan added safety feature, your vehicle has beenequipped with a tire pressure monitoring system,TPMS, that illuminates a low tire pressuretelltale when one or more of your tires are significantlyunder-inflated. Accordingly, when thelow tire pressure telltale illuminates, you shouldstop and check your tires as soon as possible,and inflate them to the proper pressure. Drivingon a significantly underinflated tire causes thetire to overheat and can lead to tire failure.Underinflation also reduces fuel efficiency andtire tread life and may affect the vehicle's handlingand stopping ability. Please note that theTPMS is not a substitute for proper tire maintenance,and it is the driver's responsibility tomaintain correct tire pressure, even if underinflationhas not reached the level to trigger illuminationof the TPMS low tire pressure indicator.75Reference MobilityDriving tipsControlsAt a glance
Technology for driving comfort and safetyThe TPMS malfunction indicator is combinedwith the low tire pressure telltale. When the systemdetects a malfunction, the telltale will flashfor approximately one minute and then remaincontinuously lit. This sequence will continueupon subsequent vehicle startups as long asthe malfunction exists. When the malfunctionindicator is illuminated, the system may not beable to detect or signal low tire pressure asintended. TPMS malfunctions may occur for avariety of reasons, including the installation ofreplacement or alternate tires or wheels on thevehicle that prevent the TPMS from functioningproperly. Always check the TPMS malfunctiontelltale after replacing one or more tires orwheels on your vehicle to ensure that thereplacement or alternate tires and wheels allowthe TPMS to continue to function properly.Active steering*The conceptActive steering varies the turning angle of thefront wheels in relation to steering wheel movements.It also varies the steering force requiredto turn the wheels depending on the speed atwhich you are driving.When you are driving in the low road speedrange, e.g. in a town or when parking, the steeringangle is increased, i.e. steering becomesvery direct and less effort is required to turn thewheels. In the higher speed range, on the otherhand, the steering angle is reduced as thespeed increases. This improves the handling ofyour <strong>BMW</strong> over the entire speed range.In critical situations, the system can make targetedcorrections to the steering angle providedby the driver and thus stabilize the vehiclebefore the driver intervenes. This stabilizingintervention is simultaneously deactivatedwhen DSC is switched off, refer to page 71.MalfunctionThe warning lamps come on. Activesteering is malfunctioning or is temporarilydeactivated. At low speeds,greater steering wheel movementsare required, whereas at higher speeds thevehicle reacts more sensitively to steeringwheel movements. The stability-enhancingfeature may also be deactivated. Drive cautiouslyand think well ahead.DeactivationActive steering is deactivated to perform an initialization.A message indicates that the featureis deactivated. Initialization may take severalminutes.If the message does not disappear during thecurrent trip, have the system checked.DefectIf there is a defect, a corresponding messageappears. Have the system checked.Servotronic*The conceptThe Servotronic varies the steering forcerequired to turn the wheels relative to the vehiclespeed.At low speeds, the steering force is stronglyassisted, i.e. less force is needed for steering.As the vehicle speed increases, the steeringassisting power is reduced.This system functions automatically.MalfunctionsMalfunctions are displayed via Check Control,refer to page 68.76
Brake Force Display*On the left: normal braking.On the right: sharp braking.AirbagsThe following airbags are located under themarked covers:1 Front airbags2 Coupe: head airbags3 Side airbags in the seat backrests4 Convertible: knee airbagsProtective actionObserve the adjustment instructions onpage 35 to ensure the best possible personalprotection.
Technology for driving comfort and safetyremove or dismantle the steering wheel.Do not touch the individual components immediatelyafter the system has been triggered,because there is a danger of burns.In the event of malfunctions, deactivation ortriggering of the airbag restraint system, havethe testing, repair, removal and disposal of airbaggenerators executed only by a <strong>BMW</strong> centeror a workshop that works according to repairprocedures of <strong>BMW</strong> with correspondinglytrained personnel and that has the requiredexplosives licenses. Unprofessional attempts towork on the system could lead to failure in anemergency or to undesired airbag activation,either of which could result in personal injury.
Operational readiness of airbag systemAs of radio readiness, refer to page 48, thewarning lamp comes on briefly to indicate thatthe entire airbag system and the belt tensionersare operational.Airbag system malfunction> Warning lamp does not light up at radioreadiness or beyond.> Warning lamp remains permanently on.In the event of a fault in the airbag system,have it checked <strong>without</strong> delay; otherwise,there is the risk that the system will not functionas intended even if a sufficiently severe accidentoccurs.
Technology for driving comfort and safetyTo check the system and ensure flawless longtermoperation, always observe the serviceintervals, refer to page 66.
LampsParking lamps/low beams0 Lamps off,daytime running lights1 Parking lamps and daytime running lights2 Low beams,welcome lamps*3 Automatic headlamp control*, daytime runninglights, welcome lamps*, high-beamassistant*, adaptive light control*When you open the driver's door with the ignitionswitched off, the exterior lighting is automaticallyswitched off if the light switch is inposition 0, 2 or 3.Switch on the parking lamps if necessary,switch position 1.Parking lampsIn switch position 1, the front, rear and sidevehicle lighting is switched on. You can use theparking lamps for parking.The parking lamps will discharge the battery.Therefore, do not leave them on forunduly long periods of time; otherwise, the batterymight not have enough power to start theengine. It is preferable to switch on the lefthandor right-hand roadside parking lamps,refer to page 83.
Lamps1. Switch on the ignition, refer to page 48.2. Briefly press button 1 in the turn signal/highbeam lever up or down repeatedly until thesymbol appears in the display, accompaniedby the word "SET".Activating/deactivating daytimerunning lightsFor operating principle refer to page 65.1. Switch on the ignition, refer to page 48.2. Briefly press button 1 in the turn signal/highbeam lever up or down repeatedly until thesymbol appears in the display, accompaniedby the word "SET".3. Press button 2.4. Briefly press button 1 in the turn signal/highbeam lever down repeatedly until the symbolappears in the display.3. Press button 2.4. Briefly press button 1 in the turn signal/highbeam lever down repeatedly until the symbolappears in the display.5. Press button 2.6. Use button 1 to select:>The function is deactivated.> ...Select the corresponding duration, e.g.40 seconds.7. Press button 2.The setting is stored for the remote controlcurrently in use.Daytime running lightsThe daytime running lights light up in switchposition 0, 1 and 3. They are less powerful thanthe low beams.5. Press button 2.6. Use button 1 to select:>Daytime running lights activated.>Daytime running lights deactivated.7. Press button 2.The setting is stored for the remote controlcurrently in use.82
Adaptive light control*The conceptAdaptive light control is a variable headlampcontrol system that enables better illuminationof the road surface. Depending on the steeringangle and other parameters, the light from theheadlamp follows the course of the road.In tight curves at speeds up to 40 mph/70 km/h,e.g. on mountainous roads or when turning, anadditional, corner-illuminating lamp is switchedon that lights up the inside area of the curve.Activating adaptive light controlWith the ignition switched on, turn the lightswitch to position 3, refer to page 81.The corner-illuminating lamp is switched onautomatically, depending on the steering wheelangle or turn signal indicator.Standstill function*: to avoid blinding oncomingtraffic, the adaptive light control directs lighttowards the front passenger side when thevehicle is at a standstill.When you are reversing, only the corner-illuminatinglamps are switched on and active onboth sides.MalfunctionThe LED next to the symbol for automatic headlampcontrol flashes. Adaptive light control ismalfunctioning or has failed. Have the systemchecked as soon as possible.High beams/roadside parkinglamps*1 High beams2 Headlamp flasher3 Roadside parking lamps*Roadside parking lamps, left or right*There is an additional option of switching on thelamps on the side of the car facing the roadwhen parked.Switching onAfter parking the vehicle, press the lever up ordown beyond the pressure point for approx.1 second, arrow 3.The roadside parking lamps drain the battery.Therefore, do not leave them on forunduly long periods of time; otherwise, the batterymight not have enough power to start theengine.
LampsThe indicator lamp in the instrumentcluster lights up when the high beamsare activated. The system automaticallyswitches from high beams to low beamsand vice versa in response to oncoming traffic,traffic ahead of you, and adequate ambientlighting, e.g. on city streets.Switching the high beams on and offmanuallyWhenever you wish, or when the situationrequires, you can intervene:> If the high-beam assistant switches on thehigh beams, but you would like to drive withthe low beams, simply switch off the highbeams using the turn signal/high beamlever. This deactivates the high-beamassistant.To reactivate the system, briefly push theturn signal/high beam lever toward the highbeams again.> If the high-beam assistant switches on thelow beams, but you would like to drive withthe high beams, switch on the high beamsas usual. This deactivates the system andthe high beams need to be switched offmanually, if necessary.To reactivate the system, briefly push theturn signal/high beam lever toward the highbeams again.> Use the headlamp flasher as usual with thelow beams switched on.System limitationsThe high-beam assistant cannot serve asa substitute for the driver's personal judgmentof when to use the high beams. Therefore,manually switch off the high beams in situationswhere this is required to avoid a safety risk. In very unfavorable weather conditions,such as fog or heavy precipitation> In detecting poorly-lit road users, such aspedestrians, cyclists, horseback riders andwagons; when driving close to train or shiptraffic; and at animal crossings> In tight curves, on hilltops or in depressions,in cross traffic or half-obscured oncomingtraffic on highways> In poorly lit towns and cities and in the presenceof highly reflective signs> At low speeds> When the windshield in front of the interiorrearview mirror is fogged over, dirty or coveredwith stickers, etc.> If the sensor is dirty. Clean the sensor onthe front of the interior rearview mirror usinga cloth moistened with a small amount ofglass cleaner.Fog lamps*To switch on/off, press the button.The parking lamps or low beams mustbe switched on for the fog lamps tooperate. The green indicator lamp inthe instrument cluster lights up whenever thefog lamps are on.The fog lamps are switched off while you activatethe headlamp flasher or switch on the highbeams.If the automatic headlamp control is activated,the low beams will come on automaticallywhen you switch on the fog lamps.
Instrument lightingYou can adjust the brightness of the instrumentlighting only when the parking lamps or the lowbeams are switched on.1. Push button 1 in the turn signal/high beamlever up or down repeatedly until the appropriatesymbol appears in the display,accompanied by the brightness level andthe word "SET".2. Press button 2.3. Push button 1 up or down to select thedesired brightness level.4. Press button 2.The display again shows the outside temperatureand the time.Interior lampsThe interior lamps, footwell lamps*, entrylamps*, the cargo area lamp and courtesylamps* are controlled automatically.The LEDs for the courtesy lamps are set in thedoor handles and illuminate the ground in frontof the doors.To avoid draining the battery, all lampsinside the car are switched off about8 minutes after the ignition is switched off, referto Start/stop button on page 48.
ClimateClimateEquipment versionsDepending on the equipment version, yourvehicle contains either an air conditioner* or anautomatic climate control system*.1 Heating, air conditioner*2 Automatic climate control*Air vents3 Airflow directed toward the windshield andside windows4 Air to the upper body area.The thumbwheels smoothly open and closethe air supply. The levers alter the directionof the airflow. For further details of draftfreeventilation, refer to page 88 or 91.5 Air to the footwell86
Heating and ventilation, air conditioner*1 Air distribution2 Recirculated-air mode3 Air volume4 Cooling function*If the vehicle is not equipped with a coolingAir distributionDirect the flow of air to the windows, to the upper body areaor to the footwell . Intermediatesettings are possible. In thecenter position between and , the air isalso deflected at toward the windows.Recirculated-air modeIf the air outside the car has anunpleasant odor or contains pollutants,shut off the supply to theinterior of the car temporarily. Thesystem then recirculates the air currently withinthe vehicle.You can also activate/deactivate the recirculated-airmode by means of a button* on thesteering wheel, refer to page 11.If condensation starts to form on theinside window surfaces during operationin the recirculated-air mode, you should switchit off while also increasing the air volume asrequired.The recirculated-air mode should not be usedcontinuously for lengthy periods; otherwise, thequality of the air inside the car will graduallydeteriorate.
ClimateThe cooling function helps prevent condensationon the windows or removes it quickly.Depending on the weather, the windshield mayfog over briefly when the engine is started.Rear window defrosterThe defroster is switched off automaticallyafter a certain time.Depending on your vehicle'sequipment, the upper wires serveas an antenna and are not part of the rear windowdefroster.TemperatureTo increase the temperature, turnthe rotary switch clockwisetowards red.To lower the temperature or tocool* the interior, turn to the left towards blue.Defrosting windows and removingcondensationVentilation1 Use the thumbwheels to smoothly openand close the air vents2 Use the lever to change the direction of theairflowVentilation for coolingAdjust the vent outlets to direct the flow of coolair in your direction, for instance if it has becometoo hot in the car.Draft-free ventilationAdjust the vents to let the air flow past you.MicrofilterThe microfilter removes dust and pollen fromthe incoming air. The microfilter is changed byyour <strong>BMW</strong> center during routine maintenancework.1. Air distribution 1 in position .2. Deactivate recirculated-air mode 2.3. Air volume control 3 all the way to the right.4. Switch on cooling function 4.5. Temperature 5 to the right, red.6. Switch on rear window defroster 6 todefrost the rear window .88
Automatic climate control*1 Seat heating*, left side 402 Air distribution, manual3 Temperature, left side4 Maximum cooling5 AUTO program6 Air volume, manual adjustment; AUTOintensity7 Automatic recirculated-air control AUC/Recirculated-air modeComfortable interior climateAUTO program 5 offers the ideal air distributionand air volume for almost all conditions, refer toAUTO program below. All you need to do isselect an interior temperature which is comfortablefor you.The following sections inform you in detailabout how to adjust the settings.Most settings are stored for the remote controlcurrently in use, refer also to Personal Profilesettings on page 18.Adjusting air distribution manuallyThe air distribution can beswitched on and off manually. Theair is directed to the windshield, tothe upper body area and to thefootwell.The automatic air distribution can be switchedback on by pressing the AUTO button. Thecooling function is switched on automaticallyand the manual air distribution setting iscleared.8 ALL program9 Temperature, right side10 Defrosting windows and removing condensation11 Switching cooling function on/off manually12 Rear window defroster13 Seat heating*, right side 4014 Interior temperature sensor, please keepclearTemperatureTurn to set the desired temperature.The automatic climate controlachieves this temperature asquickly as possible regardless of the season,using maximum cooling or heating power if necessary,and then maintains it.Avoid rapid switching between different temperaturesettings. The automatic climate controlwill not have sufficient time to adjust the settemperature.Maximum heating power can be obtained withthe highest setting, regardless of the outsidetemperature.The system cools steadily in the lowest setting,regardless of the outside temperature.Maximum coolingPress the button.The system is set to the lowesttemperature, maximum air volumeand recirculated-air mode.89Reference MobilityDriving tipsControlsAt a glance
ClimateAir flows out of the vent outlets for the upperbody region. Open them for this purpose.Air is cooled as quickly as possible> Above an outside temperature of approx.327/06> When the engine is runningAUTO programPress the button.Air volume, air distribution andtemperature are controlled automatically.Depending on the selected temperature, AUTOintensity and outside influences, the air isdirected toward the windshield, the side windows,the upper body, and the footwell.Pressing the AUTO button automaticallyswitches on the cooling function.At the same time, a condensation sensor controlsthe program so as to prevent window condensationas much as possible.The program is switched off when the air distributionis set manually or the button is pressedagain.Intensity of the AUTO programWith the AUTO program switched on, automaticcontrol of the air volume and air distributioncan be adjusted:Press the left side of the button toreduce the intensity. Press theright side of the button to increaseit.The selected intensity is shown on the displayof the automatic climate control.Press the left side of the button toreduce air volume. Press the rightside of the button to increase it.The air volume may be reduced or the blowermay be switched off entirely to save on batterypower. The display remains the same.Automatic recirculated-air controlAUC/Recirculated-air modeYou can respond to unpleasant odors or pollutantsin the immediate environment by temporarilysuspending the supply of outside air. Thesystem then recirculates the air currently withinthe vehicle.Press the button repeatedly toselect an operating mode:> LED off: outside air flows in continuously.> Left-hand LED on, AUC mode: a sensordetects pollutants in the outside air andcontrols the shut-off automatically.> Right-hand LED on, recirculated-air mode:the supply of outside air is permanentlyshut off. If the windows fog over, switch offrecirculated-air mode and increase the airvolume, if necessary. Make sure that air canflow onto the windshield.The recirculated-air mode should not beused continuously for lengthy periods;otherwise, the quality of the air inside the carwill gradually deteriorate.
The program is switched off when the setting isadjusted on the front passenger side or the buttonis pressed again.Defrosting windows and removingcondensationPress the button.Quickly removes ice and condensationfrom the windshield andfront side windows.For this purpose, also switch on the coolingfunction.Switching cooling function on/offThe passenger compartment can only becooled while the engine is running.Press the button.The air is cooled and dehumidifiedand – depending on the temperaturesetting – warmed again.Depending on the weather, the windshield mayfog up briefly when the engine is started.Pressing the AUTO button automaticallyswitches on the cooling function.Rear window defrosterPress the button.The defroster is switched off automaticallyafter a certain time.Depending on your vehicle's equipment, theupper wires serve as an antenna and are notpart of the rear window defroster.Switching the system on/offSwitching offWith the blower at its lowest setting,press the left side of the buttonto switch off the automatic climatecontrol.All displays are cleared except for the rear windowdefroster if it is switched on.The outside air supply is blocked whenthe automatic climate control is switchedoff. If the air quality deteriorates or the windowfogs over, switch the system back on andincrease the air volume.
Practical interior accessoriesPractical interior accessoriesIntegrated universal remotecontrol*The conceptThe integrated universal remote control canreplace as many as three hand-held transmittersfor various remote-controlled devices,such as garage doors and gates or lighting systems.The integrated universal remote controlregisters and stores signals from the originalhand-held transmitters.The signal of an original hand-held transmittercan be programmed on one of the three memorybuttons 1. After this, the programmedmemory button 1 will operate the system inquestion. The LED 2 flashes to confirm transmissionof the signal.Should you sell your vehicle one day, be sure todelete the stored programs beforehand for yoursafety, refer to page 93.To prevent possible damage or injury,before programming or using the integrateduniversal remote control, always inspectthe immediate area to make certain that no people,animals or objects are within the pivoting ortravel range of the device being operated. Complyalso with the safety instructions suppliedwith the original hand-held transmitter.
The corresponding memory button 1 is nowprogrammed with the signal of the originalhand-held transmitter.You can operate the device while the ignition isswitched on.If the device fails to function even afterrepeated programming, check whetherthe original hand-held transmitter uses an alternating-codesystem. To do so, either read theinstructions for the original hand-held transmitteror hold down the programmed memorybutton 1 of the integrated universal remotecontrol. If the LED 2 on the integrated universalremote control flashes rapidly and then remainslit for about two seconds, the original hand-heldtransmitter uses an alternating-code system. Ifit uses an alternating-code system, programthe memory buttons 1 as described underAlternating-code hand-held transmitters.
Practical interior accessoriesDigital compass*1 Adjustment button2 DisplayThe display shows you the main or secondarycompass direction in which you are driving.Operating principleYou can call up various functions by pressingthe adjustment button with a pointed objectsuch as a pen or similar item. The followingadjustment options are displayed one after theother, depending on how long you keep theadjustment button pressed:> Press briefly: switch display on/off> 3 to 6 seconds: set compass zone> 6 to 9 seconds: calibrate compass> 9 to 12 seconds: set left-hand/right-handsteering> 12 to 15 seconds: set the languageSetting compass zonesSet the compass zone corresponding to yourvehicle's geographic location so that the compasscan function correctly; refer to the worldmap with compass zones.To set the compass zone, press the adjustmentbutton for approx. 3-4 seconds. The number ofthe compass zone set is shown in the display.To change the zone setting, briefly press theadjustment button repeatedly until the displayshows the number of the compass zone correspondingto your current location.The compass is operational again after approx.10 seconds.94
Calibrating the digital compassThe digital compass must be calibrated in thefollowing situations:> An incorrect compass direction is shown.> The compass direction shown does notchange although the direction of traveldoes.> Not all compass directions are shown.Procedure1. Make sure that no large metal objects oroverhead power lines are in the vicinity ofyour vehicle and that you have enoughspace to drive in a circle.2. Set the currently valid compass zone.3. Convertible: ensure that the convertible topis fully closed.4. Press the adjustment button for approx.6-7 seconds to call up C. Then drive in atleast one full circle at a speed of no morethan 4 mph/7 km/h.If calibration is successful, the displaychanges from C to a compass direction.5. Convertible: open the convertible top fullyand repeat step 4.Setting right-hand/left-hand steeringYour digital compass is factory-set to righthandor left-hand steering, in accordance withyour vehicle.Set the languageYou can set the language of the display:Press the adjustment button for approx.12-13 seconds. Briefly press the adjustmentbutton again to switch between English, "E",and German, "O".The setting is automatically saved after approx.10 seconds.Glove compartmentOpeningPull the handle.The light in the glove compartment comes on.To prevent injury in the event of an accidentwhile the vehicle is being driven,close the glove compartment immediately afteruse.
Practical interior accessoriesOpeningPress the button, see arrow.Connection for external audio deviceYou can connect an external audio device suchas a CD or MP3 player and play audio tracksover the car's loudspeaker system. You can setthe volume and tone by means of the car radio,refer to the separate <strong>Owner's</strong> <strong>Manual</strong> for Radio.ConnectingLift up the center armrest.Compartment on the instrument panel*To open: press the button.Coupe: clothes hooksThere are clothes hooks in the rear.Items of clothing hung from the hooksmust not obstruct the driver's view. Donot hang heavy objects from the hooks; otherwise,they could endanger the car's occupants,e.g. in case of heavy braking or sudden swerving.
LighterYou can mount an attachable cupholder* on theside of the center console.Ashtray*OpeningPush the ridge on the cover.EmptyingLift out the insert.With the engine running or the ignition switchedon, press in the cigarette lighter.The lighter can be pulled out as soon as it popsback out.Hold or touch the hot cigarette lighter bythe knob only. Holding or touching it inother areas could result in burns.When leaving the car, always remove theremote control so that children cannot operatethe cigarette lighter and burn themselves.
Practical interior accessoriesCoupe: through-loadingsystemOpening1. To release the rear seat backrest, pull thecorresponding lever in the cargo area.2. The unlocked rear seat backrest moves forwardslightly. Fold the backrest forward bythe head restraint.Convertible: cargo loadingEnlarging the cargo areaWhen the convertible top is closed you canenlarge the cargo area:To do so, fold the cargo area partition upward.Before opening the convertible top, pull thecargo area partition down until it engages.Ensure that pointed objects do not pressagainst the cargo area partition from below.The convertible top can only be openedwhen the cargo area partition is foldeddown. Rubber strap* on the left trim panel forsecuring small objects such as a foldingumbrella> Net* for small objects on the right trimpanel of the cargo area> Retaining straps* on cargo area floor: forsecuring smaller objects or as an anti-slipsurface when you place objects on thestrapsThe lashing eyes in the cargo area provide youwith a way to attach cargo area nets* or drawstraps* for securing suitcases and luggage,refer to page 108.98
Coupe: ski bag*The ski bag is designed for safe, clean transportof up to 4 pairs of standard skis or up to2snowboards.With the ski bag you can stow skis with a lengthof up to 6.6ft/2.0m. When skis of 6.6ft/2.0mlength are loaded, the overall capacity of the skibag is reduced due to its tapered design.LoadingEnsure that the skis are clean when they areloaded into the ski bag. Wrap sharp edges toprevent damage.1. Fold down the center panel in the rear seatbackrest.2. Press the button, reach into the recess andfold down the cover. To stabilize the coverin the folded-down position, place the centerpanel underneath it.3. Open the Velcro fastener, spread the skibag between the front seats and insert theskis or snowboards.The zip fastener makes objects in the skibag easier to reach.4. Attach the hook of the ski bag retainingstrap to the eyelet on the side of the ski bagopening.Securing cargoAfter loading, secure the ski bag and its contents.Tighten the retaining strap on the tensioningbuckle for this purpose.Secure the ski bag in the mannerdescribed; otherwise, it could endangerthe car's occupants, e.g. in case of heavy brakingor sudden swerving.
Practical interior accessoriesWhen using the transport bag, it is notpermissible to transport passengers inthe rear seats.
101Reference MobilityDriving tipsControlsAt a glance
Driving tipsThis section provides you with informationuseful in dealing with specific driving andoperating conditions.
Things to remember when drivingThings to remember when drivingBreak-in periodMoving parts need breaking-in time to adjust toeach other. Please follow the instructions belowin order to achieve the optimal service life andeconomy of operation for your vehicle.Engine and differentialAlways obey all official speed limits.Up to 1,200 miles/2,000 kmDrive at varying engine and road speeds, but donot exceed an engine speed of 4,500 rpm or aroad speed of 100 mph/160 km/h.Avoid full-throttle operation and use of thetransmission's kickdown mode.After driving 1,200 miles/2,000 kmEngine and vehicle speeds can be graduallyincreased.TiresDue to technical factors associated with theirmanufacture, tires do not achieve their full tractionpotential until after an initial break-inperiod. Therefore, drive cautiously during thefirst 200 miles/300 km.Brake systemBrakes require an initial break-in period ofapprox. 300 miles/500 km to achieve optimizedcontact and wear patterns between brake padsand rotors. Drive cautiously during this break-inperiod.ClutchThe function of the clutch reaches its optimallevel only after a distance driven of approx.300 miles/500 km. During this break-in period,engage the clutch gently.Following part replacementThe same break-in procedures should beobserved if any of the components mentionedabove have to be renewed in the course of thevehicle's operating life.Saving fuelThe fuel consumption of your vehicle dependson several factors. You can lower fuel consumptionand the environmental impact by takingcertain measures, adjusting your driving styleand having the vehicle serviced regularly.Remove any unneeded cargoAdditional weight increases fuel consumption.Remove any mounted parts after youhave finished using themRemove unneeded additional mirrors, the roofrack and the rear luggage rack after use.Mounted parts affect the vehicle's aerodynamicsand increase fuel consumption.Close the windows and glass roofAn open glass roof or window causes higher airresistance and thus increases fuel consumption.Check tire inflation pressure regularlyCheck the tire inflation pressure at least twice amonth and before embarking on a long journey,and correct it if necessary.Low tire inflation pressure causes higher rollingresistance and thus increases fuel consumptionand tire wear.Set off immediatelyDo not let the engine warm up while the car isstill standing, but set off immediately at moderateengine speed. This is the fastest way for thecold engine to reach its operating temperature.104
Drive defensivelyAvoid unnecessary acceleration and brakingmaneuvers. To do so, keep an adequate distancebetween you and the vehicle in front ofyou. A defensive and smooth driving stylekeeps fuel consumption down.Avoid high engine speedsOnly use first gear when setting off. In secondand higher gears, accelerate <strong>without</strong> hesitationor pauses. When accelerating, shift up beforereaching high engine speeds.When you reach the desired speed, shift intothe highest applicable gear and drive with theengine speed as low as possible and at a constantspeed.As a rule: driving at low engine speeds lowersfuel consumption and reduces wear.CoastingWhen approaching a red light, take your foot offthe accelerator and coast to a stop in the highestapplicable gear.On a downhill slope, take your foot off the acceleratorand coast in a suitable gear.The fuel supply is interrupted when coasting.Switch off the engine during lengthystopsSwitch off the engine when stopping for lengthyperiods, e.g. at traffic lights, railroad crossingsor in traffic congestions. You achieve fuel savingseven if standing time is as short as approx.4 seconds.Switch off functions you do not need atthe momentFunctions such as the air conditioner, seatheating or rear window defroster draw largeamounts of power and consume additional fuel.Especially in city traffic and in stop-and-go drivingthey have a considerable impact. Therefore,switch these functions off when they are notreally needed.Have the vehicle servicedHave the vehicle serviced regularly to achievegood economy and a long vehicle life. <strong>BMW</strong>recommends having the vehicle serviced at a<strong>BMW</strong> center. Also note the <strong>BMW</strong> service system,refer to page 126.General driving notesClose the trunk lidOperate the vehicle only when the trunklid is closed. Otherwise, exhaust fumescould enter the interior of the vehicle.
Things to remember when drivingDriving through waterDrive through water on the road only if it isnot deeper than 1 ft/30 cm, and then onlyat walking speed at the most. Otherwise, thevehicle's engine, the electrical systems and thetransmission may be damaged.
develops inside the tires. In some cases, thiscan result in sudden tire pressure loss.
Things to remember when driving> For very heavy cargo when the rear seat isnot occupied, secure each safety belt in theopposite buckle.Securing cargo> Secure smaller and lighter items usingretaining straps*, a cargo area net* or drawstraps*.> Heavy-duty cargo straps* for securinglarger and heavier objects are available atyour <strong>BMW</strong> center. To attach the cargostraps, there are two lashing eyes, arrows 1,on the inside wall of the cargo area.Depending on your vehicle's equipment,there may be two additional lashing eyes,arrows 2, on the cargo area sidewalls.Follow the information included with thecargo straps.Always position and secure the cargo asdescribed above, so that it cannot endangerthe car's occupants, for example if suddenbraking or swerving is necessary.Never exceed either the approved gross vehicleweight or either of the approved axle loads, referto page 159, as excessive loads can pose asafety hazard, and may also place you in violationof traffic safety laws.Heavy or hard objects should not be carriedloose inside the car, since they could be thrownaround, for example as a result of heavy braking,sudden swerves, etc., and endanger the occupants.Only attach the cargo straps using the lashingeyes shown in the illustration. Do not securecargo with the anchors for tether straps, refer topage 46, otherwise, these could be damaged.
109Reference MobilityDriving tipsControlsAt a glance
MobilityThis section helps you maintain your car'smobility by supplying important informationon vital topics including fuels and lubricants,wheels and tires, service, maintenance androadside assistance.
RefuelingRefuelingAlways switch off the engine before refueling;otherwise, fuel cannot be added tothe tank and a message will be displayed.
Fuel specificationsDo not fill the tank with leaded fuel, as thiswould cause permanent damage to thecatalytic converter.Do not fill the tank with E85, i.e. fuel containing85% ethanol, nor with FlexFuel. Otherwise, theengine and fuel supply system will be damaged. 128i: 87> 135i: 89If you use gasoline with this minimum AKI Rating,the engine may produce knocking soundswhen starting at high outside temperatures.This has no effect on the engine life.Do not use any gasoline below the specifiedminimum fuel grade. Otherwise, theengine could be damaged.
Wheels and tiresWheels and tiresTire inflation pressuresInformation for your safetyIt is not merely the tires' service life, but alsodriving comfort and, to a great extent, drivingsafety that depend on the condition of the tiresand the maintenance of the specified tire pressure.Check the tire inflation pressure regularlyand correct it, if necessary: at least twice amonth and before starting long trips. If you failto observe this precaution you may be drivingon tires with incorrect tire pressures, a conditionthat can not only compromise your vehicle'sdriving stability, but also lead to tire damageand the risk of an accident. Do not drivewith deflated, i.e. flat tires, except when usingrun-flat tires. A flat tire will seriously impair yourvehicle's handling and braking response.Attempts to drive on a flat tire can lead to loss ofcontrol over the vehicle. Tire sizes for your vehicle> Load conditions> Maximum allowable driving speedTire inflation pressures for driving up to100 mph or 160 km/hFor normal driving up to 100 mph or 160 km/hand to achieve optimum driving comfort, adjustpressures to the respective tire inflation pressureslisted on the following pages in the columnsfor traveling speeds up to a maximum of100mph or 160km/h.These tire inflation pressures can also be foundon the driver's side door post when the driver'sdoor is open.Checking pressureOnly check tire inflation pressure when thetires are cold. This means after a maximum of1.25 miles/2 km driving or when the vehicle hasbeen parked for at least 2 hours. When tires arewarm, the tire inflation pressure is higher.After correcting the tire inflation pressure,reset the Tire Pressure Monitor, refer topage 74, or reinitialize the Flat Tire Monitor,refer to page 72.
Coupe: tire inflation pressures for the 128iTire sizeAll pressure specifications in the table areindicated in psi/kilopascal with cold tires.Cold = ambient temperatureCoupe: tire inflation pressures for the 135iPressure specifications in psi/kPaTraveling speedsup to a max. of100 mph/160 km/hTraveling speedsincluding thoseexceeding100 mph/160 km/h195/55 R 16 87 H M+S 32/220 38/260 35/240 42/290205/55 R 16 91 H M+S205/50 R 17 89 H M+S32/220 35/240 35/240 42/290Front: 205/50 R 17 89 V 32/220 - 36/250 -Rear: 225/45 R 17 91 V - 35/240 - 44/300Front: 215/40 R 18 85 Y 32/220 - 35/240 -Rear: 245/35 R 18 88 Y - 39/270 - 42/290More details on the permissible load and weights can be found on page 159.Tire sizeAll pressure specifications in the table areindicated in psi/kilopascal with cold tires.Cold = ambient temperaturePressure specifications in psi/kPaTraveling speedsup to a max. of100 mph/160 km/hTraveling speedsincluding thoseexceeding100 mph/160 km/h205/50 R 17 89 H M+S 33/230 36/250 38/260 42/290Front: 215/40 R 18 85 Y 36/250 - 38/260 -Rear: 245/35 R 18 88 Y - 39/270 - 42/290More details on the permissible load and weights can be found on page 159.115Reference MobilityDriving tipsControlsAt a glance
Wheels and tiresConvertible: tire inflation pressures for the 128iTire sizeAll pressure specifications in the table areindicated in psi/kilopascal with cold tires.Cold = ambient temperaturePressure specifications in psi/kPaTraveling speedsup to a max. of100 mph/160 km/hTraveling speedsincluding thoseexceeding100 mph/160 km/h<strong>without</strong> Sport Package205/55 R 16 91 H M+S 32/220 35/240 32/220 39/270205/50 R 17 89 H M+S 32/220 38/260 35/240 42/290Front: 205/50 R 17 89 V 32/220 - 35/240 -Rear: 225/45 R 17 91 V - 36/250 - 41/280Front: 215/40 R 18 85 Y 35/240 - 35/240 -Rear: 245/35 R 18 88 Y - 41/280 - 41/280with Sport Package205/55 R 16 91 H M+S 32/220 35/240 32/220 39/270205/50 R 17 89 H M+S 32/220 38/260 35/240 42/290Front: 205/50 R 17 89 V 32/220 - 39/270 -Rear: 225/45 R 17 91 V - 36/250 - 46/320Front: 215/40 R 18 85 Y 35/240 - 38/260 -Rear: 245/35 R 18 88 Y - 41/280 - 45/310More details on the permissible load and weights can be found on page 159.116
Convertible: tire inflation pressures for the 135iTire sizeAll pressure specifications in the table areindicated in psi/kilopascal with cold tires.Cold = ambient temperaturePressure specifications in psi/kPaTraveling speedsup to a max. of100 mph/160 km/hTraveling speedsincluding thoseexceeding100 mph/160 km/h<strong>without</strong> Sport Package205/50 R 17 89 H M+S 32/220 38/260 36/250 42/290Front: 215/40 R 18 85 Y 39/270 - 39/270 -Rear: 245/35 R 18 88 Y - 41/280 - 41/280with Sport Package205/50 R 17 89 H M+S 32/220 38/260 36/250 42/290Front: 215/40 R 18 85 Y 39/270 - 39/270 -Rear: 245/35 R 18 88 Y - 41/280 - 45/310More details on the permissible load and weights can be found on page 159.117Reference MobilityDriving tipsControlsAt a glance
Wheels and tiresTire identification marksKnowledge of the labeling on the side of the tiremakes it easier to identify and choose the righttires.Tire sizee.g.225/45 R 17 91 VNominal width in mmAspect ratio in ΞRadial belt constructionRim diameter in inchesLoad rating,not on ZR tiresSpeed code letter, infront of the R on ZR tiresSpeed code letterQ = up to 100 mph or 160 km/hT = up to 118 mph or 190 km/hH = up to 131 mph or 210 km/hV = up to 150 mph or 240 km/hW = up to 167 mph or 270 km/hY = up to 186 mph or 300 km/hTire Identification NumberTires with DOT codes meet the guidelines ofthe US Department of Transportation.DOT code:e.g.DOT xxxx xxx 1010Manufacturer'scode for tire makeTire size andtire designTire ageTire ageThe manufacturing date of tires is contained inthe tire coding: DOT … 1010 means that thetire was manufactured in week 10 of 2010.<strong>BMW</strong> recommends that you replace all tiresafter 6 years at most, even if some tires may lastfor 10 years.Uniform Tire Quality GradingQuality grades can be found where applicableon the tire sidewall between tread shoulder andmaximum section width. For example:Tread wear 200 Traction AATemperature ADOT Quality GradesTread wearTraction AA A B CTemperature A B CAll passenger car tires must conform toFederal Safety Requirements in additionto these grades.
TemperatureThe temperature grades are A, the highest, B,and C, representing the tire's resistance to thegeneration of heat and its ability to dissipateheat when tested under controlled conditionson a specified indoor laboratory test wheel.Sustained high temperature can cause thematerial of the tire to degenerate and reducetire life, and excessive temperature can lead tosudden tire failure. The grade C corresponds toa level of performance which all passenger cartires must meet under the Federal Motor VehicleSafety Standard No. 109. Grades B and Arepresent higher levels of performance on thelaboratory test wheel than the minimumrequired by law.The temperature grade for this tire isestablished for a tire that is properlyinflated and not overloaded. Excessive speed,underinflation, or excessive loading, either separatelyor in combination, can cause heatbuildup and possible tire failure.
Wheels and tiresRun-flat tiresThe symbol identifying run-flat tires is a circlewith the letters RSC on the sidewall.Run-flat tires comprise a conditionally self-supportingtire and a special rim. The reinforcementin the sidewalls ensures that the tire cancontinue to be used subject to certain restrictions,even if depressurized.For information on continuing to drive with a flattire, refer to Indication of a flat tire on page 73.New wheels and tiresHave new wheels and tires installed onlyby your <strong>BMW</strong> center or tire shop thatworks according to <strong>BMW</strong> repair procedureswith correspondingly trained personnel. If thiswork is not carried out properly, there is a dangerof subsequent damage and related safetyhazards. Make sure that the new wheels are balanced.
When properly used, these tires meet the higheststandards in terms of safety and handlingcharacteristics.Special characteristics of winter tires<strong>BMW</strong> recommends winter tires for winter roadsor at temperatures below +457/+76.Although all-season M+S tires provide betterwinter traction than summer tires, they generallyfail to provide the same levels of coldweatherperformance as winter tires.Pay attention to speedAlways comply with the speed limit for thewinter tires mounted on your car; failureto do so could result in tire damage and accidents.
Under the hoodUnder the hoodDo not work on the car unless you possessthe necessary technical knowledge.If you are unfamiliar with the statutory guidelines,have any work on the vehicle performedonly by a <strong>BMW</strong> center or by a workshop thatwork according to <strong>BMW</strong> repair procedures withcorrespondingly trained personnel. If this workis not carried out properly, there is a danger ofsubsequent damage and related safety hazards.
Important parts of the engine compartment1 Expansion tank for coolant, refer topage 1252 Washer fluid filler neck for headlamp cleaningsystem and window washer system,refer to page 59Engine oilThe engine oil consumption is dependent ondriving style and driving conditions.Checking oil levelYour car is equipped with an electronic oil-levelmonitor.For precise measurement and display of the oillevel, the engine must be at operating temperature,i.e. following at least 6.2 miles/10 km ofuninterrupted driving. You can have the oil leveldisplayed while you are driving, or while thevehicle is at a standstill on a level surface andthe engine is running.You can have the oil level reading displayed inthe instrument cluster.3 Jump-starting connection, refer topage 1394 Fluid filler neck for engine oil, refer to Addingengine oil, page 1241. Push button 1 in the turn indicator lever upor down repeatedly until the appropriatesymbol is shown in the display, accompaniedby the word "OIL".2. Press button 2.The oil level is checked and the reading displayed.123Reference MobilityDriving tipsControlsAt a glance
Under the hoodPossible displaysAdding engine oilAdd a maximum of 1 US quart/1 liter of engineoil only after until the following warning lamplights up in the instrument cluster or the oil leveldisplay reads "+1l".1 Oil level OK2 Oil level is being checked.This can take about 3 minutes if the car is ata standstill on a level surface, or about5 minutes while the car is on the move.3 Oil level down to minimum:Add engine oil as soon as possible, but nomore than 1 US quart/1 liter, refer also toAdding engine oil on page 124.4 Oil level is too high.Too much oil will harm the engine.Have the vehicle checked <strong>without</strong>delay.
The engine oil grade is a decisive factor for theservice life of the engine.Approved engine oils can be found in the followingspecification:Gasoline enginePreferred:Alternative:Approved engine oils belong to the viscosityclasses SAE 0W-40, SAE 0W-30, SAE 5W-40,and SAE 5W-30.Alternative oil gradesIf approved oils are not available, you can usequantities of up to 1 US quart/1 liter of anotheroil with the following specifications:API SM or higherCoolantDo not add coolant to the cooling systemwhen the engine is hot. Escaping coolantcan cause burns.
MaintenanceMaintenance<strong>BMW</strong> Maintenance SystemThe <strong>BMW</strong> Maintenance System supports thepreservation of the traffic and operating safetyof your <strong>BMW</strong>. The objective is to optimizeefforts with respect to minimal vehicle maintenancecosts.If and when you come to sell your <strong>BMW</strong>, a comprehensiverecord of servicing will prove a significantbenefit.Condition Based Service CBSSensors and special algorithms take the differentdriving conditions of your <strong>BMW</strong> intoaccount. Condition Based Service uses this todetermine the current and future servicerequirements. By letting you define a serviceand maintenance regimen that reflects yourown individual requirements, the system buildsthe basis for trouble-free driving.In the instrument cluster, you can have theremaining times or distances for selected maintenancetasks and any legally prescribed datesdisplayed, refer to page 66:> Engine oil> Brake pads: separately for front and rear> Brake fluid> Vehicle check> Legally mandated inspections dependingon local regulationsService data in the remote controlYour vehicle continuously stores servicerequirementinformation in the remote controlwhile you are driving. Your <strong>BMW</strong> Service Advisorcan read out this data from the remote controlunit, and propose an optimized maintenanceapproach. Whenever you take your car infor servicing you should therefore hand your<strong>BMW</strong> Service Advisor the remote control unitthat you last used.Make sure that the date in the instrumentcluster is always set correctly, refer topage 68; otherwise, the effectiveness of ConditionBased Service CBS is not assured.
Socket for OnboardDiagnosis OBDOn the driver's side is an OBD socket for checkingcomponents relevant to the composition ofthe vehicle's emissions.EmissionsThe warning lamp lights up:The vehicle is producing higher emissions.The trip can be continued. Havethe car checked as soon as possible.Canadian models display this warninglamp.The lamp flashes under certain conditions.This indicates excessive misfiring in theengine. If this happens, you should reduce yourspeed and visit your nearest <strong>BMW</strong> center assoon as possible. Severe engine misfiring canquickly lead to serious damage of emissionsrelatedcomponents, especially the catalyticconverter.The warning lamp comes on if the gascap is not properly tightened and theOBD system assumes that fuel vaporis escaping. Make sure that the gas cap is correctlypositioned and close it until it audiblyclicks.Data memoryYour vehicle records data about the operation,faults, and user settings. These data are storedin the vehicle and in extract form, in the remotecontrol, and can be read out using suitabledevices at your <strong>BMW</strong> center. The data that areread out are used to support service proceduresand repairs or to optimize and expandvehicle functions. If you have a <strong>BMW</strong> Assistcontract, certain vehicle data can also be transmitteddirectly from the vehicle in order toenable the desired services.127Reference MobilityDriving tipsControlsAt a glance
CareCareCare productsRegular cleaning and care contributes significantlyto the value retention of your <strong>BMW</strong>.<strong>BMW</strong> recommends cleaning and caring for yourvehicle with products that are approved by<strong>BMW</strong> for this purpose.Your <strong>BMW</strong> center will be happy to advise you onthe products and services available for cleaningand caring for your <strong>BMW</strong>.Original <strong>BMW</strong> CareProducts have beenmaterial tested, laboratory checked andproven in the field, and offer optimal care andprotection for your vehicle. Remove additional attachments, e.g. spoilersor telephone antennas, if there is a possibilitythat they could be damaged.Automatic transmissionBefore driving into an automatic car wash, performthe following steps to ensure that the vehiclecan roll:1. Insert the remote control into the ignitionlock, even with Comfort Access.2. Move the selector lever to position N.3. Release the parking brake.4. Switch off the engine.5. Leave the remote control in the ignition lockso that the vehicle can roll.128
Sports automatic transmission withdouble clutchBefore driving into an automatic car wash, performthe following steps to ensure that the vehiclecan roll:1. Insert the remote control into the ignitionlock, even with Comfort Access.2. Engage transmission position N.3. Release the parking brake.4. Switch off the engine.5. Leave the remote control in the ignition lockso that the vehicle can roll.The transmission is switched into position P:> automatically after approx. 30 minutes> if you remove the infrared remote controlfrom the ignition lockSteam jets/high-pressure washersWhen using steam jets or high-pressurewashers, make sure to maintain sufficientdistance from the vehicle and do not exceed atemperature of 1407/606.Insufficient clearance or excessive pressure ortemperature can lead to component damage orwater penetration. Follow the operating instructionsfor the steam jet or high-pressurewasher.
CarePaintwork careRegular care contributes to value retention andprotects the paintwork against the long-termeffects of damaging substances.Region-specific environmental influences candamage the vehicle paintwork. Therefore, it isimportant to adapt the frequency and scope ofcar care accordingly.Immediately remove aggressive materials suchas spilled fuel, oil, grease, brake fluid, tree sap orbird droppings to prevent damage to the paintwork.Repairing paintwork damageImmediately repair scratches or similardamage, such as that caused by stoneshitting the vehicle, where necessary to preventrusting.
Clean light-colored leather more frequently asdust and dirt are more noticeable.Treat the leather at least once every twomonths using a leather lotion as dirt and greasewill gradually attack the leather's protectivelayer.Carpet/floor mats*The floor mats can be removed for cleaning.When heavily soiled, clean carpets with amicrofiber cloth and water or textile cleaner.Rub back and forth in the direction of travel; otherwise,the carpet may become matted.Interior plastic parts> Imitation leather surfaces> Lamp glasses> Display pane of instrument cluster> Matte partsClean with water and solvent-free plasticcleaner if necessary.Fine wood partsClean fine wood trim and fine wood parts with adamp cloth. Wipe dry with a soft cloth.Safety beltsDirty belt straps impede the reeling action andthus have a negative impact on safety.Do not clean chemically, as this maydestroy the webbing.
Replacing componentsReplacing componentsOnboard vehicle tool kitThe onboard vehicle tool kit is stored below thefloor mat in the cargo area.Wiper bladesOnly change bulbs when cool; otherwise,you may burn yourself.
Xenon lamps*These bulbs have a very long service life and arehighly unlikely to fail. If a xenon lamp fails nevertheless,switch on the fog lamps and continuethe journey with great care, provided that locallegislation does not prohibit this.Have any work on the xenon lamp system,including bulb replacements, performedonly by a <strong>BMW</strong> center or a workshop that worksaccording to <strong>BMW</strong> repair procedures with correspondinglytrained personnel. Otherwise, ifsuch work is carried out improperly, the highvoltage in the system presents the danger offatal injuries.
Replacing componentsXenon headlampsParking lamps, roadside parkinglamps, daytime running lightsH8 bulb, 35 wattsThe figure shows the right-hand headlamp.1. Remove the headlamp cover.2. Turn the bulb, see arrow, and remove it.3. Pull off the connector and replace the bulb.4. Attach the connector, insert the bulb andturn it all the way in the opposite direction.5. Attach the headlamp cover.3. Slide the bulb out of the holder and pull offthe connector.4. Replace the bulb and attach the connector.5. Insert the bulb holder and turn it all the wayin the opposite direction.6. Attach the headlamp cover.Turn signals, frontPY21W bulb, 21 wattsThe turn signal bulb can be changed via a coverin the wheel arch.Corner-illuminating lampsH3 bulb, 55 wattsThe figure shows the right-hand headlamp.1. Remove the top headlamp cover, using thescrewdriver to push the detents to one side.2. Turn the bulb holder, see arrow, andremove it.1. Turn the respective wheel inwards.2. Using a coin, turn both locks of the cover allthe way to the left, arrows 1, and remove thecover.3. Turn the bulb holder to the left and removeit, arrow 2.4. Apply gentle pressure to the bulb whileturning it to the right for removal andreplacement.5. Insert the bulb holder and lock it by turningit to the right.6. Attach the cover by positioning the bottomedge first and then turning both locks all theway to the right.134
Side turn signalsW5W bulb, 5 watts1. Press the rear edge of the lamp toward thefront with your fingertip, arrow 1 and pivot itout, arrow 2.2. While simultaneously lifting the retainingtab, rotate bulb holder to the left andremove.3. Remove lamp and replace it.To install, insert front end of the lamp and pressinto place at the back.Tail lamps> Turn signal:PY21W bulb, 21 watts> Backup lamp:W16W bulb, 16 watts> Brake lamps:P21W bulb, 21 watts> Brake Force Display lamp:H21W bulb, 21 watts1 Inner brake lamp2 Outer brake lamp3 Lateral reflector4 Roadside parking lamp and tail lamp LED5 Reflector6 Turn signal7 Backup lamp8 Brake Force Display lampReplacing tail lampsOuter brake lampThe outer brake lamp can be accessed througha single socket.The figure shows the right side of the vehicle.1. Remove the cover from the panel of thecargo area.2. Turn the bulb holder to the left, see arrow,and remove it.3. Apply gentle pressure to the bulb whileturning it to the left for removal and replacement.4. Attach the bulb holder and turn it all the wayin the opposite direction.5. Reattach the cover.The roadside parking lamp/tail lamp usesLED design. After replacing the bulb,ensure that the bulb holder is properly seated;otherwise, the roadside parking lamp/tail lampmay not work.
Replacing componentsInner brake lamp, turn signal, backuplamp and Brake Force Display lampThe bulbs are integrated in a single bulb holder.1. Remove the cover from the panel of thecargo area.2. Detach the bulb holder by pressingtogether the clips, see arrows, and removeit.3. Brake lamps and turn signal: apply gentlepressure to the bulb while turning it to theleft for removal and replacement.4. Backup lamp: pull the bulb out of the socketand replace it.5. Attach the bulb holder and let it snap intoplace.6. Reattach the cover.License plate lamps and center brakelampThese lamps use LED technology for operation.In the event of a malfunction, please contactyour <strong>BMW</strong> center or a workshop that worksaccording to <strong>BMW</strong> repair procedures with correspondinglytrained personnel.Changing wheelsYour <strong>BMW</strong> comes with run-flat tires as standardequipment. This eliminates the need to changea wheel immediately in the event of a puncture.For information on continuing to drive with adamaged tire, refer to Indication of a flat tire onpage 73.The symbol identifying run-flat tires is a circlewith the letters RSC on the sidewall, refer toRun-flat tires, page 120.When mounting new tires or changing overfrom summer to winter tires and vice versa,mount run-flat tires for your own safety. In theevent of a flat, no spare wheel is available. Your<strong>BMW</strong> center will be glad to advise you. Referalso to New wheels and tires, page 120.The tools for changing wheels are availableas optional accessories from your<strong>BMW</strong> center.
Charging the batteryOnly charge the battery in the vehicle via theterminals in the engine compartment with theengine off. Connections, refer to Jump-startingon page 139.DisposalHave old batteries disposed of by your<strong>BMW</strong> center or bring them to a recyclingcenter. Maintain the battery in an upright positionfor transport and storage. Always securethe battery against tipping over during transport. Time and dateThese values must be updated, refer topage 68.> RadioStations must be stored again, refer to theseparate <strong>Owner's</strong> <strong>Manual</strong> for Radio.> Glass roofIt may happen that the roof can only beraised. The system must be initialized.Please contact your <strong>BMW</strong> center.> Seat and mirror memory*The positions must be stored again, refer topage 40.> Inside rearview mirror with digital compassThe system must be calibrated, refer topage 95.> Active steeringThe system automatically initializes itselfbriefly during a trip. The system is deactivatedduring this time, refer to page 76.FusesNever attempt to repair a blown fuse anddo not replace a defective fuse with a substituteof another color or amperage rating; otherwise,this could lead to a circuit overload, ultimatelyresulting in a fire in the vehicle.
Giving and receiving assistanceGiving and receiving assistanceEmergency Request*Conditions for an Emergency Request:> Full preparation package mobile phone: thisequipment makes it possible to send anEmergency Request even if no mobilephone is paired with the vehicle.> <strong>BMW</strong> Assist is activated. Activating<strong>BMW</strong> Assist, refer to separate <strong>Owner's</strong><strong>Manual</strong>.> Radio readiness is on.> The <strong>BMW</strong> Assist system is logged on to amobile phone network.> The Emergency Request system is operable.Once your service contract for <strong>BMW</strong> Assistexpires, the <strong>BMW</strong> Assist system can be deactivatedby a <strong>BMW</strong> center <strong>without</strong> you having tovisit a workshop. Once the <strong>BMW</strong> Assist systemhas been deactivated, Emergency Requestsare not possible. The <strong>BMW</strong> Assist system canbe reactivated by a <strong>BMW</strong> center after a newcontract has been signed.Sending an Emergency Request1. Briefly press the cover flap to open.<strong>BMW</strong> Assist Response Center contacts youand takes further steps to help you. Even if youare unable to respond, the <strong>BMW</strong> AssistResponse Center will be able to initiate furthersteps to assist you under certain conditions.If the circumstances allow this, remain in thevehicle until the connection has been established.You will then be able to provide adetailed description of the situation.Data for determining the necessary rescuemeasures are transmitted to the <strong>BMW</strong> AssistResponse Center, e.g. the current position ofyour vehicle, if it can be determined.If the LED is flashing but the <strong>BMW</strong> AssistResponse Center cannot be heard over thehands-free system, it is possible that thehands-free system is malfunctioning. You maystill be heard by the <strong>BMW</strong> Assist ResponseCenter, however.Under certain conditions, an EmergencyRequest is sent automatically immediately aftera severe accident. This Automatic CollisionNotification is not affected by the button beingpressed.For technical reasons, the EmergencyRequest service cannot be guaranteedfor the most unfavorable conditions.
ularly and replace any items in good time, if necessary.The first aid pouch is located on the right-handside of the cargo area in a storage area.Warning triangle*The warning triangle is located in a holder in thetrunk lid. Press the tabs to take it out.Jump-startingIf the car's own battery is flat, your <strong>BMW</strong>'sengine can be started by connecting twojumper cables to another vehicle's battery. Youcan also use the same method to help startanother vehicle. Only use jumper cables withfully-insulated clamp handles.Do not touch any electrically live partswhen the engine is running, or a fatal accidentmay occur. Carefully adhere to the followingsequence, both to prevent damage to one orboth vehicles, and to guard against possiblepersonal injuries.
Giving and receiving assistanceYour <strong>BMW</strong> has a special nut as body ground ornegative pole.5. Attach the second terminal clamp of theminus/– jumper cable to the negative terminalof the battery or to the engine or bodyground of the vehicle to be started.Starting the engine1. Start the engine of the donor vehicle andallow it to run for a few minutes at slightlyincreased idle speed.2. Start the engine on the other vehicle in theusual way.If the first start attempt is not successful,wait a few minutes before another attemptin order to allow the discharged battery torecharge.3. Let the engines run for a few minutes.4. Disconnect the jumper cables by reversingthe above connecting sequence.If necessary, have the battery checked andrecharged.Never use spray fluids to start theengine.
ing will require increased effort. Active steeringis not active and it will be necessary to turn thesteering wheel further.
Giving and receiving assistanceSports automatic transmission withdouble clutch:Have the <strong>BMW</strong> transported with a tow truckwith a so-called lift bar, or on a flatbed.Do not tow the vehicle with just the rear axleraised as this may cause the steering to turn.Tow-startingAvoid tow-starting the vehicle whenever possible;instead, jump-start the engine, refer topage 139. Vehicles with a catalytic convertershould only be tow-started when the engine iscold, vehicles with an automatic transmission orSports automatic transmission with doubleclutch cannot be tow-started at all.1. Switch on the hazard warning flashers,comply with local regulations.2. Switch on the ignition, refer to page 48.3. Shift into 3rd gear.4. Have the vehicle tow-started with the clutchdepressed all the way and slowly releasethe clutch. After the engine starts, immediatelydepress the clutch completely again.5. Stop at a suitable location, remove the towbar or rope and switch off the hazard warningflashers.6. Have the vehicle checked.142
Indicator and warning lampsIndicator and warning lamps can light up in thedisplay areas 1 or 2 in a variety of combinationsand colors. See the table for information oncauses and how to react. Note whether a lampcomes on alone or in combination with another.Some lamps can light up in different colors.Corresponding distinctions are made in thetext.1 2 Cause Special actions to be takenTurn signalsHigh beams/headlamp flasherswitched onFog lamps switched onFasten safety beltsFasten your safety belt, refer also topage 42.Indication in US modelsParking brake appliedRelease the parking brake.Indication in Canadian modelsParking brake appliedRelease the parking brake.Outside temperature warning Drive cautiously, refer also to page 62.Lights up briefly:> Approx. 2.1 US gallons/8 liters offuel remain in the tankRemains on:Remaining operating range is no morethan 30 miles/50 km, refer to page 63Engine will not startIgnition switched on and driver's dooropenParking lamps still onRoadside parking lamps still onDepress the brake or clutch in order tostart the engine, refer to page 49.Switch off the ignition, refer to page 48,or close the driver's door.Switch off the roadside parking lamps,refer to page 83.143Reference MobilityDriving tipsControlsAt a glance
Indicator and warning lamps1 2 Cause Special actions to be takenDoor openEngine compartment lid openTrunk lid openLights up in red:Convertible top not lockedElectronic failure when closing convertibletopLights up in yellow:Cargo area partition not in lowermostposition. Convertible top cannot bemovedVehicle speed too high for convertibletop movementConvertible top drive overheatedRollover protection system malfunctioningAutomatic lock malfunctioning. Lockthe convertible top manually, refer topage 32. Have it checked by your <strong>BMW</strong>center.Close the convertible top manually,refer to page 32. Have it checked byyour <strong>BMW</strong> center.Fold the cargo area partition down.Reduce speed to below 30 mph/50 km/h and continue convertible topmovement.Close the convertible top immediatelyand let the convertible top drive cool.After cooling, the convertible top canbe opened electrically again.Have the rollover protection systemchecked by your nearest <strong>BMW</strong> center.Gas cap is openWindshield washer fluid level too lowMake sure that the gas cap is correctlypositioned and close it until it audiblyclicks. Do not jam the strap betweenthe gas cap and the vehicle.Add washer fluid as soon as possible,refer to page 59.144
1 2 Cause Special actions to be takenLights up in red:Service dueLights up in yellow:The engine will start the next time thestart/stop button is touched, possibly<strong>without</strong> the brake or clutch beingdepressedRemote control malfunctioning or, incars with Comfort Access, not presentBattery of remote control dischargedBelt tensioners and/or airbag systemfailedActive steering defectiveSteering assistance failedLights up:Emergency Request system has failedor is malfunctioningLights up in red:Engine malfunctionLights up in yellow:Full engine power is no longer availableArrange a service appointment.Check service requirements, refer topage 66.The engine cannot be started. Have theremote control checked, if necessary.Use the remote control for a longerjourney or, in cars with ComfortAccess, replace the battery.Have the system checked immediately.You can continue your journey.Steering characteristics are modifiedand steering wheel could be off-center.Have the system checked as soon aspossible.Markedly different steering response.You can continue your journey, butmoderate your speed and exercise duecaution.Have the system checked as soon aspossible.Have the system checked as soon aspossible.Stop the car and switch off the engine.You cannot continue your journey.Contact your <strong>BMW</strong> center.You can continue your journey, butmoderate your speed and exercise duecaution. Have the engine checked assoon as possible.145Reference MobilityDriving tipsControlsAt a glance
Indicator and warning lamps1 2 Cause Special actions to be takenIndication in US models:Warning lamp flashes:Engine malfunction under high load.High engine load will result in damageto the catalytic converterWarning lamp comes on:Engine malfunction with adverse effecton emissionsIndication in Canadian models:Warning lamp flashes:Engine malfunction under high load.High engine load will result in damageto the catalytic converterWarning lamp comes on:Engine malfunction with adverse effecton emissionsLights up in red:Engine overheatingLights up in yellow:Engine too hotLights up in red:Battery is no longer being charged.Alternator malfunctionLights up in yellow:Battery charge level very low, batteryaged or not securely connectedEngine oil pressure too lowEngine oil level too lowYou can continue your journey, butmoderate your speed and exercise duecaution. Have the vehicle checked<strong>without</strong> delay.Have the car checked as soon as possible.You can continue your journey, butmoderate your speed and exercise duecaution. Have the vehicle checked<strong>without</strong> delay.Have the car checked as soon as possible.Carefully bring the car to a stop, switchoff the engine and allow it to cool down.Do not open the hood; otherwise, thereis a risk of injury from scalding. Contactyour <strong>BMW</strong> center.Continue driving at more moderatespeed so that the engine can cooldown. Have the engine checked <strong>without</strong>delay if the situation reoccurs.Switch off all unnecessary electricalconsumers. Have the vehicle's powersupply system checked immediately.Have the battery checked as soon aspossible.Stop immediately and switch off theengine. You cannot continue your journey.Contact your <strong>BMW</strong> center.Add engine oil immediately; refer topage 123 for more information.146
1 2 Cause Special actions to be takenIndication in US models:Parking brake appliedIndication in Canadian models:Parking brake appliedIndication in US modelsLights up in red:Brake fluid level too lowLights up in yellow:Drive-off assistant has failed. The carwill not be held in place after the brakeis releasedIndication in Canadian modelsLights up in red:Brake fluid level too lowLights up in yellow:Drive-off assistant has failed. The carwill not be held in place after the brakeis releasedIndication in US models:Brake pads wornIndication in Canadian models:Brake pads wornReduced braking effect, stop the carcarefully. Contact your <strong>BMW</strong> center.Have the system checked as soon aspossible.Reduced braking effect, stop the carcarefully. Contact your <strong>BMW</strong> center.Have the system checked as soon aspossible.Have the condition of the brake padschecked <strong>without</strong> delay.Have the condition of the brake padschecked <strong>without</strong> delay.Lights up in red:Have the system in question checked<strong>without</strong> delay.> Starter failed or The engine cannot be restarted.> Ignition malfunctioning. Enginerestart only possible when brake isdepressed orDepress the brake to restart the engine.> lighting system failed. Low beams/tail lamps and brake lamps stilloperational. All other lamps failedLights up in yellow:> Control of the brake lamps failed or> fuel supply malfunctioning, or> electrical system of trailer hitch*failedYou can continue your journey, butmoderate your speed and exercise duecaution. Have the system in questionchecked <strong>without</strong> delay.147Reference MobilityDriving tipsControlsAt a glance
Indicator and warning lamps1 2 Cause Special actions to be takenFlashing:Dynamic Stability Control DSC orDynamic Traction Control DTC is controllingdrive and braking forces, referalso to page 71Dynamic Traction Control DTC activated,refer also to page 71Dynamic Stability Control DSC andDynamic Traction Control DTC deactivated,refer also to page 71Suspension control system failed, referalso to page 70Indication in US models:The driving stability control systems,including ABS and the Tire PressureMonitor, have failed, refer also topage 70Indication* in Canadian models:The driving stability control systems,including ABS and the Flat Tire Monitoror Tire Pressure Monitor*, have failed,refer also to page 70Indication* in Canadian models:The driving stability control systems,including ABS and the Flat Tire Monitoror Tire Pressure Monitor*, have failed,refer also to page 70Indication in US models:Vehicle electronics failedDriving stability limited during accelerationand cornering.You can continue your journey, butmoderate your speed and exercise duecaution.Driving stability limited during accelerationand cornering.You can continue your journey, butmoderate your speed and exercise duecaution. Have the system checked assoon as possible.Driving stability limited during accelerationand cornering.You can continue your journey, butmoderate your speed and exercise duecaution. Have the system checked assoon as possible.Driving stability limited during accelerationand cornering.You can continue your journey, butmoderate your speed and exercise duecaution. Have the system checked assoon as possible.Driving stability limited during accelerationand cornering.You can continue your journey, butmoderate your speed and exercise duecaution. Have the system checked assoon as possible.You cannot continue your journey.Contact your <strong>BMW</strong> center.148
1 2 Cause Special actions to be takenIndication* in Canadian models:Vehicle electronics failedIndication* in Canadian models:Vehicle electronics failedVehicles with Flat Tire Monitor*:You cannot continue your journey.Contact your <strong>BMW</strong> center.You cannot continue your journey.Contact your <strong>BMW</strong> center.Light up in yellow and red:> Tire is deflated Carefully bring the car to a stop. Complywith the additional informationstarting on page 72.> Flat Tire Monitor not initialized Initialize Flat Tire Monitor, refer topage 72.Light up in yellow:Flat Tire Monitor failed. Punctures are Have the system checked.not indicatedVehicles with Tire Pressure Monitor*:Light up in yellow and red:> There is a flat tire or substantial lossof tire pressureCarefully bring the car to a stop. Complywith the additional informationstarting on page 74.149Reference MobilityDriving tipsControlsAt a glance
Indicator and warning lamps1 2 Cause Special actions to be takenVehicles with Tire Pressure Monitor*:Light up in yellow:> Tire Pressure Monitor not initialized Check the inflation pressure and resetthe system, refer to page 74.The small lamp flashes in yellow andthen lights up continuously; the largerlamp comes on in yellow:> Tire Pressure Monitor has failed.Punctures are not indicatedHave the system checked.> A wheel <strong>without</strong> TPM electronicshas been mounted> Interference from systems ordevices that use the same radio frequency.The system automaticallyreactivates once it is outside of thefield of interferenceHave the system checked.150
1 2 Cause Special actions to be takenLights up in red:> Transmission limp-home programactive with restricted range ofgears, possibly with reduced acceleration.Gears can be engaged <strong>without</strong>depressing the brakeLights up in yellow:> Transmission emergency-run programwith limited gear selectionactive> Automatic selector lever locked:Selector lever locked in position Pwith engine running and brakedepressed or> Selector lever position P malfunctioning:Selector lever locked in position Pwith engine running and brakedepressed> Brake signal malfunctioning: gearcan be engaged <strong>without</strong> depressingthe brakeLights up in red:Transmission overheatingLights up in yellow:Transmission too hotSelector lever position P not engaged.Vehicle not prevented from rollingYou can continue your journey, butmoderate your speed and exercise duecaution. Have the system checked<strong>without</strong> delay.Always depress the brake to engage agear.You can continue your journey, butmoderate your speed and exercise duecaution. Have the system checked<strong>without</strong> delay.Override the selector lever lock, refer topage 52.Override the parking lock, refer topage 56. Have the system checked assoon as possible.Always depress the brake to engage agear. Before leaving the vehicle, movethe selector lever to position P andswitch off the engine.Bring the car to a stop and move theselector lever to position P. Allow thetransmission to cool down. You cancontinue your journey, but moderateyour speed and exercise due caution.Have the system checked if the situationreoccurs.Avoid high engine loads. You can continueyour journey, but moderate yourspeed and exercise due caution.151Reference MobilityDriving tipsControlsAt a glance
Indicator and warning lamps1 2 Cause Special actions to be takenSelector lever position P not engaged.Ignition cannot be switched offSelector lever malfunctioningBrake signal malfunctioning: gear canbe engaged <strong>without</strong> applying the brakePinch protection system of the powerwindows malfunctioningPinch protection system of the electricglass roof malfunctioningCruise control system failedPark Distance Control failedEngage selector lever position P whenyou wish to switch off the ignition, referto page 48.You can continue your journey. Repeatgearshift request if necessary. Have thesystem checked if the situation reoccurs.When the vehicle is stationary, alwaysdepress the brake to engage a gear.Before leaving the vehicle, switch offthe engine. Have the system checkedas soon as possible.Have the system checked.Have the system checked.You can continue your journey. Havethe system checked.Have the system checked.> High-beam assistant inactive Clean the sensor field on the front ofthe interior rearview mirror, refer topage 84.> High-beam assistant malfunctioning> Sensitivity of the high-beam assistanthas been changedBulb of exterior lighting system failedHave the system checked by your nearest<strong>BMW</strong> center.There is a risk that oncoming trafficmay be blinded. Have the systemchecked by your nearest <strong>BMW</strong> center.Have the exterior lighting checked assoon as possible.Low-beam headlamp or fog lamp failedHigh-beam headlamp failedHave the low beams checked as soonas possible.Have the high-beam headlampschecked.Adaptive light control failedCoolant level too lowAdd coolant immediately, refer topage 125.152
1 2 Cause Special actions to be takenLights up in red:Service appointment overdueLights up in yellow:Service dueNo service dueSet speed limit* has been exceededArrange a service appointment.Check service requirements, refer topage 66.Arrange a service appointment.Check service requirements, refer topage 66.Time and date no longer correct Set the time and date, refer to page 68.153Reference MobilityDriving tipsControlsAt a glance
ReferenceThis chapter contains technical data and anindex that will help you find information mostquickly.
Technical dataTechnical dataEngine data128i 135iDisplacement cu in/cmμ 182.8/2,996 181.8/2,979Number of cylinders 6 6Maximum power output hp 230 300at engine speed rpm 6,500 5,800Maximum torque lb ft/Nm 200/270 300/407at engine speed rpm 2,750 1,200-5,000156
DimensionsCoupeAll dimensions given in inches/mm.Smallest turning circle dia.: 35.1 ft/10.7 m135i: height 55.4 in/1,408 mm157Reference MobilityDriving tipsControlsAt a glance
Technical dataConvertibleAll dimensions given in inches/mm.Smallest turning circle dia.: 35.1 ft/10.7 m135i: height 54.8 in/1,392 mm158
WeightsCoupe128i135iApproved gross weight> with manual transmission lbs/kg 4,134/1,875 4,255/1,930> with automatic transmission lbs/kg 4,211/1,910 –> Sports automatic transmissionwith double clutchlbs/kg – 4,321/1,960Load lbs/kg 794/360 794/360Approved front axle load lbs/kg 2,028/920 2,116/960Approved rear axle load lbs/kg 2,293/1,040 2,293/1,040Approved roof load capacity lbs/kg 165/75 165/75Cargo area capacity cu ft/liters 13.1/370 13.1/370Convertible128i135iApproved gross weight> with manual transmission lbs/kg 4,398/1,995 4,541/2,060> with automatic transmission lbs/kg 4,475/2,030 –> Sports automatic transmissionwith double clutchlbs/kg – 4,608/2,090Load lbs/kg 750/340 750/340Approved front axle load lbs/kg 2,050/930 2,161/980Approved rear axle load lbs/kg 2,467/1,119 2,469/1,120Approved roof load capacity lbs/kg – –Cargo area capacity cu ft/liters 9.1-10.7/260-305 9.1-10.7/260-305159Reference MobilityDriving tipsControlsAt a glance
Technical dataCapacitiesNotesFuel tank: US gal/liters approx. 14.0/53 Fuel grade: page 113including reserve of US gal/liters approx. 2.1/8.0Window washer system For more details: page 59including headlamp washers US qt/liters approx. 6.3/6.0160
161Reference MobilityDriving tipsControlsAt a glance
Everything from A to ZEverything from A to ZIndexAABS Antilock BrakeSystem 71Acceleration assistant, refer toLaunch Control 57Accessories, refer to Theindividual vehicle 5Accident, reporting, refer toEmergency Request 138Activated-charcoal filter 91Active steering 76Adaptive light control 83Additives– coolant 125– engine oil 124Adjusting temperature 88– climate control 89Airbags 77– sitting safely 35– warning lamp 79Air conditioner 86Air distribution– automatic 90– individual 87Airing, refer toVentilation 88, 91Air outlets, refer to Airvents 86Air pressure, checking, referto Tire inflationpressure 114Air recirculation, refer toRecirculated-airmode 87, 90Air vents 86Air volume 87, 90AKI, refer to Fuelspecifications 113162Alarm system 24– avoiding unintentionalalarms 25– interior motion sensor 25– switching off an alarm 25– tilt alarm sensor 25ALL program 90All-season tires, refer toWinter tires 121Ambient air, refer toRecirculated-airmode 87, 90Antifreeze– coolant 125– washer fluid 59Antilock Brake SystemABS 71Anti-theft alarm system, referto Alarm system 24Anti-theft system 19Approved axle loads, refer toWeights 159Approved engine oils 124Approved gross vehicleweight, refer to Weights 159Armrest, refer to Centerarmrest 95Ashtray 97Assistance systems, refer toDynamic Stability ControlDSC 71AUC Automatic recirculatedaircontrol 90Automatic– air distribution 90– air volume 90– cruise control 60– headlamp control 81Automatic car washes 128Automatic climate control 86Automatic curb monitor 43Automatic high beams andlow beams, refer to Highbeamassistant 83Automatic lamps– refer to Welcome lamps 81Automatic recirculated-aircontrol AUC 90Automatic transmission withSteptronic 50– selector lever lock 51– shiftlock 51– towing 140– tow-starting 140AUTO program for automaticclimate control 90Average fuel consumption 64– setting the units 66Average speed 64Avoiding unintentionalalarms 25Axle loads, refer toWeights 159BBackrests, refer to Seats 36Backrest width adjustment 37Back seats, refer to Rear seats– adjusting head restraints 38Backup lamp, replacingbulb 135Bag for skis, refer to Skibag 99Band-aids, refer to First aidpouch 138Bar, refer to Tow-starting,towing away 141Battery 136– charging 137– disposal 27, 137– jump-starting 139– replacing 136– temporary power failure 137Battery renewal– remote control for vehicle 27Being towed 140
Belts, refer to Safety belts 41Belt tensioner, refer to Safetybelts 41Beverage holders, refer toCupholders 96Blower, refer to Airvolume 87, 90<strong>BMW</strong>– car shampoo 129<strong>BMW</strong> MaintenanceSystem 126Bottle holders, refer toCupholders 96Brake Assist, refer to DynamicBrake Control 71Brake fluid– service requirements 66Brake Force Display 77Brake lamps– Brake Force Display 77– replacing bulb 135Brake pads, breaking in 104Brake rotors 106– brakes 104– breaking in 104Brakes– ABS 71– <strong>BMW</strong> MaintenanceSystem 126– braking safely 106– breaking in 104– parking brake 50– service requirements 66Brake system 104– <strong>BMW</strong> MaintenanceSystem 126– breaking in 104– disc brakes 106Breakdown services, refer toRoadside Assistance 138Breaking in the clutch 104Break-in period 104Bulb changing, refer to Lampsand bulbs 132Bulbs, changing 132Button for starting theengine 48Buttons on the steeringwheel 11CCalifornia Proposition 65warning 6Calling, refer to Telephoneowner's manualCan holders, refer toCupholders 96Capacities 160Capacity of the cargo area 159Car battery, refer to Vehiclebattery 136Car care, refer to Care 128Care 128– automatic car washes 128– care products 128– carpets 131– CD/DVD drives 131– chrome parts 130– convertible top 129– displays 131– exterior 128– fine wood parts 131– headlamps 129– high-pressure washer 129– interior 130– leather 130– light-alloy wheels 130– paintwork 130– plastic parts 131– rubber seals 130– safety belts 131– sensors and cameras 131– upholstery and clothtrim 130– washing the carmanually 129– windows 129Cargo, securing 108Cargo area– capacity 159– Comfort Access 26– enlarging, refer to Throughloadingsystem 98– lamp, refer to Interiorlamps 85– lid, refer to Trunk lid 23– opening from outside 23Cargo area lid, refer to Trunklid 23Cargo area net, refer toSecuring cargo 108Cargo loading 107– securing cargo 108– stowing cargo 107– vehicle 106Car jack– jacking points 136Car key, refer to Integratedkey/remote control 18Car phone– installation location, refer toCenter armrest 95– refer to separate <strong>Owner's</strong><strong>Manual</strong>Car shampoo 129Car wash 128Catalytic converter, refer toHot exhaust system 105Center armrest 95Center brake lamp, replacingbulb 136Center console, refer toAround the centerconsole 14Central key, refer to Integratedkey/remote control 18Central locking– from inside 22– from outside 19Central locking system 19– Comfort Access 26Changes, technical, refer toFor your own safety 5Changing wheels 136Chassis number, refer toEngine compartment 123Check Control 68Checking oil level 123Child restraint fixing systemLATCH 46Child restraint systems 45Child seats 45Chrome parts 130Chrome polish 130Cigarette lighter 97163Reference MobilityDriving tipsControlsAt a glance
Everything from A to ZCleaning headlamps 59– washer fluid 59Cleaning your <strong>BMW</strong>, refer toCare 128Climate control– automatic air distribution 90Clock 62– 12h/24h format 66– setting time 68Closing– from inside 22– from outside 19clothes hooks 96Cold start, refer to Starting theengine 49Comfort Access 26– replacing the battery 27Comfort access, refer toComfort Access 26Comfort area, refer to Aroundthe center console 14Compartment for remotecontrol, refer to Ignitionlock 48Compass 94Computer 63Condensation, refer to Whenthe vehicle is parked 106Condition Based ServiceCBS 126Configuring settings, refer toPersonal Profile 18Confirmation signals forlocking/unlocking thevehicle 21Connecting vacuum cleaner,refer to Connectingelectrical appliances 97Consumption, refer toAverage fuelconsumption 64Controls and displays 10Convenient operation– windows 20– windows with ComfortAccess 26– with Comfort Access 26Convenient starting, refer toStarting the engine 49Convertible– rollover protectionsystem 79– top 30– wind deflector 33Convertible top– convenient opening 20Convertible top care 129Coolant 125– checking level 125– filling 125Coolant temperature 63Cooling, maximum 89Cooling fluid, refer toCoolant 125Copyright 2Corner-illuminating lamps 83Corner-illuminating lamps,refer to Adaptive lightcontrol 83Cornering lamps, refer toAdaptive light control 83Courtesy lamps 85Cruise control 60Cruising range 64Cupholders 96Curb weight, refer toWeights 159Current fuel consumption 64DDashboard, refer toDashboard 10Dashboard lighting, refer toInstrument lighting 85Data, technical 156– capacities 160– dimensions 157– engine 156– sizes 157– weights 159Data memory 127Date– setting 68– setting format 66Daytime running lights, switchpositions 82DBC Dynamic BrakeControl 71Deactivating front passengerairbags 78Deadlocking, refer toLocking 20Defect– door lock 22– fuel filler flap 112– glass roof 30Defogging windows 88, 91Defrosting thewindows 88, 91Defrosting windows andremovingcondensation 88, 91Defrosting windshield, refer toDefrosting windows 88, 91Defrost position, refer toDefrosting windows 88, 91Differential, breaking in 104Digital clock 62, 68Digital compass 94Dimensions 157Directional indicators, refer toTurn signals 57Displacement, refer to Enginedata 156Display lighting, refer toInstrument lighting 85Displays, refer to Instrumentcluster 12Displays and controls 10Disposal– of coolant 125– remote control battery 27– vehicle battery 137Distance remaining to service,refer to Servicerequirements 66Distance warning, refer toPark Distance ControlPDC 70Door key, refer to Integratedkey/remote control 18Door lock 22Door lock, confirmationsignals 21164
Doors, emergencyoperation 22DOT Quality Grades 118Draft-free ventilation 88, 91Drinks holders, refer toCupholders 96Drive mode 54Drive-off assistance, refer toDSC 71Drive-off assistant 72Driving dynamics control 55Driving lamps, refer to Parkinglamps/low beams 81Driving notes 104Driving off on hills, refer toDrive-off assistant 72Driving stability controlsystems 70Driving through water 106Driving tips, refer to Drivingnotes 104Dry air, refer to Coolingfunction 87, 91DSC Dynamic StabilityControl 71DTC Dynamic TractionControl 71– indicator lamps 71Dynamic Brake ControlDBC 71Dynamic Stability ControlDSC 71Dynamic Traction ControlDTC– indicator lamps 72EEBV Electronic brake-forcedistribution 71Electrical defect– 7-gear sports automatictransmission with doubleclutch 56Electrical malfunction– door lock 22– fuel filler flap 112– glass roof 30Electronic brake-forcedistribution EBV 71Electronic oil level check 123Electronic Stability ProgramESP, refer to DynamicStability Control DSC 71Emergency operation, refer to<strong>Manual</strong> operation– door lock 22– fuel filler flap 112– glass roof 30– transmission lock, automatictransmission 52Emergency release, trunklid 24Emergency Request 138Emergency services, refer toRoadside Assistance 138Energy, saving– saving fuel 104Engine– breaking in 104– data 156– speed 156– starting 49– starting, Comfort Access 26– switching off 49Engine compartment 123Engine coolant, refer toCoolant 125Engine oil– adding 124– additives 124– alternative oil grades 125– approved engine oils 124– <strong>BMW</strong> MaintenanceSystem 126– checking level 123– intervals between changes,refer to Servicerequirements 66Engine output, refer to Enginedata 156Engine speed, refer to Enginedata 156Engine starting, refer toStarting the engine 49ESP Electronic StabilityProgram, refer to DynamicStability Control DSC 71Exhaust system, refer to Hotexhaust system 105Exterior mirrors 42– adjusting 42– automatic dimmingfeature 43– automatic heating 42– folding in and out 42Eyes– for tow-starting and towingaway 140– for tying down loads 108FFailure messages, refer toCheck Control 68Failure of an electricalconsumer 137False alarm, refer to Avoidingunintentional alarms 25Fastening safety belts, refer toSafety belts 41Filter of automatic climatecontrol, refer to Microfilter/activated charcoal filter 91Filter of heating or airconditioner, refer toMicrofilter 88First aid pouch 138Fixture for remote control,refer to Ignition lock 48Flash when locking/unlocking 21Flat tire– run-flat tires 120– Tire Pressure MonitorTPM 74Flat Tire Monitor FTM 72– indicating a flat tire 73– initializing the system 72– system limits 72Flat tires, refer to Tirecondition 119Fog lamps 84– indicator lamp 84, 143165Reference MobilityDriving tipsControlsAt a glance
Everything from A to ZFootbrake, refer to Brakingsafely 106Footwell lamps 85For your own safety 5Front airbags 77Front seat setting 36Frost, removing fromwindows, refer to Defrostingwindows 88, 91FTM, refer to Flat TireMonitor 72Fuel 113– gauge 63– high-quality brands 113– quality 113– specifications 113– tank contents, refer toCapacities 160Fuel clock, refer to Fuelgauge 63Fuel consumption indicator,refer to Average fuelconsumption 64Fuel consumption statistics,refer to Average fuelconsumption 64Fuel display, refer to Fuelgauge 63Fuel filler flap 112– releasing in the event ofelectrical malfunction 112Fuses 137GGarage door opener, refer toIntegrated universal remotecontrol 92Gasoline, refer to Requiredfuel 113Gasoline display, refer to Fuelgauge 63Gear change– with automatictransmission 51– with manual transmission 50Gear display, with automatictransmission 51Gear shifting 55Gearshift lever 53– automatic transmission withSteptronic 51– manual transmission 50General driving notes 105Glass roof, electric 29– closing after electricalmalfunction 30– convenient operation 22– opening, closing 29– operation with ComfortAccess 26– pinch protection system 29– raising 29– remote control 20Glove compartment 95Grills, refer to Air vents 86Gross vehicle weight, refer toWeights 159HHalogen lamps– replacing bulbs 133Handbrake, refer to Parkingbrake 50Hands-free system 14Hazard warning flashers 14Head airbags 77Headlamp control,automatic 81Headlamp cover 133Headlamp flasher 57Headlamps– replacing bulbs 133Head restraints 38Heated– seats 40– steering wheel 44Heated mirrors 42Heating 86– mirrors 42– seats 40– steering wheel 44Heating, rear window 88, 91Heating and ventilation 86Heavy loads, refer to Stowingcargo 107Height, refer toDimensions 157Height adjustment– steering wheel 43High-beam assistant 83High beams 83– indicator lamp 143– replacing bulbs 133High beams and low beams,automatic, refer to Highbeamassistant 83High-pressurewasher 128, 129High water, refer to Drivingthrough water 106Hills 106Holders for cups 96Hood 122Hot exhaust system 105Hydraulic brake assist, refer toDynamic Brake Control 71Hydroplaning 105IIce warning, refer to Outsidetemperature warning 62Identification marks– tire coding 118Idle position 54Ignition 48– switched off 49– switched on 48Ignition key, refer toIntegrated key/remotecontrol 18Ignition key position 1, refer toRadio readiness 48Ignition key position 2, refer toIgnition on 48Ignition lock 48Imprint 2Indicator and warninglamps 13, 143– Tire Pressure MonitorTPM 75Individual air distribution 87Individual settings, refer toPersonal Profile 18166
Inflation pressure, tires 114Inflation pressure monitoring,refer to Tire PressureMonitor TPM 74Initializing– compass, refer toCalibrating 95Initializing, Flat Tire MonitorFTM 72Instrument cluster 12Instrument combination, referto Instrument cluster 12Instrument lighting 85Integrated key 18Integrated universal remotecontrol 92Interior lamps 85– remote control 20Interior motion sensor 25Interior rearview mirror 43– automatic dimmingfeature 43– compass 94Intermittent mode of thewipers 58JJacking points 136Jumpering, refer to Jumpstarting139Jump-starting 139KKey, refer to Integrated key/remote control 18Keyless go, refer to ComfortAccess 26Keyless opening and closing,refer to Comfort Access 26Key Memory, refer to PersonalProfile 18Kickdown 51Knock control 113LLamps– adaptive light control 83– interior lighting 85Lamps, refer to Parking lamps/low beams 81Lamps and bulbs, replacingbulbs 132Lashing eyes, refer toSecuring cargo 108LATCH child restraint fixingsystem 46Launch Control 57Leather care 130LED Light-emittingdiodes 132Length, refer toDimensions 157License plate lamp, replacingbulb 136Light– instrument lighting 85– refer to High-beamassistant 83Light-alloy wheels 130Light control– refer to High-beamassistant 83Light-emitting diodesLED 132Lighter 97– socket 97Lighting– lamps and bulbs 132– of instruments 85– of vehicle, refer to Lamps 81Light switch 81Limit, refer to Speed limit– indicator lamp 153Load 107Load securing equipment,refer to Securing cargo 108Lock buttons of doors, refer toLocking 23Locking– adjusting confirmationsignal 21– from inside 23– from outside 20– <strong>without</strong> remote control, referto Comfort Access 26Locking and unlocking doors– from inside 22– from outside 19Low beam control, refer toHigh-beam assistant 83Low-beam headlamps 81– automatic 81– replacing bulbs 133Lower back support, refer toLumbar support 37Luggage compartment, referto Cargo areaLuggage rack, refer to Roofmountedluggage rack 108Lumbar support 37MM+S tires, refer to Wintertires 121Maintenance, refer to– <strong>BMW</strong> MaintenanceSystem 126– Service bookletMaintenance system 126Malfunction warnings, refer toCheck Control 68<strong>Manual</strong> car wash 129<strong>Manual</strong>ly unlocking parkinglock 56<strong>Manual</strong> operation– door lock 22– fuel filler flap 112– glass roof 30– parking lock 56– transmission lock, automatictransmission 52<strong>Manual</strong> operation withautomatic transmission 52<strong>Manual</strong> transmission 50Maximum cooling 89167Reference MobilityDriving tipsControlsAt a glance
Everything from A to ZMaximum speed– for winter tires 121Microfilter/activated-charcoalfilter for automatic climatecontrol 91Microfilter for heating or airconditioner 88Microphone for telephone 14Mirror dimming feature 43Mirrors 42– automatic curb monitor 43– exterior mirrors 42– heating 42– interior rearview mirror 43Mobile phone, installationlocation, refer to Centerarmrest 95Mobile phone, refer to theseparate <strong>Owner's</strong> <strong>Manual</strong>Modifications, technical, referto For your own safety 5Monitoring system for tirepressures, refer to Flat TireMonitor 72Multifunctional steeringwheel, refer to Buttons onthe steering wheel 11Multifunction switch– refer to Turn signals/headlamp flasher 57– refer to Wiper system 58NNeck support, refer to Headrestraints 38Nets, refer to Storagecompartments 96New tires 120Next Service indicator, refer toCondition Based ServiceCBS 126Number of cylinders, refer toEngine data 156OOBD socket, refer to Socketfor Onboard Diagnosis 127Octane ratings, refer to Fuelspecifications 113Odometer 62Oil, refer to Engine oil 123Oil consumption 123Oil level 123Old batteries, refer toDisposal 137Onboard vehicle tool kit 132Opening and closing– Comfort Access 26– from inside 22– from outside 19– using the door lock 22– using the remote control 19Outlets, refer toVentilation 88, 91Output, refer to Enginedata 156Outside temperaturedisplay 62– changing unit of measure 66– in computer 66Outside temperaturewarning 62Overriding selector leverlock 52PPaintwork care 130Park assistant, refer to ParkDistance Control 70Park Distance Control PDC 70Parking– vehicle 49Parking aid, refer to ParkDistance Control PDC 70Parking brake 50– indicator lamp 50– manual activation 50Parking lamps/low beams 81– replacing bulbs 133Parts and accessories, refer toThe individual vehicle 5Passenger-side mirror tiltfunction 43Pathway lighting 81Personal Profile 18Pinch protection system– glass roof, electric 29– windows 28Polish 130Pollen, refer to Microfilter 88Pollen, refer to Microfilter/activated-charcoal filter 91Power windows 27Power windows, refer toWindows 27Pressure, tires 114Pressure monitoring of tires,refer to Flat Tire Monitor 72Pressure monitoring of tires,refer to Tire PressureMonitor TPM 74Programmable buttons on thesteering wheel 11Protection function, refer toPinch protection system– glass roof, electric 29– windows 28Providing medical assistance,refer to First add pouch 138Puncture– Flat Tire Monitor 72RRadio position, refer to Radioreadiness 48Radio readiness 48– switched off 49– switched on 48Rain sensor 58Reading lamps 85Rear lamps, refer to Taillamps 135Rear seats– adjusting head restraints 38– folding down backrests 98168
Rearview mirror, refer toMirrors 42Rear window defroster 88, 91Recirculated-air mode 87, 90Recirculation of air, refer toRecirculated-airmode 87, 90Reflectors, refer to Taillamps 135Refueling 112Releasing– hood 122Remaining distance, refer toCruising range 64Remote control 18– battery renewal 27– Comfort Access 26– garage door opener 92– malfunctions 21, 27– removing from the ignitionlock 48– service data 126– trunk lid 20Remote control key, refer toIntegrated key/remotecontrol 18Replacement fuses, refer toFuses 137Replacement remotecontrol 18Replacing bulbs, refer toLamps and bulbs 132Replacing tires, refer to Newwheels and tires 120Reporting safety defects 7Reserve warning, refer to Fuelgauge 63Reservoir for washersystems 59Restraint systems, refer toSafety belts 41Restraint systems forchildren 45Retreaded tires 120Reverse gear 54– automatic transmission withSteptronic 51– manual transmission 50Roadside Assistance 138Roadside parking lamps 83– replacing bulbs 133Roadworthiness test, refer toService requirements 66Rollover protection system,Convertible 79– resetting 79Roof load capacity 159Roof-mounted luggagerack 108Rope, refer to Tow-starting,towing away 141RSC Runflat SystemComponent, refer to Runflattires 120Runflat System ComponentRSC, refer to Run-flattires 120Run-flat tires 120, 121– flat tire 73– Inflation pressure 114– new tires 120– remaining driving distance,refer to Indication of a flattire 73– tire replacement 120Runflat tyres, refer to Run-flattires 120SSafety-belt heightadjustment 41Safety belts 41– damage 42– indicator lamp 42– reminder 42– sitting safely 35Safety systems– airbags 77– Antilock Brake SystemABS 71– Dynamic Stability ControlDSC 71– rollover protection system,Convertible 79– safety belts 41Safety tires, refer to Run-flattires 120Saving fuel 104Screw thread for towfitting 140Seat and mirror memory 40Seat belt reminder, refer to"Fasten safety belts"reminder 42Seats 36– heating 40– sitting safely 35Securing cargo 99, 100Selector lever, automatictransmission withSteptronic 51Selector lever positions 53Service, refer to RoadsideAssistance 138Service car, refer to RoadsideAssistance 138Service data in remotecontrol 126Service Interval Display, referto Condition Based ServiceCBS 126Service requirements 66Settings– clock, 12h/24h format 66– date format 66Shifting 55– 7-gear sports automatictransmission with doubleclutch 54Shifting gears with automatictransmission withSteptronic 52Shift into a drive position, referto Selector leverpositions 53Shiftlock, refer to Changingselector lever positions 51Shift paddles on the steeringwheel 55Side airbags 77Side windows, refer toWindows 27Signal horn, refer to Horn 10169Reference MobilityDriving tipsControlsAt a glance
Everything from A to ZSitting safely 35– airbags 35– safety belt 35Ski bag 99Sliding/tilt sunroof, refer toGlass roof, electric 29Slot for remote control 48Smokers' package, refer toAshtray 97Snap-in adapter, refer toCenter armrest 95Snow chains 121Socket, refer to Connectingelectrical appliances 97Socket for Onboard DiagnosisOBD 127Spare fuses 137Special oils, refer to Approvedengine oils 124Specified engine oils, refer toApproved engine oils 124Speed– for winter tires 121Speed display, refer toSpeedometer 12Speedometer 12Sport program, automatictransmission withSteptronic 52Sport program with 7-gearSports automatictransmission with doubleclutch 54Sports automatictransmission with doubleclutch 53– driving dynamics control 55– idle position 54– kick-down 54– Launch Control 57– manually unlocking parkinglock 56– reverse gear 54Spray nozzles, refer toWindshield washernozzles 59Stability control, refer toDriving stability controlsystems 70Start/stop button 48– starting the engine 49– switching off the engine 49Starting, refer to Starting theengine 49Starting assistance, refer toJump-starting 139Starting the engine– start/stop button 48Status of this <strong>Owner's</strong> <strong>Manual</strong>at time of printing 5Steam jet 128, 129Steering wheel 43– adjustment 43– buttons on steeringwheel 11– heating 44– shift paddles 55Steering wheel shift paddles,refer to Shift paddles 55Steering with variable ratio,refer to Active steering 76Steptronic, refer to Automatictransmission withSteptronic 50Storage 131Storage compartmentpackage 96Storage compartments 96Storing– seat position, refer to Seatand mirror memory 40– telephone numbers, refer toseparate <strong>Owner's</strong> <strong>Manual</strong>Storing tires 121Stowage, refer to Storagecompartments 96Summer tires, refer to Wheelsand tires 114Switches, refer toDashboard 10Switching off– engine 49Switching off the engine– start/stop button 48Switching the cooling functionon and off 87, 91Symbols 4TTachometer 62Tailgate, refer to Trunk lid 23Tail lamp, refer to Taillamps 135– replacing bulb 135Tail lamps 135– replacing bulb 135Tank contents, refer toCapacities 160Technical changes 5Technical data 156Telephone, installationlocation, refer to Centerarmrest 95Telephone, refer to separate<strong>Owner's</strong> <strong>Manual</strong>Temperature display– outside temperature 62– outside temperaturewarning 62– setting the units 66Tempomat, refer to Cruisecontrol 60Thigh support 36Third brake lamp, refer toCenter brake lamp 136Three-point safety belt 41Through-loading system 98Tilt alarm sensor 25Tilt function, passenger-sidemirror 43Tire inflation pressure 114– loss 73Tire pressure monitoring,refer to Flat Tire Monitor 72Tire Pressure MonitorTPM 74– resetting the system 74– system limitations 74– warning lamp 75Tire puncture, refer to Flat TireMonitor 73Tire Quality Grading 118170
Tires– age 118– air loss 75– breaking in 104– changing, refer to Changingwheels 136– condition 119– damage 119– inflation pressure 114– labels 118– minimum tread depth 119– new tires 120– pressure monitoring, refer toFlat Tire Monitor 72– pressure monitoring, refer toTire Pressure MonitorTPM 74– puncture 73– retreaded 120– size 118– wear indicators, refer toMinimum tread depth 119– winter tires 121Tools, refer to Onboardvehicle tool kit 132Torque, refer to Enginedata 156Tow bar 141Tow fitting 140Tow fittings for tow-startingand towing away 140Towing 140– car with automatictransmission 140– methods 141– with 7-gear Sportsautomatic transmission withdouble clutch 141Towing and tow-starting 140Tow rope 141Tow-starting 140TPM, refer to Tire PressureMonitor 74Traction control, refer toDynamic Stability ControlDSC 71Transmission– 7-gear Sports automatictransmission with doubleclutch 53– automatic transmission withSteptronic 50– idle position 54– Launch Control 57– manually unlocking parkinglock 56– manual transmission 50– reverse gear 54Transporting childrensafely 45Transport securing devices,refer to Securing cargo 108Tread depth, refer to Minimumtire tread 119Trip-distance counter, refer toTrip odometer 62Triple turn signal activation 57Trip odometer 62Trunk, refer to Cargo areaTrunk lid 23– Comfort Access 26– emergency release 24– opening from outside 23– unlocking with remotecontrol 20Turning circle, refer toDimensions 157Turn signals 57– indicator lamp 12– replacing bulbs 134– triple turn signal 57Tying down loads, refer toCargo loading 108UUnderbody protection, refer toCaring for your vehicle 128Uniform Tire Quality Grading/UTQR 118Units– average fuelconsumption 66Units of measure– temperature 66Universal garage door opener,refer to Integrated universalremote control 92Unlatching, refer toUnlocking 19Unlocking– from inside 23– from outside 19– trunk lid 26– <strong>without</strong> remote control, referto Comfort Access 26Unlocking <strong>without</strong> a key, referto Comfort Access 26VVehicle– battery 136– breaking in 104– cargo loading 106– decommissioning, refer toVehicle storage 131– dimensions 157– Identification Number, referto Engine compartment 123– parking 49– weight 159Vehicle jack 136Vehicle storage 131Ventilation 88, 91– draft-free 88, 91Vents, refer to Air vents 86Vents, refer toVentilation 88, 91Volume– fuel tank, refer toCapacities 160WWarning and indicatorlamps 13, 143Warning messages, refer toCheck Control 68Warning triangle 139171Reference MobilityDriving tipsControlsAt a glance
Everything from A to ZWasher fluid 59– content of the reservoir 59Washer fluid filler neck 59Waste tray, refer to Ashtray 97Water on roads, refer toDriving through water 106Water penetration 128, 129Wear indicators in tires, referto Minimum tread depth 119Weights 159Welcome lamps 81Wheelbase, refer toDimensions 157Wheels, new 120Wheels and tires 114Width, refer toDimensions 157Windows 27– convenient operation 20– convenient operation withComfort Access 26– opening, closing 27– pinch protection system 28Window washer system 58Windshield– cleaning 59– defrosting and removingcondensation 88, 91Windshield wash– filling capacity, reservoir 160Windshield washer reservoir,refer to Washer fluid fillerneck 59Windshield washer system– spray nozzles 59– washer fluid 59Windshield wiper blades,changing 132Windshield wipers, refer toWiper system 58Winter tires 121– storage 121Wiper blade replacement 132Wiper system 58Wrench/screwdriver, refer toOnboard vehicle tool kit 132XXenon lamps– replacing bulb 133172
More about <strong>BMW</strong>bmwusa.comThe UltimateDriving Machine01 41 2 604 079 Ue Basis*BL260407900W*