User manual and parts book Verti-Quake Serial ... - Golf Ventures
User manual and parts book Verti-Quake Serial ... - Golf Ventures
User manual and parts book Verti-Quake Serial ... - Golf Ventures

Create successful ePaper yourself
Turn your PDF publications into a flip-book with our unique Google optimized e-Paper software.
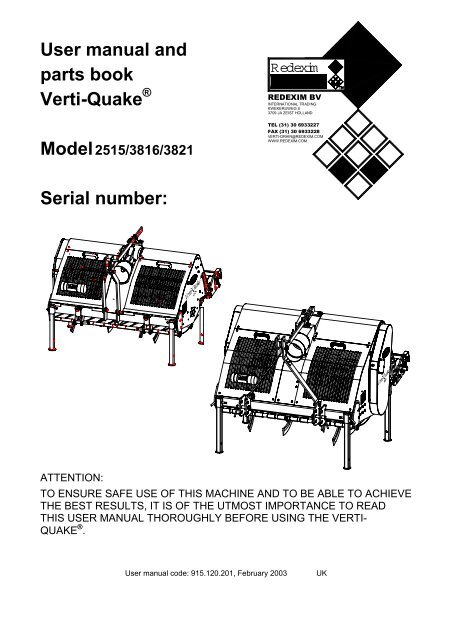
FORWARDCongratulations on your purchase of the <strong>Verti</strong>-<strong>Quake</strong> ® . To ensure the long <strong>and</strong> safe use ofthis <strong>Verti</strong>-<strong>Quake</strong> ® , it is of the utmost importance for all those who will be using it to read <strong>and</strong>underst<strong>and</strong> this user <strong>manual</strong>. Without full knowledge of its contents, it is not possible tosafely work with this machine.The <strong>Verti</strong>-<strong>Quake</strong> ® is not an independently operating machine. It is the user’s responsibility touse the right tractor. The user must also make sure the tractor/<strong>Verti</strong>-<strong>Quake</strong> ® combination isprovided with safety aspects such as noise reduction, user instructions, <strong>and</strong> risk analysis.The <strong>Verti</strong>-<strong>Quake</strong> ® is solely intended for use on lawns <strong>and</strong> other areas where grass couldgrow.On the next page, you will first find the general safety instructions. Every user must knowthese <strong>and</strong> be able to apply them. After this, a registration card is included. This card shouldbe returned in order to be able to follow up on any claims at a later stage.This user <strong>manual</strong> offers many instructions, which are numbered in sequence. This sequenceshould be followed. An asterisk * indicates a safety instruction. An ‘at’-sign @ indicates a tipor note.WARRANTY CONDITIONSTHIS VERTI-QUAKE ® IS DELIVERED WITH A WARRANTY AGAINST DEFECTS INMATERIALS.THIS WARRANTY IS VALID FOR A PERIOD OF 12 MONTHS FROM DATE OFPURCHASE.VERTI-QUAKE ® WARRANTIES ARE SUBJECT TO THE “GENERAL CONDITIONS FORSUPPLY OF PLANT AND MACHINERY FOR EXPORT, NUMBER 188”, WHICH AREPUBLISHED UNDER THE AUSPICES OF THE UNITED NATIONS ECONOMICCOMMISSION FOR EUROPE.REGISTRATION CARDFor your own information, please fill in the table below:<strong>Serial</strong> number machineDealer nameDate of purchaseRemarks2
Connect the <strong>Verti</strong>-<strong>Quake</strong> ® to the vehicle that will pull it exactly according to theinstructions (Danger of injury!)Before driving off, make sure you have a clear view both nearby <strong>and</strong> far away.On both sides of the <strong>Verti</strong>-<strong>Quake</strong> ® , decals (Fig. 5) are applied to the sideboardshowing these warnings. Make sure these safety decals are always clearlyvisible <strong>and</strong> legible. Replace them if they are damaged.During operation, make sure there are NO persons in the danger area of the<strong>Verti</strong>-<strong>Quake</strong> ® , because they may be injured by rotating <strong>parts</strong>. (Fig. 3)Keep a distance of at least 4 metres! (Fig. 4)Fig. 3 Fig. 4Be aware of the maximum lifting capacity of the vehicle pulling it.Wear suitable clothing. Wear sturdy shoes with a steel tip, long trousers, keep long hairtied up <strong>and</strong> wear no loose articles of clothing.(7) Placement of safety decals. (Fig 5.)Fig. 5Used oil/grease is harmful to the environment; dispose of it according to locallyapplicable regulations.5
CONTENTSSection Description PagePreface 2Warranty conditions 2Registration card 2Safety instructions 31.0 Technical data 72.0 First installation, removing the machine from the pallet 82.1 Prepare machine for operation 93.0 General <strong>parts</strong> list 114.0 The PTO 124.1 Length of the PTO 124.2 Operation of the PTO 134.3 PTO information <strong>and</strong> maintenance 135.0 Connecting to the tractor 146.0 Adjusting the operating depth 157.0 Driving speed 168.0 Start/stop procedure 169.0 Operation of the <strong>Verti</strong>-<strong>Quake</strong> ® 1710.0 Transportation of the <strong>Verti</strong>-<strong>Quake</strong> ® 1811.0 Disconnecting the <strong>Verti</strong>-<strong>Quake</strong> ® 1812.0 Troubleshooting 1913.0 Maintenance 2013.1 Tensioning the chain 2113.2 Cleaning the <strong>Verti</strong>-<strong>Quake</strong> ® 2113.3 Replacing/mounting the knives 2213.4 Replacing the knife’s breaking bolt 2314.0 Options: 20 mm knives for models 3816 & 3821 2314.1 Options: Mounting the coulter knives 2415.0 EU certificate 266
1.0 TECHNICAL DATAModel 2515 3816 3821Operating width 1.5 m 1.6 m 2.1 mOperating depth 250 mm 380 mm 380 mmTractor speed measuredat 540 rev/min on PTO.0.5 - 1.5 km/u0.3 - 0.9 mph0.5 - 1.5 km/u0.3 - 0.9 mph0.5 - 1.5 km/u0.3 - 0.9 mphPTO speed (rpm): (max.) 540 540 540Weight658 kg1450 lbs1042 kg2297 lbs1347 kg2969 lbsNumber of knives 18 18 24Number of knife discs 6 6 8Distance between knife 260 mm 270 mm 260 mmdiscsKnife thickness 12 mm 15 mm 15 mmRecommended tractorMinimum lifting capacity35-50 hp850 kg /1873 lbs60-80 hp1200 kg / 2645 lbs70-90 hp1525 kg / 3362 lbsHydraulic connection NoneDouble-operating Double-operatingexternal hydraulic external hydraulicconnectionconnectionMaximum treatmentcapacity2250 m 2 /u24219 ft 2 /u2400 m 2 /u25833 ft 2 /u3150 m 2 /u33906 ft 2 /uShipping measurements 1.6x0.88x1.56m63”x34.6”x61.4”1.82x1.15x1.95 m71.7”x45.3”x76.8”2.32x1.15x1.95 m91.3”x45.3”x76.8”Three-point connection Cat. 1 & 2 Cat. 2 Cat. 2Gearbox oil SAE 90 SAE 90 SAE 90Lubricant EP 2 EP 2 EP 2St<strong>and</strong>ard <strong>parts</strong>-Knives 12 mm(0,47”)-Knives 15 mm(0,59”)-Knives 15 mm(0,59”)-Back roller-Integratedadjustable legs-PTO with breakingbolt-Back roller-Integratedadjustable legs-Hydraulic depthadjustment-PTO with breakingboltOptions -Coulter knives -Coulter knives-Knives 20 mm(0,79”)-Back roller-Integratedadjustable legs-Hydraulic depthadjustment-PTO with breakingbolt-Coulter knives-Knives 20 mm(0.79”)7
Position 1 Position 2 Position 31 23Fig. 62.0 FIRST INSTALLATION, REMOVING THE MACHINE FROM THEPALLETThe machine is located vertically on the pallet. To remove the pallet <strong>and</strong> lay the machinehorizontally, carry out the following steps (fig. 6):*!! DO NOT CRAWL UNDER THE MACHINE !!1. Mount a cable to the lifting points at both sides of the machine. (fig. 6 Position 1)* Make sure that the cable/crane/lift can lift at least 2000 kg (4400 lbs)(for the models 2515, 3816 <strong>and</strong> 3821)2. Raise the machine, including the pallet, 50 mm from the ground.3. Make sure that the machine is on the point of the pallet. (fig. 6 Position 2)4. Gently lower the machine, in a controlled way, until it fully rests upon the ground. (fig. 6Position 3)*!! BE CAREFUL – KEEP YOUR DISTANCE – THE MACHINE MAY SHIFT !!5. Remove bolt 1 <strong>and</strong> bolt 2 <strong>and</strong> carefully rotate the pallet around point 3 until it isresting on the ground.6. Remove the bottom three-point pins 3 <strong>and</strong> remove the pallet.8
251538-Series431 2 1665 5Fig. 72.1 PREPARING THE MACHINE FOR OPERATION1. Loosen the nuts 1. Remove the access hatches 2. (fig. 7)2. Remove the loose <strong>parts</strong>, which were supplied with the machine, from it.*!! Be careful – the knives are sharp !!3. Mount the top-link rod using the bolts <strong>and</strong> nuts 3 (2515) or 4 (38-series) as shown infig 7.For the <strong>Verti</strong>-<strong>Quake</strong> ® 2515, the st<strong>and</strong>ard mounting position is the 5 th hole from the end of thetop-link rod.For the <strong>Verti</strong>-<strong>Quake</strong> ® 3816 <strong>and</strong> 3821, the st<strong>and</strong>ard mounting position is the 3 rd hole from the topof the gearbox.*!! MAKE SURE THAT THE BOLTS ARE WELL TIGHTENED !!4. Couple the machine to a tractor. See Section 5.0.* Use the correct tractor. See the specifications.5. Raise the machine off the ground.6. *!! Ensure that the tractor is well blocked <strong>and</strong> cannot start moving by itself!!7. *!! Switch off the tractor before getting off !!8. Lower the adjustable legs 5 of the machine <strong>and</strong> secure them using the pins 6.Secure the pins 6 with a safety pin.9. Carefully lower the machine onto the adjustable legs 5.*!! BEFORE GETTING OFF THE TRACTOR, MAKE SURE THAT THE TRACTORAND THE VERTI-QUAKE ® ARE FIRMLY PLACED ON THE GROUND ANDCANNOT SAG OR SLIDE !!9
2515 3816 & 382121213Fig.810. Loosen bolts 1 & 2 (Model 2515) <strong>and</strong> bolts 1,2 & 3 (Model 3816 & 3821) from the mountedknives, in order to relieve the tension.11. Loosen bolts 1 & 2 (All models) from the points where no knife is mounted yet.12. Mount the not yet mounted knives with the sharp edge pointing towards the backroller of the machine.*!! Be careful – the knives are sharp !!Tighten bolts 1 well.Tighten the breaking bolts 2 (the bolts nearest to the shaft) to a normal torque.Tighten bolts 3 well. (Models 3816 & 3821)13. Mount the access hatches 2 <strong>and</strong> secure these by tightening nuts 1. (fig. 7)14. Set the tractor’s stabiliser to 50 mm lateral movement.15. Determine the length of the PTO according to Section 4.Fig. 8a16. Mount the bleeder, which was included in the delivery, onto the top of the gearbox.(See Fig. 8a)10
3.0 GENERAL PARTS LISTFigure 9 shows a number of important <strong>parts</strong>:Fig. 91. Safety decal 900.280.402:• *!! Before use, make sure to read <strong>and</strong> underst<strong>and</strong> the user <strong>manual</strong> !!2. Safety decal 911.280.402:• *!! Danger of injuries because of rotating <strong>parts</strong> !!• *!! Keep a distance of at least 4 metres from the machine !!• *!! Stop the tractor engine before carrying out repairs or adjustments!!* !! Make sure all decals are clearly visible on the machine <strong>and</strong> are understood !!3. The serial number is on the bottom left on the outside of the machine.4. Adjustment mechanism to adjust the operating depth <strong>and</strong> the operating-depth indicator.5. Dragging legs for adjustment of the operating depth <strong>and</strong> integrated Turf Hold Downsystem.6. Inspection hatches for inspection <strong>and</strong> access to the rotating <strong>parts</strong> of the machine.7. Chain tensioner.8. Central lubricating point.9. Container for user <strong>manual</strong> <strong>and</strong> tools.10. Adjustment legs, intended to secure the machine when it is not in operation, for exampleto enable work to be carried out onto the machine.11. Pressure-adjustable terrain-following back roller.12. Adjustable back-roller scraper.13. Bottom three-point connecting pins.14. Top three-point connecting pin.15. PTO protective cover on the machine.16. PTO input shaft.The safety side (with breaking bolt) of the PTO has to be mounted to this shaft.17. Hydraulic hoses for the adjustment function of the operating depth.(Only available on the <strong>Verti</strong>-<strong>Quake</strong> ® 3816 <strong>and</strong> 3821)11
4.0 THE PTOThe PTO is a very important part. It takes care of the drive from the tractor <strong>and</strong> ensures safeuse of the machine – if installed, used, <strong>and</strong> maintained correctly. The PTO has its own CEcertificate. Make sure to read the PTO <strong>manual</strong>. It is located on the PTO itself.Fig. 104.1 LENGTH OF THE PTO (fig. 10)The length of the PTO is very important. If it is too long, it may damage the drive of thetractor <strong>and</strong>/or the <strong>Verti</strong>-<strong>Quake</strong>®.If the overlapping length of the sleeves is, at any time, shorter than 150 mm, the PTO may bedamaged.*!! The length will vary when the machine is raised or if another tractor is used !!To make sure the length of the PTO is correct, after purchase or when using another tractor,carry out the following steps:1. Connect the <strong>Verti</strong>-<strong>Quake</strong> ® to the tractor, as described in Section 2.1.2. * !! Switch off the tractor <strong>and</strong> make sure the tractor is properly blocked <strong>and</strong> cannotstart moving by itself !!3. Lower the <strong>Verti</strong>-<strong>Quake</strong> ® to the ground until the knives are almost touching the ground <strong>and</strong>the dragging legs are parallel with the ground.4. Measure the distance between the PTO connection of the tractor <strong>and</strong> that of the <strong>Verti</strong>-<strong>Quake</strong>®, from one furrow to the next.5. Measure the distance B of the PTO at its shortest position, from locking pin to lockingbolt.6. Divide the PTO up into two <strong>parts</strong> <strong>and</strong> remove the protective cover from bothends.7. Both the sleeve ends <strong>and</strong> the cover ends have to be shortened: (B-A) + 75 mm (3”).8. Deburr, grease, then assemble all <strong>parts</strong>.9. Mount the PTO with the breaking bolt side facing the <strong>Verti</strong>-<strong>Quake</strong>®.10. Mount the other end of the PTO to the tractor.11. Check the overlap of the sleeves.* !! Never use the machine if the protective cover of the PTO is damaged.Replace it first. !!12
4.2 OPERATION OF THE PTOTo ensure correct operation of the PTO, check the following items:1. During operation of the <strong>Verti</strong>-<strong>Quake</strong> ® , the angle between the points of rotationmay not exceed 30 degrees.2. The rotating points should be aligned.3. The overlap of the sleeves must be at least 150 mm.4. Never use the machine if the protective cover of the PTO is damaged.4.3 PTO INFORMATION AND MAINTENANCEThe PTO intended for use with your <strong>Verti</strong>-<strong>Quake</strong> ® machine is provided with a breaking-boltsafety device, which protects the <strong>Verti</strong>-<strong>Quake</strong> ® against overloading.*!! If the breaking bolt is broken, replace it with an original with the correct strengthclass !!If another breaking bolt with an incorrect strength class is mounted, this will increasethe risk of overloading, which in turn may cause damage to your <strong>Verti</strong>-<strong>Quake</strong> ® .Summarised PTO maintenance schedule.Periodic maintenance:−−−Grease the lubricating points after every 100 hours of operation or when thePTO was not used for a while.Check the PTO for signs of damage to the protective covers <strong>and</strong> replacethese if necessary.Make sure all safety decals are present on the PTO <strong>and</strong> that they areundamaged.Annual maintenance:−−−−−−−−Remove the PTO from the machine.Carefully check all <strong>parts</strong> of the PTO.Replace all <strong>parts</strong> that are damaged.Put down all <strong>parts</strong> <strong>and</strong> check them carefully.If any <strong>parts</strong> show signs of damage or wear, replace these.Clean all <strong>parts</strong> that interlock or engage.Reassemble the <strong>parts</strong>.Grease both sleeves <strong>and</strong> reassemble the two PTO halves.Reassemble the PTO <strong>and</strong> mount it to the machine.For further information concerning maintenance <strong>and</strong> assembly of the PTO, pleaserefer to the <strong>manual</strong> included with the PTO.@ If the PTO was shortened incorrectly, or if another tractor was used, the gearboxmay be overloaded. This may result in damages.13
5.0 CONNECTING TO THE TRACTOR (Fig. 11)Inspection procedure before connection of the <strong>Verti</strong>-<strong>Quake</strong> ® :−−−Visually inspect the <strong>Verti</strong>-<strong>Quake</strong> ® for signs of damage <strong>and</strong> repair theseif they endanger a safe operation of the machine.Make sure that all nuts <strong>and</strong> bolts are properly tightened.Check the hydraulic components for leaks/damage.Fig. 11The <strong>Verti</strong>-<strong>Quake</strong> ® is connected to the tractor by means of the three-point connection.This is done as follows: (fig.11)1. Remove the three-point pins 1 <strong>and</strong> 22. Mount the PTO with the breaking bolt side facing the PTO shaft of the<strong>Verti</strong>-<strong>Quake</strong> ® .3. Drive the tractor carefully in reverse so that the low connection armscan be connected to the frame.4. *!! Ensure that the tractor is well blocked <strong>and</strong> cannot start moving byitself !!5. *!! Switch off the tractor before getting off !!6. Connect the lower connecting arms to the three-point connectingplates pins 1 <strong>and</strong> secure these using the safety pins included.7. Mount the top rod of your tractor <strong>and</strong> pull it out by turning it until it hasreached the same level as the three-point stop connection of the <strong>Verti</strong>-<strong>Quake</strong> ® .8. Connect the top rod 3 with pin 2 to the frame. Secure pin 2 using thesafety pin included.9. Push the top rod in by turning in order to tension it.10. Mount the PTO to the PTO shaft of the tractor.11. Connect the hydraulic hoses to the tractor.(Only present on models 3816 <strong>and</strong> 3821)12. Start the tractor <strong>and</strong> raise the <strong>Verti</strong>-<strong>Quake</strong> ® from the ground.13. Remove pins 4 <strong>and</strong> slide up the adjustable legs 5.14. Lock the adjustable legs 5 using pins 4 <strong>and</strong> secure these using thesafety pins included.15. *!! Make sure that all mounting pins are securely locked!!14
6.0 ADJUSTING THE OPERATING DEPTH (Fig. 12)Fig. 121. If the <strong>Verti</strong>-<strong>Quake</strong> ® is not yet connected, connect it to the tractor as described inSection 5.2. Pull out safety pins 2 from pins 1 (Models 3816 <strong>and</strong> 3821).Give a quarter turn to pin 1 (Model 2515)3. Raise the <strong>Verti</strong>-<strong>Quake</strong> ® using the tractor.4. Pull out pins 1 from the frame on both sides of the machine.5. Adjust the dragging legs / operating-depth indicator until the desired position hasbeen reached.For the desired operating depth, refer to Table 1.@ Adjustment of the dragging legs on the <strong>Verti</strong>-<strong>Quake</strong> ® 2515 is achieved<strong>manual</strong>ly. On the <strong>Verti</strong>-<strong>Quake</strong> ® 3816 <strong>and</strong> 3821, this is done by means ofthe hydraulic adjustment mechanism, which is powered by the tractor.6. Mount pins 1 into the desired hole <strong>and</strong> secure the pins using safety pins 2 (Models 3816<strong>and</strong> 3821).Mount the pins 1 to the side of the frame <strong>and</strong> the desired hole in the operating-depthindicator. Give them a quarter turn. (Model 2515)7. On the <strong>Verti</strong>-<strong>Quake</strong> ® 3816 <strong>and</strong> 3821, the hydraulic adjustment must be retractedcarefully until the pins 1 touch the main frame 3.Adjustment of the operating depth (new knives)Hole <strong>Verti</strong>-<strong>Quake</strong> ®2515<strong>Verti</strong>-<strong>Quake</strong> ®3816/38211 25 cm 38 cm2 23 cm 36.5 cm3 20 cm 35 cm4 18 cm 33 cm5 15 cm 29 cm6 13 cm 27 cm7 10 cm 24 cm8 21 cm9876543217654321<strong>Verti</strong>-<strong>Quake</strong> ®2515<strong>Verti</strong>-<strong>Quake</strong> ®3816/3821Table 19 18 cm15
7.0 DRIVING SPEEDThe effectiveness of the aeration depends upon the condition of the soil, the driving speed,<strong>and</strong> the speed (rpm) of the PTO.To aerate using the <strong>Verti</strong>-<strong>Quake</strong> ® , a driving speed of between 0.5 <strong>and</strong> 1.5 km/h (0.3 – 0.9mph) is recommended, in combination with a PTO speed of max. 540 rpm.The driving speed <strong>and</strong> the rpm of the PTO should be adjusted according to the soil condition<strong>and</strong> the amount of aeration needed.8.0 START/STOP PROCEDUREThe start procedure is VERY important. If this procedure is not followed exactly as describedbelow, serious damage may occur to the <strong>Verti</strong>-<strong>Quake</strong> ® .The start procedure is as follows:1. Visually inspect the <strong>Verti</strong>-<strong>Quake</strong> ® <strong>and</strong> make sure all <strong>parts</strong> are functioning properly.*!! If they are not, these problems must be resolved before the <strong>Verti</strong>-<strong>Quake</strong> ® is to beused !!2. Check the oil level in the gearbox. The oil level should be in the centre of the gaugeglass.3. Connect the <strong>Verti</strong>-<strong>Quake</strong> ® to the tractor.4. Drive to the place where the soil is to be treated.5. Lower the machine until the knives are almost touching the ground.6. Switch on the four-wheel drive. Switch on the tractor in the right gear.7. Switch on the PTO at a low speed (rpm).8. Slowly raise the PTO speed to approx. 300 rpm.9. Start the tractor moving <strong>and</strong> smoothly lower the <strong>Verti</strong>-<strong>Quake</strong> ® into the ground.10. Raise the PTO speed to a maximum speed of 540 rpm.11. Raise the driving speed to a maximum of 1.5 km/h (0.9 mph)Fig 12@ Adjust the top rod in such a way that the rear part of the dragging legsare parallel to the ground.This will reduce the pressure of the machine on the ground <strong>and</strong> willprevent damage to the soil. (fig. 12)@ Always work in straight lines. Curves may damage the soil to betreated.16
Stopping is done as follows:1. Stop the forward movement of the tractor.2. Slowly reduce the PTO speed to approx. 300 rpm.3. Stop the PTO as soon as the knives are out of the soil.4. Gradually raise the <strong>Verti</strong>-<strong>Quake</strong> ® from the soil.5. Drive to the next place <strong>and</strong> start again as described at the beginning of thisSection.*!! NEVER operate the tractor gears when the <strong>Verti</strong>-<strong>Quake</strong> ® is operated.The <strong>Verti</strong>-<strong>Quake</strong> ® may push the tractor forward at high speed!!@ It is absolutely imperative that the above procedures are followed.If the machine is placed into the soil while the PTO is not running, this maycause serious damage to the machine.@ Always lower the <strong>Verti</strong>-<strong>Quake</strong> ® into the soil VERY CAREFULLY.@ Two safety provisions – breaking bolts – have been built into the machine in caseof overloading.− Each knife is provided with a breaking bolt, which will break if the <strong>Verti</strong>-<strong>Quake</strong> ® is overloaded.The knife will, however, remain suspended to the main shaft by amounting bolt.− A breaking bolt on the PTO prevents overloading of the <strong>Verti</strong>-<strong>Quake</strong> ® <strong>and</strong>the tractor.*!! If the breaking bolt is broken, replace it with an original with the correct strengthclass !!9.0 OPERATION OF THE VERTI-QUAKE ®Before the <strong>Verti</strong>-<strong>Quake</strong>® is used in any place, the following should be checked first:1. Are there any loose objects lying about in the field? Remove these first.2. Are there any slopes? The maximum slope for the <strong>Verti</strong>-<strong>Quake</strong> ® is 20 degrees.Make sure to always move downhill.3. Does the ground contain cables or pipes? If so, determine their depth <strong>and</strong> set theoperating depth of the machine to 60% of this depth.4. Does the ground contain hard objects? Adjust the operating depth accordingly.5. Is there any danger of flying objects, such as golf balls, which may distract the attentionof the driver? If so, do NOT use the <strong>Verti</strong>-<strong>Quake</strong> ® .6. Is there any danger of sagging or sliding? If so, postpone working with the <strong>Verti</strong>-<strong>Quake</strong> ® .7. If the soil is frozen or very wet, the treatment should be postponed until thecircumstances are more favourable.17
10.0 TRANSPORT OF THE VERTI-QUAKE ®The user is responsible for the transport of the <strong>Verti</strong>-<strong>Quake</strong> ® behind the tractor whentravelling public roads. Check the national traffic regulations.On open fields, a maximum speed of 12 km/h (7.5 mph) should be observed, because of theweight of the <strong>Verti</strong>-<strong>Quake</strong>®.A higher speed may endanger the driver <strong>and</strong>/or other people <strong>and</strong> may even damage themachine.* When the machine is in raised position, at least 20% of the weight of the tractorshould be supported by the front axle.11.0 DISCONNECTING THE VERTI-QUAKE ®Fig. 13The machine is disconnected from the tractor as follows:1. Drive the <strong>Verti</strong>-<strong>Quake</strong> ® up to its storage place, which must have a stable <strong>and</strong> flatground.2. *!! Ensure that the tractor is well blocked <strong>and</strong> cannot start moving by itself !!3. *!! Switch off the tractor before getting off !!4. Remove the safety pins from pins 2. Remove pins 2 from their holes.5. Slide down the adjustable legs 1.6. Secure the adjustable legs 1 by placing pins 2 into the hole. Secure these pins usingthe safety pins provided.7. Carefully lower the <strong>Verti</strong>-<strong>Quake</strong> ® onto the ground.8. * !! Before getting off the tractor, make sure the <strong>Verti</strong>-<strong>Quake</strong> ® is stably restingon the ground !!9. Release the top rod 3.10. Remove the safety pin from pin 4. Pull out pin 4 from the top-rod connection.11. Disconnect the PTO.12. Pull out the safety pins from pins 5. Pull out pins 5 from the <strong>Verti</strong>-<strong>Quake</strong> ® frame.13. Disconnect the hydraulic hoses from the <strong>Verti</strong>-<strong>Quake</strong> ® .(Only present on models 3816 <strong>and</strong> 3821)14. *!! Make sure the <strong>Verti</strong>-<strong>Quake</strong> ® is stable !!15. Start the tractor <strong>and</strong> drive it away from the machine.18
12.0 TROUBLESHOOTINGProblem Possible cause SolutionToo much damage to thesoil to be treated.The aerator shaft is notturning.Gearbox or chain guardis leaking.Breaking bolts arebreaking too easily.Machine is pushing thetractor forward.Soil is insufficientlyaerated.Knives are bringing uptoo much soil.Knives are damaged.Knives are crooked.Machine is not in line withthe tractor.Not driven in a straight line.Soil is too wet.Breaking bolt of the PTO hasbroken.Drive chain has broken.Gearbox damaged.Seal is leaking.Bleeder on gearbox isblocked or not mounted.Too many stones or rocks.Ground is too hard.Driving speed is too high.PTO speed is too low.Tractor is too light.Driving speed is too high.Too fast driving.Soil is too wet.PTO speed (rpm) is too low.Knives are crooked.Soil is too wet.Try aligning the knives bystraightening them using ahammer <strong>and</strong> anvil.Align the knives.Mount new ones.Adjust the bottom left three-pointplate to align the knives with thetractor.Try driving in a straight line.Postpone the job until the soil hasdried.Replace the PTO’s breaking bolt.Repair or replace the chain.Repair or replace the gearbox.Replace seal.Deblock or mount the bleeder.Adjust the operating depth.Adjust the operating depth.Adjust the driving speed.Increase the PTO speed (rpm).Weigh down the tractor or chooseanother type of tractor.Adjust the driving speed.Drive more slowly.Postpone the job until the soil hasdried.Raise the PTO speed (rpm).Align the knives.Mount new ones.Postpone the job until the soil hasdried.19
13.0 MAINTENANCETo protect machine <strong>and</strong> user, all adjustment <strong>and</strong> repair work carried out to the<strong>Verti</strong>-<strong>Quake</strong> ® may only be performed by authorised technical staff.When carrying out any maintenance or repairs, make sure to use original <strong>Verti</strong>-<strong>Quake</strong> ® <strong>parts</strong>only. This will ensure continued safety of the machine <strong>and</strong> its user.Time schedule Check point /lubricating pointMethodBefore each use Check for loose bolts/nuts. Tighten loose bolts/nuts.Check the oil level in thegearbox. The oil level should bein or above the centre of thegauge glass.Use SAE 90Connect the machine to thetractor <strong>and</strong> leave the machinerunning without load for fiveminutes.Check the hydraulic componentsfor leaks.(Only models 3816 <strong>and</strong> 3821)Look <strong>and</strong> listen for anystrange noises <strong>and</strong>movements.Repair any leaks.After every 8 operatinghours.Check for loose bolts/nuts.Tighten loose bolts/nuts.Breaking bolts of the knives.Presence <strong>and</strong> legibility of safetydecals.(See Fig. 5)Tighten these to normaltorque.Replace these if damaged.Any loose <strong>parts</strong> around the PTO. Secure these <strong>parts</strong> so thatthey cannot come too closeto the PTO.Lubricate the central lubricating Use EP2 lubricating grease.points at both sides of themachine.(See Fig. 9)Grease the PTO lubricating Use EP2 lubricating grease.points.After every 50 operatinghours.Check the gearbox <strong>and</strong> chainguard for oil leakage.Replace gearbox seals /chain-guard sealing paste.Check the knife holders. Tighten the normal <strong>and</strong>breaking bolts of the knives.Check the chain tensioning. See Section 13.1After every 100 operatinghours.Check the knives.Amount of grease in chain box.Replace or repair them.Use EP2 lubricating grease.20
13.1 TENSIONING THE CHAINThe <strong>Verti</strong>-<strong>Quake</strong> ® is equipped with an automatic chain tensioner, which keeps thechain correctly tensioned.After a while, the chain will stretch. This will largely be corrected by the automaticchain tensioner. But if the chain is stretched too far, the automatic chain tensioner willhave to be readjusted.The <strong>Verti</strong>-<strong>Quake</strong> ® model 2515 has one chain tensioner. The models3816 <strong>and</strong> 3821 have two, one on each side of the machine.They are adjusted as follows: (fig. 14)Fig. 141. Remove the cover, revealing the mechanism. See Fig. 14.2. Unscrew bolts 2 <strong>and</strong> 3 <strong>and</strong> nut 5.3. Screw in bolt 1 until the distance A is 10 mm.4. Screw in bolts 2 <strong>and</strong> 3 <strong>and</strong> nut 5.5. Mount the cover back on the <strong>Verti</strong>-<strong>Quake</strong> ® .13.2 CLEANING THE VERTI-QUAKE ®Please follow the cleaning instructions below to maintain an optimum condition forthe <strong>Verti</strong>-<strong>Quake</strong> ® .−−−−−−Never point a high-pressure cleaner at the bearing seals <strong>and</strong> chainguardseals.After cleaning, grease all lubricating points.Never use aggressive soap or cleaning agents.Make sure the <strong>Verti</strong>-<strong>Quake</strong> ® is switched off before cleaning it.Make sure the machine is stable <strong>and</strong> cannot sag or slide.Make sure the safety decals remain clearly visible.21
13.3 REPLACING THE KNIVES2515 3816 & 3821112 12 14433443355Fig.15If new or other knives are to be mounted, proceed as follows. (See Fig. 15):1. *!! Make sure the <strong>Verti</strong>-<strong>Quake</strong> ® is stable on the ground <strong>and</strong> cannot sag or slide!!2. Loosen the nuts 1. Remove the access hatches 2.3. Remove bolts 3 & 4.4. Unscrew bolts 5 somewhat (Only on models 3816 & 3821) in order to relieve the tension.5. Remove the knives to be replaced.6. Mount the new knives with the sharp edge pointing towards the back roller of themachine.*!! Be careful – the knives are sharp !!Tighten bolts 3 well.Tighten the breaking bolts 4 (the bolts nearest to the shaft) to a normal torque.Tighten bolts 5 well. (Only models 3816 & 3821)7. Mount the access hatches 2 <strong>and</strong> secure these by tightening nuts 1.22
13.4 REPLACING THE KNIFE’S BREAKING BOLTA breaking bolt is mounted on each knife’s mounting point. This breaking bolt is anextra safety provision against overloading of the machine. If the machine isoverloaded, the breaking bolt will break. As a result, the knife will hinge towards theshaft <strong>and</strong> no longer provides a load for the machine.To replace a broken breaking bolt, proceed as follows. (See Fig. 15):1. *!! Make sure the <strong>Verti</strong>-<strong>Quake</strong> ® is stable on the ground <strong>and</strong> cannot sag or slide!!2. Loosen the nuts 1. Remove the access hatches 2.3. Remove the remainder of the broken breaking bolt 4.4. Move the hinged-off knife back to its operating position.5. Place a new, original breaking bolt <strong>and</strong> nut. Tighten these to normal torque.6. Mount the access hatches 2 <strong>and</strong> secure these by tightening nuts 1.14.0 OPTIONS: 20 mm KNIVES FOR MODELS 3816 & 3821The <strong>Verti</strong>-<strong>Quake</strong> ® models 3816 <strong>and</strong> 3821 have the possibility to have thicker knivesmounted.St<strong>and</strong>ard, 15 mm knives are delivered with these models. If desired, the machinemay be equipped with knives with a thickness of 20 mm.These thicker knives offer more lateral movement of the soil, resulting in a betteraeration. However, they will also cause a wider groove in the treated soil.To exchange the knives, please refer to Section 13.3.23
14.1 OPTIONS: MOUNTING THE COULTER KNIVESCoulter knives are intended to keep the cut grooves open.The grooves, freshly cut by the <strong>Verti</strong>-<strong>Quake</strong> ® , are opened up by the coulter knives,which may be connected separately.To mount these knives, proceed as follows:<strong>Verti</strong>-<strong>Quake</strong> ® 2515 (See Fig. 16)Fig.161. *!! Make sure the <strong>Verti</strong>-<strong>Quake</strong> ® is stable on the ground <strong>and</strong> cannot sag or slide!!2. *!! Support roller 2 to make sure it is stable <strong>and</strong> firm on the ground <strong>and</strong>cannot roll off when it is removed !!*!! Roller 2 is very heavy !!3. Remove roller 2 by unscrewing bolts 1 from both sides of the machine.4. Remove roller 2.5. Unscrew bolts 3 (12 pieces).6. Mount the coulter knives to sleeve 5, using bolts 3.7. Make sure the coulter knives are well aligned with the rotating knives of the<strong>Verti</strong>-<strong>Quake</strong> ® .8. Tighten bolts 3 well.24
<strong>Verti</strong>-<strong>Quake</strong> ® 3816 & 3821 (See Fig. 17)Fig.171. *!! Make sure the <strong>Verti</strong>-<strong>Quake</strong> ® is stable on the ground <strong>and</strong> cannot sag or slide!!2. *!! Support roller 2 to make sure it is stable <strong>and</strong> firm on the ground <strong>and</strong>cannot roll off when it is removed !!*!! Roller 2 is very heavy !!3. Remove roller 2 by unscrewing bolts 1 from both sides of the machine.4. Remove roller 2.5. Remove the protective cups 3 (3816: 24 pieces; 3821: 32 pieces).6. Mount the coulter knives to sleeve 9, using bolts 6.7. Mount pressure plate 5 to the back of sleeve 9. Mount sealing ring 7 to thetop of the pressure plate. Tighten the assembly h<strong>and</strong>-tight using nuts 8 <strong>and</strong>bolts 6.8. Make sure the coulter knives are well aligned with the rotating knives of the<strong>Verti</strong>-<strong>Quake</strong> ® .9. Tighten all bolts 6 <strong>and</strong> nuts 8 well.15.0 EU-DECLARATIONThe product:VERTI-QUAKE MODEL 2515/3816/3821, WITH MACHINE NUMBER ASINDICATED ON THE MACHINE AND IN THIS MANUALto which this declaration applies, has been manufactured in line with NEN-EN 292-1, NEN 292-2 <strong>and</strong> NEN-EN 294, according to the stipulations of: The MachineDirective 89/392, updated by 93/368/EEG, 93/44/EEG <strong>and</strong> 93/68/EEG.25