User Manual - Ken-A-Vision
User Manual - Ken-A-Vision
User Manual - Ken-A-Vision

You also want an ePaper? Increase the reach of your titles
YUMPU automatically turns print PDFs into web optimized ePapers that Google loves.
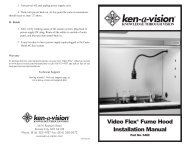
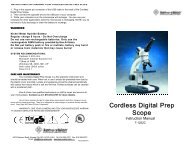
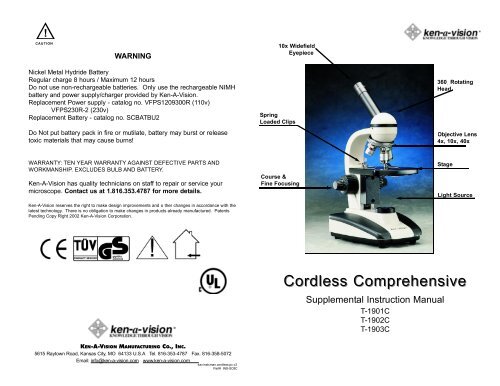
!CAUTIONWARNING10x WidefieldEyepieceNickel Metal Hydride BatteryRegular charge 8 hours / Maximum 12 hoursDo not use non-rechargeable batteries. Only use the rechargeable NIMHbattery and power supply/charger provided by <strong>Ken</strong>-A-<strong>Vision</strong>.Replacement Power supply - catalog no. VFPS1209300R (110v)VFPS230R-2 (230v)Replacement Battery - catalog no. SCBATBU2Do Not put battery pack in fire or mutilate, battery may burst or releasetoxic materials that may cause burns!SpringLoaded Clips360 RotatingHeadObjective Lens4x, 10x, 40xWARRANTY: TEN YEAR WARRANTY AGAINST DEFECTIVE PARTS ANDWORKMANSHIP. EXCLUDES BULB AND BATTERY.<strong>Ken</strong>-A-<strong>Vision</strong> has quality technicians on staff to repair or service yourmicroscope. Contact us at 1.816.353.4787 for more details.<strong>Ken</strong>-A-<strong>Vision</strong> reserves the right to make design improvements and o ther changes in accordance with thelatest technology. There is no obligation to make changes in products already manufactured. PatentsPending Copy Right 2002 <strong>Ken</strong>-A-<strong>Vision</strong> Corporation.Course &Fine FocusingStageLight SourceCordless ComprehensiveSupplemental Instruction <strong>Manual</strong>T-1901CT-1902CT-1903CKEN-A-VISION MANUFACTURING CO., INC.5615 Raytown Road, Kansas City, MO 64133 U.S.A Tel. 816-353-4787 Fax. 816-358-5072Email: info@ken-a-vision.com www.ken-a-vision.comkav.instcman.cordless.pc.v2Part# INS-SC8C
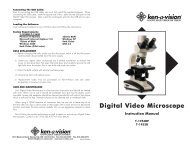
INSTRUCTIONS FOR USE OF YOUR KEN-A-VISIONCORDLESS MICROSCOPE1. Plug in the round pin adapter from the battery charger to the back ofyour microscope.2. Then connect the opposite end to a 110v (220v international) electricaloutlet.3. With 1 over-night charge you can use your microscope for up to 40 hoursof continuous operation.4. You do not have to fully discharge or drain the battery to recharge.TECHNICAL SPECIFICATIONS FOR MODEL NO. T-1900C SERIES· Power Source Life: 500 Cycles (approximately 4-5 years depending on usage)· Light Source Technology Equivalent to a 20 Watt Bulb· Power Source: Built-in rechargeable NIMH (Nickel Metal Hydride)· Light Board Life 100,000 Hours· Cool Operating Temperature Less Than 25°C (75°F)· 10 year warranty on microscope. Warranty does not apply to battery.EQUIPMENT RATING:DESCRIPTION OF INPUT OUTPUT CONNECTIONShould you need a replacement power supply, contact <strong>Ken</strong>-A-<strong>Vision</strong> or yourdealer. When using internationally, be sure to use the correct AC voltageeither 110v, 220v, or 240v output voltage. (catalog # VFPS230R-2 (230v) orVFPS1209300R (110v). Output voltage is 9 volt DC 300mA and a 2.5 mmVbarreled styled center position plug connection ofENVIRONMENTAL CONDITIONSThis equipment is designed to be safe at least under the following conditions:· indoor use;· altitude up to 2 000 m, or above 2 000 m if specified bythe manufacturer· temperature 5° to 40°C;· maximum relative humidity 80% for temperatures up to 31°Cdecreasing linearly to 50% relative humidity at 40°C;· main supply voltage fluctuations not to exceed +/- 10% of thenominal voltage;· other supply voltage fluctuations as stated by the manufacturer;· transient overvoltages according to installation categories;· Pollution Degree 2 in accordance with IEC661Normally non-conductive pollution occurs. Occasionally, however,a temporary conductivity caused by condensation must be expected.EQUIPMENT MAINTENANCEThe battery type is NIMH (Nickel Metal Hydride) part # VFBATBU2Should you need a replacement power supply/charger, or battery, contactyour nearest <strong>Ken</strong>-A-<strong>Vision</strong> dealer.INSTRUCTIONS FOR REPLACEMENT OF CHARGERRemove the connector cable marked battery from the light board. Nextremove the old NIMH battery and properly discard.To replace the NIMH battery simply plug in the cables to the appropriatecolor codes indicated. below. Secure the velcro strips to the battery andaffix to the bottom of your microscope.The power supply/charger are made exclusively for the <strong>Ken</strong>-A-<strong>Vision</strong>Cordless Microscope. Failure to use non-<strong>Ken</strong>-A-<strong>Vision</strong> parts will void thewarranty of your microscope.Note: This equipment has been tested and found to comply with the limitsfor UL Standard 61010A-1.kav.instcman.cordless.pc.v2Part# INS-SC8CCONNECTOR COLOR CODE
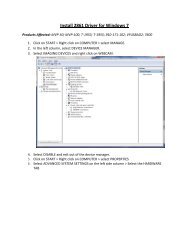
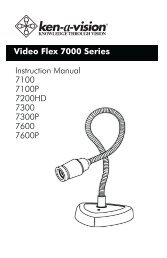
Mechanical Stage (included on model T-1903)The mechanical stage is a mechanical way to move the slide around on yourstage. It consists of a slide holder and two knobs. The knobs are located on sidebelow the stage. One knob moves the slide forward and backward. The otherknob moves the slide from left to right.BULB REPLACEMENTa. Before changing the bulb, make sure that the power switch is off and thepower cord has been disconnected from the main supply.b. On the bottom of your microscope use a slotted screw driver to remove thescrew on the lamp door. Pull open the lamp door and carefully remove the oldlight bulb from the socket by gently pushing in and turning bulb one quarter turncounter clockwise using the lens paper to hold the bulb. Put in new bulb andpush, and turn clockwise .c. Avoid touching the glass surface of the bulb with bare hand. Any oil broughtonto the bulb by the bare hand will negatively affect the heat dissipation andshorten the life of the bulb. Use two fingers and pull the bulb out touching themetal part of the bulb. Clean the bulb surface with alcohol and lens paper if theuser has touched the bulb surface accidentally.e. Specification of the bulb can be found on the surface of the microscope.Replacement bulbs may be purchased on <strong>Ken</strong>-A-<strong>Vision</strong> web site under accessoriesat www.ken-a-vision.comINTERCHANGING THE HEADUsing an allen wrench, insert into arm next to head. Loosen screw to removeplastic dust cap. Set desired microscope head on arm. Tighten screw with allenwrench until snug. No need to over tighten.The 100x Objective lens can be installed simply by removing nosepiece plugfrom hole and screwing 100x Objective into place, until snug.CARE AND MAINTENANCEYour microscope is a fine precision instrument and should be treated with care.When not in use it should be protected from dust by the plastic cover provided.Lenses and eyepieces should be cleaned periodically with optical lens tissuewhich is soft and lint free. Painted surfaces can be cleaned with a moistened cloth.When using a 100xR objective oil emersion lens, be sure not to leave any oilon the lens after use. Dip a cotton swab or lens paper with a small amount ofdenatured alcohol, and clean the lens surface carefully. Do not use aggressivesolvents to clean lens.<strong>Ken</strong>-A-<strong>Vision</strong> has quality technicians on staff to repair or service your microscopes.<strong>Ken</strong>-A-<strong>Vision</strong> recommends service every two years for optimal life of theproduct. Contact us at 1.816.353.4787 for more details.WARRANTY: TEN YEAR LIMITED WARRANTY AGAINST DEFECTIVE PARTS AND WORK-MANSHIP.5615 Raytown Road, Kansas City, MO 64133 U.S.A 816-353-4787 Fax. 816-358-5072Email: info@ken-a-vision.com www.ken-a-vision.compart# INS-SC8Comprehensive ScopSopeInstruction <strong>Manual</strong>T-1901T-1902T-1903T-1901FT-1902FT-1903F
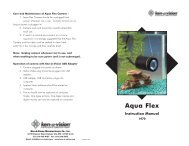
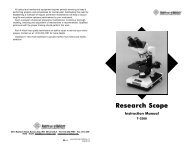
COMPREHENSIVE SCOPEApplicationThe Comprehensive microscope is so versatile it allows you to transform yourmicroscope. Simply add a different head, objective lens and mechanical stagewith Abbe condenser to create a completely different microscope. The contourmetal base is covered with high-density plastic to prevent chipping undernormal use.Catalog# T- 1901 T-1902 T-190310x Widefield Eyepiece w/ pointer • • •Monocular Interchangeable HeadDual View Interchangeable HeadBinocular Interchangeable HeadMICROSCOPE PREPARATIONFor shipping purposes your Comprehensive Microscope has been shippedwith a restraining strap. Please Cut the strap prior to use as you will not needit again.Check the coarse focus tension. The knobs are oversized were designedfor better gripping. The coarse focus knob should turn easily to change thefocus, but the stage should not drift or slip on its own.Check the stage stop safety feature. Be sure the stage moves up anddown when turning the focusing knob. The stage stop is a thumb screw with alock nut found just behind the stage. To check the stop, first place a preparedslide in position for viewing. Move the coarse focus until the object and stageare as close together as they can be. Look at the slide and turn the 40x objectiveinto place. This objective should be very close to the slide, but not touching.••4 Hole Reversed Nosepiece • • •4x, 10x, 40xR Objective lens • •4x, 10x, 40xR, 100xR •Objective lensCoarse and Fine • • •Focal AdjustmentBuilt-in 20 watt Illuminator • • •Built-in Abbe CondenserInterchangeableMechanical StageSPECIFICATIONSContour Base • • •*All models are available with fluorescent lighting (110-volt 5-watt fluorescent lamp)•••OperationBuilt-In IlluminatorTurn off the power switch before connecting the power cord located at therear of the microscope. An in-base illuminator is built into the base of the microscopeand cannot be removed. Bulb replacement can be done from the underneathside. See Bulb Replacement instructions. The built-in 20 watt bayonetincandescent bulb or 5 watt fluorescent provides all the light needed for illumination.Do Not Use Any Other Bulb As It Will Damage The Unit.EyepieceThe widefield eyepiece is locked in to place to avoid loss of eyepiece. Theeyepointer is built-in to the eyepiece.(T-1902) The dual viewing head allows two people to look at the same specimenat the same time or connect a camera to one eyepiece for group presentation.One of the dual viewing eyepieces has a diopter on the tube for focusing. Thisallows focusing for each person’s individual eye correction.(T-1903) The binocular eyepiece has a diopter on both eyetubes for focusing.Interpupiliary Adjustment (included on model T-1903) When using the binocularmicroscope there is an adjustment for the distance between the viewer’s eyescalled interpupiliary adjustment. The eyepiece lenses will spread apart or getcloser together to fit each individual. Place one hand on each side of the binocularhead next to the eyepieces and push in and out until the distance between theeyes is comfortably positioned. You will see one image.FocusPlace a specimen slide under the stage clips or in mechanical stage andmove into position for viewing. Use the 4x objective first. Raise the stage until itwill go no higher. Then lower the stage to bring into focus. Use the fine focusknob to achieve optimum resolution. Once the image is sharp you should be ableto simply turn the nosepiece to the next objective lens and do minor adjustmentswith the fine focus knob.With Coaxial focusing both the coarse and fine focus knobs are on the sameaxis. The coarse focus knob is the larger knob located next to the arm of themicroscope. The fine focus knob is the smaller knob mounted on the outside ofthe coarse focus knob. Having both sets of knobs on the same axis makes it easierto switch from one focus knob to the other without removing your attention fromyour prepared slide.Disk Diaphragm (T-1901 & T-1902)The rotating disk is located under the stage (1=Smallest 6=Largest). Thedifferent sized holes are used to control the amount of light that is projectedupward into the slide. Simply bring one of the five different sized holes in linewith the stage opening. There is no set rule regarding which setting to use witha particular lens.Abbe Condenser 1.25 N.A. (included on model T-1903)The purpose of the condenser lens is to focus the light onto the specimen.(adjust the amount of light needed on a specimen) The N.A. of 1.25 gives it theability to be used with higher magnification 100x objective lens. Movement ofthe condenser is controlled by a lever that moves from side to side.