PRODUCT MANUAL Rada-Presto TF2000/TF2000S/TF2010S
PRODUCT MANUAL Rada-Presto TF2000/TF2000S/TF2010S
PRODUCT MANUAL Rada-Presto TF2000/TF2000S/TF2010S

Create successful ePaper yourself
Turn your PDF publications into a flip-book with our unique Google optimized e-Paper software.
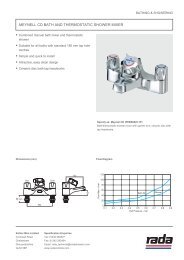
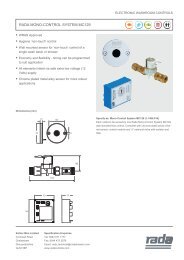
Introduction<strong>Rada</strong>-<strong>Presto</strong> taps are specified to meet the highest standards of safety, comfortand economy as demanded by today’s users. All <strong>Rada</strong> products are designed,manufactured and supported in accordance with accredited BS EN ISO 9001:1994Quality Systems.DescriptionThe taps are vandal-proof 1/2" push action taps suitable for washbasin or wallinstallation. They incorporate an automatic time delayed shut-off, self cleaningmechanism and internal components manufactured from anti-corrosion andanti‐liming materials.Some models incorporate a security "S" cartridge to prevent continuous flow shouldthe push-button be deliberately held down.Product Range<strong>Rada</strong>-<strong>Presto</strong> <strong>TF2000</strong> chrome 1/2" for individual washbasin installation, suppliedwith seat joint, sealing washer, joint and fixing nut. The tap body and push-buttonare chrome plated brass. The blue skirt is for cold water and the red skirt for hotwater.<strong>Rada</strong>-<strong>Presto</strong> <strong>TF2000</strong>S chrome 1/2" for individual washbasin installation, incorporatingthe security "S" cartridge, supplied with seat joint, sealing washer, joint and fixingnut. The tap body and push-button are chrome plated brass. The blue skirt is forcold water and the red skirt for hot water.<strong>Rada</strong>-<strong>Presto</strong> <strong>TF2010S</strong> chrome 1/2" for wall or panel mounting above the basin,incorporating the security "S" cartridge. The tap body and push-button are chromeplated brass. The blue skirt is for cold water and the red skirt for hot water.Safety : Warnings<strong>Rada</strong> products are precision-engineered and should give continued superior andsafe performance, provided:1. They are installed, commissioned, operated and maintained in accordance withthe recommendations given in this Manual.2. Periodic attention is given, as necessary, to maintain the product in good functionalorder. Recommended guidelines are given in section: 'Maintenance'.Provided it is installed, commissioned, operated and maintained within theserecommendations, the risk of failure, if not eliminated, is reduced to the minimumachievable.
Pack ContentsTick the appropriate boxes to familiarize yourself with the part names and toconfirm that the parts are included.<strong>TF2000</strong> /<strong>TF2000</strong>S1 x Sealing Washer1 x Seat Joint1 x Joint1 x <strong>TF2000</strong> or <strong>TF2000</strong>S1 x Fixing Nut1 x Product Manual<strong>TF2010S</strong>1 x Backing Plate1 x <strong>TF2010S</strong>1 x Product Manual
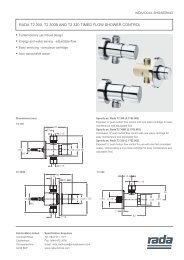
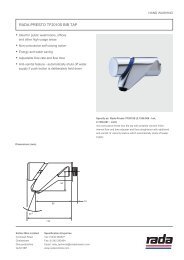
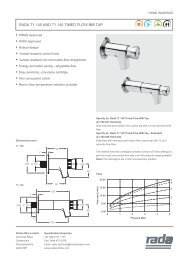
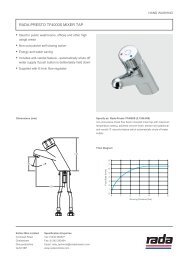
Dimensions<strong>TF2000</strong> / <strong>TF2000</strong>S126 mm66 mm45 mm23°127 mm<strong>TF2010S</strong>50 mm95 mm15 mm20°116 mm
SpecificationsImportant Points:1. The installation, commissioning and maintenance of this product must be carriedout in accordance with instructions given in this Manual, and must be conductedby designated, qualified and competent personnel.2. Installations must comply with all Local/National Water Supply AuthorityRegulations/Bye-laws, and Building and Plumbing (UK: BS6700) Regulations.3. <strong>Rada</strong>-<strong>Presto</strong> products are precision-engineered and should give continuedsuperior and safe performance, provided:• they are installed, commissioned, operated and maintained in accordancewith these recommendations• periodic attention is given as necessary to maintain the product ingood functional order. Recommended guidelines are given in section:'Maintenance'.4. Warning! Continued use of this product in conditions outside the limits listed inthis section can severely affect the performance and reduce the effective servicelife, and can present potential risk to users.Normal Operating Conditions are considered as:• inlet dynamic pressures nominally balanced to within 10% of each otherduring flow• Stop valves with check valves to isolate system supplies.• daily usage of 1-6 hours• installation and usage environment not subject to extremes of temperature,unauthorised tampering or wilful abuse.Operating Parameters:Temperature range:The temperature of stored water should never exceed 65°C. A stored watertemperature of 60°C is considered sufficient to meet all normal requirements andwill minimise the deposition of scale in hard water areas.Pressure:Minimum maintained pressure 0.15 barMaximum maintained pressure 10.0 bar
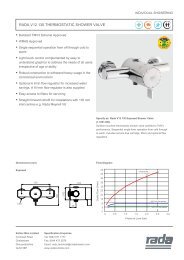
Time cycle:Supplied in position 1, time duration may be decreased in four graduated steps (referto section: 'Commissioning').30High Pressure (with Flow Regulator fitted)Time Duration (secs)25201510500 1 2 3 4 5 6 7 8 9 10Supply Pressure (bar)123430Low Pressure (without Flow Regulator fitted)25Time Duration (secs)201510500 0.5 1.0 1.5 2.0 2.5 3.0Supply Pressure (bar)1234
CommissioningCommissioning must be carried out in accordance with these instructions, and mustbe conducted by designated, qualified and competent personnel.Commissioning Checks1. Check inlet pipework for correct function of stop valves.2. Operate the tap and check:• Flow-rate is sufficient for purpose.• The connection to the supply is watertight.The flow control and flow time are preset at manufacture, however both may beadjusted, see below.Flow Rate Control SettingThe <strong>TF2000</strong>/<strong>TF2000</strong>S and <strong>TF2010S</strong> are factory set to flow position S4, which suppliesapproximately 5 l/min flow at 0.3 bar maintained pressure. Should the installationpressures require adjustment of the flow rate, any one of the five different flow ratepositions, S1 to S5 may be selected, with S5 being the least restrictive. Adjust theflow rate as follows:1. Isolate the water supply. Removethe tap knob and unscrew thehead assembly (refer to section:'Maintenance').2. Remove the head assembly andattached cartridge.3. Turn the adjusting ring (colouredblack on the <strong>TF2000</strong> and green on the<strong>TF2000</strong>S/<strong>TF2010S</strong>) on the cartridgeclockwise or anticlockwise accordingto the flow rate required (refer toillustration and Flow Rate AdjustmentChart).Note! Taps are supplied set in positionS4.4. Install the cartridge and headassembly into the body (refer tosection: 'Maintenance').PositionVisible Aperture10+-Flow Rate ControlSetting AdjustmentS1 S2 S3 S4 S5(Refer to flow curves chart for pressure/flow rates)
Operation<strong>TF2000</strong>The <strong>TF2000</strong> is simple to use. A firm push on the tap knob starts the water flowingfor the duration of the flow timing. The flow timing is factory preset but this can bealtered (refer to section: 'Commissioning'). If the tap knob is pushed again whilstthe tap is flowing a further preset cycle will commence.<strong>TF2000</strong>S and <strong>TF2010S</strong>The <strong>TF2000</strong>S and <strong>TF2010S</strong> are fitted with the security "S" cartridge. The tap isoperated by a firm push on the tap knob, however, flow will not commence until thetap knob is released. The flow timing is factory preset but this can be altered (referto section: 'Commissioning'). If the tap knob is pushed again whilst the water isflowing the flow will cease. The tap knob will have to be released again to achievewater flow.Fault DiagnosisSymptom1. Tap not working (Noflow).Cause/Rectificationa. Check Inlet supplies.b. Remove the cartridge and clean the mechanismunder running water: refer to section: 'Maintenance'for removal.Note! Cartridges may only be cleaned by flushingthrough under a jet of clean water to removelodged particles. Do not descale. Cartridges arenot serviceable, and must not be dismantled.2. Tap will not shut off. a. Check the piston seal for cleanliness.b. Make sure that the spindle spring slides freely inits aperture.Refer to section: 'Maintenance' for removal.3. Tap shuts off tooquickly.a. Check the cleanliness of the sealing cap in thepiston.b. Check the spindle spring for damage.Refer to section: 'Maintenance' for removal.13
LubricantsImportant: Use only silicone-based lubricants on this product. Do not useoil-based or other lubricant types as these may cause rapid deterioration ofseals.Standard silicone-based lubricants may be used on all static seals, and threads, toassist refitting (e.g. Rocol MX22).Maintenance ProceduresMaintenance must be carried out in accordance with these instructions, andmust be conducted by designated, qualified and competent personnel.This tap series is designed for minimal maintenance under conditions of normaluse.Components are precision-made, so care must be taken while servicing to avoiddamage.When ordering spare parts, please state product type, i.e. <strong>Rada</strong>-<strong>Presto</strong> <strong>TF2000</strong>, andidentify part name and number (refer to the Spare Parts List).Protection against freezing: Turn off the incoming supply and push the tap severaltimes to drain the system. Remove cartridge (see Removal).CleaningExternal surfaces may be wiped clean with a soft cloth, and if necessary, a mildwashing-up type detergent or soap solution can be used.Caution! Many household and industrial cleaning products contain mild abrasivesand chemical concentrates, and should not be used on polished, chromed or plasticsurfaces.15
Knob Removal1. Isolate the water supply.2. Insert a 3 mm hexagonal key in the hole in the skirt and engage it in the knobhexagon. Turn it 1/2 a turn anticlockwise against the stop, do not force.3. Remove the hexagonal key from the knob hexagon and pull off the knob.4. Remove the spring (certain models).5. Replacement is the reverse procedure.3 mmHexagonal KeySkirt and Cartridge RemovalKnob Removal1. Isolate the water supply.2. Remove the knob.3. The skirt is a push/pull fit located in the tap body by a protruding dowel. Pull theskirt free of the tap body.4. Unscrew the head nut from the tap body with the special tool or a suitable boxspanner.5. Remove the head assembly and the attached cartridge.6. Replacement is the reverse procedure.Special ToolUpper StopHead NutSkirtSkirt and Cartridge Removal16
Flow Straightener1. Insert the special tool in the flow straightener spout and unscrewanticlockwise.Flow Regulator(Optional)FlowStraightenerSpecial ToolFlow Straightener RemovalFlow Regulator (optional)1. An optional 4 l/min flow regulator is available (refer to section: 'Spare Parts').2. Remove the flow straightener using the special tool (available from CustomerSupport)3. Insert the flow regulator into the back of the flow straightener.4. Install the flow straightener/regulator assembly using the special tool.Flow RegulatorFlow StraightenerFlow Regulator AssemblySpecial Tool17
Spare Parts887.11 Blue skirt (cold)887.12 Red skirt (hot)887.14 Flow straightener/Flow regulator set887.15 Push button (<strong>TF2000</strong>/<strong>TF2010S</strong>)887.16 Cartridge (<strong>TF2000</strong>)887.18 Push button (<strong>TF2000</strong>S/<strong>TF2010S</strong>)887.19 Security "S" Cartridge (<strong>TF2000</strong>S/<strong>TF2010S</strong>)887.29 Spring (<strong>TF2000</strong>S/<strong>TF2010S</strong>)887.15887.18887.29(<strong>TF2000</strong>Sonly)<strong>Rada</strong>-<strong>Presto</strong> <strong>TF2000</strong> and <strong>TF2000</strong>S887.16887.11887.12887.19887.1418
<strong>Rada</strong>-<strong>Presto</strong> <strong>TF2010S</strong>887.19887.11887.12887.29887.18887.14AccessoriesThe Special Tool 887.20 and 3 mm Hexagonal Key are available to aid maintenanceand flow duration adjustment. They are available upon request from CustomerSupport, free of charge.Special Tool with 3 mm Hexagonal Key 887.2019
Customer Care1063825-W2-A(1506)20© Kohler Mira Limited, August 2006