Paisley Pirouette Quilt - Echidna Sewing Products
Paisley Pirouette Quilt - Echidna Sewing Products
Paisley Pirouette Quilt - Echidna Sewing Products

Create successful ePaper yourself
Turn your PDF publications into a flip-book with our unique Google optimized e-Paper software.
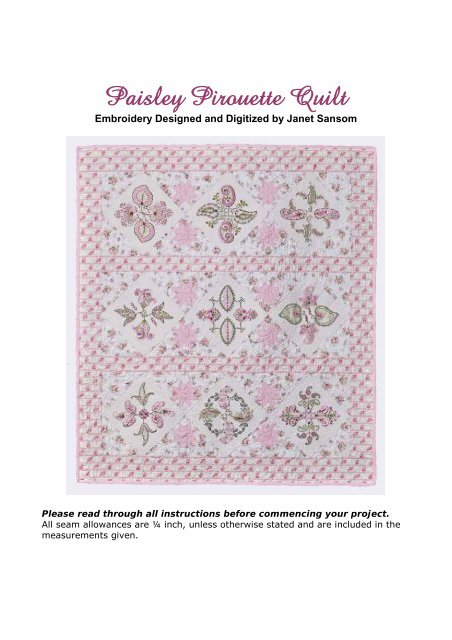
<strong>Paisley</strong> <strong>Pirouette</strong> <strong>Quilt</strong>Embroidery Designed and Digitized by Janet SansomPlease read through all instructions before commencing your project.All seam allowances are ¼ inch, unless otherwise stated and are included in themeasurements given.
General Requirements:Fabric:1 metre, 1.5m wide quilter’s muslin1.6m background fabric1.3m border and strip fabric30cm star fabric50cm binding fabric3 metres backing fabric150cm battingNote: It is recommended that fabrics be 100 per cent cotton, pre-washed andwell ironed. I also recommend that you spray starch the back of each block that isto be embroidered and also apply an iron on paper backing.Cotton Construction Thread80/12 Universal Machine Needle for construction80/12 Embroidery NeedleTearaway StabilizerIron on PaperEmbroidery ThreadsBobbin fillRotary Cutter and Cutting MatWater Soluble Dressmaking PencilSpray starch5½ in Lemoyne Star Template and10½ in embroidery setting square template from Somerset Patchwork & <strong>Quilt</strong>ing– for ordering details, please refer to the information on the last page.<strong>Paisley</strong> <strong>Pirouette</strong> embroidery designs by Janet Sansom.Finished <strong>Quilt</strong> Size: Measures 56” x 50” (142cm x 127cm)Copyright© 2009 Janet Sansom – <strong>Paisley</strong> <strong>Pirouette</strong> <strong>Quilt</strong> 2
Embroidery InstructionsThe embroidery design set comprises of 18 designs, which measure 100 x100mm (4in x 4in). When used for quilt blocks, two designs each are stitchedtwice, to make up nine 200mm (8in) square blocks.Fabric for the embroidered blocks is cut larger than needed due to shrinkage thatoccurs and to allow room for hooping.Cut nine, 12in squares - these will be recut to 10½ in squares after embroidering.TIP: Before cutting each block check to ensure that each one is large enough toaccommodate your hoop.Download the designs to your machine.The designs have already been combined and customised to make the 200mm(8in) square blocks in one hooping for larger hoop machines or two 100mm x200mm (4in x 8in) hoopings for medium hoop machines.For large hoop machines, hoop the prepared fabric with the tearaway stabiliserand stitch out the design. When finished, remove the stabiliser and press theblock, placed face down on a thick towel.For medium hoop machines, please refer to the diagram:Copyright© 2009 Janet Sansom – <strong>Paisley</strong> <strong>Pirouette</strong> <strong>Quilt</strong> 3
Stitch the right hand side of the block marked ‘a’, remove the stabilisers carefully,then press face down on a towel. Re-hoop and stitch the left hand side of theblock marked ‘b’.For smaller hoop machines draw a 100mm x 100mm (4in x 4in) square in thecentre of the prepared fabric. The corners of the drawn square are the positioningpoints for the designs. Continue to draw vertical and horizontal lines out from thesquare to give the axis for embroidery placement as shown in the diagram.Mark the top of the fabric to ensure it is always facing the right way and so thatthe design can be correctly rotated. Stitch out the top right design first. Makesure it is in the correct orientation. Hoop the prepared fabric and tearawaystabiliser making sure that the lines of the fabric square line up with the centrehoop marking. When the first design is finished, remove from the hoop, trim anyjump stitches and gently remove stabilisers. Lay the block face down on a toweland press.Make sure when looking at the block that the first design is to the top right. Rehoopwith the stabiliser for the bottom right corner. Rotate the design and stitchout. Continue this process with the bottom left and then the top left until theblock is complete.Repeat this process to embroider the remaining eight blocks.Copyright© 2009 Janet Sansom – <strong>Paisley</strong> <strong>Pirouette</strong> <strong>Quilt</strong> 4
Press all nine embroidered blocks face down on a thick towel - this preventsflattening the embroidery and then spray starch. Trim all of the embroideredblocks back to 10½ in, making sure that the embroidery is centred.The embroidery cutting squares I used have soft padded feet that raise thetemplate above the work; this ensures there’s no slipping or moving whilecutting. They have centre markings and certainly overcome costly and timelycutting mistakes!Copyright© 2009 Janet Sansom – <strong>Paisley</strong> <strong>Pirouette</strong> <strong>Quilt</strong> 5
<strong>Quilt</strong> InstructionsStarsTo machine piece the stars, place the rotary cut pieces with right sidescarefully together and machine with an accurate ¼” seam allowance. To assistwith set in seams you may choose to place a small dot on the back of your fabricusing the holes provided.To hand piece you can choose to either rotary cut around each template or tracearound with a sharp pencil, mark your ¼” seam allowance through the holesprovided and then draw a seam line between the dots. Using a small runningstitch and following the line, hand stitch, starting and stopping at the dots.Cutting the Five inch stars:Cut a strip of background fabric, 2” wide. From this strip rotary cut squares usingthe template marked 5A.Cut a strip of background, 1” wide. From this strip rotary cut triangles using thetemplate marked 5B.Cut a strip from star fabrics, 1” wide and rotary cut diamonds using thetemplate marked 5C, trim to the exact size of the template.5A2”5 B1 ”5 C1 ”Piecing the stars:Each large Lemoyne star is created using four, template A squares, four templateB triangles and eight template C diamonds. Our star is pieced using one fabric inposition C. You may choose to use more colours or use only the one. You mayCopyright© 2009 Janet Sansom – <strong>Paisley</strong> <strong>Pirouette</strong> <strong>Quilt</strong> 6
also choose to cut your fabrics in such a manner as to take advantage of a designfeature or lines and checks that may appear in the fabric.ACBCWith right sides facing, pin two fabric C diamonds together. Machine stitch usingan accurate ¼” seam, starting a ¼” in from the fabric edge and leaving the seamallowances free at each end. Backstitch 2 stitches at the start and finish ofeach line. To help with the placement of starts and finishes, draw a dot onto theback of your fabrics through the holes provided in the templates.BCBBSet in triangle B: Stitch B in place by starting at the outside edge and stitchingtowards the centre, stopping ¼” from the edge (or at the dot), backstitch twostitches. Do not stitch into the seam allowances.Lift the fabric out of the machine to rotate. Realign the triangle, and stitch fromthe centre dot towards the outer edge. Make sure that you have left the seamsfree.Construct four of these units. Stitch two units together and set in a squaretemplate A. This is done the same way as the triangle B. Start from the outsideedge, sew towards the middle using a ¼” seam, remove the fabric from themachine, then start in the middle and sew towards the outer edge.Copyright© 2009 Janet Sansom – <strong>Paisley</strong> <strong>Pirouette</strong> <strong>Quilt</strong> 7
Join together two halves and set in the final two squares (A) in the same manneras before.ACBCAYou will need to create a total of 12, 5” Lemoyne star blocks.<strong>Quilt</strong> construction:Strips: Cut 2 strips from the border fabric 3¼ in x 42¾ in.Corners: Cut 6 squares 7 7/8in x 7 7/8in from the background fabric and cut inhalf diagonally.Triangles attached to the stars: Cut 12, squares 4 3/8in x 4 3/8in from thebackground fabric and cut in half diagonally.Using the layout diagram below as a guide, join the blocks together in rows andpress the seams of each row to the outside of the quilt. Stitch the rows together,carefully abutting the seams and matching the intersections.Copyright© 2009 Janet Sansom – <strong>Paisley</strong> <strong>Pirouette</strong> <strong>Quilt</strong> 8
Border:A striped fabric was used and the stripes were used vertically on every side of thequilt, with the stripes being matched to the two strips.Cut 2 borders 4½ in x 48in for the top and bottom and 2 borders to measure4½in x 50¾ in. Stitch the top and bottom borders to the quilt and then, stitch thetwo side borders to the quilt.Backing:Cut the backing fabric into two equal lengths, remove the selvedges, sew themside-by-side and press the seam open. To enable machine quilting, the backingand batting need to be 10cm (4”) bigger than the quilt top on every side.Copyright© 2009 Janet Sansom – <strong>Paisley</strong> <strong>Pirouette</strong> <strong>Quilt</strong> 9
<strong>Quilt</strong>ing:This quilt was machine quilted by Desley Regan of Addicted to <strong>Quilt</strong>s, whostippled around the embroidered blocks and used a continuous feather motifthroughout the remainder of the quiltBinding:Cut 2½ in (6.5cm) strips for the binding. Join the strips together to form one longpiece. Fold in half down the length with the wrong sides together. Align the rawedges of the binding and sew in place using a ¼in seam allowance. Attach thebinding to the quilt with a walking foot, mitring the corners as you go. Turn thefolded edge to the back and hand stitch in place along the previous stitching line.Fabric kits are available for this quilt together with the 10½ in embroidery settingsquare template, (price: AU $21.50 plus postage) and 5in Lemoyne Startemplates (price: AU $7.00 plus postage) exclusively from Somerset Patchwork &<strong>Quilt</strong>ing, 491 High Street Road, Mt Waverley Vic 3149. Phone (03) 9807 3399,email sales@somersetpatchwork.com.au or visit www.somersetpatchwork.com.auDesley Regan from Addicted to <strong>Quilt</strong>s can be contacted by emaildesley@addictedtoquilts.com.au or phone (03) 9833 3320.This quilt was constructed by Bronwyn van’t Hof of Flying Clog Creations and canbe contacted on 0419 567 040 or email: flyingclogcreations@iinet.net.auHappy <strong>Quilt</strong>ing and Embroidering,Janet SansomCopyright© 2009 Janet Sansom – <strong>Paisley</strong> <strong>Pirouette</strong> <strong>Quilt</strong> 10