HP - Laserjet 6P - BSCW Shared Workspace Server
HP - Laserjet 6P - BSCW Shared Workspace Server
HP - Laserjet 6P - BSCW Shared Workspace Server

Create successful ePaper yourself
Turn your PDF publications into a flip-book with our unique Google optimized e-Paper software.
Service Supplement<br />
<strong>HP</strong> LaserJet 5P / 5MP /<br />
<strong>6P</strong> / 6MP Printer<br />
(C3150A / C3155A /<br />
C3980A / C3982A)
Contents<br />
Overview . . . . . . . . . . . . . . . . . . . . . . . . . . . . . 1<br />
Product Information . . . . . . . . . . . . . . . . . . . . . . 2<br />
Key Printer Locations and Parts. . . . . . . . . . . . . . . . 3<br />
Model and Serial Numbers . . . . . . . . . . . . . . . . . . 4<br />
Product Specifications . . . . . . . . . . . . . . . . . . . . 5<br />
<strong>HP</strong> LaserJet 5P/5MP . . . . . . . . . . . . . . . . . . . . . 5<br />
<strong>HP</strong> LaserJet <strong>6P</strong>/6MP . . . . . . . . . . . . . . . . . . . . . 6<br />
Location Space Requirements . . . . . . . . . . . . . . . . . 7<br />
Documentation and Software . . . . . . . . . . . . . . . . 8<br />
Documentation . . . . . . . . . . . . . . . . . . . . . . . . . 8<br />
Software . . . . . . . . . . . . . . . . . . . . . . . . . . . . 9<br />
New Product Features . . . . . . . . . . . . . . . . . . . . . 10<br />
The <strong>HP</strong> LaserJet 5P/5MP Status Panel . . . . . . . . . . . 10<br />
The <strong>HP</strong> LaserJet <strong>6P</strong>/6MP Status Panel . . . . . . . . . . . 11<br />
Status Panel Buttons . . . . . . . . . . . . . . . . . . . . . 12<br />
Status Panel Lights . . . . . . . . . . . . . . . . . . . . . . 13<br />
Common LED patterns . . . . . . . . . . . . . . . . . . . . 14<br />
Paper Movement Overview . . . . . . . . . . . . . . . . . . 17<br />
Infrared Communication . . . . . . . . . . . . . . . . . . . 19<br />
To Print Using the Infrared Port . . . . . . . . . . . . . . . 22<br />
Troubleshooting IR Printing Problems . . . . . . . . . . . . 24<br />
Interface Connections . . . . . . . . . . . . . . . . . . . . . 27<br />
The Parallel Printer Interfaces . . . . . . . . . . . . . . . . 28<br />
Resource Saving . . . . . . . . . . . . . . . . . . . . . . . . 29<br />
I/O Buffering . . . . . . . . . . . . . . . . . . . . . . . . . . 30<br />
Reprinting Jammed Pages . . . . . . . . . . . . . . . . . . 31<br />
Service Mode, PJL Defaults . . . . . . . . . . . . . . . . . 32<br />
Test Pages and Resets . . . . . . . . . . . . . . . . . . . . . 34<br />
Printing a Self-Test Page . . . . . . . . . . . . . . . . . . . 35<br />
Life Expectancy of Consumables . . . . . . . . . . . . . . 40<br />
Removal and Replacement . . . . . . . . . . . . . . . . . . 41<br />
Overview . . . . . . . . . . . . . . . . . . . . . . . . . . . . 41<br />
Required Tools . . . . . . . . . . . . . . . . . . . . . . . . . 42<br />
Removing the Power Door . . . . . . . . . . . . . . . . . . . 43<br />
Removing the I/O Cover . . . . . . . . . . . . . . . . . . . . 43<br />
Removing the Left Side Cover . . . . . . . . . . . . . . . . . 45<br />
Removing the Top Cover . . . . . . . . . . . . . . . . . . . . 46<br />
Removing the Tray 1 Pickup Assembly . . . . . . . . . . . . 49<br />
Removing the Formatter Board and Shield . . . . . . . . . 52<br />
Removing the Fusing Assembly . . . . . . . . . . . . . . . . 55<br />
Removing the DC Controller Assemblies . . . . . . . . . . . 56<br />
iii
Troubleshooting . . . . . . . . . . . . . . . . . . . . . . . 60<br />
Continuable Data Error Light Patterns . . . . . . . . . . . 62<br />
Error 53 -- Memory/SIMM Errors . . . . . . . . . . . . . . 65<br />
Fatal/Service Errors . . . . . . . . . . . . . . . . . . . . . 67<br />
Infrared Port Not Responding . . . . . . . . . . . . . . . . 73<br />
Using the Infrared Test Tool . . . . . . . . . . . . . . . . . 73<br />
Parts and Diagrams . . . . . . . . . . . . . . . . . . . . . . 75<br />
Ordering Parts . . . . . . . . . . . . . . . . . . . . . . . . 76<br />
Ordering Consumables . . . . . . . . . . . . . . . . . . . . 77<br />
Parts Index . . . . . . . . . . . . . . . . . . . . . . . . . . . 94<br />
Alphabetical Parts Index . . . . . . . . . . . . . . . . . . . 94<br />
Numerical Parts Index . . . . . . . . . . . . . . . . . . . . 100<br />
Accessories . . . . . . . . . . . . . . . . . . . . . . . . . . . 106<br />
iv
Overview<br />
The <strong>HP</strong> LaserJet 5P/5MP and <strong>6P</strong>/6MP printers (<strong>HP</strong> Product<br />
Numbers C3150A/C3155A, and C3980A/C3982A) have many<br />
service and repair processes in common with their predecessors,<br />
the <strong>HP</strong> LaserJet 4L/4ML and 4P/4MP printers. These processes<br />
are documented in the Combined Service Manual for the <strong>HP</strong><br />
LaserJet 4L/4ML (C2003A/C2015A) <strong>HP</strong> LaserJet 4P/4MP<br />
(C2005A/C2040A). The purpose of this appendix is to provide<br />
supplemental service information that is unique to the <strong>HP</strong><br />
LaserJet 5P/5MP and <strong>6P</strong>/6MP printers.
<strong>HP</strong> LaserJet 5P/5MP, <strong>6P</strong>/6MP Printer Service Supplement<br />
Product Information<br />
Product Information<br />
Printer Features<br />
Features <strong>HP</strong> LaserJet 5P/5MP <strong>HP</strong> LaserJet <strong>6P</strong>/6MP<br />
Print Speed 6 PPM 8 PPM<br />
Text & Graphics Resolution 600 dpi; plus Resolution Enhancement<br />
Technology (REt)<br />
Printer Languages<br />
<strong>HP</strong> LaserJet 5P and <strong>6P</strong><br />
<strong>HP</strong> LaserJet 5MP and 6MP<br />
Enhanced PCL 5<br />
PostScript Level 2 1<br />
Enhanced PCL 5<br />
600 dpi; plus Resolution Enhancement<br />
Technology (REt)<br />
PCL 6<br />
PostScript Level 2 1<br />
PCL 6<br />
Monthly Usage (pages) Up to 12,000 Up to 12,000<br />
Memory:<br />
<strong>HP</strong> LaserJet 5P and <strong>6P</strong><br />
<strong>HP</strong> LaserJet 5MP and 6MP<br />
2MByte on-board standard memory<br />
3MByte on-board standard memory<br />
Tray 1 Capacity 100 100<br />
Tray 2 Capacity 250 250<br />
Output Tray capacity 100 100<br />
Internal Typefaces<br />
<strong>HP</strong> LaserJet 5P and <strong>6P</strong><br />
LaserJet 5MP and 6MP<br />
45 PCL<br />
45 PCL, 35 PS<br />
Standard Interfaces 2 Parallel (B connector, C connector)<br />
1 LocalTalk<br />
1 SIR<br />
2 MByte on-board standard memory<br />
3 MByte on-board standard memory<br />
45 PCL<br />
45 PCL 35 PS<br />
Power Control Power switch Power switch<br />
NVRAM Yes Yes<br />
Status Panel 2 Buttons<br />
5 LEDs<br />
Economode (toner saving) yes yes<br />
Min. Paper Size<br />
(using flat paper path)<br />
3 x 5 inch<br />
(76 x 127mm)<br />
1 SIMM includes 1 MByte additional memory.<br />
2<br />
2 Parallel (B connector, C connector)<br />
1 LocalTalk<br />
1 Infrared (wireless) port<br />
2 Buttons<br />
5 LEDs<br />
3 x 5 inch<br />
(76 x 127mm)
<strong>HP</strong> LaserJet 5P/5MP, <strong>6P</strong>/6MP Printer Service Supplement<br />
Product Information<br />
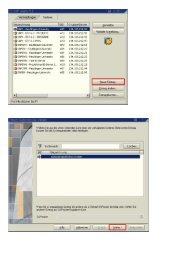
Key Printer Locations and Parts.<br />
Figure 1 Front View (5P/5MP shown)<br />
1. Top Status Panel 5. Infrared Port and Status Light<br />
2. Top Output Tray 6. Removable Side Panel<br />
3. Tray 1 - MultiPurpose Tray 7. Interface Cable Door<br />
4. Tray 2 - 250-sheet Paper Cassette<br />
Figure 2 Rear View (5P/5MP shown)<br />
1. Top Cover Release Button 3. Serial Number Label<br />
2. Rear Output Tray 4. Power Cable Door<br />
5. On/Off Button<br />
3
<strong>HP</strong> LaserJet 5P/5MP, <strong>6P</strong>/6MP Printer Service Supplement<br />
Product Information<br />
Model and Serial Numbers<br />
The model number and serial numbers are listed on identification<br />
labels located on the rear of the printer. The model numberd are<br />
alphanumeric:<br />
• <strong>HP</strong> LaserJet 5P C3150A<br />
• <strong>HP</strong> LaserJet 5MP C3155A<br />
• <strong>HP</strong> LaserJet <strong>6P</strong> C3980A<br />
• <strong>HP</strong> LaserJet 6MP C3982A<br />
The serial number contains information about the Country of<br />
Origin, the Revision Level, the Production Code, and production<br />
number of the printer.<br />
The rear labels also contain power rating and regulatory<br />
information as shown in Figure 3.<br />
Figure 3 Sample Model and Serial Number Labels (5P/5MP shown)<br />
4
<strong>HP</strong> LaserJet 5P/5MP, <strong>6P</strong>/6MP Printer Service Supplement<br />
Product Specifications<br />
Product Specifications<br />
<strong>HP</strong> LaserJet 5P/5MP<br />
Physical Dimensions<br />
Width 15.79 in. (401 mm)<br />
Depth 17.38 in. (441.7mm)<br />
Height 7.92 in. (201.1mm)<br />
Weight 15.4 lbs. (7 kg)<br />
Electrical Specifications<br />
Power Requirements 100/120V (+/- 10%) 50/60Hz (+/- 2Hz)<br />
127 Volts NOM<br />
Power Consumption (typical for <strong>HP</strong><br />
LaserJet 5P and <strong>HP</strong> LaserJet 5MP)<br />
Minimum recommended circuit<br />
capacity<br />
Temperature<br />
(printer and toner cartridge)<br />
220/240V (+/- 10%) 50 Hz (+/- 2Hz)<br />
During printing - 165 W (average) During printing - 165 W (average)<br />
During standby – 5W (instant power<br />
save)<br />
During power save mode - 5 W<br />
4 Amps 1.8 Amps<br />
Environmental Specifications<br />
During standby – 5W (instant power<br />
save)<br />
During power save mode - 5 W<br />
Item Operating Printing Storage/Standby<br />
59° to 89° F (15° to 32.5° C) -4° to 104° F (-20° to 40° C)<br />
Relative humidity 10% to 80% 10% to 90%<br />
Acoustic Emissions (Per ISO 9296)<br />
Operator Position Bystander (1m) Sound Power<br />
Printing LpAm 52dB(A) LpAm 46dB(A) LWAd 6.0 bels(A)<br />
Power Save* LpAm
<strong>HP</strong> LaserJet 5P/5MP, <strong>6P</strong>/6MP Printer Service Supplement<br />
Product Specifications<br />
<strong>HP</strong> LaserJet <strong>6P</strong>/6MP<br />
Physical Dimensions<br />
Height 7.87 in (200 mm)<br />
Width 15.75 in (400 mm)<br />
Depth (body) 17.52 in (445 mm)<br />
Weight 15.4 lbs. (7 kg)<br />
Electrical Specifications<br />
Power Requirements 100/120V (+/- 10%) 50/60Hz (+/- 2Hz)<br />
127 Volts NOM<br />
Power Consumption (typical for <strong>6P</strong><br />
and 6MP)<br />
Minimum recommended circuit<br />
capacity<br />
Temperature<br />
(printer and toner cartridge)<br />
220/240V (+/- 10%) 50/60 Hz (+/- 2Hz)<br />
During printing – 175 W (average) During printing – 175 W (average)<br />
During standby – 8 W (instant power<br />
save)<br />
During power save mode – 8 W<br />
5 Amps 2.4 Amps<br />
Environmental Specifications<br />
During standby – 8 W (instant power<br />
save)<br />
During power save mode – 8 W<br />
Item Operating Printing Storage/Standby<br />
59° to 89° F (15° to 32.5° C) -4° to 104° F (-20° to 40° C)<br />
Relative humidity 10% to 80% 10% to 90%<br />
Acoustic Emissions (Per ISO 9296)<br />
Printer State Operator Position Bystander (1m) Sound Power<br />
Printing LpAm 54dB(A) LpAm 48dB(A) LWAd 6.3 bels(A)<br />
Power Save* LpAm
<strong>HP</strong> LaserJet 5P/5MP, <strong>6P</strong>/6MP Printer Service Supplement<br />
Product Specifications<br />
Location Space Requirements<br />
Figure 4. Location Space Requirements<br />
Make sure there is adequate space for:<br />
• Opening top cover (A)<br />
• Opening Tray 1 (B)<br />
• Loading Tray 2 (C)<br />
• Extending rear output tray (D)<br />
7
<strong>HP</strong> LaserJet 5P/5MP, <strong>6P</strong>/6MP Printer Service Supplement<br />
Documentation and Software<br />
Documentation and Software<br />
Documentation<br />
You can order the documents listed below. There is a charge for<br />
some documents.<br />
Table 1. Related Documentation<br />
Title Part Number<br />
The PCL/PJL Technical Reference Package contains the following documents* 5961-0601<br />
• PCL5 Printer Language Technical Reference Manual. Explains the PCL 5 printer<br />
language for experienced users and programmers.<br />
• Printer Job Language Technical Reference Manual. Explains <strong>HP</strong>’s Printer Job<br />
Language (PJL) for experienced users and programmers.<br />
• PCL/PJL Technical Quick Reference Guide.<br />
• PCL Comparison Guide. Describes the different implementation of commands<br />
and extensions across the printer family supporting PJL and PCL 5.<br />
<strong>HP</strong> LaserJet 5P/5MP Printer User’s Manual (English) C3150-90901<br />
<strong>HP</strong> LaserJet 5MP Macintosh Notes* (included with <strong>HP</strong>LaserJet 5MP Printer and optional<br />
Adobe PostScript Level 2 SIMM)<br />
C3155-90901<br />
<strong>HP</strong> LaserJet Printer Family Paper Specification Guide* 5010-6394<br />
<strong>HP</strong> LaserJet <strong>6P</strong>/6MPPrinter User’s Manual (English) C3980-90968<br />
<strong>HP</strong> LaserJet Family Quick Service Reference Guide 5010-6395<br />
* This item must be ordered through <strong>HP</strong> Parts Direct Ordering, (800) 227-8164.<br />
Outside the U.S., see the ordering information in "Parts and Diagrams" later in<br />
this chapter.<br />
8
<strong>HP</strong> LaserJet 5P/5MP, <strong>6P</strong>/6MP Printer Service Supplement<br />
Documentation and Software<br />
Software<br />
The following table lists the software that is shipped with each<br />
printer.<br />
<strong>HP</strong> LaserJet 5P C3150A<br />
• The <strong>HP</strong> LaserJet 5P DOS Utilities and DOS Printer Drivers diskette. The DOS utilities<br />
include a Status Monitor and Remote Control Panel. The DOS printer drivers<br />
include WordPerfect (versions 5.1, 5.1+, and 6.0) and Lotus 1-2-3 (versions 2.3,<br />
2.4, 3.1 and 3.4).<br />
• The <strong>HP</strong> LaserJet Printing System for Microsoft Windows 3.1 and 3.11 contains<br />
the PCL drivers and the <strong>HP</strong> FontSmart utility for font management.<br />
<strong>HP</strong> LaserJet 5MP C3155A<br />
• The <strong>HP</strong> LaserJet 5MP Printer Software for Macintosh. Supports System 6.07 to 7.5.<br />
• The PostScript Printer Software for Windows 3.1 and 3.11 includes the PostScript<br />
drivers and the <strong>HP</strong> FontSmart utility for font management.<br />
<strong>HP</strong> LaserJet <strong>6P</strong> C3980A<br />
• The <strong>HP</strong> LaserJet <strong>6P</strong> DOS Utilities diskette. The DOS utilities include a Status<br />
Monitor and Remote Control Panel software.<br />
• The <strong>HP</strong> LaserJet Printing Software for Windows 3.x and Windows 95 contains the<br />
Standard (PCL) driver, Enhanced (PCL XL) driver, <strong>HP</strong> FontSmart, toolbox utilities,<br />
and a software deinstaller.<br />
<strong>HP</strong> LaserJet 6MP C3982A<br />
• The <strong>HP</strong> LaserJet <strong>6P</strong> DOS Utilities diskette. The DOS utilities include a Status<br />
Monitor and Remote Control Panel software.<br />
• The <strong>HP</strong> LaserJet Printing Software for Windows 3.x and Windows 95 contains the<br />
PostScript drivers (both Windows 3.x and Windows 95) in addition to the Standard<br />
(PCL) driver, Enhanced (PCL XL) driver, <strong>HP</strong> FontSmart, toolbox utilities, and a<br />
software deinstaller.<br />
• The <strong>HP</strong> LaserJet 6MP Printer Software for Macintosh (supports System 6.07 to<br />
7.5)<br />
9
<strong>HP</strong> LaserJet 5P/5MP, <strong>6P</strong>/6MP Printer Service Supplement<br />
New Product Features<br />
New Product Features<br />
The <strong>HP</strong> LaserJet 5P/5MP Status Panel<br />
This <strong>HP</strong> LaserJet printer has been designed to be controlled<br />
mainly by software. However, some simple functions are also<br />
available from the status panel. You also receive status<br />
information about the operation of the IrDA-compatible infrared<br />
(IR) port from the status light just above the port (for more<br />
information, see “To Print Using the Infrared Port,” later in this<br />
appendix).<br />
Figure 5 5P/5MP Status Panel Buttons and Lights<br />
1. RESET button 5. DATA status light<br />
2. ERROR status light 6. READY status light<br />
3. TRAY 1 status light 7. GO button<br />
4. TRAY 2 status light 8. IR port status light<br />
The Status Panel consists of two buttons for completing tasks and<br />
six lights that indicate the status of the printer (see Figure 5).<br />
10<br />
1<br />
2
<strong>HP</strong> LaserJet 5P/5MP, <strong>6P</strong>/6MP Printer Service Supplement<br />
New Product Features<br />
The <strong>HP</strong> LaserJet <strong>6P</strong>/6MP Status Panel<br />
The status panel on the <strong>HP</strong> LaserJet <strong>6P</strong>/6MP printer differs<br />
slightly from the 5P/5MP printer. The status lights for Tray 1 and<br />
Tray 2 have been moved from top status panel down to the front of<br />
the printer. These status lights are now located next to the trays.<br />
In addition, the Reset button has been replaced by the Job Cancel<br />
button.<br />
Figure 6 <strong>6P</strong>/6MP Status Panel Buttons and Lights<br />
1. JOB CANCEL button 5. GO button<br />
2. ERROR (back) light 6. TRAY 1 (top) status light<br />
3. DATA (middle) light 7. TRAY 2 empty light<br />
4. READY (front) light 8. IR (bottom) status light<br />
The Status Panel consists of two buttons for completing tasks and<br />
six lights that indicate the status of the printer (see Figure 6).<br />
11
<strong>HP</strong> LaserJet 5P/5MP, <strong>6P</strong>/6MP Printer Service Supplement<br />
New Product Features<br />
Status Panel Buttons<br />
The <strong>HP</strong> LaserJet 5P/5MP printer has two buttons: GO and<br />
RESET.<br />
The <strong>HP</strong> LaserJet <strong>6P</strong>/6MP printer has two buttons: GO and<br />
JOB CANCEL.<br />
Pressing the GO button:<br />
• Tells the printer to resume printing.<br />
• Prints a demo page. The printer must be in Ready Mode (the<br />
green Ready light on steady).<br />
• Prints a self-test page when pressed simultaneously with the<br />
RESET button (JOB CANCEL button on the <strong>6P</strong>/6MP. The<br />
printer must be in Ready Mode (the green Ready light on<br />
steady).<br />
• Prints unprinted data in the printer’s memory (the Ready and<br />
Data lights are both on steady).<br />
Pressing the RESET button: (available on 5P/5MP)<br />
• Clears incomplete print jobs from the printer’s memory.<br />
• Clears errors.<br />
• Removes all temporary fonts and macros.<br />
• Returns all printer settings to the default values that you<br />
selected.<br />
Pressing the JOB CANCEL button: (available on the<br />
<strong>6P</strong>/6MP)<br />
• Press to cancel a job that the printer is currently printing. The<br />
top status panel lights will cycle while the printer memory is<br />
being cleared, and then return to a ready state (front light on).<br />
The printer will continue receiving data until the job is<br />
complete. This data will be discarded. This may take a while,<br />
depending on the size of the print job.<br />
• If JOB CANCEL is accidentally pushed, the job must be<br />
reprinted. There is no undo function.<br />
• If JOB CANCEL is pushed when the printer is idle, the top<br />
panel status lights will cycle, but nothing else will happen.<br />
12
<strong>HP</strong> LaserJet 5P/5MP, <strong>6P</strong>/6MP Printer Service Supplement<br />
New Product Features<br />
Status Panel Lights<br />
There are six Status Panel lights on the printer:<br />
• ERROR • TRAY 1<br />
• DATA • TRAY 2<br />
• READY • IR Status<br />
These lights indicate the current status of the printer by<br />
displaying an amber or a green hue and flashing individually or<br />
sequentially as a group (cascading).<br />
ERROR (amber)<br />
Indicates an error condition, such as a paper jam, missing toner<br />
cartridge, or the printer’s top cover is open.<br />
DATA (green)<br />
When the Data light is on, the printer is printing. When the Ready<br />
light and the Data light are both on, the printer still has unprinted<br />
data in its memory. Either press GO to print the remaining data,<br />
or press RESET/JOB CANCEL to clear the data from the printer’s<br />
memory.<br />
READY (green)<br />
The printer is in Ready Mode when the Ready light is on. If the<br />
light is flashing, the printer is currently receiving data or in the<br />
process of printing.<br />
TRAY 1 (amber)<br />
Tray 1 (the MP tray) is empty. Add paper to Tray 1. When the<br />
Tray 1 light is flashing, the printer is waiting for paper to be<br />
manually fed into Tray 1. Once you have inserted the paper, you<br />
must press the GO button to feed the paper.<br />
TRAY 2 (amber)<br />
Tray 2 (the Paper Cassette) is empty. Add paper to Tray 2.<br />
13
<strong>HP</strong> LaserJet 5P/5MP, <strong>6P</strong>/6MP Printer Service Supplement<br />
New Product Features<br />
IR Port Status Light (green)<br />
The status light above the IR port indicates the current status of<br />
the IR port by displaying a green hue. This status light comes on<br />
when a connection has been established with the IR port. The<br />
other Status Panel lights operate the same for the IR port as they<br />
do for any other port on the printer.<br />
Common LED patterns<br />
The following chart shows the light patterns for normal<br />
<strong>HP</strong> LaserJet 5P/5MP and <strong>6P</strong>/6MP printer states. If the Error light<br />
is on, the printer is experinecing an error. Error messages are<br />
listed later in this appendix.<br />
14<br />
Light Pattern<br />
5P/5MP <strong>6P</strong>/6MP<br />
Description<br />
The printer is in Ready Mode and is ready to print.<br />
Press the GO button to print a demo page. Press the<br />
GO and RESET/JOB CANCEL buttons to print a selftest<br />
page.<br />
The printer has received data. If the Ready light is<br />
flashing, the printer is processing the data—wait for<br />
the next page to be printed.
<strong>HP</strong> LaserJet 5P/5MP, <strong>6P</strong>/6MP Printer Service Supplement<br />
New Product Features<br />
Light Pattern<br />
5P/5MP <strong>6P</strong>/6MP<br />
Description<br />
If the Data light and the Ready light are both on for an<br />
extended period of time (the Ready light does not<br />
begin to flash), press the GO button to print the data in<br />
the printer. A page may take a long time to print if, for<br />
example, the page contains complex text or graphics.<br />
If each light briefly turns on and off, in sequence, the<br />
printer is warming up, processing a self test, or<br />
canceling a print job.The lights will continue to<br />
“cascade” until the printer is ready to print.<br />
Tray 1 (the MP Tray) is empty. Add paper to the tray.<br />
15
<strong>HP</strong> LaserJet 5P/5MP, <strong>6P</strong>/6MP Printer Service Supplement<br />
New Product Features<br />
16<br />
Light Pattern<br />
5P/5MP <strong>6P</strong>/6MP<br />
Description<br />
If the Tray 1 light is flashing, the printer is waiting for<br />
paper to be manually fed into Tray 1. Once you have<br />
inserted the paper, you must press the GO button to<br />
feed the paper.<br />
Tray 2 (the Paper Cassette) is empty. Add paper to the<br />
tray.<br />
When the IR port status light is on, a connection has<br />
been established. If you are printing to the IR port and<br />
the status light does not come on, make sure the<br />
printer is in Ready Mode and that the IR port you are<br />
printing from is within range of operation and is IrDAcompliant.<br />
If you continue to have trouble printing,<br />
refer to the “Infrared Port Not Responding” table, later<br />
in this section.
<strong>HP</strong> LaserJet 5P/5MP, <strong>6P</strong>/6MP Printer Service Supplement<br />
New Product Features<br />
Paper Movement Overview<br />
The paper feed system picks print media automatically from<br />
Tray 1 or Tray 2 and delivers it to the image formation system at<br />
precisely the right time. The system then feeds the media to the<br />
fusing station, and delivers the finished product to the output<br />
position, either the face-down output tray on top of the printer, or<br />
through the face-up delivery slot at the rear of the printer. The<br />
output path is user-selectable by opening the rear output tray.<br />
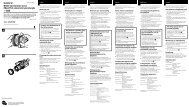
Figure 7 shows the possible paper paths and locations of the<br />
various solenoids, photosensors and rollers.<br />
17
<strong>HP</strong> LaserJet 5P/5MP, <strong>6P</strong>/6MP Printer Service Supplement<br />
New Product Features<br />
PS 3<br />
DC Controller PCA<br />
Figure 7 <strong>HP</strong> LaserJet 5P/<strong>6P</strong> Printer Paper Path<br />
18<br />
PS1 Input Paper Sensor Input Paper Sensor (PS1) Positions:<br />
PS2 Tray 2 Paper Out Sensor A = Manual Feed Sense Position<br />
PS3 Exit Paper Sensor B = Registration Sense Position<br />
PS4 Winding Paper Sensor C = TOP Sense Position<br />
PS5 Tray 1 Paper Out Sensor SL1 Tray 2 Solenoid<br />
SL2 Tray 1 Solenoid
<strong>HP</strong> LaserJet 5P/5MP, <strong>6P</strong>/6MP Printer Service Supplement<br />
New Product Features<br />
Infrared Communication<br />
The <strong>HP</strong> LaserJet 5P/5MP and <strong>6P</strong>/6MP printers are equipped with<br />
an Infrared Datalink Association (IrDA) compliant port. The IrDA<br />
specification allows “wireless” transmission of print data between a<br />
wide variety of hosts (primary) and peripheral (secondary) devices.<br />
A primary device -- such as a PC or laptop computer -- is capable of<br />
reading and writing data to another primary device or writing to a<br />
secondary device, such as a printer. Secondary devices are<br />
read-only; they cannot initiate their own communication, and can<br />
only respond to a host command when properly addressed.<br />
The IR port works by receiving data similarly to a serial port, but<br />
without a cable. The port’s speed depends on the printer model:<br />
• <strong>HP</strong> <strong>Laserjet</strong> 5P/5MP printer<br />
• 115 k bits per second<br />
• <strong>HP</strong> <strong>Laserjet</strong> <strong>6P</strong>/6MP printer<br />
• up to 4 megabits per second<br />
When the IR connection is established, the status light comes on. If<br />
the connection is broken or when the print job is complete, the<br />
status light goes off.<br />
The IrDA protocol uses a transceiver chip in both devices to send<br />
and receive data packets. The packets are checked for validity, and<br />
a response is sent by the secondary device indicating whether the<br />
packets were complete or in error.<br />
The IrDA protocol is contained in three layers:<br />
• The physical electronics are the hardware elements in each<br />
device for sending and receiving the data.<br />
• The Link Access Protocol (LAP) layer controls the physical<br />
layer, packetizes/unpacketizes data, and sets transmission rates.<br />
• The Link Management Protocol (LMP) layer routes data to and<br />
from the host operating system (DOS/Windows).<br />
The data flow is shown in Figure 8.<br />
19
<strong>HP</strong> LaserJet 5P/5MP, <strong>6P</strong>/6MP Printer Service Supplement<br />
New Product Features<br />
The LAP and LMP layers can reside in either firmware, software,<br />
or a combination of both. There are different LAP and LMP<br />
protocols for primary and secondary devices.<br />
The <strong>HP</strong> LaserJet 5P/5MP and <strong>6P</strong>/6MP printers have the complete<br />
secondary protocol, and any host trying to communicate via the<br />
infrared (IR) port must have the complete primary protocol installed.<br />
The primary protocol software is the responsibility of the host supplier.<br />
It is not provided by Hewlett-Packard Company with the printer.<br />
IrDA communications can be obtained either via an internal IR<br />
port or an external IR accessory. Several manufacturers offer<br />
complete accessory upgrades for both host and peripheral devices.<br />
Application<br />
GDI DDI<br />
Ptr DVR<br />
IRLMP<br />
IRLAP<br />
IR Physical<br />
Transmitter<br />
Receiver<br />
primary<br />
device<br />
Figure 8. IR Data Flow.<br />
20<br />
ASCII Data<br />
Windows<br />
System<br />
Standard<br />
LJ Printer Driver<br />
Windows<br />
(SW)<br />
IR<br />
(Software)<br />
Redirector<br />
IR<br />
Data<br />
Driver<br />
(SW<br />
Packetizes<br />
or FW)<br />
Protocol<br />
IR Chip<br />
Serializer<br />
Data Packets & Queries<br />
Responses<br />
Formatter<br />
I/O Buffer<br />
IRLMP<br />
IRLAP<br />
IR Physical<br />
Receiver<br />
Transmitter<br />
secondary<br />
device<br />
ASCII<br />
Raster<br />
to<br />
Data<br />
ASCII<br />
Data Buffer<br />
Unpacks Data<br />
Checks Packets<br />
Protocol<br />
Deserializer<br />
IR Chip
<strong>HP</strong> LaserJet 5P/5MP, <strong>6P</strong>/6MP Printer Service Supplement<br />
New Product Features<br />
System Requirements<br />
• Hardware<br />
• Both the primary and secondary devices must be equipped<br />
with an IrDA-compliant IR component. Older, non-IrDAcompliant<br />
devices may not be compatible with the<br />
<strong>HP</strong> LaserJet 5P/5MP and <strong>6P</strong>/6MP printers.<br />
• Software<br />
• The primary device must be loaded during boot-up with<br />
software provided by the manufacturer for infrared operation.<br />
• The primary device must be properly configured with an<br />
infrared COM port, IRQ level, and base address value.<br />
• The infrared port must be installed and selected in the<br />
Printers section of the Windows Control Panel.<br />
• Software drivers<br />
• The IR driver for Windows 3.1 is available through hardcopy<br />
fulfillment. The driver shipped is proprietary to Extended<br />
Systems, Inc. (ESI) and is supported by Hewlett-Packard to<br />
the level of identifying the cause as the ESI driver. Beyond<br />
that, the call must be escalated to ESI. The ESI driver is not<br />
available through <strong>HP</strong>’s Electronic Fulfillment.<br />
• The IR driver for Windows 95 is the Microsoft IRDA supported<br />
driver. It is available on the Microsoft electronic BBS. After<br />
November 1995, machines manufactured with Windows 95<br />
will already have this driver installed. Users must enable the<br />
IR port on the PC. The Microsoft IrDA driver has a Tray Icon<br />
that provides status and run options. It is Plug and Play and<br />
polls the area for other IR devices within range.<br />
Hewlett-Packard recommends that users turn off Plug and<br />
Play and Polling when not in use or not needed to prevent<br />
draining the battery.<br />
• There is currently no IR support for Macintosh products<br />
(October 96).<br />
21
<strong>HP</strong> LaserJet 5P/5MP, <strong>6P</strong>/6MP Printer Service Supplement<br />
New Product Features<br />
To Print Using the Infrared Port<br />
The infrared (IR) port on your <strong>HP</strong> LaserJet 5P/5MP or <strong>6P</strong>/6MP<br />
printer is located on the lower front left corner of the printer<br />
(Figure 9). This port is compliant with the specifications<br />
determined by the Infrared Data Association (IrDA). Just above<br />
the port is a status light that indicates when the port is activated.<br />
To use the IR port, you need to use a portable device that also<br />
includes an IrDA-compliant IR port and be within the range of<br />
operation (see Figure 10).<br />
Figure 9 IrDA Port Location (5P/5MP shown)<br />
The IR port is compatible with a wide variety of IrDA-compliant<br />
portable devices; however, the method for printing will vary<br />
depending on the type of device and the operating system in use.<br />
Refer to the instruction manual for your portable equipment for<br />
specific instructions on printing from that device.<br />
1. Make sure the printer is in Ready Mode (the Ready light is on).<br />
2. Align your laptop computer (or other portable equipment) that<br />
is equipped with an IrDA-compliant IR port within 3 feet (1 m)<br />
of the IR port on the printer and at an angle of ±15 degrees to<br />
ensure printing (Figure 10).<br />
3. Send the print job. The status light above the IR port turns on<br />
(printing a complex document or using a software print spooler on<br />
your PC may delay the time it takes for the IR status light to turn<br />
22
<strong>HP</strong> LaserJet 5P/5MP, <strong>6P</strong>/6MP Printer Service Supplement<br />
New Product Features<br />
on). If the status light does not turn on, realign the port on your<br />
portable equipment with the port on the printer, resend the<br />
print job and stay within the range of operation during printing.<br />
4. If you have to move the device, make sure you stay within the<br />
range of operation to maintain the connection. If the connection<br />
is interrupted before your print job is complete, the IR port<br />
status light will turn off. You have from 3 to 40 seconds<br />
(depending on the host implementation) to correct the<br />
interruption and continue the job. In this case, the IR port<br />
status light turns back on.<br />
5. The connection can be permanently broken (interrupted for more<br />
than 3 to 40 seconds) if the “sending” IR port is moved out of the<br />
range of operation or if anything passes between the two ports to<br />
block the transmission, such as a hand or piece of paper, or even<br />
direct sunlight. In this case, the job needs to be reprinted.<br />
≤1 Meter<br />
≤ 3 feet<br />
30°<br />
Figure 10 IRDA Port ranges (5P/5MP shown)<br />
If you still have problems printing, make sure you are using an<br />
IrDA-compliant device and proper software and have selected the<br />
proper port for printing. See "Infrared Port Not Responding" on page 71.<br />
23
<strong>HP</strong> LaserJet 5P/5MP, <strong>6P</strong>/6MP Printer Service Supplement<br />
New Product Features<br />
N o t e<br />
The IrDA standard for infrared communications<br />
represents an emerging technology. Older<br />
non-IrDA-compliant portable devices may not be<br />
compatible with your <strong>HP</strong> LaserJet 5P/5MP, <strong>6P</strong>/6MP<br />
printer. If you continue to have problems printing<br />
using the IR port, contact the manufacturer or dealer<br />
where you purchased your portable device to verify<br />
compatibility with the IrDA standard, and follow the<br />
troubleshooting procedure immediately following.<br />
Troubleshooting IR Printing Problems<br />
IR printing problems may be caused by any of the several system<br />
components or by lack of proper configuration. The following<br />
checklist will help determine the source of the problem.<br />
1. Verify the user is operating the printer and PC as described in<br />
the User’s Manual: less than one meter between devices, and<br />
not more than ±15 degrees from direct center.<br />
2. Verify the host PC or laptop and the printer are IrDA-compliant and<br />
have the necessary hardware components for IR communication.<br />
3. Verify the IR software has been loaded on the primary device.<br />
(This is system software and should be available from the PC<br />
manufacturer.)<br />
4. Verify the host PC or laptop is properly configured. Check the<br />
port assignment, the IRQ level, and the base address value.<br />
Check both the DOS AUTOEXEC.BAT and CONFIG.SYS files,<br />
and the Windows system configuration.<br />
If all these elements are properly installed and configured, use the IR<br />
test tool to test the IrDA protocol transmission and device operation.<br />
This tool for troubleshooting IR communication problems, shown in<br />
Figure 10, has been developed by Genoa Technology, Inc., in<br />
cooperation with Hewlett-Packard. The part number is 5062-4661<br />
and can be ordered through <strong>HP</strong> Parts Direct Ordering.<br />
24
<strong>HP</strong> LaserJet 5P/5MP, <strong>6P</strong>/6MP Printer Service Supplement<br />
New Product Features<br />
The IR test tool can be used with any IrDA-compliant primary or<br />
secondary device, regardless of manufacturer.<br />
LB<br />
Figure 11 Infrared Test Tool<br />
IR Diodes<br />
Test Connect Pass<br />
Peripheral<br />
Test<br />
Test Modes<br />
PCL Printer<br />
PostScript Printer<br />
Energy Detect<br />
Test Frame<br />
Computer<br />
Test<br />
To test the peripheral device:<br />
1. Put the printer in Ready Mode.<br />
2. Press the "Peripheral Test" button on the test tool. The LEDs<br />
on the test tool will sequence.<br />
If the "PASS" LED lights, the test was successful, indicating that<br />
communication with the printer’s IR port is functioning normally. On<br />
<strong>HP</strong> LaserJet printers, a self-test page will be initiated by the test.<br />
If the "TEST" LED goes out and the "PASS" LED fails to light, the<br />
printer’s IR port is not functioning correctly; check the operator’s<br />
instructions included with the IR test tool.<br />
switches<br />
25
<strong>HP</strong> LaserJet 5P/5MP, <strong>6P</strong>/6MP Printer Service Supplement<br />
New Product Features<br />
To test the host computer:<br />
1. Place the test tool on a table in front of the PC’s IR port<br />
2. Press the "Computer Test" button. The test tool will sequence<br />
the LEDs.<br />
If the "PASS" LED light, the test was successful, indicating that<br />
communication with the printer’s IR port is functioning normally.<br />
If the "TEST" LED goes out and the "PASS" LED fails to light, the<br />
host’s IR port is not functioning correctly.<br />
26
<strong>HP</strong> LaserJet 5P/5MP, <strong>6P</strong>/6MP Printer Service Supplement<br />
New Product Features<br />
Interface Connections<br />
Your <strong>HP</strong> LaserJet 5P/5MP, <strong>6P</strong>/6MP printer supports the following<br />
interfaces (see Figure 12):<br />
• Two IEEE-1284–compliant parallel ports at the back of the<br />
printer—one large B-type and one small C-type.<br />
• One LocalTalk port at the back of the printer.<br />
• One IrDA-compliant infrared port at the front of the printer.<br />
Figure 12 <strong>HP</strong> LaserJet 5P/5MP, <strong>6P</strong>/6MP Printer Interface Connections<br />
1. LocalTalk cable and connectors.<br />
2. IEEE-1284 parallel cable and large (B-type) printer connector.<br />
3. IEEE-1284 parallel cable and small (C-type) printer connector. (The cable will be stamped as IEEE-<br />
1284 compatible.<br />
4. Host PC connector (A-type) (in the future C-type connectors may also be available on host PCs).<br />
C a u t i o n Make sure that all power and interface cables on<br />
your printer and host computer are properly<br />
grounded and in compliance with local electrical<br />
codes.<br />
27
<strong>HP</strong> LaserJet 5P/5MP, <strong>6P</strong>/6MP Printer Service Supplement<br />
New Product Features<br />
The Parallel Printer Interfaces<br />
These interfaces are compliant with IEEE-1284 specifications for<br />
"Compatibility Mode” and “Nibble Mode” or “<strong>HP</strong> Bi-tronics”. To use<br />
advanced interface functions, such as bi-directional<br />
communication, the parallel port on your host PC must also be<br />
IEEE-1284 "Nibble Mode" compatible.<br />
The small “C” connector offers IEEE-1284 II (level 2) electrical<br />
interfacing, i.e. support for cables up to 10 meter length. The large<br />
"B" connector supports standard cable lengths up to 3 meters.<br />
The parallel interfaces can operate at speeds of up to 2 MBytes per<br />
second. Use a high-quality, shielded IEEE-1284 compliant parallel<br />
interface cable to insure best performance and support of advanced<br />
interface functions such as bi-directional communication.<br />
Compliant cables are marked with “IEEE-1284" on the cable.<br />
Applications such as the Remote Control Panel, Status Monitor, or<br />
the Status Window use the printer’s parallel interface to send<br />
status information back to the computer (bi-directional<br />
communication). This requires a direct connection from the<br />
computer to the printer via a local parallel port (for example,<br />
LPT1:, LPT2:). These applications may not work through a<br />
network or a switching device.<br />
Connecting to Networks and Switchboxes<br />
Most devices connected between the printer and the host computer<br />
prevent the printer from sending data back to the computer.<br />
Therefore, the Remote Control Panel, Status Monitor, and Status<br />
Window may not work with networks, most hardware print<br />
spoolers, some software print spoolers, and some switchboxes.<br />
Newer sharing devices are available that fully support status<br />
feedback. Check with your supplier on support for bi-directional<br />
communication.<br />
Automatic I/O Switching<br />
The printer automatically switches between all interfaces (parallel,<br />
infrared, and LocalTalk) when multiple users share the printer.<br />
28
<strong>HP</strong> LaserJet 5P/5MP, <strong>6P</strong>/6MP Printer Service Supplement<br />
New Product Features<br />
Resource Saving<br />
Resource Saving gives the printer the ability to save certain<br />
entities such as permanent soft fonts, macros, symbol sets and<br />
user-defined graphics patterns when the printer changes<br />
personalities, resolutions or page protect modes. For example, if a<br />
user switches the printer from PCL mode to PostScript mode, all<br />
PCL soft fonts and macros are lost.<br />
With resource saving, the <strong>HP</strong> LaserJet 5P/5MP, <strong>6P</strong>/6MP printer<br />
can retain these in memory. When the user switches back to PCL<br />
from PostScript all of the PCL entities would still be resident in<br />
the <strong>HP</strong> LaserJet 5P/5MP, <strong>6P</strong>/6MP printer. Resource Saving can be<br />
changed via software, but can only be accessed when the printer<br />
has the PostScript language installed and a minimum memory<br />
configuration of 7 MB.<br />
Resource Saving can be set via software for one of three modes,<br />
AUTO (default), ON, and OFF. Auto configuration sets the<br />
Resource Saving for PCL and Postscript to a minimum value (400<br />
KBytes) for each personality. Setting Resource Saving to ON<br />
allows the user to determine how much printer memory will be<br />
used for Resource Saving for the PCL personality and the<br />
Postscript personality. The memory can be allocated in 100 KBytes<br />
increments. For example, if the user sets the Resource Saving<br />
memory size to 200 KBytes, a total of 400 KBytes of memory will<br />
be assigned to Resource Saving. 200 KBytes of memory will be<br />
used for Postscript Resource Saving and 200 KBytes of memory<br />
will be used for PCL Resource Saving. Turning Resource Saving<br />
OFF disables the Resource Saving function and no memory is<br />
allocated to Resource Saving.<br />
29
<strong>HP</strong> LaserJet 5P/5MP, <strong>6P</strong>/6MP Printer Service Supplement<br />
New Product Features<br />
I/O Buffering<br />
I/O buffering allows the user to allocate printer memory to hold the<br />
job while it prints, freeing up the host system sooner, like a print<br />
spooler. The standard printer has approximately 10 KBytes of<br />
memory allocated to I/O buffering and an additional 100 KBytes of<br />
memory is assigned to I/O buffering for each MBytes of memory<br />
added to the printer.<br />
If the printer has a minimum of 6 MBytes of memory installed, the<br />
I/O buffer size can also be adjusted via software. Three settings<br />
exist for the I/O buffer; AUTO (default), ON, and OFF. AUTO sets<br />
the printer’s I/O buffer to a minimum value that is determined by<br />
the total amount of memory that is resident in the printer. Setting<br />
I/O buffering to ON allows the user to set the I/O buffer size<br />
Setting the I/O buffering to OFF disables I/O buffering.<br />
N o t e When you change the I/O buffer setting all<br />
downloaded resources are deleted.<br />
30
<strong>HP</strong> LaserJet 5P/5MP, <strong>6P</strong>/6MP Printer Service Supplement<br />
New Product Features<br />
Reprinting Jammed Pages<br />
When a paper jam is cleared in the <strong>HP</strong> LaserJet 5P printer and<br />
other previous <strong>HP</strong> LaserJet printers, the printer will automatically<br />
reprint the page(s) that were jammed. The <strong>HP</strong> LaserJet <strong>6P</strong> printer<br />
will not do this by default with standard memory installed. The<br />
user must send the affected page(s) again from the host system to<br />
reprint them. If the user wishes the printer to reprint jammed<br />
pages automatically, the best solution is to add memory to the<br />
printer. If the user does not want to add memory but still wants<br />
jammed pages to reprint automatically, the “REPRINT” PJL<br />
variable should be changed from its default setting of AUTO to<br />
ON.<br />
N o t e If the “REPRINT” variable is turned ON with<br />
only default memory installed in the <strong>HP</strong><br />
LaserJet <strong>6P</strong> printer, the user may experience<br />
delays when printing multi-page jobs. These<br />
delays may substantially reduce the number of<br />
pages printed per minute.<br />
31
<strong>HP</strong> LaserJet 5P/5MP, <strong>6P</strong>/6MP Printer Service Supplement<br />
Service Mode, PJL Defaults<br />
Service Mode, PJL Defaults<br />
The Service Mode should be used only by authorized service<br />
personnel. While in Service Mode, you can:<br />
• Print a Service Mode Self Test.<br />
• Verify and set the Page Count (the page count also is displayed<br />
on the standard self test).<br />
• Set the Cold Reset Default. (This sets the factory default paper<br />
size to either Letter or A4).<br />
• Set the Demo Page=True/False. Used to remove the Demo Page<br />
option from the self test menu.<br />
• Set the Diagnostic Functions ON or OFF (for software<br />
developers use only).<br />
Since the <strong>HP</strong> LaserJet 5P/5MP, <strong>6P</strong>/6MP printer does not have a<br />
front control panel, Service Mode and many configuration tasks<br />
are accessible only through software (PJL commands).<br />
The following example shows how to use PJL commands to enter<br />
Service Mode and perform various Service Mode configuration<br />
tasks.<br />
N o t e Text is CASE-sensitive in PJL; enter exactly as<br />
shown. The ECsymbol stands for the ASCII<br />
escape character (ESC or /027). When the PJL<br />
code is entered, print the data file (or use the<br />
DOSCOPY command to copy it to the printer).<br />
Detailed explanations of PJL commands and their functions can be<br />
found in the Printer Job Language Technical Reference Manual<br />
(<strong>HP</strong> part number 5961-0704).<br />
32
<strong>HP</strong> LaserJet 5P/5MP, <strong>6P</strong>/6MP Printer Service Supplement<br />
Service Mode, PJL Defaults<br />
Common PJL Commands<br />
PJL Command Explanation<br />
E C%-12345X@PJL Start PJL job.<br />
@PJL SET SERVICEMODE=<strong>HP</strong>BOISEID Enter Service Mode<br />
@PJL SET PAGES=0 Set page count [= xxxxx]<br />
@PJL SET CRPAPER=LETTER Sets cold reset page size [= Letter/A4]<br />
@PJL SET SKIPDEMO=FALSE Skips demo/PCL type page [= true/false]<br />
@PJL SET DIAGNOSTICS=OFF Sets diagnostics [= OFF/ON] (for ISV use)<br />
@PJL SET SERVICEMODE=EXIT Exits Service Mode<br />
@PJL DEFAULT PAPER=LETTER Selects user paper size default<br />
@PJL RESET Performs PJL reset<br />
E C%-12345X Exits PJL mode<br />
E Cz Prints Self-Test page<br />
E CE Resets the printer.<br />
Other PJL Command examples:<br />
@PJL INITIALIZE Sets user environment to factory defaults.<br />
@PJL SET ECONOMODE=ON Sets Economode<br />
@PJL SET PAGEPROTECT=LEGAL Sets the memory size for page protection to LEGAL<br />
paper size.<br />
@PJL SET MANUALFEED=ON Sets manual feed mode.<br />
@PJL SET LANG = FRENCH, GERMAN... Sets the default display language 1<br />
1 Do not confuse this command with @PJL ENTER LANGUAGE, which sets<br />
the printer language to PCL or PostScript.<br />
33
<strong>HP</strong> LaserJet 5P/5MP, <strong>6P</strong>/6MP Printer Service Supplement<br />
Service Mode, PJL Defaults<br />
Test Pages and Resets<br />
Test pages, resets, and NVRAM initialization can all be performed<br />
by using the GO and RESET/JOB CANCEL buttons on the <strong>HP</strong><br />
LaserJet 5P/5MP, <strong>6P</strong>/6MP printer status panel. Table 2 shows how<br />
to perform these tests and diagnostic functions.<br />
Table 2. Button Functions<br />
FUNCTION ACTION RESULT<br />
Demo Page Press GO button when printer is idle. Prints page that highlights printer<br />
features and demonstrates print quality.<br />
Self Test Press GO and RESET/JOB CANCEL<br />
buttons simultaneously.<br />
Continuous Self<br />
Test<br />
Hold GO button more than 20 seconds<br />
after powering on printer<br />
Prints a Self Test page.<br />
Prints continuous self test pages. Press<br />
the button to stop printing.<br />
Reset (all I/O) Press RESET button. (5P/5MP only) Clears all data from memory, including<br />
unprinted data, downloaded temporary<br />
fonts and macros.<br />
Job Cancel Press JOB CANCEL button. (<strong>6P</strong>/6MP<br />
only)<br />
Continue (Waiting for paper, or continuable error.)<br />
Press the GO button.<br />
Stops a job that is curently printing,<br />
including receiving data from the host<br />
until the job is finished. Memory will clear<br />
and printer will return to a Ready State.<br />
Allows the printer to recover and<br />
continue printing the job.<br />
Form Feed Press the GO button. Print remaining data in printer memory.<br />
Cold Reset Hold RESET/JOB CANCEL button less<br />
than 20 seconds after turning power on.<br />
NVRAM<br />
Initialization<br />
Service Error<br />
Codes<br />
34<br />
Hold RESET/JOB CANCEL button more<br />
than 20 seconds after turning power on.<br />
Press GO and RESET/JOB CANCEL<br />
buttons to display additional code.<br />
Clears all data from memory, including<br />
unprinted data, downloaded fonts and<br />
macros. Resets printer to factory default<br />
settings.<br />
Clears all I/O and print configuration<br />
information from NVRAM.<br />
See "Troubleshooting" to determine the<br />
problem and solution.
<strong>HP</strong> LaserJet 5P/5MP, <strong>6P</strong>/6MP Printer Service Supplement<br />
Service Mode, PJL Defaults<br />
Printing a Self-Test Page<br />
You can print a self-test page to get information about your<br />
printer’s current settings, options, and print quality. You can use<br />
this page to troubleshoot print quality problems and to view<br />
current print density and Resolution Enhancement settings so you<br />
can adjust them.<br />
You can also print the demo, or demonstration, page to quickly<br />
check that the printer is operational.<br />
To print a self-test page:<br />
Simultaneously press the GO and RESET/JOB CANCEL buttons<br />
on the printer’s Status Panel while the printer is in Ready Mode.<br />
Or using the <strong>HP</strong> LaserJet PCL Windows Printer Driver, under<br />
“Device Option”, select the “Configure Printer” button and choose<br />
“PCL Self-Test Page”.<br />
Or using the Remote Control Panel (in DOS), under “Options”<br />
select “Print Test Page” and choose “PCL Self-Test Page”.<br />
Figure 13 shows a sample self-test page for the <strong>HP</strong> LaserJet 5P<br />
printer. Numbers in the sample self-test page match numbers in<br />
the Key to Figure 13, which follows the illustration. The<br />
appearance of the self-test page varies depending on the options<br />
currently installed in the printer.<br />
Figure 14 shows a sample self-test page for the <strong>HP</strong> LaserJet <strong>6P</strong><br />
printer. Numbers in the sample selft test page match numbers in<br />
the Key to Figure 14, which follows the illustriation. The<br />
appearance of the self-test page varies depending on the options<br />
currently installed in the printer.<br />
N o t e The factory default for the self-test page is<br />
English. A PJL command is required to change<br />
the self-test language to appear in a language<br />
other than English. Refer to the discussion of<br />
PJL commands on page 33<br />
35
<strong>HP</strong> LaserJet 5P/5MP, <strong>6P</strong>/6MP Printer Service Supplement<br />
Service Mode, PJL Defaults<br />
Figure 13. <strong>HP</strong> LaserJet 5P Self-Test Page<br />
36
<strong>HP</strong> LaserJet 5P/5MP, <strong>6P</strong>/6MP Printer Service Supplement<br />
Service Mode, PJL Defaults<br />
1<br />
2<br />
3<br />
4<br />
5<br />
6<br />
7<br />
8<br />
9<br />
10<br />
11<br />
12<br />
Key to Figure 13. Self-Test Page<br />
Item Explanation<br />
Printer Options: Lists printer options you can adjust using your printer software (see Appendix F, “Software<br />
Procedures”).<br />
Test Pages: Shows test pages you can print from your printer.<br />
PCL Memory Information: Shows the total amount of installed memory. Also indicates the amount of<br />
available memory for PCL applications.<br />
LocalTalk Name/Node ID/Network Number: If your printer is connected to a LocalTalk network, shows the<br />
network name, node ID for your printer, and the network number.<br />
Formatter Number: Shows serial number of internal electronics board.<br />
RAM size: Shows total installed printer memory.<br />
Page Count: Shows number of pages the printer has printed.<br />
Firmware Datecode: Eight-digit date (YYYYMMDD) of formatter firmware.<br />
Resolution Enhancement: When resolution is set to 600 dpi, the Resolution Enhancement technology<br />
(REt) block appears here. The REt block illustrates current resolution enhancement (see “Fine-Tuning Print<br />
Quality,” in Chapter 2, “Printing”).<br />
I/O Buffering and Resource Saving: Information about the current configuration appears here. If the<br />
printer does not have enough memory installed to enable I/O Buffering or Resource Saving, the amount of<br />
additional memory needed appears here.<br />
Print Pattern: Illustrates print density and quality.<br />
Installed Personalities: Shows which printer languages (personalities) are installed.<br />
37
<strong>HP</strong> LaserJet 5P/5MP, <strong>6P</strong>/6MP Printer Service Supplement<br />
Service Mode, PJL Defaults<br />
Figure 14. <strong>HP</strong> LaserJet <strong>6P</strong> Self-Test Page<br />
38
<strong>HP</strong> LaserJet 5P/5MP, <strong>6P</strong>/6MP Printer Service Supplement<br />
Service Mode, PJL Defaults<br />
Key to Figure 14. Self-Test Page<br />
Item Explanation<br />
1 Printer Information:<br />
Lists the Formatter Number, Firmware Datecode, Page Count, and LocalTalk Network<br />
information for the printer.<br />
2 Memory:<br />
Lists printer memory, I/O Buffering data, and Resource Saving data.<br />
3 Installed Personalities and Options:<br />
Lists all personalities, such as PCL and PostScript that are installed, and the status of<br />
each SIMM slot.<br />
4 REt block:<br />
This block is used when adjusitng the Resolution Enhancement technology (REt)<br />
setting.<br />
5 Settings:<br />
Current pritner default settings and product-specific information.<br />
39
<strong>HP</strong> LaserJet 5P/5MP, <strong>6P</strong>/6MP Printer Service Supplement<br />
Life Expectancy of Consumables<br />
Life Expectancy of Consumables<br />
Always inspect the components listed in the following table for<br />
wear when servicing the printer. Replace these components as<br />
needed, based on printer failures or wear, not strictly on usage.<br />
Table 3. Life Expectancy of Consumables<br />
DESCRIPTION<br />
QTY EST. LIFE<br />
(pages)<br />
1. Toner Cartridge 1 4000 1<br />
REMARKS<br />
When print becomes faint, shake cartridge<br />
to distribute remaining toner.<br />
2. Tray 1 Pickup Roller 1 100,000 Replace roller and separation pad together.<br />
3. Tray 2 Pickup Roller 1 100,000 Look for glazing and cracks.<br />
4. Separation Pad 1 100,000 Look for glazing and grooves. Replace<br />
together with Pickup Roller.<br />
5. Transfer Charging Roller 1 100,000 May affect print quality and/or paper jams.<br />
6. Fuser Assembly<br />
(115 V, 50/60 Hz)<br />
1<br />
100,000<br />
May affect print quality and/or paper jams.<br />
Look for marks on rollers.<br />
Fuser Assembly<br />
(220 V, 50 Hz)<br />
1 100,000<br />
7. Exhaust Fan 1 25,000 hrs.<br />
1The estimated Toner Cartridge life is based on A4 or letter size prints with<br />
an average of 5% toner coverage, and with the density setting at 3.<br />
40
<strong>HP</strong> LaserJet 5P/5MP, <strong>6P</strong>/6MP Printer Service Supplement<br />
Removal and Replacement<br />
Removal and Replacement<br />
Overview<br />
The removal and replacement procedures for many <strong>HP</strong> LaserJet<br />
5P/5MP, <strong>6P</strong>/6MP printer Field Replaceable Units (FRUs) are<br />
identical to the <strong>HP</strong> LaserJet 4L and 4P printers. This section<br />
describes only those differences unique to the <strong>HP</strong> LaserJet 5P/5MP,<br />
<strong>6P</strong>/6MP for removing:<br />
• Power Door<br />
• I/O Cover<br />
• Left Side Cover<br />
• Top Cover<br />
• Tray 1 Pickup Assembly<br />
• Formatter Board Assembly<br />
• Fuser Assembly<br />
• DC Controller Assembly<br />
W A R NING! Unplug the power cord from the power outlet<br />
before attempting to service the printer. If this<br />
warning is not followed, severe injury may result.<br />
Never operate or service the printer with the<br />
protective cover removed from the<br />
Laser/Scanner Assembly. The reflected beam,<br />
although invisible, can damage your eyes.<br />
C A UTION<br />
The printer contains parts that are electrostatic<br />
discharge (ESD) sensitive. Always service<br />
printers at an ESD protected workstation.<br />
41
<strong>HP</strong> LaserJet 5P/5MP, <strong>6P</strong>/6MP Printer Service Supplement<br />
Removal and Replacement<br />
C A UTION<br />
N o t e<br />
To install a self-tapping screw, first turn it<br />
counter-clockwise to align it with the existing<br />
thread pattern, then carefully turn clockwise to<br />
tighten. Do not over-tighten. If a self-tapping<br />
screw-hole becomes stripped, repair of the screw-hole<br />
or replacement of the affected assembly is required.<br />
Always remove the toner cartridge and the<br />
paper cassette from the printer before removing<br />
or replacing printer parts.<br />
Required Tools<br />
Refer to page 6-3 of the Combined Service Manual.<br />
A TORX T-10 head screwdriver is needed to remove the formatter<br />
shield.<br />
42
<strong>HP</strong> LaserJet 5P/5MP, <strong>6P</strong>/6MP Printer Service Supplement<br />
Removal and Replacement<br />
Removing the Power Door<br />
The Power Door is located on the right rear of the printer.<br />
1. Ensure the power to the printer is turned OFF.<br />
2. Grasp the power door by the finger slot directly above the power<br />
cord, and swing the rear of the door out and forward. The door<br />
easily tilts and lifts out.<br />
3. Unplug the power cord from the printer power socket.<br />
Removing the I/O Cover<br />
The I/O Cover is located to the left rear of the printer.<br />
5P/5MP I/O Cover<br />
1. Locate the two release tabs shown in Figure 15. Press the tabs<br />
in, and swing the rear of the door out and forward. The door<br />
easily lifts away from the printer.<br />
Figure 15 5P/5MP I/O Cover Release Tabs<br />
43
<strong>HP</strong> LaserJet 5P/5MP, <strong>6P</strong>/6MP Printer Service Supplement<br />
Removal and Replacement<br />
<strong>6P</strong>/6MP I/O Cover<br />
1. Pull the I/O door out using the finger slot for levarage.<br />
Figure -16 <strong>6P</strong>/6MP I/O Cover Finger Slot<br />
44
<strong>HP</strong> LaserJet 5P/5MP, <strong>6P</strong>/6MP Printer Service Supplement<br />
Removal and Replacement<br />
Removing the Left Side Cover<br />
1. Disconnect all I/O cables.<br />
2. Press the Top Cover Release button on the right side of the<br />
printer, and open the top cover.<br />
3. Press the removable side panel as shown in Figure 17.<br />
4. Slide the cover forward and pull straight away from the side of<br />
the printer.<br />
Figure 17 Left Side Cover Release Latch (5P/5MP shown)<br />
45
<strong>HP</strong> LaserJet 5P/5MP, <strong>6P</strong>/6MP Printer Service Supplement<br />
Removal and Replacement<br />
Removing the Top Cover<br />
1. Remove the toner cartridge and paper cassette if they have not<br />
already been removed.<br />
2. Remove the (4) self-tapping printer cover screws (Figure 18).<br />
Figure 18 Removing the Top Cover Screws<br />
3. Grasp the lower left front corner of the top cover, and lift it<br />
forward and up.<br />
4. Grasp the lower portion of the right front cover, and pull<br />
forward and up.<br />
5. At the rear of the printer, lower the face-up output tray.<br />
46
<strong>HP</strong> LaserJet 5P/5MP, <strong>6P</strong>/6MP Printer Service Supplement<br />
Removal and Replacement<br />
6. Lift the rear of the printer slightly. Grasp the lower right back<br />
corner. With your thumbs, flex the plastic toward you, up, and<br />
out. Figure 19 shows this process for the rear right corner.<br />
Repeat the process for the left rear corner.<br />
N o t e Note the position of the tabs and the catches<br />
carefully. This step may require considerable<br />
twisting and flexing of the plastic in order to free<br />
the release tabs.<br />
Figure 19 Releasing the Back Corner of the Top Cover<br />
7. Lift the printer cover straight up.<br />
47
<strong>HP</strong> LaserJet 5P/5MP, <strong>6P</strong>/6MP Printer Service Supplement<br />
Removal and Replacement<br />
R e p lacement<br />
N o t e<br />
Figure 20 Paper-Out Flag<br />
48<br />
When reseating the top cover onto the printer<br />
frame, ensure the black paper-out flag in front of<br />
Tray 1 is seated in the groove of the Tray 1 lift<br />
plate. If not in the groove, it can easily break when<br />
the cover is forced into place. Refer to Figure 20
<strong>HP</strong> LaserJet 5P/5MP, <strong>6P</strong>/6MP Printer Service Supplement<br />
Removal and Replacement<br />
Removing the Tray 1 Pickup Assembly<br />
1. Remove Tray 1 by opening the tray at a 45° angle and pulling<br />
up on the tray (Figure 21).<br />
Figure 21 Removing Tray 1.<br />
2. Unplug the two cables (Callout 2 in Figure 22) by grasping the<br />
cables where they attach to the plug and pulling straight back.<br />
3. Route the cables through the right side of the printer chassis<br />
and bring them to the front.<br />
4. Remove the 5 screws (callout 1 in Figure 22) from the front of<br />
the pickup assembly. (Two screws are adjacent in the lower left<br />
corner.)<br />
49
<strong>HP</strong> LaserJet 5P/5MP, <strong>6P</strong>/6MP Printer Service Supplement<br />
Removal and Replacement<br />
Figure 22 Tray 1 Pickup Assembly Locations.<br />
5. Press the two release tabs on either side of the pickup assembly<br />
(callout 3 in Figure 19) and pull the assembly away from the<br />
printer. (The left side release tab is partially hidden from view.<br />
Pressing in on both sides will release the tabs.)<br />
6. Pull the pickup assembly straight out from the back of the<br />
printer.<br />
7. To remove the roller from the pickup assembly, grasp the tabs<br />
on the right end of the roller and slide it to the right (shown in<br />
Figure 23).<br />
50
<strong>HP</strong> LaserJet 5P/5MP, <strong>6P</strong>/6MP Printer Service Supplement<br />
Removal and Replacement<br />
Figure 23 Replacing the Pickup Roller<br />
R e p lacement<br />
N o t e<br />
When replacing the pickup assembly roller, hold<br />
the shaft from the left side so that the pickup<br />
roller shaft and gears will remain in place.<br />
51
<strong>HP</strong> LaserJet 5P/5MP, <strong>6P</strong>/6MP Printer Service Supplement<br />
Removal and Replacement<br />
Removing the Formatter Board and Shield<br />
1. Remove any installed SIMMs.<br />
N o t e There are two TORX screws holding the I/O<br />
connector in position (Callout 1 in Figure 24).<br />
These are the only two TORX screws in the <strong>HP</strong><br />
LaserJet 5P printer. Note also the location of the<br />
test print button hole (Callout 2) on the side of<br />
the formatter board cover.<br />
Figure 24 TORX Screw Locations.<br />
52
<strong>HP</strong> LaserJet 5P/5MP, <strong>6P</strong>/6MP Printer Service Supplement<br />
Removal and Replacement<br />
Figure 25 Removing the formatter screws.<br />
2. Remove the (7) screws shown in Figure 25.<br />
3. Pull the formatter board straight from the side of the chassis.<br />
(There will be a slight resistance from the DC Controller<br />
interconnect.)<br />
4. Pull the DC controller interconnect out (Figure 26).<br />
5. To separate the formatter PCA from its shield, remove the two<br />
screws (refer to callout 1 in Figure 21).<br />
53
<strong>HP</strong> LaserJet 5P/5MP, <strong>6P</strong>/6MP Printer Service Supplement<br />
Removal and Replacement<br />
Figure 26 Removing the DC Controller Interconnect.<br />
N o t e<br />
54<br />
RETAIN THE DC CONTROLLER<br />
INTERCONNECT when replacing the DC<br />
Controller Board. The replacement board part<br />
number does not include this interconnect.
<strong>HP</strong> LaserJet 5P/5MP, <strong>6P</strong>/6MP Printer Service Supplement<br />
Removal and Replacement<br />
Removing the Fusing Assembly<br />
1. Remove the top cover assemblies.<br />
2. Locate the black plastic fuser cover at the back of the printer.<br />
Press the release tab (callout 1 in Figure 27).<br />
3. Slide the cover all the way to the right.<br />
4. Pull the left end of the strip toward you at a 45° angle.<br />
5. Slide the cover to the left and out of the printer.<br />
6. Remove the four screws (2 self-tapping screws, two machine<br />
screws with washers) directly below the fuser assembly.<br />
7. Grasp the fuser by the green plastic handle and pull out from<br />
the printer.<br />
Figure 27 Removing the fuser cover.<br />
55
<strong>HP</strong> LaserJet 5P/5MP, <strong>6P</strong>/6MP Printer Service Supplement<br />
Removal and Replacement<br />
Removing the DC Controller Assemblies<br />
The DC Controller Assembly is located on the bottom of the<br />
printer. The PCA is protected by a metal shield assembly, and is<br />
mounted to a plastic base. The Formatter PCA and Fusing<br />
Assemblies are connected directly into the DC Controller and must<br />
be removed prior to removal of the DC Controller Assembly.<br />
C a u t i o n Failure to remove these components before<br />
removing the DC Controller will result in printer<br />
damage.<br />
1. Remove the printer covers (page 43), Formatter PCA and Shield<br />
(page 53), and Fusing Assemblies (page 55).<br />
2. On the right side, remove the machine screw and washer<br />
(Figure 28) holding the grounding spring in place. (Callout 1 in<br />
Figure 25).<br />
3. Disconnect the two cables to the tray 1 assembly (callout 2 in<br />
Figure 25).<br />
56
<strong>HP</strong> LaserJet 5P/5MP, <strong>6P</strong>/6MP Printer Service Supplement<br />
Removal and Replacement<br />
Figure 28 Grounding Spring screw location.<br />
4. On the left side, remove the (2) screws that attach the<br />
grounding strap to the Gear Train Assembly (see callout 1 in<br />
Figure 6-36 of the Combined Service Manual). Turn the<br />
assembly upside-down before proceeding with further steps.<br />
5. Remove the (5) self-tapping screws and the (1) machine screw<br />
with star washer from the bottom of the DC Controller<br />
Assembly. (See callouts 2 and 3 in Figure 6-36 in the Combined<br />
Service Manual.)<br />
6. Lift the DC Controller Assembly away from the printer frame.<br />
57
<strong>HP</strong> LaserJet 5P/5MP, <strong>6P</strong>/6MP Printer Service Supplement<br />
Removal and Replacement<br />
N o t e<br />
The PS1 Input Sensor Arm may come loose and<br />
fall out when you remove the DC Controller<br />
Assembly. See Figure 6-51 in the Combined<br />
Service Manual for re-installation.<br />
7. Remove the metal backing plate from the DC Controller<br />
Assembly (see pages 6-43 and 6-44 in the Combined Service<br />
Manual for this procedure.)<br />
8. Disconnect Tray 1 Interconnect PCA (callout 2 in Figure 26)<br />
and cable 302 (callout 1 in Figure 29) from the DC Controller<br />
PCA.<br />
C a u t i o n Remove the Tray 1 Interconnect PCA carefully;<br />
it can easily be broken when separating it from<br />
the black plastic cover.<br />
N o t e<br />
58<br />
The Tray 1 Interconnect PCA and cable must<br />
also be retained when replacing the DC<br />
Controller Board. The part number for the DC<br />
Controller Board does not include a replacement<br />
PCA and cable. This cable can be directly pulled<br />
from the connector no releases are necessary.
<strong>HP</strong> LaserJet 5P/5MP, <strong>6P</strong>/6MP Printer Service Supplement<br />
Removal and Replacement<br />
Figure 29 Tray 1 Interconnect PCA and Cable 302<br />
59
<strong>HP</strong> LaserJet 5P/5MP, <strong>6P</strong>/6MP Printer Service Supplement<br />
Troubleshooting<br />
Troubleshooting<br />
The troubleshooting process for the <strong>HP</strong> LaserJet 5P/5MP and<br />
<strong>6P</strong>/6MP printers has two key differences from the 4L/4ML printer:<br />
• Different error light patterns (5 LEDs instead of 4).<br />
• Infrared port troubleshooting.<br />
This section provides a list and explanation of the error LED<br />
patterns and instructions on troubleshooting the infrared port<br />
60<br />
A data error has occurred. Press the [GO] button to<br />
continue printing (some data may be lost). For more<br />
information, see “Data Error Light Patterns,” later in this<br />
appendix.<br />
A SIMM error has occurred. Make sure your SIMM is<br />
installed correctly. Replace the SIMM that caused the<br />
error. Or press the [GO] button on the printer to continue<br />
without configuring the SIMM that caused the error. If the<br />
SIMM has more than one bank of memory, the good<br />
banks will be automatically configured.
<strong>HP</strong> LaserJet 5P/5MP, <strong>6P</strong>/6MP Printer Service Supplement<br />
Troubleshooting<br />
A fatal error has occurred. Turn the printer off and then<br />
back on. If the same light pattern reappears, turn the<br />
printer off again and leave it off for about 10 minutes,<br />
then turn it back on. If the same light pattern reappears.<br />
refer to the discussion of Fatal Errors in<br />
"Troubleshooting."<br />
A recoverable error has occurred, such as a paper jam,<br />
the top cover is open, or the toner cartridge is missing.<br />
61
<strong>HP</strong> LaserJet 5P/5MP, <strong>6P</strong>/6MP Printer Service Supplement<br />
Troubleshooting<br />
Continuable Data Error Light Patterns<br />
Possible data error light patterns are listed in the first column of the<br />
following table. If the Error and Data lights on the Status Panel are<br />
lit, simultaneously press the GO and RESET/JOB CANCEL buttons<br />
on the printer to display a secondary light pattern. This secondary<br />
light pattern, or data error light pattern, will more precisely describe<br />
the problem. Where more than one data error light pattern is<br />
possible, corresponding computer messages are listed in the second<br />
column.<br />
Data Error Light Pattern Computer Description &<br />
5P/5MP <strong>6P</strong>/6MP Message Recommended Action<br />
62<br />
20 MEM<br />
OVERFLOW<br />
21 PRINT<br />
OVERRUN<br />
22 IO ERROR<br />
Too much data, or data too complex.<br />
Turn Page Protection ON or to AUTO (can<br />
be set within the Remote Control Panel).<br />
2. Add optional memory.<br />
3. Reduce the complexity of the print job.<br />
Press GO to resume printing.<br />
The computer and printer are not<br />
communicating because of improper signal<br />
protocols. Indicates a loose cable<br />
connection or a bad or poor quality cable.<br />
Reseat the cable and make sure you are<br />
using a high-quality cable
<strong>HP</strong> LaserJet 5P/5MP, <strong>6P</strong>/6MP Printer Service Supplement<br />
Troubleshooting<br />
Data Error Light Pattern<br />
5P/5MP <strong>6P</strong>/6MP<br />
Computer<br />
Message<br />
Description &<br />
Recommended Action<br />
40 ERROR Indicates an abnormal connection break<br />
occurred while transferring data from the<br />
computer.<br />
Press GO on the printer to clear the error<br />
message.<br />
41 ERROR A temporary error occurred while printing.<br />
This error most commonly occurs when the<br />
printer picks two sheets of paper at once.<br />
The page containing the error is reprinted<br />
automatically. (first two light sequences)<br />
51/52 ERROR<br />
Remove the page from the output tray and<br />
press GO on the printer<br />
The printer detected a temporary error<br />
condition.<br />
Turn the printer off then on. If the problem<br />
persists replace the laser scanner assembly.<br />
55 ERROR The printer detected a temporary error<br />
condition<br />
Turn the printer off then back on. If problem<br />
persists, replace the DC Controller. If the<br />
problem still continues, replace the formatter<br />
PCA.<br />
63
<strong>HP</strong> LaserJet 5P/5MP, <strong>6P</strong>/6MP Printer Service Supplement<br />
Troubleshooting<br />
Data Error Light Pattern<br />
5P/5MP <strong>6P</strong>/6MP<br />
64<br />
Computer<br />
Message<br />
68 SERVICE<br />
or 68 READY/<br />
SERVICE<br />
Description &<br />
Recommended Action<br />
The printer’s nonvolatile memory (NVRAM)<br />
is full or defective.<br />
Press GO on the printer to clear the error<br />
message. If problem persists,<br />
1. Perform NVRAM Reset to clear NVRAM<br />
(hold down the RESET/JOB CANCEL<br />
button for more than 20 seconds during<br />
power on.<br />
2. Replace the formatter PCA.
<strong>HP</strong> LaserJet 5P/5MP, <strong>6P</strong>/6MP Printer Service Supplement<br />
Troubleshooting<br />
Error 53 -- Memory/SIMM Errors<br />
Error 53 is indicated by a combination of the Error LED and either<br />
Tray LED, on and steady. More detail about the error is found by<br />
pressing the GO and RESET/JOB CANCEL buttons simultaneously,<br />
which causes a secondary sequence of light patterns. These secondary<br />
patterns form a binary representation of the exact hardware type,<br />
device and error number in the form 53-XY-ZZ as shown in Table 4.<br />
Table 4. Memory Error Codes<br />
X-Hardware<br />
Type<br />
Y-Hardware Device ZZ - Error Number<br />
0: ROM 0: On board RAM/ROM 00: Unsupported memory<br />
1: RAM 1: SIMM slot 1 01: Unrecognized memory<br />
2: SIMM slot 2 03: Unsupported memory size<br />
3: SIMM slot 3 04: Invalid SIMM speed<br />
05: SIMM reporting information<br />
incorrectly<br />
06: SIMM address conflict<br />
07: Could not make temporary mapping<br />
Figure 30 explains how to read the light sequences. The initial<br />
sequence (Part 1) shows that ERROR 53 can be indicated by two<br />
different light sequences, depending on the X value: ROM (x =0) or<br />
in RAM (x =1) . Pressing GO and RESET/JOB CANCEL together<br />
produces a secondary light pattern, which reveals the Y- and ZZvalues,<br />
which complete the error code (Part II) . The binary Y<br />
value is read from the top two LEDS; the binary Z value is read<br />
from the lower three LEDS. Part III of Figure 27 shows the binary<br />
values of the different light combinations.<br />
65
<strong>HP</strong> LaserJet 5P/5MP, <strong>6P</strong>/6MP Printer Service Supplement<br />
Troubleshooting<br />
Figure -30 Secondary Light Patterns<br />
66
<strong>HP</strong> LaserJet 5P/5MP, <strong>6P</strong>/6MP Printer Service Supplement<br />
Troubleshooting<br />
Fatal/Service Errors<br />
The following tables show fatal/service errors, which are not<br />
continuable; no further operation of the printer will occur until<br />
corrective action is taken.<br />
Table 5. Fuser Malfunction<br />
LED Display<br />
5P/5MP <strong>6P</strong>/6MP<br />
Table 6. Fuser Checks<br />
ERROR CODE Description and Recommendation<br />
50 Fuser Malfunction 1. Remove power to the printer for 10<br />
minutes. If this doesn’t clear the error:<br />
2. Perform the Fuser Checks shown in Table<br />
C-6.<br />
3. Check the Fuses (FU101 and FU201) on<br />
the DC Controller PCA. Replace if faulty.<br />
3. Replace the DC Controller PCA.<br />
SUSPECTED CAUSE CHECK<br />
1. Connector Contact Ensure that J103 and J204 connectors on the Fusing Assembly are seated<br />
securely into the DC Controller PCA connectors (see Figure 6-29 in the<br />
Combined Service Manual for locations). Reseat the Fusing Assembly.<br />
2. Thermistor wire open. Remove the Fuser and measure the resistance between connectors J204-1<br />
and J204-2 (see Figure 6-29 in the Combined Service Manual for location).<br />
Resistance should read approximately 440 K Ohms at 20 Deg C (room<br />
temperature). If the thermistor wire is open, replace the Fusing Assembly.<br />
3. Thermal Fuse. Measure the continuity between connectors J103-1 and J103-2 on the Fuser<br />
(see Figure 6-29, the Combined Service Manual for location). It should be<br />
approximately 30±5 Ohms for 100-120 VAC or 127±5 Ohms for 220-245<br />
VAC. If the thermal fuse is open, replace the Fusing Assembly.<br />
67
<strong>HP</strong> LaserJet 5P/5MP, <strong>6P</strong>/6MP Printer Service Supplement<br />
Troubleshooting<br />
Table 7. 57/58 Main Motor Failure<br />
68<br />
LED Display<br />
5P/5MP <strong>6P</strong>/6MP<br />
ERROR CODE Description and Recommendation<br />
57/58 Main Motor<br />
Failure<br />
The DC Controller has reported a general<br />
motor failure. The Main Motor is controlled by<br />
the DC Controller PCA, and seated into<br />
connector J601. Power-cycle the printer. If<br />
this doesn’t clear the message:<br />
1. Does the main motor rotate on power-up?<br />
If no:<br />
a. Reseat the Main Motor into the DC<br />
Controller connector.<br />
b. Inspect the Gear Train for debris that<br />
would block the free operation of the gears.<br />
c. The toner cartridge may not be rotating.<br />
Refer to "Drum Rotation Functional Check in<br />
the Combined Service Manual.<br />
d. Main Motor faulty. Power up the printer<br />
and observe if stacker rollers rotate. If not,<br />
replace the Main Motor.<br />
e. Replace the DC Controller PCA.<br />
If the main motor does rotate:<br />
2. Does the fan turn during printing?<br />
If no:<br />
a. Power-cycle the printer.<br />
b. Check the fan to determine if it is blocked<br />
from operation.<br />
c. Reseat the fan connector on the<br />
Laser/Scanner Assembly.<br />
d. Replace the Fan.<br />
e. Replace the Laser/Scanner Assembly.<br />
f. Replace the DC Controller.<br />
g. Replace the connector between the<br />
scanner and DC Controller.
<strong>HP</strong> LaserJet 5P/5MP, <strong>6P</strong>/6MP Printer Service Supplement<br />
Troubleshooting<br />
Table 8. 61.x SIMM Parity and Memory Errors<br />
LED Display<br />
5P/5MP <strong>6P</strong>/6MP<br />
ERROR CODE Description and Recommendation<br />
61.1 SIMM Slot One<br />
Parity Error<br />
61.2 SIMM Slot Two<br />
Parity Error<br />
61.3 SIMM Slot Three<br />
Parity Error<br />
1. Power-cycle the printer.<br />
2. Reseat the SIMM.<br />
3. Replace the SIMM.<br />
69
<strong>HP</strong> LaserJet 5P/5MP, <strong>6P</strong>/6MP Printer Service Supplement<br />
Troubleshooting<br />
70<br />
Table 9 62.x SIMM Parity and Memory Errors<br />
LED Display<br />
5P/5MP <strong>6P</strong>/6MP<br />
ERROR CODE Description and Recommendation<br />
62.1 SIMM Slot One<br />
Memory Problem<br />
62.2 SIMM Slot Two<br />
Memory Problem<br />
62.3 SIMM Slot Three<br />
Memory Problem<br />
1. Power-cycle the printer.<br />
2. Reseat the SIMM.<br />
3. Replace the SIMM.
<strong>HP</strong> LaserJet 5P/5MP, <strong>6P</strong>/6MP Printer Service Supplement<br />
Troubleshooting<br />
Table 10. 62/63/64 Internal Memory Error<br />
LED Display<br />
5P/5MP <strong>6P</strong>/6MP<br />
ERROR CODE Description and Recommendation<br />
62.0 Internal Memory<br />
Problem<br />
63 Internal RAM<br />
Memory Test Failed<br />
64 Scan Buffer Error<br />
1. Power-cycle the printer.<br />
2. Replace the Formatter PCA.<br />
71
<strong>HP</strong> LaserJet 5P/5MP, <strong>6P</strong>/6MP Printer Service Supplement<br />
Troubleshooting<br />
Table 12. Video DMA Timeout Error<br />
LED Display<br />
5P/5MP <strong>6P</strong>/6MP<br />
LED Display<br />
5P/5MP <strong>6P</strong>/6MP<br />
ERROR CODE Description and Recommendation<br />
64 ERROR:<br />
Video DMA Timeout<br />
Table 11. Dynamic RAM Controller Error<br />
72<br />
1. Power-cycle the printer.<br />
2. Replace the Formatter PCA.<br />
ERROR CODE Description and Recommendation<br />
65 ERROR:<br />
Dynamic RAM<br />
Controller<br />
1. Power-cycle the printer.<br />
2. Replace the Formatter PCA.
<strong>HP</strong> LaserJet 5P/5MP, <strong>6P</strong>/6MP Printer Service Supplement<br />
Troubleshooting<br />
Infrared Port Not Responding<br />
Situation Solution<br />
The connection cannot be established or<br />
the transmission seems to be taking longer<br />
than usual.<br />
The printer prints only part of a page or<br />
document.<br />
The print job has been properly sent to the<br />
printer, but the printer will not print.<br />
The IR status light turns off during<br />
transmission.<br />
Using the Infrared Test Tool<br />
Make sure the device you are using is IrDA-compliant; look<br />
for an IrDA symbol on the device or refer to the manual for<br />
the device for IrDA specifications.<br />
Make sure that the operating system on your computer<br />
includes an IR driver and your application uses a <strong>HP</strong><br />
LaserJet 5P/5MP, <strong>6P</strong>/6MP compatible printer driver.<br />
Make sure you have positioned the device within the range<br />
of operation and that no objects, such as a finger, paper,<br />
books, or bright light, are interfering with the connection.<br />
Also make sure the two IR ports are clean (free from dirt<br />
and grease).<br />
Bright light of any kind (sunlight, incandescent light,<br />
fluorescent light, or light from an infrared remote control,<br />
such as those used for TVs and VCRs) shining directly into<br />
one of the IR ports may cause interference.<br />
Position the device closer to the IR port on the printer.<br />
The connection has been broken during transmission. If you<br />
move the portable device during transmission, the<br />
connection can be broken. IrDA-compliant devices are<br />
designed to recover from temporary connection<br />
interruptions. Re-establish the connection (depending on<br />
the device you are using, you can have anywhere from 3 to<br />
40 seconds to re-establish the connection).<br />
If the connection is broken before the entire print job has<br />
been transmitted to the printer (printing has not yet started),<br />
the printer may not print any of the job. If the Data light is<br />
on, press the RESET/JOB CANCEL button to clear the<br />
printer’s memory. Then, position the device within the range<br />
of operation, and print the job again.<br />
The connection may have been broken. If the Data light is<br />
on, press the RESET/JOB CANCEL button to clear the<br />
printer’s memory. Then, position the device within the range<br />
of operation, and print the job again.<br />
A special infrared troubleshooting test tool manufactured by<br />
Genoa Technology, Inc. in cooperation with Hewlett-Packard is<br />
available through <strong>HP</strong> Direct Ordering (part number 5062-4461).<br />
Refer to the discussion beginning on page 22 for more information.<br />
73
<strong>HP</strong> LaserJet 5P/5MP, <strong>6P</strong>/6MP Printer Service Supplement<br />
Troubleshooting<br />
TO FRONT OF PRINTER<br />
Solenoid<br />
SL2<br />
Tray 1 Pickup Assembly<br />
Tray 1 Paper Out<br />
Sensor PS5<br />
Tray 1<br />
Inter-connect<br />
PCA<br />
J301<br />
Tray 2 Solenoid<br />
SL1<br />
Input Paper<br />
Sensor PS1<br />
VR301<br />
Registration<br />
Adjust<br />
AA<br />
J302<br />
High Voltage<br />
Power Supply<br />
Circuitry<br />
J402<br />
AA<br />
Infrared<br />
Sensor<br />
J207<br />
Tray 2 Paper Out<br />
Sensor PS2<br />
J404<br />
J201<br />
J403<br />
SW201<br />
Winding Paper<br />
Sensor PS4<br />
Figure 31 Main Wiring Diagram<br />
74<br />
J401<br />
J202<br />
AC Power<br />
Supply Circuitry<br />
J101<br />
DC Power<br />
Supply Circuitry<br />
FU201<br />
FU101<br />
J601<br />
Exit Paper<br />
Sensor PS3<br />
J204<br />
J103<br />
SW301<br />
Engine Test
<strong>HP</strong> LaserJet 5P/5MP, <strong>6P</strong>/6MP Printer Service Supplement<br />
Parts and Diagrams<br />
Parts and Diagrams<br />
The figures in this section illustrate the major subassemblies in<br />
the printer and their component parts. A table (material list)<br />
follows each exploded assembly diagram. Each table lists the<br />
reference designator (item number) for each part, the associated<br />
part number for the item, the quantity, and a description of the<br />
part.<br />
While looking for a part number, pay careful attention to the<br />
voltage listed in the description column to ensure that the part<br />
number selected is for the correct model of printer.<br />
75
<strong>HP</strong> LaserJet 5P/5MP, <strong>6P</strong>/6MP Printer Service Supplement<br />
Parts and Diagrams<br />
Ordering Parts<br />
All standard part numbers listed are stocked and may be ordered<br />
from <strong>HP</strong>’s Parts Direct Ordering, or Parts Center Europe (PCE).<br />
Hewlett-Packard Co.<br />
Support Materials Organization<br />
8050 Foothills Blvd.<br />
Roseville, CA 95678<br />
Parts Direct Ordering: 1-800-227-8164 (U.S. Only)<br />
Hewlett-Packard Co.<br />
Parts Center, Europe<br />
Wolf-Hirth Strasse 33<br />
D-7030 Boeblingen, Germany<br />
(49 7031) 14-2253<br />
Contact your local <strong>HP</strong> Parts Coordinator for other local phone<br />
numbers.<br />
76
<strong>HP</strong> LaserJet 5P/5MP, <strong>6P</strong>/6MP Printer Service Supplement<br />
Parts and Diagrams<br />
Ordering Consumables<br />
Consumables and accessories such as those listed on page 8-5, and<br />
in Table 4-1, Chapter 4, may be ordered direct from<br />
Hewlett-Packard. The phone numbers are:<br />
U.S.: 1-800-538-8787<br />
Canada: 1-800-387-3154<br />
(Toronto) 416-671-8383<br />
United Kingdom: 0734-441212<br />
Germany: 0130-3322<br />
Contact your local <strong>HP</strong> Parts Coordinator for other local phone<br />
numbers.<br />
N o t e Parts that have no reference designator or part<br />
number are not field replaceable parts and<br />
cannot be ordered through SMO.<br />
The majority of parts numbers are the same for<br />
both the <strong>HP</strong> LaserJet 5P/5MP and the <strong>6P</strong>/6MP<br />
printers. Parts that are different for the<br />
<strong>HP</strong> LaserJet <strong>6P</strong>/6MP printers are highlighted.<br />
77
<strong>HP</strong> LaserJet 5P/5MP, <strong>6P</strong>/6MP Printer Service Supplement<br />
Parts and Diagrams<br />
Figure 32. <strong>HP</strong> LaserJet 5P/<strong>6P</strong> Covers and Doors<br />
78
<strong>HP</strong> LaserJet 5P/5MP, <strong>6P</strong>/6MP Printer Service Supplement<br />
Parts and Diagrams<br />
Table 13. Covers and Doors<br />
REF PART NO. QTY DESCRIPTION<br />
1 RG5-1709-000CN<br />
RG5-2782-000CN<br />
2 RG5-1699-000CN<br />
RG5-2779-000CN<br />
3 RB1-5931-000CN<br />
RB1-9160-000CN<br />
4 RB1-5935-000CN<br />
RB1-9164-000CN<br />
1 Top Door Assembly (5P/5MP)<br />
Top Door Assembly (<strong>6P</strong>/6MP)<br />
1 Power Connector Cover Assy (5P/5MP)<br />
Power Connector Cover Assy (<strong>6P</strong>/6MP)<br />
1 Cover, Main (<strong>HP</strong> LaserJet 5P/5MP)<br />
Cover, Main (<strong>HP</strong> LaserJet <strong>6P</strong>/6MP)<br />
1 Button, Lock (<strong>HP</strong> LaserJet 5P/5MP)<br />
Button, Lock (<strong>HP</strong> LaserJet <strong>6P</strong>/6MP)<br />
5 RS5-2228-000CN 1 Spring, Compression<br />
6 RB1-5936-000CN<br />
RB1-9165-000CN<br />
7 RG5-1697-000CN<br />
RG5-2785-000CN<br />
1 Guide, Lock Button (<strong>HP</strong> LaserJet 5P/5MP)<br />
Guide, Lock Button (<strong>HP</strong> LaserJet <strong>6P</strong>/6MP)<br />
1 Paper Feed Tray Assembly (5P/5MP)<br />
Paper Feed Tray Assembly (<strong>6P</strong>/6MP)<br />
8 RB1-5939-000CN 1 Arm, Tray 1 Sensor<br />
9 C3150-00004<br />
C3155-00001<br />
C3980-00001<br />
C3982-00001<br />
1 Nameplate (<strong>HP</strong> LaserJet 5P)<br />
Nameplate (<strong>HP</strong> LaserJet 5MP)<br />
Nameplate (<strong>HP</strong> LaserJet <strong>6P</strong>)<br />
Nameplate (<strong>HP</strong> LaserJet 6MP)<br />
10 RS5-2418-000CN 1 Spring, Torsion<br />
11 RB1-5937-000CN 1 Stopper, Hinge, Right<br />
12 RB1-5938-000CN 1 Stopper, Hinge, Left<br />
13 RS5-2419-000CN 1 Spring, Torsion<br />
14 RF5-0593-000CN 1 Brush, Mirror<br />
15 RB1-5934-000CN<br />
RB1-9151-000CN<br />
16 RG5-1710-000CN<br />
RG5-2780-000CN<br />
17 RB1-5927-000CN 1 Bushing<br />
18 RB1-5924-000CN<br />
RB1-9171-000CN<br />
19 RG5-1707-000CN<br />
RG5-2784-000CN<br />
1 Cover, Interface Connector (5P/5MP)<br />
Cover, Interface Connector (<strong>6P</strong>/6MP)<br />
1 Side Cover Assembly (5P/5MP)<br />
Side Cover Assembly (<strong>6P</strong>/6MP)<br />
1 Tray, Sub-assy, Face-Up (5P/5MP)<br />
Tray, Sub-assy, Face-Up (<strong>6P</strong>/6MP)<br />
1 Face-Up Tray Assembly (5P/5MP)<br />
Face-Up Tray Assembly (<strong>6P</strong>/6MP)<br />
79
<strong>HP</strong> LaserJet 5P/5MP, <strong>6P</strong>/6MP Printer Service Supplement<br />
Parts and Diagrams<br />
Figure 33. <strong>HP</strong> LaserJet 5P/<strong>6P</strong> Internal Components (1)<br />
80
<strong>HP</strong> LaserJet 5P/5MP, <strong>6P</strong>/6MP Printer Service Supplement<br />
Parts and Diagrams<br />
Table 14. Internal Components (1)<br />
REF PART NO. QTY DESCRIPTION<br />
1 RG5-1801-000CN<br />
RG5-2776-000CN<br />
1 Fan Assembly (5P/5MP)<br />
Fan Assembly (<strong>6P</strong>/6MP)<br />
2 RB1-6006-000CN 1 Arm, Sensor<br />
3 RB1-6332-000CN 1 Pick-Up Roller (tray 2)<br />
4 RG5-1692-000CN<br />
RG5-2796-000CN<br />
5 RG5-1799-000CN<br />
RG5-2786-000CN<br />
6 C3150-00005<br />
C3980-00007<br />
7 C3152-69001<br />
C3987-69001<br />
8 C3151-67901<br />
C3151-69001<br />
C3981-69001<br />
Pick-Up Assy (tray 2) (5P/5MP)<br />
Pick-Up Assy (tray 2) (<strong>6P</strong>/6MP)<br />
1 Motor Assembly (5P/5MP)<br />
Motor Assembly (<strong>6P</strong>/6MP)<br />
1 Formatter Shield (5P/5MP)<br />
Formatter Shield (<strong>6P</strong>/6MP)<br />
1 PostScript SIMM (exch.) (5P/5MP)<br />
PostScript SIMM (exch.) (<strong>6P</strong>/6MP)<br />
1 Formatter PCA (new)<br />
Formatter PCA (exch.) (5P/5MP)<br />
Formatter PCA (exch.) (<strong>6P</strong>/6MP)<br />
9 0515-2701 2 TORX screws<br />
10 RB1-5971-000CN 1 Leaf Spring<br />
11 RG5-1713-000CN<br />
RG5-2778-000CN<br />
12 RB1-5999-000CN<br />
RB1-9195-000CN<br />
13 RB1-5998-000CN<br />
RB1-9194-000CN<br />
1 Gear train Assembly (5P/5MP)<br />
Gear train Assembly (<strong>6P</strong>/6MP)<br />
1 Plate, Grounding, Left (5P/5MP)<br />
Plate, Grounding, Left (<strong>6P</strong>/6MP)<br />
1 Plate, Grounding, Right (5P/5MP)<br />
Plate, Grounding, Right (<strong>6P</strong>/6MP)<br />
81
<strong>HP</strong> LaserJet 5P/5MP, <strong>6P</strong>/6MP Printer Service Supplement<br />
Parts and Diagrams<br />
Figure 34. <strong>HP</strong> LaserJet 5P/<strong>6P</strong> Internal Components (2)<br />
82
<strong>HP</strong> LaserJet 5P/5MP, <strong>6P</strong>/6MP Printer Service Supplement<br />
Parts and Diagrams<br />
Table 15. Internal Components (2)<br />
REF PART NO. QTY DESCRIPTION<br />
1 RG5-0683-020CN 1 Roller, Upper Output Assembly<br />
2 XA9-0666-000CN 2 Screw, TP<br />
3 RG5-1786-000CN 1 Mirror Assembly<br />
4 RB1-5873-000CN 1 Roller, Transfer (5P only)<br />
5 RS5-0313-000CN 1 Gear, 17T<br />
5a RF5-1287-000CN<br />
RF5-0596-000CN<br />
1 Transfer Roller Assembly (5P/5MP)<br />
Transfer Roller Assembly (<strong>6P</strong>/6MP)<br />
6 RG5-1706-000CN 1 Transfer Guide Assembly<br />
7 RG5-0675-000CN 1 Transfer Mount Assy, Right<br />
8 RG5-0674-000CN 1 Transfer Mount Assy, Left<br />
9 RG5-0694-020CN 1 Switch, Plunger Assembly<br />
10 RG5-0766-030CN 1 Scanner Connector Assy<br />
11 RG5-0682-030CN 4 Lower Delivery Roller<br />
83
<strong>HP</strong> LaserJet 5P/5MP, <strong>6P</strong>/6MP Printer Service Supplement<br />
Parts and Diagrams<br />
Figure -35. <strong>HP</strong> LaserJet 5P/<strong>6P</strong> Internal Components (3)<br />
84
<strong>HP</strong> LaserJet 5P/5MP, <strong>6P</strong>/6MP Printer Service Supplement<br />
Parts and Diagrams<br />
Table 16. Internal Components (3)<br />
REF PART NO. QTY DESCRIPTION<br />
1 RG5-1780-000CN<br />
RG5-2848-000CN<br />
C3150-69005<br />
C3980-69005<br />
1 Laser Scanner Assembly (new 5P/5MP)<br />
Laser Scanner Assembly (new <strong>6P</strong>/6MP)<br />
Laser Scanner Assembly (exch 5P/5MP)<br />
Laser Scanner Assembly (exch <strong>6P</strong>/6MP)<br />
2 RG5-1698-000CN 1 Top Oblique Roller Assy<br />
3 RB1-3002-040CN 1 Plunger Lock, Door<br />
4 RS5-2232-000CN 1 Spring, Compression<br />
5 RB1-6003-000CN 1 Plate, Cartridge<br />
6 RB1-6002-000CN 1 Plate, Cartridge Grounding<br />
7 RF5-1286-000CN 1 Plate, MP Grounding, Right<br />
8 RB1-6001-000CN 1 Arm, Input Paper Sensor<br />
9 RB1-2987-020CN 1 Shield, HVT<br />
10 RG5-0584-000CN 1 Feeder Guide Assembly<br />
11 RF5-1283-000CN 1 Eliminator, Static Charge<br />
12 RG5-1814-000CN 1 Roller Assembly, Small Media<br />
13 RB1-6007-000CN 4 Foot, Chassis<br />
14 RB1-6008-000CN 6 Damper, Rubber<br />
15 RB1-3681-000CN 1 Cap, Laser Shutter<br />
85
<strong>HP</strong> LaserJet 5P/5MP, <strong>6P</strong>/6MP Printer Service Supplement<br />
Parts and Diagrams<br />
Figure 36. DC Controller Assembly<br />
86
<strong>HP</strong> LaserJet 5P/5MP, <strong>6P</strong>/6MP Printer Service Supplement<br />
Parts and Diagrams<br />
Table 17. DC Controller Assembly<br />
REF PART NO. QTY DESCRIPTION<br />
1 RG5-1719-000CN 1 HVT Controller Assembly<br />
2 RH2-5259-000CN 1 Cable, Flat (5P/5MP)<br />
3 RG5-1712-000CN<br />
RG5-2774-000CN<br />
1 DC Controller Case Assy (5P/5MP)<br />
DC Controller Case Assy (<strong>6P</strong>/6MP)<br />
4 RG5-1808-000CN 1 Tray 1 Connector PCA Assy<br />
5 RB1-5987-000CN 1 Shield, Case<br />
6<br />
RG5-1798-000CN<br />
RG5-2826-000CN<br />
C3150-69001<br />
C3980-69001<br />
RG5-1809-000CN<br />
RG5-2827-000CN<br />
C3150-69002<br />
c3980-69002<br />
1 DC Controller PCA 100-120V<br />
new (5P/5MP)<br />
new (<strong>6P</strong>/6MP)<br />
exchange (5P/5MP)<br />
exchange (<strong>6P</strong>/6MP)<br />
DC Controller PCA 220-240V<br />
new (5P/5MP)<br />
new (<strong>6P</strong>/6MP)<br />
exchange (5P/5MP)<br />
exchange (<strong>6P</strong>/6MP)<br />
87
<strong>HP</strong> LaserJet 5P/5MP, <strong>6P</strong>/6MP Printer Service Supplement<br />
Parts and Diagrams<br />
Figure 37. Tray 2 Assembly<br />
88
<strong>HP</strong> LaserJet 5P/5MP, <strong>6P</strong>/6MP Printer Service Supplement<br />
Parts and Diagrams<br />
Table 18. Tray 2 Assembly<br />
REF PART NO. QTY DESCRIPTION<br />
R75-4000-000CN<br />
R98-1001-000CN<br />
1 RF5-0673-000CN 1 Plate, Side<br />
1 Complete Tray 2 Assembly (5P/5MP)<br />
Complete Tray 2 Assembly (<strong>6P</strong>/6MP)<br />
2 RS5-2458-000CN 1 Spring, Compression<br />
3 RB1-3426-000CN 1 Claw, Separation<br />
4 RB1-6378-000CN 1 Tray, Legal<br />
5 RB1-6382-000CN 1 Plate, End<br />
6 RB1-9205-000CN 1 Tray 2 Front Panel<br />
89
<strong>HP</strong> LaserJet 5P/5MP, <strong>6P</strong>/6MP Printer Service Supplement<br />
Parts and Diagrams<br />
Figure 38. Tray 1 Assembly<br />
90
<strong>HP</strong> LaserJet 5P/5MP, <strong>6P</strong>/6MP Printer Service Supplement<br />
Parts and Diagrams<br />
Table 19. Tray 1 Assembly<br />
REF PART NO. QTY DESC<br />
RG5-1695-000CN<br />
RG5-2790-000CN<br />
1 Complete Tray 1 Pickup Assy (5P/5MP)<br />
Complete Tray 1 Pickup Assy (<strong>6P</strong>/6MP)<br />
1 RG5-1804-000CN 1 Tray 1 Sensor Cable<br />
2 RG5-1694-000CN 1 Paper guide Plate Assy<br />
3 RS5-2415-000CN 1 Spring, Compression<br />
4 RH7-1258-000CN<br />
RH7-5160-000CN<br />
5 RG5-1693-000CN<br />
RG5-2791-000CN<br />
1 Solenoid SL2 (5P/5MP)<br />
Solenoid SL2 (<strong>6P</strong>/6MP)<br />
1 Tray 1 Pickup Roller Assy (5P/5MP)<br />
Tray 1 Pickup Roller Assy (<strong>6P</strong>/6MP)<br />
6 RB1-2205-000CN 1 Roller, Tray 1 Pickup<br />
7 RF5-0343-000CN 1 Pad, Separation<br />
8 WG8-5210-000CN 1 Photosensor PS5<br />
91
<strong>HP</strong> LaserJet 5P/5MP, <strong>6P</strong>/6MP Printer Service Supplement<br />
Parts and Diagrams<br />
Figure 39. <strong>HP</strong> LaserJet 5P/<strong>6P</strong> Fusing Assembly<br />
92
<strong>HP</strong> LaserJet 5P/5MP, <strong>6P</strong>/6MP Printer Service Supplement<br />
Parts and Diagrams<br />
Table 20. Fusing Assembly<br />
REF PART NO. QTY DESCRIPTION<br />
RG5-1700-000CN<br />
RG5-2800-000CN<br />
C3150-69003<br />
C3980-69003<br />
RG5-1701-000CN<br />
RG5-2801-000CN<br />
C3150-69004<br />
C3980-69004<br />
1 RB1-5918-000CN 1 Cover, Delivery<br />
1<br />
1<br />
Complete Fuser Assy (100-120V)<br />
new (5P/5MP)<br />
new (<strong>6P</strong>/6MP)<br />
exchange (5P/5MP)<br />
exchange (<strong>6P</strong>/6MP)<br />
Complete Fuser Assy (220-240V)<br />
new (5P/5MP)<br />
new (<strong>6P</strong>/6MP)<br />
exchange (5P/5MP)<br />
exchange (<strong>6P</strong>/6MP)<br />
2 RB1-3097-000CN 1 Flag, Exit Sensor<br />
3 RG5-0681-000CN 1 Fuser Delivery Assembly<br />
4<br />
RG5-1813-000CN<br />
RG5-2799-000CN<br />
1<br />
Guide , Fuser Entrance (5P/5MP)<br />
Guide , Fuser Entrance (<strong>6P</strong>/6MP)<br />
5 XB2-8300-809CN 2 Screw, W/Star, M3X8<br />
6<br />
RS5-2421-000CN<br />
RS5-2643-000CN<br />
7 RS5-0637-000CN 1 Gear, 24T<br />
1<br />
Spring, Tension (5P/5MP)<br />
Spring, Tension (<strong>6P</strong>/6MP)<br />
8 RB1-3109-000CN 1 Rubber, Continuity<br />
9 RS5-2421-000CN 1 Spring, Fuser Hook<br />
10<br />
11<br />
12<br />
RB1-5910-000CN<br />
RB1-9179-000CN<br />
RG5-1702-000CN<br />
RG5-2802-000CN<br />
RG5-1703-000CN<br />
RG5-2803-000CN<br />
RB1-5917-000CN<br />
RB1-9181-000CN<br />
1<br />
1<br />
1<br />
Roller, Fuser Pressure (5P/5MP)<br />
Roller, Fuser Pressure (<strong>6P</strong>/6MP)<br />
Fuser Film Assembly 100-120v (5P/5MP)<br />
Fuser Film Assembly 100-120v (<strong>6P</strong>/6MP)<br />
Fuser Film Assembly 220-240V (5P/5MP)<br />
Fuser Film Assembly 220-240V (<strong>6P</strong>/6MP)<br />
Roller, Fuser Delivery (5P/5MP)<br />
Roller, Fuser Delivery (<strong>6P</strong>/6MP)<br />
13 RB1-5906-000CN 1 Tab, Fuser Release<br />
93
<strong>HP</strong> LaserJet 5P/5MP, <strong>6P</strong>/6MP Printer Service Supplement<br />
Parts Index<br />
Parts Index<br />
Alphabetical Parts Index<br />
DESCRIPTION PART NUMBER FIG<br />
Arm, Input Paper Sensor RB1-6001-000CN 35<br />
Arm, Sensor RB1-6006-000CN 33<br />
Arm, Tray 1 Sensor RB1-5939-000CN 32<br />
Brush, Mirror RF5-0593-000CN 32<br />
Bushing RB1-5927-000CN 32<br />
Button, Lock (<strong>HP</strong> LaserJet 5P/5MP) RB1-5935-000CN 32<br />
Button, Lock (<strong>HP</strong> LaserJet <strong>6P</strong>/6MP) RB1-9164-000CN 32<br />
Cable, Flat RH2-5259-000CN 36<br />
Cap, Laser Shutter RB1-3681-000CN 35<br />
Claw, Separation RB1-3426-000CN 37<br />
Complete Fuser Assy (100-120V), exchange (5P/5MP) C3150-69003 39<br />
Complete Fuser Assy (100-120V), exchange (<strong>6P</strong>/6MP) C3980-69003 39<br />
Complete Fuser Assy (100-120V), new (5P/5MP) RG5-1700-000CN 39<br />
Complete Fuser Assy (100-120V), new (<strong>6P</strong>/6MP) RG5-2800-000CN 39<br />
Complete Fuser Assy (220-240V), exchange (5P/5MP) C3150-69004 39<br />
Complete Fuser Assy (220-240V), exchange (<strong>6P</strong>/6MP) C3980-69004 39<br />
Complete Fuser Assy (220-240V), new (5P/5MP) RG5-1701-000CN 39<br />
Complete Fuser Assy (220-240V), new (<strong>6P</strong>/6MP) RG5-2801-000CN 39<br />
Complete Tray 1 Pickup Assy (5P/5MP) RG5-1695-000CN 38<br />
Complete Tray 1 Pickup Assy (<strong>6P</strong>/6MP) RG5-2790-000CN 38<br />
Complete Tray 2 Assembly (5P/5MP) R75-4000-000CN 37<br />
Complete Tray 2 Assembly (5P/5MP) R98-4000-000CN 37<br />
Cover, Delivery RB1-5918-000CN 39<br />
94
<strong>HP</strong> LaserJet 5P/5MP, <strong>6P</strong>/6MP Printer Service Supplement<br />
Parts Index<br />
DESCRIPTION PART NUMBER FIG<br />
Cover, Interface Connector (5P/5MP) RB1-5934-000CN 32<br />
Cover, Interface Connector (<strong>6P</strong>/6MP) RB1-9151-000CN 32<br />
Cover, Main (<strong>HP</strong> LaserJet 5P/5MP) RB1-5931-000CN 32<br />
Cover, Main (<strong>HP</strong> LaserJet <strong>6P</strong>/6MP) RB1-9160-000CN 32<br />
Damper, Rubber RB1-6008-000CN 35<br />
DC Controller Case Assy (5P/5MP) RG5-1712-000CN 36<br />
DC Controller Case Assy (<strong>6P</strong>/6MP) RG5-2774-000CN 36<br />
DC Controller PCA 100-120V, exchange (5P/5MP) C3150-69001 36<br />
DC Controller PCA 100-120V, exchange (<strong>6P</strong>/6MP) C3980-69001 36<br />
DC Controller PCA 100-120V, new (5P/5MP) RG5-1798-000CN 36<br />
DC Controller PCA 100-120V, new (<strong>6P</strong>/6MP) RG5-2826-000CN 36<br />
DC Controller PCA 220-240V, exchange (5P/5MP) C3150-69002 36<br />
DC Controller PCA 220-240V, exchange (<strong>6P</strong>/6MP) C3980-69002 36<br />
DC Controller PCA 220-240V, new (5P/5MP) RG5-1809-000CN 36<br />
DC Controller PCA 220-240V, new (<strong>6P</strong>/6MP) RG5-2827-000CN 36<br />
Eliminator, Static Charge RF5-1283-000CN 35<br />
Face-Up Tray Assembly (5P/5MP) RG5-1707-000CN 32<br />
Face-Up Tray Assembly (<strong>6P</strong>/6MP) RG5-2784-000CN 32<br />
Fan Assembly (5P/5MP) RG5-1801-000CN 33<br />
Fan Assembly (<strong>6P</strong>/6MP) RG5-2776-000CN 33<br />
Feeder Guide Assembly RG5-0584-000CN 35<br />
Flag, Exit Sensor RB1-3097-000CN 39<br />
Foot, Chassis RB1-6007-000CN 35<br />
Formatter PCA (exch.) (5P/5MP) C3151-69001 33<br />
Formatter PCA (exch.) (<strong>6P</strong>/6MP) C3981-69001 33<br />
Formatter PCA (new) C3151-67901 33<br />
95
<strong>HP</strong> LaserJet 5P/5MP, <strong>6P</strong>/6MP Printer Service Supplement<br />
Parts Index<br />
DESCRIPTION PART NUMBER FIG<br />
Formatter Shield C3150-00005 33<br />
Fuser Delivery Assembly RG5-0681-000CN 39<br />
Fuser Film Assembly 100-120v (5P/5MP) RG5-1702-000CN 39<br />
Fuser Film Assembly 100-120v (<strong>6P</strong>/6MP) RG5-2802-000CN 39<br />
Fuser Film Assembly 220-240V (5P/5MP) RG5-1703-000CN 39<br />
Fuser Film Assembly 220-240V (<strong>6P</strong>/6MP) RG5-2803-000CN 39<br />
Gear train Assembly (5P/5MP) RG5-1713-000CN 33<br />
Gear train Assembly (<strong>6P</strong>/6MP) RG5-2778-000CN 33<br />
Gear, 17T RS5-0313-000CN 34<br />
Gear, 24T RS5-0637-000CN 39<br />
Guide , Fuser Entrance (5P/5MP) RG5-1813-000CN 39<br />
Guide , Fuser Entrance (<strong>6P</strong>/6MP) RG5-2799-000CN 39<br />
Guide, Lock Button (<strong>HP</strong> LaserJet 5P/5MP) RB1-5936-000CN 32<br />
Guide, Lock Button (<strong>HP</strong> LaserJet <strong>6P</strong>/6MP) RB1-9165-000CN 32<br />
HVT Controller Assembly RG5-1719-000CN 36<br />
Laser Scanner Assembly (exch 5P/5MP) C3150-69005 35<br />
Laser Scanner Assembly (exch <strong>6P</strong>/6MP) C3980-69005 35<br />
Laser Scanner Assembly (new 5P/5MP) RG5-1780-000CN 35<br />
Laser Scanner Assembly (new <strong>6P</strong>/6MP) RG5-2848-000CN 35<br />
Leaf Spring RB1-5971-000CN 33<br />
Lower Delivery Roller RG5-0682-030CN 34<br />
Mirror Assembly RG5-1786-000CN 34<br />
Motor Assembly (5P/5MP) RG5-1799-000CN 33<br />
Motor Assembly (<strong>6P</strong>/6MP) RG5-2786-000CN 33<br />
Nameplate (<strong>HP</strong> LaserJet 5MP) C3155-00001 32<br />
Nameplate (<strong>HP</strong> LaserJet 5P) C3150-00004 32<br />
96
<strong>HP</strong> LaserJet 5P/5MP, <strong>6P</strong>/6MP Printer Service Supplement<br />
Parts Index<br />
DESCRIPTION PART NUMBER FIG<br />
Pad, Separation RF5-0343-000CN 38<br />
Paper Feed Tray Assembly (5P/5MP) RG5-1697-000CN 32<br />
Paper Feed Tray Assembly (<strong>6P</strong>/6MP) RG5-2785-000CN 32<br />
Paper guide Plate Assy RG5-1694-000CN 38<br />
Photosensor PS5 WG8-5210-000CN 38<br />
Pick-Up Assy (tray 2) (5P/5MP) RG5-1692-000CN 33<br />
Pick-Up Assy (tray 2) (<strong>6P</strong>/6MP) RG5-2796-000CN 33<br />
Pick-Up Roller (tray 2) RB1-6332-000CN 33<br />
Plate, Cartridge RB1-6003-000CN 35<br />
Plate, Cartridge Grounding RB1-6002-000CN 35<br />
Plate, End (5P/5MP) RB1-3338-000CN 37<br />
Plate, End (<strong>6P</strong>/6MP) RB1-6382-000CN 37<br />
Plate, Grounding, Left (5P/5MP) RB1-5999-000CN 33<br />
Plate, Grounding, Left (<strong>6P</strong>/6MP) RB1-9195-000CN 33<br />
Plate, Grounding, Right (5P/5MP) RB1-5998-000CN 33<br />
Plate, Grounding, Right (<strong>6P</strong>/6MP) RB1-9194-000CN 33<br />
Plate, MP Grounding, Right RF5-1286-000CN 35<br />
Plate, Side (5P/5MP) RF5-0673-000CN 37<br />
Plate, Side (<strong>6P</strong>/6MP) RF5-0673-000CN 37<br />
Plunger Lock, Door RB1-3002-040CN 35<br />
PostScript SIMM (exch.) C3152-69001 33<br />
Power Connector Cover Assy (5P/5MP) RG5-1699-000CN 32<br />
Power Connector Cover Assy (<strong>6P</strong>/6MP) RG5-2779-000CN 32<br />
Roller Assembly, Small Media RG5-1814-000CN 35<br />
Roller, Fuser Delivery (5P/5MP) RB1-5917-000CN 39<br />
Roller, Fuser Delivery (<strong>6P</strong>/6MP) RB1-9181-000CN 39<br />
97
<strong>HP</strong> LaserJet 5P/5MP, <strong>6P</strong>/6MP Printer Service Supplement<br />
Parts Index<br />
DESCRIPTION PART NUMBER FIG<br />
Roller, Fuser Pressure (5P/5MP) RB1-5910-000CN 39<br />
Roller, Fuser Pressure (<strong>6P</strong>/6MP) RB1-9179-000CN 39<br />
Roller, Transfer RB1-5873-000CN 34<br />
Roller, Tray 1 Pickup RB1-2205-000CN 38<br />
Roller, Upper Output Assembly RG5-0683-020CN 34<br />
Rubber, Continuity RB1-3109-000CN 39<br />
Scanner Connector Assy RG5-0766-030CN 34<br />
Screw, TP XA9-0666-000CN 34<br />
Screw, W/Star, M3X8 XB2-8300-809CN 39<br />
Shield, Case RB1-5987-000CN 36<br />
Shield, HVT RB1-2987-020CN 35<br />
Side Cover Assembly (5P/5MP) RG5-1710-000CN 32<br />
Side Cover Assembly (<strong>6P</strong>/6MP) RG5-2780-000CN 32<br />
Solenoid SL2 (5P/5MP) RH7-1258-000CN 38<br />
Solenoid SL2 (<strong>6P</strong>/6MP) RH7-5160-000CN 38<br />
Spring, Compression RS5-2228-000CN 32<br />
Spring, Compression RS5-2232-000CN 35<br />
Spring, Compression RS5-2415-000CN 38<br />
Spring, Compression RS5-2458-000CN 37<br />
Spring, Fuser Hook RS5-2421-000CN 39<br />
Spring, Tension (5P/5MP) RS5-2421-000CN 39<br />
Spring, Tension (<strong>6P</strong>/6MP) RS5-2643-000CN 39<br />
Spring, Torsion RS5-2418-000CN 32<br />
Spring, Torsion RS5-2419-000CN 32<br />
Stopper, Hinge, Left RB1-5938-000CN 32<br />
Stopper, Hinge, Right RB1-5937-000CN 32<br />
98
<strong>HP</strong> LaserJet 5P/5MP, <strong>6P</strong>/6MP Printer Service Supplement<br />
Parts Index<br />
DESCRIPTION PART NUMBER FIG<br />
Switch, Plunger Assembly RG5-0694-020CN 34<br />
Tab, Fuser Release RB1-5906-000CN 39<br />
Top Door Assembly (5P/5MP) RG5-1709-000CN 32<br />
Top Door Assembly (<strong>6P</strong>/6MP) RG5-2782-000CN 32<br />
Top Oblique Roller Assy RG5-1698-000CN 35<br />
TORX screws 0515-2701 33<br />
Transfer Guide Assembly RG5-1706-000CN 34<br />
Transfer Mount Assy, Left RG5-0674-000CN 34<br />
Transfer Mount Assy, Right RG5-0675-000CN 34<br />
Transfer Roller Assembly (5P/5MP) RF5-1287-000CN 34<br />
Transfer Roller Assembly (<strong>6P</strong>/6MP) RF5-0596-000CN 34<br />
Tray 1 Connector PCA Assy RG5-1808-000CN 36<br />
Tray 1 Pickup Roller Assy (5P/5MP) RG5-1693-000CN 38<br />
Tray 1 Pickup Roller Assy (<strong>6P</strong>/6MP) RG5-2791-000CN 38<br />
Tray 1 Sensor Cable RG5-1804-000CN 38<br />
Tray 2 Front Panel RB1-9205-000CN 37<br />
Tray, Legal RB1-6378-000CN 37<br />
Tray, Sub-assy, Face-Up (5P/5MP) RB1-5924-000CN 32<br />
Tray, Sub-assy, Face-Up (<strong>6P</strong>/6MP) RB1-9171-000CN 32<br />
99
<strong>HP</strong> LaserJet 5P/5MP, <strong>6P</strong>/6MP Printer Service Supplement<br />
Parts Index<br />
Numerical Parts Index<br />
PART NUMBER DESCRIPTION FIG<br />
100<br />
0515-2701 TORX screws 33<br />
C3150-00004 Nameplate (<strong>HP</strong> LaserJet 5P) 32<br />
C3150-00005 Formatter Shield 33<br />
C3150-69001 DC Controller PCA 100-120V, exchange (5P/5MP) 36<br />
C3150-69002 DC Controller PCA 220-240V, exchange (5P/5MP) 36<br />
C3150-69003 Complete Fuser Assy (100-120V), exchange (5P/5MP) 39<br />
C3150-69004 Complete Fuser Assy (220-240V), exchange (5P/5MP) 39<br />
C3150-69005 Laser Scanner Assembly (exch 5P/5MP) 35<br />
C3151-67901 Formatter PCA (new) 33<br />
C3151-69001 Formatter PCA (exch.) (5P/5MP) 33<br />
C3152-69001 PostScript SIMM (exch.) 33<br />
C3155-00001 Nameplate (<strong>HP</strong> LaserJet 5MP) 32<br />
C3980-69001 DC Controller PCA 100-120V, exchange (<strong>6P</strong>/6MP) 36<br />
C3980-69002 DC Controller PCA 220-240V, exchange (<strong>6P</strong>/6MP) 36<br />
C3980-69003 Complete Fuser Assy (100-120V), exchange (<strong>6P</strong>/6MP) 39<br />
C3980-69004 Complete Fuser Assy (220-240V), exchange (<strong>6P</strong>/6MP) 39<br />
C3980-69005 Laser Scanner Assembly (exch <strong>6P</strong>/6MP) 35<br />
C3981-69001 Formatter PCA (exch.) (<strong>6P</strong>/6MP) 33<br />
R75-4000-000CN Complete Tray 2 Assembly (5P/5MP) 37<br />
R98-4000-000CN Complete Tray 2 Assembly (5P/5MP) 37<br />
RB1-2205-000CN Roller, Tray 1 Pickup 38<br />
RB1-2987-020CN Shield, HVT 35<br />
RB1-3002-040CN Plunger Lock, Door 35<br />
RB1-3097-000CN Flag, Exit Sensor 39<br />
RB1-3109-000CN Rubber, Continuity 39
<strong>HP</strong> LaserJet 5P/5MP, <strong>6P</strong>/6MP Printer Service Supplement<br />
Parts Index<br />
PART NUMBER DESCRIPTION FIG<br />
RB1-3338-000CN Plate, End (5P/5MP) 37<br />
RB1-3426-000CN Claw, Separation 37<br />
RB1-3681-000CN Cap, Laser Shutter 35<br />
RB1-5873-000CN Roller, Transfer 34<br />
RB1-5906-000CN Tab, Fuser Release 39<br />
RB1-5910-000CN Roller, Fuser Pressure (5P/5MP) 39<br />
RB1-5917-000CN Roller, Fuser Delivery (5P/5MP) 39<br />
RB1-5918-000CN Cover, Delivery 39<br />
RB1-5924-000CN Tray, Sub-assy, Face-Up (5P/5MP) 32<br />
RB1-5927-000CN Bushing 32<br />
RB1-5931-000CN Cover, Main (<strong>HP</strong> LaserJet 5P/5MP) 32<br />
RB1-5934-000CN Cover, Interface Connector (5P/5MP) 32<br />
RB1-5935-000CN Button, Lock (<strong>HP</strong> LaserJet 5P/5MP) 32<br />
RB1-5936-000CN Guide, Lock Button (<strong>HP</strong> LaserJet 5P/5MP) 32<br />
RB1-5937-000CN Stopper, Hinge, Right 32<br />
RB1-5938-000CN Stopper, Hinge, Left 32<br />
RB1-5939-000CN Arm, Tray 1 Sensor 32<br />
RB1-5971-000CN Leaf Spring 33<br />
RB1-5987-000CN Shield, Case 36<br />
RB1-5998-000CN Plate, Grounding, Right (5P/5MP) 33<br />
RB1-5999-000CN Plate, Grounding, Left (5P/5MP) 33<br />
RB1-6001-000CN Arm, Input Paper Sensor 35<br />
RB1-6002-000CN Plate, Cartridge Grounding 35<br />
RB1-6003-000CN Plate, Cartridge 35<br />
RB1-6006-000CN Arm, Sensor 33<br />
RB1-6007-000CN Foot, Chassis 35<br />
101
<strong>HP</strong> LaserJet 5P/5MP, <strong>6P</strong>/6MP Printer Service Supplement<br />
Parts Index<br />
102<br />
PART NUMBER DESCRIPTION FIG<br />
RB1-6008-000CN Damper, Rubber 35<br />
RB1-6332-000CN Pick-Up Roller (tray 2) 33<br />
RB1-6378-000CN Tray, Legal 37<br />
RB1-6382-000CN Plate, End (<strong>6P</strong>/6MP) 37<br />
RB1-9151-000CN Cover, Interface Connector (<strong>6P</strong>/6MP) 32<br />
RB1-9160-000CN Cover, Main (<strong>HP</strong> LaserJet <strong>6P</strong>/6MP) 32<br />
RB1-9164-000CN Button, Lock (<strong>HP</strong> LaserJet <strong>6P</strong>/6MP) 32<br />
RB1-9165-000CN Guide, Lock Button (<strong>HP</strong> LaserJet <strong>6P</strong>/6MP) 32<br />
RB1-9171-000CN Tray, Sub-assy, Face-Up (<strong>6P</strong>/6MP) 32<br />
RB1-9179-000CN Roller, Fuser Pressure (<strong>6P</strong>/6MP) 39<br />
RB1-9181-000CN Roller, Fuser Delivery (<strong>6P</strong>/6MP) 39<br />
RB1-9194-000CN Plate, Grounding, Right (<strong>6P</strong>/6MP) 33<br />
RB1-9195-000CN Plate, Grounding, Left (<strong>6P</strong>/6MP) 33<br />
RB1-9205-000CN Tray 2 Front Panel 37<br />
RF5-0343-000CN Pad, Separation 38<br />
RF5-0593-000CN Brush, Mirror 32<br />
RF5-0596-000CN Transfer Roller Assembly (<strong>6P</strong>/6MP) 34<br />
RF5-0673-000CN Plate, Side (5P/5MP) 37<br />
RF5-0673-000CN Plate, Side (<strong>6P</strong>/6MP) 37<br />
RF5-1283-000CN Eliminator, Static Charge 35<br />
RF5-1286-000CN Plate, MP Grounding, Right 35<br />
RF5-1287-000CN Transfer Roller Assembly (5P/5MP) 34<br />
RG5-0584-000CN Feeder Guide Assembly 35<br />
RG5-0674-000CN Transfer Mount Assy, Left 34<br />
RG5-0675-000CN Transfer Mount Assy, Right 34<br />
RG5-0681-000CN Fuser Delivery Assembly 39
<strong>HP</strong> LaserJet 5P/5MP, <strong>6P</strong>/6MP Printer Service Supplement<br />
Parts Index<br />
PART NUMBER DESCRIPTION FIG<br />
RG5-0682-030CN Lower Delivery Roller 34<br />
RG5-0683-020CN Roller, Upper Output Assembly 34<br />
RG5-0694-020CN Switch, Plunger Assembly 34<br />
RG5-0766-030CN Scanner Connector Assy 34<br />
RG5-1692-000CN Pick-Up Assy (tray 2) (5P/5MP) 33<br />
RG5-1693-000CN Tray 1 Pickup Roller Assy (5P/5MP) 38<br />
RG5-1694-000CN Paper guide Plate Assy 38<br />
RG5-1695-000CN Complete Tray 1 Pickup Assy (5P/5MP) 38<br />
RG5-1697-000CN Paper Feed Tray Assembly (5P/5MP) 32<br />
RG5-1698-000CN Top Oblique Roller Assy 35<br />
RG5-1699-000CN Power Connector Cover Assy (5P/5MP) 32<br />
RG5-1700-000CN Complete Fuser Assy (100-120V), new (5P/5MP) 39<br />
RG5-1701-000CN Complete Fuser Assy (220-240V), new (5P/5MP) 39<br />
RG5-1702-000CN Fuser Film Assembly 100-120v (5P/5MP) 39<br />
RG5-1703-000CN Fuser Film Assembly 220-240V (5P/5MP) 39<br />
RG5-1706-000CN Transfer Guide Assembly 34<br />
RG5-1707-000CN Face-Up Tray Assembly (5P/5MP) 32<br />
RG5-1709-000CN Top Door Assembly (5P/5MP) 32<br />
RG5-1710-000CN Side Cover Assembly (5P/5MP) 32<br />
RG5-1712-000CN DC Controller Case Assy (5P/5MP) 36<br />
RG5-1713-000CN Gear train Assembly (5P/5MP) 33<br />
RG5-1719-000CN HVT Controller Assembly 36<br />
RG5-1780-000CN Laser Scanner Assembly (new 5P/5MP) 35<br />
RG5-1786-000CN Mirror Assembly 34<br />
RG5-1798-000CN DC Controller PCA 100-120V, new (5P/5MP) 36<br />
RG5-1799-000CN Motor Assembly (5P/5MP) 33<br />
103
<strong>HP</strong> LaserJet 5P/5MP, <strong>6P</strong>/6MP Printer Service Supplement<br />
Parts Index<br />
104<br />
PART NUMBER DESCRIPTION FIG<br />
RG5-1801-000CN Fan Assembly (5P/5MP) 33<br />
RG5-1804-000CN Tray 1 Sensor Cable 38<br />
RG5-1808-000CN Tray 1 Connector PCA Assy 36<br />
RG5-1809-000CN DC Controller PCA 220-240V, new (5P/5MP) 36<br />
RG5-1813-000CN Guide , Fuser Entrance (5P/5MP) 39<br />
RG5-1814-000CN Roller Assembly, Small Media 35<br />
RG5-2774-000CN DC Controller Case Assy (<strong>6P</strong>/6MP) 36<br />
RG5-2776-000CN Fan Assembly (<strong>6P</strong>/6MP) 33<br />
RG5-2778-000CN Gear train Assembly (<strong>6P</strong>/6MP) 33<br />
RG5-2779-000CN Power Connector Cover Assy (<strong>6P</strong>/6MP) 32<br />
RG5-2780-000CN Side Cover Assembly (<strong>6P</strong>/6MP) 32<br />
RG5-2782-000CN Top Door Assembly (<strong>6P</strong>/6MP) 32<br />
RG5-2784-000CN Face-Up Tray Assembly (<strong>6P</strong>/6MP) 32<br />
RG5-2785-000CN Paper Feed Tray Assembly (<strong>6P</strong>/6MP) 32<br />
RG5-2786-000CN Motor Assembly (<strong>6P</strong>/6MP) 33<br />
RG5-2790-000CN Complete Tray 1 Pickup Assy (<strong>6P</strong>/6MP) 38<br />
RG5-2791-000CN Tray 1 Pickup Roller Assy (<strong>6P</strong>/6MP) 38<br />
RG5-2796-000CN Pick-Up Assy (tray 2) (<strong>6P</strong>/6MP) 33<br />
RG5-2799-000CN Guide , Fuser Entrance (<strong>6P</strong>/6MP) 39<br />
RG5-2800-000CN Complete Fuser Assy (100-120V), new (<strong>6P</strong>/6MP) 39<br />
RG5-2801-000CN Complete Fuser Assy (220-240V), new (<strong>6P</strong>/6MP) 39<br />
RG5-2802-000CN Fuser Film Assembly 100-120v (<strong>6P</strong>/6MP) 39<br />
RG5-2803-000CN Fuser Film Assembly 220-240V (<strong>6P</strong>/6MP) 39<br />
RG5-2826-000CN DC Controller PCA 100-120V, new (<strong>6P</strong>/6MP) 36<br />
RG5-2827-000CN DC Controller PCA 220-240V, new (<strong>6P</strong>/6MP) 36<br />
RG5-2848-000CN Laser Scanner Assembly (new <strong>6P</strong>/6MP) 35
<strong>HP</strong> LaserJet 5P/5MP, <strong>6P</strong>/6MP Printer Service Supplement<br />
Parts Index<br />
PART NUMBER DESCRIPTION FIG<br />
RH2-5259-000CN Cable, Flat 36<br />
RH7-1258-000CN Solenoid SL2 (5P/5MP) 38<br />
RH7-5160-000CN Solenoid SL2 (<strong>6P</strong>/6MP) 38<br />
RS5-0313-000CN Gear, 17T 34<br />
RS5-0637-000CN Gear, 24T 39<br />
RS5-2228-000CN Spring, Compression 32<br />
RS5-2232-000CN Spring, Compression 35<br />
RS5-2415-000CN Spring, Compression 38<br />
RS5-2418-000CN Spring, Torsion 32<br />
RS5-2419-000CN Spring, Torsion 32<br />
RS5-2421-000CN Spring, Tension (5P/5MP) 39<br />
RS5-2421-000CN Spring, Fuser Hook 39<br />
RS5-2458-000CN Spring, Compression 37<br />
RS5-2643-000CN Spring, Tension (<strong>6P</strong>/6MP) 39<br />
WG8-5210-000CN Photosensor PS5 38<br />
XA9-0666-000CN Screw, TP 34<br />
XB2-8300-809CN Screw, W/Star, M3X8 39<br />
105
<strong>HP</strong> LaserJet 5P/5MP, <strong>6P</strong>/6MP Printer Service Supplement<br />
Accessories<br />
Accessories<br />
Listed below are the accessories and supplies, including<br />
supplemental documentation you can order for your <strong>HP</strong> LaserJet<br />
5P/5MP, <strong>6P</strong>/6MP printer.<br />
Option Part Number Description or Use<br />
Toner Cartridge C3903A Replacement toner cartridge.<br />
Memory upgrades 1 MByte—C3130A<br />
2 MByte—C3131A<br />
4 MByte—C3132A<br />
8 MByte—C3133A<br />
16 MByte—C3146A<br />
Adobe’s PostScript Level 2<br />
SIMM<br />
C3152A (<strong>HP</strong> LaserJet 5P)<br />
C3987A (<strong>HP</strong> LaserJet <strong>6P</strong>)<br />
IEEE-1284 Parallel Cable 2 Meter A to B—C2950A<br />
3 Meter A to B—C2951A<br />
3 Meter A to C—C2946A<br />
10 Meter A to C—C2947A<br />
LocalTalk Network cable<br />
for Macintosh<br />
Serial printer cable for<br />
Macintosh<br />
<strong>HP</strong> JetDirect EX print<br />
servers (external)<br />
Adds up to 48 MBytes of memory to the <strong>HP</strong> LaserJet<br />
5P/<strong>6P</strong> printers, for a total of 50 MBytes. Adds up to 32<br />
MBytes of memory to the <strong>HP</strong> LaserJet 5MP/6MP printers,<br />
for a total of 35 MBytes.<br />
Adds PostScript Level 2 language and 1 MByte of memory<br />
to the printer.<br />
IEEE-1284-compliant cables, where:<br />
A=host computer connector (A-type)<br />
B=large printer connector (B-type)<br />
C=small printer connector (C-type)<br />
92215N Connect to a LocalTalk Network.<br />
92215S Directly connect to a Macintosh computer.<br />
J2382B<br />
J2383B<br />
J2593A<br />
J2594A<br />
Ethernet (1 parallel ports)<br />
TokenRing (1 parallel ports)<br />
Ethernet (3 parallel ports)<br />
TokenRing (3 parallel ports)<br />
<strong>HP</strong> Printer Pal (external) C2971A Printer fax accessory. Allows faxes to be printed by the<br />
printer; faxes can also be sent electronically from the PC.<br />
Availability outside the US may vary.<br />
Extra Paper Cassette (Tray<br />
2)*<br />
R75-4000-000CN Universal tray.<br />
IrDA Test Tool 5062-4661 Infrared communications test tool manufactured by Genoa<br />
Technologies, Inc.<br />
* This item must be ordered through <strong>HP</strong> Parts Direct Ordering, (800) 227-<br />
8164. Outside the U.S., see "Parts and Diagrams earlier in this appendix.<br />
106
Index<br />
!<br />
20 MEM OVERFLOW -62<br />
21 PRINT OVERRUN -62<br />
22 IO ERROR -62<br />
40 ERROR -63<br />
41 ERROR -63<br />
50 Fuser ERROR -67<br />
51 ERROR -63<br />
52 ERROR -63<br />
55 ERROR -63<br />
57/58 Motor ERROR -68<br />
61.x SIMM ERROR -69<br />
62 memory error -71<br />
62.x SIMM ERROR -70<br />
63 memory error -71<br />
64 ERROR -72<br />
64 scanner error -71<br />
65 ERROR -72<br />
68 SERVICE ERROR -64<br />
A<br />
accessories -106<br />
acoustic emissions -6<br />
auto I/O switching -28<br />
automatic I/O switching -28<br />
B<br />
bi-directional communication -28<br />
books available -8 - -9<br />
buttons<br />
power -3<br />
buttons, status panel -12<br />
C<br />
cables<br />
IEEE-1284 compliant -28<br />
cold reset -32<br />
connections<br />
network -28<br />
consumables<br />
life -40<br />
ordering -77<br />
consumables, ordering -77<br />
D<br />
data light -13<br />
DC controller -86<br />
interconnect -54<br />
removal and replacement -56<br />
default settings, reset to -12<br />
default settings, returning to -12<br />
demo page -32<br />
demo pages -35<br />
diagnostics -32<br />
diagrams<br />
covers and doors -78<br />
DC controller -86<br />
fusing assembly -92<br />
internal components -80, -82, -84<br />
printer parts -3<br />
tray 1 assembly -90<br />
tray 2 assembly -88<br />
Direct Marketing Division (DMO) -77<br />
DMO -77<br />
documentation -8 - -9<br />
E<br />
Economode -2<br />
electrical<br />
specifications -6<br />
erasing memory with RESET -12<br />
error<br />
continuable -62<br />
data -60<br />
fatal -61, -67<br />
infrared -73<br />
IR port -16<br />
memory -65<br />
recoverable -61<br />
secondary -62<br />
service -67<br />
SIMM -60, -65<br />
error light -13, -60<br />
errors<br />
clearing with RESET -12<br />
hardware-related -13<br />
light patterns -62<br />
F<br />
fax accessory -106<br />
features -10 - -31<br />
product information -2<br />
flashing lights -13<br />
fonts -2<br />
temporary, removing with RESET -12<br />
formatter<br />
removal and replacement -52<br />
fusing assembly -92<br />
removal and replacement -55<br />
G<br />
GO button -12, -34, -62<br />
grounding -27<br />
I<br />
I/O<br />
buffering -30<br />
I/O buffering -30<br />
I/O cover<br />
removal and replacement -43<br />
I/O switching -28<br />
IEEE-1284<br />
A-Type, B-Type, C-Type -27<br />
B-Type, C-Type connector -28<br />
Index-1
cables, compliant -28<br />
parallel ports -27 - -28<br />
specifications -28<br />
infrared<br />
operation -23<br />
port -3, -10<br />
printing -22<br />
software -19<br />
status light -3<br />
status light -10, -14, -16, -22<br />
test tool -24, -73<br />
troubleshooting -24, -73<br />
using to print -22<br />
infrared<br />
test tool -106<br />
troubleshooting -73<br />
infrared communication -19<br />
infrared interface -2<br />
infrared status light -14<br />
Infrared, test tool -24<br />
interface cables -27 - -28<br />
interfaces -27<br />
I/O switching -28<br />
internal components -80, -82, -84<br />
introduction to your printer<br />
diagram -3<br />
IrDA, print using -22<br />
J<br />
JetDirect -106<br />
L<br />
LED<br />
patterns -65<br />
LED<br />
patterns -62<br />
LED patterns -14<br />
LEDs, status -13<br />
left side cover<br />
removal and replacement -45<br />
light<br />
patterns -62, -65<br />
Light Patterns -14<br />
lights on status panel<br />
described -13<br />
lights, status -13<br />
LocalTalk interface -2<br />
LocalTalk port -27<br />
M<br />
Macintosh<br />
reference manual available -8 - -9<br />
macros, temporary -12<br />
Main wiring diagram -74<br />
media path -17 - -18<br />
Memory -2<br />
and I/O buffering -30<br />
and resource saving -29<br />
clearing with RESET -12<br />
error -65, -70<br />
Index-2<br />
ordering -106<br />
ordering -106<br />
memory, SIMM removal -43<br />
model number -4<br />
Monthly Usage -2<br />
N<br />
Network, connecting to -28<br />
networks -28<br />
NVRAM -34<br />
O<br />
ordering<br />
books -8 - -9<br />
consumables -77<br />
LocalTalk -106<br />
parts -76<br />
Postscript -106<br />
ordering consumables -77<br />
ordering parts -76<br />
P<br />
pages, self-test -35<br />
panel<br />
See status panel<br />
Paper<br />
path -17 - -18<br />
size -2<br />
paper jams -13<br />
paper movement, overview (theory) -17<br />
paper specifications -8 - -9<br />
paper trays -2 - -3, -106<br />
paper-out flag -48<br />
parallel cable -28<br />
parallel interface -2<br />
parallel ports -27<br />
parts<br />
ordering -76, -106<br />
Parts Center Europe (PCE) -76<br />
parts and diagrams -75 - -93<br />
parts, location -3, -18<br />
parts, ordering -76<br />
PCE -76<br />
PCL<br />
self-test page -35<br />
phone numbers<br />
ordering consumables -77<br />
phone numbers<br />
DMO -77<br />
PCE -76<br />
SMO -76<br />
PJL commands -32 - -39<br />
port<br />
infrared -21<br />
ports -27<br />
PostScript, SIMM removal -43<br />
power<br />
button -3<br />
power door<br />
removal and replacement -43
power switch -3<br />
Print Speed -2<br />
print spoolers -28<br />
printer<br />
diagram -3<br />
dimensions -6<br />
lights -13<br />
parts diagram -3<br />
serial number -4<br />
printer configuration -32<br />
Printer Languages -2<br />
printer settings<br />
returning to defaults -12<br />
protocol<br />
infrared -19<br />
R<br />
ready light -13<br />
reference guides -8 - -9<br />
regulatory information -4<br />
removal and replacement -41<br />
DC Controller -56<br />
formatter -52<br />
fusing assembly -55<br />
I/O cover -43<br />
left side cover -45<br />
power door -43<br />
tools -42<br />
top cover -46<br />
Tray 1 assembly -49<br />
removing fonts, macros -12<br />
required tools -42<br />
requirements<br />
for infrared -21<br />
RESET button -12, -62<br />
RESET buttons -34<br />
resetting your printer -12<br />
Resolution -2<br />
Resource Saving -29<br />
modes -29<br />
S<br />
self test -32<br />
self test -35<br />
self-test<br />
explained -37, -39<br />
self-test pages -35<br />
serial number -4<br />
Serial Number -3<br />
Service mode -32 - -39<br />
settings<br />
returning to defaults -12<br />
SIMM<br />
error -60, -65, -69<br />
SIMMs, removal -43<br />
SMO -76<br />
Software -21<br />
shipped with printer -9, -20<br />
space requirements -7<br />
Specifications<br />
acoustic -5<br />
dimensions -5 - -7<br />
electrical -5 - -6<br />
enviormental -5<br />
IrDA -19<br />
spoolers -28<br />
Status Panel -2, -10<br />
5P/5MP -10<br />
<strong>6P</strong>/6MP -11<br />
GO button -12<br />
lights -13<br />
Status Panel -3<br />
supplementary documents -8 - -9<br />
Support Materials Organization (SMO)<br />
-76<br />
switchbox, connecting to -28<br />
switchboxes -28<br />
switching, I/O -28<br />
T<br />
temporary fonts, macros -12<br />
test pages -34 - -35<br />
test tool -73, -106<br />
infrared -24<br />
toner, ordering -106<br />
tools, required -42<br />
top cover<br />
removal and replacement -46<br />
tray<br />
empty -15 - -16<br />
tray 1 assembly -90<br />
removal and replacement -49<br />
TRAY 1 light -13<br />
Tray 2<br />
empty indicator -13<br />
tray 2 assembly -88<br />
Tray 2 light -13<br />
troubleshooting -60 - -74<br />
infrared -24<br />
Troubleshooting, IR port -24<br />
turning on your printer -3<br />
Typefaces see fonts -2<br />
W<br />
wireless printing<br />
See see infrared<br />
wiring diagram -74<br />
Index-3
Hewlett-Packard Company<br />
C/O Service Training Team<br />
11311 Chinden Blvd. MS 517<br />
Boise, Idaho 83714-1021