Microtek ScanWizard Pro User's Guide
Microtek ScanWizard Pro User's Guide
Microtek ScanWizard Pro User's Guide

Create successful ePaper yourself
Turn your PDF publications into a flip-book with our unique Google optimized e-Paper software.
<strong>Microtek</strong><br />
<strong>ScanWizard</strong> <strong>Pro</strong><br />
<strong>User's</strong> <strong>Guide</strong><br />
for Windows
English<br />
Copyright © 2004 by <strong>Microtek</strong> International, Inc.<br />
All rights reserved.<br />
Trademarks<br />
<strong>Microtek</strong>, Artix, <strong>ScanWizard</strong> <strong>Pro</strong>, and ArtixScan are trademarks of <strong>Microtek</strong><br />
International, Inc. Macintosh ® and Apple ® are trademarks or registered trademarks of Apple<br />
Computer, Inc. Windows ® is a registered trademark of Microsoft Corporation. All other products<br />
or name brands are trademarks of their respective holders.<br />
Important<br />
Documents that you scan may be protected under copyright law. The unauthorized use of such<br />
documents could be a violation of the rights of the copyright holder. <strong>Microtek</strong> bears no<br />
responsibility for the unauthorized use of copyrighted materials.<br />
To obtain optimal results from the <strong>Microtek</strong> scanning software and user's manual, you should be<br />
familiar with such Windows concepts as pointing, clicking, dragging, and selecting from menus and<br />
dialog boxed. If these things are new to you, refer to your Microsoft Windows <strong>User's</strong> <strong>Guide</strong>.<br />
September 2004<br />
I49-003135 B<br />
<strong>Microtek</strong> Lab, Inc.<br />
16941 Keegan Avenue, Carson, CA 90746<br />
Main: 310-687-5800, Fax: 310-687-5950, http://www.microtekusa.com<br />
<strong>Microtek</strong> International, Inc.<br />
6, Industry East Road 3, Science Based Industrial Park, Hsinchu, 30077, Taiwan<br />
Tel: 886-3-5772155, Fax: 886-3-5772598, http://www.microtek.com<br />
ii
Contents<br />
1Introduction<br />
What is <strong>ScanWizard</strong> <strong>Pro</strong>? ................................................................................ 1-1<br />
A Powerful New Software......................................................................... 1-1<br />
The <strong>ScanWizard</strong> <strong>Pro</strong> Interface ................................................................... 1-2<br />
Settings window (LCH mode) ............................................................... 1-2<br />
Scan Job window .................................................................................. 1-2<br />
Information window .............................................................................. 1-2<br />
Preview window .................................................................................... 1-3<br />
System Requirements ...................................................................................... 1-4<br />
Installing <strong>ScanWizard</strong> <strong>Pro</strong> ................................................................................ 1-4<br />
About this User’s <strong>Guide</strong> .................................................................................. 1-5<br />
2 Getting Started<br />
Using the Scan Mode ...................................................................................... 2-1<br />
Using the Batch Mode..................................................................................... 2-1<br />
Exiting <strong>ScanWizard</strong> <strong>Pro</strong> .................................................................................... 2-3<br />
Color Matching ................................................................................................ 2-3<br />
3 Basic Scenarios<br />
How to Scan a Color Photographic Print ......................................................... 3-2<br />
How to Scan a Color Positive Transparency ................................................... 3-4<br />
How to Scan a Color Negative ......................................................................... 3-6<br />
How to Scan a Line Art Image ......................................................................... 3-8<br />
How to Scan a Newspaper or Magazine Image ...............................................3-10<br />
4 Using the AIC Tools<br />
The LCH Color Model ..................................................................................... 4-2<br />
Selecting LCH or Native Color Space .............................................................. 4-3<br />
Workflow for Optimizing Images ...................................................................... 4-4<br />
Adding a Custom Setting ................................................................................ 4-5<br />
How to Choose the Correct Image Category ................................................... 4-6<br />
Using the Dynamic Range Tool ....................................................................... 4-8<br />
Using the White & Black Points Tool .............................................................4-10<br />
Using the Gradation Tool (LCH Mode only)...................................................4-12<br />
Using the Color Cast Tool (LCH Mode Only) .................................................4-14<br />
Using the Saturation Curve Tool (LCH Mode Only) .......................................4-16<br />
Using the Selective Color Tool (LCH Mode Only)..........................................4-18<br />
Using the Tone Curve Tool .............................................................................4-20<br />
Using the Filter Tool .......................................................................................4-22<br />
iii<br />
English
English<br />
5 Special Features & Advanced Scenarios<br />
How to Edit Multiple Scan Jobs ...................................................................... 5-2<br />
How to Scan Multiple Jobs .............................................................................. 5-4<br />
How to Use <strong>ScanWizard</strong> <strong>Pro</strong> Working Directory ............................................. 5-6<br />
How to Use the SnapTrans Templates ......................................................... 5-8<br />
How to Use the Magic Diamonds ...................................................................5-10<br />
How to Customize Negative Film .................................................................... 5-12<br />
How to Scan and Display an Image on a 640 x 480 Monitor ...........................5-14<br />
Appendix<br />
A Color Matching for for Advanced Users<br />
Display using monitor compensation ................................................................. 2<br />
Display: ............................................................................................................... 3<br />
Native mode RGB color matching (Native Color Mode only) ............................. 3<br />
Embed ICC destination profile in scan image ...................................................... 3<br />
RGB destination: ................................................................................................. 4<br />
CMYK destination: ............................................................................................. 4<br />
Add <strong>Pro</strong>files Button ............................................................................................ 5<br />
Info Button ......................................................................................................... 5<br />
Preview Button ................................................................................................... 5<br />
Refresh Button.................................................................................................... 5<br />
B Available File Format Color for "Scan to File" Function<br />
iv
1 Introduction<br />
What is <strong>ScanWizard</strong> <strong>Pro</strong>?<br />
<strong>ScanWizard</strong> <strong>Pro</strong> (version 6.0 or later) is an advanced scanner controller program that<br />
is designed and engineered to provides many powerful, professional-level features<br />
for scanning with <strong>Microtek</strong> ScanMaker and Artix scanners.<br />
One important feature of <strong>ScanWizard</strong> <strong>Pro</strong> is that it lets you work in the LCH color<br />
space, which is based on the LCH (Luminance, Chroma, Hue) model of colors. The<br />
LCH model is a more intuitive way of editing and working with colors because it<br />
defines colors the way we understand them -- based on the properties of brightness<br />
(how light or dark a color is), saturation (how rich or dull a color is), and hue (“red” as<br />
opposed to “blue”).<br />
Another important function of <strong>ScanWizard</strong> <strong>Pro</strong> is the batch scan feature, a separate<br />
but integrated program that lets you create and manipulate specific “contexts” or<br />
batches of jobs. With Batch Scanning, you can lay out your jobs beforehand, make<br />
adjustments to each scan, then start the scan when you are ready. The result? A<br />
tremendously improved workflow and savings in time, with the additional advantage<br />
of being able to call up the various “contexts” or batch jobs when required.<br />
A Powerful New Software<br />
With <strong>ScanWizard</strong> <strong>Pro</strong>, you can achieve a new level of efficiency in scanning. The<br />
many powerful tools of the program work together to help you obtain the superior<br />
color images you need, as well as provide you with the flexibility to adjust or improve<br />
the images as needed.<br />
And as you become increasingly familiar with the program, you will see how<br />
<strong>ScanWizard</strong> can open up a whole new vista for organizing your workflow and<br />
boosting your scanning productivity in as many ways as your creative imagination<br />
will allow.<br />
Introduction 1-1<br />
English
English<br />
The <strong>ScanWizard</strong> <strong>Pro</strong> Interface<br />
Settings window (LCH mode)<br />
Thumbnails showing<br />
prescanned images<br />
Checked: Indicates<br />
job will be scanned<br />
when you press the<br />
Scan button<br />
Lets you switch<br />
image output into<br />
other image type<br />
(default RGB)<br />
Scan Job window<br />
Function buttons for manipulating<br />
scan jobs<br />
1-2 <strong>ScanWizard</strong> <strong>Pro</strong> for Windows User’s <strong>Guide</strong><br />
Shows current scan<br />
job in preview<br />
Resolution settings<br />
Image dimension input/output<br />
settings and output memory<br />
size info<br />
Scan Frame dimension editing and<br />
image Transformation options<br />
Scanner profile setup and info<br />
Image category options<br />
Minimize Settings window<br />
Advanced Image Correction<br />
controls for adjusting and<br />
optimizing image quality<br />
Reset custom setting(s)<br />
Selected (highlighted) scan job. There<br />
can be multiple selected scan jobs<br />
(Shift + click), which may or may not<br />
include the current scan job in preview<br />
(only jobs with check marks are<br />
scanned<br />
Image output Type of the<br />
current scan job.<br />
Information<br />
window
Preview window<br />
Unit of<br />
measurement.<br />
Options are inch,<br />
cm, mm, point,<br />
pixel, & pica<br />
Cursor Locator:<br />
Shows x, y position of<br />
mouse cursor on the<br />
current overview /<br />
prescan image<br />
Color Meter Display:<br />
Displays input and output<br />
pixel values relative to the<br />
pointer position in<br />
overview/prescan image as<br />
previewed at the bottom<br />
of the window (output<br />
toggles between RGB &<br />
LCH per Color Space Mode<br />
in use)<br />
Color Meter Options: Let<br />
you choose the area of the<br />
sample size shown in the<br />
Sample Display area<br />
Ruler<br />
Prescan button:<br />
Previews a high-resolution<br />
image of the area selected by<br />
the scan frame.<br />
Overview button:<br />
Previews the<br />
entire scan<br />
material<br />
Toolbar:<br />
Left to right, Scan<br />
Frame, Zoom, Pane,<br />
Tag Windows<br />
Scan button:<br />
Starts the final scanning<br />
process.<br />
Scan Material icon:<br />
Selects the type of<br />
scan material.<br />
Overview image<br />
with multiple<br />
Scan Frames<br />
(press Shift key<br />
to add new<br />
frames)<br />
Current Scan<br />
Job shown with<br />
scrolling Scan<br />
Frame. Drag any<br />
side or corner of<br />
the frame to<br />
resize<br />
Status bar<br />
provides useful<br />
tips relative to<br />
the Toolbar tool<br />
in use<br />
(described below)<br />
Sample Display area: Shows<br />
Current Scan Job<br />
resolution & zoom<br />
in/out status<br />
“Magic Diamonds” markers<br />
pinpoint shadow &<br />
highlight points of the<br />
current Scan Job. The<br />
Drag this corner<br />
to resize the<br />
Preview<br />
window.<br />
zoomed pixelized display of<br />
the pointer position within<br />
the preview image<br />
Handy buttons<br />
for zooming in/<br />
out at twofold<br />
magnification<br />
Markers can be made to<br />
blink by clicking the Flash<br />
Marker button from the<br />
Status Bar for easy<br />
detection<br />
Introduction 1-3<br />
English
English<br />
System Requirements<br />
IBM-PC Pentium or compatibles<br />
Windows 95/98 or Windows NT4.0<br />
64 MB RAM required; 128 MB or more suggested for better performance<br />
Free hard disk space as required by the size of your scanned images and for<br />
additional working files<br />
CD-ROM drive (internal or external)<br />
“Thousands of color” display or better<br />
<strong>Microtek</strong> ScanMaker 3, 4, 5, 9600XL, 2000; the <strong>Microtek</strong> ArtixScan line of professional<br />
scanners; and other scanner models that support <strong>ScanWizard</strong> <strong>Pro</strong>.<br />
Installing <strong>ScanWizard</strong> <strong>Pro</strong><br />
1. Insert the <strong>Microtek</strong> <strong>ScanWizard</strong> <strong>Pro</strong> CD-ROM into your CD-ROM drive.<br />
2. Double-click the CD-ROM when it appears on your Windows desktop to open it.<br />
3. When the CD-ROM opens, double-click the ICC <strong>Pro</strong>file Installer icon, and follow<br />
screen instructions to install the desired profiles.<br />
NOTE: If the ICC profile for your monitor is not found, contact your monitor<br />
manufacturer.<br />
4. Next, double-click the <strong>ScanWizard</strong> <strong>Pro</strong> Installer icon, and follow screen<br />
instructions to install the program.<br />
5. Restart your computer.<br />
NOTE: You may want to skip Step #3 and install the ICC profiles later. When<br />
Step #4 is run, some default profiles will be installed as the default.<br />
1-4 <strong>ScanWizard</strong> <strong>Pro</strong> for Windows User’s <strong>Guide</strong>
About this User’s <strong>Guide</strong><br />
This manual provides basic information on the program and sketches out a variety of<br />
scenarios that illustrate <strong>ScanWizard</strong>’s versatility and how best to use the program for<br />
specific scanning tasks with applicable <strong>Microtek</strong> scanner.<br />
For a more detailed listing of individual features, please refer to the companion<br />
Reference <strong>Guide</strong> included in your documentation package.<br />
Introduction 1-5<br />
English
2 Getting Started<br />
This <strong>ScanWizard</strong> <strong>Pro</strong> operates in two operating modes, Scan and Batch modes:<br />
1. The Scan mode (or scan-to-application) “acquires” <strong>ScanWizard</strong> <strong>Pro</strong> from an<br />
image-editing software program such as the Adobe Photoshop. The output<br />
images are scanned and directly delivered (individually or in batches) to your<br />
image editing software for further processing.<br />
2. The Batch mode (or scan-to-file) launches the <strong>ScanWizard</strong> <strong>Pro</strong> from desktop<br />
program icon or Windows Start menu. The output images are scanned and saved<br />
to files individually or in batches.<br />
Using the Scan Mode<br />
To operate <strong>ScanWizard</strong> <strong>Pro</strong> in the Scan mode, launch the image-editing software (e.g.<br />
Photoshop) of your choice. When the software program launches, go to the File<br />
menu, and choose the Import or Acquire command, depending on the software you<br />
are using (see sample menu from Photoshop below). This will automatically launch<br />
<strong>ScanWizard</strong> <strong>Pro</strong>, and the four major windows that form the interface of <strong>ScanWizard</strong><br />
<strong>Pro</strong> will appear on your screen.<br />
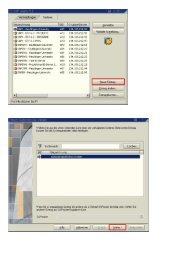
Using the Batch Mode<br />
The Batch mode of operating <strong>ScanWizard</strong> <strong>Pro</strong> allows you to setup scan jobs<br />
individually or in “batches” and then start the scanning and save-to-file processes<br />
when you are ready to do so with a simple click of the Batch button.<br />
To operate <strong>ScanWizard</strong> <strong>Pro</strong> in stand-alone Batch mode, click on the <strong>ScanWizard</strong> <strong>Pro</strong><br />
program icon on your desktop or go to the Start menu and simply follow the steps as<br />
illustrated below.<br />
Getting Started 2-1<br />
English
English<br />
2<br />
1<br />
1. Start button<br />
2. <strong>Pro</strong>gram<br />
3. <strong>Microtek</strong> <strong>ScanWizard</strong> <strong>Pro</strong> for Windows<br />
4. <strong>Microtek</strong> <strong>ScanWizard</strong> <strong>Pro</strong> 6.0<br />
Note that the final scan button for stand-alone operation differs with that of<br />
<strong>ScanWizard</strong> <strong>Pro</strong> operation under a TWAIN program as illustrated below.<br />
"Batch" button<br />
displays for standalone<br />
(scan-to-file)<br />
operation<br />
2-2 <strong>ScanWizard</strong> <strong>Pro</strong> for Windows User’s <strong>Guide</strong><br />
3<br />
"Scan" button<br />
displays for TWAIN<br />
(scan-to-application)<br />
operation<br />
For more details, refer to the batch scan scenarios and information presented in<br />
Chapter 5, Special Features & Advanced Scenarios of this manual.<br />
4
This is dimmed<br />
when<br />
operating under<br />
LCH mode<br />
Exiting <strong>ScanWizard</strong> <strong>Pro</strong><br />
To exit from <strong>ScanWizard</strong> <strong>Pro</strong>, go to the Preview window, and click on the Close button<br />
at top-right corner of the window.<br />
Color Matching<br />
"Close" button<br />
Click to quit from<br />
<strong>ScanWizard</strong> <strong>Pro</strong><br />
The first time you launch <strong>ScanWizard</strong> <strong>Pro</strong>, you will be prompted to perform color<br />
matching for your monitor and printer.<br />
Color Matching is an important feature of <strong>ScanWizard</strong> <strong>Pro</strong> that ensures color<br />
consistency — from the initial input phase when an image is captured by the scanner,<br />
to the final output process when the image is output to your monitor or printer. Color<br />
Matching allows you to gain the assurance that the colors captured by the scanner<br />
are consistent with those displayed on your monitor and will be reproduced as<br />
closely as possible when they are printed.<br />
You will be prompted with a dialog box (below) to select color matching settings<br />
immediately after you launch <strong>ScanWizard</strong> <strong>Pro</strong> the first time.<br />
Monitor selection<br />
shown here is set at<br />
default profiles for<br />
monitor and printer<br />
CMYK printer<br />
profile. No default<br />
provided. Must<br />
select one if required<br />
You may redefine color matching settings whenever required. To do this, go to the<br />
Preferences menu in the Preview window, and choose the Color Matching Setup<br />
command.<br />
For more detailed information on color matching, see Color Matching for Advanced<br />
Users in the Appendix section of this manual.<br />
Getting Started 2-3<br />
English
3 Basic Scenarios<br />
This section of the manual sets out a few scenarios on how to do some basic scans,<br />
using a color photograph, a positive slide, negative film, line art and magazine<br />
images as scan material. The steps are laid out on the left-hand side of the page, and<br />
supplementary information for each scenario can be found in a shaded sidebar next<br />
to the procedures. Information on how to adjust and enhance images, as well as<br />
more advanced scanning scenarios, are provided in the succeeding chapters of the<br />
manual.<br />
The following basic sample scenarios are discussed in the following pages:<br />
• How to Scan a Color Photographic Print<br />
How to Scan a Color Positive Transparency<br />
How to Scan a Color Negative<br />
How to Scan a Line Art Image<br />
How to Scan a Newspaper or Magazine Image<br />
Basic Scenarios 3-1<br />
English
English<br />
How to Scan a Color Photographic Print<br />
1. Place the photograph to be scanned on your<br />
scanner’s glass bed.<br />
2. Go to the Preview window and click the Scan<br />
Material icon. From the submenu that appears,<br />
choose Reflective. You will notice the change in<br />
the appearance of the icon.<br />
3. Click the Overview button to start an overview,<br />
and you will see the image appear in your<br />
Preview window.<br />
4. Select the Scan Frame tool from the Toolbar in<br />
the Preview window, and choose the area to be<br />
scanned by dragging a rectangle around it. You<br />
will see a flashing frame (marquee) around the<br />
selected area.<br />
5. If you like what you see in the Preview window,<br />
click the Scan (or Batch) button to start<br />
scanning.<br />
3 4 5<br />
3-2 <strong>ScanWizard</strong> <strong>Pro</strong> for Windows User’s <strong>Guide</strong><br />
2<br />
If you want to....<br />
Before the Final Scan<br />
• Select an output image type (after<br />
step 2)<br />
Go to the Settings window, and from<br />
the Type box, choose the appropriate<br />
image type for the image to be scanned.<br />
• Specify output dimensions (after<br />
step 2)<br />
Go to the Settings window, and enter<br />
the desired output dimensions (width<br />
and height) in the output dimension edit<br />
boxes. The scan frame may change<br />
slightly, and you may want to go back<br />
to the Preview window to readjust the<br />
scan frame that selects the area you<br />
want.<br />
• Change output image resolution<br />
(before step 5)<br />
Go to the Settings window, and enter<br />
the resolution value in the Resolution<br />
edit box.<br />
• See a more detailed preview image<br />
(after step 4)<br />
Go to the Preview window, highlight<br />
the scan job you wish to see in detail,<br />
and click the Prescan button.<br />
• Fine-tune the preview image with<br />
image processing options (after step<br />
4)<br />
Go to the Preview window, and select<br />
the desired image-processing option<br />
from the Correction menu. Alternatively,<br />
you can go to the Settings<br />
window and click an image processing<br />
button; the Advanced Image Correction<br />
(AIC) dialog box will then appear.<br />
View the prescanned image in the<br />
Preview window to see a real-time<br />
display of the fine tuning results
Define output image settings and<br />
access Advance Image Correction<br />
tools from Settings window<br />
Typical Advanced Image Correction tool<br />
dialog box for fine-tuning images<br />
Basic Scenarios 3-3<br />
English
English<br />
How to Scan a Color Positive Transparency<br />
1. For dual bed-scanners (such as the ArtixScan<br />
2500f), make use of the SnapTrans templates<br />
feature explained in Chapter 5. Place the film to be<br />
scanned on the appropriate template, and insert<br />
the film and template into your scanner’s lower<br />
bed. For flatbed scanners, use a Transparent<br />
Media Adapter.<br />
2. Go to the Preview window and click the Scan<br />
Material icon. From the submenu that appears,<br />
choose Positive Transparency. You will notice<br />
the change in the appearance of the icon.<br />
3. Click the Overview button to start an overview,<br />
and you will see the image appear in your Preview<br />
window.<br />
4. Select the Scan Frame tool from the Toolbar in<br />
the Preview window, and choose the area to be<br />
scanned by dragging a rectangle around it. You<br />
will see a flashing frame (marquee) around the<br />
selected area.<br />
5. If you like what you see in the Preview window,<br />
click the Scan (or Batch) button to start<br />
scanning.<br />
3 4<br />
5<br />
3-4 <strong>ScanWizard</strong> <strong>Pro</strong> for Windows User’s <strong>Guide</strong><br />
2<br />
If you want to....<br />
Before the Final Scan<br />
• Select an output image type (after<br />
step 2)<br />
Go to the Settings window, and from the<br />
Type box, choose the appropriate image<br />
type for the image to be scanned.<br />
• Specify output dimensions (after step<br />
2)<br />
Go to the Settings window, and enter<br />
the desired output dimensions (width and<br />
height) in the output dimension edit<br />
boxes. The scan frame may change<br />
slightly, and you may want to go back to<br />
the Preview window to readjust the scan<br />
frame that selects the area you want.<br />
• Change output image resolution<br />
(before step 5)<br />
Go to the Settings window, and enter<br />
the resolution value in the Resolution<br />
edit box.<br />
• See a more detailed preview image<br />
(after step 4)<br />
Go to the Preview window, highlight<br />
the scan job you wish to see in detail,<br />
and click the Prescan button.<br />
• Fine-tune the preview image with<br />
image processing options (after step<br />
4)<br />
Go to the Preview window, and select<br />
the desired image-processing option<br />
from the Correction menu. Alternatively,<br />
you can go to the Settings<br />
window and click an image processing<br />
button; the Advanced Image Correction<br />
dialog box will then appear.<br />
View the prescanned image in the<br />
Preview window to see a real-time<br />
display of the fine tuning results
Define output image settings and<br />
access Advance Image Correction<br />
tools from Settings window<br />
Typical Advanced Image Correction tool<br />
dialog box for fine-tuning images<br />
Basic Scenarios 3-5<br />
English
English<br />
How to Scan a Color Negative<br />
1. For dual bed-scanners (such as the ArtixScan<br />
2500f), make use of the SnapTrans templates<br />
feature explained in Chapter 5. Place the film to be<br />
scanned on the appropriate template, and insert<br />
the film and template into your scanner’s lower<br />
bed. For flatbed scanners, use a Transparent<br />
Media Adapter.<br />
2. Go to the Preview window and click the Scan<br />
Material icon. From the submenu that appears,<br />
choose Negative Film. You will notice the change<br />
in the appearance of the icon.<br />
3. Click the Overview button to start an overview,<br />
and you will see the image appear in your Preview<br />
window.<br />
4. Select the Scan Frame tool from the Toolbar in<br />
the Preview window, and choose the area to be<br />
scanned by dragging a rectangle around it. You<br />
will see a flashing frame (marquee) around the<br />
selected area.<br />
5. If you like what you see in the Preview window,<br />
click the Scan button to start scanning.<br />
3<br />
4<br />
3-6 <strong>ScanWizard</strong> <strong>Pro</strong> for Windows User’s <strong>Guide</strong><br />
5<br />
2<br />
If you want to....<br />
Before the Final Scan<br />
• Select an output image type (after<br />
step 2)<br />
Go to the Settings window, and from the<br />
Type box, choose the appropriate image<br />
type for the image to be scanned.<br />
• Specify output dimensions (after step<br />
2)<br />
Go to the Settings window, and enter<br />
the desired output dimensions (width and<br />
height) in the output dimension edit<br />
boxes. The scan frame may change<br />
slightly, and you may want to go back to<br />
the Preview window to readjust the<br />
scan frame that selects the area you<br />
want.<br />
• See a more detailed preview image<br />
(after step 4)<br />
Go to the Preview window, highlight<br />
the scan job you wish to see in detail,<br />
and click the Prescan button.<br />
• Fine-tune the preview image with<br />
image processing options (after step<br />
4)<br />
Go to the Preview window, and select<br />
the desired image-processing option<br />
from the Correction menu. Alternatively,<br />
you can go to the Settings<br />
window and click an image processing<br />
button; the Advanced Image Correction<br />
dialog box will then appear.<br />
• Adjust film type (before step 5)<br />
Go to the Film Type menu in the<br />
Settings window and select the film<br />
type and manufacturer.<br />
View the prescanned image in the<br />
Preview window to see a real-time<br />
display of the fine tuning results
Define output image settings and<br />
access Advance Image Correction<br />
tools from Settings window<br />
Typical Advanced Image Correction tool<br />
dialog box for fine-tuning images<br />
When scanning Negative Film, this pane<br />
will switch into "Film Type" option.<br />
Default is Generic Negative Film<br />
Basic Scenarios 3-7<br />
English
English<br />
How to Scan a Line Art Image<br />
1. Place the image to be scanned on your scanner’s<br />
glass bed.<br />
2. Go to the Preview window and click the Scan<br />
Material icon. From the submenu that appears,<br />
choose Reflective.<br />
3. Go to the Settings window, and from the Type box,<br />
choose Line Art.<br />
4. Click the Overview button to start an overview.<br />
5. Select the Scan Frame tool from the Toolbar in<br />
the Preview window, and choose the area to be<br />
scanned by dragging a rectangle around it. You<br />
will see a flashing frame (marquee) around the<br />
selected area.<br />
6. On the Resolution box, enter a Resolution value<br />
that matches the resolution of your printer (300 or<br />
600 dpi, for example) to obtain optimal results.<br />
7. If you like what you see in the Preview window,<br />
click the Scan button to start scanning.<br />
3-8 <strong>ScanWizard</strong> <strong>Pro</strong> for Windows User’s <strong>Guide</strong><br />
If you want to....<br />
Before the Final Scan<br />
• Specify output dimensions (after<br />
step 2)<br />
Go to the Settings window, and<br />
enter the desired output dimensions<br />
(width and height) in the output<br />
dimension edit boxes. The scan frame<br />
may change slightly, and you may<br />
want to go back to the Preview<br />
window to readjust the scan frame<br />
that selects the area you want.<br />
• See a more detailed preview<br />
image (after step 5)<br />
Go to the Preview window, highlight<br />
the scan job you wish to see in detail,<br />
and click the Prescan button.<br />
• Fine-tune the preview image with<br />
image processing options (after<br />
step 5)<br />
For Line Art images, only the<br />
Threshold option is available.<br />
Threshold measures how gray levels<br />
are converted to black and white,<br />
with the value of 128 (middle gray<br />
level) as the determining point of<br />
conversion. Gray levels below the<br />
threshold are converted to black,<br />
while gray levels above the threshold<br />
are converted to white.
3<br />
6<br />
Define output image settings and<br />
access Advance Image Correction<br />
tools from Settings window<br />
When set to "B&W Diffusion," this<br />
pane, and all the Advance Image<br />
Correction (AIC) tools are dimmed<br />
(unavailable).<br />
When output image type is set to<br />
"Line Art," this pane will switch<br />
into "Threshold" while the rest of<br />
the Advance Image Correction<br />
(AIC) tools are dimmed<br />
(unavailable).<br />
4<br />
5<br />
View the prescanned image in the<br />
Preview window to see a real-time<br />
display of the fine tuning results<br />
Typical Advanced Image Correction tool<br />
(Threshold ) dialog box for fine-tuning Line<br />
Art images<br />
7<br />
2<br />
Basic Scenarios 3-9<br />
English
English<br />
How to Scan a Newspaper or Magazine Image<br />
1. Place the printer matter material to be scanned on<br />
your scanner.<br />
2. Go to the Preview window and click the Scan<br />
Material icon. From the submenu that appears,<br />
choose Reflective.<br />
3. Click the Overview button to start an overview, and<br />
you will see the image appear in your Preview<br />
window.<br />
4. Select the Scan Frame tool from the Toolbar in the<br />
Preview window, and choose the area to be scanned<br />
by dragging a rectangle (scan frame) around it. You<br />
will see a flashing frame (marquee) around the<br />
selected area.<br />
5. Move the pointer to the menu next to the Descreen<br />
tool in the Settings window. From the drop-down<br />
menu that appears, select your source material -whether<br />
the image being scanned is from a<br />
newspaper, magazine, or art magazine (higher-quality<br />
printing).<br />
NOTE: If you know the printed lpi (lines per inch)<br />
for the image, you may enter the exact number. You<br />
can measure the line screen by using a screen<br />
finder, which can be purchased from your local<br />
print shop.<br />
6. Click the Scan button. When the image is scanned,<br />
no moiré patterns will be evident.<br />
NOTE: Descreen result will not show in the preview<br />
screen. You need to display or print the output<br />
image under your application to see the<br />
descreening effect.<br />
3-10 <strong>ScanWizard</strong> <strong>Pro</strong> for Windows User’s <strong>Guide</strong><br />
If you want to....<br />
Before the Final Scan<br />
• Specify output dimensions (after<br />
step 2)<br />
Go to the Settings window, and<br />
enter the desired output dimensions<br />
(width and height) in the output<br />
dimension edit boxes. The scan frame<br />
may change slightly, and you may<br />
want to go back to the Preview<br />
window to readjust the scan frame<br />
that selects the area you want.<br />
• See a more detailed preview<br />
image (after step 4)<br />
Go to the Preview window, highlight<br />
the scan job you wish to see in detail,<br />
and click the Prescan button.<br />
Before Descreen<br />
After Descreen
If you know the<br />
printed lpi (lines per<br />
inch) for the image<br />
type, you may enter<br />
the exact lpi value in<br />
the Descreen Custom<br />
dialog box. Click on<br />
“Descreen” button to<br />
display the dialog box<br />
(right)<br />
The Descreen tool is used to remove “screens” or moiré patterns from appearing in<br />
images. Moirés are interference patterns that show up on your scanned images when<br />
you scan images from magazines and newspapers. Moiré patterns emerge as a series<br />
of crosshatches or screens crisscrossing in the image.<br />
In the example in previous page, the top image was scanned from a magazine,<br />
resulting in an undesirable moiré pattern. The solution: rescan the image using the<br />
Descreen tool. This will eliminate potential moirés from appearing in the resulting<br />
image as illustrated by the bottom image.<br />
Define output image settings and<br />
access Advance Image Correction<br />
tools from Settings window<br />
5<br />
3 4<br />
6 2<br />
When using<br />
"Descreen," printed<br />
matter type must be<br />
defined.<br />
View the prescanned image in<br />
the Preview window to see a<br />
real-time display of the fine<br />
tuning results except descreen<br />
result.<br />
Basic Scenarios 3-11<br />
English
4 Using the AIC Tools<br />
This section of the user’s guide describes the use of the various Advanced Image<br />
Correction (AIC) tools, which form an integral part of <strong>ScanWizard</strong> <strong>Pro</strong>. All the tools<br />
are available when you work in the default LCH color space, but a different set of<br />
tools is available when you choose to work in the Native color space. Included at the<br />
beginning of this section is a brief discussion of the LCH color model vs. the Native<br />
color model, as well as other concepts important to optimizing your workflow. The<br />
scenarios provided are based on the Advanced Image Correction tools available<br />
through the LCH color model.<br />
The LCH Color Model<br />
Selecting LCH or Native Color Space<br />
Workflow for Optimizing Images<br />
Adding a Custom Setting<br />
How to Choose the Correct Image Category<br />
Using the Dynamic Range Tool<br />
Using the Black & White Points Tool<br />
Using the Gradation Tool<br />
Using the Color Cast Tool<br />
Using the Saturation Curve Tool<br />
Using the Selective Color Tool<br />
Using the Tone Curve Tool<br />
Using the Filter Tool<br />
Using AIC Tools 4-1<br />
English
English<br />
The LCH Color Model<br />
One of <strong>ScanWizard</strong> <strong>Pro</strong>’s strengths is its ability to let you work in the LCH color<br />
space. Unlike the RGB color model, which corresponds to the color space as defined<br />
in monitors and printers, the LCH color model is a more intuitive way of working with<br />
colors, based on the values of Lightness (the “L” in LCH), Chroma (C), and Hue (H).<br />
For instance, if you wish to change the color of the sky in an image to a darker blue,<br />
your own eye — and your own judgment — will be the guide to making those color<br />
changes. This is easier than, say, knowing the mathematical equivalent in RGB or<br />
CMYK values that would correspond to a “dark sky blue”.<br />
The LCH model, in effect, makes it easier to comprehend colors as they are couched<br />
in the terms we are familiar with: Lightness (how dark or light a color is), Chroma or<br />
saturation (how rich or dull a particular hue of green is), and Hue (the property that<br />
distinguishes, say, the color red from the color blue.)<br />
In the LCH color model, colors of equal brightness lie on a single plane of the model,<br />
as shown below. Red and green lie opposite each other on the horizontal axis, as blue<br />
and yellow lie opposite each other on the vertical axis.<br />
On the color sphere shown below, you can see how the different LCH properties play<br />
out:<br />
The different hues (red, green, yellow, blue) are spread around the sphere.<br />
The chroma (saturation) for each hue increases from the center of the sphere<br />
outward, with the most saturated colors lying on the edge of the sphere.<br />
• The brightness values increase from the bottom of the model to the top.<br />
4-2 <strong>ScanWizard</strong> <strong>Pro</strong> for Windows User’s <strong>Guide</strong>
Selecting LCH or Native Color Space<br />
<strong>ScanWizard</strong> <strong>Pro</strong> lets you choose the color space in which you wish to edit and work<br />
with color images.<br />
Select LCH mode if you wish to edit or correct images in terms of color perception<br />
according to the human eye, based on the properties of Lightness, Chroma, and<br />
Hue. This is the default mode.<br />
Select Native mode if you wish to edit or correct the individual RGB / CMYK<br />
channels of an image.<br />
LCH mode is the default working color space when you first starts <strong>ScanWizard</strong> <strong>Pro</strong>.<br />
To switch to Native mode, click on Preference from Preview window menu bar. Then<br />
click More... command from the bottom of the menu.<br />
The following dialog box will then display.<br />
From the dialog box, click on the Color<br />
Space Mode: list box and choose Native.<br />
The same procedure applies in switching<br />
from Native back to LCH color space<br />
mode.<br />
Using AIC Tools 4-3<br />
English
English<br />
Workflow for Optimizing Images<br />
To prepare and optimize images for final scan, it is recommended that the AIC tools<br />
are used in accordance to their sequence (as they appear in the LCH Mode Settings<br />
window shown below). Following this order will significantly influence the overall<br />
quality of your images.<br />
1 Dynamic Range<br />
Manually or auto-adjust<br />
color balance (darkest to<br />
lightest tone)<br />
3 Gradation Curve<br />
Manually or auto-adjust<br />
midtones of the<br />
Lightness (Channel” L”)<br />
5 Saturation Curve<br />
Adjust image saturation<br />
by manipulating the<br />
saturation curve<br />
7 Tone Curve<br />
Adjust tonal distribution<br />
of each RGB/CMYK<br />
channel in an image<br />
Descreen (Use randomly)<br />
Required only to remove<br />
moiré patterns from scans<br />
of newspaper/magazine<br />
originals<br />
LCH Mode AIC Tools<br />
The sequence is practically the same under Native<br />
Mode, except AIC Step 3 (Gradation) to Step 6<br />
(Selective Color) of LCH Mode are not available in<br />
Native Mode. The later mode however, offers<br />
Brightness & Contrast (B&C) and Color<br />
Correction which are its nearest equivalent of the<br />
more advanced tools.<br />
4-4 <strong>ScanWizard</strong> <strong>Pro</strong> for Windows User’s <strong>Guide</strong><br />
2 White & Black Points<br />
Manually or auto-adjust to fine-tune<br />
the white & black points and neutral<br />
gray<br />
4 Color Cast<br />
Adjust gray balance by<br />
removing or adding color cast<br />
6 Selective Color<br />
Manipulate a specific color without<br />
affecting other colors<br />
8 Filter & Unsharp Masking<br />
Apply special effects to image and<br />
sharpen focus of blurry images with<br />
unsharp masking (USM)<br />
Native Mode AIC Tools
Adding a Custom Setting<br />
To the right side of each AIC tool is a custom pull-down menu that features<br />
predefined settings for the AIC tool. For instance, some of these settings include<br />
Automatic or No Correction. You can also add your own image correction setting for<br />
each AIC tool. That way, you can retrieve or load the setting at any time in the future.<br />
To do this, choose an AIC tool and make the adjustments you desire to the image.<br />
Then click the Add to Menu button in the AIC dialog box.<br />
When another dialog box comes up, enter the name for the new setting. The new<br />
setting will appear in the custom pull-down menu of the Settings window for that<br />
particular AIC tool.<br />
Click to save current custom<br />
setting and add into AIC (Tone<br />
Curve in this example)<br />
predefined settings menu in<br />
the Settings window (see<br />
below)<br />
Saved custom setting (e.g.,<br />
test4) is stored here. To<br />
retrieve and apply test4 to a<br />
new image to be subjected to<br />
a Tone Curve adjustment,<br />
click on this expansion<br />
arrowhead and choose test4<br />
from the menu<br />
Using AIC Tools 4-5<br />
English
English<br />
How to Choose the Correct Image Category<br />
<strong>ScanWizard</strong> <strong>Pro</strong> provides several pre-defined image correction categories which can<br />
be applied as shortcut auto-correction your image.<br />
To select the correct image category for your image, go to the Settings window and<br />
choose the option you wish from the Image Category menu. Select the image<br />
category that corresponds most closely to the image characteristics of your original.<br />
The selected image category could be used as a starting point of enhancing your<br />
prescan before proceeding to further optimize it with the AIC tools.<br />
None: No image category conversion (default).<br />
Standard: An image that does not fall into any of the d category described below.<br />
You can also use this category for images of good quality (neither underexposed<br />
nor overexposed, with accurate color and tones).<br />
Landscape: An image with cool atmosphere with broad tonal variation and a<br />
wide hue range. Examples include natural scenery, skyline with an expanse of blue<br />
sky, mountains and fields.<br />
Portraits (Skin Tones): An image with dominant skin tones and mid-tone details.<br />
Examples include portraits and objects with fleece- or skin-like covering.<br />
Jewelry (Gold Tones): An image featuring dominant gold / silver hues. Examples<br />
include gold and silver jewelry, silverware.<br />
Sunsets: An image with warm reddish hues or a color cast reminiscent of sunsets.<br />
Examples include scenes at dusk or twilight and images of the Grand Canyon.<br />
Metallic Subjects: An image with broad highlight and shadow details but with<br />
very narrow mid-tone details. Examples include audio equipment, TV sets,<br />
cameras.<br />
High Keys: An image with broad highlight tonal variation but with less shadow<br />
detail. Examples include snow-covered landscapes, wedding gowns, whitewashed<br />
structures.<br />
Low Keys: An image with broad shadow tonal variation but with less highlight<br />
detail. Examples include nighttime scenery, dark suits and clothing, a coal pit.<br />
Underexposed: An image with compressed tonal variation particularly in the<br />
shadow areas, characterized by an overall dark appearance typical of underexposed<br />
positive film.<br />
Overexposed: An image with compressed tonal variation particularly in the<br />
highlight areas, characterized by an overall bright appearance typical of overexposed<br />
positive film.<br />
4-6 <strong>ScanWizard</strong> <strong>Pro</strong> for Windows User’s <strong>Guide</strong>
In the example images at right, an<br />
overexposed original is shown in two<br />
different image categories. Because<br />
the original was overexposed to<br />
begin with, choosing the<br />
Overexposed image category had the<br />
result of neutralizing the exposure,<br />
resulting in a better image.<br />
Image defined as “Standard” image category<br />
Image assigned “Overexposed” image category<br />
The same original did not fare as well<br />
when it was assigned the Standard<br />
image category (too<br />
bright overall, not enough contrast), because this image category is best used for<br />
originals of fairly good quality (sharp, neither underexposed nor overexposed). In this<br />
case, the original is with flawed exposure settings.<br />
This example then shows the importance of choosing the correct image category that<br />
corresponds most closely to your original to obtain optimal results.<br />
Using AIC Tools 4-7<br />
English
English<br />
Using the Dynamic Range Tool<br />
Original image and<br />
lightness histogram<br />
without density<br />
correction, showing<br />
narrow tonal range<br />
Corrected image and<br />
lightness histogram with<br />
density correction,<br />
showing a broader tonal<br />
range<br />
4-8 <strong>ScanWizard</strong> <strong>Pro</strong> for Windows User’s <strong>Guide</strong><br />
The Dynamic Range tool is used to set the density<br />
capture range of the scanner and displays the<br />
density distribution (histogram) of the image to be<br />
scanned.<br />
The Auto range (default) feature automatically<br />
determines the Dmin (minimum density, lightest<br />
tone) and Dmax (maximum density, darkest tone) of<br />
the image, and sets the scanner capture range.<br />
In the example here, the original image has low<br />
contrast and a limited range of tones, as can be seen<br />
in the narrow image histogram. The solution;<br />
truncate or narrow the scanner’s range of density to<br />
the actual density range of the image (or smaller).<br />
This would then redistribute the small density range<br />
of the image to the maximum range of the scanner<br />
output, and thus restore contrast to the image.<br />
1. Place the image to be corrected on your scanner.<br />
2. Click the Overview button to start an overview,<br />
and you will see the image appear in your<br />
Preview window.<br />
3. Select the area to be prescanned with the Scan<br />
Frame tool, then click the Prescan button to<br />
obtain a prescan image, and switch to the<br />
Prescan view from the View menu.<br />
4. Click the Dynamic Range tool in the Settings<br />
window. The Dynamic Range screen will then<br />
appear.<br />
5. Adjust the Dmin and Dmax values to an<br />
optimized range. To do this, move the sliders to<br />
the boundaries on both ends of the histogram.<br />
6. Click OK to confirm the correction.<br />
NOTE: In the default Automatic setting,<br />
<strong>ScanWizard</strong> <strong>Pro</strong> optimizes density capture range<br />
automatically. You only need to use the<br />
Dynamic Range tool if you wish to further<br />
enhance image contrast.
4<br />
6<br />
Use the Dynamic Range tool to set the density<br />
capture range of the scanner.<br />
In the example below, the original has a narrow<br />
image histogram skewed heavily to the right. In the<br />
corrected version, the dynamic range is adjusted<br />
more evenly or spread out toward the left,<br />
enhancing contrast to the image.<br />
5<br />
6<br />
Using AIC Tools 4-9<br />
English
English<br />
Using the White & Black Points Tool<br />
Original image<br />
Image corrected with White &<br />
Black Points tool<br />
4-10 <strong>ScanWizard</strong> <strong>Pro</strong> for Windows User’s <strong>Guide</strong><br />
The White & Black Points tool is used to change the<br />
shadow and highlight points of an image. (See note on next<br />
page for additional descriptions.)<br />
By using this tool, you can manipulate an image to either<br />
bring out the highlights in a very dark image, or bring out<br />
more of the shadows in a very light image.<br />
The White & Black Points tool can also be used to<br />
neutralize the color cast in the highlight and shadow<br />
regions.<br />
In the example here, we need to set the shadows and<br />
highlights, as well as correct the color cast on both highlight<br />
and shadow regions.<br />
1. Place the image to be corrected on your scanner.<br />
2. Click the Overview button, and you will see the image<br />
appear in your Preview window.<br />
3. Select the area to be prescanned with the Scan Frame<br />
tool, then click the Prescan button to obtain a prescan<br />
image, and switch to the Prescan view in the View menu.<br />
4. Click the White & Black Points tool in the Settings<br />
window. The White & Black Points dialog box will<br />
appear.<br />
5. Check the Shadows and Highlights Auto Neutralize<br />
options to “On” (default). This helps to neutralize the<br />
color cast in the shadow and highlight areas of the<br />
image.<br />
6. Click the Auto button. This will automatically set the<br />
optimal highlight and shadow points for the image.<br />
7. Check the Preview box so that the image in the Preview<br />
window is updated with the latest image correction. The<br />
update is done in the background and so may take a few<br />
seconds to show.<br />
8. Click OK to confirm the correction.
4<br />
8<br />
Use the White & Black Points tool to<br />
set the shadow and highlight points of<br />
an image, as well as to neutralize the<br />
color cast in shadow/highlight regions.<br />
In the example below, the original has a<br />
slight color cast in the shadow and<br />
highlight portions of the image. With<br />
the use of the auto neutralizing and<br />
auto adjustment features, the color cast<br />
is removed, and the shadows and<br />
highlights are remapped accordingly.<br />
The shadow point is defined as the lightness value “L” in an image that is output as<br />
black (mapped to the Minimum Output Level), while the highlight point is defined as<br />
the lightness value “L” that is output as white (mapped to the Maximum Output Level).<br />
The default values of the Minimum Output Level and Maximum Output Level are<br />
L=5.0 and L=95.0, respectively.<br />
6<br />
7<br />
5<br />
Using AIC Tools 4-11<br />
English
English<br />
Using the Gradation Tool (LCH Mode only)<br />
Original image<br />
Image corrected with Gradation tool<br />
4-12 <strong>ScanWizard</strong> <strong>Pro</strong> for Windows User’s <strong>Guide</strong><br />
The Gradation tool lets you adjust the midtones<br />
(the mid-level grays) of the lightness channel “L”<br />
of an image without altering the color itself. This<br />
is because even with changes to the luminance or<br />
lightness value, the chroma and hue values are<br />
kept constant.<br />
To prevent color images from losing saturation<br />
when adjusting the lightness, <strong>ScanWizard</strong> <strong>Pro</strong><br />
provides a Saturation Range option. With this<br />
option, colors outside of a given chroma range are<br />
not affected by the manipulation of the gradation<br />
curve.<br />
In the example here, the original image is<br />
underexposed, with the middle tones of the image<br />
being too dark. The solution: Lighten the tones to<br />
brighten up the image.<br />
1. Place the image to be corrected on your<br />
scanner.<br />
2. Click the Overview button, and you will see<br />
the image appear in your Preview window.<br />
3. Select the area to be prescanned with the Scan<br />
Frame tool, then click the Prescan button to<br />
obtain a prescan image, and switch to the<br />
Prescan view in the View menu.<br />
4. Click the Gradation tool in the Settings<br />
window. The Gradation dialog box will appear.<br />
5. Move the pointer over the curve, and drag the<br />
center of the curve to the left. This brighten<br />
up the midtones of the image.<br />
6. Check the Preview box so that the image in the<br />
Preview window is updated with the latest<br />
image correction. The update is done in the<br />
background and so may take a few moments<br />
to show.<br />
7. Click OK to confirm the correction.
4<br />
5<br />
7<br />
Use the Gradation tool to adjust the<br />
midtones of the lightness channel “L”<br />
of an image.<br />
In the example below, the original is<br />
underexposed, with the middle tones<br />
of the image being too dark. The<br />
corrected image shows the middle<br />
tones being brightened, but the<br />
saturation and hues of the image<br />
remain untouched.<br />
6<br />
Using AIC Tools 4-13<br />
English
English<br />
Using the Color Cast Tool (LCH Mode Only)<br />
Original image<br />
Image corrected with Color Cast tool<br />
4-14 <strong>ScanWizard</strong> <strong>Pro</strong> for Windows User’s <strong>Guide</strong><br />
The Color Cast tool is used to eliminate any<br />
unwanted color casts in an image, as well as to<br />
add a color cast without altering the lightness<br />
channel “L” values.<br />
In the example here, the original has a slight<br />
cyan cast that makes the image look cold and<br />
unappealing. The solution: Remove the<br />
undesirable color cast.<br />
1. Place the image to be corrected on your<br />
scanner.<br />
2. Click the Overview button, and you will see<br />
the image appear in your Preview window.<br />
3. Select the area to be prescanned with the<br />
Scan Frame tool, then click the Prescan<br />
button to obtain a prescan image, and<br />
switch to the Prescan preview from the<br />
View menu.<br />
4. Click the Color Cast tool in the Settings<br />
window. The Color Cast screen will appear.<br />
5. Move pointer toward preview image (notice<br />
that the pointer turns into Neutral<br />
Eyedropper pointer). With the Eyedropper<br />
pointer, click the color cast that you wish to<br />
remove. In the example here, we click on the<br />
“watch tower” of the fishing boat to remove<br />
the unwanted cyan cast.<br />
6. Check the Preview box so that the image in<br />
the Preview window is updated with the<br />
latest image correction. The update is done<br />
in the background and so may take a few<br />
moments to show.<br />
7. Click OK to confirm the correction.
4<br />
Use the Color Cast tool to remove an<br />
unwanted color cast or to add a color<br />
cast without altering the lightness<br />
channel “L” values.<br />
In the example below, the original has a<br />
slight cyan cast to it. Using the Tag<br />
Windows tool and clicking on the<br />
“watch tower” of the fishing boat<br />
removes the unwanted cyan cast from<br />
the image.<br />
8 5<br />
6<br />
Using AIC Tools 4-15<br />
English
English<br />
Using the Saturation Curve Tool (LCH Mode Only)<br />
Original image<br />
Image corrected with Saturation Curve tool<br />
4-16 <strong>ScanWizard</strong> <strong>Pro</strong> for Windows User’s <strong>Guide</strong><br />
The Saturation Curve tool lets you increase<br />
or decrease the color intensity (chroma or<br />
saturation) of an image without altering its<br />
hue and lightness values.<br />
In the example here, the colors in the original<br />
are not as saturated as they should be,<br />
resulting in a dull, lifeless image. The<br />
solution: To increase the saturation or<br />
intensity of the colors and restore vibrancy<br />
to the image.<br />
1. Place the image to be corrected on your<br />
scanner.<br />
2. Click the Overview button to start an<br />
overview, and you will see the image<br />
appear in your Preview window.<br />
3. Select the area to be prescanned with the<br />
Scan Frame tool, then click the Prescan<br />
button to obtain a prescan image, and<br />
switch to the Prescan preview from the<br />
View menu.<br />
4. Click the Saturation Curve tool in the<br />
Settings window. The Saturation Curve<br />
dialog box will appear.<br />
5. Move the pointer over the curve, and<br />
drag the center of the curve to the left.<br />
This increases the saturation of the image.<br />
6. Check the Preview box so that the image<br />
in the Preview window is updated with<br />
the latest image correction. The update is<br />
done in the background and so may take a<br />
few moments to show.<br />
7. Click OK to confirm the correction.
4<br />
5<br />
7<br />
Use the Saturation Curve to increase or<br />
decrease the color intensity (chroma or<br />
saturation) of an image without altering the hue<br />
and lightness values.<br />
In the example below, the colors are not as rich<br />
as they should be (notice the slightly muddied<br />
wash to the overall image). The corrected image<br />
shows deeper, richer tones, resulting in a more<br />
vibrant, lifelike image.<br />
6<br />
Using AIC Tools 4-17<br />
English
English<br />
Using the Selective Color Tool (LCH Mode Only)<br />
The Selective Color tool is used to perform color<br />
correction to a specific color range without altering<br />
the other colors in an image. This is done either to<br />
increase the visual impact of a color or to completely<br />
change the relationship of the targeted color(s) to the<br />
other colors in the image.<br />
In the example here, we want to increase the<br />
saturation of the sky and change the boat color but<br />
leave everything else untouched.<br />
1. Place the image to be corrected on your scanner.<br />
2. Click the Overview button to see the overview<br />
image in your Preview window.<br />
3. Select the area to be prescanned with the Scan<br />
Frame tool, then click the Prescan button to<br />
obtain a prescan image, and switch to the Prescan<br />
view from the View menu.<br />
4. Click the Selective Color tool in the Settings<br />
window. The Selective Color dialog box will<br />
appear.<br />
5. Select the From color or the color to be corrected.<br />
In the example, move the pointer over the preview<br />
image (notice that the pointer turns into Neutral<br />
Eyedropper pointer). Point the Eyedropper over<br />
the blue sky and click. (Steps 5 to 9 are repeated<br />
for the change in the ship’s color. Click the New<br />
button to define a second color.)<br />
6. Check the Show Affected Areas option to see the<br />
targeted color(s).<br />
7. Adjust the color range to be affected (the Delta<br />
LCH values). To do this, drag the arc of the color<br />
wheel and the sliders of the lightness bar until<br />
only the sky’s blue color is affected.<br />
8. Enter the To color or the color that will take the<br />
place of the original. Enable the To color mode by<br />
clicking on the To color label prior to entering the<br />
color. In the Color Wheel, move the To color<br />
marker to the desired chroma position.<br />
4-18 <strong>ScanWizard</strong> <strong>Pro</strong> for Windows User’s <strong>Guide</strong><br />
Original image<br />
Image corrected with Selective Color tool<br />
9. Uncheck the Show Affected Areas option to<br />
see the corrected result, displayed on the<br />
right thumbnail.<br />
10. Check the Preview box so that the image in<br />
the Preview window is updated with the<br />
latest image correction. The update is done<br />
in the background and so may take a few<br />
seconds to show.<br />
11. Click OK to confirm the correction.
7<br />
4<br />
New button<br />
for defining<br />
succeeding<br />
colors to be<br />
changed<br />
10<br />
Use the Selective Color tool to perform color<br />
correction to a specific color range without<br />
altering the other colors in an image.<br />
In the example below, the color of the blue sky is<br />
changed with an increase in saturation, but all<br />
other colors in the image are held constant and<br />
remain unchanged.<br />
7<br />
6 9<br />
8<br />
5<br />
Using AIC Tools 4-19<br />
English
English<br />
Using the Tone Curve Tool<br />
Original image<br />
Image corrected with Tone Curve tool<br />
4-20 <strong>ScanWizard</strong> <strong>Pro</strong> for Windows User’s <strong>Guide</strong><br />
The Tone Curve tool is used to adjust the tonal<br />
distribution of each channel of an image. It functions<br />
very much like the Gradation tool, except that it<br />
provides additional functions to allow separate<br />
adjustments of the tones in each RGB or CMYK<br />
channel, depending on the image type. This tool is<br />
especially useful for correcting the “ink percentage”<br />
distribution (i.e., dot gain correction) in CMYK<br />
images.<br />
In the example here, the original image looks cold, with<br />
a decidedly blue-green cast to it. The solution:<br />
Increase the “ink percentage” of the yellow and<br />
magenta channels to bring out the warmer tones.<br />
1. Place the image to be corrected on your scanner.<br />
2. Click the Overview button, and you will see the<br />
image appear in your Preview window.<br />
3. Select the area to be prescanned with the Scan<br />
Frame tool, then click the Prescan button to<br />
obtain a prescan image, and switch to the Prescan<br />
view in the View menu.<br />
4. Click the Tone Curve tool in the Settings window.<br />
The Tone Curve dialog box will appear.<br />
5. Select Curve as your “Method”.<br />
6. Select Yellow as your “Channel”, and adjust the<br />
yellow channel by moving the curve slightly<br />
higher and towards the left, as shown.<br />
7. Select Magenta as your next “Channel”, and do<br />
the same thing you did with the yellow channel,<br />
moving the curve slightly higher and towards the<br />
left.<br />
8. Check the Preview box so that the image in the<br />
Preview window is updated with the latest image<br />
correction. The update is done in the background<br />
and so may take a few moments to show.<br />
9. Click OK to confirm the correction.
4<br />
9<br />
7<br />
Use the Tone Curve tool to adjust<br />
the tones separately or as a whole<br />
for RGB/CMYK images.<br />
In the example below, the original<br />
looks cold, with a preponderance of<br />
blue-green tones. The corrected<br />
version shows the image with<br />
adjusted tones in the yellow and<br />
magenta channels, resulting in a<br />
rosier, warmer look.<br />
8<br />
5<br />
6<br />
7<br />
Using AIC Tools 4-21<br />
English
English<br />
Using the Filter Tool<br />
Original image<br />
Image corrected with Unsharp Masking filter<br />
tool<br />
4-22 <strong>ScanWizard</strong> <strong>Pro</strong> for Windows User’s <strong>Guide</strong><br />
The Filter tool is used to apply special effects to<br />
your images. Several filters are provided in<br />
<strong>ScanWizard</strong> <strong>Pro</strong>, including various Blur / Blur More,<br />
Sharpen / Sharpen More, Emboss, and Edge<br />
Enhancement.<br />
In the example here, the original is a bit blurry to<br />
begin with. The solution: Use the Unsharp Masking<br />
filter to increase sharpness in an image.<br />
1. Place the image to be corrected on your scanner.<br />
2. Click the Overview button, and you will see the<br />
image appear in your Preview window.<br />
3. Select the area to be prescanned with the Scan<br />
Frame tool, then click the Prescan button to<br />
obtain a prescan image, and switch to the<br />
Prescan view from the View menu.<br />
4. Click the Filter tool in the Settings window. The<br />
Filter dialog box will appear.<br />
5. Check the option, Simulate Unsharp Mask Effect<br />
on Preview Images.<br />
6. Check the option, Apply Filter to Lightness<br />
channel only.<br />
7. Select Unsharp Masking from the Filter dropdown<br />
menu. The Unsharp Masking dialog box<br />
will appear.<br />
8. Adjust the Strength and Mask Size parameters<br />
until you are satisfied with the effect displayed<br />
by the thumbnail.<br />
9. Click OK to return to the Filter screen.<br />
10. Check the Preview box so that the image in the<br />
Preview window is updated with the latest image<br />
correction. The update is done in the background<br />
and so may take a few seconds to display the<br />
result.<br />
11. Click OK to confirm the correction.
4<br />
5<br />
6<br />
11<br />
8<br />
The Filters tool applies special effects to your<br />
images.<br />
In the example below, the Unsharp Masking<br />
(USM) filter is used to increase sharpness in<br />
the image and improve image quality.<br />
10<br />
7<br />
9<br />
Using AIC Tools 4-23<br />
English
5 Special Features & Advanced Scenarios<br />
This section of the manual touches on the special features of <strong>ScanWizard</strong> <strong>Pro</strong> and<br />
provides more advanced scenarios on how to use the program.<br />
• How to Edit Multiple Scan Jobs<br />
How to Scan Multiple Jobs<br />
How to Use <strong>ScanWizard</strong> <strong>Pro</strong> Working Directory<br />
How to Use the SnapTrans Templates<br />
How to Use the Magic Diamonds<br />
How to Customize Negative Film<br />
How to Scan and Display an Image on a 640 x480 Monitor<br />
Special Features 5-1<br />
English
English<br />
How to Edit Multiple Scan Jobs<br />
<strong>ScanWizard</strong> <strong>Pro</strong> lets you edit multiple scan jobs at the<br />
same time, increasing your efficiency in using the<br />
software.<br />
In the scenario below, each scan job has its own image<br />
type setting (RGB, CMYK, Lab Color) and its own<br />
resolution setting (from 100 to 300 dpi). With multiple job<br />
editing, you can select all the jobs and then change their<br />
image type and resolution in a few quick steps, and then,<br />
say, apply a filter to all the images.<br />
1. Define the scan jobs in your Scan Job window. If you<br />
wish to see how this scenario works, try setting up<br />
each scan job as a different image type with its own<br />
resolution, so that each of the jobs has varying<br />
settings.<br />
2. Select all three scan jobs in the Scan Job window. To<br />
include each scan job for selection, use the Shift + Click combination (pressing the Shift key while<br />
clicking the mouse at the same time).<br />
3. Go to the Settings window, and choose an image type that will apply to all the scan jobs. In the<br />
example here, we selected CMYK.<br />
4. Choose a resolution setting that will apply to all the scan jobs. In the example here, we selected<br />
300 dpi.<br />
5. As a last step, apply a filter to all the scan jobs. In the example here, we chose the Unsharp<br />
Masking filter. Take note that any of the Advanced Image Correction tools (such as the filters)<br />
can be applied to scan jobs simultaneously only if the jobs are of a similar image type (in this<br />
case, all are CMYK).<br />
5-2 <strong>ScanWizard</strong> <strong>Pro</strong> for Windows User’s <strong>Guide</strong><br />
If you want to....<br />
Before the Final Scan<br />
• Fine-tune the preview image with<br />
image processing options (after<br />
step 5)<br />
Go to the Preview window, and<br />
select the desired image-processing<br />
option from the Correction menu.<br />
Alternatively, you can go to the<br />
Settings window and click on an<br />
image processing button. If all your<br />
images are of the same type, you can<br />
edit and apply image corrrections to<br />
all the selected scan jobs simultaneously.
4<br />
5<br />
1<br />
3<br />
Kid & Beach<br />
City View<br />
2<br />
Special Features 5-3<br />
English
English<br />
How to Scan Multiple Jobs<br />
Oftentimes, you will need to scan several images at a<br />
time or find yourself wanting to scan multiple jobs to<br />
save time. The sample scenario below shows how this<br />
can be done.<br />
1. Place the images to be scanned on your scanner.<br />
2. Go to the Preview window, click the Scan Material<br />
icon, and choose the correct scan material type.<br />
3. In the Preferences menu, choose More, then check<br />
the Smoked Glass option. This feature will help you<br />
distinguish the different scan jobs created,<br />
especially if each one is of a different image type<br />
(RGB color, Lab color, grayscale; shown in example<br />
here).<br />
4. Click the Overview button to start an overview. The<br />
images will appear in the Preview window.<br />
5. If the Scan Job window is not open, go to the View<br />
menu and choose Show Scan Job window.<br />
6. Create the other scan jobs that you need. To do this,<br />
use the Duplicate or New button, or Shift+Drag the<br />
current scan frame to form new ones.<br />
7. Define the settings for each scan job. To do this,<br />
highlight one or more scan jobs in the Scan Job<br />
window, then specify the appropriate settings (type,<br />
resolution, etc.) in the Settings window for these<br />
particular scan jobs.<br />
NOTE: Changed settings will apply to all selected<br />
jobs (highlighted jobs). For more information, see<br />
the “How to Edit Multiple Scan Jobs” scenario.<br />
8. If you like what you see in the Preview window, click<br />
the Scan button to start scanning.<br />
5-4 <strong>ScanWizard</strong> <strong>Pro</strong> for Windows User’s <strong>Guide</strong><br />
If you want to....<br />
Before the Final Scan<br />
• Select an output image type (after<br />
step 7)<br />
Go to the Settings window, and from the<br />
Type box, choose the appropriate image<br />
type for each scan job.<br />
• Specify output dimensions (after step<br />
7)<br />
Go to the Settings window, and enter the<br />
desired output dimensions (width and<br />
height) in the output dimension edit boxes<br />
for each scan job. The scan frame may<br />
change slightly, and you may want to go<br />
back to the Preview window to move the<br />
scan frame and enclose the area you want.<br />
• Change output image resolution<br />
(before step 8)<br />
Go to the Settings window, and enter the<br />
resolution value in the Resolution edit<br />
box for each scan job.<br />
• See a more detailed preview image or<br />
do multiple prescans (after step 7)<br />
Go to the Preview window, highlight the<br />
scan job you wish to see in detail, and<br />
click the Prescan button. You can also do<br />
multiple prescans if you have multiple<br />
scan jobs. Simply choose all the scan jobs<br />
in the Scan Job window, then click the<br />
Prescan button. To view the various<br />
prescan images, go to the View menu and<br />
switch among the different views possible.<br />
• Fine-tune the preview image with<br />
image processing options (after step 7)<br />
Go to the Preview window, and select the<br />
desired image-processing option for each<br />
scan job from the Correction menu.<br />
Alternatively, you can go to the Settings<br />
window and click on an image processing<br />
button; the Advanced Image Correction<br />
dialog box will then appear.
5 3<br />
4 2<br />
6<br />
8<br />
7<br />
Special Features 5-5<br />
English
English<br />
How to Use <strong>ScanWizard</strong> <strong>Pro</strong> Working Directory<br />
The <strong>ScanWizard</strong> <strong>Pro</strong> working directory helps you get the most productivity out of your scanner,<br />
especially if you need to perform several multiple scanning jobs. You can assign your own working<br />
directory for each scanning session or use the default directory at windows\twain_32\scanpro\data\.<br />
Current scan jobs are automatically save in the working directory whenever you -<br />
change to a new working directory for your next scanning session.<br />
quit <strong>ScanWizard</strong> <strong>Pro</strong>.<br />
This will also help in preventing accidental loss of scan jobs in case of inadvertent system failure.<br />
Suppose you want to scan several sets of 35 millimeter color filmstrips for your digital album. Here is<br />
what you should do to allow the working directory helps speed up things for you.<br />
1. If you are using a dual-bed scanner, load the<br />
appropriate template with your first set of negative<br />
filmstrips, and insert the tray into your scanner’s lower<br />
bed. If you are using a flatbed, use a Transparent<br />
Media Adapter.<br />
2. Go to the Preference menu and choose More. In the<br />
dialog box, enter an appropriate folder name. e.g.,<br />
Gallery I as your current scan session working<br />
directory.<br />
3. Select the appropriate Scan Material type (Negative<br />
Film in this example) in the Preview window, and click<br />
the Overview button. Notice that each frame of the<br />
filmstrips is auto-selected (enclosed in scan frames)<br />
and each frame has been auto-assigned with jobnames<br />
as shown in the Scan Job window. You may on-line edit<br />
the jobnames to provide your own jobnames.<br />
5-6 <strong>ScanWizard</strong> <strong>Pro</strong> for Windows User’s <strong>Guide</strong>
4. If you wish to provide all jobs with one<br />
common settings, select all the scan jobs<br />
and proceed to make the required settings<br />
and image correction in the Settings<br />
window. All adjustments you make will<br />
apply to all selected scan jobs. See How to<br />
Edit Multiple Scan Jobs in this chapter.<br />
5. At this stage you may elect to change the<br />
working directory or folder (e.g., Gallery<br />
II) for the new set of filmstrips or quit<br />
<strong>ScanWizard</strong> <strong>Pro</strong>. Whichever you do, the<br />
current scan jobs are automatically stored<br />
in the Gallery I folder.<br />
6. If you are going to perform another scanning session with the next set of filmstrips, repeat from Step<br />
2 again.<br />
Special Features 5-7<br />
English
English<br />
How to Use the SnapTrans Templates<br />
<strong>ScanWizard</strong> <strong>Pro</strong> provides a way to use the SnapTrans<br />
templates on scanners featuring the E.D.I.T technology.<br />
The templates are holders designed to secure a variety of<br />
film, such as 4” x 5” film, 6cm x 9cm film, 35mm filmstrips,<br />
and 35mm mounted slides (that can be mounted in either<br />
landscape or portrait orientation).<br />
This scenario shows you how to choose a particular<br />
template, which then loads predefined scan jobs for you to<br />
help in automating the scanning process.<br />
1. After mounting the film holder with your orignal, go to<br />
the Scan Job window, and click on Load Save button.<br />
2. Then click the SnapTrans Templates button. The<br />
SnapTrans Templates dialog box appears.<br />
3. From the SnapTrans Template, choose the correct<br />
reflective scan material (Positive Film/Negative Film)<br />
from the Material box.<br />
4. Select the template to be loaded for your reflective<br />
material by clicking the appropriate template icon.<br />
5. Click the Add button to implement the chosen template.<br />
The pre-defined set of scan frames (based of the<br />
selected SnapTrans templated) are then displayed on<br />
the Preview window. At the same time, the Scan Job<br />
window will also show the pre-defined scan jobs.<br />
6. From hereon, do an overview to see the images in the<br />
Preview window, and continue with the process of<br />
matching each overview image with each of the<br />
predefined scan jobs in the Scan Job window.<br />
7. When you are done, click the Scan button in the<br />
Preview window to start scanning with the use of your<br />
selected SnapTrans template.<br />
NOTE: The pre-defined scan jobs that are created in<br />
this process are in their default settings, and may not<br />
what you want. To change the settings easily among<br />
multiple scan jobs, see the “How to Edit Multiple<br />
Scan Jobs” scenario.<br />
5-8 <strong>ScanWizard</strong> <strong>Pro</strong> for Windows User’s <strong>Guide</strong><br />
If you want to....<br />
Before the Final Scan<br />
• Select an output image type<br />
(after step 6)<br />
Go to the Settings window, and<br />
from the Type box, choose the<br />
appropriate image type for the image<br />
to be scanned.<br />
• See a more detailed preview<br />
image (after step 6)<br />
Go to the Preview window, highlight<br />
the scan job you wish to see in detail,<br />
and click the Prescan button.<br />
• Fine-tune the preview image with<br />
image processing options (after<br />
step 6)<br />
Go to the Preview window, and<br />
select the desired image-processing<br />
option from the Correction menu.<br />
Alternatively, you can go to the<br />
Settings window and click on an<br />
image processing button.
3<br />
6<br />
4<br />
1<br />
5<br />
2<br />
5 7<br />
Special Features 5-9<br />
English
English<br />
How to Use the Magic Diamonds<br />
The “Magic Diamonds” that are a part of the Tag<br />
Windows feature in <strong>ScanWizard</strong> <strong>Pro</strong> let you set the white<br />
and black points, as well as remove any unwanted color<br />
casts in an image without having to bring up the color<br />
adjustment/correction screens.<br />
In the example here, the image has a slightly grayish cast<br />
(i.e., less contrast), which can be removed easily with the<br />
use of the Magic Diamonds.<br />
1. Place the image to be scanned on your scanner.<br />
2. Go to the Preview window and click the Scan<br />
Material icon. From the submenu that appears,<br />
choose the correct scan material type.<br />
3. Click the Overview button, and you will see the image<br />
appear in your Preview window.<br />
4. Click the Eyedropper tool from the Preview window.<br />
5. Click a black or dark area in the image where you wish<br />
to be your new shadow point. A black “Tag #1”<br />
window will appear (indicated by a black strip at the<br />
bottom of the Tag window) with the corresponding<br />
RGB/LCH values of the spot where you had clicked.<br />
Click the Black Diamond button to set the spot as<br />
your new shadow point.<br />
6. Next, click a white area in the image where you wish<br />
to be your new highlight point. A white “Tag #2”<br />
window will appear (indicated by a white strip at the<br />
bottom of the Tag window) with the corresponding<br />
RGB/LCH values of the spot where you had clicked.<br />
Click the White Diamond button to set the spot as<br />
your new highlight point.<br />
7. Now, click on the area with unwanted color cast<br />
which you wanted to remove. In the example here, we<br />
clicked the light gray color on the boy’s T-shirt. From<br />
the “Tag #3” window, click the Center Diamond<br />
button to set remove the color cast and neutralize the<br />
image. In case you want to add a color cast, press Alt<br />
key while clicking on the centdr button.<br />
5-10 <strong>ScanWizard</strong> <strong>Pro</strong> for Windows User’s <strong>Guide</strong><br />
If you want to....<br />
Before the Final Scan<br />
• Select an output image type<br />
(after step 2)<br />
Go to the Settings window, and from<br />
the Type box, choose the appropriate<br />
image type for the image to be<br />
scanned. For monitor display of<br />
images, choose RGB, Grayscale, or<br />
Web / Internet colors.<br />
• See a more detailed preview<br />
image (after step 3)<br />
Go to the Preview window, highlight<br />
the scan job you wish to see in detail,<br />
and click the Prescan button.<br />
• Fine-tune the preview image with<br />
image processing options (after<br />
step 7)<br />
Go to the Preview window, and<br />
select the desired image-processing<br />
option from the Correction menu.<br />
Alternatively, you can go to the<br />
Settings window and click on an<br />
image processing button.
3<br />
4<br />
5 6<br />
7<br />
2<br />
Special Features 5-11<br />
English
English<br />
How to Customize Negative Film<br />
With <strong>ScanWizard</strong> <strong>Pro</strong>, you can create a customized film profile for your negative film, based on an<br />
existing negative film profile. This lets you create film profiles at will or as the need arises, and allows<br />
you to use the profiles for subsequent scans as well.<br />
1. Place the negative film (preferably with blank or unexposed frame) to be customized in the proper<br />
film holder and insert into your scanner.<br />
2. Go to the Preview window and click the Scan Material icon. From the submenu that appears,<br />
choose Negative Film.<br />
3. Go to the Settings window, and click the Film Type button. Select Custom at the bottom of the<br />
menu.<br />
4. When the Customized Negative Film Type dialog box appears, follow the steps outlined. First, click<br />
the Overview (Step 2) option in the dialog box. When the overview image appears in the dialog box<br />
window, plot a scan frame on the blank area of the film or on the blank space between two exposed<br />
frames.<br />
5. Click the Prescan (Step 4) option. When the prescan image appears, fine-tune the selection area<br />
you made in step #4 to make sure that the film blank area is properly selected.<br />
6. Choose the base film type on which the custom negative film profile will be based for Step 6 of the<br />
dialog box. In general, select an existing film profile closest to your new film type. Kodak Gold 100-<br />
6 in this example.<br />
7. Click the Customize (Step 7) option in the dialog box.<br />
8. When the customization process is completed, you will be promted by the Save Custom Film Type<br />
dialog box to enter a file name for the new negative film profile. A description is provided but may be<br />
changed if you want to. Take note that the new film will later appear in the Settings Window Film<br />
Type menu by description, not by file name.<br />
9. Click the Save button. The saved profile will now appear in the Film Type menu in the Settings<br />
window.<br />
10. Click the Close button in the Customize Negative Film Type dialog box to return to the Preview<br />
window.<br />
11. Select the newly created customized profile from the Film Type menu to scan your customized film<br />
type. In this example, it is Kodak Gold 100 New.<br />
5-12 <strong>ScanWizard</strong> <strong>Pro</strong> for Windows User’s <strong>Guide</strong>
3<br />
11<br />
Prescan image<br />
showing blank<br />
(unexposed) area of<br />
film selected<br />
9<br />
2<br />
7<br />
4<br />
5<br />
6<br />
10<br />
8<br />
Special Features 5-13<br />
English
English<br />
How to Scan and Display an Image on a 640 x 480 Monitor<br />
At times, you may wish to scan an image and then scale or<br />
resize the image so that it can be displayed on your<br />
monitor (either as a screen saver or wallpaper). The sample<br />
scenario below shows how this can be done.<br />
1. Place the image to be scanned on your scanner.<br />
2. Go to the Preview window and click the Scan Material<br />
icon. From the submenu that appears, choose the<br />
correct scan material type.<br />
3. Click the Overview button to start an overview, and<br />
you will see the image appear in your Preview window.<br />
4. Go to the Settings window, and choose pixels as your<br />
unit of measurement. Then, enter the resolution value<br />
in the Resolution edit box — 72 dpi in this case for<br />
monitor display. If you change the resolution after<br />
specifying the<br />
output dimensions, the dimensions will change, and<br />
you will then need to re-enter the correct output<br />
dimensions again.<br />
5. Change to an initial scaling value of 200% in the<br />
scaling menu. This step is necessary because most<br />
scanners have a scan bed of only 8.5”, and this is not<br />
enough to generate 640 pixels with the 72-dpi<br />
resolution specified in Step #4 (8.5” x 72=576, not 640).<br />
To compensate for the shortage in scan bed length, we<br />
boost the scaling factor to 200%. Do not worry about<br />
this; the final scaling will be changed but the output<br />
dimensions will still be preserved.<br />
6. In the Output edit boxes, enter “640” for width and<br />
“480” for height. You will notice that the scan frame in<br />
your preview image changes.<br />
7. Check the Fixed Output Size box. Take note of the<br />
flashing frame (marquee) around the selected area. If<br />
you adjust or move the scan frame, the scaling will<br />
change accordingly.<br />
8. If you like what you see in the Preview window, click<br />
the Scan button in the Preview window to start<br />
scanning.<br />
5-14 <strong>ScanWizard</strong> <strong>Pro</strong> for Windows User’s <strong>Guide</strong><br />
If you want to....<br />
Before the Final Scan<br />
• Select an output image type<br />
(after step 2)<br />
Go to the Settings window, and from<br />
the Type box, choose the appropriate<br />
image type for the image to be<br />
scanned. For monitor display of<br />
images, choose RGB, Grayscale, or<br />
Web / Internet colors.<br />
• See a more detailed preview<br />
image (after step 7)<br />
Go to the Preview window, highlight<br />
the scan job you wish to see in detail,<br />
and click the Prescan button.<br />
• Fine-tune the preview image with<br />
image processing options (after<br />
step 7)<br />
Go to the Preview window, and select<br />
the desired image-processing option<br />
from the Correction menu.<br />
Alternatively, you can go to the<br />
Settings window and click on an<br />
image processing button.
3<br />
7<br />
8<br />
5<br />
2<br />
6<br />
4<br />
Special Features 5-15<br />
English
Appendix<br />
The following are the contents of the Appendix section:<br />
A Color Matching for Advanced Users<br />
B Available File Formats for “Scan to File” Function<br />
Appendix-1<br />
English
English<br />
A Color Matching for Advanced Users<br />
This is dimmed<br />
when operating<br />
under LCH mode<br />
To keep color consistency between the scanner, monitor, and printing device,<br />
<strong>ScanWizard</strong> <strong>Pro</strong> applies Kodak CMS (Color Management System) with ICC<br />
(International Color Consortium) profile standards.<br />
When you install <strong>ScanWizard</strong> <strong>Pro</strong> 6.0, the CMS installer will prompt you (with the<br />
Color Matching Setup dialog box) to match your color monitor and printer with the<br />
provided list. The dialog box allows you to select the correct ICC profile to match<br />
your color monitor and color printer. You may, however, change and update your<br />
existing settings after installation by clicking the Color Matching Setup command<br />
from the Reference menu. The default profile for color monitor is “Generic P22 1.8<br />
Gamma Monitor” and printer will set to “Display.”<br />
Display using monitor compensation<br />
Appendix-2 <strong>ScanWizard</strong> <strong>Pro</strong> for Windows User’s <strong>Guide</strong><br />
Monitor selection<br />
shown here is set at<br />
default profiles for<br />
monitor and printer<br />
CMYK printer<br />
profile. No default<br />
provided. Must<br />
select one if required<br />
This check box controls the option on how the RGB destination data will be<br />
displayed. If check box is unchecked (disabled), the RGB data is displayed directly to<br />
the monitor. If checked, the RGB destination data will be simulated for the selected<br />
type of display monitor.
Display:<br />
This feature allows you to select the type of color monitor that corresponds with the<br />
one currently in use. The selected monitor profile is applicable only when the Display<br />
using monitor compensation check box is enabled (checked).<br />
NOTE: If the monitor type you need is not listed, select Generic P22 or Generic<br />
EBU. These two profiles are compatible with most of the monitors.<br />
Native mode RGB color matching (Native Color<br />
Mode only)<br />
If the Native mode RGB color matching checkbox is unchecked, the ICC profile only<br />
applies to the RGB color for matching without applying to other output devices (e.g.,<br />
printer or image typesetter). If checked the ICC profile applies to both the color<br />
monitor and output devices.<br />
This check box should generally be checked (enabled) unless you want to scan raw<br />
color data, in which case you lose the compensatory effects of the Color Matching<br />
system. Also note that it is not desirable to scan in raw data and then perform data<br />
conversion. This will generate incorrect CMS effect.<br />
Embed ICC destination profile in scan image<br />
If chek box is checked, the ICC information is also saved and embedded with your<br />
scanned image file. When the saved images are opened by an image editing<br />
application (e.g., Photoshop), the embedded image data are also delivered to the<br />
application. This will saves color matching conversion time and results to a well<br />
preserved data of the image.<br />
Appendix-3<br />
English
English<br />
RGB destination:<br />
This feature lets you select the RGB output device (e.g., display monitor, or RGBbased<br />
printer) for matching RGB Color family images (including RGB colors, 48-bit<br />
RGB colors, and 256 colors image types).<br />
A number of RGB profiles is provided with <strong>ScanWizard</strong> <strong>Pro</strong> 6.0. If you can not find the<br />
ICC profile for your monitor or RGB device, contact your device manufacturer. To add<br />
a specific ICC profile, click Add <strong>Pro</strong>files button to load the required ICC profile from<br />
its source. Some device suppliers (e.g., HP, Kodak, etc.) have made their ICC profiles<br />
available from the web sites.<br />
CMYK destination:<br />
If your image type is CMYK color, this function lets you select the CMYK based<br />
color printer or commercial offset printing standards for color separation.<br />
Appendix-4 <strong>ScanWizard</strong> <strong>Pro</strong> for Windows User’s <strong>Guide</strong>
Add <strong>Pro</strong>files Button<br />
The Add <strong>Pro</strong>files button is provided which will allow you to add additional ICC<br />
profiles that normally came with your device (e.g., display monitor or printer). You<br />
may add profiles when you can not find the ICC profile for your device from those<br />
provided with the <strong>ScanWizard</strong> <strong>Pro</strong> 6.0.<br />
You may also source additional<br />
ICC profiles from web sites as<br />
some device suppliers (e.g., HP,<br />
Kodak, etc.) have made their<br />
ICC profiles available from<br />
Internet.<br />
Select the profiles you need,<br />
then click on the Open button<br />
to load the additional profiles<br />
into <strong>ScanWizard</strong> <strong>Pro</strong> 6.0. This<br />
may take a while to process.<br />
NOTE: When you purchase color monitor or color printer, check to make sure your<br />
supplier provides the corresponding ICC profiles.<br />
Info Button<br />
This button displays basic<br />
profile information for the<br />
current selected devices<br />
Preview Button<br />
Clicking on the Preview<br />
button immediately updates the Preview window image when a new color profile is<br />
selected. This will reflect colors consistent with the newly selected profile.<br />
Refresh Button<br />
Clicking on the Refresh button updates the ICC profiles stored in \Windows\<br />
System\color and \Windows\System32\color folder. This command is required only if<br />
you have removed obsolete ICC profiles from the above mentioned folder to save<br />
disk space.<br />
Appendix-5<br />
English
English<br />
B Available File Formats for ‘‘Scan to File’’<br />
Function<br />
<strong>ScanWizard</strong> <strong>Pro</strong> TX’s “Scan to File” features batch-scanning function, allowing you<br />
to carry out scan-and-save images as several file formats. Not all file formats are<br />
available for different image types, you should select the proper file format with the<br />
image type that meets your requirements. For details, see the following crossreference<br />
table.<br />
Appendix-6 <strong>ScanWizard</strong> <strong>Pro</strong> for Windows User’s <strong>Guide</strong><br />
TIF EPS BMP PSD SCT JPG<br />
RGB Colors ü ü ü ü ü<br />
RGB Colors (48-bit) ü<br />
Gray Scale ü ü ü ü ü ü<br />
Gray Scale (16-bit) ü<br />
CMYK Colors ü ü ü ü<br />
Lab Colors ü<br />
Web/Internet Colors<br />
256 Colors (Default) ü ü ü<br />
256 Colors (Custom)<br />
Line art ü ü ü ü<br />
B & W Diffusion
Appendix-7<br />
English