Microtek ScanWizard Pro User's Guide
Microtek ScanWizard Pro User's Guide
Microtek ScanWizard Pro User's Guide

You also want an ePaper? Increase the reach of your titles
YUMPU automatically turns print PDFs into web optimized ePapers that Google loves.
2 Getting Started<br />
This <strong>ScanWizard</strong> <strong>Pro</strong> operates in two operating modes, Scan and Batch modes:<br />
1. The Scan mode (or scan-to-application) “acquires” <strong>ScanWizard</strong> <strong>Pro</strong> from an<br />
image-editing software program such as the Adobe Photoshop. The output<br />
images are scanned and directly delivered (individually or in batches) to your<br />
image editing software for further processing.<br />
2. The Batch mode (or scan-to-file) launches the <strong>ScanWizard</strong> <strong>Pro</strong> from desktop<br />
program icon or Windows Start menu. The output images are scanned and saved<br />
to files individually or in batches.<br />
Using the Scan Mode<br />
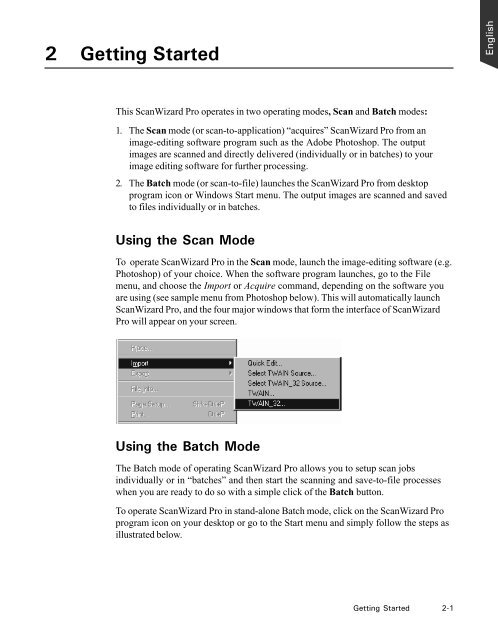
To operate <strong>ScanWizard</strong> <strong>Pro</strong> in the Scan mode, launch the image-editing software (e.g.<br />
Photoshop) of your choice. When the software program launches, go to the File<br />
menu, and choose the Import or Acquire command, depending on the software you<br />
are using (see sample menu from Photoshop below). This will automatically launch<br />
<strong>ScanWizard</strong> <strong>Pro</strong>, and the four major windows that form the interface of <strong>ScanWizard</strong><br />
<strong>Pro</strong> will appear on your screen.<br />
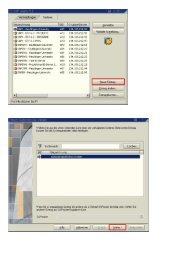
Using the Batch Mode<br />
The Batch mode of operating <strong>ScanWizard</strong> <strong>Pro</strong> allows you to setup scan jobs<br />
individually or in “batches” and then start the scanning and save-to-file processes<br />
when you are ready to do so with a simple click of the Batch button.<br />
To operate <strong>ScanWizard</strong> <strong>Pro</strong> in stand-alone Batch mode, click on the <strong>ScanWizard</strong> <strong>Pro</strong><br />
program icon on your desktop or go to the Start menu and simply follow the steps as<br />
illustrated below.<br />
Getting Started 2-1<br />
English