Microtek ScanWizard Pro User's Guide
Microtek ScanWizard Pro User's Guide
Microtek ScanWizard Pro User's Guide

Create successful ePaper yourself
Turn your PDF publications into a flip-book with our unique Google optimized e-Paper software.
English<br />
How to Customize Negative Film<br />
With <strong>ScanWizard</strong> <strong>Pro</strong>, you can create a customized film profile for your negative film, based on an<br />
existing negative film profile. This lets you create film profiles at will or as the need arises, and allows<br />
you to use the profiles for subsequent scans as well.<br />
1. Place the negative film (preferably with blank or unexposed frame) to be customized in the proper<br />
film holder and insert into your scanner.<br />
2. Go to the Preview window and click the Scan Material icon. From the submenu that appears,<br />
choose Negative Film.<br />
3. Go to the Settings window, and click the Film Type button. Select Custom at the bottom of the<br />
menu.<br />
4. When the Customized Negative Film Type dialog box appears, follow the steps outlined. First, click<br />
the Overview (Step 2) option in the dialog box. When the overview image appears in the dialog box<br />
window, plot a scan frame on the blank area of the film or on the blank space between two exposed<br />
frames.<br />
5. Click the Prescan (Step 4) option. When the prescan image appears, fine-tune the selection area<br />
you made in step #4 to make sure that the film blank area is properly selected.<br />
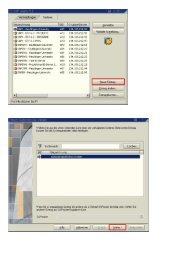
6. Choose the base film type on which the custom negative film profile will be based for Step 6 of the<br />
dialog box. In general, select an existing film profile closest to your new film type. Kodak Gold 100-<br />
6 in this example.<br />
7. Click the Customize (Step 7) option in the dialog box.<br />
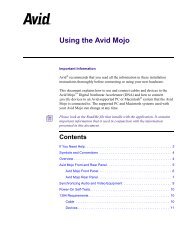
8. When the customization process is completed, you will be promted by the Save Custom Film Type<br />
dialog box to enter a file name for the new negative film profile. A description is provided but may be<br />
changed if you want to. Take note that the new film will later appear in the Settings Window Film<br />
Type menu by description, not by file name.<br />
9. Click the Save button. The saved profile will now appear in the Film Type menu in the Settings<br />
window.<br />
10. Click the Close button in the Customize Negative Film Type dialog box to return to the Preview<br />
window.<br />
11. Select the newly created customized profile from the Film Type menu to scan your customized film<br />
type. In this example, it is Kodak Gold 100 New.<br />
5-12 <strong>ScanWizard</strong> <strong>Pro</strong> for Windows User’s <strong>Guide</strong>