Microtek ScanWizard Pro User's Guide
Microtek ScanWizard Pro User's Guide
Microtek ScanWizard Pro User's Guide

You also want an ePaper? Increase the reach of your titles
YUMPU automatically turns print PDFs into web optimized ePapers that Google loves.
English<br />
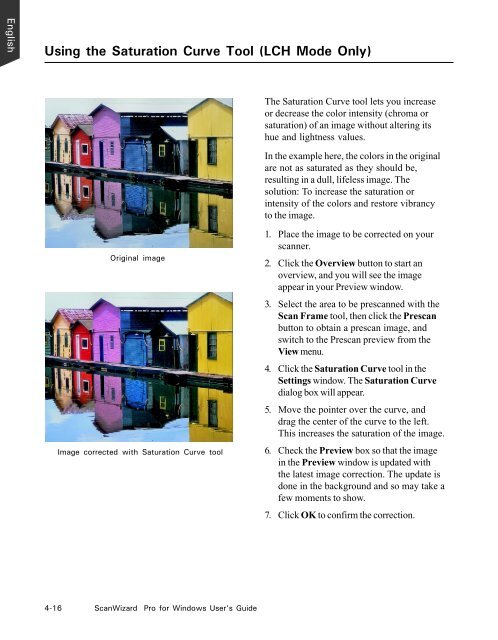
Using the Saturation Curve Tool (LCH Mode Only)<br />
Original image<br />
Image corrected with Saturation Curve tool<br />
4-16 <strong>ScanWizard</strong> <strong>Pro</strong> for Windows User’s <strong>Guide</strong><br />
The Saturation Curve tool lets you increase<br />
or decrease the color intensity (chroma or<br />
saturation) of an image without altering its<br />
hue and lightness values.<br />
In the example here, the colors in the original<br />
are not as saturated as they should be,<br />
resulting in a dull, lifeless image. The<br />
solution: To increase the saturation or<br />
intensity of the colors and restore vibrancy<br />
to the image.<br />
1. Place the image to be corrected on your<br />
scanner.<br />
2. Click the Overview button to start an<br />
overview, and you will see the image<br />
appear in your Preview window.<br />
3. Select the area to be prescanned with the<br />
Scan Frame tool, then click the Prescan<br />
button to obtain a prescan image, and<br />
switch to the Prescan preview from the<br />
View menu.<br />
4. Click the Saturation Curve tool in the<br />
Settings window. The Saturation Curve<br />
dialog box will appear.<br />
5. Move the pointer over the curve, and<br />
drag the center of the curve to the left.<br />
This increases the saturation of the image.<br />
6. Check the Preview box so that the image<br />
in the Preview window is updated with<br />
the latest image correction. The update is<br />
done in the background and so may take a<br />
few moments to show.<br />
7. Click OK to confirm the correction.