Microtek ScanWizard Pro User's Guide
Microtek ScanWizard Pro User's Guide
Microtek ScanWizard Pro User's Guide

You also want an ePaper? Increase the reach of your titles
YUMPU automatically turns print PDFs into web optimized ePapers that Google loves.
English<br />
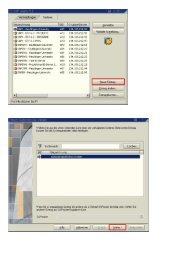
How to Edit Multiple Scan Jobs<br />
<strong>ScanWizard</strong> <strong>Pro</strong> lets you edit multiple scan jobs at the<br />
same time, increasing your efficiency in using the<br />
software.<br />
In the scenario below, each scan job has its own image<br />
type setting (RGB, CMYK, Lab Color) and its own<br />
resolution setting (from 100 to 300 dpi). With multiple job<br />
editing, you can select all the jobs and then change their<br />
image type and resolution in a few quick steps, and then,<br />
say, apply a filter to all the images.<br />
1. Define the scan jobs in your Scan Job window. If you<br />
wish to see how this scenario works, try setting up<br />
each scan job as a different image type with its own<br />
resolution, so that each of the jobs has varying<br />
settings.<br />
2. Select all three scan jobs in the Scan Job window. To<br />
include each scan job for selection, use the Shift + Click combination (pressing the Shift key while<br />
clicking the mouse at the same time).<br />
3. Go to the Settings window, and choose an image type that will apply to all the scan jobs. In the<br />
example here, we selected CMYK.<br />
4. Choose a resolution setting that will apply to all the scan jobs. In the example here, we selected<br />
300 dpi.<br />
5. As a last step, apply a filter to all the scan jobs. In the example here, we chose the Unsharp<br />
Masking filter. Take note that any of the Advanced Image Correction tools (such as the filters)<br />
can be applied to scan jobs simultaneously only if the jobs are of a similar image type (in this<br />
case, all are CMYK).<br />
5-2 <strong>ScanWizard</strong> <strong>Pro</strong> for Windows User’s <strong>Guide</strong><br />
If you want to....<br />
Before the Final Scan<br />
• Fine-tune the preview image with<br />
image processing options (after<br />
step 5)<br />
Go to the Preview window, and<br />
select the desired image-processing<br />
option from the Correction menu.<br />
Alternatively, you can go to the<br />
Settings window and click on an<br />
image processing button. If all your<br />
images are of the same type, you can<br />
edit and apply image corrrections to<br />
all the selected scan jobs simultaneously.