Microtek ScanWizard Pro User's Guide
Microtek ScanWizard Pro User's Guide
Microtek ScanWizard Pro User's Guide

Create successful ePaper yourself
Turn your PDF publications into a flip-book with our unique Google optimized e-Paper software.
English<br />
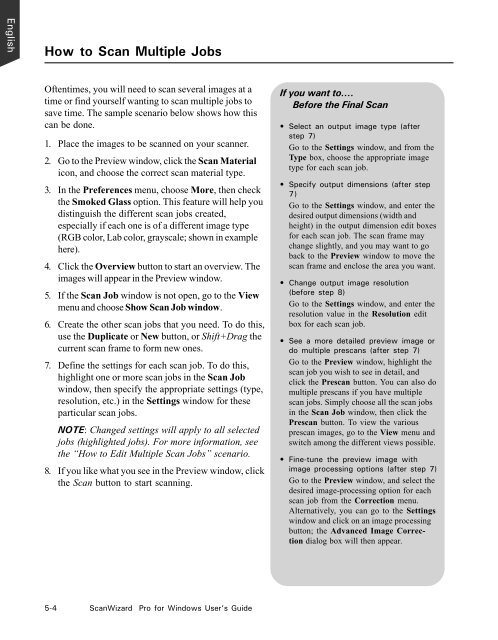
How to Scan Multiple Jobs<br />
Oftentimes, you will need to scan several images at a<br />
time or find yourself wanting to scan multiple jobs to<br />
save time. The sample scenario below shows how this<br />
can be done.<br />
1. Place the images to be scanned on your scanner.<br />
2. Go to the Preview window, click the Scan Material<br />
icon, and choose the correct scan material type.<br />
3. In the Preferences menu, choose More, then check<br />
the Smoked Glass option. This feature will help you<br />
distinguish the different scan jobs created,<br />
especially if each one is of a different image type<br />
(RGB color, Lab color, grayscale; shown in example<br />
here).<br />
4. Click the Overview button to start an overview. The<br />
images will appear in the Preview window.<br />
5. If the Scan Job window is not open, go to the View<br />
menu and choose Show Scan Job window.<br />
6. Create the other scan jobs that you need. To do this,<br />
use the Duplicate or New button, or Shift+Drag the<br />
current scan frame to form new ones.<br />
7. Define the settings for each scan job. To do this,<br />
highlight one or more scan jobs in the Scan Job<br />
window, then specify the appropriate settings (type,<br />
resolution, etc.) in the Settings window for these<br />
particular scan jobs.<br />
NOTE: Changed settings will apply to all selected<br />
jobs (highlighted jobs). For more information, see<br />
the “How to Edit Multiple Scan Jobs” scenario.<br />
8. If you like what you see in the Preview window, click<br />
the Scan button to start scanning.<br />
5-4 <strong>ScanWizard</strong> <strong>Pro</strong> for Windows User’s <strong>Guide</strong><br />
If you want to....<br />
Before the Final Scan<br />
• Select an output image type (after<br />
step 7)<br />
Go to the Settings window, and from the<br />
Type box, choose the appropriate image<br />
type for each scan job.<br />
• Specify output dimensions (after step<br />
7)<br />
Go to the Settings window, and enter the<br />
desired output dimensions (width and<br />
height) in the output dimension edit boxes<br />
for each scan job. The scan frame may<br />
change slightly, and you may want to go<br />
back to the Preview window to move the<br />
scan frame and enclose the area you want.<br />
• Change output image resolution<br />
(before step 8)<br />
Go to the Settings window, and enter the<br />
resolution value in the Resolution edit<br />
box for each scan job.<br />
• See a more detailed preview image or<br />
do multiple prescans (after step 7)<br />
Go to the Preview window, highlight the<br />
scan job you wish to see in detail, and<br />
click the Prescan button. You can also do<br />
multiple prescans if you have multiple<br />
scan jobs. Simply choose all the scan jobs<br />
in the Scan Job window, then click the<br />
Prescan button. To view the various<br />
prescan images, go to the View menu and<br />
switch among the different views possible.<br />
• Fine-tune the preview image with<br />
image processing options (after step 7)<br />
Go to the Preview window, and select the<br />
desired image-processing option for each<br />
scan job from the Correction menu.<br />
Alternatively, you can go to the Settings<br />
window and click on an image processing<br />
button; the Advanced Image Correction<br />
dialog box will then appear.