K1 Auto Pflegetipps Flyer A4 Biometrixx eng.cdr
K1 Auto Pflegetipps Flyer A4 Biometrixx eng.cdr
K1 Auto Pflegetipps Flyer A4 Biometrixx eng.cdr

Create successful ePaper yourself
Turn your PDF publications into a flip-book with our unique Google optimized e-Paper software.
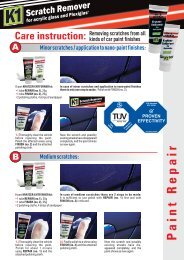
Scratch Remover<br />
for acrylic glass and Plexiglas ®<br />
Care instruction:<br />
A<br />
8-part KRATZER-ENTFERNER kit: In case of minor scratches and application to nano-paint finishes<br />
•1<br />
tube REPAIR (no.1), 25g there is only one step to make: Polish with FINISH (no. 2).<br />
•1<br />
tube FINISH (no. 2), 25g<br />
•2<br />
polishing cloths, 4 strips of sandpaper<br />
1.) Thoroughly clean the vehicle<br />
before repairing the paint.<br />
Polish the affected areas using<br />
FINISH (no. 2) and the attached<br />
polishing cloth.<br />
B<br />
8-part KRATZER-ENTFERNER kit: In case of medium scratches there are 2 steps to be made:<br />
•1<br />
tube REPAIR (no.1), 25g<br />
•1<br />
tube FINISH (no. 2), 25g<br />
It is sufficient to just polish with REPAIR (no. 1) first and with<br />
FINISH (no. 2) in the end.<br />
•2<br />
polishing cloths, 4 strips of sandpaper<br />
1.) Thoroughly clean the vehicle<br />
before repairing the paint.<br />
Polish for about 1 minute<br />
using REPAIR (no. 1) and the<br />
attached polishing cloth.<br />
Removing scratches from all<br />
kinds of car paint finishes<br />
Minor scratches / application to nano-paint finishes:<br />
Now the scratch and possibly<br />
existing streaks have disappeared<br />
completely, and the paint shines<br />
as new again.<br />
Medium scratches:<br />
Scratch Remover<br />
for acrylic glass and Plexiglas ®<br />
2.) Finally polish to a shine using<br />
FINISH (no. 2) and the attached<br />
polishing cloth.<br />
Now the scratch and possibly<br />
existing streaks have disappeared<br />
completely, and the<br />
paint shines as new again.<br />
P a i n t R e p a i r
C<br />
Scratch Remover<br />
for acrylic glass and Plexiglas ®<br />
Care instruction:<br />
8-part KRATZER-ENTFERNER kit:<br />
•1<br />
tube REPAIR (no.1), 25g<br />
•1<br />
tube FINISH (no. 2), 25g<br />
•2<br />
polishing cloths, 4 strips of sandpaper<br />
1.) Thoroughly clean the vehicle before repairing the paint. Then<br />
carefully wet-grind the scratch with one of the attached strips of micro<br />
sandpaper. Please pay special attention to avoid grinding to expose<br />
the primer of the paint.<br />
3.) Finally polish to a shine using<br />
FINISH (no. 2) and the attached<br />
polishing cloth in the third step.<br />
Deep scratches:<br />
In case of deep scratches the following 3 steps are to be made.<br />
Scratch Remover<br />
for acrylic glass and Plexiglas ®<br />
Now the scratch and possibly<br />
existing streaks have disappeared<br />
completely, and the<br />
paint shines as new again.<br />
Removing scratches from all<br />
kinds of car paint finishes<br />
2.) Subsequently polish the pregrinded<br />
areas with REPAIR (no. 1)<br />
and the attached polishing cloth.<br />
A D V I C E : If the scratch exposes the primer of the paint, the damaged area needs to be pre-treated with a touch-up<br />
pen (please observe the colour code).<br />
BioMetrixx Produktions GmbH<br />
Raiffeisenstraße 26 • 94110 Wegscheid • Telefon: +49 (0) 8592 9356-25 • info@biometrixx.de • www.biometrixx.de<br />
P a i n t R e p a i r