XVR-1 - Pass Labs
XVR-1 - Pass Labs
XVR-1 - Pass Labs

You also want an ePaper? Increase the reach of your titles
YUMPU automatically turns print PDFs into web optimized ePapers that Google loves.
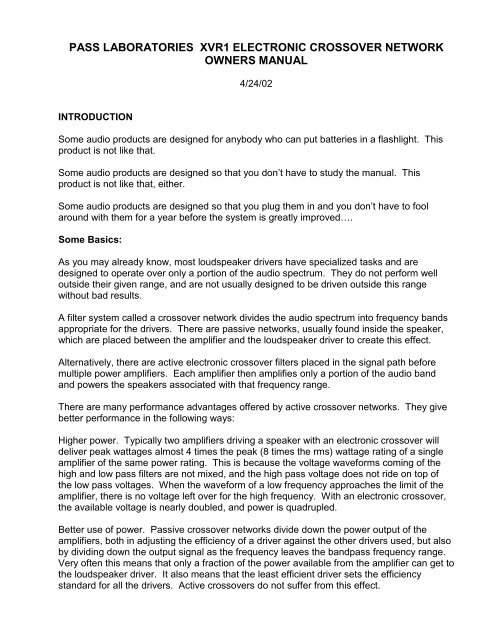
PASS LABORATORIES <strong>XVR</strong>1 ELECTRONIC CROSSOVER NETWORKOWNERS MANUAL4/24/02INTRODUCTIONSome audio products are designed for anybody who can put batteries in a flashlight. Thisproduct is not like that.Some audio products are designed so that you don’t have to study the manual. Thisproduct is not like that, either.Some audio products are designed so that you plug them in and you don’t have to foolaround with them for a year before the system is greatly improved….Some Basics:As you may already know, most loudspeaker drivers have specialized tasks and aredesigned to operate over only a portion of the audio spectrum. They do not perform welloutside their given range, and are not usually designed to be driven outside this rangewithout bad results.A filter system called a crossover network divides the audio spectrum into frequency bandsappropriate for the drivers. There are passive networks, usually found inside the speaker,which are placed between the amplifier and the loudspeaker driver to create this effect.Alternatively, there are active electronic crossover filters placed in the signal path beforemultiple power amplifiers. Each amplifier then amplifies only a portion of the audio bandand powers the speakers associated with that frequency range.There are many performance advantages offered by active crossover networks. They givebetter performance in the following ways:Higher power. Typically two amplifiers driving a speaker with an electronic crossover willdeliver peak wattages almost 4 times the peak (8 times the rms) wattage rating of a singleamplifier of the same power rating. This is because the voltage waveforms coming of thehigh and low pass filters are not mixed, and the high pass voltage does not ride on top ofthe low pass voltages. When the waveform of a low frequency approaches the limit of theamplifier, there is no voltage left over for the high frequency. With an electronic crossover,the available voltage is nearly doubled, and power is quadrupled.Better use of power. <strong>Pass</strong>ive crossover networks divide down the power output of theamplifiers, both in adjusting the efficiency of a driver against the other drivers used, but alsoby dividing down the output signal as the frequency leaves the bandpass frequency range.Very often this means that only a fraction of the power available from the amplifier can get tothe loudspeaker driver. It also means that the least efficient driver sets the efficiencystandard for all the drivers. Active crossovers do not suffer from this effect.
Higher damping factor. Many loudspeaker drivers depend on a low source impedance fromthe amplifier to deliver their best performance. Even moderately good amplifiers have aquite low source impedance, also known as high damping factor, and this quality helps theloudspeaker driver to start and stop its motion more quickly and also evens out thefrequency response. Any passive crossover introduces significant impedance between theamplifier and the amplifier, and can reduce damping factor from 1,000 to as low as 1.Lower distortion. In addition to lowering the distortion of individual drivers and eliminatingthe linear and nonlinear distortions of high power passive filter components, active filtersdramatically lower the intermodulation distortion of the amplifiers. Since the highfrequencies share the same amplifier as the low frequencies, the low frequencies canmodulate, or change the amplitude, of the high frequencies, particularly under high powerconditions.More control and flexibility. It is difficult and time consuming to adjust the characteristics ofa passive crossover filter. It is easy with an electronic crossover to adjust the crossoverfrequencies, the filter cutoff rate (slope), the “Q” or sharpness of the cutoff knee, and thevolume level of the loudspeaker driver. Unlike a passive crossover, these characteristics donot depend on the driver’s impedance which varies considerably at different frequencies.The <strong>XVR</strong>1 is probably the most flexible electronic crossover in existence. It has literallymillions of possible settings, most of which you will never want, but they are available just incase.Tailoring amplifiers to speakers. Some amplifiers are more appropriate for poweringdifferent frequencies and loudspeaker drivers. As an example, you might prefer to driveyour woofer with a big powerful solid state amplifier which will deliver the maximum dampingand control and drive your midrange and tweeter with a tube amplifier chosen for itsambience and the sweet character if its high frequencies.In any case, for those seeking the utmost performance from acoustic transducers (that’sloudspeakers), an active filter system carries the most promise, and is particularlynecessary for those doing custom work and design.Using an electronic crossover is not necessarily easy. Getting what you truly want requireseffort and patience and the ability to tell what you want when you hear it (or measure it).While this crossover can execute a “canned” setting recommended by a speaker drivermanufacturer or a system designer, its true value lies in being able to do anything you wantto try.There are several sections to this owners manual: Introduction, Product Description, QuickInstallation, Some Real Basic Theory, Some Real Tips, Some Real Projects, and SomeProduct Specs.2
Cautions:Remove the AC power cord from the <strong>XVR</strong>1 power supply before opening theenclosure of the <strong>XVR</strong>1 in order to adjust the filter settings. When the power supply isconnected to the AC wall socket there are high voltages inside.Do not open the enclosure to the <strong>XVR</strong>1 power supply. There are adjustable partsinside the power supply, but there are dangerously high voltages inside.It is fairly easy to set the crossover filters with characteristics which will damageloudspeaker drivers. Follow the instructions closely and double check the settingsbefore powering up the amplifiers.Please read the Quick Install section before attempting to operate the <strong>XVR</strong>1. Even if youare a big time expert in audio, you will probably need this information if you need to adjustany characteristic of the filters.Unless you are provided with a document indicating otherwise, the following are the defaultsettings of the filters that ship with the <strong>XVR</strong>1:Low <strong>Pass</strong>: 1060 Hz, 12 dB/oct, Q = MEDIUM AS SEEN ON PAGE 9High <strong>Pass</strong>: 1060 Hz, 12 dB/oct, Q = MEDIUM AS SEEN ON PAGE 13Thank you for purchasing this product. It was created over a period of several years for ourown loudspeaker design efforts, and it is the design that ultimately performed with the mostflexibility and quality, and gave us the most satisfaction with the end result. Many of thepractical things we learned about what makes an effective active crossover are described inthe Theory of Operation section of this manual. Remember that it takes patience andpersistence to get the absolute best out of an active system, but the results will be worth it.You will may have additional questions not covered in this manual. Please feel free tocontact us at WWW.PASSLABS.COMNelson <strong>Pass</strong>Copyright 2002<strong>Pass</strong> Laboratories, PO Box 219, 24449 Foresthill Rd, Foresthill, CA, 95631, USATel (530) 367 3690, Fax (530) 367 2193, WWW.PASSLABS.COM3
PRODUCT DESCRIPTIONThe <strong>XVR</strong>1 is a two channel crossover filter for bi-amplification. It offers two channels ofeither balanced (XLR) or single-ended (RCA) input, and divides the input signal of eachchannel into two frequency bands, the low pass band and the high pass band. Thesefiltered signals can be adjusted for loudness on four knobs on the front panel, one each fortwo channels of low pass, and one each for two channels of high pass. The low pass andhigh pass signal outputs are presented both as balanced (XLR) and unbalanced (RCA).The characteristics of each of the crossover filters is extremely flexible and adjustable,offering approximately 20 million possibilities. Each filter offers 1,2,3 or 4 poles for 6, 12,18, or 24 deciBels per octave (dB/oct) slopes at 39 frequencies ranging from 22 Hz to18,000 Hz. The 4 poles are independently adjustable, meaning that they can each be at 39different frequency values, and are not required to have the same value as withconventional crossover networks. This is of particular value in fine adjustment of crossoverpoints and custom equalization of loudspeaker drivers and phase compensation. Inaddition, the sharpness of the frequency curve or “Q” is available in low, medium, or highcharacteristic. These filters are adjustable through clearly marked jumpers on the mainboard of the <strong>XVR</strong>1.The <strong>XVR</strong>1 circuitry is completely discrete single-ended Class A, using matched JFET inputdevices and bipolar current sources. The input circuit features a high input impedance and,when used balanced, a very high rejection of common mode noise. The distortion andnoise imposed on a signal running through all possible circuits in the system is typically lessthan .05% at 30 volts balanced output from 10 Hz to 20 KHz, and less than .005% at 3 voltsoutput. Provision has been made to completely bypass unused 3 and 4 pole portions of thefilters so as to absolutely minimize distortion and noise.The outputs of the <strong>XVR</strong>1 are designed to drive balanced (XLR) or single-ended (RCA)cables and will drive ordinary amplifier impedances to 45 volts peak balanced, or 22 voltssingle-ended. The outputs of the <strong>XVR</strong>1 are muted to ground through relays to prevent turnonnoise through the speakers when the unit is initially powered up. When power isinterrupted or when AC line voltage is too low to support supply regulation, the relays muteagain, preventing turn-off transient noise.The <strong>XVR</strong>1 comes with a physically separate power supply which carries provision forpowering two <strong>XVR</strong>1 chassis for tri-amp filter configurations. Each <strong>XVR</strong>1 chassis drawsapproximately 15 watts, and is designed to operate continuously. Additional <strong>XVR</strong>1’s andsupplies are used in cascade to create crossover filters for 4 amplifier and 5 amplifiersystems.4
INSTALLATION AND SETUPYou can put the <strong>XVR</strong>1 and its power supply anywhere you like, but keep in mind that theyshould be close enough so that the power cord will reach from the <strong>XVR</strong>1 to the powersupply. You can place the <strong>XVR</strong>1 on top of the supply if you like.You may occasionally want to adjust the filter characteristics of the <strong>XVR</strong>1 (see sectionsbelow) and to do so it will be necessary to have access through the top cover, and so youmight want to consider placing the <strong>XVR</strong>1 so that you can easily access the top cover.The <strong>XVR</strong>1 power supply is designed to power one or two <strong>XVR</strong>1 filter networks. Each <strong>XVR</strong>1is provided with a 25 pin cable for connection from the <strong>XVR</strong>1 to the power supply. Attachthe cable to the appropriate 25 pin connector on the back of the <strong>XVR</strong>1 and connect theother end to either of the two 25 pin connectors on the back of the power supply. Do notplug in the AC power line yet.There are two sets of input connectors for the Left and Right channels; single ended RCAaudio connectors and balanced XLR connectors. On the XLR connector, pin 1 is grounded,pin 2 is positive signal, and pin 3 is negative signal. Pin 2 of the XLR connector is the sameas the “tip” or “hot” pin of the RCA connector. If you are using the RCA input connection,you will obtain best results with pins 1 and 3 of the XLR connector shorted together with thejumper provided. The <strong>XVR</strong>1 will work without the jumper when you use the RCA input, butthe jumper gives lower noise and is preferred. If you remove this jumper when using theXLR connection, save it for future use. If you lose it, contact <strong>Pass</strong> <strong>Labs</strong> for a replacement,which we cheerfully send.By the way, the input impedance for RCA connection is 44.2 K ohms, and is 66.3 K ohmsfor balanced connection.Each of the four filters, two Low <strong>Pass</strong> and two High <strong>Pass</strong>, has a set of output jacks on theback of the <strong>XVR</strong>1. Each set of output connections has a single-ended RCA jack with whichyou are probably familiar, design to accept an ordinary audio cable which connects theoutput of the filter to the input of a power amplifier. Also included is an XLR balanced outputconnector for driving balanced lines and intended to connect to a similar connector on theinput of a power amplifier. On the XLR connector, pin 1 is grounded, pin 2 is positive signal,and pin 3 is negative signal. Both pin 2 and 3 are driven actively with an output impedanceof 100 ohms.You may use either or both RCA and XLR output jacks without adjusting anything, keepingin mind that they share a common ground and also have the positive output in common, sothat pin 2 output of the XLR is the same connection as the “tip” of the RCA connector.Ground noise is a common problem with active crossovers as there is more opportunity forground loops when you have multiple amplifiers. Use of balanced operation commonlyavoids these problems, but you may find that you have to break the earth groundconnection of one or more components in order to eliminate the ground loop. If you do this,it is advisable to leave at least one component, preferably the <strong>XVR</strong>1, earth groundedthrough the AC power connection so that electrical safety can be assured.5
Setting Up the FiltersThe <strong>XVR</strong>1 is shipped with a hex or “allen” wrench for the purpose of opening the top coverof the <strong>XVR</strong>1 for adjustment of the filters.DO NOT OPERATE THE <strong>XVR</strong>1 WITH THE COVER REMOVED. THERE ARE HIGHVOLTAGES INSIDE WHICH ARE HAZARDOUS. ALWAYS UNPLUG THE AC LINECORD OF THE <strong>XVR</strong>1 POWER SUPPLY WHEN THE COVER IS OPEN.If you have any hesitation about your expertise or ability to perform the internaladjustments to the <strong>XVR</strong>1 filters, then get a qualified technician to do the work.This section assumes that you are planning a filter with medium “Q”, or corner sharpness,and that all poles for each high or low pass filter are at the same frequency. For informationon using different Q values or different pole frequencies, refer to the MORE OPERATIONDETAILS section of this manual.This section also assumes that you know what frequency and slope you want each filter tohave. The choices are 22, 25, 29, 36, 48, 53, 59, 66, 75, 88, 106, 133, and 180 Hz. Eachof the four poles available has a labeled spot for a shorting plug to set the frequency of thatpole. Each pole also has three sets of pins for shorting plugs to set the frequency multiplier,X1, X10, and X100.When a pole is not used, there are two spots to place the shorting jumpers, both markedOUT which disable that pole of the filter.The poles of each filter are to be used in sequence, that is to say we use the bank of pinslabeled POLE 1 first, then POLE 2 and so on. A 6 dB/octave single pole filter uses only thefrequency and multiplier settings of POLE 1 and the jumpers of POLE 2, 3, and 4 are set tothe OUT positions.A 12 dB/octave 2 pole filter uses the banks of pins labeled POLE 1 and POLE 2.An 18 dB/octave 3 pole filter uses the banks of pins of POLE 1, 2 and 3.A 24 dB/octave 4 pole filter uses the banks of pins of POLE 1, 2, 3, and 4.Again, the two jumpers for each unused pole of any filter should be placed on the two setsof OUT pins provided.Under no circumstances should you use POLE 2 with POLE 1 in the OUT setting, and youshould never use POLE 4 with POLE 3 in the OUT setting. Doing so will not hurt the <strong>XVR</strong>1,but we make no guarantees that your loudspeaker will appreciate the result. Observe thefollowing cautions whenever adjusting the filter characteristics of the <strong>XVR</strong>1:6
Remove the AC power cord from the <strong>XVR</strong>1 power supply before opening theenclosure of the <strong>XVR</strong>1 in order to adjust the filter settings. When the power supply isconnected to the AC wall socket there are high voltages inside.It is fairly easy to set the crossover filters with characteristics which will damageloudspeaker drivers. The <strong>XVR</strong>1 is sufficiently flexible that it can be made into anoscillator through some combinations of filter values. For this reason, set the frontpanel level controls of the <strong>XVR</strong>1 to minimum and double check the settings beforepowering up the amplifiers. After powering up both the <strong>XVR</strong>1 and the poweramplifiers, gently raise the level controls of the <strong>XVR</strong>1 while listening for any potentialnoise.Each filter of the <strong>XVR</strong>1 actually consists of two filters cascaded, each capable of 6 or 12dB/octave slopes and each capable of its own “Q” setting. For this reason, you will see thateach filter has two sets of “Q” pin settings, L, M, and H (Low, Medium, and High). Thesecan be set independently, and in this section, it is assumed that the jumpers of both are inthe M (medium) or middle position.As the two parts of each filter are cascaded, signal runs through both of them in series,however when using only one or two poles for 6 or 12 dB/octave, it is not necessary to alsorun the signal through the second part and pick up the extra noise and distortion that thesecond part contributes. To enhance performance, each filter also offers a means ofbypassing the second part when you are using 6 or 12 dB/octave slopes. In the middle atthe top of each filter you will see a 3 pin jumper switch which allows selection of either 6/12or 18/24. Selecting 6/12 bypasses the second part of the filter circuit, and selecting 18/24enables the second part also. It is not essential to bypass the second part of the filtercircuit; it will work fine on 18/24 even if you are only using a 6 dB/octave filter, but it will havea bit more noise and distortion.In the following pages we are going to show you four different setups each for high passand low pass filters, along with the resulting curves for each. Note the positions of thejumpers in each of these examples, and we hope you will gain the proper insight as to howthese jumpers work. All of the examples assume a crossover frequency of 1060 Hz, whichhas the frequency jumpers on 106 and the multipliers on X10.In each of these cases, we are going to show you a set of 4 response lines in eachfrequency response graph. These are the characteristics for the 6, 12, 18, and 24dB/octave settings. We do this so you can get a sense of the comparative response ofthese four different slopes, and we will be indicating which of the four lines matches the filtersetting shown on that page.Please note that only one channel of the crossover is shown here. You will need to set thefilters for both the LEFT and RIGHT sets of filters. The LEFT channels are in the front of the<strong>XVR</strong>1 and the RIGHT channels are in the back, and both are labeled on the left of the mainboard.By the way, we provide some extra shorting plugs packed with the <strong>XVR</strong>1 in case you lose orbreak any. If you come up short, contact <strong>Pass</strong> <strong>Labs</strong>, and we will provide you with some inexchange for a smile.7
6 DB/OCT ( 1 POLE ) @ 1060 Hz8
12 DB/OCT ( 2 POLE ) @ 1060 Hz9
18 DB/OCT ( 3 POLE ) @ 1060 Hz10
24 DB/OCT ( 4 POLE ) @ 1060 Hz11
6 DB/OCT ( 1 POLE ) @ 1060 Hz12
12 DB/OCT ( 2 POLE ) @ 1060 Hz13
18 DB/OCT ( 3 POLE ) @ 1060 Hz14
24 DB/OCT ( 4 POLE ) @ 1060 Hz15
Powering Up the First TimePresuming that the <strong>XVR</strong>1 filters are set as desired, It is time to power up the system. Beginby setting all four Level Controls on the front panel to minimum (counterclockwise). This willhelp prevent any damage due to mistakes in setting up the filters or source material which istoo loud.Plug the AC power cord of the <strong>XVR</strong>1 into the wall socket. The blue front panel light will lightup on both the power supply and the <strong>XVR</strong>1. After a few seconds you may hear the faintclick of the output relays of the <strong>XVR</strong>1 engaging. These relays give a delay on turn-on toprevent transients from reaching the speakers, and also mute the output at shutoff or whenthere is not enough AC line voltage to properly power the <strong>XVR</strong>1.At this point, send some audio signal through the system, and then turn on the lowfrequency amplifier. Slowly raise the Low <strong>Pass</strong> level controls of each channel and confirmthat there is proper low frequency output from the loudspeakers. Then turn the lowfrequency amplifier levels down.If the low frequency amplification seems to be OK, then turn on the high frequencyamplifiers and slowly raise their level controls. If everything seems OK and there is nostrange noises and distortion, then you may again raise the level of the Low <strong>Pass</strong> levelcontrols until a proper balance is achieved between the drivers.As mentioned earlier, ground loops are more common in Bi- and Tri- amplified systemsbecause there are more power amplifiers. If you encounter hum in the system, first attemptto isolate it. Is it in both channels, left and right? If so, it is probably a ground loop. Is italso on both top and bottom? If it is only on the high or low, you will want to considerobtaining one or more “cheater” plugs for the AC power connection which convert a 3 prongearth grounded wall socket to a 2 prong connection without earth ground. Try it on theamplifier which has the hum. If the hum and noise is on both high and low, then try usingthe “cheater” plug on both top and bottom amplifiers.In any case, when you encounter a problem like this, it usually pays to try different thingsout and see how the problem is affected, so that you can get a clue as to where it comesfrom. When using “cheater” plugs, it is important that at least one component in the systemis attached to the earth ground at the wall socket so as to ensure safety from electricalshock should the AC wiring isolation fail in one of the components.If you have a problem in one channel and not the other, for example in the Right channelbut not the Left channel, try switching Left for Right in the interconnection betweencomponents. For example, if there is no sound coming out of the Right channel but there issound coming from the Left, then start with the source, for example where the CD playerconnects to the cables going to the preamplifier and switch Left for Right. If the problemdoes not change, then the fault is in a component “downstream”. If the problem doeschange Left for Right, then the fault is in the CD player. If not, then proceed “downstream”to the place where the cables reach the next component, say the preamplifier, and switchLeft for Right. If the problem changes, then it was in the cable. Then go to the output of thenext component and so on until you get a change. Then the fault will be in the previouscomponent.16
SOME REAL BASIC THEORYHow we look at filter characteristics (dB vs Frequency):If you look at the two curves below you will see a Low pass filter on the left and a High passfilter on the right. On the left of each graph we see numbers representing the levelexpressed in decibels and on the bottom axis we see number expressing the audiofrequency. And so the primary picture of such a filter is in decibel level versus frequency.To cover a wide range and reflect physical reality, both axes on these curves arelogarithmic, that is to say a constant distance along the axis represent multiplication bysome value. On the vertical axis, decibels are such that each 3 dB represents a loudnessfactor of 2 and each 10 dB represents a loudness factor of 10.When we look a the curves in the graph on the left, we see the character of four differentLow pass filters, so called because they let the low frequencies through and attenuate, orremove, the higher frequencies. The different slopes of these curves show how rapidly theattenuation occurs as the frequency rises. The most gentle is 6 dB/octave, and then thereis 12 dB/oct, 18 dB/oct, and 24 dB/oct. The same applies to the curve on the right, exceptthat the signal is attenuated more as the frequency goes down, and these are thus knownas High pass filters; they let the high frequencies through.The cutoff frequency, also known as the crossover frequency, is that frequency where thefilter begins reducing the signal. In this particular design, the point at which the response isdown 3 dB is the crossover frequency for 6 dB/oct and 12 dB/oct slopes, and –6 dB is thecrossover frequency for 18 dB/oct and 24 dB/oct slopes. You might imagine that the 24dB/oct slopes might be better as they remove unwanted signal more rapidly as you moveaway from the desired frequencies, but in fact a price is paid for this steep character, whichis some phase, or timing, distortion, which is greater for sharper slopes. Some times theprice is worth the steep slope, sometimes not.The sharpness of the “knee” in the curve for the region of the crossover point is known asthe “Q” of the filter. A low “Q” gives a very gentle transition between the flat and slopedregions of the curve, and a high “Q” gives a sharper transition. As with higher slopes, onemight also imagine that higher “Q” would be more desirable, but as with slopes, higher “Q” isaccompanied with higher phase shift. To find out which setting is best, you just have to try itout.17
Bi-ampingIn this and the following three pages are diagrams showing typical interconnection of the<strong>XVR</strong>1 with source, amplifiers, and loudspeaker driver in two-way, three-way, four-way andfive-way loudspeaker systems. These are not the only ways in which more than one <strong>XVR</strong>1can be arranged, but they are chosen to minimize the signal path and maximize theperformance.18
Tri-Amping19
Quad-Amping20
Quint-amping23
SOME REAL TIPS#1 Adjustment of crossover filters requires great peace of mind.#2 Much of what you think you know about active crossovers is probably wrong. By this Imean that choosing textbook frequencies and slopes for loudspeaker drivers is probably notgoing to be the best solution. If loudspeakers had truly flat response and no phasevariation, then a textbook solution such as “18 dB/oct at 1000 Hz” for both high and lowpass filters might work perfectly. However, loudspeaker drivers do not have neutralcharacteristics, and if they did, we might not need a crossover in the first place.Loudspeaker drivers bring lots of their own characteristics to the table, and the settings ofthe crossover must be adjusted to consider this. So use the textbook settings as a startingpoint, and don’t be surprised when it doesn’t work all that well. Be prepared to experiment,measure, listen, and experiment again.#3 Acquire some means of measuring the response curve of your loudspeaker and learnhow to use it. Measurements are not the last word in defining quality in a loudspeaker, butthey are a big help.#4 Unless the manufacturer recommends higher slopes for reliability reasons such as withhorn drivers, start out of with low slope and Q values and then progress to more complexfilters as the need arises. All other things equal, low slope values such as 6 dB/oct tend tosound better due to lower phase shift. Even if the manufacturer recommends a steep slopeon the high pass filter, feel free to try a more gentle slope at a lower volume level.#5 Remember to try the response with the phase of the driver flipped. You do this byreversing the connections plus and minus at the driver. If this is a midrange driver, keep inmind that it has two crossover points, and you have altered the response of both of them.SOME REAL PROJECTSTo show that real crossover networks often vary from textbook cases and to give you aflavor of how design often really proceeds, we worked up two real loudspeaker designs overthe course of several evenings.We started out measuring the drivers and trying on various slopes and frequencies to seewhat was likely to work. The procedure is somewhat haphazard, and the results you willsee following are condensed, with the mis-steps removed. The approach was simply to geta result which represented a reasonable in approach, knowing the characters of the drivers,and also reasonably flat in frequency response. We generally start with the most gentleslopes, 6 dB/oct unless there is already some reason to use sharper slopes, as in the caseof a horn loaded compression driver. If the gentle slopes don’t work, then we go to thehigher slopes, usually 12 or 18 dB/oct. 24 dB/octave is used rarely in our experience, asthe sharpness of the filter introduces other sonic effects that we don’t like as much.The result is a fairly flat frequency response curve, suitable for listening tests. We thenlisten and adjust and re-measure over the course of several hours, several days, severalweeks, several months, or even several years, until we get the best result.24
Real Project: #1We took a Pioneer TAD 1101 woofer and mounted it in a four cubic foot enclosure and useda TAD 4001 compression driver with a Selenium exponential horn for a tweeter.This is what the curves of the two drivers looked like run without a crossover filter, but withlevels adjusted for roughly equal levels. We see that the 1101 has a bandwidth out to 3000Hz and the horn goes down to about 500 Hz. Logically we will assume that the crossoverpoint will occur somewhere between 500 Hz and 3000 Hz. We know from the literature ofthe TAD 4001 and the horn that it is not designed to operate below 800 Hz, and that theywant a reasonably sharp cutoff to avoid overdriving the compression driver below the hornlow frequency cutoff. To start, we chose 18 dB/oct (3 pole) at 880 Hz for the High passfilter. It turned out to be an excellent choice, and we did not find ourselves having to changeit to improve the response.Then we tried a variety of Low pass filter characteristics for the woofer and looked at theresult when operated with the horn. A variety of 6 dB/octave (1 pole) filters were tried,including flipping the phase of the tweeter for each, but we did not see a good looking curve,as the drivers interfered with each other too much in the 800 to 3000 Hz range. Then wetried 12 dB/oct filters (2 pole) on the Low pass with similar results. When we tried 18 db/oct(3 pole), the curve became smooth with a 660 Hz setting. Flipping the phase of the tweetergave us a dip, so we went back to both drivers in phase.The following curves showed the final results: a reasonably flat, reasonably good soundingloudspeaker in about an hour’s worth of fooling around. From this point it will be necessaryto perform minor adjustments and evaluate the sound by listening over a longer period oftime before making more decisions. Usually it takes several weeks to reach some finalconclusion.25
(Above) The curves of the two drivers measured separately, the woofer with 18 dB/oct (3pole) Low pass filter at 660 Hz and the horn tweeter with 18 dB/oct filter High pass filter at880 Hz.(Below) The curve of the speaker with both drivers measured simultaneously.26
Real Project #2This is a much more complex system. It has twin 21 inch subwoofers mounted in a 12 footlong transmission line, a 12 inch woofer for midbass, a 5 inch midrange, and a ribbontweeter. This system will be quad-amped.We start with the raw curve of the subwoofer:The response curve here shows some interaction with the room in the region below 100 Hz,but we see a clearly rising output as we go up toward 100 Hz, and we surmise that thewoofer is going to need some equalization to be flat at 20 Hz. We try a Low pass filter at 6dB/oct (1 pole) at 22 Hz, and at 12 db/oct (2 pole) at 22 Hz with the following results:27
Either of the above curves could be attractive to us: the 6 dB/oct might serve suitably tomate this subwoofer to a mid-bass woofer at 200 Hz or so, and the 12 dB/oct filter mightwork for 100 Hz or so. It happens that our mid-bass woofer is perfectly happy down below100 Hz, so we choose the 12 dB/oct as our starting point.The mid-bass woofer has the curve shown below, which also shows its response with a 6dB/octave High pass filter at 180 Hz. The higher crossover frequency was chosen tocompensate for the bump in the curve at 90 Hz or so.When we mate the subwoofer and the mid-bass driver with these filters, we get the curvebelow, which shows both the response of the mid-bass driver and both driver together. Ifwe flip the phase of the mid-bass driver, we get a big dip, so we leave the phase positive forboth. That competes our initial setting of the first crossover point.28
Now it is time to develop a crossover point between the mid-bass driver and the midrangedriver. We will only be looking at these two drivers, and the subwoofer is not part of thesecurves. We see below the curve of the mid-bass driver and the midrange. The midrange isquite smooth from about 200 Hz to about 4000 Hz, where it starts to rise a bit. The midbasshas a rising character into the midrange, and we will probably want to think aboutusing a Low pass filter at a fairly low frequency to compensate.This particular midrange is not too happy being driven with power below 500 Hz, but a 6dB/oct High pass filter will work well for it. The question is what Low pass frequency mightbring these two drivers together happily, and with some experimentation we find that 6dB/oct at 133 Hz gets us a fairly smooth curve over this region. Below you will see the twocurves of the drivers separately and the smoother mix between the two. Once again,flipping the phase of the upper driver gives us a dip, and so we don’t.29
For the third and last crossover point, we want to make a smooth transition from themidrange driver to the ribbon tweeter. We experience that the ribbon will distort if operatedat 6 dB/oct slopes below 10,000 Hz, but that it can go lower if a higher slope is applied.Playing around with it and various Low pass filters for the midrange, we conclude that wedon’t like the sound with a 24 dB/oct slope and we have to choose between 18 dB/oct at5900 Hz or 12 dB/oct at 8800 Hz. After several days of listening we conclude that we preferthe High pass with a 12 DB/oct slope at 8800 Hz and a Low pass with a 6 dB/oct slope at480 Hz. Below, you see the individual curves for the drivers with the filters applied:The two curves combine to form the result below:And there we have it, a quad-amped loudspeaker with a response +-5 dB from about 18 Hzto 40,000 Hz. This of course is only the start of the listening tests during which moreadjustments will be made.30
SOME PRODUCT SPECSTests conducted with 10 Kohm load on outputs, 50 ohm signal source, 120 VACAC current drawAc voltage minimumInput impedanceInput CMRRCrosstalkOutput impedanceGain, input to output.2 Amps, 24 watts97 V66 Kohm balanced differential, 44 Kohm single ended-60 dB @ 20 KHz-80 dB @ 20 KHz200 ohm balanced differential, 100 ohm single endedLow Q, XLR = 5.6 dB, RCA out = -.4 dBMed Q, 6/12 dB/oct, XLR = 8.6 dB, RCA out = 2.6 dBMed Q, 18/24 dB/oct, XLR = 13.4 dB, RCA out = 7.4 dBHi Q, 6/12 dB/oct, XLR = 11.6 dB, RCA out = 5.6 dBHi Q, 18/24 dB/oct, XLR = 17.6 dB, RCA out = 11.6 dBAll <strong>Pass</strong> BandwidthLow <strong>Pass</strong>: -0 @ 10 Hz, -0 @ 100,000 HzHigh <strong>Pass</strong>: -1 @ 10 Hz, -0 @ 100,000 HzMaximum OutputMaximum InputDistortion + Noise30 V rms Balanced, 15 V rms single ended RCA30 V rms Balanced, 15 V rms single ended RCA.05%, .2 V to 30 V balanced, 20 Hz to 20 KHz.002%, 3V balanced, 1 KHzFilter characteristicHigh <strong>Pass</strong>: 6/12/18/24 dB/oct, 22 Hz to 18 KHz in 39 stepsLow <strong>Pass</strong>: 6/12/18/24 dB/oct, 22 Hz to 18 KHz in 39 stepsSizeWeightTwo enclosures xx.x by xx.x by xx.x inchesShipping weight XX lbs.Limited WarrantyParts and labor, 3 years from date of manufacture.No warranty against consequential or collateral damage.31
SIMPLIFIED SCHEMATIC – ONE CHANNEL32
The basic circuitry is a very simple discrete single-ended Class A stage designed tooperated at low gain and feedback levels with high performance and stability. In thediagram above you see the matched JFET input devices. These drive a PNP bipolar gaintransistor which is also a level-shifter. Both gain stages are driver by NPN bipolar currentsources which are in turn regulated by an NPN bipolar voltage reference taking feedbackfrom the first current source.The distortion and noise imposed on a signal running through this circuit is typically .03% at30 volts balanced output from 10 Hz to 20 KHz, and .002% at 3 volts output. The bandwidthis flat from DC to way beyond 100 KHz.33
SOME MORE SPECS:THD + NOISE, LOW/MED/HIGH QTHD VS FREQUENCYLOW PASS (OUT) FREQUENCY RESPHI PASS (OUT) FREQUENCY RESPINPUT COMMON MODE REJECTIONCROSSTALK34
LOW PASS FAMILY – 6 DB/OCTLOW PASS FAMILY – 12 DB/OCTLOW PASS FAMILY – 18 DB/OCTLOW PASS FAMILY – 24 DB/OCTHIGH PASS FAMILY – 6 DB/OCTHIGH PASS FAMILY – 12 DB/OCTHIGH PASS FAMILY – 18 DB/OCTHIGH PASS FAMILY – 24 DB/OCT35
LOW PASS, LOW Q, 1060 HZ, 6/12/18/24 LOW PASS, MED Q, 1060 HZ, 6/12/18/24LOW PASS, HIGH Q, 1060 HZ, 6/12/18/24HIGH PASS, LOW Q, 1060 HZ, 6/12/18/24 HIGH PASS, MED Q, 1060 HZ, 6/12/18/24HIGH PASS, HIGH Q, 1060 HZ, 6/12/18/2436