
You also want an ePaper? Increase the reach of your titles
YUMPU automatically turns print PDFs into web optimized ePapers that Google loves.
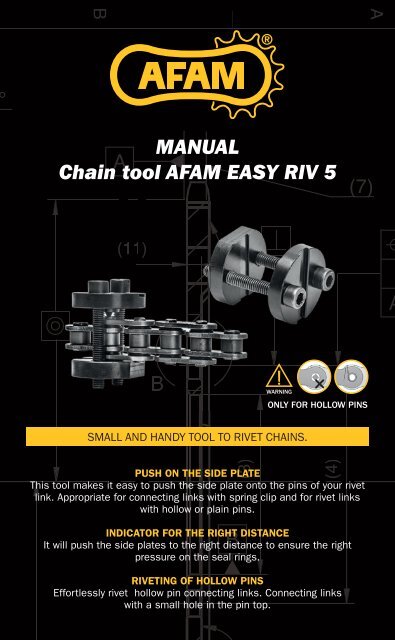
BAAMANUALAChain tool <strong>AFAM</strong> EASY RIV 5(7)(11)BONLY FOR HOLLOW PINSSMALL AND HANDY TOOL TO RIVET CHAINS.(3)B(4)PUSH ON THE SIDE PLATEThis tool makes it easy to push the side plate onto the pins of your rivetlink. Appropriate for connecting links with spring clip and for rivet linkswith hollow or plain pins.INDICATOR FOR THE RIGHT DISTANCEIt will push the side plates to the right distance to ensure the rightpressure on the seal rings.RIVETING OF HOLLOW PINSEffortlessly rivet hollow pin connecting links. Connecting linkswith a small hole in the pin top.
BAADirections for useI1 2II1,2,1,2,etc14352(7)IIIIVCONTACT = STOPCONTACT = STOPB>> The ’EASY RIV 5’ contains 4 parts, a support plate (1), a push plate (2)on the other side the rivet point (3) and two bolts (4) et (5) (drawing I).>> IMPORTANT! Before mounting the connecting link, thoroughly greasethe pins and the seal rings from the connecting link with chain grease.To make it easier to install the connecting link, put the two ends ofthe chain around the rear sprocket, fi t the connecting link and sealsand pack the chain link with chain grease! Now use pliers to guide theloose side plate of the connecting link onto the pins. Always use thepliers on the pins and never in the middle of the plate. When the chainholds together turn the chain until the connecting link is in the middleof the chain run between front and rear Bsprocket.(3)(4)>> Now fi t the chain tool so that the support plate (1) is on the back ofthe link and the push plate (2) is pushing on the loose side plate of thelink. This way the two cutaways of the plates should both be pointinginwards and should be facing each other.
ABNext screw in the bolts (4) & (5) and tighten the bolts so that thepins are aligned into the cut-away of support plate (1) and push plate(2) (drawing I). Eventually use a 30 mm spanner to hold the supportplate and tighten on push the plate (1) (drawing II) by tightening thetwo bolts (4) and (5) (hex key 5 mm). Progressively tighten each bolta quarter of a turn at a time and alternate between the two bolts sothat the side plate is guided smoothly onto the pins. Continue until theextreme edges of the push plate (2) touch the neighbour side platesof the chain. Now the side plate of the connecting link has exactly theright distance <strong>com</strong>pared to the other links of the chain and ensuresthe right pressure on the joints (drawing III).AUnscrew the bolts (4) and (5) and take the device off. If your link hasa pressed side plate with a spring clip link, you can now install thespring clip making sure that the closed side of the clip is pointed intothe drive direction.(7)>> For rivet style links with a hollow pin, you have to turn the push plate(2) around and rivet the chain link. To rivet the chain, put the point (3)(11)of the push plate precisely into the hole of the pin top. Tighten thebolts (4) and (5) progressively and again alternating between the twobolts with a quarter of a turn at a time until the riveting is done (drawingIV). Repeat this procedure on the second pin.After installing the rivet link, check that the connecting link moves justas freely as all the other links of the chain and is not fitted too tight.AIncorrect fi tting can lead to premature wear and even failure. If youhave any doubt about the links fi tting, please consult a professionalengineer or mechanic!B(3)(4)BENJOY YOUR RIDEwww.afam.<strong>com</strong>