General Laboratory Procedures - Nyaya Health
General Laboratory Procedures - Nyaya Health
General Laboratory Procedures - Nyaya Health

Create successful ePaper yourself
Turn your PDF publications into a flip-book with our unique Google optimized e-Paper software.
4. Check the performance of the colorimeter:Measure the Abs of a sample solution of known Abs value.→ If the Abs displayed on the readout match the expected value the instrument is considered to beworking properly.→ If the Abs does not matched the expected value, further test should be performed in order toconfirm the source of the error.NOTE: Make sure that the correct filter was selected and that the tube in the correct position and thatthe optical sides are dry.5. MaintenanceThe colorimeter requires little or no maintenance:a) Keep away from vibration and sunlight exposition.b) Clean the colorimeter immediately after a spillage.c) Replace fuse or lamp according to the following trouble shooting:d)Abnormality Possible fault Remedya) No display on ReadoutFuse blew offReplace fuseb) Display glowing but %T and Abs gettingLamp blew offReplace lampFor any other fault consult the supplier or return the instrument to the nearest ELICO supplier(Label correctly the equipment with the serial number and fault description and pack it correctly)
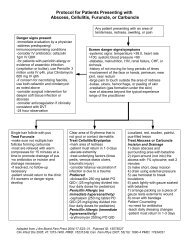
III. QBC AUTOREAD PLUS AND CENTRIGUGE SYSTEM1. DescriptionThe QBC system provides a 9-parameter hematology profile of centrifuged venous and capillary blood.It provides a diagnostic hematology profile of the following quantitative values from a single tube ofblood:• Hematocrit• Hemoglobin• Mean corpuscular hemoglobin concentration• Platelet count• White blood cell count• Granulocyte count(1% and number)• Lymphocyte-monocyte count (1% and number)a) Principle of the TestThis method is based on electro-optical linear measurements of the discrete layers of packed bloodcells in a microhematrocrit-type tube. The cell layering results from density gradients formed duringhigh speed centrifugation of the blood (Figure .
Figure 1.4. Cell layering in microhematocrit tube2. Material needed for Auto-Analyzer Hematology Testing:• QBC Autoread Plus• QBC Centrifuge• Lancet for capillary blood or test tube of bloodfor venous blood• Accutube• Accutube Float• Ethanol or other antiseptic• Cotton swabs• Band aid3. USING THE QBC…<strong>General</strong> Rules of usage:• Read the User Manuals of both the Autoread Plus and the Centrifuge prior to operating themachine, especially parts on how to calibrate the machine, how to take blood sample usinglancet or how to draw correct amount of blood from a test tube of venous blood, how toprepare the Accutube for the analyzer, how to centrifuge, and how to interpret results• Do not change settings, except in going from Calibration Rod mode to CBC (analysis) mode, asall settings are preset and automatic.• Run calibration (cal) rod one time a day, each morning when the machine is turned ON.
• Make sure to compare actual results with the ranges of the appropriate gender/age group.• In case of error messages, the manual should be consulted for all answers.Tips and Tricks of Usage:• Blue lancet has a needle of 2.2, and should be used on extremely cold or callous fingers• If too much blood gets into the Accutube, gently touch the end of the test tube to soak upsome of it and decrease the volume slightly; however, this is not a good practice.• If any air bubbles get into the Accutube, they must be removed before the tube can be insertedinto the analyzer. Usually the air bubbles can be eliminated by tilting the tube down and holdingthe tube vertical with the open end at the bottom; if this does not get the air bubbles out,blood has to be taken out of the tube using a tissue paper, and the tube be refilled again.• Make sure to manually record all results before taking out the Accutube from the analyzer orbefore shutting the lid., as they will get automatically erased when the door shuts.• In cases where the manual cannot help explain a problem with the machine, the last resort is toremove the software drive from the rear of the Analyzer for 30 seconds, then put back in.Analysis of Results• Individual results must be compared with the range of values for that same gender/age• The hematocrite is the most sensitive measure in the system. Any deviances in procedurewould affect the hematocrite the most, though not usually by a large margin.
Quality Control
QUALITY CONTROLQuality Control AssuranceQCAExternal Quality Assessment(EQA)Quality ManagementInternal Quality Assessment(IQA)External Quality Assessment: Organized by the National Public <strong>Health</strong> <strong>Laboratory</strong> (NPHL) – Teku,Kathmandu. Send sample to the laboratory:- Haemoglobin,- Total WBC count;- Differential WBC Count,- Urea,- Glucose- Gram- Ziehl Neelsen Stain (AFB)Results are reported in lab register and in NPHL form and resend to Kathmandu.Evaluate past performance, identify hidden problems and compare performance with others.Improve qualityInternal Quality Assessment (IQA): Daily procedure at the laboratory. Applied to all work processes andto every test performed in lab.Identify problems immediately Immediate correction
Quality Management:- Training of laboratory staff- Use of SOPs- Standard supply management- Standard equipment management- Supervision and OrganizationQuality control:Before implement the test in the laboratory:Calculate the Standard deviation (SD) and the coefficient of variation (CV) for the 0.5 mg/dl standardby measuring 15 samples. By plotting these values as previously described, the Optimal ConditionsVariance (OCV) can be obtained.In the beginning of each day, with the first test.Measure the Abs of a standard and see if it matches the calibration curve. If the standard matches thecalibration curve the sample can be read from the graph.If it doesn’t match the calibration curve, check how the result is distributed around the mean (if it’swithin the standard deviation (2SD)).If the value is outside the limits, further measurements should not be performed till confirm the sourceof the error (operator, colorimeter performance, reagent…). A new standard or a control should be testedto see if the expected value of concentration is obtained.Setting up a new test:
Quality controlControl serum (purchase)StandardControl serum (produced in the lab)Prepared control serum (pooled)Not availableMatchCalibration graph1. Run a Standard every day2. Compare with the calibrationDoesn’t MatchDetermine concentration(calibration curve)Value inside expected rangeGood controlRun the control at least once a weekPerform the tests normallyRun the control serum together with the test (once a week)a. Run a control with the kit (comparewith OCV)If the control value is within 2SDConsider the resultsb. Run a new standard (compare withgiven value)
1. Calculate the Standard deviation (SD) and the coefficient of variation (CV) for each standard/control.The Standard deviation represents the variation of the substance being measured (in substance units inrelation to the mean value).Squared ⋅ difference =( Difference ⋅ from ⋅ mean( + / −)) 2Sum ⋅ of⋅ the ⋅ squared ⋅ difference = ∑ Squared ⋅ differenceSD =Sum ⋅ of⋅ the ⋅ squared ⋅ differencen −1The CV expresses the SD as a percentage of the mean:CVSD= ×100 MeanTwo different coefficients of variation can be calculated for a test:- Optimal Conditions Variance (OCV): Expresses the reliability and degree of variability under optimalconditions. OCV can be determined in a single experience and as a reference before set up the new test.- Routine Conditions Variance (RCV): Expresses the reliability and degree of variability under routineconditions of work. It takes some time to accumulate enough information from routine tests to calculateRCV.Under routine conditions the RCV is inevitably higher than the OCV→ Thus when a new test is first introduced, it is usual to set up the firstcontrol chart using twice the optimal conditions SD and OCV.
Establishment of the Optimal Conditions Variance (OCV)1. Prepare sufficient quantity of control reagent with a known amount of the substance beingmeasured.2. Under optimal conditions, perform 20 measurements on the same control reagent.3. Read off the values from the colorimeter and respective concentration from the calibration graph.4. List the 20 values ( X ) in the table represented in the next page.5. Adding up all the results and perform the calculation represented on table X
SD and OCV calculation for HiCN standard solutions:Day: Test Method: Control serum No: Analyst:Test No(n)1234567891011121314151617181920AbsTest Result, XnConcentration (____)Difference from mean( X − Xn )2( )Total ∑ X = ∑ ( − Xn)X =Squared Difference( X − Xn) 2X =Calculations∑ X=n2( X − Xn))∑ SD =n −1
Checking the test method and colorimeter: Calibration graphsCalibration curves are used to check if the Abs of the measured substance increases in a linear way with itsconcentration.How to prepare a calibration curve?1. Allow the standard solutions to warm to room temperature.2. Place the correct filter in the colorimeter or set the right wavelength.3. Turn the colorimeter on.4. Zero the colorimeter with diluting/blank fluid.5. Read the Abs of each standard, beginning with lowest.6. Plot the Abs (y) of each standard against its concentration (g/L) (x) in a graph paper and draw astraight line from the zero through the points plotted (extended the line till 200 g/L)..7. Make a table for intended substance values from 20-200 g/L.Notes:1. Use 5 standards: Series of dilutions of the substance being assayed.Graph interpretation and further application:1. Check if a straight line is drawn through the points plotted:a) If yes the Beer-Lambert formula can be applied to estimate the concentration and the value canbe read from a table covering the appropriate range of values (prepared from the graph).Concentration of test = Abs of test x Concentration of standardAbs of standardb) If a non-linear graph is produced the Beer-Lambert formula cannot be used and the values mustbe read from the calibration graph.Notes:1. If one or two points are slightly off the linear line, it usually means inaccurate pipetting. Repeat thecalibration if a line of “best fit” cannot be drawn.2. Ideally the line should pass through zero at an 45 o angle. If the angle is too steep or to flat, repeat thereadings. Using the filter or wavelength near the maximum absorption.
During calibration always record: Date, instrument used, filter used, blank solution, used to zero, name ofthe analyst.
CALIBRATION SHEETCalibration for:______________________ Method.Kind of standards used:Date:Filter used:Blank solution used to zero:Absorvance measured in colorimeter for each calibration solutionSolution Abs Concentration (_______________)123456Calibration Graph:Range of Abs values and correspondent concentration (for linear curves):Abs Concentration (________) Abs Concentration (______)
Daily control:In the beginning of the day, at least the reading of 2 standards must be checked to see if it matches with thecalibration graph. The correspondent values should be also registered and marked every day in the monthlygraph in order to see if its within the acceptable limits (SD). This record helps to predict upward ordownward drifts in relation to mean (Interpretation of results in next page).Check turbidity and presence of floccules in the solutions which might indicate deterioration orcontamination by fungi. Suspicious fluids should be discarded and not used.For Drabkin’s Reagent:Also visible (turbidity) and photometric check of the diluting fluid must be performed to look for signs ofdeterioration:1. Measure against a water blank with a yellow-green filter in the colorimeter (wavelength 540 nm)Note: A zero reading should be obtained for the diluting fluid (with correct pH 7.0-7.4).A different result may indicate deterioration and thus the fluid should not be used. When this happens,check the absorbance of a new equal fluid to check if the problem is the reagent or the equipment.If a control serum is available, run the control together with each test once a week, and plot it in the qualitycontrol graph.Furthermore, a control serum will be sent from TEKU (Kathmandu) in order to check the performance ofour equipment, technician and methodology. The results obtained in Sanfe Bagar laboratory will be resendto Kathmandu in order to compare it with TEKU results.
QUALITY CONTROL TEST SHEETDay Abs Day Abs1 172 183 194 205 216 227 238 249 2510 2611 2712 2813 2914 3015 3116Method:Month:Controls NoFilter used:Blank solution used to zero:Analyst:SD:OCVQuality control chart* At the end of the month control, estimate new SD and the RCV
Daily interpretation from Quality control tests (Check where the control sample Abs is positioned in the graph)Results Interpretation What to do? Result Interpretation What to do?Value within+/- 2 SD limitsReliable result andequipmentThe result is not reliablebecause:Further patient’s resultscan be considered1. Wrong filter being useda) Check the filter inuse2. Reagentdeterioration/wrongworking reagent.b) Check the reagent inuseValue outside+/- 2SD limits:3. Unacceptableperformance of theequipment.c) If both are OK:Measure a fresh controland preanalyzed/characterizedsamplesi) The fresh standard’ Absis within +/- 2 SD limitsand the samples presentthe same Abs values.ii) The Abs of the newstandard continues notacceptable and the samplesvalues do not match theprevious results.The equipment is reliable.The result is not reliableprobably because:- Faulty equipment.→ The old standard mustbe discarded.- Further patient’s resultscan be reported.→ Further results shouldnot be recorded.Check and Fix equipmentiii) The Abs of the newstandard continues notacceptable and the samplesvalues match the previousresults.The result is not reliableprobably because:- Deterioration of thestandard reagents→ Further results shouldnot be recorded tillconfirm that the standardsolution is the source ofthe problem.Analyze anotherstandards/characterizedsolutions.
Detecting errors that can lead to incorrect test results:Incorrect or uncommon test results can be generated from errors produced during:1. Pre-analytical stage2. Analytical stage3. Post-analytical stageIn order to anticipate and avoid errors and incorrect test results, the following precautions shouldbe considered and followed:1. Pre-analytical stage:• DO NOT collect blood from the wrong patient. The <strong>Laboratory</strong> staff MUST check thepatient’s identification/number and take special ATTENTION when there are languagedifficulties.• DO NOT use a wet syringe and needle when collecting venous blood. DO NOT removethe needle from the syringe before dispensing the blood.• DO NOT collect blood from an arm into which an intravenous infusion has been given.• DO NOT apply a tourniquet too tightly or for too long because it can lead to venousstasis and false increase of the Hemoglobin or other detected substances.• DISPENSE blood into a container with sufficient anticoagulant (EDTA) and MIXappropriately to avoid formation of clots in the sample.• ADD sufficient blood to anticoagulant in a container.• DO NOT leave blood samples at high temperatures and exposed to sunlight and TEST itas soon as possible.• APPLY correct techniques for the collection of capillary blood (from a qualified person).E.g. (Excessive squeezing of tissues can lead to sample dilution with tissues juice).• DO NOT use a wet and damaged/fragmented pipette to collect capillary blood• When a specimen reaches the laboratory it should be accompanied by a request formwhich provides the following patient details:- Name
- Age- Gender- Inpatient- Outpatient number- Ward when an impatient- Home area or village- Patient Illness- Date and time of specimen collection• Check if the identity on the specimen container matches the one from the request form.2. Analytical stage:• Mix the samples appropriately. (E.g. Before testing anticoagulant venous blood it must bemixed for 2-5 minutes (manually or preferably on a mixer)• Avoid pipetting errors: wipe the blood from the outside surface of a pipette tip and checkif the blood is on the graduation line before dispensing it. Do not used wet or chip pipettetips.• Prepare and stain sample films correctly:- Use a clean grease-free slide and smooth edged spreader.- The spreading of a sample film must be done by an experienced technician.- Avoid humidity (causes lyses of red cells) prior to fixation (a hair dryer can helpto dry films rapidly).- Avoid the presence of water in the methanol used to fix the film.- Prepare the stock stain correctly and without water.- Use suitable water to prepare the buffered water and check the appropriate pH (ifnot correct smears appear to red or blue.- Respect the staining time.- Apply the staining technique in a correct way to avoid stain deposit.- Prepare blood films that will be only used as a control and a reference of wellprepared staining.
3. Post-analytical stage:• Report and verify test results.• Take appropriate actions when a result has serious clinical implications.• Ensure that the results are interpreted correctly and that adequate records are kept.
Standard Operation Process(SOPs)
MICROSCOPYGram Stain protocolGram staining of corneal material enables visualization of bacteria and fungi within the tissue,thus providing a simple and effective means of differentiating between the two commonest typesof causative organism, enabling appropriate treatment to be initiated.Materials• Microscope slides (76.2 mm x 25.4 mm x 1.2 mm)• Disposable micropipettes• Light microscope• Paper towel• Immersion oil• Timer• Washed bottles (with filtered water)• Droppers or suitable stain dispensing container• Reagent containers (clear and amber)Reagents• Distilled water• Filtered waterSolutions:• Crystal violet• Gram’ s iodine• Acetone-ethanol decolorizer
• Safranin or Carbol fuchsin• Distilled water<strong>Procedures</strong>Fixation:3. Make a smear of the tissue or body fluid that is to be stained, by spread it on a slide tillcovering an area of about 15-20 mm.4. Allow the smear to air dry completely5. Depending on the type of smear, alcohol-fix as follows:- For Gram negative diplococci (N.gonorrhoeae or N.menigitidis) fix with 1 or 2 drops ofabsolute ethanol.- For gonococci or meningococci use methanol for 2 minutes.6. Leave the alcohol on the smear for a minimum of 2 minutes or until the alcoholevaporates.Staining:1. Cover the fixed smear with crystal violet stain for 30-60 minutes. This step colors allcells violet.2. Rapid wash off the stain with clean water (filtered water)3. Tip off all the water by tapping gently on paper towels and cover the smear with Gram'siodine for 30-60 seconds. (All cells remain violet).4. Wash off the iodine with filtered water.5. Decolorize rapidly (few seconds) with ethanol-acetone (1:1, v/v). Wash immediately withfiltered water.6. Cover the smear with safranin or Carbol fuchsin and incubate for 30 seconds-1 minute.
Note: Use Safranine to stain gonococci and menigococci, while Carbol fuchsin isrecommended for Vincent’s organisms, Yersinia, Haemophilus, Campylobacter and Vibriospecies.7. Wash off the stain with filtered water for a maximum of 5 seconds. .8. Wipe the back of the slide clean, and place it on paper towels in a draining rack for thesmear to air-dry9. Examine the smear microscopically, first with the 40 x objective to observe the stainingand distribution of material, ant then with the oil immersion objective to report thebacteria and cells.ResultsCells Example of m.o. ResultGram positive bacteria Staphylococcus,Dark purpleStreptococcus,Clostridium,CorynebacteriumGram negative bacteria Neisseria, Haemophilus, Red-pinkSalmonella, Shigella,Vibrio, Klebsiella,Brucella, yersinia,coliformsYeast cells:Dark PurpleNuclei of pus cellsEpithelial CellsRedPale red
Wet mountsMaterial:• Microscope• Slides• Cover slips• Eyedropper• Water• Toothpick• Paper towelReagents:• Distilled water• Methylene blue or crystal violet (not essential)Procedure:1. Place slide on a flat surface and place the sample on it.2. Using an eyedropper put a drop of distilled water on the sample.3. Place one end of the cover slip on the slide (a 45 o angle helps). Slowly lower the other endof the cover slip (so that spreads the water) using the end of a toothpick.Notes:a) If you get air bubbles (looking like little black doughnuts), gently press on the coverslip tomove them to the edge.b) If there is too much water and the cover slip is floating around, it can be dabbed off byholding a piece of paper towel next to the edge of the cover slip.Staining specimens - Methylene blue or crystal violet may be added to specimens in order toincrease contrast. The stain can be directly added to the water when first preparing the slide or itcan be added later after first viewing the specimen without the stain. Add a drop of the stain
along one edge of the coverslip. Placing a piece of paper towel along the opposite edge of thecoverslip will help draw the stain under the coverslip.
KOH prepClinical indication: Identification of fungal elements in clinic specimens (e.g. vaginalsecretions).Material:• Scraping implement:- Sterile blade for skin and nail;- Forceps for hair;- Sterile swab for vaginal secretions.• Vials for vaginal samples• Microscope slides• Cover slips• Disposable pipettes• Microscope with a 20 watt halogen lamp and a blue daylight filter• Scalpel• Sterile swabs• Vials• GlovesReagents:• 20% Potassium Hydroxide (KOH) with DMSO• 0.9% Sterile sodium chloride• Physiological saline• 70 % alcoholVaginal sample:Sample collection
1. Using a sterile swab, collect vaginal material and place in vial containing approximately0.5 mL of physiological saline (0.9% NaCl).2. Reseal vial and label.Note: To preserve the motility of trichomonas, specimens should not be refrigerated and shouldbe examined as soon as possible, following collection.Procedure1. Mix sample in vial and place two drops of the solution into a small culture tube.2. Add two drops of 20% KOH with DMSO to the tube3. Mix and allow to sit for about 5 min until the material has cleared4. Place one drop on the slide5. Observe the preparation by brightfield microscopy.Skin and Nails samples:Sample collection:Skin:1. Cleanse skin to be sampled with 70 % alcohol.2. If a characteristic dermatophyte “ring” is present on the skin, collect samples from theouter margin of the ring at its junction with the normal skin. Otherwise, collect samples fromareas where the skin appears to be scaling.3. Use the edge of a glass slide or scalped to scrape off the surface skin scales.4. Cover the specimen between two glass slides or place the scales in a folded piece of paper,or other suitable container.5. Label the specimen with the patient’s name and unit history number or the identifyingnumber.Nails:1. Clean the nail with 70% alcohol to remove contaminating microorganisms.2. Scrape away the top layers of the nail and collect the subsurface material.3. Also remove a portion of debris from under the nail with a scalpel.4. Place the collected material into a sterile specimen container.
Procedure:1. Samples should be thoroughly minced with a scalpel. (The DMSO and KOH penetrateslowly or not at all into the interior of inadequately minced pieces. Nail clippings can beprogressively shaved with a scalpel and pulverized with mortar and pestle).2. Place the material to be examined onto a clean glass microscope slide.3. Add 1-2 drops of 20% KOH with DMSO to the material.4. Place a cover slip over the preparation.5. Allow the KOH to sit at room temperature for 15-30 minutes until the material has cleared.(The slide may be warmed to speed the clearing process of thick specimens).
Sputum for AFB (acid fast bacilli)Material:• Centrifuge (300o g)• Microscope (100x)• Immersion oil• Amber bottle (minimum 100 mL)• Beaker• Centrifuge tubes (15-20 mL)• Plastic bulb pipettes• Bunsen burner• Paper towel• Dropper• Filter• FunnelReagents:•Carbol fuschin (filtered) (1)•Acid alcohol, 3% v/v (2)• Methylene blue, 5 g/L• Filtered waterProcedure:Ziehl-Neelsen smear preparation:1. Label a new slide with the name patient/case number, etc.2. Transfer a drop of sputum to a clean scratch-free glass slide.3. Spread the sediment to make a thin preparation and air-dry completely.Heat fixation and staining:2. Rapidly pass the slide, smear uppermost, three times through the flame of a Bunsen burner(it should be possible to lay the slide on the back of the hand without feel uncomfortablehot).3. Allow the smear to cool and place the slides on a staining rack (ensure the slides don’ttouch each other).
Staining:1. Cover the smear with carbol fuchsin stain.2. Heat the slide slowly until it is steaming. Do not boil. Maintain steaming for 3 to 5 min byusing low heat.3. Rinse each slide individually in a gentle stream of running filtered water until all free stainis washed away.4. Cover the slide with 3% v/v acid alcohol for 5 minutes or until the smear is sufficientlydecolorized (pale pink)5. Wash well with clean water and drain excess water from the slide.6. Cover the slide with methylene blue for 1 min.7. Wash off the stain with filtered water and drain excess water from the slide.8. Wipe the back of the slide clean and allow smear to air dry. Do not blot.9. Examine the smear at the microscope using the 100x immersion oil objective (if availableuse 7x eyepieces for a brighter image).
Haematology (colorimeter)
HAEMIGLOBINCYANIDE (HICN) Technique H – 01Authorized signature: Issuing date: 11 th February 2008Next Revision date: 31 st March 2008Staff able to perform test: <strong>Laboratory</strong> officer (supervisor) laboratory technician (under supervision)Clinical significance: Primarily for antenatal screening and basic investigation of anemia (diagnoseand monitor response to treatment): Haemoglobin concentration below normal values is a sign ofanemia.Principle of Test Method:The absorbance of haemiglobincyanide (HiCN) redden in a colorimeter is expressed in nm and therespective concentration (g/l) in the sample is calculated by comparison with a HiCN standardsolution. HiCN is directly proportional to the amount of Haemoglobin in the blood because:FerricyanideHaemoglobin + Drabkin’s solution methaemoglobin Haemiglobincytanide HiCNOxidizationCyanideSpecimen: 10 μl (0.01 ml) of capillary blood. Used directly after collection and thus do not need anticoagulant. 10 μl (0.01 ml) of well-mixed EDTA-anticoagulated 1 venous blood.Note: Capillary blood can be almost as satisfactory as venous blood if a free flow of blood is obtained, if dilution of samplewith tissue juice does not occur and if the puncture is not squeezed excessively. Because of these factors, measurementswith capillary blood are usually not so accurate.Equipment required:Sample collection:• Sterile lancets (capillary blood)• Dry cotton wool• Cotton wool soaked in 70& alcohol• Microcapillar with heparin (capillary blood) orsyringe (2.5/5.0/10 ml) + tubes + 10 μlmicropipette (venous blood).Test:• Tubes (7.5 ml)• Test tubes rack• Colorimeter and cuvette• Toilette paper• Distilled water• TimerReagents/stains:- Diluting fluid: Drabkin’s Reagent solution (pH 7.0-7.4)1 For additional information on preparation and storage see Annex 1
- Haemiglobincyanide (HiCN) standard solution.NOTE:• During hot season store Drabkin’s reagent in the refrigerator. Before use it, allow warming to RT.• Drabkin’s solution is very poisonous.Procedure:1. Label test-tubes (7.5 ml) as T1, T2 (Test 1, Test 2) according to the number of samples to betested.2. Pipette 1 ml of Drabkin’s solution into the marked test-tubes.3. With a pipette, measure exactly 10 µL (0.01 mL) of capillary blood or well-mixed (gentleinversion or swirling) venous EDTA-anticoagulant blood.4. Wipe the outside of the pipette with a piece of cotton/toilet paper/gauze while holding the pipettein the horizontal.5. Before dispense the blood, check if there are no air bubbles in the pipette.6. Dispense the blood into the test tubes (T1, T2…) and rinse the tip by washing 3 to 5 times out theinside of the pipette tip repeatedly.7. Stopper the tube, mix in vortex, and leave the sample at RT and protected from sunlight, for 10minutes ** When a neutral (pH 7.0-7.4) Drabkin’s reagent is not available, at least 20 min is required for an alkaline Drabkin’sreagent.8. Set the wavelength of the colorimeter at 540 nm and zero the colorimeter without cuvette (if notON, turn it ON and allow to worm up for 10 min).9. Place 1 ml of Drabkin’s solution into a match cuvette (blank cuvette) and place in thecolorimeter.10. Zero the colorimeter and then remove the blank cuvette.11. Place the patient’s sample into the test-cuvette and place it in the colorimeter.Note: If the diluted blood is cloudy, which can be related to the presence of abnormal plasma proteins or to highconcentration of white cells), centrifuge the diluted blood at 2000 g for 5 min before read the Abs.12. Read the Abs of the patient’s sample, and by using the graph or the table prepared from thecalibration curve, read the patient’s haemoglobin value (g/l).Note: Replaced the test samples back into the original test-tube so that, if necessary they are available for re-check.NOTE: Always check if the cuvette is clear on the side that will face the light path, and ensure that there are no airbubbles.
Reporting and interpretation of results:Normal Values: Haemoglobin (Fe) (mmol/l) Haemoglobin concentration (g/l)Newborn infants 8.4 – 12.1 136 - 196Infants (1 year) 7.0 – 8.1 113 - 130Children (10 – 12 years) 7.4 – 9.2 115 - 148Women 7.4 – 9.9 120 – 160Men 8.1 – 11.2 130 - 180Decrease Values of Haemoglobin: Sign of anemia.Note: In women haemoglobin values drop during pregnancy.Increase Values of Haemoglobin: Due to haemoconcentration (loss of body fluids e.g. in severediarrhea, vomiting), reduced oxygen supply (e.g. congenital heart diseases, emphysema) and rarelypolycythaemia vera.Quality controlInternal Quality Control (IQC) <strong>Procedures</strong>:• Daily measurement of HiCN standard to check instrument performance.• Check visible the Drabkin’s reagent: should be clean and pale in color yellow discard if turbid orwithout color.• Check photometric Drabkin’s reagent: When measured against water blank at 540 nm, it gives a zeroreading.External Quality Control (EQC):The National Public <strong>Health</strong> Laboratories (NPHL - Teku) will provide a preserved whole bloodcontrol previously analyzed. The results will be reported in the laboratory records and also reportedto NPHL for further comparison with standard values.Sources of error:• During sample:- Inadequate flow of blood from the finger prick;- Excessive squeezing of the finger;- Prolonged used of tourniquet which leads to concentration of blood cells.- Insufficient mixing of venous blood, which sediments after collection.- Inadequate mixing with EDTA after collection, which leads to the formation of clots.NOTE: Before testing anticoagulant venous blood it must be mix in the vortex for 2-5 minutes.- Inaccuracy in the amount auditioned to the Drabkin’s reagent.- Air bubbles trapped in pipettes
• Faulty Technique:- Use of the wrong factor for calculation of concentration.- Inadequate mixing of reagents- Use of the wrong colorimeter wavelength- Reading samples that are not at RT- Pipetting errors:a) Inaccuracy in the measurement of the blood sample check if the blood is on thegraduation line before dispensing it;b) Utilization of a wet pipette wipe the blood from the outside surface of the pipette tipwith cotton or paper. Avoid chip pipette/pipette tips.- Inappropriate use of cuvettes: Ensure that the optical surfaces are clean and dry and that there is no air bubbles in thesolution Hold the cuvette only in the sides that will not face the light path. When transferring a solution allow the fluid to run down the inside wall of the cuvette. Do not fill a cuvette more than ¾ full. Before place the cuvette into the colorimeter, wipe the sides that face the light path witha soft paper or cloth. In the cuvette, the optical sides always face the light source.- Inappropriate maintenance of the colorimeter Protect from sunlight and vibration.- Not checking signs of deterioration in reagents such as Drabkin’s fluid.Other precautions:• Store Drabkin’s diluting fluid in a brown bottle or glass bottle wrapped in silver foil paper.• Once the haemiglobincyanide solution has been prepared, the haemoglobin estimation must becarried out within 6 hours.• If RT exceeds 30 C, store Drabkin’s reagent in the refrigerator (4-6 C). Do not freeze. Always allowto warm to RT before use.• Drabkin’s reagent is very poisonous. Keep it in a locked cupboard when not in use and always washyour hands immediate after handle it.References:Mukherjee, K. L., (1988) Medical <strong>Laboratory</strong> Technology: A procedure Manual for RoutineDiagnostic Tests, Volume I; Tata McGraw-Hill Publishing Company Limited, New Delhi, India.Mallapaty, G.; (2000) Quality Assurance: Training Programme for Primary <strong>Health</strong>care <strong>Laboratory</strong>services, Kathmandu, NepalCheesbrough, M., (2000) District <strong>Laboratory</strong> Practice in Tropical Countries; Cambridge UniversityPress, Cambridge, UKWHO (2003) Manual of Basic Techniques for a <strong>Health</strong> <strong>Laboratory</strong>; WHO, Geneva
Calibration of the colorimeter (trough a haemoglobincyanide reference solution):1. Prepare dilutions (HiCN standards) of the stock solution in test-tubes (7.5 ml) according toinstructions provided by the supplier.2. Mix the contents of the tubes and allow to standing for 5 minutes.3. During this time:a) Set the wavelength to 540 nm and zero the colorimeter without cuvette.b) Prepare the blank by placing 1 ml of Drabkin’s diluting fluid into a cuvette.c) Zero the colorimeter and remove the blank cuvette.4. Once at each time and beginning with the lowest concentrated, place the HiCN standards intothe test-cuvette and read the Abs in the colorimeter display.Note 1: If the diluted blood is cloudy (can be related to the presence of abnormal plasma proteins or to highconcentration of white cells), centrifuge the diluted blood at 2000 g for 5 min before read the Abs.Note 2: Before reading check if standards are at RTNote 3: Make sure that the value shown in the colorimeter display return to zero between each reading of thestandards.5. In a graph paper, prepare a graph by plotting the Absreadings of the HiCN standards (y) against theirrespective haemoglobin concentrations in g/l (x).6. Draw a straight line from the zero through the pointsplotted (extended the line till 200 g/L).7. From the graph make a table of haemoglobinconcentration values (20 – 200 g/l) and respective Abs,or calculate it with:ATHb ⋅ concentration = × concentration ⋅ of ⋅ s tan dard =ASconcentration ⋅ of ⋅ s tan dardHb ⋅ concentration = AT ×ASWhere: AT = Absorbance of test sampleAS = Absorbance of Standard solutionFactor (constant)
CALIBRATION SHEETCalibration for: HiCN Method . Date: _________________ Analyst: ____________________Kit used: _______________________________________________________________________________Blank solution used to zero: ____________________________ Wavelength used: ____________________Absorvance measured in colorimeter for each standard solutionStandard Concentration (g/l) Abs1234Calibration Graph:
Estimation of Haemoglobin (Hb) - colorimeterABS (NM)CONCENTRATION (G/L)Date: ______________________Analyst: ____________________________
Quality assurance in Haematology:Sample collection:Capillary blood (skin puncture): finger, ear-lobe or foot infantIt is used immediate after collection and thus do no need addition of anticoagulants.Capillary blood is good for making a blood smear or for a single routine test (haematrocitdetermination or a single enumeration of blood cells). It’s ideal for infants because is less painfull.[1]It can be used for Haemoglobin estimation (Sahli-Method), Total WBC-Count, Differential WBCcount,Platelet count, Reticulocyte count, Blood film for Malaria or FIlaria. [2]Collection must be done according to the following indications:Test method:
PLATELETS Estimation H – 02Authorized signature: Issuing date: 11 th February 2008Next Revision date: 31 st March 2008Staff able to perform test: <strong>Laboratory</strong> officer (supervisor) laboratory technician (under supervision)Clinical significance: Primarily for antenatal screening and basic investigation of anemia (diagnoseand monitor response to treatment): Haemoglobin concentration below normal values is a sign ofanemia.Principle of Test Method:The absorbance of haemiglobincyanide (HiCN) redden in a colorimeter is expressed in nm and therespective concentration (g/l) in the sample is calculated by comparison with a HiCN standardsolution. HiCN is directly proportional to the amount of Haemoglobin in the blood because:FerricyanideHaemoglobin + Drabkin’s solution methaemoglobin Haemiglobincytanide HiCNOxidizationCyanideSpecimen: 10 μl (0.01 ml) of capillary blood. Used directly after collection and thus do not need anticoagulant. 10 μl (0.01 ml) of well-mixed EDTA-anticoagulated 2 venous blood.Note: Capillary blood can be almost as satisfactory as venous blood if a free flow of blood is obtained, if dilution of samplewith tissue juice does not occur and if the puncture is not squeezed excessively. Because of these factors, measurementswith capillary blood are usually not so accurate.Equipment required:Sample collection:• Sterile lancets (capillary blood)• Dry cotton wool• Cotton wool soaked in 70& alcohol• Microcapillar with heparin (capillary blood) orsyringe (2.5/5.0/10 ml) + tubes + 10 μlmicropipette (venous blood).Test:• Tubes (7.5 ml)• Test tubes rack• Colorimeter and cuvette• Toilette paper• Distilled water• TimerReagents/stains:- Diluting fluid: Drabkin’s Reagent solution (pH 7.0-7.4)2 For additional information on preparation and storage see Annex 1
- Haemiglobincyanide (HiCN) standard solution.NOTE:• During hot season store Drabkin’s reagent in the refrigerator. Before use it, allow warming to RT.• Drabkin’s solution is very poisonous.Procedure:13. Label test-tubes (7.5 ml) as T1, T2 (Test 1, Test 2) according to the number of samples to betested.14. Pipette 1 ml of Drabkin’s solution into the marked test-tubes.15. With a pipette, measure exactly 10 µL (0.01 mL) of capillary blood or well-mixed (gentleinversion or swirling) venous EDTA-anticoagulant blood.16. Wipe the outside of the pipette with a piece of cotton/toilet paper/gauze while holding the pipettein the horizontal.17. Before dispense the blood, check if there are no air bubbles in the pipette.18. Dispense the blood into the test tubes (T1, T2…) and rinse the tip by washing 3 to 5 times out theinside of the pipette tip repeatedly.19. Stopper the tube, mix in vortex, and leave the sample at RT and protected from sunlight, for 10minutes ** When a neutral (pH 7.0-7.4) Drabkin’s reagent is not available, at least 20 min is required for an alkaline Drabkin’sreagent.20. Set the wavelength of the colorimeter at 540 nm and zero the colorimeter without cuvette (if notON, turn it ON and allow to worm up for 10 min).21. Place 1 ml of Drabkin’s solution into a match cuvette (blank cuvette) and place in thecolorimeter.22. Zero the colorimeter and then remove the blank cuvette.23. Place the patient’s sample into the test-cuvette and place it in the colorimeter.Note: If the diluted blood is cloudy, which can be related to the presence of abnormal plasma proteins or to highconcentration of white cells), centrifuge the diluted blood at 2000 g for 5 min before read the Abs.24. Read the Abs of the patient’s sample, and by using the graph or the table prepared from thecalibration curve, read the patient’s haemoglobin value (g/l).Note: Replaced the test samples back into the original test-tube so that, if necessary they are available for re-check.NOTE: Always check if the cuvette is clear on the side that will face the light path, and ensure that there are no airbubbles.
Reporting and interpretation of results:Normal Values: Haemoglobin (Fe) (mmol/l) Haemoglobin concentration(g/l)Newborn infants 8.4 – 12.1 136 - 196Infants (1 year) 7.0 – 8.1 113 - 130Children (10 – 12 years) 7.4 – 9.2 115 - 148Women 7.4 – 9.9 120 – 160Men 8.1 – 11.2 130 - 180Decrease Values of Haemoglobin: Sign of anemia.Note: In women haemoglobin values drop during pregnancy.Increase Values of Haemoglobin: Due to haemoconcentration (loss of body fluids e.g. in severediarrhea, vomiting), reduced oxygen supply (e.g. congenital heart diseases, emphysema) and rarelypolycythaemia vera.Quality controlInternal Quality Control (IQC) <strong>Procedures</strong>:• Daily measurement of HiCN standard to check instrument performance.• Check visible the Drabkin’s reagent: should be clean and pale in color yellow discard if turbid orwithout color.• Check photometric Drabkin’s reagent: When measured against water blank at 540 nm, it gives a zeroreading.External Quality Control (EQC):The National Public <strong>Health</strong> Laboratories (NPHL - Teku) will provide a preserved whole bloodcontrol previously analyzed. The results will be reported in the laboratory records and also reportedto NPHL for further comparison with standard values.Sources of error:• Incorrect sample homogenization (mix properly)NOTE: Before testing anticoagulant venous blood it must be mix in the vortex for 2-5 minutes.• Pipetting errors: Inaccuracy in the measurement of the blood sample check if the blood is on thegraduation line before dispensing it; utilization of a wet pipette wipe the blood from the outsidesurface of the pipette tip with cotton or paper. Avoid chip pipette/pipette tips.• Not ensuring that the optical surfaces of the cuvette are clean and dry and that there is no air bubblesin the solution a) Hold the cuvette only in the sides that will not face the light path. b) Whentransferring a solution allow the fluid to run down the inside wall of the cuvette. c) Do not fill acuvette more than ¾ full. d) Before place the cuvette into the colorimeter, wipe the sides that face the
light path with a soft paper or cloth. e) Always face the optical faces to the light source. f) Ensurethat the solution is at RT before reading the Abs.• Inappropriate maintenance of the colorimeter. Protect from sunlight and vibration.• Not checking signs of deterioration in reagents such as Drabkin’s fluid.Other precautions:• Store Drabkin’s diluting fluid in a brown bottle or glass bottle wrapped in silver foil paper.• Once the haemiglobincyanide solution has been prepared, the haemoglobin estimation must becarried out within 6 hours.• If RT exceeds 30 C, store Drabkin’s reagent in the refrigerator (4-6 C). Do not freeze. Always allowto warm to RT before use.• Drabkin’s reagent is very poisonous. Keep it in a locked cupboard when not in use and always washyour hands immediate after handle it.References:Mukherjee, K. L., (1988) Medical <strong>Laboratory</strong> Technology: A procedure Manual for RoutineDiagnostic Tests, Volume I; Tata McGraw-Hill Publishing Company Limited, New Delhi, India.Mallapaty, G.; (2000) Quality Assurance: Training Programme for Primary <strong>Health</strong>care <strong>Laboratory</strong>services, Kathmandu, NepalCheesbrough, M., (2000) District <strong>Laboratory</strong> Practice in Tropical Countries; Cambridge UniversityPress, Cambridge, UKWHO (2003) Manual of Basic Techniques for a <strong>Health</strong> <strong>Laboratory</strong>; WHO, Geneva
Haematology (QBC)
HEAMAGLOBIN Estimation H – 03Authorized signature: Issuing date: 11 th February 2008Next Revision date: 31 st March 2008Staff able to perform test: <strong>Laboratory</strong> officer (supervisor) laboratory technician (under supervision)Clinical significance: Diagnosis of patients suffering from anaemia, hydraemia, (excessive fluid in theblood which accurs during pregnancy), dehydration, shock or burns.Principle of Test Method:The blood (mixed with anticoagulant) is placed in a long capillary tube and centrifuged in amicrohaematocrit centrifuge. The level reached by the column of erythrocytes is read with a scalereader. This method is preferable to that using a macro scale: it is quicker, and blood from the fingercan be used.Specimen: 10 μl (0.01 ml) of capillary blood. Used directly after collection and thus do not need anticoagulant. 10 μl (0.01 ml) of well-mixed EDTA-anticoagulated 3 venous blood.Note: Capillary blood can be almost as satisfactory as venous blood if a free flow of blood is obtained, if dilution of samplewith tissue juice does not occur and if the puncture is not squeezed excessively. Because of these factors, measurementswith capillary blood are usually not so accurate.Equipment required:Sample collection:• Sterile lancets (capillary blood)• Dry cotton wool• Cotton wool soaked in 70& alcohol• Microcapillar with heparin (capillary blood) orsyringe (2.5/5.0/10 ml) + tubes + 10 μlmicropipette (venous blood).Test:• Tubes (7.5 ml)• Test tubes rack• Colorimeter and cuvette• Toilette paper• Distilled water• TimerReagents/stains:- Diluting fluid: Drabkin’s Reagent solution (pH 7.0-7.4)- Haemiglobincyanide (HiCN) standard solution.NOTE:3 For additional information on preparation and storage see Annex 1
• During hot season store Drabkin’s reagent in the refrigerator. Before use it, allow warming to RT.• Drabkin’s solution is very poisonous.Procedure:25. Label test-tubes (7.5 ml) as T1, T2 (Test 1, Test 2) according to the number of samples to betested.26. Pipette 1 ml of Drabkin’s solution into the marked test-tubes.27. With a pipette, measure exactly 10 µL (0.01 mL) of capillary blood or well-mixed (gentleinversion or swirling) venous EDTA-anticoagulant blood.28. Wipe the outside of the pipette with a piece of cotton/toilet paper/gauze while holding the pipettein the horizontal.29. Before dispense the blood, check if there are no air bubbles in the pipette.30. Dispense the blood into the test tubes (T1, T2…) and rinse the tip by washing 3 to 5 times out theinside of the pipette tip repeatedly.31. Stopper the tube, mix in vortex, and leave the sample at RT and protected from sunlight, for 10minutes ** When a neutral (pH 7.0-7.4) Drabkin’s reagent is not available, at least 20 min is required for an alkaline Drabkin’sreagent.32. Set the wavelength of the colorimeter at 540 nm and zero the colorimeter without cuvette (if notON, turn it ON and allow to worm up for 10 min).33. Place 1 ml of Drabkin’s solution into a match cuvette (blank cuvette) and place in thecolorimeter.34. Zero the colorimeter and then remove the blank cuvette.35. Place the patient’s sample into the test-cuvette and place it in the colorimeter.Note: If the diluted blood is cloudy, which can be related to the presence of abnormal plasma proteins or to highconcentration of white cells), centrifuge the diluted blood at 2000 g for 5 min before read the Abs.36. Read the Abs of the patient’s sample, and by using the graph or the table prepared from thecalibration curve, read the patient’s haemoglobin value (g/l).Note: Replaced the test samples back into the original test-tube so that, if necessary they are available for re-check.NOTE: Always check if the cuvette is clear on the side that will face the light path, and ensure that there are no airbubbles.
Reporting and interpretation of results:Normal Values: Haemoglobin (Fe) (mmol/l) Haemoglobin concentration(g/l)Newborn infants 8.4 – 12.1 136 - 196Infants (1 year) 7.0 – 8.1 113 - 130Children (10 – 12 years) 7.4 – 9.2 115 - 148Women 7.4 – 9.9 120 – 160Men 8.1 – 11.2 130 - 180Decrease Values of Haemoglobin: Sign of anemia.Note: In women haemoglobin values drop during pregnancy.Increase Values of Haemoglobin: Due to haemoconcentration (loss of body fluids e.g. in severediarrhea, vomiting), reduced oxygen supply (e.g. congenital heart diseases, emphysema) and rarelypolycythaemia vera.Quality controlInternal Quality Control (IQC) <strong>Procedures</strong>:• Daily measurement of HiCN standard to check instrument performance.• Check visible the Drabkin’s reagent: should be clean and pale in color yellow discard if turbid orwithout color.• Check photometric Drabkin’s reagent: When measured against water blank at 540 nm, it gives a zeroreading.External Quality Control (EQC):The National Public <strong>Health</strong> Laboratories (NPHL - Teku) will provide a preserved whole bloodcontrol previously analyzed. The results will be reported in the laboratory records and also reportedto NPHL for further comparison with standard values.Sources of error:• Incorrect sample homogenization (mix properly)NOTE: Before testing anticoagulant venous blood it must be mix in the vortex for 2-5 minutes.• Pipetting errors: Inaccuracy in the measurement of the blood sample check if the blood is on thegraduation line before dispensing it; utilization of a wet pipette wipe the blood from the outsidesurface of the pipette tip with cotton or paper. Avoid chip pipette/pipette tips.• Not ensuring that the optical surfaces of the cuvette are clean and dry and that there is no air bubblesin the solution a) Hold the cuvette only in the sides that will not face the light path. b) Whentransferring a solution allow the fluid to run down the inside wall of the cuvette. c) Do not fill acuvette more than ¾ full. d) Before place the cuvette into the colorimeter, wipe the sides that face the
light path with a soft paper or cloth. e) Always face the optical faces to the light source. f) Ensurethat the solution is at RT before reading the Abs.• Inappropriate maintenance of the colorimeter. Protect from sunlight and vibration.• Not checking signs of deterioration in reagents such as Drabkin’s fluid.Other precautions:• Store Drabkin’s diluting fluid in a brown bottle or glass bottle wrapped in silver foil paper.• Once the haemiglobincyanide solution has been prepared, the haemoglobin estimation must becarried out within 6 hours.• If RT exceeds 30 C, store Drabkin’s reagent in the refrigerator (4-6 C). Do not freeze. Always allowto warm to RT before use.• Drabkin’s reagent is very poisonous. Keep it in a locked cupboard when not in use and always washyour hands immediate after handle it.References:Mukherjee, K. L., (1988) Medical <strong>Laboratory</strong> Technology: A procedure Manual for RoutineDiagnostic Tests, Volume I; Tata McGraw-Hill Publishing Company Limited, New Delhi, India.Mallapaty, G.; (2000) Quality Assurance: Training Programme for Primary <strong>Health</strong>care <strong>Laboratory</strong>services, Kathmandu, NepalCheesbrough, M., (2000) District <strong>Laboratory</strong> Practice in Tropical Countries; Cambridge UniversityPress, Cambridge, UKWHO (2003) Manual of Basic Techniques for a <strong>Health</strong> <strong>Laboratory</strong>; WHO, Geneva
HEMATOCRIT or PCV (packed cell volume) H – 04Authorized signature: Issuing date: 11 th February 2008Next Revision date: 31 st March 2008Staff able to perform test: <strong>Laboratory</strong> officer (supervisor) laboratory technician (under supervision)Clinical significance: Hematocrit values, along with haemoglobin concentration and red cell count, isused to calculate the mean cell haemoglobin concentration (MCHC) and mean cell volume (MCV).These red blood/erythrocytes cells indices are used to investigate anemia. PCV is also used to diagnosepolycychaemia vera and to monitor its treatment.Principle of Test Method:The blood (mixed with anticoagulant) is placed in a long capillary tube and centrifuged in amicrohaematocrit centrifuge. The level reached by the column of erythrocytes is read with a scalereader. This method is preferable to that using a macro scale: it is quicker, and blood from the fingercan be used.Specimen: 10 μl (0.01 ml) of capillary blood. Used directly after collection and thus do not need anticoagulant. 10 μl (0.01 ml) of well-mixed EDTA-anticoagulated 4 venous blood.Note: Capillary blood can be almost as satisfactory as venous blood if a free flow of blood is obtained, if dilution of samplewith tissue juice does not occur and if the puncture is not squeezed excessively. Because of these factors, measurementswith capillary blood are usually not so accurate.Equipment required:Sample collection:• Sterile lancets (capillary blood)• Dry cotton wool• Cotton wool soaked in 70& alcohol• Microcapillar with heparin (capillary blood) orsyringe (2.5/5.0/10 ml) + tubes + 10 μlmicropipette (venous blood).Test:• Tubes (7.5 ml)• Test tubes rack• Colorimeter and cuvette• Toilette paper• Distilled water• TimerReagents/stains:- Diluting fluid: Drabkin’s Reagent solution (pH 7.0-7.4)- Haemiglobincyanide (HiCN) standard solution.4 For additional information on preparation and storage see Annex 1
NOTE:• During hot season store Drabkin’s reagent in the refrigerator. Before use it, allow warming to RT.• Drabkin’s solution is very poisonous.Procedure:37. Label test-tubes (7.5 ml) as T1, T2 (Test 1, Test 2) according to the number of samples to betested.38. Pipette 1 ml of Drabkin’s solution into the marked test-tubes.39. With a pipette, measure exactly 10 µL (0.01 mL) of capillary blood or well-mixed (gentleinversion or swirling) venous EDTA-anticoagulant blood.40. Wipe the outside of the pipette with a piece of cotton/toilet paper/gauze while holding the pipettein the horizontal.41. Before dispense the blood, check if there are no air bubbles in the pipette.42. Dispense the blood into the test tubes (T1, T2…) and rinse the tip by washing 3 to 5 times out theinside of the pipette tip repeatedly.43. Stopper the tube, mix in vortex, and leave the sample at RT and protected from sunlight, for 10minutes ** When a neutral (pH 7.0-7.4) Drabkin’s reagent is not available, at least 20 min is required for an alkaline Drabkin’sreagent.44. Set the wavelength of the colorimeter at 540 nm and zero the colorimeter without cuvette (if notON, turn it ON and allow to worm up for 10 min).45. Place 1 ml of Drabkin’s solution into a match cuvette (blank cuvette) and place in thecolorimeter.46. Zero the colorimeter and then remove the blank cuvette.47. Place the patient’s sample into the test-cuvette and place it in the colorimeter.Note: If the diluted blood is cloudy, which can be related to the presence of abnormal plasma proteins or to highconcentration of white cells), centrifuge the diluted blood at 2000 g for 5 min before read the Abs.48. Read the Abs of the patient’s sample, and by using the graph or the table prepared from thecalibration curve, read the patient’s haemoglobin value (g/l).Note: Replaced the test samples back into the original test-tube so that, if necessary they are available for re-check.NOTE: Always check if the cuvette is clear on the side that will face the light path, and ensure that there are no airbubbles.
Reporting and interpretation of results:Normal Values: Haemoglobin (Fe) (mmol/l) Haemoglobin concentration(g/l)Newborn infants 8.4 – 12.1 136 - 196Infants (1 year) 7.0 – 8.1 113 - 130Children (10 – 12 years) 7.4 – 9.2 115 - 148Women 7.4 – 9.9 120 – 160Men 8.1 – 11.2 130 - 180Decrease Values of Haemoglobin: Sign of anemia.Note: In women haemoglobin values drop during pregnancy.Increase Values of Haemoglobin: Due to haemoconcentration (loss of body fluids e.g. in severediarrhea, vomiting), reduced oxygen supply (e.g. congenital heart diseases, emphysema) and rarelypolycythaemia vera.Quality controlInternal Quality Control (IQC) <strong>Procedures</strong>:• Daily measurement of HiCN standard to check instrument performance.• Check visible the Drabkin’s reagent: should be clean and pale in color yellow discard if turbid orwithout color.• Check photometric Drabkin’s reagent: When measured against water blank at 540 nm, it gives a zeroreading.External Quality Control (EQC):The National Public <strong>Health</strong> Laboratories (NPHL - Teku) will provide a preserved whole bloodcontrol previously analyzed. The results will be reported in the laboratory records and also reportedto NPHL for further comparison with standard values.Sources of error:• Incorrect sample homogenization (mix properly)NOTE: Before testing anticoagulant venous blood it must be mix in the vortex for 2-5 minutes.• Pipetting errors: Inaccuracy in the measurement of the blood sample check if the blood is on thegraduation line before dispensing it; utilization of a wet pipette wipe the blood from the outsidesurface of the pipette tip with cotton or paper. Avoid chip pipette/pipette tips.• Not ensuring that the optical surfaces of the cuvette are clean and dry and that there is no air bubblesin the solution a) Hold the cuvette only in the sides that will not face the light path. b) Whentransferring a solution allow the fluid to run down the inside wall of the cuvette. c) Do not fill acuvette more than ¾ full. d) Before place the cuvette into the colorimeter, wipe the sides that face the
light path with a soft paper or cloth. e) Always face the optical faces to the light source. f) Ensurethat the solution is at RT before reading the Abs.• Inappropriate maintenance of the colorimeter. Protect from sunlight and vibration.• Not checking signs of deterioration in reagents such as Drabkin’s fluid.Other precautions:• Store Drabkin’s diluting fluid in a brown bottle or glass bottle wrapped in silver foil paper.• Once the haemiglobincyanide solution has been prepared, the haemoglobin estimation must becarried out within 6 hours.• If RT exceeds 30 C, store Drabkin’s reagent in the refrigerator (4-6 C). Do not freeze. Always allowto warm to RT before use.• Drabkin’s reagent is very poisonous. Keep it in a locked cupboard when not in use and always washyour hands immediate after handle it.References:Mukherjee, K. L., (1988) Medical <strong>Laboratory</strong> Technology: A procedure Manual for RoutineDiagnostic Tests, Volume I; Tata McGraw-Hill Publishing Company Limited, New Delhi, India.Mallapaty, G.; (2000) Quality Assurance: Training Programme for Primary <strong>Health</strong>care <strong>Laboratory</strong>services, Kathmandu, NepalCheesbrough, M., (2000) District <strong>Laboratory</strong> Practice in Tropical Countries; Cambridge UniversityPress, Cambridge, UKWHO (2003) Manual of Basic Techniques for a <strong>Health</strong> <strong>Laboratory</strong>; WHO, Geneva
MCHC – Mean Corpuscular Haemoglobin Concentration H – 05Authorized signature: Issuing date: 11 th February 2008Next Revision date: 31 st March 2008Staff able to perform test: <strong>Laboratory</strong> officer (supervisor) laboratory technician (under supervision)Clinical significance: Diagnosis of patients suffering from anaemia, dehydration, shock or burns.Principle of Test Method:The blood (mixed with anticoagulant) is placed in a long capillary tube and centrifuged in amicrohaematocrit centrifuge. The level reached by the column of erythrocytes is read with a scalereader. This method is preferable to that using a macro scale: it is quicker, and blood from the fingercan be used.Specimen: 10 μl (0.01 ml) of capillary blood. Used directly after collection and thus do not need anticoagulant. 10 μl (0.01 ml) of well-mixed EDTA-anticoagulated 5 venous blood.Note: Capillary blood can be almost as satisfactory as venous blood if a free flow of blood is obtained, if dilution of samplewith tissue juice does not occur and if the puncture is not squeezed excessively. Because of these factors, measurementswith capillary blood are usually not so accurate.Equipment required:Sample collection:• Sterile lancets (capillary blood)• Dry cotton wool• Cotton wool soaked in 70& alcohol• Microcapillar with heparin (capillary blood) orsyringe (2.5/5.0/10 ml) + tubes + 10 μlmicropipette (venous blood).Test:• Tubes (7.5 ml)• Test tubes rack• Colorimeter and cuvette• Toilette paper• Distilled water• TimerReagents/stains:- Diluting fluid: Drabkin’s Reagent solution (pH 7.0-7.4)- Haemiglobincyanide (HiCN) standard solution.NOTE:5 For additional information on preparation and storage see Annex 1
• During hot season store Drabkin’s reagent in the refrigerator. Before use it, allow warming to RT.• Drabkin’s solution is very poisonous.Procedure:49. Label test-tubes (7.5 ml) as T1, T2 (Test 1, Test 2) according to the number of samples to betested.50. Pipette 1 ml of Drabkin’s solution into the marked test-tubes.51. With a pipette, measure exactly 10 µL (0.01 mL) of capillary blood or well-mixed (gentleinversion or swirling) venous EDTA-anticoagulant blood.52. Wipe the outside of the pipette with a piece of cotton/toilet paper/gauze while holding the pipettein the horizontal.53. Before dispense the blood, check if there are no air bubbles in the pipette.54. Dispense the blood into the test tubes (T1, T2…) and rinse the tip by washing 3 to 5 times out theinside of the pipette tip repeatedly.55. Stopper the tube, mix in vortex, and leave the sample at RT and protected from sunlight, for 10minutes ** When a neutral (pH 7.0-7.4) Drabkin’s reagent is not available, at least 20 min is required for an alkaline Drabkin’sreagent.56. Set the wavelength of the colorimeter at 540 nm and zero the colorimeter without cuvette (if notON, turn it ON and allow to worm up for 10 min).57. Place 1 ml of Drabkin’s solution into a match cuvette (blank cuvette) and place in thecolorimeter.58. Zero the colorimeter and then remove the blank cuvette.59. Place the patient’s sample into the test-cuvette and place it in the colorimeter.Note: If the diluted blood is cloudy, which can be related to the presence of abnormal plasma proteins or to highconcentration of white cells), centrifuge the diluted blood at 2000 g for 5 min before read the Abs.60. Read the Abs of the patient’s sample, and by using the graph or the table prepared from thecalibration curve, read the patient’s haemoglobin value (g/l).Note: Replaced the test samples back into the original test-tube so that, if necessary they are available for re-check.NOTE: Always check if the cuvette is clear on the side that will face the light path, and ensure that there are no airbubbles.
Reporting and interpretation of results:Normal Values: Haemoglobin (Fe) (mmol/l) Haemoglobin concentration(g/l)Newborn infants 8.4 – 12.1 136 - 196Infants (1 year) 7.0 – 8.1 113 - 130Children (10 – 12 years) 7.4 – 9.2 115 - 148Women 7.4 – 9.9 120 – 160Men 8.1 – 11.2 130 - 180Decrease Values of Haemoglobin: Sign of anemia.Note: In women haemoglobin values drop during pregnancy.Increase Values of Haemoglobin: Due to haemoconcentration (loss of body fluids e.g. in severediarrhea, vomiting), reduced oxygen supply (e.g. congenital heart diseases, emphysema) and rarelypolycythaemia vera.Quality controlInternal Quality Control (IQC) <strong>Procedures</strong>:• Daily measurement of HiCN standard to check instrument performance.• Check visible the Drabkin’s reagent: should be clean and pale in color yellow discard if turbid orwithout color.• Check photometric Drabkin’s reagent: When measured against water blank at 540 nm, it gives a zeroreading.External Quality Control (EQC):The National Public <strong>Health</strong> Laboratories (NPHL - Teku) will provide a preserved whole bloodcontrol previously analyzed. The results will be reported in the laboratory records and also reportedto NPHL for further comparison with standard values.Sources of error:• Incorrect sample homogenization (mix properly)NOTE: Before testing anticoagulant venous blood it must be mix in the vortex for 2-5 minutes.• Pipetting errors: Inaccuracy in the measurement of the blood sample check if the blood is on thegraduation line before dispensing it; utilization of a wet pipette wipe the blood from the outsidesurface of the pipette tip with cotton or paper. Avoid chip pipette/pipette tips.• Not ensuring that the optical surfaces of the cuvette are clean and dry and that there is no air bubblesin the solution a) Hold the cuvette only in the sides that will not face the light path. b) Whentransferring a solution allow the fluid to run down the inside wall of the cuvette. c) Do not fill acuvette more than ¾ full. d) Before place the cuvette into the colorimeter, wipe the sides that face the
light path with a soft paper or cloth. e) Always face the optical faces to the light source. f) Ensurethat the solution is at RT before reading the Abs.• Inappropriate maintenance of the colorimeter. Protect from sunlight and vibration.• Not checking signs of deterioration in reagents such as Drabkin’s fluid.Other precautions:• Store Drabkin’s diluting fluid in a brown bottle or glass bottle wrapped in silver foil paper.• Once the haemiglobincyanide solution has been prepared, the haemoglobin estimation must becarried out within 6 hours.• If RT exceeds 30 C, store Drabkin’s reagent in the refrigerator (4-6 C). Do not freeze. Always allowto warm to RT before use.• Drabkin’s reagent is very poisonous. Keep it in a locked cupboard when not in use and always washyour hands immediate after handle it.References:Mukherjee, K. L., (1988) Medical <strong>Laboratory</strong> Technology: A procedure Manual for RoutineDiagnostic Tests, Volume I; Tata McGraw-Hill Publishing Company Limited, New Delhi, India.Mallapaty, G.; (2000) Quality Assurance: Training Programme for Primary <strong>Health</strong>care <strong>Laboratory</strong>services, Kathmandu, NepalCheesbrough, M., (2000) District <strong>Laboratory</strong> Practice in Tropical Countries; Cambridge UniversityPress, Cambridge, UKWHO (2003) Manual of Basic Techniques for a <strong>Health</strong> <strong>Laboratory</strong>; WHO, Geneva
Platelet count H – 06Authorized signature: Issuing date: 11 th February 2008Next Revision date: 31 st March 2008Staff able to perform test: <strong>Laboratory</strong> officer (supervisor) laboratory technician (under supervision)Clinical significance: Diagnosis of patients suffering from anaemia, dehydration, shock or burns.Principle of Test Method:The blood (mixed with anticoagulant) is placed in a long capillary tube and centrifuged in amicrohaematocrit centrifuge. The level reached by the column of erythrocytes is read with a scalereader. This method is preferable to that using a macro scale: it is quicker, and blood from the fingercan be used.Specimen: 10 μl (0.01 ml) of capillary blood. Used directly after collection and thus do not need anticoagulant. 10 μl (0.01 ml) of well-mixed EDTA-anticoagulated 6 venous blood.Note: Capillary blood can be almost as satisfactory as venous blood if a free flow of blood is obtained, if dilution of samplewith tissue juice does not occur and if the puncture is not squeezed excessively. Because of these factors, measurementswith capillary blood are usually not so accurate.Equipment required:Sample collection:• Sterile lancets (capillary blood)• Dry cotton wool• Cotton wool soaked in 70& alcohol• Microcapillar with heparin (capillary blood) orsyringe (2.5/5.0/10 ml) + tubes + 10 μlmicropipette (venous blood).Test:• Tubes (7.5 ml)• Test tubes rack• Colorimeter and cuvette• Toilette paper• Distilled water• TimerReagents/stains:- Diluting fluid: Drabkin’s Reagent solution (pH 7.0-7.4)- Haemiglobincyanide (HiCN) standard solution.NOTE:6 For additional information on preparation and storage see Annex 1
• During hot season store Drabkin’s reagent in the refrigerator. Before use it, allow warming to RT.• Drabkin’s solution is very poisonous.Procedure:61. Label test-tubes (7.5 ml) as T1, T2 (Test 1, Test 2) according to the number of samples to betested.62. Pipette 1 ml of Drabkin’s solution into the marked test-tubes.63. With a pipette, measure exactly 10 µL (0.01 mL) of capillary blood or well-mixed (gentleinversion or swirling) venous EDTA-anticoagulant blood.64. Wipe the outside of the pipette with a piece of cotton/toilet paper/gauze while holding the pipettein the horizontal.65. Before dispense the blood, check if there are no air bubbles in the pipette.66. Dispense the blood into the test tubes (T1, T2…) and rinse the tip by washing 3 to 5 times out theinside of the pipette tip repeatedly.67. Stopper the tube, mix in vortex, and leave the sample at RT and protected from sunlight, for 10minutes ** When a neutral (pH 7.0-7.4) Drabkin’s reagent is not available, at least 20 min is required for an alkaline Drabkin’sreagent.68. Set the wavelength of the colorimeter at 540 nm and zero the colorimeter without cuvette (if notON, turn it ON and allow to worm up for 10 min).69. Place 1 ml of Drabkin’s solution into a match cuvette (blank cuvette) and place in thecolorimeter.70. Zero the colorimeter and then remove the blank cuvette.71. Place the patient’s sample into the test-cuvette and place it in the colorimeter.Note: If the diluted blood is cloudy, which can be related to the presence of abnormal plasma proteins or to highconcentration of white cells), centrifuge the diluted blood at 2000 g for 5 min before read the Abs.72. Read the Abs of the patient’s sample, and by using the graph or the table prepared from thecalibration curve, read the patient’s haemoglobin value (g/l).Note: Replaced the test samples back into the original test-tube so that, if necessary they are available for re-check.NOTE: Always check if the cuvette is clear on the side that will face the light path, and ensure that there are no airbubbles.
Reporting and interpretation of results:Normal Values: Haemoglobin (Fe) (mmol/l) Haemoglobin concentration(g/l)Newborn infants 8.4 – 12.1 136 - 196Infants (1 year) 7.0 – 8.1 113 - 130Children (10 – 12 years) 7.4 – 9.2 115 - 148Women 7.4 – 9.9 120 – 160Men 8.1 – 11.2 130 - 180Decrease Values of Haemoglobin: Sign of anemia.Note: In women haemoglobin values drop during pregnancy.Increase Values of Haemoglobin: Due to haemoconcentration (loss of body fluids e.g. in severediarrhea, vomiting), reduced oxygen supply (e.g. congenital heart diseases, emphysema) and rarelypolycythaemia vera.Quality controlInternal Quality Control (IQC) <strong>Procedures</strong>:• Daily measurement of HiCN standard to check instrument performance.• Check visible the Drabkin’s reagent: should be clean and pale in color yellow discard if turbid orwithout color.• Check photometric Drabkin’s reagent: When measured against water blank at 540 nm, it gives a zeroreading.External Quality Control (EQC):The National Public <strong>Health</strong> Laboratories (NPHL - Teku) will provide a preserved whole bloodcontrol previously analyzed. The results will be reported in the laboratory records and also reportedto NPHL for further comparison with standard values.Sources of error:• Incorrect sample homogenization (mix properly)NOTE: Before testing anticoagulant venous blood it must be mix in the vortex for 2-5 minutes.• Pipetting errors: Inaccuracy in the measurement of the blood sample check if the blood is on thegraduation line before dispensing it; utilization of a wet pipette wipe the blood from the outsidesurface of the pipette tip with cotton or paper. Avoid chip pipette/pipette tips.• Not ensuring that the optical surfaces of the cuvette are clean and dry and that there is no air bubblesin the solution a) Hold the cuvette only in the sides that will not face the light path. b) Whentransferring a solution allow the fluid to run down the inside wall of the cuvette. c) Do not fill acuvette more than ¾ full. d) Before place the cuvette into the colorimeter, wipe the sides that face the
light path with a soft paper or cloth. e) Always face the optical faces to the light source. f) Ensurethat the solution is at RT before reading the Abs.• Inappropriate maintenance of the colorimeter. Protect from sunlight and vibration.• Not checking signs of deterioration in reagents such as Drabkin’s fluid.Other precautions:• Store Drabkin’s diluting fluid in a brown bottle or glass bottle wrapped in silver foil paper.• Once the haemiglobincyanide solution has been prepared, the haemoglobin estimation must becarried out within 6 hours.• If RT exceeds 30 C, store Drabkin’s reagent in the refrigerator (4-6 C). Do not freeze. Always allowto warm to RT before use.• Drabkin’s reagent is very poisonous. Keep it in a locked cupboard when not in use and always washyour hands immediate after handle it.References:Mukherjee, K. L., (1988) Medical <strong>Laboratory</strong> Technology: A procedure Manual for RoutineDiagnostic Tests, Volume I; Tata McGraw-Hill Publishing Company Limited, New Delhi, India.Mallapaty, G.; (2000) Quality Assurance: Training Programme for Primary <strong>Health</strong>care <strong>Laboratory</strong>services, Kathmandu, NepalCheesbrough, M., (2000) District <strong>Laboratory</strong> Practice in Tropical Countries; Cambridge UniversityPress, Cambridge, UKWHO (2003) Manual of Basic Techniques for a <strong>Health</strong> <strong>Laboratory</strong>; WHO, Geneva
Leucocytes (White blood cells) Count H – 07Authorized signature: Issuing date: 11 th February 2008Next Revision date: 31 st March 2008Staff able to perform test: <strong>Laboratory</strong> officer (supervisor) laboratory technician (under supervision)Clinical significance: Diagnosis of patients suffering from anaemia, dehydration, shock or burns.Principle of Test Method:The blood (mixed with anticoagulant) is placed in a long capillary tube and centrifuged in amicrohaematocrit centrifuge. The level reached by the column of erythrocytes is read with a scalereader. This method is preferable to that using a macro scale: it is quicker, and blood from the fingercan be used.Specimen: 10 μl (0.01 ml) of capillary blood. Used directly after collection and thus do not need anticoagulant. 10 μl (0.01 ml) of well-mixed EDTA-anticoagulated 7 venous blood.Note: Capillary blood can be almost as satisfactory as venous blood if a free flow of blood is obtained, if dilution of samplewith tissue juice does not occur and if the puncture is not squeezed excessively. Because of these factors, measurementswith capillary blood are usually not so accurate.Equipment required:Sample collection:• Sterile lancets (capillary blood)• Dry cotton wool• Cotton wool soaked in 70& alcohol• Microcapillar with heparin (capillary blood) orsyringe (2.5/5.0/10 ml) + tubes + 10 μlmicropipette (venous blood).Test:• Tubes (7.5 ml)• Test tubes rack• Colorimeter and cuvette• Toilette paper• Distilled water• TimerReagents/stains:- Diluting fluid: Drabkin’s Reagent solution (pH 7.0-7.4)- Haemiglobincyanide (HiCN) standard solution.NOTE:7 For additional information on preparation and storage see Annex 1
• During hot season store Drabkin’s reagent in the refrigerator. Before use it, allow warming to RT.• Drabkin’s solution is very poisonous.Procedure:73. Label test-tubes (7.5 ml) as T1, T2 (Test 1, Test 2) according to the number of samples to betested.74. Pipette 1 ml of Drabkin’s solution into the marked test-tubes.75. With a pipette, measure exactly 10 µL (0.01 mL) of capillary blood or well-mixed (gentleinversion or swirling) venous EDTA-anticoagulant blood.76. Wipe the outside of the pipette with a piece of cotton/toilet paper/gauze while holding the pipettein the horizontal.77. Before dispense the blood, check if there are no air bubbles in the pipette.78. Dispense the blood into the test tubes (T1, T2…) and rinse the tip by washing 3 to 5 times out theinside of the pipette tip repeatedly.79. Stopper the tube, mix in vortex, and leave the sample at RT and protected from sunlight, for 10minutes ** When a neutral (pH 7.0-7.4) Drabkin’s reagent is not available, at least 20 min is required for an alkaline Drabkin’sreagent.80. Set the wavelength of the colorimeter at 540 nm and zero the colorimeter without cuvette (if notON, turn it ON and allow to worm up for 10 min).81. Place 1 ml of Drabkin’s solution into a match cuvette (blank cuvette) and place in thecolorimeter.82. Zero the colorimeter and then remove the blank cuvette.83. Place the patient’s sample into the test-cuvette and place it in the colorimeter.Note: If the diluted blood is cloudy, which can be related to the presence of abnormal plasma proteins or to highconcentration of white cells), centrifuge the diluted blood at 2000 g for 5 min before read the Abs.84. Read the Abs of the patient’s sample, and by using the graph or the table prepared from thecalibration curve, read the patient’s haemoglobin value (g/l).Note: Replaced the test samples back into the original test-tube so that, if necessary they are available for re-check.NOTE: Always check if the cuvette is clear on the side that will face the light path, and ensure that there are no airbubbles.
Reporting and interpretation of results:Normal Values: Haemoglobin (Fe) (mmol/l) Haemoglobin concentration(g/l)Newborn infants 8.4 – 12.1 136 - 196Infants (1 year) 7.0 – 8.1 113 - 130Children (10 – 12 years) 7.4 – 9.2 115 - 148Women 7.4 – 9.9 120 – 160Men 8.1 – 11.2 130 - 180Decrease Values of Haemoglobin: Sign of anemia.Note: In women haemoglobin values drop during pregnancy.Increase Values of Haemoglobin: Due to haemoconcentration (loss of body fluids e.g. in severediarrhea, vomiting), reduced oxygen supply (e.g. congenital heart diseases, emphysema) and rarelypolycythaemia vera.Quality controlInternal Quality Control (IQC) <strong>Procedures</strong>:• Daily measurement of HiCN standard to check instrument performance.• Check visible the Drabkin’s reagent: should be clean and pale in color yellow discard if turbid orwithout color.• Check photometric Drabkin’s reagent: When measured against water blank at 540 nm, it gives a zeroreading.External Quality Control (EQC):The National Public <strong>Health</strong> Laboratories (NPHL - Teku) will provide a preserved whole bloodcontrol previously analyzed. The results will be reported in the laboratory records and also reportedto NPHL for further comparison with standard values.Sources of error:• Incorrect sample homogenization (mix properly)NOTE: Before testing anticoagulant venous blood it must be mix in the vortex for 2-5 minutes.• Pipetting errors: Inaccuracy in the measurement of the blood sample check if the blood is on thegraduation line before dispensing it; utilization of a wet pipette wipe the blood from the outsidesurface of the pipette tip with cotton or paper. Avoid chip pipette/pipette tips.• Not ensuring that the optical surfaces of the cuvette are clean and dry and that there is no air bubblesin the solution a) Hold the cuvette only in the sides that will not face the light path. b) Whentransferring a solution allow the fluid to run down the inside wall of the cuvette. c) Do not fill acuvette more than ¾ full. d) Before place the cuvette into the colorimeter, wipe the sides that face the
light path with a soft paper or cloth. e) Always face the optical faces to the light source. f) Ensurethat the solution is at RT before reading the Abs.• Inappropriate maintenance of the colorimeter. Protect from sunlight and vibration.• Not checking signs of deterioration in reagents such as Drabkin’s fluid.Other precautions:• Store Drabkin’s diluting fluid in a brown bottle or glass bottle wrapped in silver foil paper.• Once the haemiglobincyanide solution has been prepared, the haemoglobin estimation must becarried out within 6 hours.• If RT exceeds 30 C, store Drabkin’s reagent in the refrigerator (4-6 C). Do not freeze. Always allowto warm to RT before use.• Drabkin’s reagent is very poisonous. Keep it in a locked cupboard when not in use and always washyour hands immediate after handle it.References:Mukherjee, K. L., (1988) Medical <strong>Laboratory</strong> Technology: A procedure Manual for RoutineDiagnostic Tests, Volume I; Tata McGraw-Hill Publishing Company Limited, New Delhi, India.Mallapaty, G.; (2000) Quality Assurance: Training Programme for Primary <strong>Health</strong>care <strong>Laboratory</strong>services, Kathmandu, NepalCheesbrough, M., (2000) District <strong>Laboratory</strong> Practice in Tropical Countries; Cambridge UniversityPress, Cambridge, UKWHO (2003) Manual of Basic Techniques for a <strong>Health</strong> <strong>Laboratory</strong>; WHO, Geneva
GRANULOCYTE Count and Percentage H – 08Authorized signature: Issuing date: 11 th February 2008Next Revision date: 31 st March 2008Staff able to perform test: <strong>Laboratory</strong> officer (supervisor) laboratory technician (under supervision)Clinical significance: Diagnosis of patients suffering from anaemia, dehydration, shock or burns.Principle of Test Method:The blood (mixed with anticoagulant) is placed in a long capillary tube and centrifuged in amicrohaematocrit centrifuge. The level reached by the column of erythrocytes is read with a scalereader. This method is preferable to that using a macro scale: it is quicker, and blood from the fingercan be used.Specimen: 10 μl (0.01 ml) of capillary blood. Used directly after collection and thus do not need anticoagulant. 10 μl (0.01 ml) of well-mixed EDTA-anticoagulated 8 venous blood.Note: Capillary blood can be almost as satisfactory as venous blood if a free flow of blood is obtained, if dilution of samplewith tissue juice does not occur and if the puncture is not squeezed excessively. Because of these factors, measurementswith capillary blood are usually not so accurate.Equipment required:Sample collection:• Sterile lancets (capillary blood)• Dry cotton wool• Cotton wool soaked in 70& alcohol• Microcapillar with heparin (capillary blood) orsyringe (2.5/5.0/10 ml) + tubes + 10 μlmicropipette (venous blood).Test:• Tubes (7.5 ml)• Test tubes rack• Colorimeter and cuvette• Toilette paper• Distilled water• TimerReagents/stains:- Diluting fluid: Drabkin’s Reagent solution (pH 7.0-7.4)- Haemiglobincyanide (HiCN) standard solution.NOTE:8 For additional information on preparation and storage see Annex 1
• During hot season store Drabkin’s reagent in the refrigerator. Before use it, allow warming to RT.• Drabkin’s solution is very poisonous.Procedure:85. Label test-tubes (7.5 ml) as T1, T2 (Test 1, Test 2) according to the number of samples to betested.86. Pipette 1 ml of Drabkin’s solution into the marked test-tubes.87. With a pipette, measure exactly 10 µL (0.01 mL) of capillary blood or well-mixed (gentleinversion or swirling) venous EDTA-anticoagulant blood.88. Wipe the outside of the pipette with a piece of cotton/toilet paper/gauze while holding the pipettein the horizontal.89. Before dispense the blood, check if there are no air bubbles in the pipette.90. Dispense the blood into the test tubes (T1, T2…) and rinse the tip by washing 3 to 5 times out theinside of the pipette tip repeatedly.91. Stopper the tube, mix in vortex, and leave the sample at RT and protected from sunlight, for 10minutes ** When a neutral (pH 7.0-7.4) Drabkin’s reagent is not available, at least 20 min is required for an alkaline Drabkin’sreagent.92. Set the wavelength of the colorimeter at 540 nm and zero the colorimeter without cuvette (if notON, turn it ON and allow to worm up for 10 min).93. Place 1 ml of Drabkin’s solution into a match cuvette (blank cuvette) and place in thecolorimeter.94. Zero the colorimeter and then remove the blank cuvette.95. Place the patient’s sample into the test-cuvette and place it in the colorimeter.Note: If the diluted blood is cloudy, which can be related to the presence of abnormal plasma proteins or to highconcentration of white cells), centrifuge the diluted blood at 2000 g for 5 min before read the Abs.96. Read the Abs of the patient’s sample, and by using the graph or the table prepared from thecalibration curve, read the patient’s haemoglobin value (g/l).Note: Replaced the test samples back into the original test-tube so that, if necessary they are available for re-check.NOTE: Always check if the cuvette is clear on the side that will face the light path, and ensure that there are no airbubbles.
Reporting and interpretation of results:Normal Values: Haemoglobin (Fe) (mmol/l) Haemoglobin concentration(g/l)Newborn infants 8.4 – 12.1 136 - 196Infants (1 year) 7.0 – 8.1 113 - 130Children (10 – 12 years) 7.4 – 9.2 115 - 148Women 7.4 – 9.9 120 – 160Men 8.1 – 11.2 130 - 180Decrease Values of Haemoglobin: Sign of anemia.Note: In women haemoglobin values drop during pregnancy.Increase Values of Haemoglobin: Due to haemoconcentration (loss of body fluids e.g. in severediarrhea, vomiting), reduced oxygen supply (e.g. congenital heart diseases, emphysema) and rarelypolycythaemia vera.Quality controlInternal Quality Control (IQC) <strong>Procedures</strong>:• Daily measurement of HiCN standard to check instrument performance.• Check visible the Drabkin’s reagent: should be clean and pale in color yellow discard if turbid orwithout color.• Check photometric Drabkin’s reagent: When measured against water blank at 540 nm, it gives a zeroreading.External Quality Control (EQC):The National Public <strong>Health</strong> Laboratories (NPHL - Teku) will provide a preserved whole bloodcontrol previously analyzed. The results will be reported in the laboratory records and also reportedto NPHL for further comparison with standard values.Sources of error:• Incorrect sample homogenization (mix properly)NOTE: Before testing anticoagulant venous blood it must be mix in the vortex for 2-5 minutes.• Pipetting errors: Inaccuracy in the measurement of the blood sample check if the blood is on thegraduation line before dispensing it; utilization of a wet pipette wipe the blood from the outsidesurface of the pipette tip with cotton or paper. Avoid chip pipette/pipette tips.• Not ensuring that the optical surfaces of the cuvette are clean and dry and that there is no air bubblesin the solution a) Hold the cuvette only in the sides that will not face the light path. b) Whentransferring a solution allow the fluid to run down the inside wall of the cuvette. c) Do not fill acuvette more than ¾ full. d) Before place the cuvette into the colorimeter, wipe the sides that face the
light path with a soft paper or cloth. e) Always face the optical faces to the light source. f) Ensurethat the solution is at RT before reading the Abs.• Inappropriate maintenance of the colorimeter. Protect from sunlight and vibration.• Not checking signs of deterioration in reagents such as Drabkin’s fluid.Other precautions:• Store Drabkin’s diluting fluid in a brown bottle or glass bottle wrapped in silver foil paper.• Once the haemiglobincyanide solution has been prepared, the haemoglobin estimation must becarried out within 6 hours.• If RT exceeds 30 C, store Drabkin’s reagent in the refrigerator (4-6 C). Do not freeze. Always allowto warm to RT before use.• Drabkin’s reagent is very poisonous. Keep it in a locked cupboard when not in use and always washyour hands immediate after handle it.References:Mukherjee, K. L., (1988) Medical <strong>Laboratory</strong> Technology: A procedure Manual for RoutineDiagnostic Tests, Volume I; Tata McGraw-Hill Publishing Company Limited, New Delhi, India.Mallapaty, G.; (2000) Quality Assurance: Training Programme for Primary <strong>Health</strong>care <strong>Laboratory</strong>services, Kathmandu, NepalCheesbrough, M., (2000) District <strong>Laboratory</strong> Practice in Tropical Countries; Cambridge UniversityPress, Cambridge, UKWHO (2003) Manual of Basic Techniques for a <strong>Health</strong> <strong>Laboratory</strong>; WHO, Geneva
Combined MYMPHOCYTE/MONOCYTE Count and Percentage H – 10Authorized signature: Issuing date: 11 th February 2008Next Revision date: 31 st March 2008Staff able to perform test: <strong>Laboratory</strong> officer (supervisor) laboratory technician (under supervision)Clinical significance: Diagnosis of patients suffering from anaemia, dehydration, shock or burns.Principle of Test Method:The blood (mixed with anticoagulant) is placed in a long capillary tube and centrifuged in amicrohaematocrit centrifuge. The level reached by the column of erythrocytes is read with a scalereader. This method is preferable to that using a macro scale: it is quicker, and blood from the fingercan be used.Specimen: 10 μl (0.01 ml) of capillary blood. Used directly after collection and thus do not need anticoagulant. 10 μl (0.01 ml) of well-mixed EDTA-anticoagulated 9 venous blood.Note: Capillary blood can be almost as satisfactory as venous blood if a free flow of blood is obtained, if dilution of samplewith tissue juice does not occur and if the puncture is not squeezed excessively. Because of these factors, measurementswith capillary blood are usually not so accurate.Equipment required:Sample collection:• Sterile lancets (capillary blood)• Dry cotton wool• Cotton wool soaked in 70& alcohol• Microcapillar with heparin (capillary blood) orsyringe (2.5/5.0/10 ml) + tubes + 10 μlmicropipette (venous blood).Test:• Tubes (7.5 ml)• Test tubes rack• Colorimeter and cuvette• Toilette paper• Distilled water• TimerReagents/stains:- Diluting fluid: Drabkin’s Reagent solution (pH 7.0-7.4)- Haemiglobincyanide (HiCN) standard solution.NOTE:9 For additional information on preparation and storage see Annex 1
• During hot season store Drabkin’s reagent in the refrigerator. Before use it, allow warming to RT.• Drabkin’s solution is very poisonous.Procedure:97. Label test-tubes (7.5 ml) as T1, T2 (Test 1, Test 2) according to the number of samples to betested.98. Pipette 1 ml of Drabkin’s solution into the marked test-tubes.99. With a pipette, measure exactly 10 µL (0.01 mL) of capillary blood or well-mixed (gentleinversion or swirling) venous EDTA-anticoagulant blood.100. Wipe the outside of the pipette with a piece of cotton/toilet paper/gauze while holding thepipette in the horizontal.101. Before dispense the blood, check if there are no air bubbles in the pipette.102. Dispense the blood into the test tubes (T1, T2…) and rinse the tip by washing 3 to 5 times outthe inside of the pipette tip repeatedly.103. Stopper the tube, mix in vortex, and leave the sample at RT and protected from sunlight, for 10minutes ** When a neutral (pH 7.0-7.4) Drabkin’s reagent is not available, at least 20 min is required for an alkaline Drabkin’sreagent.104. Set the wavelength of the colorimeter at 540 nm and zero the colorimeter without cuvette (ifnot ON, turn it ON and allow to worm up for 10 min).105. Place 1 ml of Drabkin’s solution into a match cuvette (blank cuvette) and place in thecolorimeter.106. Zero the colorimeter and then remove the blank cuvette.107. Place the patient’s sample into the test-cuvette and place it in the colorimeter.Note: If the diluted blood is cloudy, which can be related to the presence of abnormal plasma proteins or to highconcentration of white cells), centrifuge the diluted blood at 2000 g for 5 min before read the Abs.108. Read the Abs of the patient’s sample, and by using the graph or the table prepared from thecalibration curve, read the patient’s haemoglobin value (g/l).Note: Replaced the test samples back into the original test-tube so that, if necessary they are available for re-check.NOTE: Always check if the cuvette is clear on the side that will face the light path, and ensure that there are no airbubbles.
Reporting and interpretation of results:Normal Values: Haemoglobin (Fe) (mmol/l) Haemoglobin concentration(g/l)Newborn infants 8.4 – 12.1 136 - 196Infants (1 year) 7.0 – 8.1 113 - 130Children (10 – 12 years) 7.4 – 9.2 115 - 148Women 7.4 – 9.9 120 – 160Men 8.1 – 11.2 130 - 180Decrease Values of Haemoglobin: Sign of anemia.Note: In women haemoglobin values drop during pregnancy.Increase Values of Haemoglobin: Due to haemoconcentration (loss of body fluids e.g. in severediarrhea, vomiting), reduced oxygen supply (e.g. congenital heart diseases, emphysema) and rarelypolycythaemia vera.Quality controlInternal Quality Control (IQC) <strong>Procedures</strong>:• Daily measurement of HiCN standard to check instrument performance.• Check visible the Drabkin’s reagent: should be clean and pale in color yellow discard if turbid orwithout color.• Check photometric Drabkin’s reagent: When measured against water blank at 540 nm, it gives a zeroreading.External Quality Control (EQC):The National Public <strong>Health</strong> Laboratories (NPHL - Teku) will provide a preserved whole bloodcontrol previously analyzed. The results will be reported in the laboratory records and also reportedto NPHL for further comparison with standard values.Sources of error:• Incorrect sample homogenization (mix properly)NOTE: Before testing anticoagulant venous blood it must be mix in the vortex for 2-5 minutes.• Pipetting errors: Inaccuracy in the measurement of the blood sample check if the blood is on thegraduation line before dispensing it; utilization of a wet pipette wipe the blood from the outsidesurface of the pipette tip with cotton or paper. Avoid chip pipette/pipette tips.• Not ensuring that the optical surfaces of the cuvette are clean and dry and that there is no air bubblesin the solution a) Hold the cuvette only in the sides that will not face the light path. b) Whentransferring a solution allow the fluid to run down the inside wall of the cuvette. c) Do not fill acuvette more than ¾ full. d) Before place the cuvette into the colorimeter, wipe the sides that face the
light path with a soft paper or cloth. e) Always face the optical faces to the light source. f) Ensurethat the solution is at RT before reading the Abs.• Inappropriate maintenance of the colorimeter. Protect from sunlight and vibration.• Not checking signs of deterioration in reagents such as Drabkin’s fluid.Other precautions:• Store Drabkin’s diluting fluid in a brown bottle or glass bottle wrapped in silver foil paper.• Once the haemiglobincyanide solution has been prepared, the haemoglobin estimation must becarried out within 6 hours.• If RT exceeds 30 C, store Drabkin’s reagent in the refrigerator (4-6 C). Do not freeze. Always allowto warm to RT before use.• Drabkin’s reagent is very poisonous. Keep it in a locked cupboard when not in use and always washyour hands immediate after handle it.References:Mukherjee, K. L., (1988) Medical <strong>Laboratory</strong> Technology: A procedure Manual for RoutineDiagnostic Tests, Volume I; Tata McGraw-Hill Publishing Company Limited, New Delhi, India.Mallapaty, G.; (2000) Quality Assurance: Training Programme for Primary <strong>Health</strong>care <strong>Laboratory</strong>services, Kathmandu, NepalCheesbrough, M., (2000) District <strong>Laboratory</strong> Practice in Tropical Countries; Cambridge UniversityPress, Cambridge, UKWHO (2003) Manual of Basic Techniques for a <strong>Health</strong> <strong>Laboratory</strong>; WHO, Geneva
Blood Chemistry(Colorimeter)
ASPARTATE AMINOTRANSFERASE (AST or GOT); Reitman-Frankel Method BC – 01Authorized signature: Issuing date: 11 th February 2008Next Revision date: 31 st March 2008Staff able to perform test: <strong>Laboratory</strong> officer (supervisor) laboratory technician (under supervision)Clinical significance:Measurement of serum/plasma AST activity to investigate liver disease and myocardial infarction.Usually the determination of AST is preferred to that of ALT because AST enzyme activity is also auseful indicator of myocardial damage.Principle of Test Method:In the presence of buffered substrate containing aspartate and α-ketoglutarate, AST catalyzes theformation of oxaloacetate, which in alkaline medium reacts with DNPH and gives rise to 2,4-dinitrophenylhydrazone. In an alkaline medium this product gives a red-brown colour which is thusmeasured in the colorimeter. The concentration of 2,4-dinitrophenylhydrazone is proportional to theAST activity.Specimen: 20 µl (0.02 ml) of patient’s fresh serum or plasma free from haemolysis.Note: No prior patient preparation is necessary. The serum or plasma must be free from haemolysis and if it is lipaemic itshould be reported.Equipment required:Sample collection:• Test tubes (10 ml)• Dry cotton wool/gauze/toilet paper• Cotton wool soaked in 70% alcohol• Syringe (2.5/5.0/10 ml)Test:• Micropipette• Tubes (7.5 ml)• Test tubes rack• Water bath• Centrifuge• Colorimeter and cuvette• Toilette paper• Distilled water• Timer
Reagents/stains:Reagents supplied with the BioLab kitConcentration1 - Buffer Substrate Phosphate Buffer (pH7.4) 100 mMol/lL-aspartate100 mMol/lOxo-2-Glutarate2 mMol/l2 - Chromogen 2, 4-Dinitro phenylhydrazine 1 mMol/lHydrochloric Acid1 Mol/l3 – Standard Sodium pyruvate 2 mMol/l4 – Sodium hydroxide 4 Mol/l• NOTES: The reagents can be stored at 2-8 o C for 18 months. After dilution, reagent 4 is stable for at least 8 days inpolyethylene vials at temperatures between 18 and 25 o C. Avoid bacterial contamination in every reagent.Procedure:1. Dilute required amount of reagent 4 as follows:Reagent 4 ……………………1 volumeDistilled water ……………….9 volumes2. Take tubes according to the number of patient’s samples analyzed, and label appropriately.• Patient Number,• Requisition number• Test performed4. Place in each test tube 100 µl (0.1 ml) of Reagent 1 and incubate at 37 o C for 5 minutes.5. After 5 min, add 20 µl (0.02 ml) of fresh serum or plasma; mix carefully (no vortex) andincubate exactly for 60 min at 37 o C.6. Add to each sample 100 µl (0.1 ml) of Reagent 2, mix well and let stand for 20 minutes at RT(18-25 o C).7. Add rapidly 1000 µl (1 ml) of diluted Reagent 4 to each tube and mix at the same time.8. Incubate for exactly 5 mi at RT.9. During the incubation time, select a wavelength equal to 530 nm (510 – 550 nm) in thecolorimeter.10. Place distilled water in a cuvette (exclusive for distilled water) and zero the equipment.11. After exactly 5 min of incubation place the sample in the Test cuvette (T) and read the Abs inthe same conditions.12. Register the value in the test requisition file.
13. Place the test sample back into the original test tube so that, if necessary it is available for recheck.14. Return the blank solution to the colorimeter and check if it continues to read zero.15. Read the AST concentration from the calibration graph (in Karmen Units/ml or IU/l) or fromthe table prepared from the calibration curve.Note: Since the correlation between OD (Abs) and AST concentration is not linear, the concentration of testresults must be read directly from the graph.Note: Samples with a concentration greater than 100 Karmen Units/ml (82 IU/l) must be diluted with 0.9% saline(page. 408) and confirmed by re-assay (multiply the result by the dilution factor).NOTE: Always check if the cuvette is clear on the side that will face the light path, and ensure that there are no airbubbles.Reporting and interpretation of results:Normal Values: AST concentration (Karmen Units/ml) AST concentration (IU/l)Women 2.6 – 27.8 3 - 34Men 4.2 – 28.9 10 5 - 36Increase Values of Haemoglobin:Very high Liver disease (especially when there is hepatocellular damage, e.g. in hepatitis).Small or moderate rise Obstructive liver disease.Other causes:Elevated levels of AST can be due to myocardial infraction (AST enzyme reaches highest value 12 to24 hours after the infarct and returns to normal within 48 hours).High levels can be also related with diseases involving cellular injury: Severe bacterial infections,malaria, pneumonia, infectious mononucleosis, pulmonary infarcts and tumors.AST also increase in some muscle disorders, following surgery, injury or blood transfusion.Note: AST activity increases when haemolysis is present or if the blood has been stored without separation of the serum.Quality controlInternal Quality Control (IQC) <strong>Procedures</strong>:• Daily measurement of one of the daily prepared standards to check instrument performance.• Establish the OCV by measuring and plotting the Abs the values of 20 samples from the qualitycontrol serum. OCV around 8%.• Run the prepared control serum once every week and plot it on the RCV graph. RCV should notexceed 16% for AST measurements.10 IU compared with Karmen Units at 30 C inspectrometer at 340 nM by LDH-MDH methods.
External Quality Control (EQC):• The National Public <strong>Health</strong> Laboratories (NPHL - Teku) will provide a preserved whole bloodcontrol previously analyzed. The results will be reported in the laboratory records and also reportedto NPHL for further comparison with standard values.Sources of error:• Incorrect sample collection:- Allow the blood to clot at RT and centrifuge as soon as possible (1 hour maximum aftercollection).- Also remove the serum carefully without sucking up the red cells.- Carry out test as soon as possible after separation of the serum from the clot.• Pipetting errors: Inaccuracy in the measurement of the blood sample check if the blood is on thegraduation line before dispensing it; utilization of a wet pipette wipe the blood from the outsidesurface of the pipette tip with cotton or paper. Avoid chip pipette/pipette tips.• Not ensuring that the optical surfaces of the cuvette are clean and dry and that there is no air bubblesin the solution a) Hold the cuvette only in the sides that will not face the light path. b) Whentransferring a solution allow the fluid to run down the inside wall of the cuvette. c) Do not fill acuvette more than ¾ full. d) Before place the cuvette into the colorimeter, wipe the sides that face thelight path with a soft paper or cloth. e) Always face the optical faces to the light source. f) Ensurethat the solution is at RT before reading the Abs.• Inappropriate maintenance of the colorimeter. Protect from sunlight and vibration.Other precautions:• Since the method is not linear, each kit should be controlled and calibrated for its activities.• A new calibration graph should be prepared and checked against controls every week, whenever newreagents are used or dubious results are obtained (a control should be run along with the test byadding serum to the step 4).References:BioLAb Diagnostics Kit InstructionsMallapaty, G.; (2000) Quality Assurance: Training Programme for Primary <strong>Health</strong>care <strong>Laboratory</strong>services, Kathmandu, NepalCheesbrough, M., (2000) District <strong>Laboratory</strong> Practice in Tropical Countries; Cambridge UniversityPress, Cambridge, UKWHO (2003) Manual of Basic Techniques for a <strong>Health</strong> <strong>Laboratory</strong>; WHO, Geneva
AST (GOT) - Bio Lab Diagnostics KITCalibration of the colorimeter:1. Dilute the reagent 4 as follows (for 30 ml):Reagent 4 ……………………3 ml (1 volume)Distilled water ……………..27 ml (9 volumes)2. Take five tubes and label them as AST standards from 1 to 5.3. Pipette accurately into each tube the as follows:StandardsReagent 1 (ml) 2 (ml) 3 (ml) 4 (ml) 5 (ml)Distilled water 0.10 0.10 0.10 0.10 0.10Reagent 1 0.50 0.45 0.40 0.35 0.30Reagent 3 (standard) - 0.05 0.10 0.15 0.20Reagent 2 0.50 0.50 0.50 0.50 0.504. Mix well and allow to stand 20 min at 18-25 o C (RT)5. Add rapidly 5 ml of the diluted reagent 4 to each tube and mix at the same time.6. Leave for 5 minutes at RT. During the last minute set the colorimeter at 530 nm (510 nm – 550nm) and zero the equipment with distilled water (always use the same cuvette for the distilled water).7. After exactly 5 minutes and in the same wavelength conditions, read the Abs of the standardsand register in the Calibration sheet file.8. Return the blank solution to the colorimeter and check if it continues to read zero.9. Plot the Abs (horizontal axis (x)) of each standard in the graph paper (Calibration sheet)against its equivalent AST concentration (vertical axis (y)) (in Karmen Units/ml or IU/l).10. From the graph make a table of haemoglobin concentration values (20 – 200 g/l) and respectiveAbs.Note: A non-linear graph will be obtained which means that test results will need to be readfrom the graph and not calculated by a formula.
CALIBRATION SHEETCalibration for AST Test . Date: __________________ Analyst: ____________________Kit used: ________ Bio Lab Diagnostics KIT _________________________________________________Blank solution used to zero: ___________________________ Filter/nm used: ________________________Absorvance measured in colorimeter for each calibration solutionConcentrationStandardKarmenUnits/mlIU/l(at 30 o C in a in spectrometer at 340nm)1 0 0Abs2 24 213 61 504 114 955 190 157Calibration Graph:
Estimation of AST- colorimeterABS (NM)CONCENTRATION (G/L)Date: ______________________Analyst: ____________________________
ALANINE AMINOTRANSFERASE (ALT or GPT) BC – 02Authorized signature:Issuing date: 5 th28 th March 2008Next Revision date: 31 st April 2008Staff able to perform test: <strong>Laboratory</strong> officer (supervisor) laboratory technician (under supervision)Clinical significance:Measurement of serum/plasma Alanine Aminotransferase Activity (ALT or SGPT) in a colorimeter toinvestigate liver disease. AST is found principally in the liver with only small amounts being present inother organs. Levels are raised when there is liver cells damage and during various hepatic diseasestates including hepatitis.Note: ALT measurement is more specific than AST for detecting liver cell damage. However the difference in the raisedlevels of the two enzymes is small and does not justify the measurement of both. Usually the measurement of AST ispreferred to the measurement of ALT because AST enzyme activity is also a useful indicator of myocardial damage. ALTis usually measured under special circumstances.Principle of Test Method:ALT is a specific soluble enzyme localized in the cytosol of cells. It catalyses the transformation of L-Alanine and 2-Oxoglutarate into Pyruvate. The ALT or GPT activity controls the quantity of pyruvateformed, which can be assayed by the formation of a brown substance - 2,4 dinitro phenylhydrazone, inalkaline medium. The intensity of this colour is proportional to the quantity of pyruvate formed andthus to the catalytic activity of ALT.Specimen: 20 µl (0.02 ml) of patient’s fresh serum or plasma.Note: No prior patient preparation is necessary. The serum or plasma must be free from haemolysis and if it is lipaemic itshould be reported.Equipment required:Sample collection:• Test tubes (10 ml)• Dry cotton wool/gauze/toilet paper• Cotton wool soaked in 70% alcohol• Syringe (2.5/5.0/10 ml)Test:• Micropipette• Tubes (7.5 ml)• Test tubes rack• Water bath• Centrifuge• Colorimeter and cuvette• Toilette paper• Distilled water• Timer
Reagents/stains:Reagents supplied with the BioLab kitConcentrationPhosphate Buffer (pH7.4) 100 mMol/l1 - Buffer Substrate L-alanine200 mMol/lOxo-2-Glutarate2 mMol/l2 - Chromogen 2, 4-Dinitro phenylhydrazine 1 mMol/lHydrochloric Acid1 Mol/l3 – Standard Sodium pyruvate 2 mMol/l4 – Sodium hydroxide 4 Mol/l• NOTES: The reagents can be stored at 2-8 o C for 18 months. After dilution, reagent 4 is stable for at least 8 days inpolyethylene vials at temperatures between 18 and 25 o C. Avoid bacterial contamination in every reagent.Procedure:1. Dilute required amount of reagent 4 as follows (1 ml to 10 ml):Reagent 4 ……………………1 volumeDistilled water ……………….9 volumes2. Take tubes according to the number of patient’s samples analyzed, and label appropriately.• Patient Number• Requisition number• Test performed3. Place in each test tube 100 µl (0.1 ml) of Reagent 1 and incubate at 37 o C for 5 minutes.4. After 5 min, add 20 µl (0.02 ml) of fresh serum or plasma; mix carefully (no vortex) andincubate exactly for 30 min at 37 o C.5. Add to each sample 100 µl (0.1 ml) of Reagent 2, mix well and let stand for 20 minutes at RT(18-25 o C).6. Add rapidly 1000 µl (1 ml) of diluted Reagent 4 to each tube and mix at the same time.7. Incubate for exactly 5 mi at RT.8. During the incubation time, select a wavelength equal to 530 nm (510 – 550 nm) in thecolorimeter.9. Place distilled water in a cuvette (exclusive for distilled water) and zero the colorimeter.10. After exactly 5 min of incubation place the sample in the Test cuvette (T) and read the Abs inthe same conditions.11. Register the value in the test requisition file.
12. Place the test sample back into the original test tube so that, if necessary it is available for recheck.Note: Test results will be different I a second measurement because the amount of pyruvate increases with time.13. Return the blank solution to the colorimeter and check if it continues to read zero.14. Read the ALT concentration from the calibration graph (in Karmen Units/ml or IU/l) or fromthe table prepared from the calibration curve.Note: Since the correlation between OD (Abs) and ALT concentration is not linear, the concentration of testresults must be read directly from the graph.Note: Samples with a concentration greater than 90 Karmen Units/ml (45 IU/l) must be diluted with 0.9% saline(page. 408) and confirmed by re-assay (multiply the result by the dilution factor).NOTE: Always check if the cuvette is clear on the side that will face the light path, and ensure that there are no airbubbles.Reporting and interpretation of results:Normal Values: ALT concentration (Karmen Units/ml) ALT concentration (IU/l)Women 1.3 – 16.0 3 - 34Men 3.8 – 17.0 11 8 - 36Increase Values of ALT:High values Liver cells damage, hepatic disease states including hepatitis.Quality controlInternal Quality Control (IQC) <strong>Procedures</strong>:• Before use the kit, the OCV value should be established by measuring and plotting the Abs values of20 samples from the quality control serum (add serum after step 4).• Daily measurement of one of the daily prepared standards to check instrument performance.• Run the prepared control serum once every week and plot it on the RCV graph.External Quality Control (EQC):• The National Public <strong>Health</strong> Laboratories (NPHL - Teku) will provide a preserved whole bloodcontrol previously analyzed. The results will be reported in the laboratory records and also reportedto NPHL for further comparison with standard values.Sources of error:• Incorrect sample collection:- Allow the blood to clot at RT and centrifuge as soon as possible (1 hour maximum aftercollection).11 Karmen Units compared with IUat 30 C inspectrometer at 340 nM by NADH-LDH methods.
- Also remove the serum carefully without sucking up the red cells.- Carry out test as soon as possible after separation of the serum from the clot.• Pipetting errors: Inaccuracy in the measurement of the blood sample check if the blood is on thegraduation line before dispensing it; utilization of a wet pipette wipe the blood from the outsidesurface of the pipette tip with cotton or paper. Avoid chip pipette/pipette tips.• Not ensuring that the optical surfaces of the cuvette are clean and dry and that there is no air bubblesin the solution a) Hold the cuvette only in the sides that will not face the light path. b) Whentransferring a solution allow the fluid to run down the inside wall of the cuvette. c) Do not fill acuvette more than ¾ full. d) Before place the cuvette into the colorimeter, wipe the sides that face thelight path with a soft paper or cloth. e) Always face the optical faces to the light source. f) Ensurethat the solution is at RT before reading the Abs.• Inappropriate maintenance of the colorimeter. Protect from sunlight and vibration.Other precautions:• Since the method is not linear, each kit should be controlled and calibrated for its activities.• A new calibration graph should be prepared and checked against controls every week, whenever newreagents are used or dubious results are obtained (a control should be run along with the test byadding serum to the step 4).References:BioLAb Diagnostics Kit InstructionsMallapaty, G.; (2000) Quality Assurance: Training Programme for Primary <strong>Health</strong>care <strong>Laboratory</strong>services, Kathmandu, NepalCheesbrough, M., (2000) District <strong>Laboratory</strong> Practice in Tropical Countries; Cambridge UniversityPress, Cambridge, UKWHO (2003) Manual of Basic Techniques for a <strong>Health</strong> <strong>Laboratory</strong>; WHO, Geneva
ALT (GPT) - Bio Lab Diagnostics KITCalibration graph:1. Dilute Reagent 4 as follows (for a final volume equal to 30 ml):Reagent 4 ……………………3 ml (1 volume)Distilled water ……………..27 ml (9 volumes)2. Take five tubes and label them as ALT standards from 1 to 5.3. Pipette accurately into each tube as follows:StandardsReagent 1 (ml) 2 (ml) 3 (ml) 4 (ml) 5 (ml)Distilled water 0.10 0.10 0.10 0.10 0.10Reagent 1 0.50 0.45 0.40 0.35 0.30Reagent 3 (standard) - 0.05 0.10 0.15 0.20Reagent 2 0.50 0.50 0.50 0.50 0.504. Mix well and allow to stand 20 min at RT (18-25 o C).5. Add rapidly 5 ml of the diluted Reagent 4 to each tube and mix at the same time.6. Leave for 5 minutes at RT. During the last minute set the colorimeter at 530 nm (510 nm – 550nm) and zero the equipment with distilled water (always use the same cuvette for the distilled water).7. After exactly 5 minutes and in the same wavelength conditions, read the Abs of the standardsand register in the Calibration sheet file.8. Return the blank solution to the colorimeter and check if it continues to read zero.9. Plot the Abs (horizontal axis (x)) of each standard in the graph paper (Calibration sheet) againstits equivalent ALT concentration (vertical axis (y)) (in Karmen Units/ml or IU/l).10. From the graph make a table of haemoglobin concentration values (20 – 200 g/l) and respectiveAbs.Note: A non-linear graph will be obtained which means that test results will need to be readfrom the graph and not calculated by a formula.
CALIBRATION SHEETCalibration for ALT Test . Date: __________________ Analyst: _________________________Kit used: __ Bio Lab Diagnostics KIT_______________________________________________________Blank solution used to zero: ___________________________ Calibration Graph: Filter/nm used: ________________________Absorvance measured in colorimeter for each calibration solutionConcentrationStandardKarmen Units/ml IU/l (at 30 o C in a in spectrometer at 340nm)1 0 0Abs2 28 133 57 284 97 495 150 78Calibration Graph:
Estimation of ALT- colorimeterABS (NM)CONCENTRATION (G/L)Date: ______________________Analyst: ____________________________
BILIRUBIN – Jendrassik and Grof Method (Crest Biosystems – coral kit) BC – 03Authorized signature:Issuing date: 5 th28 th March 2008Next Revision date: 31 st April 2008Staff able to perform test: <strong>Laboratory</strong> officer (supervisor) laboratory technician (under supervision)Clinical significance:Jendrassik and Grof Method measure the amount of direct (conjugated) or total bilirrubin in serum orplasma samples. Is usually performed for primarily triage and evaluation of neonatal jaundice andcauses of liver disease (Hepatitis, Cirrhosis, Hepatoma, Parasitic diseases…).Principle of Test Method:Bilirubin is one of the degradation products of heamoglobin formed when red blood cells die. It existsin the insoluble unconjugated form (indirect bilirubin) or soluble glucuronide conjugated formbilirubin (direct bilirubin.Bilirubin reacts with diazotized sulphanilic acid (diazo reagent) to form a colored azobilirubincompound. The intensity of the color formed is measured in a colorimeter at 600 nm and is directlyproportional to the amount of bilirubin present in the sample.Bilirubin + Diazozited Sulphanilic AcidAzobilirubin compoundTotal Bilirubin:For the measurement of total bilirubin, caffeine benzoate is added to the reaction. This catalyst is anaccelerator and gives a rapid and complete conversion to azobilirubin. The amount of azobilirubin ismeasured at alkaline pH.Direct or conjugated Bilirubin:Measured in the absence of caffeine benzoate catalyst and at an acid pH. Under this condition only theconjugated bilirubin will react.Unconjugated Bilirubin:The concentration of unconjugated bilirubin can be calculated by subtracting the conjugated bilirubinvalue from the total bilirubin value.Specimen: 200 µl (0.2 ml) of patient’s fresh serum or plasma (not more than 24 hours hold sample).Note: No patient preparation required. Bilirubin in stable in the sample for 4 days at 2-8 C protected from light as itphotosensitive.
Samples from infants: the sample quantity is a limitation and the samples have high bilirubin (above 3mg/dl). In these cases, the serum can be diluted 1 in 2 (0.05 ml sample and 0.05 ml distilled water) or 1in 5 (0.02 ml of the sample and 0.8 ml distilled water. The real concentration is obtained bymultiplying the concentration by 2 or 5, respectively.Equipment required:Sample collection:• Test tubes (10 ml)• Dry cotton wool/gauze/toilet paper• Cotton wool soaked in 70% alcohol• Syringe (2.5/5.0/10 ml)Test:• Micropipette• Tubes (7.5 ml)• Test tubes rack• Water bath• Centrifuge• Colorimeter and cuvette• Toilette paper• Distilled water• TimerReagents/stains:Reagent suppliedVolume (75 Tests)L1L2Direct Bilirubin ReagentTotal Bilirubin ReagentDirect Nitrite ReagentTotal Nitrite Reagent150 ml4 ml150 ml4 mlS – Standard (10 mg/dl)10 ml• NOTES: The reagents are ready to use and all reagents are stable ay RT (18 to 25 C). Avoid reagent contamination.Procedure:Direct or Conjugated Bilirubin Test Method:1. Turn ON the colorimeter and allow to worm up for 10 min, before use.2. Take clean and dry tubes and label as B (Blank) and T1, T2, etc (Test tubes) according to thenumber of patient’s samples analyzed. Label each patient sample appropriately:• Patient Number,• Requisition number• Test performed
3. Pipette accurately into the tubes as follows:Addition sequence B (ml) T (ml)L1 - Direct Bilirubin Reagent 1.00 1.00L2 – Direct Nitrite Reagent - 0.05Sample 0.10 0.10Total Volume (ml) 1.10 1.15The total volumes shouldn’t be the same????4. Mix well and incubate at RT for exactly 5 min.5. During the incubation time, select a wavelength equal to 546 nm (510-550 nm) in thecolorimeter and zero the instrument with distilled water???.6. After exactly 5 min place the blank sample in the Blank cuvette and zero the colorimeter.7. Remove the Blank cuvette and measure immediately the Abs of the patient’s samples in a Testcuvette (specific for test samples).Note: Replaced the test samples back into the original test-tube so that, if necessary they are available for re-check.However, since the reaction that converts bilirubin into Azobilirubin compound proceeds, the second reading willgive a higher value of bilirrubin than the first reading.8. Register the Abs of the patient’s sample, and subtract the Abs of the blank from the patient’ssamples (A Tsample = Abs T - Abs B ).Note: If the colorimeter was zero with the blank before read the Abs of the samples (step 6) this step is not necessary.9. Read the bilirrubin concentration (mg/dl) by:a) Using the graph or the table prepared from the calibration curve.b) Using the following formula:Direct ⋅ Bilirubin ⋅ concentration =ATsample× concentration ⋅ ofAS⋅ s tan dardWhere: A Tsample = Abs of test(s) against respective blank (see step 6).AS = Abs of standard against distilled water (Abs obtained after zero the colorimeter with distilled water)Note: In this procedure, the correlation between the OD (Abs) of the samples and respective bilirubinconcentration is linear up to 20 mg/dl.If the bilirubin values exceed 20 mg/dl (working limit for linearity), dilute the sample with distilled waterand repeat the assay. At the end of the assay the bilirubin concentration can be obtained as mentioned in step10 and after multiplying the result by the proper dilution factor.E.g. If diluted 1 in 2 (0.05 ml sample and 0.05 ml distilled water) the real concentration is obtained bymultiplying the concentration by 2.NOTE: Always check if the cuvette is clear on the side that will face the light path, and ensure that there are no airbubbles.
Total Bilirubin Test Method:1. Turn ON the colorimeter and allow to worm up for 10 min, before use.2. Take clean and dry tubes and label as B (Blank) and T1, T2, etc (Test tubes) according to thenumber of patient’s samples analyzed. Label each patient sample appropriately:• Patient Number,• Requisition number• Test performed3. Pipette accurately into the tubes as follows:Addition sequence B (ml) T (ml)L1 – Total Bilirubin Reagent 1.00 1.00L2 – Total Nitrite Reagent - 0.05Sample 0.10 0.10The total volumes shouldn’t be the same????4. Mix well and incubate at RT for exactly 10 min.Total Volume (ml) 1.10 ?? 1.15???5. During the incubation time, select a wavelength equal to 546 nm (510-550 nm) in the colorimeterand zero the instrument with distilled water???.7. After exactly 5 min place the blank sample in the Blank cuvette and zero the colorimeter.8. Remove the Blank cuvette and measure immediately the Abs of the patient’s samples in a Testcuvette (specific for test samples).Note: Replaced the test samples back into the original test tube so that, if necessary they are available for re-check.However, since the reaction that converts bilirubin into Azobilirubin compound proceeds, the second reading willalways give a higher value of bilirrubin than the first reading.9. Register the Abs of the patient’s sample, and subtract the Abs of the blank from the patient’ssamples (A Tsample = Abs T - Abs B ).Note: If the colorimeter was zero with the blank before read the Abs of the samples (step 6) this step is not necessary.10. Read the bilirrubin concentration (mg/dl) by:a) Using the graph or the table prepared from the calibration curve.b) Using the following formula:Total ⋅ Bilirubin ⋅ concentration =ATsample× concentration ⋅ ofAS⋅ s tan dardWhere: A Tsample = Abs of test(s) against respective blank (see step 6).AS = Abs of standard against distilled water (Abs obtained after zero the colorimeter with distilled water)Note: In this procedure, the correlation between the OD (Abs) of the samples and respective bilirubin
concentration is linear up to 20 mg/dl.If the bilirubin values exceed 20 mg/dl (working limit for linearity), dilute the sample with distilled waterand repeat the assay. At the end of the assay the bilirubin concentration can be obtained as mentioned in step10 and after multiplying the result by the proper dilution factor.E.g. If sample was diluted 1 in 2 (0.05 ml sample and 0.05 ml distilled water) the real concentration isobtained by multiplying the concentration by 2.NOTE: Always check if the cuvette is clear on the side that will face the light path, and ensure that there are no airbubbles.Reporting and interpretation of results:Normal Values: Bilirubin concentration (mg/dl) Bilirubin concentration (g/l)Direct up to 0.2 up to 0.02Total (adults) up to 1.0 up to 0.10Total (newborns) 0.5 to 4.0 12 0.05 to 0.4Increase Values of Haemoglobin:Elevation values to more than 2 mg/dl patients with jaundice. Also, the whites of the eyes appearyellow and the skin and body fluids also became pigmented.Quality controlInternal Quality Control (IQC) <strong>Procedures</strong>:• Before use the kit, the OCV value should be established by measuring and plotting the Abs values of20 samples from the quality control serum for both Direct and Total Bilirubin (add serum after step 3).• Daily measurement of one of the daily prepared standards to check instrument performance (discardthe artificial standard after use).• Run the prepared control serum once every week and plot it on the RCV graph.External Quality Control (EQC):- The National Public <strong>Health</strong> Laboratories (NPHL - Teku) will provide a preserved whole bloodcontrol previously analyzed. The results will be reported in the laboratory records and also reportedto NPHL for further comparison with standard values.Sources of error:• Incorrect sample collection:- Allow the blood to clot at RT and centrifuge as soon as possible (1 hour maximum aftercollection).- Also remove the serum carefully without sucking up the red cells.- Carry out test as soon as possible after separation of the serum from the clot.12 Highest values in the first 3-5 days of life.
• Pipetting errors: Inaccuracy in the measurement of the blood sample check if the blood is on thegraduation line before dispensing it; utilization of a wet pipette wipe the blood from the outsidesurface of the pipette tip with cotton or paper. Avoid chip pipette/pipette tips.• Not ensuring that the optical surfaces of the cuvette are clean and dry and that there is no air bubblesin the solution a) Hold the cuvette only in the sides that will not face the light path. b) Whentransferring a solution allow the fluid to run down the inside wall of the cuvette. c) Do not fill acuvette more than ¾ full. d) Before place the cuvette into the colorimeter, wipe the sides that face thelight path with a soft paper or cloth. e) Always face the optical faces to the light source. f) Ensurethat the solution is at RT before reading the Abs.• Inappropriate maintenance of the colorimeter. Protect from sunlight and vibration.Other precautions:• Protect sample from daylight and fluorescent light because bilirubin is rapidly destroyed by ultraviolet light.• A new calibration graph should be prepared and checked against controls every week (by addingserum to the step 3), and whenever new reagents are used or dubious results are obtained.References:Crest Biosystems Kit – Coral InstructionsMallapaty, G.; (2000) Quality Assurance: Training Programme for Primary <strong>Health</strong>care <strong>Laboratory</strong>services, Kathmandu, NepalCheesbrough, M., (2000) District <strong>Laboratory</strong> Practice in Tropical Countries; Cambridge UniversityPress, Cambridge, UKWHO (2003) Manual of Basic Techniques for a <strong>Health</strong> <strong>Laboratory</strong>; WHO, Geneva
Bilirubin – Jendrassik and Grof Method – Crest Biosystems (coral clinic biosystems)Calibration:1. Take five tubes and label them as Bilirubin standards from 1 to 5.2. Prepare each standard dilution by pipetting accurately into each tube as follows:StandardsReagent 1 (ml) 2 (ml) 3 (ml) 4 (ml) 5 (ml)Distilled water??? orphysiological1.500 1.400 1.250 1.125 0.000saline????Artificial standard - 0.100 0.225 0.375 1.500Total volume (ml) 1.500 1.500 1.500 1.500 1.500Concentration (mg/dl) 0.00 0.50 1.50 2.5 10.03. Zero the colorimeter with distilled water.4. Mix well and read the Abs of the standards at (preferably 546 nm) 510 nm – 550 nm andregister the results in the Calibration sheet file.5. Discard the standards after use.6. Plot the Abs (horizontal axis (x)) of each standard in the graph paper (Calibration sheet)against its equivalent Bilirubin concentration (y) (in mg/dl).
CALIBRATION SHEETCalibration for Bilirubin Test . Date: __________________ Analyst: _________________________Kit used: __ Crest Biosystems – Coral clinical systems_________________________________________Blank solution used to zero: ___________________________ Calibration Graph: Filter/nm used: ________________________Absorvance measured in colorimeter for each calibration solutionStandard Abs Concentration (mg/dl)1 -2 0.53 1.54 2.55 10.0Calibration Graph:
Estimation of Bilirubin - colorimeterABS (NM)CONCENTRATION (G/L)Date: ______________________Analyst: ____________________________
CREATININE - Jaffe-Slot Alkaline Picrate colorimetric method (Biolab Diagnostics) BC – 04Authorized signature:Issuing date: 5 th28 th March 2008Next Revision date: 31 st April 2008Staff able to perform test: <strong>Laboratory</strong> officer (supervisor) laboratory technician (under supervision)Clinical significance:Important test of Kidney function, primarily in triage of acute patients. It is recommended inpreference to the measurement of serum or plasma urea because it is a better indicator of overall renalfunction and progress in renal failure. Serum creatinine levels are less affected than urea levels by age,dehydration, changes in diet (e.g. low and non prolonged intake of proteins) and catabolic states (e.g.fever, sepsis, internal bleeding).Principle of Test Method:Creatinine reacts with picric acid in an alkaline medium. The Abs of the yellow-red color compoundformed is measured in a colorimeter using a 490 nm wavelength. A number of other compounds reactwith picric acid giving artificially high values for creatinine.Specimen:1 ml of serum or plasma with anticoagulant (heparin or EDTA) free from haemolysis.No prior patient preparation is needed.Urine samples:Use fresh sample diluted 1 to 25 or 1 to 50 in distilled water. Perform the test with the dilution as forthe serum.Multiply the result by the dilution factor (25 or 50, respectively).Equipment required:Sample collection:• Test tubes (10 ml)• Dry cotton wool/gauze/toilet paper• Cotton wool soaked in 70% alcohol• Syringe (2.5/5.0/10 ml)Test:• Micropipette• Tubes (7.5 ml)• Test tubes rack• Water bath• Centrifuge
• Colorimeter and cuvette• Toilette paper• Distilled water• TimerReagents/stains:Reagents:- Sodium dodecyl sulphate (40 g/l)- Phosphate borate buffer (pH 12.8)- Picric acid- Acetic acid (60% v/v)Creatinine working reagent:Mix equal volumes of sodium dodecyl sulphate with phosphate borate and picric acid. Thissolution can be used for one day only and should be prepared to allow 2 ml to each tube.Reagent supplied Concentration Volume (75 Tests)1. Picric Acid30 mmol/l2x80 ml2. Sodium Hydroxide 750 mmol/l 50 ml3. Standard Creatinine 2 mGs/dl 15 mlNOTES: Reagents are stable at RT (18-25 C) for 24 months away from light. The standard must be stored at 2-8 C.The working standard is stable for 3 days at 2-8 C away from light and 24 hours at 25 C ± 5 C.Procedure:1. Dilute required amount of reagent 4 as follows (1 ml to 10 ml):Reagent 4 ……………………1 volumeDistilled water ……………….9 volumes2. Take tubes according to the number of patient’s samples analyzed, and label appropriately.• Patient Number• Requisition number• Test performed3. Place in each test tube 100 µl (0.1 ml) of Reagent 1 and incubate at 37 o C for 5 minutes.15. After 5 min, add 20 µl (0.02 ml) of fresh serum or plasma; mix carefully (no vortex) andincubate exactly for 30 min at 37 o C.
16. Add to each sample 100 µl (0.1 ml) of Reagent 2, mix well and let stand for 20 minutes at RT(18-25 o C).17. Add rapidly 1000 µl (1 ml) of diluted Reagent 4 to each tube and mix at the same time.18. Incubate for exactly 5 mi at RT.19. During the incubation time, select a wavelength equal to 530 nm (510 – 550 nm) in thecolorimeter.20. Place distilled water in a cuvette (exclusive for distilled water) and zero the colorimeter.21. After exactly 5 min of incubation place the sample in the Test cuvette (T) and read the Abs inthe same conditions.22. Register the value in the test requisition file.23. Place the test sample back into the original test tube so that, if necessary it is available for recheck.Note: Test results will be different I a second measurement because the amount of pyruvate increases with time.24. Return the blank solution to the colorimeter and check if it continues to read zero.25. Read the ALT concentration from the calibration graph (in Karmen Units/ml or IU/l) or fromthe table prepared from the calibration curve.Note: Since the correlation between OD (Abs) and ALT concentration is not linear, the concentration of testresults must be read directly from the graph.Note: Samples with a concentration greater than 90 Karmen Units/ml (45 IU/l) must be diluted with 0.9% saline(page. 408) and confirmed by re-assay (multiply the result by the dilution factor).NOTE: Always check if the cuvette is clear on the side that will face the light path, and ensure that there are no airbubbles.Reporting and interpretation of results:Normal Values: ALT concentration (Karmen Units/ml) ALT concentration (IU/l)Women 1.3 – 16.0 3 - 34Men 3.8 – 17.0 13 8 - 36Increase Values of ALT:Increased levels are associated with substantially impaired renal function.High values Liver cells damage, hepatic disease states including hepatitis.Quality controlInternal Quality Control (IQC) <strong>Procedures</strong>:• Before use the kit, the OCV value should be established by measuring and plotting the Abs values of13 Karmen Units compared with IUat 30 C inspectrometer at 340 nM by NADH-LDH methods.
20 samples from the quality control serum (add serum after step 4).• Daily measurement of one of the daily prepared standards to check instrument performance.• Run the prepared control serum once every week and plot it on the RCV graph.External Quality Control (EQC):• The National Public <strong>Health</strong> Laboratories (NPHL - Teku) will provide a preserved whole bloodcontrol previously analyzed. The results will be reported in the laboratory records and also reportedto NPHL for further comparison with standard values.Sources of error:• Incorrect sample collection:- Allow the blood to clot at RT and centrifuge as soon as possible (1 hour maximum aftercollection).- Also remove the serum carefully without sucking up the red cells.- Carry out test as soon as possible after separation of the serum from the clot.• Pipetting errors: Inaccuracy in the measurement of the blood sample check if the blood is on thegraduation line before dispensing it; utilization of a wet pipette wipe the blood from the outsidesurface of the pipette tip with cotton or paper. Avoid chip pipette/pipette tips.• Not ensuring that the optical surfaces of the cuvette are clean and dry and that there is no air bubblesin the solution a) Hold the cuvette only in the sides that will not face the light path. b) Whentransferring a solution allow the fluid to run down the inside wall of the cuvette. c) Do not fill acuvette more than ¾ full. d) Before place the cuvette into the colorimeter, wipe the sides that face thelight path with a soft paper or cloth. e) Always face the optical faces to the light source. f) Ensurethat the solution is at RT before reading the Abs.• Inappropriate maintenance of the colorimeter. Protect from sunlight and vibration.Other precautions:• Since the method is not linear, each kit should be controlled and calibrated for its activities.• A new calibration graph should be prepared and checked against controls every week, whenever newreagents are used or dubious results are obtained (a control should be run along with the test byadding serum to the step 4).
References:BioLAb Diagnostics Kit InstructionsMallapaty, G.; (2000) Quality Assurance: Training Programme for Primary <strong>Health</strong>care <strong>Laboratory</strong>services, Kathmandu, NepalCheesbrough, M., (2000) District <strong>Laboratory</strong> Practice in Tropical Countries; Cambridge UniversityPress, Cambridge, UKWHO (2003) Manual of Basic Techniques for a <strong>Health</strong> <strong>Laboratory</strong>; WHO, Geneva
GLUCOSE – Glucose-oxidase enzymatic method (Biolab Diagnostics) BC – 05Authorized signature:Issuing date: 5 th28 th March 2008Next Revision date: 31 st April 2008Staff able to perform test: <strong>Laboratory</strong> officer (supervisor) laboratory technician (under supervision)Clinical significance:Diagnosis and management of diabetes mellitus. Good control of blood glucose levels in diabeticshelps to prevent or delay the development of complications which may lead ro premature disability ordeath. E.g. blindness, kidney failure, coronary thrombosis, etc.Principle of Test Method:Glucose oxidase (GOD) catalyzes the oxidation of glucose to give hydrogen peroxide (H 2 O 2 ) andgluconic acid.Glu coseOGluconicAcid+2⎯⎯⎯⎯⎯→⋅ +Glu cos e⋅oxidaseH2O2In the presence of the enzyme peroxidase (POD), the hydrogen peroxidase is broken down and theoxygen released reacts with 4-aminophenazone (4-aminoantipyrine) and phenol to give a pink color.2 H2O2+ Phenolperoxidase + a min o − 4 − antipyrine ⎯⎯ ⎯⎯ →Quinoneimin e + 4HOPeroxidase 2Pink ColorThe Abs of the color produced is measured in a colorimeter by using a 515 nm wavelength.Specimen: 10 μl of patient’s plasma from a fluoride-oxalate venous blood specimen. 10 μl of patient’s serum providing that the assay is carried out within 30 minutes of bloodcollection.Note: Without fluoride preservative the glucose is rapidly broken down by glycolysis.Urine samples:Pure or diluted urine in distilled water. Calculation in accordance with serum procedure. If the urinesample was diluted, the real concentration is obtained by multiplying the result by the dilution factor(e.g if the urine sample was diluted 1 in 2 (0.05 ml sample and 0.05 ml distilled water) the result isobtained by multiplying the concentration by 2).Collection of blood glucose specimens:Fasting specimen: Blood collected after a period of non food intake: a) adults usually 10 to 16hours; b) Children 6 hours unless a longer time is indicated (e.g. for hypoglycaemia investigation).
The drinking of plain water is permitted.Post-prandial specimen: This describes blood collected after a meal has been taken. The sample isusually taken as a 2 h post-prandial specimen.Random specimen: Blood sample collected at any time, regardless of food intake.Equipment required:Sample collection:• Test flasks with fluoride-oxalate anti-coagulantor test tubes (10 ml)• Dry cotton wool/gauze/toilet paper• Cotton wool soaked in 70% ethanol• Syringe (2.5/5.0/10 ml)• Test tubes rackTest:• Micropipette• Tubes (7.5 ml)• Test tubes rack• Water bath• Centrifuge• Colorimeter and cuvette• Toilette paper• Distilled water• TimerReagents/stains:Reagents:Reagent supplied Composition Concentration Volume1. Enzyme powder- Amino-4-antipyrine- Glucose oxidase- Peroxidase- Phosphate buffers- 0.125 mmol/l- 30.000 U/l- 10.000 U/l- 100 mmol/l100 ml (5 vials)2. Standard 100 mGs/dl Glucose - 100mg/dl (5.55mmol/l) 3 ml (1 vial)3. Buffer ready to use Sodium Phenolate 16 mmol/l 100 ml (5 bottles)Preparation of working reagents:Transfer 1 vial enzyme powder to one bottle of Reagent n 3 or working buffer (100 ml). Mix gentlytill complete dissolution and is ready to use.NOTES: Reagents must be stored at 2-8 C up to expire date mentioned in the pack. After preparation, working reagent orReagent n 3 is stable for 60 days at 2-8 C away from light.Procedure:1. Turn ON the colorimeter and let stabilize for 10 min.2. Take tubes: 1 for blank, 1 for standard and test tubes according to the number of patient’s
samples analyzed. Label with the following parameters:• Patient Number• Requisition number• Test performed3. Pipette into test tubes as follows:Reagent Blank (ml) Standard (ml) Test sample (ml)Working reagent 1.00 1.50 1.50Standard ___ 0.01 (10 μl) ___Sample ___ ___ 0.01 (10 μl)Total 1.00 1.51 1.514. Mix well and incubate 15 minutes at 37 C.5. During the incubation time, select a wavelength equal to 500 nm (480 – 520 nm) in thecolorimeter.6. After exactly 15 minutes place the blank into the blank cuvette and zero the colorimeter.7. Remove the blank cuvette and read the Abs of the Standard and Test Samples in the sameconditions.Note: Do not forget to register the value before remove the cuvette from the colorimeterReplaced the test samples back into the original test tube so that, if necessary they are available for re-check.Final color is stable for at least 30 min when protected form bright light.8. Return the blank solution to the colorimeter and check if it continues to read zero.9. Read the Glucose concentration (mg/dl or mmol/l) by:c) Using the graph or the table prepared from the calibration curve.d) Using the following formula:ATsampleGlu cos e×AS( mg / dl) =100ATsampleGlu cos e×ASWhere: A Tsample = Abs of test(s) against respective blank.AS = Abs of standard against distilled water.( mmol / l) =5. 55Note: The correlation between the Abs of the samples and respective Glucose concentration is linear up to500 mg/dl (27.75 mmol/l).For values higher then 500 mg/dl (27.75 mmol/l) dilute the sample into 0.9% sodium chloride solution andrepeat the assay.For values below 40 mg/dl (2.2 mmol/l) repeat the assay using 20 μl of patient’s serum or plasma.
Multiply the result by the dilution factor: e.g. If sample was diluted 1 in 2 (0.05 ml sample and 0.05 ml 0.9%sodium chloride) the real concentration is obtained by multiplying the concentration by 2.NOTE: Always check if the cuvette is clear on the side that will face the light path, and ensure that there are no airbubbles.Reporting and interpretation of results:According to Biolab kit:Normal values (serum or plasma):Glucose concentration (mg/dl) Glucose concentration (mmol/l)Fasting sample: 70 – 110 3.85 – 6.052 hours after food: < 140 < 7.7C.S.F. Non-diabetic > 50 mg/dl (50 to 70 mg/dl) > 2.75 (2.75 to 3.85)According to bibliography reference: ‘District laboratory practice in tropical countries:Normal values (plasma): Glucose concentration (mmol/l) Glucose concentration (mg/dl)Fasting sample: 64.8 – 115.2 3.6 – 6.4Random: 59.4 – 133.2 3.3 – 7.4Children Feasting 43.2 – 95.4 2.4 – 5.3Increase Values of Glucose:Raised blood glucose level Hyperglycemia.Patient’s with hypoglycemia and specific symptoms can be diagnose with diabetes mellitus when:PlasmaFastingRandommmol/l mg/dl mmol/l mg/dlVenous: ≥ 7.8 140 11.1 200Capillary: ≥ 7.8 140 12.2 220Whole bloodVenous: ≥6.7 120 ≥10.0 180Capillary: ≥6.7 120 ≥11.1 200Note: Values for adults obtained on two separate occasionsRandom values below 7.8 mmol/l and fasting values bellow 6.4 mmol/l exclude a diagnosis of diabetesmellitus.Other cases of increase of glucose levels:Hyperglycaemia may accompany pancreatic disease and some endocrine disorders (e.g. thyrotoxicosisand Cushings syndrome) and also appear as a result of steroid therapy.
Decrease Values of Glucose (Hypoglycaemia):Persistent glucose values below 2.2 mmol/l (39.6 mg/dl) accompanied by symptoms such as fainting,fits, sweating, hunger, pallor, confusion, or violence, should be investigated.Causes: Severe malnutrition, kwashiorkor, severe liver disease, alcoholic excess, insulin secretingtumours, Addison’s disease, certain drugs and following over treatment of diabetes.Neonatal: newborn babies may suffer from hypoglycaemia when values fall below 1.1 mmol/l.Infants at risk: underweight poorly nourished babies, twins, premature infants, and babies born ofdiabetes mothers.Quality controlInternal Quality Control (IQC) <strong>Procedures</strong>:• Before use the kit, the OCV value should be established by measuring and plotting the Abs values of20 samples from the quality control serum (add serum as described in step 3).Note: OCV should be around 3%• Run the standard with every assay (as described in procedure – step 3).• Run the prepared control serum once every week and plot it on the RCV graph.Note: RCV must not exceed 6%External Quality Control (EQC):• The National Public <strong>Health</strong> Laboratories (NPHL - Teku) will provide a preserved whole bloodcontrol previously analyzed (every 4 to 6 months). The results will be reported in the laboratoryrecords and also reported to NPHL for further comparison with standard values.Sources of error:• Incorrect sample collection:- Allow the blood to clot at RT and centrifuge as soon as possible (1 hour maximum aftercollection).- Also remove the serum carefully without sucking up the red cells.- Carry out test as soon as possible after separation of the serum from the clot.• Pipetting errors: Inaccuracy in the measurement of the blood sample check if the blood is on thegraduation line before dispensing it; utilization of a wet pipette wipe the blood from the outsidesurface of the pipette tip with cotton or paper. Avoid chip pipette/pipette tips.• Not ensuring that the optical surfaces of the cuvette are clean and dry and that there is no air bubblesin the solution a) Hold the cuvette only in the sides that will not face the light path. b) Whentransferring a solution allow the fluid to run down the inside wall of the cuvette. c) Do not fill acuvette more than ¾ full. d) Before place the cuvette into the colorimeter, wipe the sides that face thelight path with a soft paper or cloth. e) Always face the optical faces to the light source. f) Ensurethat the solution is at RT before reading the Abs.• Inappropriate maintenance of the colorimeter. Protect from sunlight and vibration.
Other precautions:• A new calibration graph should be prepared whenever new reagents are used or dubious results areobtained and checked against controls every week, (a control should be run along with the test byadding serum to the step 3).• In vitro contamination of glucose or any oxidizer (e.e hydrogen peroxide) can leave to false results.• Use of contaminated water or pipette tips leads to elevated blank Abs and thus wrong results.• The test is sensitive to high temperatures (>37 C) or contamination of chemicals because the enzymelose its specific activity.References:BioLab Diagnostics Kit InstructionsMallapaty, G.; (2000) Quality Assurance: Training Programme for Primary <strong>Health</strong>care <strong>Laboratory</strong>services, Kathmandu, NepalCheesbrough, M., (2000) District <strong>Laboratory</strong> Practice in Tropical Countries; Cambridge UniversityPress, Cambridge, UKWHO (2003) Manual of Basic Techniques for a <strong>Health</strong> <strong>Laboratory</strong>; WHO, Geneva
Glucose (Glucose Oxidase) – GOD-PAP, Bio Lab Diagnostics.Calibration:1. Take five tubes and label one as blank and the remaining tubes as Glucose Standards 1 to 4.2. Prepare each standard dilution by pipetting accurately into each tube as follows:Reagent Blank Standard 1 (ml) Standard 2 (ml) Standard 3 (ml) Standard 4 (ml)0.9% sodiumchlorideStandard______0.008 (8 μl) 0.005 (5 μl) 0.003 (3 μl) ___0.002 (2 μl) 0.005 (5 μl) 0.007 (7 μl) 0.01 (10 μl)Working reagent 1.00 1.50 1.50 1.50 1.50Total Volume 1.00 1.51 1.51 1.51 1.51Concentration ___ 20 50 70 1003. Zero the colorimeter with the blank.4. Mix well and read the Abs of the standards at 500 nm (480 nm – 520 nm) and register theresults in the Calibration sheet file.5. Discard the standards after use.6. Plot the Abs (horizontal axis (x)) of each standard in the graph paper (Calibration sheet) againstits equivalent Glucose concentration (y) (in mg/dl or mmol/l).Conversions:From mmol/l to mg/dl – multiply by 18From mg/dl to mmol/l – divide by 18
CALIBRATION SHEETCalibration for Glucose (GOD-PAP) Test . Date: ______________ Analyst:__________________Kit used: __ Bio Lab Diagnostics___________________________________________________________Blank solution used to zero: ___________________________ Calibration Graph: Filter/nm used: ________________________Absorvance measured in colorimeter for each calibration solutionStandard Concentration (mg/dl) Concentration (mmol/l) Abs1 20 1.112 50 2.783 70 3.894 100 5.55Calibration Graph:
Estimation of Glucose (till 500 mg/dl or 27.75 mmol/l) - colorimeterABS (NM)CONCENTRATION (G/L)Date: ______________________Analyst: ____________________________
ALBUMIN (BCG) (Biolab Diagnostics) BC – 06Authorized signature:Issuing date: 5 th28 th March 2008Next Revision date: 31 st April 2008Staff able to perform test: <strong>Laboratory</strong> officer (supervisor) laboratory technician (under supervision)Clinical significance:Albumin is produced entirely In the liver and constitutes about 60% of total serum protein. It isinvolved in the regulation of water flow between the plasma and tissue fluid by its effects on plasmacolloid osmotic pressure (oncotic pressure).Serum albumin is mainly measured to investigate liver diseases, protein energy malnutrition, disordersof water balance (e.g. dehydration), nephrotic syndrome, and protein-losing gastrointestinal diseases.Principle of Test Method:Bromocresol green is a yellow indicator when at pH 3.5 to pH 4.2. At pH 4.2, bromocresol green fixesselectively on albumin, producing a blue green color. The sensitivity if the reaction is increased byaddition of Brij 35. The intensity of the color is proportional to the albumin concentration.The Abs of the color produced is read in a colorimeter by using an orange filter or in aspectrophotometer at 620 nm (600-640 nm).Specimen: 10 μl of non-lipaemic and non-icteric patient’s serum or plasma. Blood must be collected with theminimum of venous stasis and should be free from haemolysis.Note: common anticoagulants have no interference on this assay. Avoid citrated plasma.Equipment required:Sample collection:• Test flasks with fluoride-oxalate anti-coagulantor test tubes (10 ml)• Dry cotton wool/gauze/toilet paper• Cotton wool soaked in 70% ethanol• Syringe (2.5/5.0/10 ml)• Test tubes rackTest:• Micropipette• Tubes (7.5 ml)• Test tubes rack• Water bath• Centrifuge• Colorimeter and cuvette• Toilette paper• Distilled water• TimerReagents/stains:
Reagents:Reagent supplied Composition Concentration Volume2. BCG Reagent- Bromocresol Green- Succinate Buffer pH 4.2- Brij 35- 750 μmol/l- 370 μmol/l- Trace100 ml4. Standard (Albumin) - Value of Albumin - 4.0 g/dl 2.5 mlNOTES: All reagents are ready to use. BCG Reagent (No 2) is stable for 18 months at 18-25 C away from lightAlbumin Standard is stable for 18 months at 2-8 C. This reagent should not be freezeProcedure:1. Turn ON the colorimeter and let stabilize for 10 min.2. Take tubes: 1 for blank, 1 for standard and test tubes according to the number of patient’ssamples analyzed. Label patient’s samples with the following parameters:• Patient Number• Requisition number• Test performed3. Pipette into test tubes as follows:Reagent Blank (ml) Standard (ml) Test sample (ml)Reagent No 2 1.00 1.50 1.50Standard Reagent No 4 ___ 0.01 (10 μl) ___Sample ___ ___ 0.01 (10 μl)Total 1.00 1.51 1.514. Mix well and incubate 3 minutes at RT.5. During the incubation time, select a wavelength equal to 620 nm (600 – 6400 nm) in thecolorimeter.6. After exactly 3 minutes place the blank into the blank cuvette and zero the colorimeter.10. Remove the blank cuvette and read the Abs of the Standard and Test Samples in the sameconditions.Note: Do not forget to register the value before remove the cuvette from the colorimeterReplaced the test samples back into the original test tube so that, if necessary they are available for re-check.Final color is stable for 1 hour when protected form bright light.11. Return the blank solution to the colorimeter and check if it continues to read zero.12. Read the Albumin concentration (g/dl) by:
e) Using the graph or the table prepared from the calibration curve.f) Using the following formula:ATsampleAlbu min×ASWhere: A Tsample = Abs of test(s) against respective blank.AS = Abs of standard against distilled water.( g / dl) =s tan dard( 4.0)Note: The correlation between the Abs of the samples and respective Glucose concentration is linear up to9.0 g/dl.For values higher then 9 g/dl dilute the sample in 0.9% sodium chloride solution and repeat the assay.Multiply the result for the dilution factor: E.g. If sample was diluted 1 in 2 (0.05 ml sample and 0.05 mldistilled water) the real concentration is obtained by multiplying the concentration by 2.NOTE: Always check if the cuvette is clear on the side that will face the light path, and ensure that there are no airbubbles.Reporting and interpretation of results:According to Biolab kit:Glucose concentration (g/dl)Reference (normal) range: 4.0 to 5.5According to bibliography: ‘District laboratory practice in tropical countries:Glucose concentration (g/dl)Reference (normal) range: 3.0 to 4.5Note: Albumin levels are lower in infants and when individuals are lying down (by 10%)Increase Values of Glucose:Rarely raised except artefactually by prolonged venous stasis.Decrease Values of Albumin (Hypoalbuminaemia – whenever there is increased plasma volume):- Pregnancy- Low protein intake (protein energy malnutrition).- Malabsorption as in Chronic pancreatitis, celiac disease, and sprue.- Loss of albumin in Urine as in nephronic syndrome.- Loss of albumin trough the skin following severe burns.- Loss of algumin from the bowel as in ulcerative colitis and other forms of protein losinggastroenteropathy.- Liver disease or parasitic infections associated with reduction in the production of albumin.- In AIDS usually due to malnutrition, malabsorption, high protein demands.
Quality controlInternal Quality Control (IQC) <strong>Procedures</strong>:• Before use the kit, the OCV value should be established by measuring and plotting the Abs values of20 samples from the quality control serum (add serum as described in step 3).Note: OCV should be around 3%• Run the standard with every assay (as described in procedure).• Run the prepared control serum once every week and plot it on the RCV graph.Note: RCV must not exceed 6%External Quality Control (EQC):• The National Public <strong>Health</strong> Laboratories (NPHL - Teku) will provide a preserved whole bloodcontrol previously analyzed (every 4 to 6 months). The results will be reported in the laboratoryrecords and also reported to NPHL for further comparison with standard values.Sources of error:• Incorrect sample collection:- Allow the blood to clot at RT and centrifuge as soon as possible (1 hour maximum aftercollection).- Also remove the serum carefully without sucking up the red cells.- Carry out test as soon as possible after separation of the serum from the clot.• Pipetting errors: Inaccuracy in the measurement of the blood sample check if the blood is on thegraduation line before dispensing it; utilization of a wet pipette wipe the blood from the outsidesurface of the pipette tip with cotton or paper. Avoid chip pipette/pipette tips.• Not ensuring that the optical surfaces of the cuvette are clean and dry and that there is no air bubblesin the solution a) Hold the cuvette only in the sides that will not face the light path. b) Whentransferring a solution allow the fluid to run down the inside wall of the cuvette. c) Do not fill acuvette more than ¾ full. d) Before place the cuvette into the colorimeter, wipe the sides that face thelight path with a soft paper or cloth. e) Always face the optical faces to the light source. f) Ensurethat the solution is at RT before reading the Abs.• Inappropriate maintenance of the colorimeter. Protect from sunlight and vibration.Other precautions:• A new calibration graph should be prepared whenever new reagents are used or dubious results areobtained and checked against controls every week, (a control should be run along with the test byadding serum to the step 3).• Since, bromocresol green is a pH indicator, in vitro addition of acid or alkali to the reagents makesfalse coloration of samples and reagents. Pipettes and glassware must be clean and free of allchemical contaminations.
References:BioLab Diagnostics Kit InstructionsMallapaty, G.; (2000) Quality Assurance: Training Programme for Primary <strong>Health</strong>care <strong>Laboratory</strong>services, Kathmandu, NepalCheesbrough, M., (2000) District <strong>Laboratory</strong> Practice in Tropical Countries; Cambridge UniversityPress, Cambridge, UKWHO (2003) Manual of Basic Techniques for a <strong>Health</strong> <strong>Laboratory</strong>; WHO, Geneva
Albumin (BCG) – Bio Lab Diagnostics.Calibration:7. Take five tubes and label one as blank as the remaining tubes as Albumin Standards 1 to 4.8. Prepare each standard dilution by pipetting accurately into each tube as follows:Reagent Blank Standard 1 (ml) Standard 2 (ml) Standard 3 (ml) Standard 4 (ml)0.9% sodiumchlorideStandard______0.008 (8 μl) 0.005 (5 μl) 0.003 (3 μl) ___0.002 (2 μl) 0.005 (5 μl) 0.007 (7 μl) 0.01 (10 μl)Working reagent 1.00 1.50 1.50 1.50 1.50Total Volume 1.00 1.51 1.51 1.51 1.51Concentration ___ 20 50 70 1009. Zero the colorimeter with the blank.10. Mix well and read the Abs of the standards at 500 nm (480 nm – 520 nm) and register theresults in the Calibration sheet file.11. Discard the standards after use.12. Plot the Abs (horizontal axis (x)) of each standard in the graph paper (Calibration sheet) againstits equivalent Glucose concentration (y) (in mg/dl or mmol/l).
CALIBRATION SHEETCalibration for Glucose (GOD-PAP) Test . Date: ______________ Analyst:__________________Kit used: __ Bio Lab Diagnostics___________________________________________________________Blank solution used to zero: ___________________________ Calibration Graph: Filter/nm used: ________________________Absorvance measured in colorimeter for each calibration solutionStandard Concentration (mg/dl) Concentration (mmol/l) Abs1 20 1.112 50 2.783 70 3.894 100 5.55Calibration Graph:
Estimation of Glucose (till 9 g/dl) - colorimeterABS (NM)CONCENTRATION (G/DL)Date: ______________________Analyst: ____________________________
Solutions:I. Acid alcohol, 3% v/v (100 mL):Ethanol, absolute: 68 mLDistilled water: 29 mLHydroclhoric acid, concentrated: 3 mL1. Measure the ethanol/methanol and transfer to 100 mL amber bottle.2. Add the water and mix3. Add 30 mL of concentrated hydrochloric acid and mix well. Always add acid slowly to alcohol,not vice versa.Store for six to twelve months in amber bottles.II. Carbol fuschin (115 mL):Basic fuschin powder: 1 gEthanol or methanol, absolute: 10 mLPhenol: 5 gDistilled water: 100 mL1. Dissolve the basic fuchsin in a 150 mL amber bottle by adding small portions of ethanol at eachtime.2. With great care weigh the phenol in a beaker and add water till dissolve the phenol crystals(gentle heat may be required).3. Transfer to the basic fuchsin/ethanol bottle, add the remainder of water and mix well.Store at room temperature for six to twelve months in amber bottle.Filter before use.III. Crystal Violet Stain (1 L):1. Solution A: Dissolve 2.0 g of gentian violet powder (90%) in 20 mL of 95% ethanol.2. Solution B: Dissolve 0.8 g of ammonium oxalate in 80 mL of distilled water.3. Mix solutions A and B and add distilled water till 1 L.Note: For use, filter a small amount of the stain with a funnel and a filter.
IV. Acetone-Ethanol Decolorizer (1:1, v/v) (100 mL)Ethanol, absolute: 50 mLAcetone: 50 mLV. Gram Iodine (150 mL):Potassium iodide powder: 1 gDistilled water: 150 mLDissolve 2 g of potassium iodide powder in 300 mL of distilled water; then add 1 g of iodinecrystals.(Gram’s iodine is a mordant. It doesn't give color directly to the bacteria but it fixes the crystal violet to the bacterial cellwall).V. KOH (potassium hydroxide) 200 g/L (20% w/v) (100 mL):Potassium hydroxide (KOH): 20 gDistilled water: 100 mL1. Weigh the KOH and transfer to a screw-cap bottleCaution: KOH is corrosive2. Add the water and mix until the KOH is completely dissolved.3. Label as corrosive and store at room temperature up to 2 yearsVI. Methylene blue (5 g/L)VII. Safranin:Safranin: 0.25 gEthanol (95%): 10 mLAdd distilled water to 100 mLVIII. Dimethylsulphoxide KOH reagent (120 mL)Potassium hydroxide (KOH): 20 gDimethylsulphoxide (DMSO): 40 mLDistilled water: 60 mL1. Mix the DMSO with the water2. Weight the KOH and add to the DMSO solution
3. Mix until KOH is completely dissolved4. Label the bottle as corrosive and store at room temperature out of direct sunlightIX. NaCl (physiological saline) (0.9% w/v) (100 mL)Sodium chloride: 0.9 gDistilled water: up to 100 mLMix until completely dissolution and store at room temperature. Stable for several months. Do notuse if contaminated.XI. Ethanol (70%) (1 L)Ethanol (99%): 700 mLDistilled water: 300 mLCan be stored in 1 L bottle water at room temperatureXII.Ethanol (95%) (100 mL)Ethanol (99%): 95 mLDistilled water: 5 mLCan be stored in 0.5 L bottle water at room temperatureDrabkin’s Reagent solution (pH 7.0-7.4):Diluted 20 µL of whole blood in 4 mLPhotosensitive: store in amber containers or container wrapped in silver foil paper.The solution is typically yellow clear, DO NOT use if it becomes turbid.
CHEMICALS INFORMATIONACETONEProtection: Eye, skin, clothing, equipment.- Do not bread fumes. (use in ventilated area)- Keep away from oxidizers: nitric acid, chromicacid, peroxides and permanganates, etc.ACID ALCOHOLKeep away from source of ignitionAMONIUM OXALATE is a toxic Wear protection.chemicalHandle it with care.Wash immediately any affected areaCHLORINE SOLUTIONSProtection: eyes, skin, clothing, equipment.Keep away from acids, flammable chemicals, andcombustible materials.ETHANOL Abs, 95%, 70%Keep away from sources of ignition, silver, nitrateand oxidizers.HYDROCHLORIC ACID, Concentrated Protection: skin, eye, clothing and equipmentMERCURYMETHANOLPHENOLPOTASSIUM HYDROXIDE (pelletsand solutions)METHYLENE BLUECRYSTAL VIOLETVentilate area if mercury escapes from brokenthermometer (discard in burial).Avoid skin contactKeep away from ammonia, azides, ethylene oxide.Protection: Skin and eyesKeep away from sources of ignition, sodiumhypochlorite, nitric acid, chloroform, hydrogenperoxide.Avoid breading vapor.Use in a well ventilated area or preferably in a fumecupboardProtection: skin, eyes, clothing, and equipment.Wash immediately any affected area. Keepcontainer tightly closed.Store away from oxidizersProtection: skin, eyes, clothing, equipment.Store away from acids.Do not use reagent bottles with glass stoppers.Handle with care (it stain skin and clothes)Do not ingestedHandle with care (it stain skin and clothes)Do not ingestedCRapid Kit- or Instrument-Based TestsRPRHIV
Anti-ABD, pregnancy screeningGlucometer ($40 device, each non-reusable cuvette: $1)QBC Diagnostics AutoRead Plus-- CBC with differential (generous donation from Dr. Levine and theteam at qbcdiagnostics.com)Dipstick Tests
Urine, protein/glucose, for use in antenatal screeningUrine, 9-panel, for use in UTI evaluationUrine, beta-HCG for pregnancyUrine for protein—essential practice in MCH L4 (strips)RPR—essential practice in MCH L5HIV—essential practice in MCH L6Urine sediment microscopy: http://www.texascollaborative.org/spencer_urinalysis/ds_sub3.htmBlood glucoseTesting Urine for HCG (pregnancy testing)Routine Stool examinationAnnex 1EDTA-anticoagulated blood