American Handgunner May/June 1978
American Handgunner May/June 1978
American Handgunner May/June 1978

You also want an ePaper? Increase the reach of your titles
YUMPU automatically turns print PDFs into web optimized ePapers that Google loves.
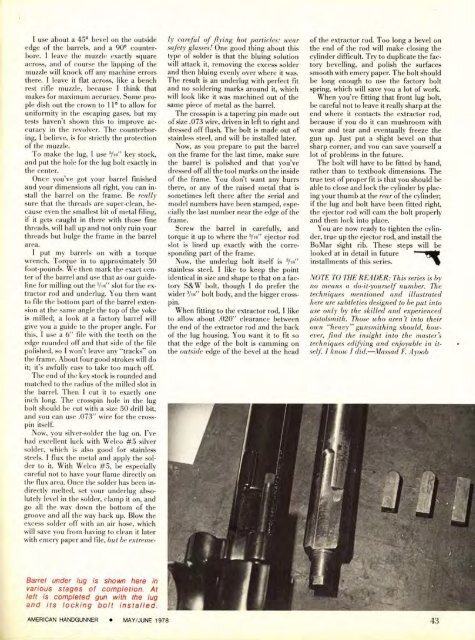
I use about a45' bevel on the outsideedge of the barrels, and a 90' counterbore.I leave the muzzle exactly squareacross, and of course the lapping of themuzzle will knock off any machine errorsthere. I leave it flat across, like a benchrest rifle muzzle, because I think thatmakes for maximum accuracy. Some peopledish out the crown to 11' to allow foruniformity in the escaping gases, but mytests haven't shown this to improve accuracyin the revolver. The counterboring,I believe, is for strictly the protectionof the muzzle.To make the lug, I use Vie'' key stock,and put the hole for the lug bolt exactly inthe center.Once you've got your barrel finishedand your dimensions all right, you can installthe barrel on the frame. Be reallysure that the threads are super-clean, becauseeven the smallest bit of metal filing,if it gets caught in there with those finethreads, will ball up and not only ruin yourthreads but bulge the frame in the barrelarea.I put my barrels on with a torquewrench. Torque in to approximately 50foot-pounds. We then mark the exact centerof the barrel and use that as our guidelinefor milling out the 5/~e" slot for the extractorrod and underlug. You then wantto file the bottom part of the barrel extensionat the same angle the top of the yokeit,.. Is milled; a look at a factory barrel will'give you a guide to the proper angle. For, , this, I use a 6" file with the teeth on theedge rounded off and that side of the fileso I won't leave any "tracks" onthe frame. About four good strokes will doit; it's awfully easy to take too much off.The end of the key stock is rounded andmatched to the radius of the milled slot inthe barrel. Then I cut it to exactly oneinch long. The crosspin hole in the lugbolt should be cut with a size 50 drill bit,and you can use .073" wire for the crosspinitself.Now, you silver-solder the lug on. I'vehad excellent luck with Welco #5 silversolder, which is also good for stainlesssteels. I flux the metal and apply the solderto it. With Welco #5, be especiallycareful not to have your flame directly onthe flux area. Once the solder has been indirectlymelted, set your underlug absolutelylevel in the solder, clamp it on, andgo all the way down the bottom of thegroove and all the way back up. Blow theexcess solder off with an air hose, whichwill save you from having to clean it laterwith emery paper and file, but be extreme-" " - -safety glasses! One good thing about thistype of solder is that the bluing solutionwill attack it, removing the excess solderand then bluing evenly over where it was.The result is an underlue with perfect fitand no soldering marks around it, whichwill look like it was machined out of thesame piece of metal as the barrel.The crosspin is a tapering pin made outof size .073 wire, driven in left to right anddressed off flush. The bolt is made out ofstainless steel, and will be installed later.Now, as you prepare to put the barrelon the frame for the last time, make surethe barrel is polished and that you'vedressed off all the tool marks on the insideof the frame. You don't want any burrsthere, or any of the raised metal that issometimes left there after the serial andmodel numbers have been stamped, especiallythe last number near the edge of theframe.Screw the barrel in carefully, andtorque it up to where the Vie" ejector rodslot is lined up exactly with the correspondingpart of the frame.Now, the underlug bolt itself is '/id'stainless steel. I like to keep the pointidentical in size and shape to that on a factoryS&W bolt, though I do prefer thewider 3/1e" bolt body, and the bigger crosspin.When fitting to the extractor rod, I liketo allow about .020" clearance betweenthe end of the extractor rod and the backof the lug housing. You want it to fit sothat the edge of the bolt is camming onthe outside edge of the bevel at the headthe end of the rod will makeuclosing thecylinder difficult. Try to duplicate the factorybevelling, and polish the surfacessmooth with emery paper. The bolt shouldbe long enough to use the factory boltspring, which will save you a lot of work.When you're fitting that front lug bolt,be careful not to leave it really sharp at theend where it contacts the extractor rod,because if you do it can mushroom withwear and tear and eventually freeze thegun up. Just put a slight bevel on thatsharp corner, and you can save yourself alot of problems in the future.The bolt will have to be fitted by hand,rather than to textbook dimensions. Thetrue test of proper fit is that you should beable to close and lock the cylinder by placingyour thumb at the rear of the cylinder;if the lug and bolt have been fitted right,the ejector rod will cam the bolt properlyand then lock into place.You are now ready to tighten the cylinder,true up the ejector rod, and install theBoMar sight rib. These steps will belooked at in detail in futureinstallments of this series. . -^. *,NOTE TO THE READER: ~hisseries'is byno means a do-it-yourself number. Thetechniques mentioned and illustratedhere are subtleties designed to be put intouse only by the skilled and experiencedpistolsmith. Those who aren't into theirown "heavy" gunsmithing should, however,find the insight into the master'stechniques edifying and enjoyable in itself.I know I did.-Massad F. Ayoob'Â¥'Barrel under lug is shown here invarious stages of completion. Atleft is completed gun with the lugand its locking bolt installed.AMERICAN HANDGUNNER MAY/JUNE <strong>1978</strong>. .,