Fitting Instructions - Townsend Design
Fitting Instructions - Townsend Design
Fitting Instructions - Townsend Design

You also want an ePaper? Increase the reach of your titles
YUMPU automatically turns print PDFs into web optimized ePapers that Google loves.
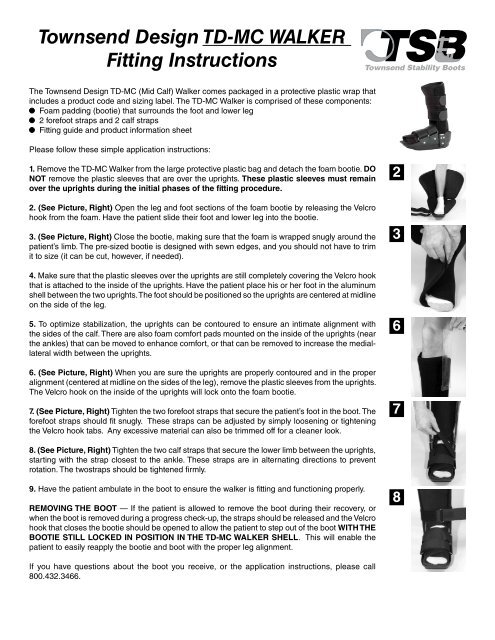
<strong>Townsend</strong> <strong>Design</strong> TD-MC WALKER<strong>Fitting</strong> <strong>Instructions</strong>The <strong>Townsend</strong> <strong>Design</strong> TD-MC (Mid Calf) Walker comes packaged in a protective plastic wrap thatincludes a product code and sizing label. The TD-MC Walker is comprised of these components:Foam padding (bootie) that surrounds the foot and lower leg2 forefoot straps and 2 calf straps<strong>Fitting</strong> guide and product information sheetPlease follow these simple application instructions:1. Remove the TD-MC Walker from the large protective plastic bag and detach the foam bootie. DONOT remove the plastic sleeves that are over the uprights. These plastic sleeves must remainover the uprights during the initial phases of the fitting procedure.2. (See Picture, Right) Open the leg and foot sections of the foam bootie by releasing the Velcrohook from the foam. Have the patient slide their foot and lower leg into the bootie.3. (See Picture, Right) Close the bootie, making sure that the foam is wrapped snugly around thepatient’s limb. The pre-sized bootie is designed with sewn edges, and you should not have to trimit to size (it can be cut, however, if needed).4. Make sure that the plastic sleeves over the uprights are still completely covering the Velcro hookthat is attached to the inside of the uprights. Have the patient place his or her foot in the aluminumshell between the two uprights. The foot should be positioned so the uprights are centered at midlineon the side of the leg.5. To optimize stabilization, the uprights can be contoured to ensure an intimate alignment withthe sides of the calf. There are also foam comfort pads mounted on the inside of the uprights (nearthe ankles) that can be moved to enhance comfort, or that can be removed to increase the mediallateralwidth between the uprights.6. (See Picture, Right) When you are sure the uprights are properly contoured and in the properalignment (centered at midline on the sides of the leg), remove the plastic sleeves from the uprights.The Velcro hook on the inside of the uprights will lock onto the foam bootie.7. (See Picture, Right) Tighten the two forefoot straps that secure the patient’s foot in the boot. Theforefoot straps should fit snugly. These straps can be adjusted by simply loosening or tighteningthe Velcro hook tabs. Any excessive material can also be trimmed off for a cleaner look.23678. (See Picture, Right) Tighten the two calf straps that secure the lower limb between the uprights,starting with the strap closest to the ankle. These straps are in alternating directions to preventrotation. The twostraps should be tightened firmly.9. Have the patient ambulate in the boot to ensure the walker is fitting and functioning properly.REMOVING THE BOOT — If the patient is allowed to remove the boot during their recovery, orwhen the boot is removed during a progress check-up, the straps should be released and the Velcrohook that closes the bootie should be opened to allow the patient to step out of the boot WITH THEBOOTIE STILL LOCKED IN POSITION IN THE TD-MC WALKER SHELL. This will enable thepatient to easily reapply the bootie and boot with the proper leg alignment.8If you have questions about the boot you receive, or the application instructions, please call800.432.3466.