Fitting Instructions - Townsend Design
Fitting Instructions - Townsend Design
Fitting Instructions - Townsend Design

Create successful ePaper yourself
Turn your PDF publications into a flip-book with our unique Google optimized e-Paper software.
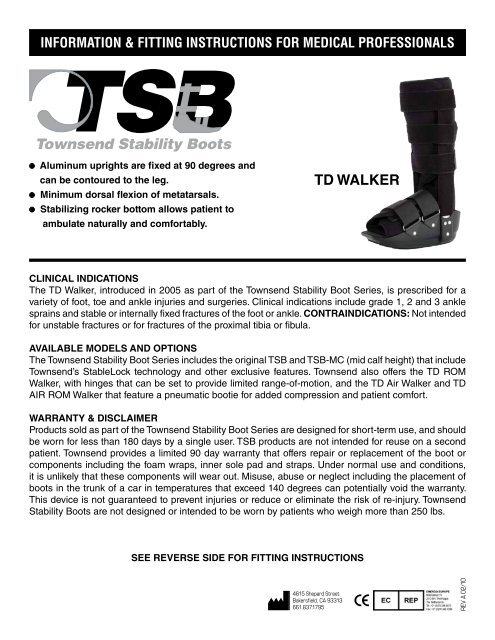
INFORMATION & FITTING INSTRUCTIONS FOR MEDICAL PROFESSIONALSAluminum uprights are fixed at 90 degrees andcan be contoured to the leg.Minimum dorsal flexion of metatarsals.Stabilizing rocker bottom allows patient toambulate naturally and comfortably.TD WALKERCLINICAL INDICATIONSThe TD Walker, introduced in 2005 as part of the <strong>Townsend</strong> Stability Boot Series, is prescribed for avariety of foot, toe and ankle injuries and surgeries. Clinical indications include grade 1, 2 and 3 anklesprains and stable or internally fixed fractures of the foot or ankle. CONTRAINDICATIONS: Not intendedfor unstable fractures or for fractures of the proximal tibia or fibula.AVAILABLE MODELS AND OPTIONSThe <strong>Townsend</strong> Stability Boot Series includes the original TSB and TSB-MC (mid calf height) that include<strong>Townsend</strong>’s StableLock technology and other exclusive features. <strong>Townsend</strong> also offers the TD ROMWalker, with hinges that can be set to provide limited range-of-motion, and the TD Air Walker and TDAIR ROM Walker that feature a pneumatic bootie for added compression and patient comfort.WARRANTY & DISCLAIMERProducts sold as part of the <strong>Townsend</strong> Stability Boot Series are designed for short-term use, and shouldbe worn for less than 180 days by a single user. TSB products are not intended for reuse on a secondpatient. <strong>Townsend</strong> provides a limited 90 day warranty that offers repair or replacement of the boot orcomponents including the foam wraps, inner sole pad and straps. Under normal use and conditions,it is unlikely that these components will wear out. Misuse, abuse or neglect including the placement ofboots in the trunk of a car in temperatures that exceed 140 degrees can potentially void the warranty.This device is not guaranteed to prevent injuries or reduce or eliminate the risk of re-injury. <strong>Townsend</strong>Stability Boots are not designed or intended to be worn by patients who weigh more than 250 lbs.SEE REVERSE SIDE FOR FITTING INSTRUCTIONS4615 Shepard StreetBakersfield, CA 93313661.837.1795REV A 02/10
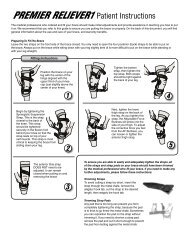
<strong>Townsend</strong> <strong>Design</strong> TD WALKER<strong>Fitting</strong> <strong>Instructions</strong>The <strong>Townsend</strong> <strong>Design</strong> TD Walker comes packaged in a protective plastic wrap that includes aproduct code and sizing label. The TD Walker is comprised of these components:Foam padding (bootie) that surrounds the foot and lower leg2 forefoot straps and 3 calf straps<strong>Fitting</strong> guide and product information sheetPlease follow these simple application instructions:1. Remove the TD Walker from the large protective plastic bag and detach the foam bootie. DO NOTremove the plastic sleeves that are over the uprights. These plastic sleeves must remain overthe uprights during the initial phases of the fitting procedure.2. (See Picture, Right) Open the leg and foot sections of the foam bootie by releasing the Velcrohook from the foam. Have the patient slide their foot and lower leg into the bootie.3. (See Picture, Right) Close the bootie, making sure that the foam is wrapped snugly around thepatient’s limb. The pre-sized bootie is designed with sewn edges, and you should not have to trimit to size (it can be cut, however, if needed).4. Make sure that the plastic sleeves over the uprights are still completely covering the Velcro hookthat is attached to the inside of the uprights. Have the patient place his or her foot in the aluminumshell between the two uprights. The foot should be positioned so the uprights are centered at midlineon the side of the leg.5. To optimize stabilization, the uprights can be contoured to ensure an intimate alignment with thesides of the calf. There are also foam comfort pads mounted on the inside of the uprights (near theankles) that can be moved to enhance comfort, or that can be removed to increase the medial-lateralwidth between the uprights.6. (See Picture, Right) When you are sure the uprights are properly contoured and in the properalignment (centered at midline on the sides of the leg), remove the plastic sleeves from the uprights.The Velcro hook on the inside of the uprights will lock onto the foam bootie.7. (See Picture, Right) Tighten the two forefoot straps that secure the patient’s foot in the boot. Theforefoot straps should fit snugly. These straps can be adjusted by simply loosening or tightening theVelcro hook tabs. Any excessive material can also be trimmed off for a cleaner look.8. (See Picture, Right) Tighten the three straps that secure the lower limb between the uprights,starting with the strap closest to the ankle. These straps are in alternating directions to preventrotation. The three straps should be tightened firmly.9. Have the patient ambulate in the boot to ensure the walker is fitting and functioning properly.REMOVING THE BOOT — If the patient is allowed to remove the boot during their recovery, orwhen the boot is removed during a progress check-up, the straps should be released and the Velcrohook that closes the bootie should be opened to allow the patient to step out of the boot WITH THEBOOTIE STILL LOCKED IN POSITION IN THE TD WALKER SHELL. This will enable the patientto easily reapply the bootie and boot with the proper leg alignment.23678If you have questions about the boot you receive, or the application instructions, please call800.432.3466.
INFORMATION & FITTING INSTRUCTIONS FOR MEDICAL PROFESSIONALSAluminum uprights are fixed at 90 degrees andcan be contoured to the leg.Minimum dorsal flexion of metatarsals.Stabilizing rocker bottom allows patient toambulate naturally and comfortably.TD AIR WALKERCLINICAL INDICATIONSThe TD AIR Walker, introduced in 2005 as part of the <strong>Townsend</strong> Stability Boot Series, is prescribedfor a variety of foot, toe and ankle injuries and surgeries. Clinical indications include grade 1, 2 and 3ankle sprains and stable or internally fixed fractures of the foot or ankle. CONTRAINDICATIONS: Notintended for unstable fractures or for fractures of the proximal tibia or fibula.AVAILABLE MODELS AND OPTIONSThe <strong>Townsend</strong> Stability Boot Series includes the original TSB and TSB-MC (mid calf height) that include<strong>Townsend</strong>’s StableLock technology and other exclusive features. <strong>Townsend</strong> also offers the standardTD Walker, TD ROM Walker, with hinges that can be set to provide limited range-of-motion, and the TDAIR ROM Walker that features a pneumatic bootie for added compression and patient comfort.WARRANTY & DISCLAIMERProducts sold as part of the <strong>Townsend</strong> Stability Boot Series are designed for short-term use, and shouldbe worn for less than 180 days by a single user. TSB products are not intended for reuse on a secondpatient. <strong>Townsend</strong> provides a limited 90 day warranty that offers repair or replacement of the boot orcomponents including the foam wraps, inner sole pad and straps. Under normal use and conditions,it is unlikely that these components will wear out. Misuse, abuse or neglect including the placement ofboots in the trunk of a car in temperatures that exceed 140 degrees can potentially void the warranty.This device is not guaranteed to prevent injuries or reduce or eliminate the risk of re-injury. <strong>Townsend</strong>Stability Boots are not designed or intended to be worn by patients who weigh more than 250 lbs.SEE REVERSE SIDE FOR FITTING INSTRUCTIONS4615 Shepard StreetBakersfield, CA 93313661.837.1795REV A 02/10
<strong>Townsend</strong> <strong>Design</strong> TD AIR WALKER<strong>Fitting</strong> <strong>Instructions</strong>The <strong>Townsend</strong> <strong>Design</strong> TD AIR Walker comes packaged in a protective plastic wrap that includesa product code and sizing label. The TD Air Walker is comprised of these components:Foam bootie that surrounds the foot and lower leg -- with built-in pneumatic bladder2 forefoot straps and 2 calf straps (third calf strap is attached to the bootie with pump-up ball)<strong>Fitting</strong> guide and product information sheetPlease follow these simple application instructions:1. Remove the TD AIR Walker from the large protective plastic bag and detach the foam bootie. DONOT remove the plastic sleeves that are over the uprights. These plastic sleeves must remainover the uprights during the initial phases of the fitting procedure.2. (See Picture, Right) Open the leg and foot sections of the foam bootie by releasing the Velcrohook from the foam. Have the patient slide their foot and lower leg into the bootie.233. (See Picture, Right) Close the bootie, making sure that the foam is wrapped snugly around thepatient’s limb. The pre-sized bootie is designed with sewn edges, and you should not have to trimit to size (it can be cut, however, if needed).4. Make sure that the plastic sleeves over the uprights are still completely covering the Velcro hookthat is attached to the inside of the uprights. Have the patient place his or her foot in the aluminumshell between the two uprights. The foot should be positioned so the uprights are centered atmidline on the side of the leg.65. To optimize stabilization, the uprights can be contoured to ensure an intimate alignment with thesides of the calf. There are also foam comfort pads mounted on the inside of the uprights (nearthe ankles) that can be moved to enhance comfort, or that can be removed to increase the mediallateralwidth between the uprights.6. (See Picture, Right) When you are sure the uprights are properly contoured and in the properalignment (centered at midline on the sides of the leg), remove the plastic sleeves from the uprights.The Velcro hook on the inside of the uprights will lock onto the foam bootie.77. (See Picture, Right) Tighten the two forefoot straps that secure the patient’s foot in the boot. Theforefoot straps should fit snugly. These straps can be adjusted by simply loosening or tighteningthe Velcro hook tabs. Any excessive material can also be trimmed off for a cleaner look.8. (See Picture, Right) Then tighten the two straps that secure the lower limb between the uprights,starting with the strap closest to the ankle. The last strap (attached to the pneumatic bootie) shouldbe secured snugly around the uprights to ensure intimate contact and proper limb alignment.9. (See Picture, Right) To increase compression, the pneumatic bladder can be inflated by compressingthe blue ball pump on the anterior aspect of the bootie. To deflate the pneumatic bladder(to reduce compression), PUSH IN and hold the black valve located directly below the blue ballpump.810. Have the patient ambulate in the boot to ensure the walker is fitting and functioning properly.REMOVING THE BOOT — If the patient is allowed to remove the boot during their recovery, orwhen the boot is removed during a progress check-up, the straps should be released and the Velcrohook that closes the bootie should be opened to allow the patient to step out of the boot WITHTHE BOOTIE STILL LOCKED IN POSITION IN THE TD AIR WALKER SHELL. This will enablethe patient to easily reapply the bootie and boot with the proper leg alignment.If you have questions about the boot you receive, or the application instructions, pleasecall 800.432.3466.9
INFORMATION & FITTING INSTRUCTIONS FOR MEDICAL PROFESSIONALSTD ROM WALKERAluminum uprights that can be contoured to theleg, with adjustable ROM HInges.Minimum dorsal flexion of metatarsals.Stabilizing rocker bottom allows patient toambulate naturally and comfortably.CLINICAL INDICATIONSThe TD ROM Walker, introduced in 2005 as part of the <strong>Townsend</strong> Stability Boot Series, is prescribedfor a variety of foot, toe and ankle injuries and surgeries. Clinical indications include grade 1, 2 and 3ankle sprains and stable or internally fixed fractures of the foot or ankle. CONTRAINDICATIONS: Notintended for unstable fractures or for fractures of the proximal tibia or fibula.AVAILABLE MODELS AND OPTIONSThe <strong>Townsend</strong> Stability Boot Series includes the original TSB and TSB-MC (mid calf height) that include<strong>Townsend</strong>’s StableLock technology and other exclusive features. <strong>Townsend</strong> also offers the standard TDWalker, the TD AIR ROM Walker that features a pneumatic bootie for added compression and patientcomfort.WARRANTY & DISCLAIMERProducts sold as part of the <strong>Townsend</strong> Stability Boot Series are designed for short-term use, and shouldbe worn for less than 180 days by a single user. TSB products are not intended for reuse on a secondpatient. <strong>Townsend</strong> provides a limited 90 day warranty that offers repair or replacement of the boot orcomponents including the foam wraps, inner sole pad and straps. Under normal use and conditions,it is unlikely that these components will wear out. Misuse, abuse or neglect including the placement ofboots in the trunk of a car in temperatures that exceed 140 degrees can potentially void the warranty.This device is not guaranteed to prevent injuries or reduce or eliminate the risk of re-injury. <strong>Townsend</strong>Stability Boots are not designed or intended to be worn by patients who weigh more than 250 lbs.SEE REVERSE SIDE FOR FITTING INSTRUCTIONS4615 Shepard StreetBakersfield, CA 93313661.837.1795REV A 02/10
<strong>Townsend</strong> <strong>Design</strong> TD ROM WALKER<strong>Fitting</strong> <strong>Instructions</strong>The <strong>Townsend</strong> <strong>Design</strong> TD ROM Walker comes packaged in a protective plastic wrap that includesa product code and sizing label. The TD ROM Walker is comprised of these components:Foam bootie that surrounds the foot and lower leg2 forefoot straps and 3 calf straps<strong>Fitting</strong> guide and product information sheet¼” Allen key for ROM Hinge adjustmentPlease follow these simple application instructions:1. Remove the TD ROM Walker from the large protective plastic bag and detach the foam bootie.DO NOT remove the plastic sleeves that are over the uprights. These plastic sleeves must remainover the uprights during the initial phases of the fitting procedure.2. (See Picture, Right) Open the leg and foot sections of the foam bootie by releasing the Velcrohook from the foam. Have the patient slide their foot and lower leg into the bootie.233. (See Picture, Right) Close the bootie, making sure that the foam is wrapped snugly around thepatient’s limb. The pre-sized bootie is designed with sewn edges, and you should not have to trimit to size (it can be cut, however, if needed).4. (See Picture, Right) To adjust the ROM stops, use the 1/4” Allen key provided with the walkerand remove the Allen bolt. Rotate the acrylic cap to the position where the flexion/extesnion lockpins are set. Reposition the pins in the desired holes, rotate the cap to its original position, reinsertthe Allen bolt and tighten it securely with the Allen key.5. Make sure that the plastic sleeves over the uprights are still completely covering the Velcro hookthat is attached to the inside of the uprights. Have the patient place his or her foot in the aluminumshell between the two uprights. The foot should be positioned so the uprights are centered at midlineon the side of the leg.6. To optimize stabilization, the uprights can be contoured to ensure an intimate alignment with thesides of the calf. There are also foam comfort pads mounted on the inside of the uprights (near theankles) that can be moved to enhance comfort, or that can be removed to increase the medial-lateralwidth between the uprights.7. (See Picture, Right) When you are sure the uprights are properly contoured and in the properalignment (centered at midline on the sides of the leg), remove the plastic sleeves from the uprights.The Velcro hook on the inside of the uprights will lock onto the foam bootie.8. (See Picture, Right) Tighten the two forefoot straps that secure the patient’s foot in the boot. Theforefoot straps should fit snugly. These straps can be adjusted by simply loosening or tightening theVelcro hook tabs. Any excessive material can also be trimmed off for a cleaner look.9. (See Picture, Right) Tighten the three straps that secure the lower limb between the uprights,starting with the strap closest to the ankle. These straps are in alternating directions to preventrotation. The three straps should be tightened firmly.10. Have the patient ambulate in the boot to ensure the walker is fitting and functioning properly.REMOVING THE BOOT — If the patient is allowed to remove the boot during their recovery, orwhen the boot is removed during a progress check-up, the straps should be released and the Velcrohook that closes the bootie should be opened to allow the patient to step out of the boot WITH THEBOOTIE STILL LOCKED IN POSITION IN THE TD ROM WALKER SHELL. This will enable thepatient to easily reapply the bootie and boot with the proper leg alignment.If you have questions about the boot you receive, or the application instructions, please call800.432.3466.4789
INFORMATION & FITTING INSTRUCTIONS FOR MEDICAL PROFESSIONALSAluminum uprights that can be contoured to theleg, with adjustable ROM HInges.Minimum dorsal flexion of metatarsals.Stabilizing rocker bottom allows patient toambulate naturally and comfortably.TD AIRROM WALKERCLINICAL INDICATIONSThe TD AIR ROM Walker, introduced in 2005 as part of the <strong>Townsend</strong> Stability Boot Series, is prescribedfor a variety of foot, toe and ankle injuries and surgeries. Clinical indications include grade 1, 2 and 3ankle sprains and stable or internally fixed fractures of the foot or ankle. CONTRAINDICATIONS: Notintended for unstable fractures or for fractures of the proximal tibia or fibula.AVAILABLE MODELS AND OPTIONSThe <strong>Townsend</strong> Stability Boot Series includes the original TSB and TSB-MC (mid calf height) that include<strong>Townsend</strong>’s StableLock technology and other exclusive features. <strong>Townsend</strong> also offers the standard TDWalker, the TD-MC (mid calf) Walker, and the ROM Walker with adjustable range of motion.WARRANTY & DISCLAIMERProducts sold as part of the <strong>Townsend</strong> Stability Boot Series are designed for short-term use, and shouldbe worn for less than 180 days by a single user. TSB products are not intended for reuse on a secondpatient. <strong>Townsend</strong> provides a limited 90 day warranty that offers repair or replacement of the boot orcomponents including the foam wraps, inner sole pad and straps. Under normal use and conditions,it is unlikely that these components will wear out. Misuse, abuse or neglect including the placement ofboots in the trunk of a car in temperatures that exceed 140 degrees can potentially void the warranty.This device is not guaranteed to prevent injuries or reduce or eliminate the risk of re-injury. <strong>Townsend</strong>Stability Boots are not designed or intended to be worn by patients who weigh more than 250 lbs.SEE REVERSE SIDE FOR FITTING INSTRUCTIONS4615 Shepard StreetBakersfield, CA 93313661.837.1795REV A 02/10
<strong>Townsend</strong> TD AIR ROM WALKER<strong>Fitting</strong> <strong>Instructions</strong>The <strong>Townsend</strong> <strong>Design</strong> TD AIR ROM Walker comes packaged in a protective plastic wrap that includesa product code and sizing label. The TD AIR ROM Walker includes these components:Foam bootie that surrounds the foot and lower leg -- with built-in pneumatic bladder2 forefoot straps and 2 calf straps (upper calf strap is attached to the bootie)<strong>Fitting</strong> guide and product information sheet¼” Allen key for ROM Hinge adjustmentPlease follow these simple application instructions:1. Remove the TD AIR ROM Walker from the large protective plastic bag and detach the foam bootie.DO NOT remove the plastic sleeves that are over the uprights. These plastic sleeves must remainover the uprights during the initial phases of the fitting procedure.232. Open the leg and foot sections of the foam bootie by releasing the Velcro hook from the foam.Have the patient slide their foot and lower leg into the bootie.3. (See Picture, Right) Close the bootie, making sure that the foam is wrapped snugly around thepatient’s limb. The pre-sized bootie has sewn edges, and you should not have to trim it.4. (See Picture, Right) To adjust the ROM stops, use the 1/4” Allen key provided with the walkerand remove the Allen bolt. Rotate the acrylic cap to the position where the flexion/extesnion lockpins are set. Reposition the pins in the desired holes, rotate the cap to its original position, reinsertthe Allen bolt and tighten it securely with the Allen key.5. Make sure that the plastic sleeves over the uprights are still completely covering the Velcro hookthat is attached to the inside of the uprights. Have the patient place his or her foot in the aluminumshell between the two uprights. The foot should be positioned so the uprights are centered at midlineon the side of the leg.6. To optimize stabilization, the uprights can be contoured to ensure an intimate fit. There are also foamcomfort pads mounted on the inside of the uprights (near the ankles) that can be moved to enhancecomfort, or that can be removed to increase the medial-lateral width between the uprights.7. (See Picture, Right) When you are sure the uprights are properly contoured and in the properalignment (centered at midline on the sides of the leg), remove the plastic sleeves from the uprights.The Velcro hook on the inside of the uprights will lock onto the foam bootie.8. (See Picture, Right) Tighten the two forefoot straps that secure the patient’s foot in the boot. Theforefoot straps should fit snugly. These straps can be adjusted by simply loosening or tightening theVelcro hook tabs. Any excessive material can also be trimmed off for a cleaner look.9. (See Picture, Right) Then tighten the two straps that secure the lower limb between the uprights,starting with the strap closest to the ankle. The last strap (attached to the pneumatic bootie) shouldbe secured snugly around the uprights to ensure intimate contact and proper limb alignment.10. (See Picture, Right) To increase compression, the pneumatic bladder can be inflated bycompressing the blue ball pump on the anterior aspect of the bootie. To deflate the pneumaticbladder (to reduce compression), PUSH IN and hold the black valve located directly below the blueball pump.REMOVING THE BOOT — If the patient is allowed to remove the boot during their recovery, orwhen the boot is removed during a progress check-up, the straps should be released and the Velcrohook that closes the bootie should be opened to allow the patient to step out of the boot WITH THEBOOTIE STILL LOCKED IN POSITION IN THE TD AIR ROM WALKER SHELL. This will enablethe patient to easily reapply the bootie and boot with the proper leg alignment.If you have questions about the boot you receive, or the application instructions, please call800.432.3466.478910
INFORMATION & FITTING INSTRUCTIONS FOR MEDICAL PROFESSIONALSTD-MC AIR WALKERAluminum uprights are fixed at 90 degrees andcan be contoured to the leg.Minimum dorsal flexion of metatarsals.Stabilizing rocker bottom allows patient toambulate naturally and comfortably.CLINICAL INDICATIONSThe TD-MC (mid calf) Air Walker is prescribed for a variety of foot, toe and ankle injuries and surgeries.Clinical indications include grade 1, 2 and 3 ankle sprains and stable or internally fixed fractures of thefoot or ankle. CONTRAINDICATIONS: Not intended for unstable fractures or for fractures of the proximaltibia or fibula.AVAILABLE MODELS AND OPTIONSThe <strong>Townsend</strong> Stability Boot Series includes the original TSB and TSB-MC (mid calf height) that include<strong>Townsend</strong>’s StableLock technology and other exclusive features. <strong>Townsend</strong> also offers the standardheight TD Walker, shorter TD-MC Walker, TD ROM Walker with hinges that can be set to provide limitedrange-of-motion, and the TD Air Walker and TD AIR ROM Walker that feature a pneumatic bootie foradded compression and patient comfort.WARRANTY & DISCLAIMERProducts sold as part of the <strong>Townsend</strong> Stability Boot Series are designed for short-term use, and shouldbe worn for less than 180 days by a single user. TSB products are not intended for reuse on a secondpatient. <strong>Townsend</strong> provides a limited 90 day warranty that offers repair or replacement of the boot orcomponents including the foam wraps, inner sole pad and straps. Under normal use and conditions,it is unlikely that these components will wear out. Misuse, abuse or neglect including the placement ofboots in the trunk of a car in temperatures that exceed 140 degrees can potentially void the warranty.This device is not guaranteed to prevent injuries or reduce or eliminate the risk of re-injury. <strong>Townsend</strong>Stability Boots are not designed or intended to be worn by patients who weigh more than 250 lbs.SEE REVERSE SIDE FOR FITTING INSTRUCTIONS4615 Shepard StreetBakersfield, CA 93313661.837.1795REV A 02/10
<strong>Townsend</strong> <strong>Design</strong> TD-MC AIR WALKER<strong>Fitting</strong> <strong>Instructions</strong>The <strong>Townsend</strong> <strong>Design</strong> TD-MC AIR Walker comes packaged in a protective plastic wrap that includesa product code and sizing label. The TD-MC Air Walker is comprised of these components:Foam bootie that surrounds the foot and lower leg -- with built-in pneumatic bladder2 forefoot straps and 2 calf straps (third calf strap is attached to the bootie with pump-up ball)<strong>Fitting</strong> guide and product information sheetPlease follow these simple application instructions:1. Remove the TD-MC AIR Walker from the large protective plastic bag and detach the foam bootie.DO NOT remove the plastic sleeves that are over the uprights. These plastic sleeves mustremain over the uprights during the initial phases of the fitting procedure.2. (See Picture, Right) Open the leg and foot sections of the foam bootie by releasing the Velcrohook from the foam. Have the patient slide their foot and lower leg into the bootie.233. (See Picture, Right) Close the bootie, making sure that the foam is wrapped snugly around thepatient’s limb. The pre-sized bootie is designed with sewn edges, and you should not have to trimit to size (it can be cut, however, if needed).4. Make sure that the plastic sleeves over the uprights are still completely covering the Velcro hookthat is attached to the inside of the uprights. Have the patient place his or her foot in the aluminumshell between the two uprights. The foot should be positioned so the uprights are centered atmidline on the side of the leg.65. To optimize stabilization, the uprights can be contoured to ensure an intimate alignment with thesides of the calf. There are also foam comfort pads mounted on the inside of the uprights (nearthe ankles) that can be moved to enhance comfort, or that can be removed to increase the mediallateralwidth between the uprights.6. (See Picture, Right) When you are sure the uprights are properly contoured and in the properalignment (centered at midline on the sides of the leg), remove the plastic sleeves from the uprights.The Velcro hook on the inside of the uprights will lock onto the foam bootie.77. (See Picture, Right) Tighten the two forefoot straps that secure the patient’s foot in the boot. Theforefoot straps should fit snugly. These straps can be adjusted by simply loosening or tighteningthe Velcro hook tabs. Any excessive material can also be trimmed off for a cleaner look.8. (See Picture, Right) Then tighten the two straps that secure the lower limb between the uprights,starting with the strap closest to the ankle. The last strap (attached to the pneumatic bootie) shouldbe secured snugly around the uprights to ensure intimate contact and proper limb alignment.9. (See Picture, Right) To increase compression, the pneumatic bladder can be inflated by compressingthe blue ball pump on the anterior aspect of the bootie. To deflate the pneumatic bladder(to reduce compression), PUSH IN and hold the black valve located directly below the blue ballpump.810. Have the patient ambulate in the boot to ensure the walker is fitting and functioning properly.REMOVING THE BOOT — If the patient is allowed to remove the boot during their recovery, orwhen the boot is removed during a progress check-up, the straps should be released and the Velcrohook that closes the bootie should be opened to allow the patient to step out of the boot WITH THEBOOTIE STILL LOCKED IN POSITION IN THE TD-MC AIR WALKER SHELL. This will enablethe patient to easily reapply the bootie and boot with the proper leg alignment.If you have questions about the boot you receive, or the application instructions, pleasecall 800.432.3466.9
INFORMATION & FITTING INSTRUCTIONS FOR MEDICAL PROFESSIONALSAluminum uprights are fixed at 90 degrees andcan be contoured to the leg.Minimum dorsal flexion of metatarsals.Stabilizing rocker bottom allows patient toambulate naturally and comfortably.TD-MC WALKERCLINICAL INDICATIONSThe TD-MC (mid calf) Walker, introduced in 2005 as part of the <strong>Townsend</strong> Stability Boot Series, isprescribed for a variety of foot, toe and ankle injuries and surgeries. Clinical indications include grade 1, 2and 3 ankle sprains and stable or internally fixed fractures of the foot or ankle. CONTRAINDICATIONS:Not intended for unstable fractures or for fractures of the proximal tibia or fibula.AVAILABLE MODELS AND OPTIONSThe <strong>Townsend</strong> Stability Boot Series includes the original TSB and TSB-MC (mid calf height) that include<strong>Townsend</strong>’s StableLock technology and other exclusive features. <strong>Townsend</strong> also offers the standardheight TD Walker, TD ROM Walker, with hinges that can be set to provide limited range-of-motion, andthe TD Air Walker and TD AIR ROM Walker that feature a pneumatic bootie for added compressionand patient comfort.WARRANTY & DISCLAIMERProducts sold as part of the <strong>Townsend</strong> Stability Boot Series are designed for short-term use, and shouldbe worn for less than 180 days by a single user. TSB products are not intended for reuse on a secondpatient. <strong>Townsend</strong> provides a limited 90 day warranty that offers repair or replacement of the boot orcomponents including the foam wraps, inner sole pad and straps. Under normal use and conditions,it is unlikely that these components will wear out. Misuse, abuse or neglect including the placement ofboots in the trunk of a car in temperatures that exceed 140 degrees can potentially void the warranty.This device is not guaranteed to prevent injuries or reduce or eliminate the risk of re-injury. <strong>Townsend</strong>Stability Boots are not designed or intended to be worn by patients who weigh more than 250 lbs.SEE REVERSE SIDE FOR FITTING INSTRUCTIONS4615 Shepard StreetBakersfield, CA 93313661.837.1795REV A 02/10
<strong>Townsend</strong> <strong>Design</strong> TD-MC WALKER<strong>Fitting</strong> <strong>Instructions</strong>The <strong>Townsend</strong> <strong>Design</strong> TD-MC (Mid Calf) Walker comes packaged in a protective plastic wrap thatincludes a product code and sizing label. The TD-MC Walker is comprised of these components:Foam padding (bootie) that surrounds the foot and lower leg2 forefoot straps and 2 calf straps<strong>Fitting</strong> guide and product information sheetPlease follow these simple application instructions:1. Remove the TD-MC Walker from the large protective plastic bag and detach the foam bootie. DONOT remove the plastic sleeves that are over the uprights. These plastic sleeves must remainover the uprights during the initial phases of the fitting procedure.2. (See Picture, Right) Open the leg and foot sections of the foam bootie by releasing the Velcrohook from the foam. Have the patient slide their foot and lower leg into the bootie.3. (See Picture, Right) Close the bootie, making sure that the foam is wrapped snugly around thepatient’s limb. The pre-sized bootie is designed with sewn edges, and you should not have to trimit to size (it can be cut, however, if needed).4. Make sure that the plastic sleeves over the uprights are still completely covering the Velcro hookthat is attached to the inside of the uprights. Have the patient place his or her foot in the aluminumshell between the two uprights. The foot should be positioned so the uprights are centered at midlineon the side of the leg.5. To optimize stabilization, the uprights can be contoured to ensure an intimate alignment withthe sides of the calf. There are also foam comfort pads mounted on the inside of the uprights (nearthe ankles) that can be moved to enhance comfort, or that can be removed to increase the mediallateralwidth between the uprights.6. (See Picture, Right) When you are sure the uprights are properly contoured and in the properalignment (centered at midline on the sides of the leg), remove the plastic sleeves from the uprights.The Velcro hook on the inside of the uprights will lock onto the foam bootie.7. (See Picture, Right) Tighten the two forefoot straps that secure the patient’s foot in the boot. Theforefoot straps should fit snugly. These straps can be adjusted by simply loosening or tighteningthe Velcro hook tabs. Any excessive material can also be trimmed off for a cleaner look.23678. (See Picture, Right) Tighten the two calf straps that secure the lower limb between the uprights,starting with the strap closest to the ankle. These straps are in alternating directions to preventrotation. The twostraps should be tightened firmly.9. Have the patient ambulate in the boot to ensure the walker is fitting and functioning properly.REMOVING THE BOOT — If the patient is allowed to remove the boot during their recovery, orwhen the boot is removed during a progress check-up, the straps should be released and the Velcrohook that closes the bootie should be opened to allow the patient to step out of the boot WITH THEBOOTIE STILL LOCKED IN POSITION IN THE TD-MC WALKER SHELL. This will enable thepatient to easily reapply the bootie and boot with the proper leg alignment.8If you have questions about the boot you receive, or the application instructions, please call800.432.3466.