

Double Insulated Portable Electric Drill Instruction manual
Double Insulated Portable Electric Drill Instruction manual
Double Insulated Portable Electric Drill Instruction manual

You also want an ePaper? Increase the reach of your titles
YUMPU automatically turns print PDFs into web optimized ePapers that Google loves.
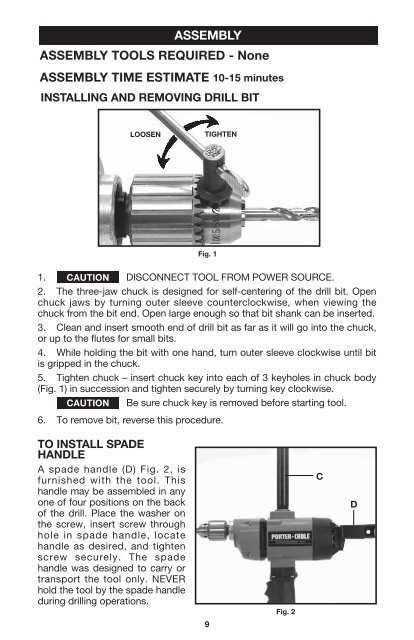
ASSEMBLYASSEMBLY TOOLS REQUIRED - NoneASSEMBLY TIME ESTIMATE 10-15 minutesINSTALLING AND REMOVING DRILL BITLOOSENTIGHTENFig. 11. DISCONNECT TOOL FROM POWER SOURCE.2. The three-jaw chuck is designed for self-centering of the drill bit. Openchuck jaws by turning outer sleeve counterclockwise, when viewing thechuck from the bit end. Open large enough so that bit shank can be inserted.3. Clean and insert smooth end of drill bit as far as it will go into the chuck,or up to the flutes for small bits.4. While holding the bit with one hand, turn outer sleeve clockwise until bitis gripped in the chuck.5. Tighten chuck – insert chuck key into each of 3 keyholes in chuck body(Fig. 1) in succession and tighten securely by turning key clockwise.Be sure chuck key is removed before starting tool.6. To remove bit, reverse this procedure.TO INSTALL SPADEHANDLEA spade handle (D) Fig. 2, isfurnished with the tool. Thishandle may be assembled in anyone of four positions on the backof the drill. Place the washer onthe screw, insert screw throughhole in spade handle, locatehandle as desired, and tightenscrew securely. The spadehandle was designed to carry ortransport the tool only. NEVERhold the tool by the spade handleduring drilling operations.9Fig. 2CD


