Barco Line Doubler Kit for RCVDS 05 Installation ... - CurtPalme.com
Barco Line Doubler Kit for RCVDS 05 Installation ... - CurtPalme.com
Barco Line Doubler Kit for RCVDS 05 Installation ... - CurtPalme.com

You also want an ePaper? Increase the reach of your titles
YUMPU automatically turns print PDFs into web optimized ePapers that Google loves.
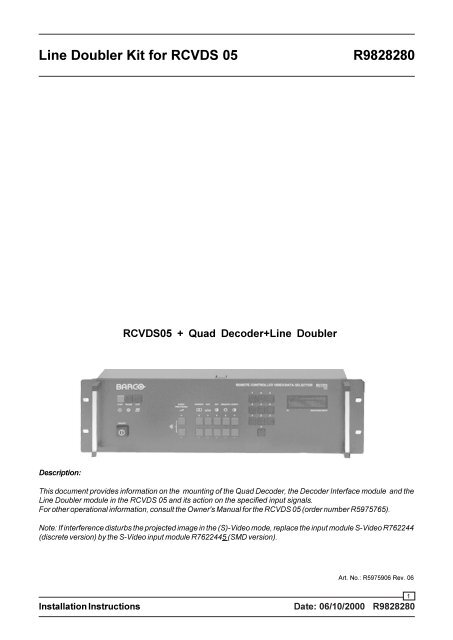
<strong>Line</strong> <strong>Doubler</strong> <strong>Kit</strong> <strong>for</strong> <strong>RCVDS</strong> <strong>05</strong>R9828280<strong>RCVDS</strong><strong>05</strong> + Quad Decoder+<strong>Line</strong> <strong>Doubler</strong>Description:This document provides in<strong>for</strong>mation on the mounting of the Quad Decoder, the Decoder Interface module and the<strong>Line</strong> <strong>Doubler</strong> module in the <strong>RCVDS</strong> <strong>05</strong> and its action on the specified input signals.For other operational in<strong>for</strong>mation, consult the Owner's Manual <strong>for</strong> the <strong>RCVDS</strong> <strong>05</strong> (order number R5975765).Note: If interference disturbs the projected image in the (S)-Video mode, replace the input module S-Video R762244(discrete version) by the S-Video input module R7622445 (SMD version).Art. No.: R5975906 Rev. 06<strong>Installation</strong> InstructionsDate: 06/10/2000 R98282801
<strong>Line</strong> <strong>Doubler</strong> <strong>Kit</strong> <strong>for</strong> <strong>RCVDS</strong> <strong>05</strong>R9828280ATTENTIONTo use the Quad Decoder feature in the <strong>RCVDS</strong><strong>05</strong>, an adapted<strong>com</strong>munication software is required (see page 3)KIT R762710KIT R762709<strong>Line</strong> <strong>Doubler</strong>R7625625Quad DecoderR7627455Decoder interfaceR7627<strong>05</strong>10-wire CableZ34841069-wire CableZ34850911-wire CableZ3495112Screw R360862Parts Listing <strong>for</strong> the <strong>Kit</strong> R9828280SpacerR367614SpacerR367614Parts Listing <strong>for</strong> the <strong>Kit</strong> R762709ITEM NO. DESCRIPTION QUANTITY ITEM NO. DESCRIPTION QUANTITYR32861910 U_S <strong>RCVDS</strong><strong>05</strong> 310 1R593010 BAG PE 80X 120X0.06 WL 1R593472 BOXBLKAST 82X 55X 20 1R593545 BAG ASTSH 203X 3<strong>05</strong> 2R593546 BAG ASTSH 152X 254 1R5975896 MAN SER EP51 <strong>RCVDS</strong><strong>05</strong>DCOMB 1R5975906 MAN SER EP51 <strong>RCVDS</strong><strong>05</strong>L_DBL 1R762709 UN LDB EP51C <strong>RCVDS</strong><strong>05</strong> 1R762710 UN DEC EP51C <strong>RCVDS</strong><strong>05</strong> +INT 1R804793 BOX509AST 300X300X 55 2NB 1R367614 SPR L25 M 3 H 5 NBRNI 6R7625625 UN LDB PJ53 *701 1V3247535 SPR L 1.5 D 3.1D 4.5 BRNI 2Z348509 CD CT FTFT P 9 100 1Z3495106 CD CT FTFT P10 120 1Z3495112 CD CT FTFT P11 130 1Parts listing <strong>for</strong> the <strong>Kit</strong> R762710ITEM NO. DESCRIPTION QUANTITYR360862 SCR Z$7985 M 3 X 8 STZY 7R367614 SPR L25 M 3 H 5 NBRNI 3R7627<strong>05</strong> UN INT EP51 <strong>RCVDS</strong><strong>05</strong> COMB 1R7627455 UN DEC PJ53 *808S COMB_F 1Mounting InstructionsDate: 06/10/2000 R98282802
<strong>Line</strong> <strong>Doubler</strong> <strong>Kit</strong> <strong>for</strong> <strong>RCVDS</strong> <strong>05</strong>R9828280The projector <strong>com</strong>munication software checks the presence of the Quad Decoder inthe <strong>RCVDS</strong> <strong>05</strong> when an input source Video, S-Video or Component Video is selected.When the projector uses the adapted <strong>com</strong>munication software (see table below), theseinput signal types are converted to RGB/S output signals.IR RemoteControlCommunication linkInput SourcesVideoS-VideoComponent Video<strong>RCVDS</strong><strong>05</strong>+Quad Decoder+LiDoRGB-S*RGsB*RGB-CS(32kHz)ProjectorLCDProjectorCRTRGB-S/RGsB* Video, S-Video and Component Video with separate Sync are converted into RGB-S Analog Signals.* Component Video with Sync on Y is converted into RGsB Analog Signals.Input module <strong>for</strong> LIDO(R762807)CRT Projector typeSoftware version**LCD Projector typeSoftware version**BARCOVISION 701BARCODATA 701not adaptednot adaptedBARCODATA 5000BARCODATA 8000not adaptednot adaptedBARCOGRAPHICS 801SBARCODATA 801Sfrom V5.30 onfrom V5.30 onBARCOGRAPHICS 8100BARCODATA 2100adapted from releaseadapted from releaseBARCODATA 1101BARCOVISION 1600BARCOGRAPHICS 1208BARCOGRAPHICS 1209BARCODATA 1109BARCOVISION 1609BARCOGRAPHICS 808BARCODATA 808not adaptednot adaptedfrom V5.31 onfrom V5.31 onadapted from releaseadapted from releaseadapted from releaseadapted from releaseBARCODATA 3100 from (V1.07**) - V2.07BARCODATA 3000 from V2.07BARCODATA 5100 from (V1.07**) - V2.07BARCODATA 8100 from (V1.07**) - V2.07** Soft V1.07 is made <strong>for</strong> the earlier type Pixel Map Processor part#R762471.**Software version of the projector can be read on the 'Start Up' or 'Identification' on screen menu.Software OverviewDate: 06/10/2000 R98282803
<strong>Line</strong> <strong>Doubler</strong> <strong>Kit</strong> <strong>for</strong> <strong>RCVDS</strong> <strong>05</strong>R9828280Mechanical disassembly of the <strong>RCVDS</strong> <strong>05</strong> <strong>for</strong> internal mounting of the kit1. Removing the top coverscrewRemove the 8 screws (4 on the top and 2 on each side).Lift top cover clear of unit.2. Removing the front panel (<strong>for</strong> software adaptation)Pull off the power button.EPROM ReplacementDate: 06/10/2000 R98282804
<strong>Line</strong> <strong>Doubler</strong> <strong>Kit</strong> <strong>for</strong> <strong>RCVDS</strong> <strong>05</strong>R9828280Remove the screws holding frontpanel to main frame, two on bottom (A) and one on each side (B)BARemove the 6 screws holding control panel module to frontplateReplace the EPROM IC3 by the one provided in the kit, if the existing software version is lower than 2.10.CHECK: if the TEXT button ispressed <strong>for</strong> a few seconds,the version of the installedsoftware is shown on thefront panel display.EPROM IC3Re-install control panel module and power button following the above steps in reverse succession.EPROM ReplacementDate: 06/10/2000 R982828<strong>05</strong>
<strong>Line</strong> <strong>Doubler</strong> <strong>Kit</strong> <strong>for</strong> <strong>RCVDS</strong> <strong>05</strong>R9828280Mechanical mounting of the Decoder Interface modulePlace the Decoder Interface module on the provided spacers (fig.1) on the main frame. Take care to line up thethreaded holes of the spacers with the holes on the module (fig.2).provided spacersto be plugged in onDecoder Interface moduleSecure the position of the Decoder Interface module by insertion of 3 spacers (A), 2 spacers (B) and two screws(C) as shown below (fig. 2).Fig.1BCABCDecoder Interface moduleAfig. 3Fig.2Mounting InstructionsDate: 06/10/2000 R98282806
<strong>Line</strong> <strong>Doubler</strong> <strong>Kit</strong> <strong>for</strong> <strong>RCVDS</strong> <strong>05</strong>R9828280Interconnection Decoder Interface module, Power Supply and Module frameInterconnection Moduleframe/Decoder InterfacePlug in the 3 provided wirecables on the Decoder InterfaceInterconnection PowerSupply/Decoder Interfaceto be plugged in onDecoder moduleFig.4Mounting the Decoder modulePlace the Decoder module on the 3 provided spacers (fig.4) on the Decoder Interface module. Take care to lineup the threaded holes of the spacers with the holes on the module (fig.5).Secure the position of the Decoder module by insertion of 2 spacers (A) and one screw (C) asshown below (fig. 5).ABCfig. 3ACFig.5Mounting InstructionsDate: 06/10/2000 R98282807
<strong>Line</strong> <strong>Doubler</strong> <strong>Kit</strong> <strong>for</strong> <strong>RCVDS</strong> <strong>05</strong>R9828280Interconnection Decoder module and Decoder Interface module (Fig.4 & Fig.6)Interconnection Decoder/Decoder InterfaceFig.6Mounting the <strong>Line</strong> <strong>Doubler</strong> modulePlace the <strong>Line</strong> <strong>Doubler</strong> module on the 4 provided spacers (fig.6) in the base. Take care to line up the threadedholes of the spacers with the holes on the module (fig.7).Secure the position of the <strong>Line</strong> <strong>Doubler</strong> module by insertion of 4 screws.<strong>Line</strong> <strong>Doubler</strong>Fig.7Mounting InstructionsDate: 06/10/2000 R98282808
<strong>Line</strong> <strong>Doubler</strong> <strong>Kit</strong> <strong>for</strong> <strong>RCVDS</strong> <strong>05</strong>R9828280Interconnection <strong>Line</strong> <strong>Doubler</strong> module and Decoder Interface module (Fig.8)Fig.8Mounting InstructionsDate: 06/10/2000 R98282809
<strong>Line</strong> <strong>Doubler</strong> <strong>Kit</strong> <strong>for</strong> <strong>RCVDS</strong> <strong>05</strong>R9828280Routed inputs through the <strong>Line</strong> <strong>Doubler</strong>Video/S-VideoInputModuleVideoS-VideoSignal transferVideo/S-VideotoR, G, B, S (32 kHz)R (32kHz)G (32kHz)B (32kHz)CS 32kHz)RGBH/CSVideoOutputModuleS-VideoVRRRGB AnalogInput ModuleStandard SyncG/GsBH/CSSignal transferG/Gs VideoBS-VideoH/CSOutputModuleVVRRRGB AnalogInput ModuleTri-Level SyncG/G3sBH/C3SSignal transferVideoG/G3sBS-VideoH/C3SOutputModuleVVComponent VideoInput ModuleInput signal = 15kHzwith Sync on YR-YYB-YSignal transferDecoding theInput signal to RGB+<strong>Line</strong> Doubling (32kHz)R (32kHz)G (32kHz)B (32kHz)CS (32kHz)RG VideoBS-VideoH/CSOutputModuleVComponent VideoInput ModuleInput signal >15kHz*orInput signal = 15kHzwith sep. syncR-YYB-YS/3SSignal transferDecoding theInput signal to RGBSync SeparateRGBCS/3SRVideoG/G3sBS-VideoH/C3SOutputModuleV* Tri-Level SignalLiDo InputModuleRG/GsBSSignal transferRGBs/RGsBtoRGB-S with<strong>Line</strong> Doubling**R (32kHz)G (32kHz)B (32kHz)CS (32kHz)RVideoGBS-VideoH/C3SOutputModuleV** If Fh>15kHz: Signal transfer to RGB with Sync separate on the original frequency11Routed inputs through the <strong>Line</strong> <strong>Doubler</strong>Date: 06/10/2000 R9828280
<strong>Line</strong> <strong>Doubler</strong> <strong>Kit</strong> <strong>for</strong> <strong>RCVDS</strong> <strong>05</strong>R9828280Printed in Belgium12Date: 06/10/2000 R9828280