Wrapid Bond IG.cdr - Canusa-CPS
Wrapid Bond IG.cdr - Canusa-CPS
Wrapid Bond IG.cdr - Canusa-CPS

Create successful ePaper yourself
Turn your PDF publications into a flip-book with our unique Google optimized e-Paper software.
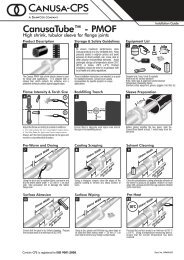
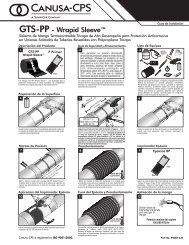
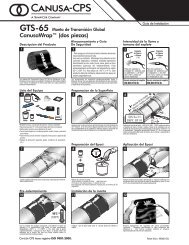
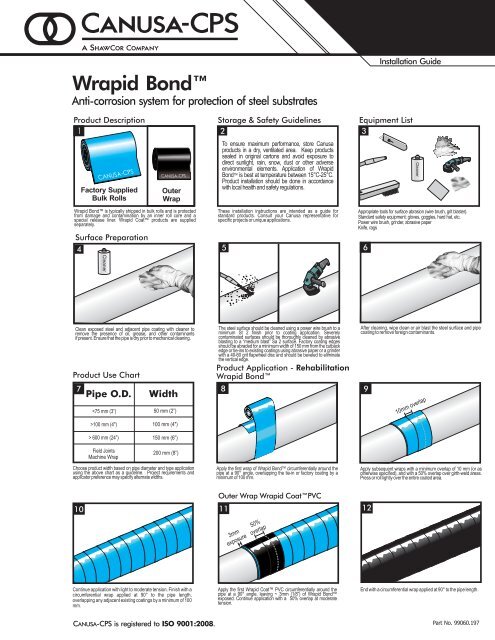
CleanerCleaner<strong>Wrapid</strong> <strong>Bond</strong>Anti-corrosion system for protection of steel substratesProduct Description1CANUSA-<strong>CPS</strong>Factory SuppliedBulk RollsCANUSA-<strong>CPS</strong>OuterWrapStorage & Safety Guidelines2To ensure maximum performance, store <strong>Canusa</strong>products in a dry, ventilated area. Keep productssealed in original cartons and avoid exposure todirect sunlight, rain, snow, dust or other adverseenvironmental elements. Application of <strong>Wrapid</strong><strong>Bond</strong>is best at temperature between 15°C-25°C.Product installation should be done in accordancewith local health and safety regulations.Installation GuideEquipment List3<strong>Wrapid</strong> <strong>Bond</strong>is typically shipped in bulk rolls and is protectedfrom damage and contamination by an inner roll core and aspecial release liner. <strong>Wrapid</strong> Coat products are suppliedseparately.Surface Preparation4These installation instructions are intended as a guide forstandard products. Consult your <strong>Canusa</strong> representative forspecific projects or unique applications.5Appropriate tools for surface abrasion (wire brush, grit blaster).Standard safety equipment; gloves, goggles, hard hat, etc.Power wire brush, grinder, abrasive paperKnife, rags6Clean exposed steel and adjacent pipe coating with cleaner toremove the presence of oil, grease, and other contaminantsif present. Ensure that the pipe is dry prior to mechanical cleaning.Product Use Chart7Pipe O.D.Width100 mm (4")> 600 mm (24”)Field JointsMachine Wrap100 mm (4")150 mm (6”)200 mm (8”)Choose product width based on pipe diameter and type applicationusing the above chart as a guideline. Project requirements andapplicator preference may specify alternate widths.Apply the first wrap of <strong>Wrapid</strong> <strong>Bond</strong> circumferentially around thepipe at a 90° angle, overlapping the tie-in or factory coating by aminimum of 100 mm.Apply subsequent wraps with a minimum overlap of 10 mm (or asotherwise specified), and with a 50% overlap over girth-weld areas.Press or roll lightly over the entire coated area.10Outer Wrap <strong>Wrapid</strong> CoatPVC113mm 50%exposure overlap12Continue application with light to moderate tension. Finish with acircumferential wrap applied at 90° to the pipe length,overlapping any adjacent existing coatings by a minimum of 100mm.Apply the first <strong>Wrapid</strong> Coat PVC circumferentially around thepipe at a 90° angle, leaving ~ 3mm (1/8”) of <strong>Wrapid</strong> <strong>Bond</strong>exposed. Continue application with a 50% overlap at moderatetension.End with a circumferential wrap applied at 90° to the pipe length.CANUSA-<strong>CPS</strong> is registered to ISO 9001:2008.Part No. 99060.197
Product Application - Field Joints13Application - <strong>Wrapid</strong> <strong>Bond</strong>14 15CANUSA-<strong>CPS</strong>Factory SuppliedBulk RollsMeasure the circumference of the of pipe and cut two (2) lengthsof <strong>Wrapid</strong> <strong>Bond</strong> at a length equal plus 75mm (3"). For widecutbacks, additional wraps may be required.Outer Wrap Application Options 1 or 2Option 1. <strong>Wrapid</strong> CoatPVC163mmexposure50%overlapWrap the first length circumferentially around the pipe overlappingthe mainline coating by a minimum of 75 mm (3”) and with oneedge completely covering the weld bead plus 25mm (1") beyondthe edge of bead. Press or roll lightly over the coated area.17Wrap the second length circumferentially around the pipeoverlapping the first length by a minimum of 50mm (2") such that 2layers of <strong>Wrapid</strong> <strong>Bond</strong> completely cover the weld bead andoverlap the mainline coating by a minimum of 75 mm (3”).Press or roll lightly over the coated area.18Apply the first layer circumferentially around the pipe at a 90°angle, leaving ~ 3mm (1/8”) of <strong>Wrapid</strong> <strong>Bond</strong> exposed. Continueapplication with a 50% overlap at moderate tension.End with a circumferential wrap applied at 90° to the pipe length.Apply a circumferential wraps around the pipe at a 90º angle ateach end overlapping the factory coating by 50% of the tapewidth.Option 2. <strong>Wrapid</strong> CoatXL192021Water is needed to activate <strong>Wrapid</strong> Coat XL. Open the foilpouch, remove the roll and submerge in tepid water for 10seconds. Alternatively water could be poured into the pouch. Onceopened, the product cannot be repackaged.22Begin the application at a minimum distance of 150 mm (6") beyondthe Inner Wrap. Apply the first layer circumferentially around the pipeat a 90° angle then begin spiral wrapping subsequent layers followingthe wrapping guideline that is printed on the roll.Apply pressure duringapplication by pulling firmly on the roll as it is applied. Squeeze andmold firmly in the direction of the wrap until tight.23End with a circumferential wrap applied at 90° to the pipe length.For high shear or impact requirements, additional layers maybe specified.Backfilling241. After application of <strong>Wrapid</strong> CoatPVC,backfilling can be done immediately.2. Once the <strong>Wrapid</strong> Coat XL has cured, toa minimum hardness of Shore D 70, thepipe can be backfilled.Apply compression film in the same direction as the previouslayers, starting beyond the outer edge of the <strong>Wrapid</strong> CoatXL,pulling firmly during application. Apply 2 layers of thecompression film over the entire area.Perforate the compression film using a wire brush (or otherperforating device) by tapping firmly on the tape with the metalbristles. Perforation allows the CO² gas generated by the curingprocess to escape. Remove compression film after 10 minutesand discard.www.canusacps.comCanadaCANUSA-<strong>CPS</strong>a division of SHAWCOR LTD.25 Bethridge RoadToronto, OntarioM9W 1M7,CanadaTel: +1 (416) 743-7111Fax: +1 (416) 743-5927U.S.A./Latin AmericaCANUSA-<strong>CPS</strong>SHAWCOR INC.a division of2408 Timberloch PlaceBuilding C-8The Woodlands, Texas77380, U.S.A.Tel: +1 (281) 367-8866Fax: +1 (281) 367-4304Europe/Middle EastCANUSA-<strong>CPS</strong>a division of <strong>Canusa</strong> Systems Ltd.Unit 3, Sterling ParkGatwick RoadCrawley, West SussexEngland RH10 9QTTel: +44 (1293) 541254Fax: +44 (1293) 541777Asia/PacificCANUSA-<strong>CPS</strong>a division of SHAWCOR LTD.#05-31, Blk 52, FrontierUbi Avenue 3Singapore408867Tel +65-6749-8918Fax +65-6749-8919<strong>Canusa</strong> warrants that the product conforms to its chemical and physical description and is appropriate for the use stated on the installation guide when used in compliance with <strong>Canusa</strong>’s written instructions. Since many installationfactors are beyond our control, the user shall determine the suitability of the products for the intended use and assume all risks and liabilities in connection therewith. <strong>Canusa</strong>’s liability is stated in the standard terms and conditions ofsale. <strong>Canusa</strong> makes no other warranty either expressed or implied. All information contained in this installation guide is to be used as a guide and is subject to change without notice. This installation guide supersedes all previousinstallation guides on this product. E&OEPrinted on recycled paper. Recyclable. <strong>IG</strong>-NA-<strong>Wrapid</strong> <strong>Bond</strong>-rev016