
You also want an ePaper? Increase the reach of your titles
YUMPU automatically turns print PDFs into web optimized ePapers that Google loves.
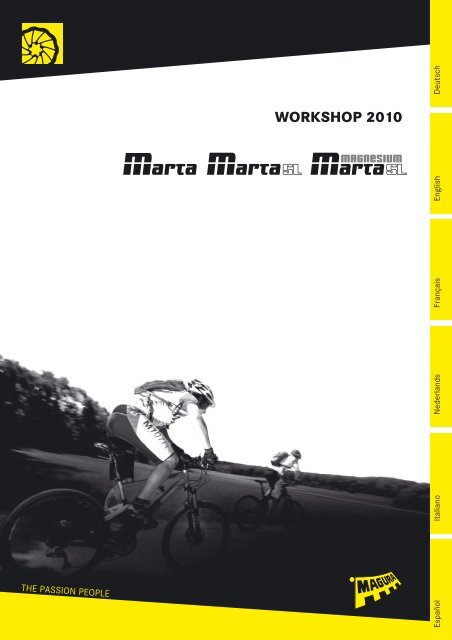
DeutschWORKSHOP 2010Italiano Nederlands FrançaisEnglishTHE PASSION PEOPLETHE PASSION PEOPLEwww.magura.comEspañol
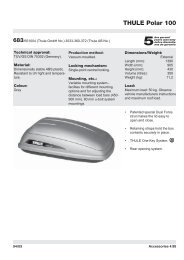
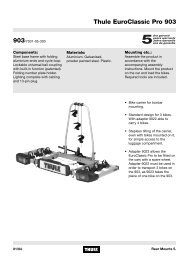
Our disc brake range | recommended useGround contactisn’t that importantto you. There is(almost), no terrainwhere a Freeriderwon’t go. Tough andstable componentsare amust have.Here they are.There are bikers outtherefor whomuphill is just ameans to an end.The downhill fun ishaving absolutepriority for them.With lots of traveland robust componentsthe Endurosmust cope withtechnically hairydownhills and bikeparkweekends..You’re an all-rounder.You love longand sweeping trails,up as well as down.The optimummix oflight weight andstability is the hallmark of yourAllMountain componentsmeant forabroad spectrum ofuse.Mile after mile overthe dusty trails aswell ashard fast tarmac.On every rideyour bike shouldbethe epitome ofuncomplicated –and naturally theparts for your X-country adventuresshouldn’t cost theearth.Race-orientatedmeans for us theminimum weightthat is technicallypossible. Everygram extra weightcan be the decisivefactor between winningor losing foryou, the racermaniac.FREERIDE ENDURO ALL MOUNTAIN X-COUNTRY XC RACEGustav MGustav MMarta SL Magnesium 203/203Marta SL Magnesium 180/180Marta SL Magnesium 160/160Marta SL 203/203Marta SL 180/180Marta SL 160/160Marta 203/203Marta 180/180Marta 160/160Marta SL Magnesium 203/203Marta SL Magnesium 180/180Marta SL 203/203Marta SL 180/180Marta 203/203Marta 180/180Marta SL Magnesium 160/160Marta SL 160/160Marta 160/160Louise 203/203Louise 180/180Louise 160/160Louise 203/203Louise 180/180Louise 160/160Julie HP 203/203Julie HP 180/180Julie HP 160/160Julie HP 203/203Julie HP 180/180Julie HP 160/160Specifications subject to change withoutprior noticeTHE PASSION PEOPLEwww.magura.com
Summary1. Introduction 32. Safety instructions before the first ride 43. Safety instructions before every ride 44. Transport of the bicycle 55. Brake installation 6-96. Shortening the hose 10-117. Maintenance 12-138. Repairs 149. Bleeding and Filling 15-1610. The disc brake wheel 1711. Trouble Shooting 1812. Accessories 1913. Warranty 1914. Spare parts exploded view 20-2115. Tuning adaptors for Postmount caliper 22WARNING:This symbol means possible danger for your health and even life if you do not follow theinstructions given respectively if the necessary safety measures are not followed.ATTENTION:This symbol warns you of inappropriate handling that might cause serious damage to thematerial and/or the environment.NOTE:This symbol gives you additional information about the general handling of theproduct or gives hints to paragraphs in this manual which have to be read carefully.Español Italiano Nederlands Français English Deutsch2
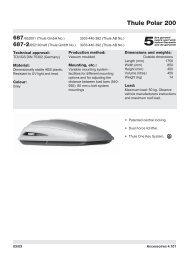
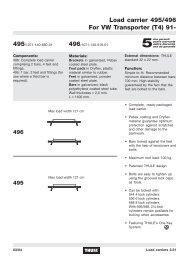
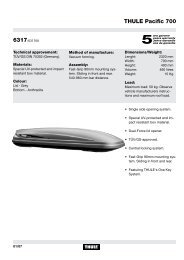
1. Welcome to the Passion People!Brake lever (master cylinder)MAGURA Marta SL MagnesiumCongratulations! You have purchased afully hydraulic MAGURA disc brake proudly„Made in Germany“. You will be amazed athe awesome braking power and the minimumamount of maintenance that is necessaryon our stoppers. Good to know thatyou are not alone, millions of riders worldwiderely on them and every day our numbersare increasing.Brake caliper and rotorMAGURA Marta SL MagnesiumOn the fully hydraulic MAGURA disc brake system Marta, Marta SL and Marta SLMagnesium the braking force is transmitted to the braking surface by a mineral oil column.The movement of the lever blade moves a piston, which is integrated in the brake lever(master cylinder). The piston pushes the mineral oil column through the brake hose in thedirection of the brake caliper, where two pistons, on which the brake pads are fixed, arepushed out. The friction between the brake pads and the rotor slowes down the bicycle andcauses both the rotor and the brake caliper to heat up.Never touch either the rotor or the brake caliper after long braking as this maycause serious burnsYou will be pleased to find out that the MAGURA Marta disc brake offers a superior brakingpower even with little hand force applied, no matter what the weather conditionsshould be. Particularly in wet weather conditions disc brakes are much more responsivethan rim brakes and transmit their enormous power immediately after activating the brakelever.Disc brakes don’t wear your rims down. However if they have been mounted incorrectlythey might cause a squealing noise during braking, mainly during wet weather conditions.This manual contains important information about the safe installation,operation and maintenance of your MAGURA disc brake. We urge you to readit carefully, become familiar with its contents and follow our recommendations tohelp make your new braking experience enjoyable and trouble free.All steps will be explained on the Marta model. The Marta SL and Marta SLMagnesium are technically identical, with the exception of the carbon lever blades(which are compatible with Marta).Although the Marta disc brake system is relatively simple you should not overestimateyour technical skills! We therefore advise you to leave the following operationsto a trained technician of a professional bike shop.Should there be any further questions or problems we warmly recommend thatyou visit our website www.magura.com where you will always find the newest andhottest tips about all our products. On magura.com you can also dowload this manual in aconvenient A4 format and get online help around the clock for free. Stay tuned with thePassion People!Thank you for your confidence in our products, enjoy your ride and your newMAGURA disc stoppers!Happy trails!THE PASSION PEOPLEwww.magura.com3
2. Before the first ride3. Before every ride1. Are you already familiar with hydraulic disc brakes? Our brakes might be much morepowerful than the stoppers on which you relied so far.Take your bicycle to a safe area to learn the proper braking technique and operation of yournew brakes and your bike.2. Check whether you activate the front brake with the brake lever, which youare used to braking on the front. If ever this is not the case you will have to trainyour new setup because any unintended braking might cause an accident with possibleheavy bodily injury! Change the hose connection by a trained technician in caseof any doubts.For further hints concerning swapping of the brake hose see page 10 onwards.3. New brakes and new rotors or brake pads must always be run in bybraking at least 30 times from a speed of 30 km/h to achieve the maximum brakepower. Take your bike to a safe place to run in the brake.4. While riding in extreme riding conditions (total weight of bike plus riderover 100 kg and/ or a gradient of more than 15 %) always use both brakes simultaneouslyto slow your bike down.5. Use the brakes according to the user chart on page 2 of this manual. Anymisuse might cause serious accidents with fatal injuries to yourself and others!6. Are you familiar with the other components on your bike such as gears, cliplesspedals and suspension units? Always practise using your bike in a safe area to improve yourhandling abilities before using it on the road. Consult the user’s manual of your bike to learnmore about this.7. For your own safety always wear a helmet when you ride a bicycle. Make sureas well that you wear the suitable clothing and footwear.always check carefully the following points:1. Always make sure that the quick release skewers of your wheels and seat post arecorrectly mounted and closed.incorrectly installed quick release skewers might cause the fixed items to becomeloose. Serious accidents with severe injury may result!!2. Always make sure that the brake lever pressure is o.k. by pulling the lever blade andensuring that full braking performance is achieved before the lever blade touches the handlebars.If this is not the case, pull the lever blade several times (pump) until the brake padstouch the rotor.Español Italiano Nederlands Français English DeutschChanging pressure points during a ride might be the result of having air in the brakesystem.See hints about filling and bleeding from on pages 15/16.4
3. Always make sure that the brake system does not have any leaks by activating thelever blade, holding it and checking the hose connections and reservoir cover for eventualleaks. (Also see page 11)4. Always protect your rotors and brake pads from oil and lubricants (e.g. by lubricatingyour chain). Avoid detergents and soap on the brake pads. Contaminating the pads withoil and lubricants will cause a permanent loss of braking power. Such contaminatedpads can no longer be used nd should be replaced! Clean a contaminated rotor with dishwateror alcohol.See further hints about changing the brake pads on pages 12- 13.5. Release your brake lever and check whether your wheel moves freely and withoutdrag. Check eventually whether the wheels are correctly mounted and if the quick releaseskewers are tightened sufficiently. (Also see page 9)6. Are your tires in a good condition, and have they enough air pressure? Test this withyour fingers. Lift up your bike and turn the wheels of your bike. An insufficient rotationmight be due to damaged tires, broken axles and/ or broken spokes.7. Pick up your bike and let it drop from a moderate height. Be careful in case of anyrattling noises. If any are heard check the bearings and all screwed connections.8. Always follow the instructions given in the owner’s manual of your bicycle.Never use your bicycle if any of the points mentioned above relate to your bicycle!Consult a professional bike mechanic if you feel unsure. A faulty bicycle mightcause serious accidents with possible fatal injuries of the rider!4. Transport of the bicycleIn case of a disc brake equipped bicycle you should always keep in mind the followingpoints:Never activate the lever blade without the brake pads in place and the wheels mounted.In case this should have happened see page 10 of this manual.Never throw away the transport device, which has been delivered with the brake.Always clip it between the brake pads whenever the wheel is removed (e.g. transportof the bike).Always carefully remove the wheels. Make sure that the rotors are not damaged, deformedor contaminated with lubricants.If the bike is transported upside-down squeeze before (with mounted wheel ortransport device!) the lever blade, hold pressure and fix the blade in this positionwith a rubber band or a cable tie.During transport in an aircraft you can leave your brake as it is, e.g. you do not have toempty it.THE PASSION PEOPLEwww.magura.com5
5. Brake Installation1. Tools for installation (+maintenance)83264Allen key 2*, (2,5, 3) and 5transport/mounting device*sharp knife8 mm open end wrenchflat blade screw driverTorx T25 key*(Torx T7 key)(*delivered with the brake)Always insert the allen and torx keys completely to avoid damagingthe bolt heads.151<strong>09</strong>12711Unpack your Marta disc brake:1. brake lever (master cylinder) connected through the2. brake hose with the3. brake caliper with transport deviceATTENTION:4. remove transport device only shortly before installation of the wheel!)5. rotor6. fitting bolts for caliper Allen key 5 (2 pieces)7. fitting bolts for rotor Torx key T25 (6 pieces)8. adaptor with fitting bolts (depending on model)9. hose inserts (2 pieces)10. olives (2 pieces)11. Torx T25 key12. Allen key 2Español Italiano Nederlands Français English DeutschSpecifications modifying and improving this product are subject tochange without prior notice.6
The brake levers and calipers of the different MAGURA disc brake models arecompletely different and not compatible! Never mix and match parts from the differentmodels! Any misuse might cause serious accidents!MAGURA manufacture these braking systems according to the valid standards andmake many rigorous product tests. Because of the large variety of forks and frames availableon the market it is impossible for MAGURA to test all possible combinations. If you mountany of our brake systems always make sure that the brakes are in conformity with the bicycle.Disc brake calipers can generate a lot of heat during extreme riding conditions.The resulting heat transfer from the caliper to the fork and/ or frame can have anegative influence on the mechanical characteristics of both the fork and/ or theframe.Insufficient heat transfer from the brake caliper to the frame and the fork, causedby fork and or frame components having low heat transfer characteristics (e.g.carbon rear triangles) can cause the brake to overheat, with the possibility of a totalfailure of the brake system. This can cause serious personal injury to yourself and/or others.With respect to product liability we remind all our users that any manufacturer(also: bike mechanic or end consumer!) is responsible for the correctfunction of the complete bicycle in this context. Improper combinations and insufficientinstallation can cause damage and serious accidents!2. Mount the brake lever to the handlebar with a 5 mm allen key. Tightening torque 4Nm/ 34 in.lbsHint: Tighten the brake lever so that it can still rotate around the handlebar in caseof a crash. This old motocross trick will reduce considerably the risk of a damagedbrake lever.The MAGURA disc brake Marta is compatible with frames and forks which meetthe International Standard (IS) and for Postmount (PM) mounts. Depending on themounting standard and/or rotor size adaptors are used for a proper installation (cf.table on page 21). Never mount the brakes with adapters or brackets from othermanufacturers! All warranty will be void in case of any misuse! Use only direct mountingparts from MAGURA or the frame or fork’s manufacturer!Make sure that the caliper fitting eyelets on your frame or fork are free of any paint,powder coating or burrs. (arrows). If this is not the case you should contact your dealer whowill be able to clean the surfaces providing an absolutely flat/even mounting surface withthe help of the MAGURA Gnann-o-mat disc optimizer tool (also see page 9).ATTENTION: The treatment of suspension fork lower legs made of magnesiummight be dangerous because of corrosion! Always follow the safety instructions givenby the respective manufacturer! Always make sure after having treated the discbrake mounts that these are protected against corrosion by using an appropriate protectivepaint.THE PASSION PEOPLEwww.magura.com7
3. Mounting on IS mounts:Mount the adaptor onto the fork or the frame. Use a 5 mm allen key. Please follow carefullythe mounting instructions that come with the respective adaptor! If you use a thru-axle hubon the front you might have to use thicker 3 mm spacers (depending on fork model). Theseare available separately (code: 0720 829).Tightening torque: 6 Nm/ 51 in.lbs.4. Caliper installation: Mount the caliper with MOUNTED wheel and rotor onto theadaptor. For a better understanding the mounted wheel is not shown on this picture. Do nottighten the caliper bolts yet! Squeeze the lever blade and keep the pressure. Tighten nowthe bolts. Tightening torque: 6 Nm/ 51 in.lbs.5. Mount the rotor with the 6 Torx T25 bolts onto the hub. Watch out for the correctrotation direction of the rotor (laser arrow). Use only new original bolts or thread lock if youuse old bolts. Tighten the bolts in a crossed pattern! Tightening torque: 4 Nm/ 34in.lbs.6. The transport device prevents the brake pads from being pushed out too far by unintendedlever squeeze when the wheel is removed. It is impossible then to install the wheelwith the rotor. So never throw away the transport device but keep it and always clip it betweenthe brake pads as shown when the wheel is removed.Install the wheel by positioning the rotor between the brake pads and fixing the wheel in thedropouts. Close the quick release of your wheel which you should mount on the oppositeside of the brake caliper and tighten it sufficiently.7. Squeeze the lever blade several times (pump) to push the pads to their properposition until the lever feel becomes very firm. Tighten now the caliper fitting bolts.Tightening torque: 6 Nm/ 51 in.lbs.8. Mounting on PM mounts:For Postmount 6” installation in combination with a 160mm rotor, Postmount 7” with180mm rotor or Postmount 8” with a 203mm rotor on the front you do not need an adaptor.Mount the caliper DIRECTLY onto the fork with MOUNTED wheel and rotor. For a betterunderstanding the mounted wheel is not shown on this picture. Do not tighten the caliperbolts yet! Squeeze the lever blade and keep the pressure. Tighten now the bolts. Tighteningtorque: 6 Nm/ 51 in.lbs. Further mounting alternatives cf. page 21 of this manual.Español Italiano Nederlands Français English Deutsch8
Install the wheel by positioning the rotor between the brake pads and fixing the wheelin the dropouts. Close the quick release of your wheel which you should mount on theopposite side of the brake caliper and tighten it sufficiently. As to thru-axle hubs orwheels consult the manual of the respective fork manufacturer.Squeeze the lever blade several times (pump) to push the pads to their proper positionuntil the lever feel becomes very firm.Do not worry when you hear friction between rotor and pads. A slight drag isnormal on disc brakes with automatic pad wear adjustment during the break-in period.This drag will disappear after a while. The reason for this is that the brake padsfind their optimum working position towards the rotor, only after a slight wear duringthe break-in period. Slight drag might also happen after a brake pad change or incase of an incorrectly installed wheel.In the case of a constantly dragging disc brake causing noise your frame or forkcould be miss-aligned. In such a case you should contact your dealer who can care to thiswith the MAGURA Gnann-o-mat disc optimizer for a totally even surface of the disc brakemounts. These are absolutely necessary for a drag free function of your brake.New brakes and/or new rotors or brake pads must always be run in bybraking at least 30 times from a speed of 30 km/h to achieve the maximum brakepower. Take your bike to a safe place to run in the brake.Reach adjust is done with a 2,5 mm Allen key. Turning key clockwise: leverblade moves away from the handlebar, turning counterclockwise: blade moves to the handlebar.THE PASSION PEOPLEwww.magura.com9
6. Shorten the hoseMarta is a high-pressure system and comes with a reinforced hose, the „MAGU-RA Disc Tube“ which will show this label. The Disc Tube needs an additional insert fora proper fitting. Never mix and match either the hoses or other parts from the otherMAGURA disc brake models. Any misuse might cause serious accidents!Never touch either the rotor or the brake caliper after long braking as this maycause serious burns.1. Remove the wheel so that you have free access to the brake caliper.Push back both brake pads by putting the transport device or a flat blade screwdriver intothe gap. Move the screwdriver slowly back and forth until both caliper pistons are fullyretracted and flush with caliper body.Never push back the pistons without the brake pads mounted! Open the brakesystem only after having fully pushed back the brake pads.2. Loosen the brake lever clamping screw with a 5 mm allen key. Turn the brake leverand ensure that the reservoir is horizontal.3. Slide the hose protection. Unscrew the sleeve nut on the brake lever with an8 mm open-end wrench and pull the hose out carefully. Hold the hose carefully to avoidany loss of oil! Do not squeeze the lever blade with the system open!4. Put the hose on a workbench and shorten it with a sharp knife. The best tool is theMAGURA cutter. Do not use saws or pliers!Español Italiano Nederlands Français English Deutsch10
Hold the hose carefully so that it cannot snap away (arrow)! Cut the hose squarely!The sleeve nut can be re-used. The olive and the insert cannot bereused and must be replaced!5. Press manually a new insert into the hose until it is fully seated. Clamp the hoseinto the groove of the mounting device as shown...6. ...or clamp the mounting device as shown into a vice and hammer the insert carefullyinto the hose.7. Slide on the sleeve nut and a new olive onto the hose. Push the hose with the sleevenut and the new olive fully into the brake lever and tighten the sleeve nut withan 8mm open-end wrench. Tightening torque: 4 Nm/ 34 in.lbs.8. Always check for correct installation by pulling on the hose. Make sure thatthe system has no leaks. Squeeze the lever blade, hold pressure and check hoseconnections and the reservoir cover for eventual leaks.Squeeze the lever blade several times (pump) to push the pads to their properposition until the lever feel becomes very firm. If you cannot realize this, bleed thebrake (see page 15 onwards).THE PASSION PEOPLEwww.magura.com11
7. Maintenance, brake pad changeBrake Oil: MAGURA disc brakes use as transmission medium low viscosity mineral oil,the biodegradable MAGURA ROYAL BLOOD. Contrary to DOT brake fluid the MAGURA ROYALBLOOD does not irritate human skin or strip the paint of your frame. Moreover it does notabsorb water like DOT and does not have to be changed regularly. What sounds unbelievableis a fact: you can use your brakes over years without having to touch them (except brakepad check and change!)Always make sure that the brake system does not have any leaks by activatingthe lever blade, holding it and checking the hose connections and reservoir cover foreventual leaks. Consult a trained technician in case of leaks. Leaks cause poor brakingperformance with possible serious accidents!As to hints about repairs of the hose see page 14 onwards..Brake pad wear: The brake pads are subject to wear due to friction betweenrotor and pads. The Marta disc brake features a fully automatic pad wear adjustment.Regularly check the thickness of your brake pads and replace them, if necessary!Control and replacement of the brake padsNever touch either the rotor or the brake caliper after long braking as this maycause serious burns.Control of pads.Squeeze the lever blade with the wheel mounted and hold pressure.Hint: Use eventually a rubber band or a cable tie for this.Check out whether the “finger” of the transport device fits in-between the “ears” of thebrake pads. On the picture on the left this is NOT the case, the pads must be changed!Minimum thickness of pads including holder is 2,5 mm. Change always both padssimultaneously!Here the “finger” of the transport device fits between the “ears” of the brake pads. Thepads are still o.k. Remember: the lever has to be pulled during this procedure!Pad replacement.1. Remove the wheel so that you have free access to the brake caliper.Push both brake pads back by putting the transport device or a flat blade screwdriver intothe gap. Move the screwdriver slowly back and forth until both caliper pistons are fullyretracted and flush with caliper body.Español Italiano Nederlands Français English DeutschNever push back the pistons without the brake pads mounted!12
2. Remove the brake pad fitting screw with a 2 mm allen key.3. Pull out the brake pads. Clean the pads with a dry rag that is free of oil andgrease.Never push back the pistons without the brake pads mounted!Never squeeze the lever blade without the brake pads in place and the wheelmounted! If this happened by accident push back the pistons with mounted brakepads by using the transport device or a flat blade screwdriver.Use only genuine MAGURA brake pads! MAGURA cannot guarantee a correct functionof the brake if you use brake pads from other manufacturers, which were nottested. Using other pads might cause poor braking and serious injury! All warrantyclaims will be void in case of misuse!4. Clean on the occasion of the brake pad change the brake body with a clean rag.5. Mount the new brake pads. Make sure that the friction side of the new brake padspoints towards the rotor Tightening torque of the fitting screw: 1 Nm/ 9 in.lbs. Checkafter installation the correct fitting of the pads by pulling them.6. Check, whether the pistons are fully pushed back and whether the pads are flushwith the caliper body. Push the brake pads back with the transport device or a flat bladescrewdriver as described on page 12. Re-install the wheel and check for a correctly tightenedquick release skewer of the wheel that should be mounted on the opposite side ofthe caliper.7. Squeeze the lever blade several times (pump) to push the pads to their proper positionuntil the lever feel becomes very firm.New brakes and/or new rotors or brake pads must always be run in by brakingat least 30 times from a speed of 30 km/h to achieve the maximum brake power.Take your bike to a safe place to run in the brake.Never contaminate brake pads with oil or grease this causing permanent loss ofbrake power! Contaminated pads are definitely killed and must be replaced!THE PASSION PEOPLEwww.magura.com13
8. RepairsDisc brake service kit (code: 0721 294)Don’t panic if the hose snaps! With the disc brake service kit and a separately availablespare hose (see spare parts pages 21/22), this can be repaired easily.The Marta is a high-pressure system and comes with a reinforced hose, the„MAGURA Disc Tube“ wearing also this imprint. The Disc Tube needs an additionalinsert for a proper fitting. Never mix and match either the hoses or other parts fromthe other MAGURA disc brake models! Any misuse might cause serious accidents!1. Remove the damaged hose from both the brake lever and the caliper. Cut off the barbedadapter (caliper connection) with a sharp knife. Slide both the sleeve nut and hose protectoron the other side. All mentioned parts can be re-used. Throw away the damagedhose.2. Prepare a new hose: Use only the reinforced „MAGURA Disc Tube“ hose!One end this hose comes with a pressed fitting, which has to be screwed into the caliper asdescribed above. Tightening torque: 6 Nm/ 51 in.lbs.Never shorten this hose at the end with the pressed fitting! You could no longeruse the hose then.3. Tighten the prepared end of the new hose onto the caliper.Tightening torque: 6 Nm/ 51 in.lbs.4. Mount the brake hose as described in chapter 6.After the installation of a new hose you will always have to refill the brake. Thefollowing chapter 9 describes how the filling has to be done.5. The new Marta is also compatible with the 90° hose fitting. Mounting as shown, alsosee page 20.Español Italiano Nederlands Français English Deutsch14
9. Filling and bleeding a brakeBrake oil: MAGURA disc brakes use as transmission medium low viscosity mineraloil, the biodegradable MAGURA ROYAL BLOOD. Contrary to DOT brake liquid theMAGURA ROYAL BLOOD does not irritate human skin or strip the paint of your frame.Moreover it does not absorb water like DOT and does not have to be changed regularly.What sounds unbelievable is a fact: you canuse your brakes over years without having to touch them (except brake pad change!)1. Loosen slightly the clamping screw of the brake lever with a 5 mm allen key and turnthe brake lever so that the reservoir is approximately 15° upwards from the horizontal position.Slightly tighten the clamp screw in that position.2. For filling and bleeding a MAGURA disc brake you will need the disc brake service kitincluding all necessary tools.3. Prepare the transparent filler tube by pushing in by hand the M6 barbed fittingon which you have mounted an O--ring before. Put the other end of the filler tube on thesyringe and fill the syringe completely with MAGURA ROYAL BLOOD mineral oil. Fill thesyringe completely and make sure that there are no air bubbles inside. Turn the syringeeventually to push out air bubbles.4. Remove the brake pads as described on page 12 and slide the YELLOW transportdevice as shown with its THICK END between the caliper pistons. Squeezeslightly the lever blade (pump) to tighten the transport device.5. Fix the caliper so that the hose connection is at the highest point of the caliper (hosehas to be positioned vertically!). It might be necessary that you have to unscrew the lowercaliper fitting bolt and to fix the caliper to realize this properly (e.g. on rearbrakes!) Unscrewbleeding screw with a 3mm Allen key. Screw in the prepared syringe and tighten it by hand.Place now a rag, which has to be free of oil or lubricants around the reservoirand, more important, around the brake caliper. Care for a clean working environment!No dirt or particles may come into the brake system!THE PASSION PEOPLEwww.magura.com15
6. Remove ONLY the bleed screw of the reservoir with a 2,5mm Allen key. The reservoircover and the membrane underneath remain on the brake lever!7. Put the second syringe of the service kit WITHOUT PLUNGER into the opened drillof the reservoir cover. Push oil from the brake caliper upwards until the oil column arrives inthe syring on the reservoir. You will see air bubbles now.8. Now suck the oil carefully back with the filling syringe on the brake caliper. Makesure that there is always enough oil in the reservoir syringe when you suck back the oil withthe filling syringe! You will see air bubbles again.9. Actuate in addition CAREFULLY the lever blade to chase tiny air bubbles that mighthide within the system. The job is done when no air bubbles can be seen after having followedthe steps above several times.10. Before you remove the syringe on the reservoir make sure that there is onlya small quantity of oil inside. Place a rag around the brake lever and the caliper thus preventingoverflowing oil from dropping down and contaminating and killing the brake pads.Remove the syringe and close the end that was inserted into the reservoir quickly with yourfinger. Empty the remaining content of the syringe into an container.11. Close the drill with the bleedscrew.Tightening torque: 1 Nm/ 9 in.lbs.That’s it!12. Remove the filling syringe and screw in the 5mm allen bleed screw.Tightening torque: 2,5 Nm/ 22 in.lbs. Re-install the brake pads and the wheel.Always pull the lever blade several times (pump) until the brake pads touch therotor. Always check for correct installation by activating the lever blade and checkingfor eventual leaks. Never contaminate brake pads with oil or grease this causing permanentloss of brake power! Contaminated pads are definitely killed and MUST bereplaced! A contaminated rotor can be cleaned with MAGURA brake cleaner, warmdishwater or alcohol.Español Italiano Nederlands Français English Deutsch16
10. The disc brake wheelThe XC disc brake wheelThere already exists enough literature concerning wheels, so just a few tips howa well-built X-country disc brake wheel has to be.Use spokes with a diameter of 2 mm (arc) / 1,8 mm which you cross three times.No radial lacing with disc brake wheels!Head-inside-spokes (=arc-outside-spokes have to be pulled, i.e. these spokes point forwardon the front wheel; on the back wheel these spokes point forward on the rotorside and backwards on the drive side. All spokes have to be stressed equally and high.Mount the quick release of the wheel on the opposite side of the caliper!Never use ultra lightweight quick releases with titanium or aluminum axles foryour wheel sets in combination with a disc brake. You will not be in a position to realizethe necessary tightening torque!THE PASSION PEOPLEwww.magura.com17
11. Trouble Shootingproblem reason solutionnot enough brake powerno pressure pointSquealing brakecontaminated brake padscontaminated rotorwheel cannot be mountedrattling noise and rough decelerationleaking hose or brakebrake was not run itoil/ lubricants on rotor and/or padsair in the systemleaking systemsbadly aligned framePaint/ powder coating onfitting eyeletsWheel q/r skewer insufficientlytightenedInsufficiently tightenedwheel spokescarelessnesscarelessnessLever blade was pulled withremoved wheelbrake pads worn, holder ofpads is wearing the rotoraccident, incorrectinstallationbreak in the brake (page 4)clean the rotor with warm dishwateror alcohol replace contaminatedbrake padsbleeding the brake (page15)correct transport (page 5)Check hose connections andhose for leaks; replace hose ifnecessary (pages 14/15)align brake caliper with0,2 mm spacers (page9)remove any paint or powdercoating and care for an evencontact surface without burrs.(page7)Increase tightening of q/rskewer and mount it onopposite side of caliper.check for an evenly spokedwheel with high spoketensionbrake pads must be changedclean rotor with MAGURABrake Cleaner, dish water oralcoholPush back the brake padswith transport device or a flatblade screwdriver. (page12)brake pad change (page 12)change hose or defectivebrake lever or caliper (page14)You will find further tips on our website www.magura.com in the FAQsection!! Stay tuned.Español Italiano Nederlands Français English Deutsch18
12. AccessoriesMAGURA disc brake service kitcontains everything that you need for bleeding and repairing a brake.ATTENTION: the kit does NOT include a spare hose!MAGURA braided hose for all MAGURA disc brakesSpare part no. see page 20.Watch out for the genuine hose with yellow MAGURA marker!!Use only genuine MAGURA brake pads!brake pads Marta Performance Type 6.1: code 0722 418series pad for maximum brake powerbrake pads Marta Endurance Type 6.2: code 0722 419with optimized longevityUse only genuine MAGURA accessories! Any parts manufactured by othermanufacturers like lever blades, hoses or brake pads have not been testedand approved by MAGURA and consequently nothing can be said about their shortand long-term function. Never use those parts! All warranty and product liabilityclaims will be void in case of misuse!Never change the paint, the finish or the consistence of your brake. This mightcause total failure of the whole system with possible heavy bodily injury!13. WarrantyMAGURA is giving a 5-year leakproof warranty on brake levers (mastercylinder) and brake calipers if you register your brake online on magura.com. Watch outfor the red info sheet in the middle of this manual!This warranty is void when damage to the brake has occurred fromthe following:abusemixing and matching the brake with parts from other manufacturersdamage of the exterior finish caused by improper useany attempt to disassemble the whole brakemodificationsnon-factory changes or improper serviceWe expressly point out that a warranty claim is only accepted with aclear proof of purchase (payment receipt of the dealer!) and recommendto register your brake online on magura.comTHE PASSION PEOPLEwww.magura.com19
14. Spare parts 20<strong>09</strong>/max. tightening torquescarbon lever blade 1x0724 040aluminium lever blade 1x0724 039Torx T7 key 0720 847SL rotors 6 holes (IS)203 mm 0722 332180 mm 0721 456160 mm 0721 455SL rotors Rohloff Speedhub180 mm 0721 931160 mm 0721 9300720 848 (10x)2,5 NmTitanium bolt kit 0722 5621x M5x186x M5x102x M6x1810x: 0724 04510x: 0724 04610x: 0720 849 6 Nm20x: 0720 424hose 90°250 cm: 0720 824, 6 Nmbraided hose 90°250 cm: 0721 641, 6 Nm10x: 0722 532 0,4 NmMarta SL rotors 6 holes (IS)203 mm 0722 448180 mm 0721 923160 mm 0721 640Marta SL rotors Rohloff Speedhub160 mm 0721 9290721 057 (6x) 4 NmSpecifications are subject to change without prior notice!Torx T25 key 0721 204hose 0°250 cm: 0722 636, 6 Nmbraided hose 0°250 cm: 0721 386, 6 Nm10x: 0721 000, 0,6 Nm0720 825 (10x)0720 916 (20x)0720 446 (10x)0720 405 (10x)10x: 0720 931, 6 Nm0720 931, 2,5 Nm0721 3140724 041 metallic grey0724 042 black0724 043 red10x: 0720 931Marta SL 4 NmMarta SL Magnesium 3 Nm2x 0721 418Type 6.1 Performance2x 0721 419Type 6.2 Endurance0720 828 (10x) 1 NmEspañol Italiano Nederlands Français English Deutsch2020
Brake lever completeMarta SL Magnesium:left: 0724 038right: 0724 037Marta SL (silver, carbon lever blade):left: 0724 036right: 0724 035Marta SL (red, carbon lever blade):left: 0724 146right : 0724 145Marta (black, aluminium lever blade):left: 0724 034right: 0724 033Caliper with padsMarta SL Magnesium 0724 049Marta SL (silver) 0724 048Marta SL (red) 0724 147Marta (black) 0724 047THE PASSION PEOPLEwww.magura.com21
Adaptors/mounting alternatives for MartaPostmount caliperAdaptor Rotor diameter/Installation Order codeAdaptor 5 203/Int. Standard 6" Front 0722 321Adaptor 6 180/Postmount 6" Front 0722 322Adaptor 7 203/Postmount 6" Front 0722 323Adaptor 8 203/Rockshox Boxxer 0722 324Adaptor 9 203/Int. Standard Rear 0722 325Adaptor 10 180/Int. Standard Rear 0722 424Adaptor 11 160/Int. Standard 6" Front 0722 425203/Int. Standard 8" Front (Fox 40)Adaptor 12 180/Int. Standard 6" Front 0722 426160/Int. Standard RearAdaptor Nr. 26 203 Postmount 7” Front (Thor) 0724 131Direct Mount(no adaptor!)203/Postmount 8” Front (Wotan, Travis etc.)180/Postmount 7” Front (Thor)160/Postmount 6” FrontWARNING!Always make sure, that the fixing bolts are screwed in to a depth of at least8 mm. This corresponds to around 8 full turns!Should this not be the case, longer bolts, with a minimum hardness of 8.8 should beused and secured using blue Loctite.Specifications are subejct to change without prior notice !Visit our website magura.com for further information, tech tips and free online help!!Español Italiano Nederlands Français English Deutsch22
MAGURA PARTNERS AND SERVICE CENTERS WORLDWIDEAustraliaSteve Cramer Productsphone 03-95871466fax 03-95872018sales@stevecramerproducts.com.auAustriaMAGURA Bike Parts Austriaphone +49-7333-9626-13fax +49-7333-9626-17m.haas@magura.deServicef.meder@magura-bikeparts.deBelgium | Vlaanderen> Sales:MAGURA Bike Parts Beneluxphone +49-7333-9626-25fax +49-7333-9626-17e.vandepol@magura.de> MAGURA Tech Support Beneluxphone +31-653251836fax +31-842208241maguratechsupportbenelux@beebikes.comBelgium | Wallonie> Sales:MAGURA Bike Parts Beneluxphone +49-7333-9626-42fax +49-7333-9626-17s.revillet@magura-bikeparts.de> MAGURA Service Center Francephone +49-7333-9626-43fax 1+49-7333-9626-17s.revillet@magura-bikeparts.deBrasilCiclovece World Bikesphone 55-11-31545<strong>09</strong>marcelo@ciclovece.com.brCanadaOrange Sport Supply Inc.phone 604-990-5110fax 604-990-5884info@orangesportsupply.comCzech RepublicPell’sphone +420-545242631fax +420-545242634magura@pells.czDenmarkBorandia APSphone 47-107172fax 47-107066borandia@borandia.dkEstoniaHawaii Expressphone 06-398508fax 06-398566olev@hawaii.co.nzTHE PASSION PEOPLEFinlandBest Brakes Kyphone 050-591 5863fax 019-388485info@bestbrakes.inet.fiFrance> MAGURA Bike Parts Francephone +49-7333-9626-42fax +49-7333-9626-17s.revillet@magura.de> MAGURA Service CenterFrancephone +49-7333-9626-43fax +49-7333-9626-17s.revillet@magura.deGreat Britain> MAGURA Bike Parts UK Ltd.phone +49-7333-9626-29fax +49-7333-9626-17d.coull@magura.de> MAGURA Service Center UKphone 01530-837195fax 01530-811286service_uk@magura.deGreeceNikos Maniatopoulosphone 2610-993-045fax 2610-990-424aftermarket@idealbikes.netHong KongChung Yung Cycle Companyphone +852-26703639support@hkbicycle.com.hkHungaryMali Bicycle Technologyphone 01-4207563fax 01-4205321mali@mali.huIrelandBeara Bike Tradingphone 064-89134fax 064-41334wschmidt@indigo.ieIsraelToy Housephone +972-26718282fax +972-26724521sales@pedalim.comItalyAreabphone 0438-435550fax 0438-439847info@areab.itJapanMC Internationalphone 06-6536-<strong>09</strong>01fax 06-6536-<strong>09</strong>07mcinter@mx1.alpha-web.ne.jpLuxemburg> Sales:MAGURA Bike Parts Beneluxphone +49-7333-9626-42fax 1+49-7333-9626-17s.revillet@magura-bikeparts.de> MAGURA Service CenterFrancephone +49-7333-9626-43fax +49-7333-9626-17s.revillet@magura-bikeparts.deNetherlands> Sales:MAGURA Bike Parts Beneluxphone +49-7333-9626-25fax +49-7333-9626-17e.vandepol@magura- bikeparts.de> MAGURA Tech Support Beneluxphone +31-653251836fax +31-842208241maguratechsupportbenelux@beebikes.comNew ZealandPure Sports NZphone 04-385-1185chris@puresports.co.nzNorwayLilland Sportphone +47-33074850fax +47-94761828info@lillandsport.noPolandPolsportphone +48-34-3660456fax +48-34-3660456o.baranowska@pol-sport.comPortugalLPL-Artigos Desportivosphone +351-21-910-8045fax +351-21-910-8047info@lpl.com.ptRussiaChainpowerphone +7-495685<strong>09</strong>12fax +7-4953034468info@chainpower.ruSingaporeAttitude Bikephone +65-6344-4579fax +65-6344-8436service@magura.com.twSlowakiaAGF Invest s.r.o.phone 02-62859549fax 02-62859052info@agfinvest.skSloweniaMaraton D.O.O.phone +386-74990870fax +386-74990872maraton@siol.netSouth AfricaCycles Africaphone 011-678-1548fax 011-678-1548cunning@mweb.co.zaSouth CoreaExtreme Officephone +82-31-705-3141fax +82-31-751-3181eugene@ex-office.co.krSpain> SAT MAGURA: BicisportSólo para reparaciones yservicio!phone 93-3404480fax 93-3404480> Bicicletas Montyphone 93-6667111fax 93-6667112monty@monty.es> Casa Masferrerphone 93-8463444fax 93-8465355cmcenter@casamasferrer.com> Cometphone 943-331393fax 943-551407comet@comet.es> RepresentacionesSpinola & Perezphone 619-702946fax 93-2317731c.perez@spinolaperez.comSwedenJaguarverken ABphone 060-669800fax 060-6698<strong>09</strong>info@jaguarverken.seSwitzerland> Intercyclephone +41-9266511fax +41-9266355info@intercycle.com> Amsler & Co.phone 052-6473636fax 052-6473637info@amsler.chTaiwanMAGURA ASIA Inc.phone +886-4-23283739fax +886-4-23283734service@magura.com.twUSAMAGURA USAphone 6183952200fax 6183954711magura@magurausa.comwww.magurausa.com0689691| Printed in Germany | © MAGURA 2010 | All rights reservedDeutschland | MAGURA Bike Parts GmbH + Co. KG | Heinrich-Kahn-Straße 24 | D-89150 Laichingen | info@magura-bikeparts.deHotline | Helpdesk | Phone <strong>09</strong>001-648124* | Fax 07333-962651 | service@magura.de*(41 ct. pro Minute, täglich <strong>09</strong>.00 – 12.00 h, 12.30 – 15.15 h)www.magura.comTHE PASSION PEOPLEwww.magura.com