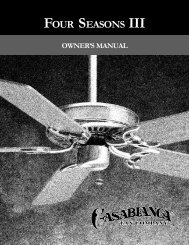
Owner's Manual - Casablanca Fan
Owner's Manual - Casablanca Fan
Owner's Manual - Casablanca Fan

Create successful ePaper yourself
Turn your PDF publications into a flip-book with our unique Google optimized e-Paper software.
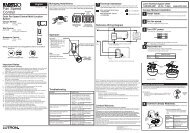
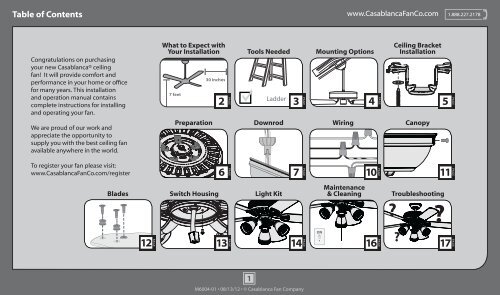
34 O CEILINGMounting Optionswww.<strong>Casablanca</strong><strong>Fan</strong>Co.com 1.888.227.2178WALLIf you have a flat ceiling:Hang your fan by a standard downrod (included).StandardMountingOPTION 1SupportStructureSupportStructureIf you have an angled ceiling:1. You will need a longer downrod (sold separately).2. If your ceiling angle is greater than 34°, you willalso need an Angled Mounting Kit (sold separately).AngledMountingUse the three steps below to determine if your ceiling angle is greater than 34°OPTION 2StandardMountingStyleCeilingOutlet Box(required)AngledMountingStyleCeilingOutlet Box(required)12 334°FOLDon dotted linePLACEagainst wallSLIDEtoward ceilingSITUATION 1Guide TouchesBOTH Ceiling & WallYou need ONLYa LongerDownrod*most commonSITUATION 2Guide Touches Wallbut NOT CeilingYou need BOTHa LongerDownrod &an AngledMounting KitUse Standard Mountingor Low-Profile Mountingto hang the fan from a flat ceiling.Use Angled Mountingto hang the fan from avaulted or angled ceiling.4M6004-01 • 08/13/12 • © <strong>Casablanca</strong> <strong>Fan</strong> Company
Downrodwww.<strong>Casablanca</strong><strong>Fan</strong>Co.com1.888.227.2178Option 1StandardDownrodfor ceilings 8-10’ highIf you need a different downrod length follow these steps:skip to next pageIncluded(pre-assembled)Option 3LongerDownrodfor angledceilings orceilings 10’ orhigherSteps 1-5 to remove standard downrod pipe1 2 3 4 5Option 2ShorterDownrodfor fans installedclose to ceilingSlideSlideIncludedSold Separately109Steps 6-10 to reassemble with new pipe8767M6004-01 • 08/13/12 • © <strong>Casablanca</strong> <strong>Fan</strong> Company
Downrod (continued)www.<strong>Casablanca</strong><strong>Fan</strong>Co.com1.888.227.21783/8”CUT& STRIPKEEP!8”(not to scale)KEEP!Remove the pre-installedsetscrew so that the downrodcan be inserted.Hand tighten the downrod (atleast 4-5 full turns) until it stops.The wires can be cut, butleave at least 8” extendingfrom the top of the downrod.Tighten the setscrewwith pliers. DO NOTHAND TIGHTEN.8” 3/8”8M6004-01 • 08/13/12 • © <strong>Casablanca</strong> <strong>Fan</strong> CompanyIf the setscrew is not tightenedsecurely, the fan may fall.
Downrod (continued)www.<strong>Casablanca</strong><strong>Fan</strong>Co.com 1.888.227.2178Put the wires and downrod through thecanopy. Let the canopy sit loosely on topof the fan.DO NOT PICK THE FAN UP BY THECANOPY OR WIRES. Place the downrodball into the slot in the ceiling bracket.9M6004-01 • 08/13/12 • © <strong>Casablanca</strong> <strong>Fan</strong> Company
WiringFROM CEILINGNote: To connect the wires,hold the bare metal leadstogether and place a wireconnector over them, then twistclockwise until tight.FROM CEILINGwww.<strong>Casablanca</strong><strong>Fan</strong>Co.com 1.888.227.2178FROM CEILINGFROM FANUsing an orange wireconnector fromthe hardware bag,connect the 3 groundingwires (green, green/yellow stripe, or barecopper) coming from theceiling, downrod, andhanging bracket.Green/YellowStripe(Grounding) Green/YellowStripeFROM CEILING BRACKETFor a Single SwitchUsing the orange wireconnectors fromthe hardware bag, connectthe black wire (ungrounded)from the ceiling to the blackand the blue wires from thefan. Connect the white wire(grounded) from the ceiling tothe white wire from the fan.Blue(Grounded)White(Ungrounded)BlackF RO M FA NFor Dual SwitchesUsing orange wireconnectors fromthe hardware bag,connect the white wire(grounded) from theceiling to the white wirefrom the fan.Connect the black wire(ungrounded) from theceiling to the black wirefrom the fan. Connect thesecond (ungrounded) wirefrom the ceiling to the bluewire from the fan.(Ungrounded)(Ungrounded)(Grounded)BlackBlueWhiteFR O M FANRefer to CAUTION c.1 on pg. 210M6004-01 • 08/13/12 • © <strong>Casablanca</strong> <strong>Fan</strong> CompanyTurn the splices upward and push them carefully back through the hanger bracketinto the outlet box. Spread the wires apart, with the grounded wires on one side ofthe outlet box and the ungrounded wires on the other side of the outlet box.
Canopywww.<strong>Casablanca</strong><strong>Fan</strong>Co.com 1.888.227.2178ScrewHolesPosition the canopy so that, whenlifted into place, the canopy fits intothe hanging bracket as shown.Lift the canopy into place so thatthe screw holes are aligned.Insert the two canopy screwsfound in the hardware bag.11M6004-01 • 08/13/12 • © <strong>Casablanca</strong> <strong>Fan</strong> CompanyNote: <strong>Fan</strong> style may vary.
Bladeswww.<strong>Casablanca</strong><strong>Fan</strong>Co.com 1.888.227.2178Remember the screws thatyou kept after removing theshipping blocks (page 6)? Youneed them plus five more fromhardware bag for this step.Insert grommets found in the hardwarebag into the holes in the blades, thensecure each blade to a blade iron withscrews found in the hardware bag.Lightly attach the blade irons to themotor with screws found inthe hardware bag, then securelytighten after both screws are attached.12M6004-01 • 08/13/12 • © <strong>Casablanca</strong> <strong>Fan</strong> CompanyYour blades are shielded with Dust Armor® whichis a nanotechnology coating that repels dust. Forcleaning the fan, use soft brushes or cloths to preventscratching. Cleaning agents may damage the finishes.
Switch Housingwww.<strong>Casablanca</strong><strong>Fan</strong>Co.com 1.888.227.2178Screw two (2) housing assembly screwsfrom the hardware bag halfway intothe motor housing. It does not matterwhich two screw holes you choose.Feed the wire plug through the centerhole of the upper switch housing, thenwrap keyhole slots around the screws andtwist counterclockwise.13M6004-01 • 08/13/12 • © <strong>Casablanca</strong> <strong>Fan</strong> CompanyInsert the third screw, found inthe hardware bag, into place andthen tighten all three (3) screws.Make sure the upper switch housing is securelyattached to the mounting plate. Failure to properlysecure all 3 assembly screws could result in the switchhousing fixture falling.
Light Kitwww.<strong>Casablanca</strong><strong>Fan</strong>Co.com 1.888.227.2178SocketShadeSocket RingSocket Ring ToolRemove the socket rings from the sockets.Install the shades onto the sockets.Install the socket rings onto the sockets.Tighten them by turning clockwise withthe socket ring glass tool.Connect the plugs from the upper andlower switch housings. Make sure to lineup the colored markings onthe connectors.Lift the lower switch housing up until theholes line up with the screw holes in theupper switch housing.For questions regarding removing a light kit, callcustomer service 1-888-227-2178.14M6004-01 • 08/13/12 • © <strong>Casablanca</strong> <strong>Fan</strong> Company
Light Kit (continued)www.<strong>Casablanca</strong><strong>Fan</strong>Co.com 1.888.227.2178CONGRATULATIONS!YOU’RE DONE!Insert three (3) switchhousing screws found in thehardware bag.Install the CFL bulbs into thesockets. When necessary, replacewith bulbs of same wattage.Connect the pull chain pendantsto the short chains coming fromthe switch housing.See next page for fanoperation instructions.Make sure the lower switch housing is securely attached tothe upper switch housing. Failure to properly secure all 3assembly screws could result in the light fixture falling.15M6004-01 • 08/13/12 • © <strong>Casablanca</strong> <strong>Fan</strong> CompanyNote: Glass shade style and number of lights may vary.
Maintenance & Cleaningwww.<strong>Casablanca</strong><strong>Fan</strong>Co.com 1.888.227.2178ONTurn PowerReverseSwitchThe pull chain controls the fan: high,medium, low, extra low, and off.The light pull chain controls thepower to the light fixture: on and off.To switch the direction of airflow, move the reverse switch tothe opposite position.For cleaning the fan, use softbrushes or cloths to preventscratching. Cleaning productsmay damage the finishes.16M6004-01 • 08/13/12 • © <strong>Casablanca</strong> <strong>Fan</strong> Company
Troubleshootingwww.<strong>Casablanca</strong><strong>Fan</strong>Co.com 1.888.227.2178<strong>Fan</strong> doesn’t work• Make sure power switch is on.• Pull the pull chain to make sureit is on.• Push the motor reversing switchfirmly left or right to ensure thatit is engaged.• Check the circuit breaker toensure the power is turned on.• Make sure the blades spin freely.• Turn off power from the circuitbreaker, then loosen the canopyand check all the connectionsaccording to the wiring diagramon page 10.• Check the plug connection inthe switch housing.Excessive wobbling• Tighten all of the blade andblade iron screws until theyare snug.• Turn the power off, supportthe fan carefully, and checkthat the hanger ball isproperly seated.• Use the provided balancingkit and instructions to balancethe fan.Noisy Operation• Tighten the blade and bladeiron screws until they are snug.• Check to see if any of theblades are cracked. If so, replaceall of the blades.17M6004-01 • 08/13/12 • © <strong>Casablanca</strong> <strong>Fan</strong> CompanyAUTHORIZED SERVICE CENTERSFor the most updated listing of <strong>Casablanca</strong> AuthorizedService Centers, visit www.<strong>Casablanca</strong><strong>Fan</strong>Co.com orcall toll free 1-888-227-2178.