View 601 - 550 - Home Mega Global Solution
View 601 - 550 - Home Mega Global Solution
View 601 - 550 - Home Mega Global Solution

You also want an ePaper? Increase the reach of your titles
YUMPU automatically turns print PDFs into web optimized ePapers that Google loves.
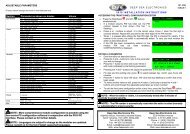
• Link pin 2 and pin 3 together on the 555• Remove wire 3 and connect to pin xxx of the 555• Reconfigure 555 Aux. Input 1 to be User configured, Open to activate, Always active, Shutdown, with "LCD textwhen active" set to read EMERGENCY STOP.‣ If the <strong>601</strong> alarm and pre-heat functions are being used (Alarm [10] and pre-heat [15]).• Remove wire 10 (<strong>601</strong>D 24 way connector), and connect to pin 6 (555 module)• Remove wire 15 (<strong>601</strong>D 24 way connector), and connect to pin 7 (555 module)• Configure Module relay 1 of the 555 to Pre-heat• Configure Module relay 2 of the 555 to Common alarm• Ensure the circuit being driven by the preheat and alarm outputs is connected correctly. The alarm and preheatoutputs switch to BATTERY POSITIVE when active.‣ Rewire the <strong>601</strong>D 12way loom.• Remove wire 1(of the 12 way <strong>601</strong>D connector) and connect to pin 42 (of the 555 module)• Remove wire 10, and connect to pin 45.• Remove wire 11, and connect to pin 34.• Remove wire 12, and connect to pin 31.If you have a 3 phase 4 wire mains AND generator supply,• Configure the 555 module for 3 phase, 4 wire AC system.• Remove wire 4 (from the <strong>601</strong>D 12 way connector), and connect to pin 43. (of the 555 module)• Remove wire 7(from the <strong>601</strong>D 12 way connector), and connect to pin 44. (of the 555 module)• Connect generator L2 to pin 32 (of the 555 module)• Connect generator L3 to pin 33 (of the 555 module)If you have a 1 phase 2 wire mains AND generator supply,• Configure the 555 module for 1 phase, 2 wire AC system.• Remove and discard any connection to the <strong>601</strong>D 12 way connector on terminals 4 & 7.• Ensure NO CONNECTION to the <strong>550</strong> module pins 32,33,43 & 44.‣ FINALLY• Check the 555 configuration to ensure that all setting and timers are correctly matched to the old <strong>601</strong> settings.• Using the Diagnostic screens in the 810 software confirm all wiring is correct. Proceed with normal 555commission instructions to verify function is correct.Should you have any queries arising from this application noteplease contact our Technical Department as detailed below:-INTERNATIONAL TEL: 44 (0) 1723 377566INTERNATIONAL FAX: 44 (0) 1723 354453E-mail: Support@DeepSeaPlc.com