Chapter 3 Configuring Basic FWLB - Brocade
Chapter 3 Configuring Basic FWLB - Brocade
Chapter 3 Configuring Basic FWLB - Brocade

You also want an ePaper? Increase the reach of your titles
YUMPU automatically turns print PDFs into web optimized ePapers that Google loves.
<strong>Chapter</strong> 3<br />
<strong>Configuring</strong> <strong>Basic</strong> <strong>FWLB</strong><br />
This chapter describes how to implement commonly used configurations for the following:<br />
• <strong>Basic</strong> <strong>FWLB</strong> (configuration without ServerIron redundancy)<br />
• IronClad (active-standby configuration with ServerIron redundancy)<br />
<strong>Configuring</strong> <strong>Basic</strong> Layer 3 <strong>FWLB</strong><br />
<strong>Basic</strong> <strong>FWLB</strong> uses a single ServerIron on the enterprise side of the load balanced firewalls and another ServerIron<br />
on the Internet side. Figure 2.2 on page 2-6 shows an example of this type of configuration.<br />
Configuration Guidelines<br />
Use the following guidelines when configuring a ServerIron for <strong>FWLB</strong>.<br />
• The ServerIron supports one firewall group, group 2. By default, all ServerIron ports belong to this firewall<br />
group.<br />
• The ServerIron must be able to reach the firewalls at Layer-2. Therefor, the firewalls must be either directly<br />
attached to the ServerIron or connected through a Layer-2 switch.<br />
• Static MAC entries for firewall interfaces are required. This is especially critical when the upstream Internetside<br />
routers use the firewall interface as the next hop for reaching internal networks. These static entries are<br />
not necessary with ServerIron router software and should not be used when a firewall path definition uses<br />
dynamic ports.<br />
• Use "dynamic ports" with firewall path definitions when the firewall interface MAC address can be learned<br />
over different physical ports by the ServerIron.<br />
• You must configure a separate path on each ServerIron for each firewall. The paths ensure that firewall traffic<br />
with a given pair of source and destination IP addresses flows through the same firewall each time. Thus, the<br />
paths reduce firewall overhead by eliminating unnecessary revalidations.<br />
NOTE: Path configuration is required for all load balancing configurations, whether the firewalls are<br />
synchronous or asynchronous.<br />
June 2009 © 2009 <strong>Brocade</strong> Communications Systems Inc. 3 - 1
ServerIron ADX Firewall Load Balancing Guide<br />
<strong>Configuring</strong> <strong>Basic</strong> Layer 3 <strong>FWLB</strong><br />
To configure basic Layer 3 <strong>FWLB</strong>, perform the following tasks.<br />
Defining the Firewalls and Adding them to the Firewall Group<br />
When <strong>FWLB</strong> is enabled, all the ServerIron ports are in firewall group 2 by default. However, you need to add an<br />
entry for each firewall, then add the firewalls to the firewall group. To add an entry for a firewall, specify the firewall<br />
name and IP address. You can specify a name up to 32 characters long.<br />
To define the firewalls shown in Figure 2.2 on page 2-6 and add them to firewall group 2, use the following method.<br />
To define the firewalls using the CLI, enter the following commands.<br />
Commands for ServerIron A (External)<br />
ServerIron(config)# server fw-name FW1-IPin 209.157.22.3<br />
ServerIron(config-rs-FW1-IPin)# exit<br />
ServerIron(config)# server fw-name FW2-IPin 209.157.22.4<br />
ServerIron(config-rs-FW2-IPin)# exit<br />
ServerIron(config)# server fw-group 2<br />
ServerIron(config-tc-2)# fw-name FW1-IPin<br />
ServerIron(config-tc-2)# fw-name FW2-IPin<br />
Commands for ServerIron B (Internal)<br />
ServerIron(config)# server fw-name FW1-IPout 209.157.23.1<br />
ServerIron(config-rs-FW1-IPout)# exit<br />
ServerIron(config)# server fw-name FW2-IPout 209.157.23.2<br />
ServerIron(config-rs-FW2-IPout)# exit<br />
ServerIron(config)# server fw-group 2<br />
ServerIron(config-tc-2)# fw-name FW1-IPout<br />
ServerIron(config-tc-2)# fw-name FW2-IPout<br />
Syntax: [no] server fw-name <br />
NOTE: When you add a firewall name, the CLI level changes to the Firewall level. This level is used when you<br />
are configuring stateful <strong>FWLB</strong>.<br />
Syntax: server fw-group 2<br />
This command changes the CLI to firewall group configuration level. The firewall group number is 2. Only one<br />
firewall group is supported.<br />
Syntax: [no] fw-name <br />
Adds a configured firewall to the firewall group.<br />
Table 3.1: Configuration tasks – <strong>Basic</strong> <strong>FWLB</strong><br />
Task See page...<br />
Configure Global Parameters<br />
Configure Firewall Parameters<br />
Define the firewalls and add them to the firewall group 3-2<br />
Configure Firewall Group Parameters<br />
Configure the paths and add static MAC entries for the firewall interfaces with the ServerIron 3-3<br />
3 - 2 © 2009 <strong>Brocade</strong> Communications Systems Inc. June 2009
<strong>Configuring</strong> the Paths and Adding Static MAC Entries<br />
<strong>Configuring</strong> <strong>Basic</strong> <strong>FWLB</strong><br />
A path is configuration information the ServerIron uses to ensure that a given source and destination IP pair is<br />
always authenticated by the same Layer 3 firewall.<br />
Each path consists of the following parameters:<br />
• The path ID – A number that identifies the path. The paths go from one ServerIron to the other through the<br />
firewalls. On each ServerIron, the sequence of path IDs must be contiguous (with no gaps), starting with path<br />
ID 1. For example, path sequence 1, 2, 3, 4, 5 is valid. Path sequence 1, 3, 5 or 5, 4, 3, 2, 1 is not valid.<br />
• The ServerIron port – The number of the port that connects the ServerIron to the firewall. If your configuration<br />
does not require static MAC entries, you can specify a dynamic port (65535) instead of the physical port<br />
number for firewall paths. Specifying the dynamic port allows the ServerIron to select the physical port for the<br />
path so you don’t need to.<br />
• The other ServerIron’s or Layer 2 switch’s IP address – The management address of the ServerIron or<br />
Layer 2 switch on the other side of the firewall. The ServerIron on the private network side and the other<br />
ServerIron or Layer 2 switch are the end points of the data path through the firewall.<br />
• The next-hop IP address – The IP address of the firewall interface connected to this ServerIron.<br />
For each type of firewall (Layer 3 synchronous and asynchronous, with or without NAT), you must configure paths<br />
between the ServerIrons through the firewalls.<br />
In addition to configuring the paths, you need to create a static MAC entry for each firewall interface attached to<br />
the ServerIron.<br />
NOTE: When defining a firewall router path on a port, make sure the port is a server router-port.<br />
NOTE: <strong>FWLB</strong> paths must be fully meshed. When you configure a <strong>FWLB</strong> path on a ServerIron, make sure you<br />
also configure a reciprocal path on the ServerIron attached to the other end of the firewalls. For example, if you<br />
configure four paths to four separate firewalls, make sure you configure four paths on the other ServerIron.<br />
NOTE: For many configurations, static MAC entries are required. Where required, you must add a static MAC<br />
entry for each firewall interface with the ServerIron. The <strong>FWLB</strong> configuration examples in this guide indicate<br />
whether static MAC entries are required.<br />
To configure the paths and static MAC entries for the configuration shown in Figure 2.2 on page 2-6, enter the<br />
following commands. Enter the first group of commands on ServerIron A. Enter the second group of commands<br />
on ServerIron B.<br />
Commands for ServerIron A (External)<br />
ServerIron(config)# server fw-group 2<br />
ServerIron(config-tc-2)# fwall-info 1 3 209.157.23.3 209.157.22.3<br />
ServerIron(config-tc-2)# fwall-info 2 5 209.157.23.3 209.157.22.4<br />
ServerIron(config-tc-2)# exit<br />
ServerIron(config)# static-mac-address abcd.4321.34e0 ethernet 3 priority 1 routertype<br />
ServerIron(config)# static-mac-address abcd.4321.34e1 ethernet 5 priority 1 routertype<br />
ServerIron(config)# write mem<br />
Commands for ServerIron B (Internal)<br />
ServerIron(config)# server fw-group 2<br />
ServerIron(config-tc-2)# fwall-info 1 1 209.157.22.2 209.157.23.1<br />
ServerIron(config-tc-2)# fwall-info 2 2 209.157.22.2 209.157.23.2<br />
ServerIron(config-tc-2)# exit<br />
ServerIron(config)# static-mac-address abcd.4321.34e2 ethernet 1 priority 1 routertype<br />
ServerIron(config)# static-mac-address abcd.4321.34e3 ethernet 2 priority 1 router-<br />
June 2009 © 2009 <strong>Brocade</strong> Communications Systems Inc. 3 - 3
ServerIron ADX Firewall Load Balancing Guide<br />
type<br />
ServerIron(config)# write mem<br />
Command Syntax<br />
Syntax: server fw-group 2<br />
Syntax: [no] fwall-info <br />
Syntax: [no] static-mac-address ethernet [priority ] [host-type | router-type]<br />
The priority can be 0 – 7 (0 is lowest and 7 is highest.<br />
The defaults are host-type and 0.<br />
NOTE: The static MAC entries are required. You must add a static MAC entry for each firewall interface with the<br />
ServerIron. In addition, you must use the priority 1 and router-type parameters with the static-mac-address<br />
command. These parameters enable the ServerIron to use the address for <strong>FWLB</strong>.<br />
NOTE: If you enter the command at the global CONFIG level, the static MAC entry applies to the default portbased<br />
VLAN (VLAN 1). If you enter the command at the configuration level for a specific port-based VLAN, the<br />
entry applies to that VLAN and not to the default VLAN.<br />
Configuration Example for <strong>Basic</strong> Layer 3 <strong>FWLB</strong><br />
The following sections show all the ServerIron commands you would enter on each ServerIron to implement the<br />
configuration shown in Figure 2.2 on page 2-6.<br />
Commands on ServerIron A (External)<br />
Enter the following commands to configure <strong>FWLB</strong> on ServerIron A.<br />
ServerIronA(config)# server fw-name FW1-IPin 209.157.22.3<br />
ServerIronA(config-rs-FW1-IPin)# exit<br />
ServerIronA(config)# server fw-name FW2-IPin 209.157.22.4<br />
ServerIronA(config-rs-FW2-IPin)# exit<br />
The commands above add two firewalls, FW1-IPin and FW2-IPin.<br />
The following commands configure parameters for firewall group 2. The fwall-info commands configure the paths<br />
for the firewall traffic. Each path consists of a path ID, the ServerIron port attached to the firewall, the IP address<br />
of the ServerIron at the other end of the path, and the next-hop IP address (usually the firewall interface connected<br />
to this ServerIron). Make sure you configure reciprocal paths on the other ServerIron, as shown in the section<br />
containing the CLI commands for ServerIron B.<br />
NOTE: Path information is required even if the firewalls are synchronized.<br />
The fw-name command adds the firewalls to the firewall group.<br />
ServerIronA(config)# server fw-group 2<br />
ServerIronA(config-tc-2)# fw-name FW1-IPin<br />
ServerIronA(config-tc-2)# fw-name FW2-IPin<br />
ServerIronA(config-tc-2)# fwall-info 1 3 209.157.23.3 209.157.22.3<br />
ServerIronA(config-tc-2)# fwall-info 2 5 209.157.23.3 209.157.22.4<br />
ServerIronA(config-tc-2)# exit<br />
The following commands add static MAC entries for the MAC addresses of the firewall interfaces connected to the<br />
ServerIron. Notice that the QoS priority is configured as priority 1 and the router-type parameter is specified.<br />
These parameters are required.<br />
3 - 4 © 2009 <strong>Brocade</strong> Communications Systems Inc. June 2009
<strong>Configuring</strong> <strong>Basic</strong> <strong>FWLB</strong><br />
NOTE: To ensure proper operation, always configure the path IDs so that the IDs consistently range from lowest<br />
path ID to highest path ID for the firewalls. For example, in Figure 2.2 on page 2-6, the path IDs should range from<br />
lowest to highest beginning with the firewall interface at the upper left of the figure.<br />
To ensure smooth operation, you might want to depict your firewalls in a vertical hierarchy as in Figure 2.2 on<br />
page 2-6, label the interfaces with their IP addresses, then configure the paths so that the path IDs to the<br />
interfaces range from lowest to highest path ID starting from the uppermost firewall interface.<br />
ServerIronA(config)# static-mac-address abcd.4321.34e0 ethernet 3 priority 1 routertype<br />
ServerIronA(config)# static-mac-address abcd.4321.34e1 ethernet 5 priority 1 routertype<br />
ServerIronA(config)# write memory<br />
Commands on ServerIron B (Internal)<br />
Enter the following commands to configure <strong>FWLB</strong> on ServerIron B. Notice that the fwall-info commands<br />
configure paths that are reciprocal to the paths configured on ServerIron A. Path 1 on each ServerIron goes<br />
through one of the firewalls while path 2 goes through the other firewall.<br />
ServerIronB(config)# server fw-name FW1-IPout 209.157.23.1<br />
ServerIronB(config-rs-FW1-IPout)# exit<br />
ServerIronB(config)# server fw-name FW2-IPout 209.157.23.2<br />
ServerIronB(config-rs-FW2-IPout)# exit<br />
ServerIronB(config)# server fw-group 2<br />
ServerIronB(config-tc-2)# fw-name FW1-IPout<br />
ServerIronB(config-tc-2)# fw-name FW2-IPout<br />
ServerIronB(config-tc-2)# fwall-info 1 1 209.157.22.2 209.157.23.1<br />
ServerIronB(config-tc-2)# fwall-info 2 2 209.157.22.2 209.157.23.2<br />
ServerIronB(config-tc-2)# exit<br />
ServerIronB(config)# static-mac-address abcd.4321.34e2 ethernet 1 priority 1 routertype<br />
ServerIronB(config)# static-mac-address abcd.4321.34e3 ethernet 2 priority 1 routertype<br />
ServerIronB(config)# write memory<br />
Configuration Examples with Layer 3 Routing Support<br />
This section shows examples of commonly used ServerIron basic <strong>FWLB</strong> deployments with Layer 3 configurations.<br />
The ServerIrons in these examples perform Layer 3 routing in addition to Layer 2 and Layer 4 – 7 switching.<br />
Generally, the steps for configuring Layer 4 – 7 features on a ServerIron running Layer 3 are similar to the steps on<br />
a ServerIron that is not running Layer 3. The examples focus on the Layer 3 aspects of the configurations.<br />
This section contains the following configuration examples:<br />
• “<strong>Basic</strong> <strong>FWLB</strong> with One Sub-Net and One Virtual Routing Interface” on page 3-5<br />
• “<strong>Basic</strong> <strong>FWLB</strong> with Multiple Sub-Nets and Multiple Virtual Routing Interfaces” on page 3-8<br />
<strong>Basic</strong> <strong>FWLB</strong> with One Sub-Net and One Virtual Routing Interface<br />
Figure 3.1 on page 3-6 shows an example of a basic <strong>FWLB</strong> configuration in which each ServerIron is in only one<br />
sub-net. On each ServerIron, a virtual routing interface is configured on all the ports in VLAN 1 (the default<br />
VLAN), and an IP sub-net address is configured on the virtual routing interface.<br />
The ServerIron supports dynamic routing protocols, including RIP and OSPF. However, some firewalls do not<br />
support dynamic routing and instead require static routes. The network in this example assumes that the firewalls<br />
do not support dynamic routing. Since the network uses static routes, each ServerIron is configured with an IP<br />
default route that uses one of the firewall interfaces as the next hop for the route.<br />
June 2009 © 2009 <strong>Brocade</strong> Communications Systems Inc. 3 - 5
ServerIron ADX Firewall Load Balancing Guide<br />
In addition, the client and server in this network each use a firewall interface as the default gateway. When this is<br />
the case, you need to do one of the following:<br />
• Configure each ServerIron with static MAC entries for the firewall interfaces. This example uses the static<br />
entries.<br />
• Configure the clients and servers to use the ServerIron itself as the default gateway.<br />
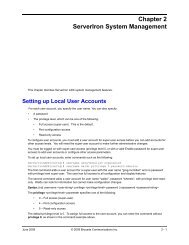
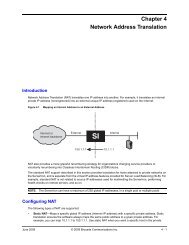
Figure 3.1 <strong>Basic</strong> <strong>FWLB</strong> in One Subnet Client<br />
IP:10.10.1.5 MAC:00.80.c8.b9.ab.a9 Layer3<br />
IP:10.10.1.15 Gtwy:10.10.1.111 or10.10.1.5 External ServerIron Port4/3<br />
Port4/2 Port4/1 S I¢A<br />
VLAN1<br />
10.10.1.111 DefaultRoute:10.10.1.5 VirtualInterface:<br />
Firewall�1 IP:10.10.2.5 MAC:00.80.c8.b9.ab.aa Port4/2 VLAN1 VirtualInterface: Port4/1 10.10.2.222 DefaultRoute:10.10.2.5<br />
Port4/3 ServerIron Internal I¢C S<br />
The following sections show the CLI commands for configuring the basic <strong>FWLB</strong> implementation in Figure 3.1<br />
IP:10.10.2.40 Gtwy:10.10.2.222<br />
on<br />
or10.10.2.5 Server<br />
page 3-6.<br />
Commands on the External ServerIron<br />
The following commands change the CLI to the global CONFIG level, then change the hostname to "SI-External".<br />
ServerIron> enable<br />
ServerIron# configure terminal<br />
ServerIron(config)# hostname SI-External<br />
IP:10.10.1.6 MAC:00.80.c8.b9.91.09 Layer3 Firewall�2<br />
MAC:00.80.c8.b9.91.0a IP:10.10.2.6<br />
The following commands configure a virtual routing interface on VLAN 1 (the default VLAN), then configure an IP<br />
address on the interface. The virtual routing interface is associated with all the ports in the VLAN. In this case,<br />
since all the ServerIron ports are in the default VLAN, the virtual routing interface is associated with all the ports<br />
on the device.<br />
SI-External(config)# vlan 1<br />
SI-External(config-vlan-1)# router-interface ve 1<br />
SI-External(config-vlan-1)# exit<br />
SI-External(config)# interface ve 1<br />
SI-External(config-ve-1)# ip address 10.10.1.111 255.255.255.0<br />
SI-External(config-ve-1)# exit<br />
The following command configures an IP default route. The first two "0.0.0.0" portions of the address are the IP<br />
address and network mask. Always specify zeroes when configuring an IP default route. The third value is the IP<br />
address of the next-hop gateway for the default route. In most cases, you can specify the IP address of one of the<br />
firewalls as the next hop. Specifying the default route is the Layer 3 equivalent of specifying the default gateway.<br />
3 - 6 © 2009 <strong>Brocade</strong> Communications Systems Inc. June 2009
SI-External(config)# ip route 0.0.0.0 0.0.0.0 10.10.1.5<br />
<strong>Configuring</strong> <strong>Basic</strong> <strong>FWLB</strong><br />
The following commands add the firewall definitions. In this example, port HTTP is configured on each firewall.<br />
Specifying the application ports on the firewalls is optional. If you configure an application port on a firewall, load<br />
balancing is performed for the configured port. All traffic from a given client for ports that are not configured is sent<br />
to the same firewall.<br />
SI-External(config)# server fw-name fw1 10.10.1.5<br />
SI-External(config-rs-fw1)# port http<br />
SI-External(config-rs-fw1)# exit<br />
SI-External(config)# server fw-name fw2 10.10.1.6<br />
SI-External(config-rs-fw2)# port http<br />
SI-External(config-rs-fw2)# exit<br />
The following commands add the firewall definitions to the firewall port group (always group 2). The firewall group<br />
contains all the ports in VLAN 1 (the default VLAN).<br />
SI-External(config)# server fw-group 2<br />
SI-External(config-tc-2)# fw-name fw1<br />
SI-External(config-tc-2)# fw-name fw2<br />
The following commands add the paths through the firewalls to the other ServerIron. Each path consists of a path<br />
number, a ServerIron port number, the IP address at the other end of the path, and the next-hop IP address. In<br />
this example, the topology does not contain routers other than the ServerIrons. If your topology does contain other<br />
routers, configure firewall paths for the routers too. For router paths, use the same IP address as the path<br />
destination and the next hop.<br />
NOTE: The path IDs must be in contiguous, ascending numerical order, starting with 1. For example, path<br />
sequence 1, 2, 3 , 4 is valid. Path sequence 4, 3, 2, 1 or 1, 3, 4, 5 is not valid.<br />
SI-External(config-tc-2)# fwall-info 1 4/1 10.10.2.222 10.10.1.5<br />
SI-External(config-tc-2)# fwall-info 2 4/2 10.10.2.222 10.10.1.6<br />
The following command sets the load balancing method to balance requests based on the firewall that has the<br />
least number of connections for the requested service. Since the firewall definitions above specify the HTTP<br />
service, the ServerIron will load balance requests based on the firewall that has fewer HTTP session entries in the<br />
ServerIron session table.<br />
SI-External(config-tc-2)# fw-predictor per-service-least-conn<br />
SI-External(config)# exit<br />
The following commands add static MAC entries for the firewall interfaces with the ServerIron. The static MAC<br />
entries are required only if the configuration uses static routes and a single virtual routing interface, as in this<br />
example, and if the default gateway for the client or server is the firewall. If the configuration uses a dynamic<br />
routing protocol (for example, RIP or OSPF), the static entries are not required. Alternatively, the static entries are<br />
not required if you use the ServerIron itself as the default gateway for the client or the server. For example, the<br />
static entries are not required if you configure the client to use 10.10.1.111 as its default gateway.<br />
SI-External(config)# vlan 1<br />
SI-External(config-vlan-1)# static-mac-address 0080.c8b9.aba9 ethernet 4/1<br />
priority 1 router-type<br />
SI-External(config-vlan-1)# static-mac-address 0080.c8b9.9109 ethernet 4/2<br />
priority 1 router-type<br />
SI-External(config-vlan-1)# exit<br />
The following command saves the configuration changes to the startup-config file.<br />
SI-External(config)# write memory<br />
Commands on the Internal ServerIron<br />
ServerIron> enable<br />
ServerIron# configure terminal<br />
ServerIron(config)# hostname SI-Internal<br />
SI-Internal(config)# vlan 1<br />
June 2009 © 2009 <strong>Brocade</strong> Communications Systems Inc. 3 - 7
ServerIron ADX Firewall Load Balancing Guide<br />
SI-Internal(config-vlan-1)# router-interface ve 1<br />
SI-Internal(config-vlan-1)# exit<br />
SI-Internal(config)# interface ve 1<br />
SI-Internal(config-ve-1)# ip address 10.10.2.222 255.255.255.0<br />
SI-Internal(config-ve-1)# exit<br />
SI-Internal(config)# ip route 0.0.0.0 0.0.0.0 10.10.2.5<br />
SI-Internal(config)# server fw-name fw1 10.10.2.5<br />
SI-Internal(config-rs-fw1)# port http<br />
SI-Internal(config-rs-fw1)# exit<br />
SI-Internal(config)# server fw-name fw2 10.10.2.6<br />
SI-Internal(config-rs-fw2)# port http<br />
SI-Internal(config-rs-fw2)# exit<br />
SI-Internal(config)# server fw-group 2<br />
SI-Internal(config-tc-2)# fw-name fw1<br />
SI-Internal(config-tc-2)# fw-name fw2<br />
SI-Internal(config-tc-2)# fwall-info 1 4/1 10.10.1.111 10.10.2.5<br />
SI-Internal(config-tc-2)# fwall-info 2 4/2 10.10.1.111 10.10.2.6<br />
SI-Internal(config-tc-2)# fw-predictor per-service-least-conn<br />
SI-Internal(config)# exit<br />
SI-Internal(config)# vlan 1<br />
SI-Internal(config-vlan-1)# static-mac-address 0080.c8b9.abaa ethernet 4/1<br />
priority 1 router-type<br />
SI-Internal(config-vlan-1)# static-mac-address 0080.c8b9.910a ethernet 4/2<br />
priority 1 router-type<br />
SI-Internal(config-vlan-1)# exit<br />
SI-Internal(config)# write memory<br />
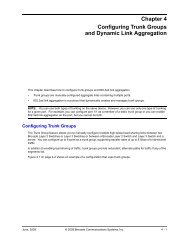
<strong>Basic</strong> <strong>FWLB</strong> with Multiple Sub-Nets and Multiple Virtual Routing Interfaces<br />
Figure 3.2 on page 3-9 shows an example of a basic <strong>FWLB</strong> configuration in which multiple IP sub-net interfaces<br />
are configured on each ServerIron. On each ServerIron, the client or server is in one sub-net and the firewalls are<br />
in another sub-net. The ports connected to the firewalls are configured in a separate port-based VLAN. The<br />
ServerIron’s IP interface to the firewalls is configured on a virtual routing interface associated with the ports in the<br />
VLAN.<br />
The client and server in this example are each configured to use their locally attached ServerIron as the default<br />
gateway, instead of using a firewall interface. Therefore, you do not need to configure static MAC entries for the<br />
firewalls on the ServerIron.<br />
3 - 8 © 2009 <strong>Brocade</strong> Communications Systems Inc. June 2009
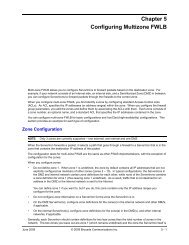
Figure 3.2 <strong>Basic</strong> <strong>FWLB</strong> in Multiple Sub-nets Using Multiple Routing Interfaces Client<br />
Firewall�1 Layer3<br />
IP:10.10.7.15 Gtwy:10.10.7.101<br />
External ServerIron S I¢A<br />
VirtualRouting<br />
ServerIron Internal<br />
Interface1<br />
10.10.1.111<br />
VirtualRouting Interface1 10.10.2.222<br />
I¢C S<br />
Interface2 10.10.7.101 VirtualRouting<br />
Interface2 10.10.5.101 VirtualRouting<br />
Firewall�2 Layer3<br />
<strong>Configuring</strong> <strong>Basic</strong> <strong>FWLB</strong><br />
Commands on the External ServerIron<br />
The following commands change the CLI to the global CONFIG level, then change the<br />
IP:10.10.5.40 Gtwy:10.10.5.101<br />
Server<br />
hostname to "SI-External".<br />
ServerIron> enable<br />
ServerIron# configure terminal<br />
ServerIron(config)# hostname SI-External<br />
The following commands configure virtual routing interface 1, which is connected to the firewalls. Since both<br />
firewalls are in the same sub-net, you must configure the ServerIron’s IP interface with the firewalls on a virtual<br />
routing interface. Otherwise, you cannot configure the same address on more than port.<br />
The first three commands configure the VLAN. The last two commands configure an IP address on the interface.<br />
The IP address is assigned to all the ports in the VLAN associated with the virtual routing interface.<br />
SI-External(config)# vlan 10<br />
SI-External(config-vlan-10)# untagged ethernet 4/1 to 4/4<br />
SI-External(config-vlan-10)# router-interface ve 1<br />
SI-External(config-vlan-10)# exit<br />
SI-External(config)# interface ve 1<br />
SI-External(config-ve-1)# ip address 10.10.1.111 255.255.255.0<br />
SI-External(config-ve-1)# exit<br />
The following commands configure virtual routing interface 2, which is connected to the client.<br />
SI-External(config)# vlan 20<br />
SI-External(config-vlan-20)# untagged ethernet 4/5 to 4/24<br />
SI-External(config-vlan-20)# router-interface ve 2<br />
SI-External(config-vlan-20)# exit<br />
SI-External(config)# interface ve 2<br />
SI-External(config-ve-2)# ip address 10.10.7.101 255.255.255.0<br />
SI-External(config-ve-2)# exit<br />
June 2009 © 2009 <strong>Brocade</strong> Communications Systems Inc. 3 - 9
ServerIron ADX Firewall Load Balancing Guide<br />
Since Figure 3.2 on page 3-9 shows only one port connected to one client, you could configure the IP address on<br />
the physical port attached to the client instead of configuring the address on a separate VLAN. This example uses<br />
a virtual routing interface to demonstrate that you can use multiple virtual routing interfaces in your configuration.<br />
The following command configures an IP default route. The first two "0.0.0.0" portions of the address are the IP<br />
address and network mask. Always specify zeroes when configuring an IP default route. The third value is the IP<br />
address of the next-hop gateway for the default route. In most cases, you can specify the IP address of one of the<br />
firewalls as the next hop. Specifying the default route is the Layer 3 equivalent of specifying the default gateway.<br />
SI-External(config)# ip route 0.0.0.0 0.0.0.0 10.10.1.5<br />
The following commands add the firewall definitions.<br />
SI-External(config)# server fw-name fw1 10.10.1.5<br />
SI-External(config-rs-fw1)# port http<br />
SI-External(config-rs-fw1)# exit<br />
SI-External(config)# server fw-name fw2 10.10.1.6<br />
SI-External(config-rs-fw2)# port http<br />
SI-External(config-rs-fw2)# exit<br />
The following commands add the firewall definitions to the firewall port group.<br />
SI-External(config)# server fw-group 2<br />
SI-External(config-tc-2)# fw-name fw1<br />
SI-External(config-tc-2)# fw-name fw2<br />
The following commands add the paths through the firewalls to the other ServerIron. Each path consists of a path<br />
number, a ServerIron port number, the IP address at the other end of the path, and the next-hop IP address. In<br />
this example, the topology does not contain routers other than the ServerIrons. If your topology does contain other<br />
routers, configure firewall paths for the routers too. For router paths, use the same IP address as the path<br />
destination and the next hop.<br />
NOTE: The path IDs must be in contiguous, ascending numerical order, starting with 1. For example, path<br />
sequence 1, 2, 3 , 4 is valid. Path sequence 4, 3, 2, 1 or 1, 3, 4, 5 is not valid.<br />
SI-External(config-tc-2)# fwall-info 1 4/1 10.10.2.222 10.10.1.5<br />
SI-External(config-tc-2)# fwall-info 2 4/2 10.10.2.222 10.10.1.6<br />
The following command sets the load balancing method to balance requests based on the firewall that has the<br />
least number of connections for the requested service.<br />
SI-External(config-tc-2)# fw-predictor per-service-least-conn<br />
SI-External(config-tc-2)# exit<br />
The following command saves the configuration changes to the startup-config file.<br />
SI-External(config)# write memory<br />
Commands on the Internal ServerIron<br />
ServerIron> enable<br />
ServerIron# configure terminal<br />
ServerIron(config)# hostname SI-Internal<br />
SI-Internal(config)# vlan 10<br />
SI-Internal(config-vlan-10)# untagged ethernet 4/1 to 4/4<br />
SI-Internal(config-vlan-10)# router-interface ve 1<br />
SI-Internal(config-vlan-10)# exit<br />
SI-Internal(config)# interface ve 1<br />
SI-Internal(config-ve-1)# ip address 10.10.2.222 255.255.255.0<br />
SI-Internal(config-ve-1)# exit<br />
SI-Internal(config)# vlan 20<br />
SI-Internal(config-vlan-20)# untagged ethernet 4/5 to 4/24<br />
SI-Internal(config-vlan-20)# router-interface ve 2<br />
SI-Internal(config-vlan-20)# exit<br />
SI-Internal(config)# interface ve 2<br />
3 - 10 © 2009 <strong>Brocade</strong> Communications Systems Inc. June 2009
SI-Internal(config-ve-2)# ip address 10.10.5.101 255.255.255.0<br />
SI-Internal(config-ve-2)# exit<br />
SI-Internal(config)# ip route 0.0.0.0 0.0.0.0 10.10.2.5<br />
SI-Internal(config)# server fw-name fw1 10.10.2.5<br />
SI-Internal(config-rs-fw1)# port http<br />
SI-Internal(config-rs-fw1)# exit<br />
SI-Internal(config)# server fw-name fw2 10.10.2.6<br />
SI-Internal(config-rs-fw2)# port http<br />
SI-Internal(config-rs-fw2)# exit<br />
SI-Internal(config)# server fw-group 2<br />
SI-Internal(config-tc-2)# fw-name fw1<br />
SI-Internal(config-tc-2)# fw-name fw2<br />
SI-Internal(config-tc-2)# fwall-info 1 4/1 10.10.1.111 10.10.2.5<br />
SI-Internal(config-tc-2)# fwall-info 2 4/2 10.10.1.111 10.10.2.6<br />
SI-Internal(config-tc-2)# fw-predictor per-service-least-conn<br />
SI-Internal(config-tc-2)# exit<br />
SI-Internal(config)# write memory<br />
<strong>Configuring</strong> <strong>Basic</strong> <strong>FWLB</strong><br />
June 2009 © 2009 <strong>Brocade</strong> Communications Systems Inc. 3 - 11
ServerIron ADX Firewall Load Balancing Guide<br />
3 - 12 © 2009 <strong>Brocade</strong> Communications Systems Inc. June 2009