Glass Body, Sealed and Refillable pH Electrodes - Sensorex
Glass Body, Sealed and Refillable pH Electrodes - Sensorex
Glass Body, Sealed and Refillable pH Electrodes - Sensorex

You also want an ePaper? Increase the reach of your titles
YUMPU automatically turns print PDFs into web optimized ePapers that Google loves.
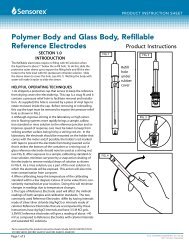
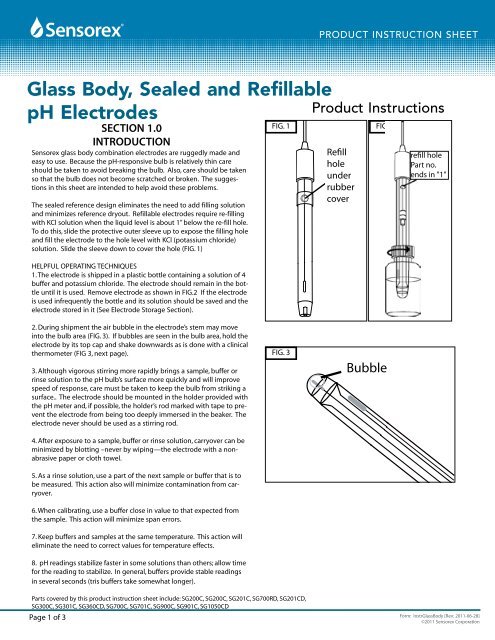
Product INSTRUCTION Sheet<strong>Glass</strong> <strong>Body</strong>, <strong>Sealed</strong> <strong>and</strong> <strong>Refillable</strong><strong>pH</strong> <strong>Electrodes</strong>SECTION 1.0INTRODUCTION<strong>Sensorex</strong> glass body combination electrodes are ruggedly made <strong>and</strong>easy to use. Because the <strong>pH</strong>-responsive bulb is relatively thin careshould be taken to avoid breaking the bulb. Also, care should be takenso that the bulb does not become scratched or broken. The suggestionsin this sheet are intended to help avoid these problems.The sealed reference design eliminates the need to add filling solution<strong>and</strong> minimizes reference dryout. <strong>Refillable</strong> electrodes require re-fillingwith KCl solution when the liquid level is about 1” below the re-fill hole.To do this, slide the protective outer sleeve up to expose the filling hole<strong>and</strong> fill the electrode to the hole level with KCl (potassium chloride)solution. Slide the sleeve down to cover the hole (FIG. 1)HELPFUL OPERATING TECHNIQUES1. The electrode is shipped in a plastic bottle containing a solution of 4buffer <strong>and</strong> potassium chloride. The electrode should remain in the bottleuntil it is used. Remove electrode as shown in FIG.2 If the electrodeis used infrequently the bottle <strong>and</strong> its solution should be saved <strong>and</strong> theelectrode stored in it (See Electrode Storage Section).FIG. 1Product InstructionsRefillholeunderrubbercoverREFILL HOLEUNDERRUBBERSEALFIG. 2refill holePart no.ends in "1"2. During shipment the air bubble in the electrode’s stem may moveinto the bulb area (FIG. 3). If bubbles are seen in the bulb area, hold theelectrode by its top cap <strong>and</strong> shake downwards as is done with a clinicalthermometer (FIG 3, next page).3. Although vigorous stirring more rapidly brings a sample, buffer orrinse solution to the <strong>pH</strong> bulb’s surface more quickly <strong>and</strong> will improvespeed of response, care must be taken to keep the bulb from striking asurface.. The electrode should be mounted in the holder provided withthe <strong>pH</strong> meter <strong>and</strong>, if possible, the holder’s rod marked with tape to preventthe electrode from being too deeply immersed in the beaker. Theelectrode never should be used as a stirring rod.4. After exposure to a sample, buffer or rinse solution, carryover can beminimized by blotting –never by wiping—the electrode with a nonabrasivepaper or cloth towel.5. As a rinse solution, use a part of the next sample or buffer that is tobe measured. This action also will minimize contamination from carryover.6. When calibrating, use a buffer close in value to that expected fromthe sample. This action will minimize span errors.7. Keep buffers <strong>and</strong> samples at the same temperature. This action willeliminate the need to correct values for temperature effects.8. <strong>pH</strong> readings stabilize faster in some solutions than others; allow timefor the reading to stabilize. In general, buffers provide stable readingsin several seconds (tris buffers take somewhat longer).FIG. 3BubbleParts covered by this product instruction sheet include: SG200C, SG200C, SG201C, SG700RD, SG201CD,SG300C, SG301C, SG360CD, SG700C, SG701C, SG900C, SG901C, SG1050CDPage 1 of 3Form: Instr<strong>Glass</strong><strong>Body</strong> [Rev: 2011-06-28]©2011 <strong>Sensorex</strong> Corporation
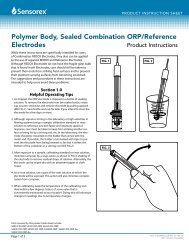
Product INSTRUCTION Sheet9. Keep in mind that all <strong>pH</strong> electrodes age with time. Aging ischaracterized by shortened span <strong>and</strong> slower speed of response.If the <strong>pH</strong> meter has a manual or microprocessor slope (span)control, the control can be adjusted to compensate for electrodespan errors (but will not affect the speed of response). Aging isbest detected by calibrating the electrode in, for example, 7 buffer,then rinsing <strong>and</strong> placing the electrode in 4 buffer. As a rule,if the span is 10% or more in error (a reading of 4.3 or higher forthis example) the electrode should be cleaned <strong>and</strong> retested (seethe Electrode Cleaning section) or reconditioned (see the Reconditioningsection). If performance is not restored the electrodeshould be replaced.SECTION 2.0CALIBRATION PROCEDUREAs a rule, follow the procedures recommended by the <strong>pH</strong>Meter manufacturer keeping in mind the Helpful OperatingTechniques given above. The frequency of calibration is a functionof the electrode, the <strong>pH</strong> meter <strong>and</strong> the solutions the electrodeis exposed to. The electrode <strong>and</strong> meter should always becalibrated together with the calibration frequency determinedby experience. Use two buffers, for example 7 & 4 or 7 & 10(FIG. 5). Use the following step-wise procedure for both calibrationin buffers <strong>and</strong> for sample measurements.1. Remove the electrode from its soaker bottle <strong>and</strong> save thebottle.2. Rinse the electrode with de-ionized water from a squirt bottleor carefully stir the electrode in a beaker of rinse solution.3. Remove residual drops of solution from the electrode by blottingwith a non-abrasive paper or cloth.4. Insert the electrode in the buffer or sample <strong>and</strong> stir gently.5. Allow the reading to stabilize <strong>and</strong> then adjust the meter (ifcalibrating) or take the reading (if making a measurement).6. Repeat these steps for each sample or buffer determination.NOTE: if the electrode’s span is to be checked (as should bedone from time to time) repeat steps 2 through 4 with a secondbuffer, allow the reading to stabilize <strong>and</strong> adjust the span (slope)control or compare the buffer readings per step 9 above.7. Between readings place the electrode in a beaker containingabout 2 cm (1 inch) of, preferably, <strong>pH</strong> 4 buffer or distilled water.FIG. 4FIG. 5<strong>pH</strong> 7.00Bubble7.00 <strong>pH</strong><strong>pH</strong> Meter<strong>pH</strong> 4.01/10.00Page 2 of 3Form: Instr<strong>Glass</strong><strong>Body</strong> [Rev: 2011-06-28]©2011 <strong>Sensorex</strong> Corporation
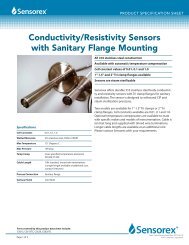
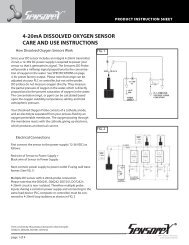
Product INSTRUCTION SheetSECTION 3.0ELECTRODE STORAGEFIG. 6When <strong>pH</strong> readings are made infrequently, for example, severaldays or weeks apart, the electrode can be stored simply byreplacing it in its soaker bottle. First, slide the cap onto the electrode,then the o-ring, then insert the electrode into the bottle<strong>and</strong> firmly tighten the cap. If the solution in the soaker bottle ismissing, fill the bottle with <strong>pH</strong> 4 buffer.SECTION 4.0CLEANING PROCEDURECoatings that coat the reference junction can cause readingerrors <strong>and</strong> coatings must be removed if accurate results are tobe obtained. We first suggest a rinse in 5% HCl for 5 minutes.Some coatings may not dissolve in HCl <strong>and</strong> so you can try aliquid detergent. If proteins are in the sample, Terg-A-Zyme®,a powdered detergent that contains enzymes that breakdownproteins, is recommended. Alcohol may be used for stubbornorganic deposits but do not soak electrode in it. Do not use abrush or abrasive cleaner. (FIG. 6)SECTION 5.0ELECTRODE RECONDITIONINGWhen reconditioning is required due to electrode aging (seeHelpful Operating Techniques, Part 9), the following chemicaltreatments can be tried. They are presented in the order of theseverity of their attack on the <strong>pH</strong> glass <strong>and</strong> may not improve (<strong>and</strong>in some cases actually further deteriorate) electrode performance.(FIG.7)NOTE: Use proper precautions when h<strong>and</strong>ling these hazardouschemicals. Ammonium bifluoride <strong>and</strong> HF (hydrofluoric acid)are extremely hazardous <strong>and</strong> should only be used by qualifiedpersonnel.FIG. 7step 1 step 20.1M HCl0.1M NaOH3Xstep 3 step 410-15 seconds3 minutes 3 minutesNH 4 F 2(NH4)F21. Immerse the electrode tip in 0.1N HCl for 15 seconds,rinse in tap water <strong>and</strong> then immerse tip in 0.1N NaOH for 15seconds <strong>and</strong> rinse in tap water. Repeat this sequence three times<strong>and</strong> then recheck electrode performance. If performance has notbeen restored, try Step 2.2. Immerse the tip in a 20% solution of NH4F (ammoniumbifluoride) for 2 or 3 minutes, rinse in tap water <strong>and</strong> recheckperformance. If performance has not been restored, try Step 3.3. Immerse electrode tip in 5% HF for 10 to 15 seconds,rinse well in tap water, quickly rinse in 5N HCl, rinse well in tapwater <strong>and</strong> recheck performance. If performance has not beenrestored it is time to get another glass bidy combination <strong>pH</strong> electrode.5% HF5% HF5N HCl DIH2O5N HClDI H 2 OPage 3 of 3Form: Instr<strong>Glass</strong><strong>Body</strong> [Rev: 2011-06-28]©2011 <strong>Sensorex</strong> Corporation