Quick Guide Wireless LAN PC / PCI Card - Mondo Plast
Quick Guide Wireless LAN PC / PCI Card - Mondo Plast
Quick Guide Wireless LAN PC / PCI Card - Mondo Plast
- No tags were found...

Create successful ePaper yourself
Turn your PDF publications into a flip-book with our unique Google optimized e-Paper software.
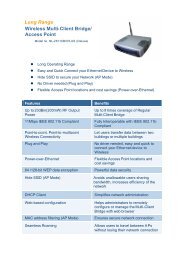
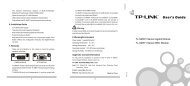
<strong>Quick</strong> <strong>Guide</strong><strong>Wireless</strong> <strong>LAN</strong> <strong>PC</strong> / <strong>PC</strong>I <strong>Card</strong>This <strong>Quick</strong> Installation <strong>Guide</strong> is intended for users who are familiar with <strong>Wireless</strong> <strong>LAN</strong> <strong>PC</strong> / <strong>PC</strong>I<strong>Card</strong> driver installation for Windows 98/ME/2000/XP.Installation for Windows 98/ME/2000/XPDuring the installation, Windows may need to copy systems files from the Windows installationdiskette or CD-ROM. Therefore you may need a copy of the Windows installation diskette orCD-ROM at hand before installing the drivers. On Win98/ME operating systems the necessaryinstallation files are usually archived on the hard disk in the C:\WINDOWS\OPTIONS\CABSdirectory.Note: Please upgrade the BIOS and System Drivers of your laptop to the latest version available.The <strong>Wireless</strong> <strong>LAN</strong> <strong>Card</strong> may not work properly with the following laptop models:1. IBM-X31, <strong>Card</strong>bus chipset Ricoh 5C476 (II)2. Acer TravelMate 650/660/260, <strong>Card</strong>bus chipset O2 Micro3. Acer laptop, <strong>Card</strong>bus chipset Ricoh 5C475(II)4. HP-NX7000, <strong>Card</strong>bus chipset ENE CB1410 <strong>Card</strong>bus ControllerRun Setup from the Installation CD1. Turn on the computer.2. Make sure that there isn’t any <strong>Wireless</strong> <strong>LAN</strong> <strong>PC</strong> / <strong>PC</strong>I <strong>Card</strong> inserted.3. Insert the Installation CD into your CD-ROM drive. The setup program should startautomatically. If it does not start automatically, you can run it manually by double clicking onthe setup.htm file from CD-ROM drive.4. Select Client and then select Drivers. From the list displayed select the appropriate modelnumber and then click on the Open button.5. The Install Shield Wizard will appear, click on the Next button. This will copy the filesnecessary for the instillation process.6. The installation process is ready to begin, click on the Next button.7. Read the Software License Agreement, click on the Yes button. The installation process willthen begin and copy the necessary files.8. Click on the Finish button to complete the first part of the installation process.9. Insert the <strong>PC</strong> / <strong>PC</strong>I card into the <strong>PC</strong>MCIA / <strong>PC</strong>I slot of your computer. Windows will thendetect the device.CAUTION: Gently insert the <strong>PC</strong> / <strong>PC</strong>I card into the slot. Forcing a misaligned card into the slot candamage the card and the computer.10. Select Install the software automatically (Recommended) radio button and then click onthe Next button. Windows will then begin to copy the necessary files.11. Click on the Finish button to complete the installation process.<strong>Quick</strong> <strong>Guide</strong>
<strong>Quick</strong> <strong>Guide</strong><strong>Wireless</strong> <strong>LAN</strong> <strong>PC</strong> / <strong>PC</strong>I <strong>Card</strong>Make sure that the network protocol parameters of your computer are set correctly. These includethe IP address, subnet mask, gateway and DNS. If you aren’t familiar with how to set the networkprotocol parameters, refer to the User’s Manual in the Installation CD.View the User’s ManualThe User’s Manual includes a more detailed version of the installation process along with detailson how to configure the client utility. Follow the steps below in order to view the User’s Manual.1. Insert the Installation CD into your CD-ROM drive. The setup program should startautomatically. If it does not start, you can run it manually by double clicking on thesetup.htm file from CD-ROM drive.2. Select Client and then select User’s Manual. From the list displayed select theappropriate model number to view the User’s Manual.Note: You must have Adobe Acrobat Reader installed on your computer in order to view theUser’s Manual.Install Adobe Acrobat Reader 6.01. Insert the Installation CD into your CD-ROM drive. The setup program should startautomatically. If it does not start, you can run it manually by double clicking on thesetup.htm file from CD-ROM drive.2. Select Client and then select User’s Manual. Click on the Adobe Acrobat hyperlink, andthen click on the Open button.3. Follow the steps in the Adobe Acrobat wizard to install the software.<strong>Quick</strong> <strong>Guide</strong>