Bravo- Brava
Bravo- Brava
Bravo- Brava
- No tags were found...

Create successful ePaper yourself
Turn your PDF publications into a flip-book with our unique Google optimized e-Paper software.
Fiat <strong>Bravo</strong>/a Service Manual Volume 3Click here tochoose chapterFuel SystemAuto trans. &diffBraking system]|Electrica< Sys Wtfingjfile:///D|/Volume%203/Vol3.htm(l of 2)08/07/2006 16:38:12
Fiat <strong>Bravo</strong>/a Service Manual Volume 3file:///D|/Volume%203/Vol3.htm(2 of 2)08/07/2006 16:38:12
<strong>Bravo</strong>-<strong>Brava</strong>SummaryTECHNICAL SERVICE MANUAL COMPOSITIONAt present, October 1999, the <strong>Bravo</strong>-<strong>Brava</strong>below:Print N°SectionsPageNos.3rd volume manual is composed of the booklets indicatedNotes001 - 6Technical data <strong>Bravo</strong> 1988 HGT 20v Sport Pack506.670/06(Ml/95)101 - 18Fuel system 1910 TD 100 engine21-271 - 50Automatic transmission551 - 36Wiring diagrams - Connector blocks001 - 11Technical data 1910 TD and 1581 automatic transmission506.670/07(VI/1996)21-2751 - 69Automatic transmission551 - 11Mid-range radio506.670/08(IX/1996)1028Fuel system 1910 TD 100 engine101 - 29Removing-refitting 1910 TD 100 engine006Introduction-Technical data506.670/10(XI/96)101 - 34Fuel system 1910 TD 75 engine101 - 24Removing-refitting 1910 TD 75 engine104Removing-refitting 1910 TD 100 engine506.670/09(11/1997)001 - 50Planned maintenance operations506.670/11(VI/1997)002IntroductionCopyright Fiat AutoI
Summary<strong>Bravo</strong>-<strong>Brava</strong>Print N°SectionsPageNos.Notes104Removing - refitting 1910 TD 100 engine506.670/11(VI/1997)105Removing - refitting 1910 TD 75 engine21-274Automatic transmission and differential506.670/12(Vll/1997)004Introduction506.670/13(XI/1997)102Fuel system 1910 TD 75336Brakes - EBD001 - 10fflp^16V 98 range506.670/14(111/1998)101 - 64Fuel system }j^M) 161/98 range551 - 37Wiring diagrams l^^j161/1998 range001 - 77Technical data 98 range1 - 54Fuel system TCp) 16V 98 range101 - 42Fuel system \^M)201/98 range506.670/16(IX/1998)1 - 26Fuel system i^p) JTD 98 range501 - 16Climate control 98 range1 - 11Control panels - 98 range radio551 - 25Wiring diagrams 98 range15 - 16Wiring diagram updateII Print n° 506.670/21
<strong>Bravo</strong>-<strong>Brava</strong>SummaryPrint N°SectionsPageNos.Notes35 - 36Fuel system update kjj&ji) 20V 98 range1021 - 22Fuel system update ItMji) JTD 98 range506.670/17(1/1999)21-271 - 13Gearbox and differential l^M) 16V98 range337 - 8ABS with active sensors update (98 range)5017-29Climate control update - Additional heater 98 range551 - 82Electrical equipment update 98 range506.670/18(M/1999)1027 -44Fuel system Ifgjji) JTD 98 range - Removing-refitting components.506.670/19(111/1999)0039 - 40Technical data update 98 range1031Update: 1910 TD 100 engine lubrication diagram0011Technical data update IU3iJ) 16V98 range506.670/20(V/1999)1051 - 54Fuel system update 1^S| 16V98 range37 - 38Fuel system update |^^| 20V 98 range5583 - 88Electrical equipment update 98 range007 - 85 - 621 - 22Technical data update )^M\ TDTechnical data update 98 range506.670/21(X/1999)31 - 3859 - 60Fuel system update Iig2^ 16V98 range1025 - 267 - 829 - 3033 - 3441 -42Fuel system update i^M) 16V 98 rangeFuel system update ilfeij^) JTD 98 rangeCopyright Fiat AutoIII
<strong>Bravo</strong>-<strong>Brava</strong>SummaryTECHNICAL SERVICE MANUAL COMPOSITIONAs of May 1999, the <strong>Bravo</strong>-<strong>Brava</strong> volume 3 manual is composed of the parts indicated belowPrint N°SectionsPageNos.Comments001 - 6Technical data <strong>Bravo</strong> 1988 HGT 20v Sport Pack506.670/06(Ml/95)101 - 18Fuel system 1910 TD 100 engine21-271 - 50Automatic transmission551 - 36Wiring diagrams - Connector blocks001 -H 11Technical data 1910 TD and 1581 automatic transmission506.670/07(VI/1996)21-2751 - 69Automatic transmission551-11Mid-range radio506.670/08(IX/1996)1028Fuel system 1910 TD 100 engine101 - 29Removing-refitting 1910 TD 100 engine006Introduction-Technical data506.670/10(XI/96)101-34Fuel system 1910 TD 75 engine101 - 24Removing-refitting 1910 TD 75 engine104Removing-refitting 1910 TD 100 engine506.670/09. (11/1997)001 - 50Planned maintenance operations506.670/11(VI/1997)002AlgemeenCopyright Fiat Auto
Summary<strong>Bravo</strong>-<strong>Brava</strong>Print N°SectionsPageNos.Comments104Removing - refitting 1910 TD 100 engine506.670/11(VI/1997)105Removing - refitting 1910 TD 75 engine21-274Automatic transmission and differential506.670/12(VII/1997)004Algemeen506.670/13(XI/1997)102Fuel system 1910 TD 75336Brakes - EBD001 - 10Ifl^l 16V 98 range506.670/14(111/1998)101 - 64Fuel system lfl^| lev 98 range551 - 37Wiring diagrams 1^^)161/1998 range001 - 77Technical data 98 range1 - 54Fuel system Kg^) 16V 98 range101 - 42Fuel system I^M) 20V 98 range506.670/16(IX/1998)1 -H 26Fuel system I^S) JTD 98 range501 - 16Climate control 98 range1 - 11Control panels - 98 range radio551 - 25Wiring diagrams 98 range15 - 16Wiring diagram updatePrint n° 506.670/20
<strong>Bravo</strong>-<strong>Brava</strong>SummaryPrint N°SectionsPageNos.Comments35 - 36Fuel system update |^3) 20V98 range1021 - 22Fuel system update lltflj^ JTD 98 range506.670/17(1/1999)21 -271 - 13Gearbox and differential l^p| 16V 98 range337 - 8ABS with active sensors update (98 range)5017 - 29Climate control update - Additional heater 98 range551 - 82Electrical equipment update 98 range506.670/18(11/1999)1027 - 44Fuel system KHIji) JTD 98 range - Removing-refitting components.506.670/19(111/1999)0039 - 40Technical data update 98 range1031Update: 1910 TD 100 engine lubrication diagram0011Technical data update lu&U) 16V98 range506.670/20(V/1999)1051 - 5437 - 38Fuel system update I^M) 16V 98 rangeFuel system update 1^^) 20V 98 range5583 - 88Electrical equipment update 98 range
<strong>Bravo</strong>-<strong>Brava</strong>SummarySERVICE MANUAL COMPOSITIONAt present, March 1999, the <strong>Bravo</strong>-<strong>Brava</strong> 3belowPrint N°SectionsPageNos.volume manual is composed of the booklets indicatedComments001 - 6Technical data <strong>Bravo</strong> 1988 HGT 20v Sport Pack506.670/06(HI/95)101 - 18Fuel system 1910 TD 100 engine21-271 - 50Automatic transmission551 - 36Wiring diagrams - Connector blocks001 - 11Technical data 1910 TD and 1581 automatic transmission506.670/07(VI/1996)21-2751 - 69Automatic transmission551 - 11Middle of the range radio506.670/08(IX/1996)1028Fuel system 1910 TD 100 engine101 - 29Removing-refitting 1910 TD 100 engine006Introduction-Technical data506.670/10(XI/96)101 - 34Fuel system 1910 TD 75 engine101 - 24Removing-refitting 1910 TD 75 engine104Removing-refitting 1910 TD 100 engine506.670/09(11/1997)001 - 50Planned maintenance operations506.670/11(VI/1997)002IntroductionCopyright Fiat AutoI
Summary<strong>Bravo</strong>-<strong>Brava</strong>Print N°SectionsPageNos.Comments104Removing - refitting 1910 TD 100 engine506.670/11(VI/1997)105Removing .- refitting 1910 TD 75 engine21-274Automatic transmission and differential506.670/12(VII/1997)004Introduction506.670/13(XI/1997)102Fuel system 1910 TD 75336Brakes - EBD001 - 10l^p) 16V 98 range506.670/14(111/1998)101 - 64Fuel system iC3p) 16V 98 range551 - 37Wiring diagrams4 161/98 range001 - 77Technical data 98 range1 - 54Fuel system lE^| 16V 98 range101 - 42Fuel system te§p| 20V 98 range506.670/16(IX/1998)1 - 26Fuel system liEglji) JTD 98 range501 - 16Climate control 98 range1 - 11Control panels - 98 range radio551 - 25Wiring diagrams 98 range15 - 16Wiring diagram updateII Print n° 506.670/19
<strong>Bravo</strong>- <strong>Brava</strong>SummaryPrint N°SectionsPageNos.Comments35 - 36Fuel system update l^^) 20V 98 range1021 - 22Fuel system update ||Egt|J| JTD 98 range506.670/17(1/1999)21-271 - 13Gearbox and differential I^M) 16V 98 range337 - 8ABS with active sensors update (98 range)5017 - 29Climate control update - Additional heater 98 range551 - 82Electrical equipment update 98 range506.670/19(111/1999)0039 - 40Technical data update 98 range1031Update: 1910 TD 100 engine lubrication diagramCopyright Fiat Auto
Summary<strong>Bravo</strong>-<strong>Brava</strong>4A06SVPrint N°SectionsPageNos.Comments001 - 10@l l6v 98 range506.670/14(111/1998)101 - 64Fuel system @i6v 98 range551 - 37Wiring diagrams'^) lev 98 range001 - 77Technical data 98 range1 - 54Fuel system *^l 16v 98 range101 - 42Fuel system '^t 20v 98 range506.670/16(IX/1998)1 - 26Fuel system &*JTO 98 range501 - 16Climate control 98 range1 - 11Control panels - Radio 98 range551 - 25Wiring diagrams 98 range15 - 16Wiring diagram update35 - 36Fuel system update lg|| 20v 98 range1021 - 22Fuel system update )fi| JTD 98 range506.670/1721-271 - 13Gearbox and differential @l I6v 98 range(1/1999)337-8ABS with active sensors update (98range)5017-29Update: climate control -Additional heater 98 range551 - 82Update: Electrical equipment 98 rangePrint no. 506.670/17
<strong>Bravo</strong>-<strong>Brava</strong>SummarySERVICE MANUAL COMPOSITIONAt present, September 1998, the <strong>Bravo</strong>- <strong>Brava</strong> manual 3rd volume is composed of the following booklets:Print IM°SectionsPageNos.Comments001 + 6Tech. data <strong>Bravo</strong> 1988 HGT 20v Sport-Pack506.670/06101 + 18Fuel system: 1910 TD 100 engine(111/1995)21-271 + 50Automatic transmission551 + 36Wiring diagrams-Connector blocks506.670/07(VI/1996)0021-271-1151 - 69Technical data 1910 TD and 1581 automatictransmissionAutomatic transmission551 + 11Middle of the range radio506.670/081028Fuel system: 1910 TD 100 engine(IX/1996)101 - 29Removing-refitting 1910 TD 100 eng.006Introduction-Technical data506.670/10101 - 341910 TD 75 engine fuel system(1/1997)101 + 24Removing-refitting 1910 TD 75 eng.104Removing-refitting 1910 TD 100 eng.506.670/09(11/1997)001 - 50Planned maintenanceoperations002Introduction506.670/11(VI/1997)101045Removing - refitting 1910 TD 100 engineRemoving - refitting 1910 TD 75 engine21 -274Automatic gearbox and differential506.670/12(VI1/1997)004Introduction506.670/13(XI/1997)103326Fuel system: 1910 TD 75Braking system - EBD deviceCopyright by Fiat Auto
Summary<strong>Bravo</strong>-<strong>Brava</strong>4A06SVPrint N°SectionsPageNos.Comments001 - 10@l I6v 98 range506.670/14(111/1998)10551 - 641 - 37Fuel system @» lev 98 rangeWiring diagrams 1^1 i6v 98 range001 + 77Technical data 98 range1 - 54Fuel system ' ^ l6v 98 range101 + 42Fuel system '@* 20v 98 range506.670/16(IX/1998)1 - 26Fuel system 1^1 JTD 98 range501 - 16Climate control 98 rarfge1 -e- 11Control panels - Radio 98 range551 - 25Wiring diagrams 98 range15-16Update: wiring diagramPrint no. 506.670/16
<strong>Bravo</strong>-<strong>Brava</strong>SummaryWORKSHOP MANUAL COMPOSITIONAs of March 1998, the <strong>Bravo</strong>-<strong>Brava</strong> volume 3 manual is made up of the following parts:Publication no.SectionsPagenumbersNotes001 - 6Tech. data: <strong>Bravo</strong> 1988 HGT 20v Pack-Sport506.670/06101 - 181910 TD 100 engine fuel system(111/1995)21-271 - 50Automatic transmission551 - 36Wiring diagrams-Connector blocks506.670/07(VI/1996)0021-271 - 1151 - 69Technical data: 1910 TD and 1581 automatictransmissionAutomatic transmission551 - 11Mid-range car radio506.670/0810281910 TD 100 engine fuel system(IX/1996)101 - 29Removing refitting 1910 TD 100 unit006Introduction-Technical data506.670/10101 - 341910 TD 75 engine fuel system(1/1997)101 - 24Removing refitting 1910 TD 75 unit104Removing refitting 1910 TD 100 engine506.670/09(11/1997)001 - 50Programmed maintenanceoperations002Introduction506.670/11104Removing - refitting 1910 TD 100 engine(VI/1997)105Removing - refitting 1910 TD 75 engine21 -274Automatic transmission and differential506.670/12(VII/1997)004Introduction506.670/13(XI/1997)1033261910 TD 75 fuel systemBraking system - EBD deviceCopyright Fiat Auto
Summary<strong>Bravo</strong>-<strong>Brava</strong>Publication no.SectionsPagenumbersNotes001 ± 10101 lev 1998 range506.670/14(111/1998)101 ± 64Fuel system @l i6v 1998 range551 ± 37Wiring diagrams @» l6v 1998 rangePublication no. 506.670/14
<strong>Bravo</strong>-<strong>Brava</strong>SummaryWORKSHOP MANUAL COMPOSITIONAs of July 1997, the <strong>Bravo</strong>-<strong>Brava</strong> manual, volume 3 is made up of the following parts:Publication no.Sections00Numberof pages1 - 6NotesTechnical data on <strong>Bravo</strong> 1988 HGT 20vSport-Pack506.670/06101 - 181910 TD 100 engine fuel system(111/1995)21-271 - 50Automatic transmission551 - 36Wiring diagrams-Connector blocks506.670/07(VI/1996)0021-271 - 1151 - 69Technical data on 1910 TD and 1581 automatictransmissionAutomatic transmission551 - 11Mid-range car radio506.670/0810281910 TD 100 engine fuel system(IX/1996)101 - 29Removing refitting 1910TD 100 unit006Introduction-Technical data506.670/10101 - 341910 TD 75 engine fuel system(1/1997)101 - 24Removing refitting 1910 TD 75 unit104Removing refitting 1910TD 100 unit506.670/09(11/1997)001 - 50Programmed maintenanceoperations002Introduction506.670/11(VI/1997)101045Removing - refitting 1910 TD 100 engineRemoving - refitting 1910 TD 75 engine21 -274Automatic transmission and differential506.670/12(VI1/1997)004IntroductionCopyright Fiat Auto
<strong>Bravo</strong>-<strong>Brava</strong>SummarySERVICE MANUAL COMPOSITIONAt present, September 1996, the <strong>Bravo</strong>-<strong>Brava</strong> 3rd volume manual is composed of the following booklets:Print No.Sections00PageNos.1 - 6CommentsTech. data <strong>Bravo</strong> 1988 HGT 20v Pack-Sport506.670/06101 - 181910 TD 100 engine fuel system(111/1995)21-271 - 50Automatic transmission551 - 36Wiring diagrams-Connector blocks506.670/07(VI/1996)0021-271 ■*■ 1151 - 69Technical data 1910 TD and 1581 automatictransmissionAutomatic transmission551 - 11Medium range radio506.670/0810281910 TD 100 engine fuel system(IX/1996)101 - 29Removing-ref itting 1910 TD 100 engineCopyright by Fiat Auto
<strong>Bravo</strong>-<strong>Brava</strong>SummarySERVICE MANUAL COMPOSITIONAt present, June 1996, the <strong>Bravo</strong>-<strong>Brava</strong> 3rd volume manual is composed of the following booklets:Print No.Sections00PageIMos.1 + 6CommentsTechnical data <strong>Bravo</strong> 1988 HGT 20v Pack-S-506.670/06101 - 18Fuel system - 1910 TD engine(111/1995)21-271 + 50Automatic transmission551 4- 36Wiring diagrams-Connector blocks506.670/07(VI/1996)0021-271 4- 1151-69Technical data - 1910 TD & 1581 automatictransmissionAutomatic transmission551 - 11Medium range radioCopyright by Fiat Auto
<strong>Bravo</strong>-<strong>Brava</strong>SummarySERVICE MANUAL COMPOSITIONAt present, April 1996, the <strong>Bravo</strong>-<strong>Brava</strong> 3rd volume manual is composed of the following booklets:Print No.Sections00PageNos.1 -5- 6CommentsTech. data <strong>Bravo</strong> 1988 HGT 20v Pack-Sport506.670/06101 + 181910 TD engine fuel system(VI/1995)21-271 4- 50Automatic gearbox551 - 36Wiring diagrams-Connector blocksCopyright by Fiat Auto
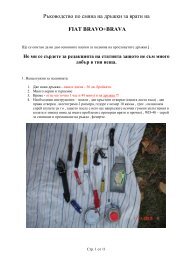
<strong>Bravo</strong>-<strong>Brava</strong>PrefaceThis manual contains the main instructions for repairing and maintaining the Fiat <strong>Bravo</strong> and Fiat <strong>Brava</strong>.The manual is divided into sections distinguished by two digit numbers which appear in the parts microfichesand the flat rate manual.The section INTRODUCTION AND TECHNICAL DATA (00.) has a dual function of introducing themodel and supporting the remaining part of the manual. This section includes the tables of technical dataand specific information relating to the sections in the remaining part of the man.The remaining sections (10. -18. etc.) include descriptions of the repair operations.This manual contains graphic representations and symbols in place of descriptions for mechanical components,operations and repair methods.If01 Small end diameterFor example:i ETighten to torque0 2 Big end bearing housingENGINES Section 10 contains illustrations of the operations of rcmoving-refitting the power units,operations on vehicle and the various fuel, lubrication and cooling systems.The procedures for overhauling the individual engines are described in other bookletswhich have the following print nos.:Engine137012V1581 16V174716V1998 20V1929 DPrint No.504.589/19504.589/20504.589/18504.589/22504.593/11Part No.604.89.774604.89.781604.89.192604.89.788604.89.8411910 TD504.593/13604.44.220The first 4 booklets are inserted in the Overhauling Petrol Engines Manual 3rd volume,whilst the last ones are inserted in the Overhauling Diesel Engines Manual 2nd volume.GEARBOXESbct/otf 21-27 contains illustrations of the operations of removing and refitting the variousgearboxes. The procedures for overhauling the various manual gearboxes at thebench are published in separate booklets which have the following print nos.:505.023-08 Inserted in the Overhauling gearboxes manual505.023- 03 Inserted in the Overhauling gearboxes manual505.023-18 Inserted in the Overhauling gearboxes manual 2nd volumeTHIS PUBLICATION HAS BEEN PRODUCED IN A LOOSE LEAF FORMAT TO FACILITATE THEOPERATION OF UPDATING THE MODEL.When using chemical products stick closely to the instructions in the safety chart which thesupplier must give to the consumer (for Italy in accordance with D.M. no. 46/1992)Copyright by Fiat Auto
Untitled Documentintroduction & T&cn Data 1&93 16introduction & Teen Data 199Sffle:///D|/Volume%203/intro&tech.htm08/07/2006 16:38:38
<strong>Bravo</strong>-<strong>Brava</strong>IntroductionPlanned maintenanceoo.pagePlanned Maintenance Programme 1M i ne riannea iviainienance rrogramme wnose operaiions are aescriueo iai-W*^ er on is the one in force at the time of printing and replaces and cancels theone in volume 1 of the ManualCopyright by Fiat Auto
Btavo-<strong>Brava</strong>IntroductionPlanned maintenanceoo.ForewordThe maintenance operations consist of checking and restoring the efficiency of certain vehicle componentssubject to wear which may deteriorate during normal usage conditions.This section describes the operations which should be carriedout on the vehicle at the intervals set out inthe Planned Maintenance Programme (on the previous page). Each operation is described independentlyon account of which there is no pre-defined ideal operating cycle to be repeated at each interval.It is therefore necessary to ensure that those operations which require the same components to be dismantledare carried out at the same intervals in order to maximize the efficiency of the repair times.If, when carrying out each operation, the need arises to carry out additional replacements or further repairsnot envisaged in the Planned Maintenance Programme, prior approval must be obtained first fromthe Customer.PLANNED MAINTENANCE OPERATIONSHCHECK CONDITION OF TYRES ANDWEARCheck the condition of the tyres making sure,in particular, that there are no signs of ageingon the tread and the tyre walls, that the tyresare not excessively/unevenly worn and thatthere are no abrasions/burrs, porousness orcuts.Check the depth of the tread using a specialgauge, taking the measurement at the intersectionbetween the transverse and longitudinalsplining (at several points on the circumference).The minimum permissibledepth is 1.6mm. The difference between thedepths of tread on the same tyre should notexceed 2 mm. The difference between thedepths of tread on different tyres on the sameaxle should not exceed 5 mm.If the tread wear is uneven, check the tyre inflationpressure and inform the Customer ofthe possible need to balance the wheels.Copyright by Fiat Auto 1
IntroductionPlanned maintenance<strong>Bravo</strong>-<strong>Brava</strong>CHECK OPERATION OF FRONT DISCBRAKE PAD WEAR SENSORDisconnect the connector for the front discbrake pad wear sensor, place the terminal forthe wiring side coupling to earth and checkthat the relevant warning light in the instrumentpanel comes on.El CHECK CONDITION OF REAR DISCMBRAKE PADS(<strong>Bravo</strong> 1998 20v)Remove one of the rear wheels and check thethickness of the friction material through theslit in the brake caliper; the minimum permissiblethickness if 1.5 mm. Check that thewear of the pads is even. Visually inspect thecondition of the brake caliper dust boots.Check the condition of the brake disc worksurfaces (for wear or deep grooves). Notifythe Customer of the need to replace or regrind(in the case of a brake pad) one of thecomponents which has been checked.QCHECK CONDITION AND WEAR OFREAR DRUM BRAKESWith one of the rear wheels removed, removethe brake drum. Check the thickness of thebrake linings: the minimum permissible thicknessis 1.5 mm. Also check that there is nofouling from oil or grease. Check the efficiencyof the shoe return device and the automaticrecovery of the clearance betweenthe drum and the shoes. Check the efficiencyof the wheel cylinders (sliding of pistons,condition of dust boots). Check the conditionof the drum work surfaces (for wear orgrooves). Notify the Customer of the need toreplace or skim (in the case of brake drums)one of the components which has beenchecked.If there is an inspection window in the brakedrum it is possible to check the thickness ofthe brake linings without having to removethe actual drum.2 Print no. 506.670/09
<strong>Bravo</strong>-<strong>Brava</strong>IntroductionPlanned maintenanceoo.nVISUALLY INSPECT CONDITION OF:PIPES, RUBBER ELEMENTS, FLEXIBLE PIPES FOR BRAKING SYSTEMAND FUEL SYSTEMPosition the vehicle on a lift. Visually inspect:- for the presence of any fluid leaks from thefollowing systems: lubrication, fuel, enginecooling, braking and power assisted steering;- the condition of the rubber elements: bushes,flexible (support) mountings and (protective)boots; check that the collars retainingthe pipes and bushes have not loosened.Check that the wires and cables for the retainingbrackets in the engine compartmentare correctly positioned.Also check for possible interference of the flexible brake pipes in maximum steering conditions.QCHECK CONDITION AND TENSION OF VARIOUS DRIVE BELTS AND ADJUST, IF NECESSARYThe tension of the various drive belts is checked using tool 1895762000. Engines equipped with automatictensioners are exempt from this check.<strong>Bravo</strong>-<strong>Brava</strong> 1581 16vCheck that alternator drive belt and power assisted steering drive belt tension, measured using the specialequipment, are within the recommended values given in the table at the bottom of this paragraph. Ifthe tension values are not correct, loosen the bolt (1), and rotate the tensioner further working on thehexagonal opening, then tighten the bolt once again and check the tension of the alternator belt. To adjustthe power assisted steering pump belt, act on the adjustment screw and the lock nut (2).P4A03CA02P4A03CA03Copyright by Fiat Auto 3
IntroductionPlanned maintenance00.<strong>Bravo</strong>-<strong>Brava</strong><strong>Bravo</strong> 1998 20vCheck that the tension values for the alternator/airconditioning compressor drive beltand the power assisted steering drive belt,measured using the special equipment, correspondto the recommended figures, givenin the table overleaf. If the tension values arenot correct, act on the centre tensioner screwto adjust the power assisted steering belt tension,with the fixing bolts (1) slack, tensionand lock the bolts (1).To adjust the tension of the alternator/airconditioning cmopressor belt tension, act onthe special adjustment screw removing thecompressor cover, if necessary.<strong>Bravo</strong>-<strong>Brava</strong> 1929 DCheck that the tension values measured usingthe special tool, correspond to the recommendedfigures, given in the table overleaf. Ifthe tension values are not correct, act on thebolts fixing the alternator and the screw foradjusting the drive belt tension and the specialmicrometeric screw and bolts fixing thepump to correct the tension of the power assistedsteering pump drive belt tension.4 Print no. 506.670/09
<strong>Bravo</strong>-<strong>Brava</strong>IntroductionPlanned maintenance00.Tension values for used beltsBELT SECTIONTENSION daNAV10TYPE ATYPES B and CNot pre-run inNot pre-run in20 -- 2925 -- 35AV 11TYPES B and CNot pre-run in25 -- 35AV 13TYPE ATYPES B and CNot pre-run inNot pre-run in30 -- 4032 -- 433 ribs23 -- 304 ribs30 -- 41POLY-V5 ribs38 -- 536 ribs45 -- 627 ribs54 -- 74Tension figures for new beltsAV10AV 11AV 13POLY-VPoly-V type beltsBELT SECTIONTYPE ATYPE B and CTYPE B and CTYPE ATYPE B and C3 ribs4 ribs5 ribs6 ribs7 ribsTENSION daN30 - 4040 - 5540 ■*■ 5545 -i- 5550 - 6536 - 4548 -e- 6060 -e- 7572 + 9084 - 105In order to determine the number of ribs on thepoly-v belt in question it is necessary to countthe number of teeth (or points) from 3 - 7 on theactual belt, as illustrated in the diagram below.Trapezoid type beltsIn order to determine whether the trapezoidbelt in question is type AV 10 - AV 11- etc., it is necessary to measure the distance"X" on the back of the belt; if the figureis 10 mm then the blet is a type AV10, ifit is 11 mm then it is type AV 11 and so on.Copyright by Fiat Auto 5
IntroductionPlanned maintenance00.<strong>Bravo</strong>-<strong>Brava</strong>Q VISUALLY INSPECT CONDITION OF VARIOUS TRAPEZOID AND/OR POLY-V DRIVE BELTS- Disconnect the negative battery lead, remove the right front wheel, then remove the wheel arch liningto gain access to the auxiliary shaft drive belts.- Insert a spanner in the nut (or bolt) fixing the damper flywheel (1), rotate the crankshaft and check thecondition of the auxiliary shaft drive belts along the entire perimeter.Check the condition of the belts, checkin in particular that there are no: cracks, cuts, surfacewear of the material (which would appear smooth and shiny), dry or hard sections with a consequentloss of grip.Also check that the belts have not come into contactwith oil or solvents which could adverselyaffect the elasticity of the rubber or the adhesion properties.If one of the above faults is found, inform the Customerof the need to replace the belts.6 Print no. 506.670/09
<strong>Bravo</strong>-BtavaIntroductionPlanned maintenanceoo.n CHECK, ADJUST CLUTCH" TRAVEL OR HEIGHTPEDALThe check should only be carried out on vehicleswith mechanical release devices (137012v -1581 16v -1747 1 6v - 1910 TD - 1929D). The 1998 20v engine type has a hydraulicrelease device.1. Measure the clutch pedal travel:1. Pedal in end of travel position2. Pedal in rest positionX. Pedal travel:155 ± 10 mm (1370 12v)170 ± 10 mm (1581 16v - 1747 16v -1910 TD - 1929 D)P4A07CA012. In order to adjust the clutch pedal in therest position it is necessary:- to let the clutch operating mechanismbed in by fully depressing the pedal 2 or3 times;- to check that the travel "X" correspondsto the recommended figure. The travelis measured using a rule correspondingto the pedal centre line and is equivalentto the distance between the pedal in theend of travel position (pedal in contactwith the bodyshell) and the pedal in therest position.- any adjustments to the travel are carriedout via the nut and lock nut for theclutch cable, gearbox side.NOTEThere should be no obstructions inthe area under the pedals preventingthe total travel of the pedals: takecare, in particular, that any mats arelying flat and not interfering with thepedals.Copyright by Fiat Auto 7
IntroductionPlanned maintenance00.<strong>Bravo</strong>-<strong>Brava</strong>HCHECK/ADJUST HANDBRAKE LEVERTRAVELOperate the handbrake lever several timesand check that the travel of the toothed sectoris 5 notches.If this is not the case, proceed with the adjustmentas follows:- remove the protective boot for the controllever;- act on the adjustment nut shown, tighteningor loosening it in order to increase ordecrease the handbrake lever cable travel;- check that the lever travel is equal to 5notches on the toothed sector.When the adjustment has been carriedout, the control lever travelshould not exceed 5 notches on thetoothed sector.With the handbrake lever In the restposit/on the rear wheels should rotatefreely; If this Is not the case, repeatthe adjustment.m m CHECK/ADJUST TAPPET CLEAR-■" ANCEThe following components must be removedin order to check and, if necessary, adjust thetappet clearance.<strong>Bravo</strong>-<strong>Brava</strong> 1910 TD1. Remove the upper engine protection.8 Print no. 506.670/09
<strong>Bravo</strong>-<strong>Brava</strong>IntroductionPlanned maintenanceoo.Disconnect the rigid engine coolant pipeusing tool 1860967000 to undo the connectoron the cylinder head; also undo thebolt shown and position the pipe at theside.Undo the bolts fixing the tappet cover andremove it taking care to disconnect the oilvapour recovery pipe and the bolt showninthe inset fixing the timing belt cover tothe tappet cover. Then proceed withchecking the tappet clearance.* //Affe\L*.'III1 L-"-^^"*-^^^<strong>Bravo</strong>-<strong>Brava</strong> 1929 D3. Undo the bolts fixing the tappet cover,disconnect the brackets connected to itand remove it. Then proceed with checkingthe tappet clearance.Checking tappet clearance and, if necessary,adjusting4. Rotate the camshaft so that the inlet andexhaust valves are in the closed position.With the engine cold, check the clearancebetween the cam recess radius and thetappet is within the recommended valuesusing a feeler gauge.%J.3!X^V^{^*^s^^Mr^SS^Engine typeInletExhaust1910 TD0.35 mm0.35 mm1929 D0.30 mm0.35 mmCopyright by Fiat Auto 9
IntroductionPlanned maintenance00.<strong>Bravo</strong>-<strong>Brava</strong>1■/ /// ^L^W1860724000 wBgSmfBAA(F&&£K// ^S?- 1 /^/ X^^P^^^sg\^7//JLL@SS/2/l* \r/\f>^Jl'~-^/^ ^ ^ ^ ^ &7 \K^§\ ^^^^^^^^W \^Sx\/r5R^^^ffl^K^^mIv^t^v\^ A ^If the tappet clearance does not correspondto the recommended figures, proceed as follows:1. Using pressure lever 1860443000, lowerthe cup for the tappet concerned and inserttool 1860724000 for retaining tappetspositioning the notches in the edgeof the tappet in such a way as to facilitatethe subsequent extraction of the shim tobe replaced.2. Lift up the shim to be replaced, working asappropriate, then remove Jt using pliers1887001000.NOTE Rep/ace the shim removed with anotherone of the appropriate size torestore the correct valve clearance.Carry out the same operation for theother shim for the pair of valves beingadjusted.ECHECK EXHAUST GAS EMISSIOSN (petrol engines)The electronic injection/ignition systems used are capableof automatically controlling the advance, thecarbon monoxide (CO) content and the idle air flow rate, therefore no manual adjustment operations arerequired. However, a check on the content of the exhaust gases downstream of the catalyzer can provideuseful indications on the injection/ignition system operating conditions and the engine and catalyzerparameters.The concentration of carbon monoxide (CO), unburnt hydrocarbons (HC) and the value X, is measuredwith the catalyzer at operating temperature (300 - 350 °C) (we recommend driving hard along a section ofroad for around 5 to 10 minutes to ensure that the catalyzer reaches operating temperature), the insert asuitably calibrated tester sensor at least 30 cm into the end of the exhaust pipe as shown in the diagramoverleaf.If the shape of the end section of the exhaust pipe is such that the sensor cannot be fully introduced, add aspecial extension pipe ensuring the seal in the join area.1. Check that the concentration of CO and the value X during idling and accelerated idle, correspondto the values recommended in the government circular:Engine measurement during idling: CO limit
<strong>Bravo</strong>-<strong>Brava</strong>IntroductionPlanned maintenanceoo.If the values are not within the limits set out in the government circular, the Customer must be notified ofthe need to check:- that the Lambda sensor is working properly using the Fiat/Lancia tester;- for the presence of air penetration in the area surrounding the Lambda sensor housing;- the injection system, particularly the wear of the spark plugs.2. If the HC figure is more than 90 p.p.m., the cause of the problem should be sought in the engine timingor the decreased efficiency of the catalyzer.VOLT^GE 0 070 » ■i*— 1 1 030i , U,Sf U ^mV1000-800-600-400-200-0-RICHMIXTURESITI'LEANMIXTURES0,7 0,8 0,9 1,0 1,1 1,2 1,3Factor X is obtained from the ratio betweenthe quantity of intake air and the theoreticalquantity of air required to burn all the fuel injected.To achieve an optimum mixture the quantityof fuel injected must be as close as possibleto the theoretical quantity required to becompletely burnt in relation to the quantity ofair drawn in by the engine. In this case theLambda factor is equal to 1 (ideal mixture)and the CO content is within the legal limits.With X ^1 (lean mixture), excess air, the COtends to assume low values: with X ^1 (richmixture), lack of air, the CO values tend to behigh.AIR COEFFICIENT XCopyright by Fiat Auto 11
IntroductionPlanned maintenance00.<strong>Bravo</strong>-<strong>Brava</strong>[£ CHECK EXHAUST GAS EMISSIONS(diesel engines using opacity meter)Start up the engine and let it reach operatingtemperature (radiator cooling fan comes ontwice).Place the opacity metering measuring unit ina stable position near the vehicle exhaustpipe (the opacity meter exhaust must be positionedagainst the wind).Connect the measuring unit flexible pipewith the vehicle exhaust pipe.Carry out the equipment connections and adjustmentsin accordance with the Manufacturers'instructions.Fully depress the accelerator pedal threetimes in quick succession so that the enginerevs limiter speed is reached.Carry out measurements for five subsequentfull accelerations.Make a note of the maximum values reached.To obtain the figure for the test, calculate thearithmetical average of the three closest values.If there is more than one suitable trio, selecttheone which gives the highest average value.Compare the values with the limit given onthe plate on the vehicle conforming with theEEC directive.Where figures are not available, apply the followinglimits from directive 92/55/EEC:Naturally aspirated diesel engine:K = 2,5 m - 1Diesel engine with turbocharger:K = 3 m 'P4A16DJ04If the figure for the exhaust fumes ismore than 70%, notify the Customerof the need to carry out a series oftests on: the condition of the air filter,injection pump timing and flow rate,valve clearance and timing, injectorcalibration and cleanliness, compressionratio.12 Print no. 506.670/09
<strong>Bravo</strong>-<strong>Brava</strong>IntroductionPlanned maintenanceoo.KB CHECK ANTI-EVAPORATION SYSTEMThe anti-evaporation system prevents the petrol vapours, which form in the tank and the fuel system,from being discharged into the atmosphere and consequently releasing the light hydrocarbons (HC)which they contain, producing a pollutant effect.It is therefore necessary to check that the anti-evaporatin system pipes are correctly positioned in theengine compartment; also check their condition, making sure that there are no signs of cracks, cuts orleaks and that they are correctly fixed and not interfering with other components. Check the conditionof the active charcoal filter. Position the vehicle on a lift and check the condition of the pipes under thefloo of the vehicle.fQ REPLACE FUEL FILTER (petrol engines)Proceed with removing the fuel filter by carryingout the following operations:- Raise the vehicle;- undo the bolts shown in the diagram andremove the protective shield.- disconnect the rapid fue inlet and outletconnectors from the filter, collecting the fuelwhich comes out during the operation ina suitable container.- undo the fixing bolt and remove the filter.NOTEThe filter should NEVER BE FITTEDTHE WRONG WAY ROUND, or elseit has to be replaced (even afterworking in the wrong position for ashort period). The arrow on the outercasing indicates the direction inwhich the fuel should flow.After replacing the filter, start up theengine and check that there are noleaks of fuel from the seals.Copyright by Fiat Auto 13
IntroductionPlanned maintenance00.<strong>Bravo</strong>-<strong>Brava</strong>QJ REPLACE FUEL FILTER (diesel engines)To replace the fuel filter, after having disconnectedthe negative battery lead, proceed asfollows:- Disconnect the connector (1) for the fuelsupply pipe from the tank from the filter;- Disconnect the connector (2) for the fuelsupply pipe to the injection pump from thefilter;- Disconnect the electrical connection (3)from the fuel pre-heating device sensor;- Disconnect the electrical connection (4)supplying the fuel pre-heating device;- Undo the two nuts fixing the partition betweenthe passenger and engine compartmentsand remove the complete fuel filter.- At the bench, undo the fuel filter (1) withthe seal from the support (2).P4AMCA02When refitting the fuel filter, proceed as follows:- lubricate the rubber seal for the cartridge;- fill the filter cartridge with diesel fuel (in orderto shorten the self-bleeding time);- tighten the cartridge in contact with thesupport;- close the cartridge by 3/4 of a turn (toachieve a tightening torque of 1.3 - 1.6daNm).For the 1929 D version, which is equipped with a Lucas pump, this is achieved by means of the numberedreferences on the cartridge. For example, when the cartridge is in contact with the support a markmust be made on the support corresponding to one of the references on the filter, then the filter must betightened counting 6 reference marks after that reference.Reference X Xmark / ^ \Referencemark/
<strong>Bravo</strong>-BtavaIntroductionPlanned maintenanceoo.EQEBREPLACEAIR FILTER CARTRIDGEUndo the bolts fixing the air filter cover. Liftup the cover and extract the filter element; tofacilitate this last operation, release the retainingband for the connecting hose to thebutterfly casing.Any cleaning operation could damagethe filter and risk adversely affectingthe operation of the enginefuel system.Clean the air filter cartridge container carefully,replace the filter, then refit the cover andfix it using the appropriate bolts.■MH // there are traces of oil on the filter,f/K^ check for possible penetrationthroughout the entire air circut.NOTE // the vehicle is used on dusty roadsreplace the air filter more often.If they ask, the Customer should beprovided with suitable informationon the optimum maintenance frequenciesdepending on the specificusage of the vehicle.P4A15CA02Copyright by Fiat Auto 15
IntroductionPlanned maintenance00.<strong>Bravo</strong>-<strong>Brava</strong>Q] TOP UP FLUID LEVELSEngine coolantDo not remove the radiator cap whenthe engine is very hot as there is adanger of being scalded.The fluid level should checked with the enginecold and it should not be below the MINlevel on the tank.137012v-1581 16vIf the level is too low, slowly pour a mixtureof 50% distilled water and Fiat LubrificantiParaflu 11 through the filler.NOTEThe addition of "Paraflu Formula Europa"to Paraflu 11 used originallymeans that it is not possible to checkthe efficiency of the anti-freeze usingthe regular test equipment."Paraflu Formula Europa" is alreadymixed which means that water doesnot have to be added.1747 16v -1998 20v -1910 TD -1929 DP4A16CA02Brake fluid levelThe brake fluid level is checked with the vehicleon a flat surface.Check that the level of the fluid in the tankcorresponds to the MAX reference on thetank.It is normal for the brake fluid level to decreaseover a period of time because this indicatesthat the brake pads are working properly.The level of the brake fluid should not exceedtheMAX level in the tank.Check the operationof the warning light inthe instrument panel: when the cover of thetank is pressed (with the ignition in the ONposition) the warning light (0) should comeon.16 Print no. 506.670/09
<strong>Bravo</strong>-<strong>Brava</strong>IntroductionPlanned maintenanceoo.If fluid has to be added, only use D0T4 classification.Tutela TOP 4 270°C, which is usedinitially, is particularly recommended.Avoid the brake fluid, which is particularlycorrosive, from coming intocontact with the paintwork. If itdoes, wash immediately with coldwater.The symbol @, on the container,identifies synthetic type brake fluids,distinguishing them from mineraltypes. The use of mineral type fluidsirreparably damages the rubber sealsin the braking system.Power steering fluid levelCheck that, with the vehicle on a flat surfaceand the engine cold, the fluid level is betweenthe MIN and MAX references on thedip stick in the tank cap or on the actual tank.In order to carry out the check, clean the dipstick, fully tighten the cap, undo it and checkthe level.When the fluid is hot it may exceed the MAXlevel.If necessary, add fluid, making sure that it hasthe same characteristics as the fluid alreadypresent in the system.Start up the engine and wait until the level ofthe fluid in the tank stabilizes.With the engine running and the vehicle stationary,turnthe steering wheel completely tothe right and to the left several times.Top up until the level corresponds to theMAX reference, then retighten the cap.Avoid power steering fluid coming intocontact with the hot parts of the engineas it is inflammable.P4A17CA03Copyright by Fiat Auto 17
IntroductionPlanned maintenance<strong>Bravo</strong>-<strong>Brava</strong>Windscreen/rearscreen and headlampwasher fluid levelIn order to add fluid, lift up the cap, lift up thefilter and pour a mixture of water and ArexonsDP1 fluid in the following percentages:<strong>Bravo</strong>-<strong>Brava</strong> 1370 12v- 30% Arexons DP1 and 70% water in summer;- 50% Arexons DP1 and 50% water in winter.In the case of temperatures below -20 °C, useundiluted Arexons DP1.Versions with headlamp washers are fittedwith a dip stick indicating the amount of fluidin the windscreen washer reservoir.Engine oil levelThe engine oil level is checked with the vehicleon a flat surface and the engine cold, oraround 10 minutes after the engine has beenswitched off.The oil level should be between the MIN andMAX marks on the dip stick. The gap betweenthe MIN and MAX levels correspondsto around 1 litre of oil.If the level of the oil is close to or actually belowthe MIN reference, add oil through thefiller until the MAX reference is reached.<strong>Bravo</strong>-<strong>Brava</strong> 1747 16vP4A18CA03The level of the oil should never exceedthe MAX reference.When topping up with oil take greatcare to avoid accidentally spilling engineoil in the alternator ventilationslits which could cause serious damageto the alternator and also representsa fire hazard.Do not add oil with different characteristicsfrom those of the oil used inthe engine. Only the use ofsemi-synthetic oil guarantees theplanned maintenance intervals.After having added oil, before checking thelevel, let the engine run for a few seconds andwait for several minutes after it has beenswitched off.18 Print no. 506.670/09
<strong>Bravo</strong>-<strong>Brava</strong>IntroductionPlanned maintenanceoo.<strong>Bravo</strong> 1998 20v<strong>Bravo</strong>-<strong>Brava</strong> 1910 TD<strong>Bravo</strong>-<strong>Brava</strong> 1929 DP4A19CA03Battery fluid levelThe battery is the "reduced maintenance"type: in normal usage conditions it does notneed topping up with distilled water.The level of the battery fluid (electrolyte),withthe vehicle on a flat surface, should bebetween the references on the battery. If thelevel is below the MIN mark, lift up the protectivecover (1) and top up using distilledwater.P4A19CA04The fluid contained in the battery ispoisonous and corrosive. Avoid contactwith the skin and eyes. Keepnaked flames and possible sources ofsparks away from the battery as thereis a danger of explosion and fire.The state of charge of the battery should be checked, preferably at the beginning of the cold season,to avoid the possibility of the electrolyte freezing.This check should be carried out more often if the vehicle is mainly used for short journies or if it isequipped with consumers which absorb power permanently with the ignition switched off, particularlyif they have been fitted in the after market.Copyright by Fiat Auto 19
IntroductionPlanned maintenance00.<strong>Bravo</strong>-<strong>Brava</strong>Qj] REPLACE TIMING BELT<strong>Bravo</strong>-<strong>Brava</strong> 1370 12vPosition the vehicle on a lift, then:- disconnect the negative battery lead;- remove the right front wheel;- remove the right wheel arch liner to gainaccess to the auxiliary shaft drive belt.P4A12AX031. Loosen the auxiliary shaft drive belt tensionacting on the centre nut for the automatictensioning device to release thespring inside the actual device. Then removethe actual belt from the damper flywheelleaving it fitted on the power steeringpump pulley; it is not necessary to removethe upper shield for the power assistedsteering pump.2. Remove the upper shield for the timingdrive belt after having removed the supportfor the coolant pipe.3. Loosen the bolts fixing the damper flywheel,then rotate the latter until the referenceon it coincides with the reference onthe shield underneath. Then, remove thedamper flywheel.4. Remove the lower timing belt lowershield.20 Print no. 506.670/09
<strong>Bravo</strong>-<strong>Brava</strong>IntroductionPlanned maintenanceoo.1. Loosen the automatic tensioner bolt, releasingthe belt tension, then remove it.Fitting timing drive belt2. After having removed the tappet cover,loosen the bolt fixing the camshaft drivepulley using spanner 1860831000; fit thetoothed belt on the crankshaft gear andremove the two bolts illustrated fixing theoil pump to the crankcase.3. Place tool 1860901000 in position, ensuringthat the opening (1) in the tool coincideswith the dowel on the crankshaftgear; in this position cylinder no. 1° is atT.D.C.4. Remove the bolts fixing the 1 st - 2nd - 3rdand 4th timing caps, exhaust side, loosenthe inlet side ones, raise the lubricationduct, remove the 2nd cap and place tool1860899000 for timing the camshaft inthe housing, then tighten all the caps to apre-torque of 1 daNm.Work with due care when raising thelubrication duct to avoid the duct beingdistorted or broken.Copyright by Fiat Auto 21
IntroductionPlanned maintenance00.1<strong>Bravo</strong>-<strong>Brava</strong>©L@L®Lv^v4^"^Lll ^^:Ill 1Li\ 1if4)€ 1-4- 1)1I '1^ '11'Ifif1C\)1. Complete the refitting of the belt observingthe following order:- crankshaft drive pinion (1);- camshaft drive pulley (2);- water pump pulley (3);- automatic tensioner (4).NOTEThe belt should be fitted avoidingbending it at acute angles in ordernot to adversely affect the structureof the actual belt.The belt should also be fitted withthe arrows on it facing in the directionof rotation of the engine.Tensioning timing drive belt2. Using tool 1860443000, act at the pointshown by the arrow and place the movingindex (1) on the tensioner in the maximumtension position, then lock the nutfixing the tensioner.3. Tighten the fixing bolt for the camshaftdrive pulley to a torque of 11.3 daNm usingspanner 1860831000.22 Print no. 506.670/09
<strong>Bravo</strong>-<strong>Brava</strong>IntroductionPlanned maintenanceoo.Remove tool 1860899000 and refit the2nd cap.In order to carry out this operation it isnecessary to remove the bolts fixing the1 st - 2nd - 3rd and 4th caps, exhaust side,loosen the inlet ones, slightly raise the lubricationduct, remove the tool and positionthe cap, tightening the cap fixingbolts to the recommended torque.Work with due care when raising thelubrication duct to avoid the ductfrom being distorted or broken.Remove tool 1860901000 placed previouslyon the timing gear and rotate thecrankshaft through two revolutions in itsdirection of rotation. Loosen the tensionerfixing nut, make sure that the movingindex (1) coincides with the fixed reference(2), then lock the nut fixing the tensionerand tighten it to the recommendedtorque.Refit the previously removed components,taking care to refit the auxiliary shaft drivepulley with the opening in the actual pulleyengaged with the dowel (1) on thecrankshaft pinion and also checking theengine timing ensuring that the reference(2) on the pulley corresponds with thereference (3) on the timing belt shield.Copyright by Fiat Auto 23
IntroductionPlanned maintenance<strong>Bravo</strong>-<strong>Brava</strong><strong>Bravo</strong>- <strong>Brava</strong> 1581 16vPosition the vehicle on a lift, then:- disconnect the negative battery lead;- remove the right front wheel;- remove the right wheel arch liner.1. To gain access to the timing belt it is necessaryto remove the alternator drive beltfrom the damper flywheel. In order to doso, act on the tensioner fixing bolt shownin the diagram.2. After having removed the air intake pipenear the upper part of the timing beltshield, remove the spark plugs and positionthe dial gauge by cylinder no. 1 usingsupport 1860895000; rotate thecrankshaft until T.D.C. is found.3. Check that the reference (1) on thedamper flywheel is aligned with the reference(2) on the timing belt lower shield.Also check that the reference on the flywheelcoincides with the reference on thebell housing, as shown in the inset.4. Remove the lower protective casing forthe flywheel from the bell housing, thenplace flywheel lock 1860771000 in positionand remove the damper flywheel.Then undo the upper and lower bolts fixingthe timing belt shield and remove it.P4A12CX0124 Print no. 506.670/09
<strong>Bravo</strong>-<strong>Brava</strong>IntroductionPlanned maintenanceoo.P4A12CX05Loosen the nut fixing the automatic belttensioner in order to discharge the belttension, then remove the actual belt.Timing at "0"2. Loosen the bolts fixing the camshaft pulliesusing tool 1860885000 fitted on support1860831001.3. Remove the ignition coils acting on themounting bracket fixing nuts, after havingdisconnected the appropriate supply connections.Then remove the camshaft rearcovers, as shown in the diagram.4. Position tools 1860874000 for timing thecamshafts, making sure that the housing (1)for the shaft coincides with the element (2)on the tools; engage the element in thehousing and fix the tool to the camshafthousing by the covers which were removedpreviously. Repeat this operation both thecamshaft inlet shaft and the exhaust one.If the tools do not fit perfectly and it isnecessary to rotate the camshafts,align the pistons so that none of themare at T.D.C. thereby avoiding thevalves from being incorrectly positioned.Tools 1860874000 for timing theshafts differ only in terms of the referencehousing (3) in the angle at thebottom which should correspond tothe plug (4) in the camshaft housing.Copyright by Fiat Auto 25
IntroductionPlanned maintenance<strong>Bravo</strong>-<strong>Brava</strong>1. Only fit the timing drive belt on thecrankshaft pinion. With flywheel lock1860771000 fitted, fit the damper flywheeland tighten the fixing nut to atorque of 22 daNm, then remove the flywheellock.2. Remove the auxiliary shaft belt tensioningdevice acting on the fixings in order to allowthe tool to be positioned for timing at"0". Use a dial gauge to recheck thatcylinder no. 1 is at T.D.C. then, using thefixing bolt for the timing belt shield, fix thefixed reference shown in the diagram inthe housing of the bolt used.3. Fit the support base for the graduated disc1860896000 on the auxiliary shaft drivepulley and fix it to the pulley using a bolt.Then fit the graduated disc on the supportbase ensuring that the "0" on the disc coincideswith the fixed reference positionedpreviously.4. Rotate the crankshaft through around 10°in its normal direction of rotation using aspecial spanner on the damper flywheelfixing nut; take a reading of the axialmovement of the piston from the dialgauge (for example 0.6 mm).P4A15CX0226Print no. 506,670/09
<strong>Bravo</strong>-<strong>Brava</strong>IntroductionPlanned maintenanceoo.P4A15CX041. Rotate the crankshaft in the opposite directionto the normal direction of rotationthrough 20° in relation to the fixed reference.Rotate the crankshaft once again inits normal direction of rotation until thesame axial movement value which appearedpreviously on the dial gauge (0.6mm) appears.2. Read the angular value on the graduateddisc corresponding to the previous axialmovement (for example 8°). Take thearithmetical average of the angular valueof the crankshaft set at the beginning ofthe procedure (10°) and the current value(8°), then release the graduated disc fromthe base, position it in relation to the fixedreference, without rotating the crankshaft,at the value which is the arithmetical average(for example 9° = the average of 10°and 8°), then lock the graduated disc onceagain.3. Rotate the crankshaft pulley in a clockwisedirection until the "0"' on the graduateddisc coincides with the fixed reference.4. Rotate the crankshaft through 10° in aclockwise direction and an anti-clockwisedirection checking that the reading on thedial gauge during the clockwise rotationof the crankshaft is the same as that for theanti-clockwise rotation.If the readings on the dial gauge afterthe check carried out for point 4 arenot the same, repeat the proceduredescribed on the previous pages.P4A16CX02Copyright by Fiat Auto 27
IntroductionPlanned maintenance00.<strong>Bravo</strong>-Btava1(s\^^fe"®^vvBb^4y/ VDL(7)- f h /^®^(2)J®Tensionamento cinghia distribuzione1. Complete the fitting of the belt in the followingorder: 1. Crankshaft gear (alreadyfitted) - 2. Oil pump gear - 3. Fixed pulley- 4. Timing pulley, inlet side - 5. Timingpulley, exhaust side -6. Automatic tensioner.Fit the belt with the camshaft pulliesfacing towards the right in order to recoverany necessary clearance for fittingthe belt perfectly on the actual pullies,ensuring the correct tension in thesection of the belt already fitted.Remove the bolt (1) to allow tool1860876000 for tensioning the timingbelt to be positioned.Acting on tool 1860876000, place thebelt tensioner in the maximum tension position,then lock the tensioner nut. Removethe dial gauge and tighten thecamshaft pullies to a torque of 11.5 daNmusing tool 1860885000 on support1860831001.Remove tools 1860874000; rotate thecrankshaft through two revolutions in thedirection of rotation, loosen the nut lockingthe tensioner and, using a special spanneron the belt tensioner, position reference(1) in line with reference (2), then tightenthe belt tensioner lock nut to a torque of2.3 daNm.As a further check, refit the dial gauge, detectT.D.C. and check that tools1860874000 fit on the camshafts, then refitthe components removed previously.28 Print no. 506.670/09
<strong>Bravo</strong>-<strong>Brava</strong>IntroductionPlanned maintenanceoo.<strong>Bravo</strong>-<strong>Brava</strong> 1747 16vPosition the vehicle on a lift, then:- disconnect the negative battery lead;- remove the right front wheel;- remove the right wheel arch liner.Loosen the tension for the auxiliary shaftdrive belt acting in an anti-clockwise directionon the centre nut for the automatictensioning device to release the spring insidethe actual device; then fit the belt.Remove the fixed pulley for the auxiliaryshaft drive belt, then undo the upper andlower bolts fixing the timing belt shieldand remove it.3. Remove the cover for the ignition coils,disconnect the connections from the coils,the earth cable (1) and the oil vapour recoverypipe from the cylinder head cover.Disconnect the connector from the airconditioning compressor, release the cableand remove the cylinder head coveracting on the fixing bolts shown in the diagram.Copyright by Fiat Auto 29
IntroductionPlanned maintenance00.<strong>Bravo</strong>-<strong>Brava</strong>Remove the spark plugs using a specialspanner. Position the dial gauge by cylinderno. 1 using support 1895879000, rotatethe crankshaft until T.D.C. is detected.Remove the 2nd cap fixing the inlet sidecamshaft and the 3rd cap fixing the exhaustside camshaft, as shown in the diagram.When the camshaft caps are removed,they must be marked so thatthey can be refitted in the correct position.If this is not the case, therecould be problems with the reliabilityof the camshafts.3. Position and fix the pair of tools1860875000 by the previously removedcaps.The pair of tools 1860875000 shouldexact follow the profile of thecamshaft cams.Remove the lower gearbox protectivecover and place flywheel lock1860898000 in position. Then removethe damper flywheel (auxiliary shaft drivepulley).30 Print no. 506.670/09
<strong>Bravo</strong>-<strong>Brava</strong>IntroductionPlanned maintenanceoo.2.P4A14BX04Check that the centering dowel on the timingdrive gear is in line with the engine. Also removethe inspection cover on the bell housingand check that the reference on the flywheelcoincides with the reference on theactual bell housing.Loosen the timing belt tension acting onthe nut shown in the diagram, then removethe actual belt.Fitting the timing belt3. To facilitate the positioning of the timingbelt, loosen the bolt fixing the inlet sidecamshaft pulley and the exhaust side pulley,using tool 1860831000. These pullieshave slots, allowing the correct matchingof the belt-pulley.4. Fit the belt observing the following order:1. Crankshaft drive pinion - 2. Fixed pulley- 3. Camshaft pulley, exhaust side - 4.Camshaft pulley, inlet side - 5. Automatictensioner pulley - 6. Water pump pulley.NOTE The belt should be fitted avoidingany bends at acute angles in not toadversely affect the structure of theactual belt.Fit the belt so that the arrow is pointingin the direction of rotation of theengine. There are three referencemarkes on the belt for fitting duringproduction.Copyright by Fiat Auto 31
IntroductionPlanned maintenance00.<strong>Bravo</strong>-<strong>Brava</strong>Tensioning the timing belt1. Introduce tool 1860845000 in the openingin the automatic tensioner support; rotatethe tool to exert force on the automatictensioner until it is in the maximum tensionposition, then tighten the nut fixingthe tensioner to the support.2. Tighten the bolts fixing the inlet side andexhaust side camshaft pulley to a torqueof 11.8 daNm using tool 1860831000.3. Remove the pair of tools 1860875000 andreturn the camshaft caps (marked duringthe dismantling) to their correct positionand tighten them to a torque of 1.5 daNm.Remove the flywheel lock 1860898000,then rotate the crankshaft through tworevolutions in its direction of rotation.Loosen the belt tensioner fixing nut and, using tool 1860845000, make sure that the moving reference(1) for the belt tensioner coincides with the fixed reference (2) on the crankcase. Tighten the nut fixingthe belt tensioner to a torque of 2.5 daNm and proceed with refitting the components removed previously.32 Print no. 506.670/09
<strong>Bravo</strong>1 ^=*cfP^L^^^^fex^ ^ ^ ^ ^ ^ ^ ^ ^ v^^^^^^^^^^l<strong>Bravo</strong> 1998 20vIntroductionPlanned maintenanceoo.The removing-refitting of the timing drivebelt cannot be carried out on the vehicle asthere is insufficient space between the timingbelt cover and the bodyshell to do so. It mustbe replaced with the engine at the bench; formore details on the procedure, refer to the instructionsin the manual for overhauling thisengine type.^ ^ ^ ^ ^mm m^Xk*^The camshafts are timed by positioningtools 1860892000 in place of the cap forthe 2nd cylinder, exhaust side and the capforthe 3rd cylinder, inlet side.2 189587900(
IntroductionPlanned maintenance00.<strong>Bravo</strong>Using a screwdriver, apply force to the automatictensioner tab so that the tensioneris in the maximum tension position, thentighten the nut fixing the tensioner to thesupport.Using spanner 1860831000, torque tightenthe inlet and exhaust side pullies to therecommended figures.Remove the tools positioned for timingand locking the camshafts and rotate thecrankshaft through two revolutions in itsdirection of rotation.Loosen the nut fixing the tensioner andensure that the moving reference on thetensioner (1) coincides with the fixed reference(2), then tighten the nut fixing thetensioner to torque and proceed with therefitting of the components removed previously.34 Print no. 506.670/09
<strong>Bravo</strong>-<strong>Brava</strong>IntroductionPlanned maintenanceoo.1860898000P4A35CA02<strong>Bravo</strong>-<strong>Brava</strong> 1910 TD 75 e 100Position the vehicle on a lift, then:- disconnect the negative battery lead;- remove the right front wheel;- remove the right wheel arch liner.1. Rotate the device tensioning the auxiliaryshaft drive belt in the direction shown bythe arrow, slacken the belt tension and removeit.2. Remove the lower shield for the enginecompartment, undo the bolts for the gearboxshield and position the flywheel lock1860898000. Then remove the damperflywheel (auxiliary shaft drive pulley).3. Remove the lower shield for the timingbelt; remove the reaction connecting rodcomplete with mounting bracket near theupper timing belt shield, then remove thelatter as well.4. For the 1910 TD 75 version, check thatthe injection pump timing is correct bymaking sure that references (1) and (2) illustratedare in line, then lock the pulley inposition using the service bolts (3) insertedin the special housings in the actualpulley.Copyright by Fiat Auto 35
IntroductionPlanned maintenance<strong>Bravo</strong>-<strong>Brava</strong>1. Loosen the nut illustrated for the tensioningdevice, release the belt tension, thenremove it.Refitting and tensioning the timing belt2. Remove the bolt (1) illustrated fixing theoil pump; place the pin for tool1860905000 in place of the bolt. Then fitthe timing belt on the crankshaft gear only.3. Position tool 1860905000 on thecrankshaft gear and on the pin (3); rotatethe crankshaft using small movements untilthe dowel (2) is matched up with theopening (1). In this position cylinder no.1 isatT.D.C.4. Using tool 1860831000, rotate thecamshaft pulley until the following alignmentsare achieved:- up to engine n° 416499the reference (1) on the pulley shouldhave moved 7 teeth (in a clockwise direction)in relation to the reference (2)on the tappet cover.- from engine n° 416450the reference (1) on the pulley shouldbe aligned with the reference (3) on thetappet cover.NOTEThe timing is correct when, withpiston n° 1 at T.D.C., the reference(1) is in the position shownin the diagram (for engines up ton° 416449 the exact position ofthe reference can vary ± 3° engineor V2 point).P4A13GX0436 Print no. 506.670/09
<strong>Bravo</strong>-<strong>Brava</strong>2Ai \/ \iIntroductionPlanned maintenanceoo.®^z^^\1 ®® \®^G> teA*Kt^\iv'i 7 /
IntroductionPlanned maintenance00.<strong>Bravo</strong>-<strong>Brava</strong>1. For the 1910 TD 100 version, fix the injectionpump pulley tightening the fixingbolts to the recommended torque and removingpin 1860965000 from the housing.2. Rotate the crankshaft through two revolutionsin its normal direction of rotation, releasethe nut fixing the tensioner andmake sure that the fixed reference (1) onthe tensioner support coincides with themoving reference (2) for the belt tensioner.Lock the tensioner fixing nut and thentighten it to the recommended torque.Proceed with refitting the componentspreviously removed reversing the order ofthe operations described previously.<strong>Bravo</strong>-<strong>Brava</strong> 1929 DPosition the vehicle on a lift, then:- disconnect the negative battery lead;- remove the right front wheel;- remove the right wheel arch liner.Remove alternator drive belt acting on thefixing bolts and the adjustment screw. Ifthe vehicle is equipped with air conditioning,remove the air conditioning compressordrive belt from the damper flywheel.38 Print no. 506.670/09
<strong>Bravo</strong>-<strong>Brava</strong>IntroductionPlanned maintenanceoo.1. Remove the upper protective cover for thetiming drive belt; if necessary, release themounting brackets for the engine coolingsystem pipes.2. Remove the lower timing belt cover.3. Remove the lower flywheel shield fromthe bell housing.4. Place flywheel lock 1860766000 in positionto prevent the rotation of thecrankshaft.5. Remove the damper flywheel, then removethe flywheel lock 1860766000.Copyright by Fiat Auto 39
IntroductionPlanned maintenance00.<strong>Bravo</strong>-Btava1. Rotate the crankshaft in its normal directionof rotation until the references on thecrankshaft pulley and the injection pumpdrive pulley are in line with the fixed referenceson the engine. Cylinder no. 1 willbe at T.D.C., under these circumstancesand the camshaft will be timed for the explosionstroke in cylinder no. 1.P4A40CA02NOTEThe fixing opening for the camshaftdrive pulley has a slot on account ofwhich under these circumstancesthe reference on it should not coincideexactly with the fixed referenceon the cover.2. Loosen the belt tensioner nut, then removethe timing drive belt.40 Print no. 506.670/09
<strong>Bravo</strong>-<strong>Brava</strong>IntroductionPlanned maintenanceoo.1. Move the connections and the cablesshown in the diagram aside, then undothe nuts fixing the brake servo vacuumpump to the cylinder head and remove it.2. Position tool 1860934000 for timing thecamshaft, matching the splining (1) forthe camshaft with the projection (2) onthe tool.Fix the tool to the cylinder head placingthe centering dowel (3) as illustrated inthe diagram. The dowel should be perfectlycentered on the tool; if it is not, use aspanner (4) to centre the dowel on thetool using extremely small movements.3. Remove the bolt shown in the diagramwhich fixes the front cover to thecrankcase. Then fit the timing drive beltonthe crankshaft drive gear only.4. Position tool 1860933000 for accuratelydetermining T.D.C. for cylinder no. 1. Thetool should be perfectly fixed to thecrankshaft drive gear using two bolts andusing another bolt to the crankshaft frontcover (for the bolt removed previously).Then loosen the bolt fixing the camshaftdrive pulley using tools 1860831000 and1860848000.Copyright by Fiat Auto 41
IntroductionPlanned maintenance<strong>Bravo</strong>-<strong>Brava</strong>Fitting and tensioning the timing drive belt1. Complete the fitting of the timing belt observingthe following order:- Crankshaft gear;- fixed pulley;- injection pump pulley;- timing pulley;- belt tensioner.Check that the reference on the injectionpump corresponds with the fixedreference on the rear cover.2. Fit part 1860745300 on tool1860745100, the position the weightwith the knurled part 120 mm away on themillimetric rod and lock it in place.Fit the tool produced in this way on thebelt tensioner as illustrated in the diagramand, acting on the joint, position the millimetricrod on the horizontal plane andlock the joint fixing bolt.3. Tighten the bolt fixing the camshaft drivepulley to the recommended torque. Removethe tools positioned previously fordetermining the timing and T.D.C. and theflywheel lock.Let the belt bed in by rotating thecrankshaft through two revolutions in itsdirection of rotation and tighten the nutfixing the belt tensioner to torque, then removethe tools used for the tensioning.NOTE During this last phase the millimetricrod may move away from the horizontalplane; if this is the case, thejoint must be adjusted again and theoperation repeated.Refit the previously removed components reversingthe procedure described for the removal.42 Print no. 506.670/09
<strong>Bravo</strong>-<strong>Brava</strong>IntroductionPlanned maintenanceoo.E] REPLACE SPARK PLUGS AND CHECK LEADSThe cleanliness and condition of the spark plugs are critical for the efficiency of the engine and containingpollutant emissions. The following types of spark plug are fitted:1370 12v1581 16v1747 16vSpark plug typeChampion RC8BYCGolden Lodge 2HLDRNGK BKR6EKCFiat7GBMSRChampion RC7BMCChampion RC8BYCGolden Lodge 2HLDRNGK BKR6EKCOnly use recommended type sparkplugs: if the heat rating is insufficientor not guaranteed for the correct period,problems can arise.Also check the condition of the supply cablesmaking sure that there are no cuts, cracks orrestrictions along the entire length.1998 20vFiat7GBMSRChampion RC7BMCNOTE Carry out the following operationswith the engine cold.1ptajjJ/ ]&_c^t S\\ wteSJJC3= S5Z^~s=^)^^Ty~~^<strong>Bravo</strong>-<strong>Brava</strong> 1370 12v1. Remove the cylinder head shield shown inthe diagram.Disconnect the H.T. leads from the sparkplugs taking great care when extractingthe boots and remove and replace thespark plugs using an appropriate spanner.Copyright by Fiat Auto 43
IntroductionPlanned maintenance00.<strong>Bravo</strong>-<strong>Brava</strong>1killplli^// \(f/\ 7^^*"i^s^r)5k\\ ^-^^^g^x/As^X ^^^TS^S?IC
<strong>Bravo</strong>-<strong>Brava</strong>IntroductionPlanned maintenanceoo.HI CHECK OPERATION OF ENGINE CONTROL SYSTEMS (using the autodiagnostic socket)A complete electronic fault diagnosis of the injection/ignition system can be carried out by connectingthe Fiat/Lancia Tester or the SDC or Examiner stations to the diagnostic socket.The system is also equipped with an autodiagnostic function which recognizes, memorizes and signalsany failures.If a fault is detected and confirmed it is permanently memorized and the relevant sensor is excluded fromthe system until it is repaired.When a fault is detected and confirmed the warning light in the dashboard usually comes on: when thefault is repaired the light goes out.Working with the Fiat/Lancia Tester or the SDC or the Examiner it is possible to carry out a completesystem fault diagnosis which consists of three stages:1. display of a series of functional parameters;2. display of the errors or their cancellinge;3. activation of certain actuators (active diagnosis).Unlike the Fiat/Lancia Tester, the SDC and Examiner equipment use a "touch screen" type displaywhich is easy to use and can display several parameters simultaneously; a single CD ROM, which can beperiodically updated, makes it possible to carry out fault diagnosis for electronic systems on all Groupvehicle models. Also, if connected to a printer, the results of the fault diagnosis can be certified. In additionto the diagnostic functions these pieces of equipment have powerful integrated measuring instruments.Copyright by Fiat Auto 45
IntroductionPlanned maintenance00.<strong>Bravo</strong>-<strong>Brava</strong>m CHECKOIL LEVELGEARBOX/DIFFERENTIALPosition the vehicle on a lift. Undo the fillerplug and check that the level of the oil is belowthe lower edge of the opening.If necessary, top up until the correct level isrestored.Retighten the filler plug tightening it to atorque of 4.6 daNm.0 CHECK AUTOMATIC GEARBOX OIL LEVEL (<strong>Bravo</strong>-<strong>Brava</strong> 1581 16v)NOTEThe gearbox oil level should bechecked with the engine and thegearbox at normal operating temperature(gearbox oil temperature:70 - 80° C), on account of which thevehicle must be driven for a suitablelength of time before the check.completely insert the dip stick in its housing;Proceed with checking the gearbox oil levelby carrying out the following operations:- park the vehicle on a flat surface and applythe handbrake;- with the engine idling, gently move the selectorlever from position P to position 1,then return it to P;- extract the oil dip stick (1) and clean itagain;extract the dip stick once again and check the the level of the oil is between the two reference on theside of the rod marked HOT.// the check takes place with the temperature of the gearbox oil low, check that the level of theoil is between the reference on the side of the dip stick marked COLD. If possible, check the levelagain with the oil at the correct temperature (70 - 80 °C).46 Print no. 506.670/09
<strong>Bravo</strong>-<strong>Brava</strong>IntroductionPlanned maintenanceoo.If the oil level is low, notify the Customer ofany leaks or seepage and the need to solvethe problem. If refillingis necessary, extractthe dip stick and, using a clean container inorder not to contaminate the oil, pour in thenecessary quantity of gearbox oil. Thenrecheck the level using the dip stick andcheck that there are no leaks from the drainplug.Recommended gearbox oil: TUTELA GI/2Periodic replacement: 3 litres (2.7 kg)Q]gj] CHANGE ENGINE OIL AND FILTER- With the engine hot remove oil filler plug;- remove the engine oil dip stick.With the engine warm, work verycarefully inside the engine compartmentbecause there is a dnager of beingscalded. Remember that, withthe engine hot, the fan may startworking with the danger of injury.- Raise the vehicle, remove the engine compartmentlower shield and undo the drainplug and completely drain the oil into asuitable container.Work very carefully whilst removingthe drain plug because the oil couldbe very hot.- Working from underneath the vehicle usingthe appropriate equipment, release the oilfilter and remove it;NOTE For the 1747 16v and 1998 20v versions,the engine compartment lowershield does not have to be removedbecause the drain plug is accessiblefrom the rear of the engineand the oil filter can be reached byremoving the special flap on the actualshield.- clean the drain plug and tighten it, with theappropriate seal, to the recommendedtorque;- lubricate the seal for the new filter with oiland tighten fully by hand.Copyright by Fiat Auto 47
IntroductionPlanned maintenance00.<strong>Bravo</strong>-<strong>Brava</strong>- lower the vehicle, introduce the correct quantity of recommended oil;- check that the oil level is correct using the dip stick;- reposition the oil filler plug, let the engine idle for around 2 minutes, switch off the engine and wait forseveral minutes, then check the level of the oil and make sure there are no leaks.NOTEIf the vehicle is mainly used in one of the following particularly harsh conditions:- towing a trailer or caravan- dusty roads- short, repeated journies (less than 7-8 km) at sub-zero temperatures- engine often idling or driving long distances at low speedsnotify the Customer of the need to change the oil more often than indicated in the Planned MaintenanceProgramme.The engine oil used and the oil filter replaced contain substances which are dangerous to the environment.The used oil and the filters should be deposited in special containers and then disposedof in accordance with the laws in force.Q3 CHANGE BRAKE FLUIDL^==^Q[(?/^>i /ffplO^WKACM Wi1 \ (JffiD/sj^jj^^^5The brake fluid is hygroscopic, i.e. it absorbshumidity. To avoid problems with braking,the brake fluid should be changed every twoyears, irrespective of the mileage.- Raise the vehicle and, if necessary, removethe wheels;- connect a flexible pipe to the bleed screwson the brake calipers (for rear drum brakesto the bleed screws on the wheel cylinders),loosen them and, acting on the controlpedal, drain the fluid into a suitablecontainer.- remove the plug from the brake fluid reservoirand (simultaneously to the operationof draining the old fluid) introduce the recommendedfluid into the system. Continueto introduce the new fluid until it starts tocomeout of the bleed screws, then tightenthem.Avoid the brake fluid, which is extremely corrosive, coming into contact with the paintwork. If itdoes, wash immediately with water.The symbol@, present on the container, identifies a synthetic type of brake fluid, distinguishingit from mineral kinds. The use of mineral type fluids irreparably damages the special rubber sealsin the braking system.48 Print no. 506.670/09
<strong>Bravo</strong>-<strong>Brava</strong>IntroductionPlanned maintenanceoo.- Bleed the system keeping the flexible pipe connected to the bleed screw and the opposite end immersedin a transparent container filled with the same fluid as the circuit;- loosen the bleed screw and, at the same time, press the brake pedal letting it return slowly; repeat thisoperation until any air bubbles finish coming out;- with the pedal fully depressed, tighten the bleed screw and remove the pipe. Carry out this operationseparately for each wheel starting at the rear (the furthest from the brake fluid reservoir).K M During the bleeding operation keep the level of the fluid in the reservoir above the MIN refer-2 j j ence.Do not reuse the hydraulic fluid drained during the bleeding procedure.- Restore the level of the fluid in the reservoir and refit the cap;- check the efficiency of the braking system.NOTE For versions with hydraulic clutches (<strong>Bravo</strong> 1998 20v) the fluid in the circuit must be drainedby connecting a flexible pipe to the clutch operating cylinder bleed screw, loosening it and actingon the pedal to drain the fluid into a suitable container. Proceed with bleeding the hydraulicclutch circuit in the same way as described for the braking circuit, using the clutch pedal thistime.The bleeding operation can also be carriedout using the "Jollyfren" equipment. Thisequipment allows the hydraulic system to bebled quickly. The bleeding action is carriedout simultaneously for both wheels by a singleoperator representing a considerable timesaving.Copyright by Fiat Auto 49
IntroductionPlanned maintenance00.<strong>Bravo</strong>-<strong>Brava</strong>SJ REPLACE POLLEN FILTER1. To gain access to the pollen filter it is necessaryto raise the seal shown in the diagramand then undo the bolts shown andremove the access flap for the pollen filter.2. Release the side retaining springs in thepollen filter housing, extract it and proceedwith replacing it.NOTE Failure to rep/ace the filter can considerablyreduce the efficiency of theclimate control system.If the vehicle is often used in dusty orstrongly polluted areas, advise theCustomer of the need to rep/ace thefilter element more often; it shouldespecially be replaced if a decreasein the flow rate of the air introducedinto the passenger compartment isnoticed.50 Print no. 506.670/09
Untitled Documentfile:///D| /Volume%203/engine.htm08/07/2006 16:39:49
<strong>Bravo</strong>-<strong>Brava</strong>Introduction and technical dataIndex00.PageINTRODUCTION- Identification data- Weights- Performance - Fuel consumption-" Capacities1234TECHNICAL DATAENGINE ^TD 75 CV^JTD 100 CV- Typical curves 4- Characteristics 5- Cylinder head assembly and valve gear components6- Fuel system and supercharging 7- Data for checking Bosch injectionpump type VER 679 x 8- Data for phecking Lucas injectionpump type FT 09 9GEARBOX AND DIFFERENTIAL 11AISIM AUTOMATIC GEARBOX 13FRONT SUSPENSION 14N.D,Data not avaiJaBle at the time ofprintingCopyright by Fiat Auto
<strong>Bravo</strong>-<strong>Brava</strong>IntroductionIdentification dataOO.oGEARBOXCHASSISENGINEVERSIONBRAVOBRAVA£182 AB 1AA01•182 A4.000182AB1AA018(A)182 BB 1AA11182 BB 1AA11B (A)•/••J^S| 16V182 AB 11A 02182 BB 11A 12•••ZFA 182 000182 A6.000 (*)182 AH 1AA08 (*)182 BH 1AA 17 (*)•••]^^3| TD 100 CV182 A7.000182 AF1AA06182 BF 1AA 15•••j^^JTD 75 CV182 A8.000182 Al 1AA 09182 Bl 1AA 18•••(*) Versions for specific markets (Germany)(A) Voluntary - GermanyA. Vehicle type identification code and chassis manufacture numberB. V.I.N. Plate (EEC regulations)C. Engine type and number.Copyright by Fiat Auto Vll-97 - Cancels and replaces 1
IntroductionWeightsOO.o<strong>Bravo</strong>-<strong>Brava</strong>WEIGHTS (in kg)ENGINE TYPE16V 16V TD 100 CV TD 75 CV3 door1050109011551145f^l^^^H^I^P1090112011801170^ ^ _ 3 door1550159016651655^S5 door3 door16308501660850172092017109205 door8508509209203 door8508509009005 door850850900900Maximum permissible load on the roof80808080Load on the tow hookMinimum----(trailer with biaking system)Maximum70707070Without braking_^~~II S^ ^ ^ ^ ^ system400400400400W"^ C^y—^ ^'HS^ With brnkinasystem1100110013001300■ Loads which must never be exceeded(•)With automatic transmission(A) 510 for <strong>Bravo</strong> 1910 TD - 540 for <strong>Brava</strong>NOTE FOR VERSIONS WITH ACCESSORIES: If special equipment is fitted (non standard air conditioner, sun roof,trailer towing device), the empty weight increases and therefore the carrying capacity may decrease, in relation to themaximum permissible loads.The fuel consumption figures according to the 80/1268/EEC standards given overleaf have been defined in the course ofofficial tests and in accordance with procedures laid down by EEC regulations. In particular, the bench tests measuresimulated urban cycle figures whilst consumption at constant speeds of 90 and 120 kph are measured directly on a flat,dry road and in equivalent bench tests. The fuel consumption figures according tothe 93/116E standards have beendefined in the course of homologation tests involving:- an urban cycle which included cold starting followed by a varied urban cycle simulation.- an extra-urban cycle which includes frequent acceleration in all gears simulating normal extra-urban usage of thevehicle. The speed varies between 0 and 120 kph.- The average combined consumption is obtained from 37% of the urban cycle and 63% of the extra-urban cycle.The type of journey, traffic conditions, driving styles, atmospheric conditions, trim level/equipment/accessories,whether a roof rack is fitted, the presence of special equipment and the general state of the vehicle can lead to fuel consumptionfigures which differ from those obtained through the above mentioned procedures.The CO2 exhaust emissions (in g/km) are obtained from the average combined cycle2VII-97 - Cancels and replacesPrint no. 506.670/12
<strong>Bravo</strong>-<strong>Brava</strong>PerformanceIntroductionFuel consumptionOO.oENGINE TYPE16V!g| *16V01TD 100 CV0iTD 75 CV523634Speed kph (averageload)9013218418063975992175137128184(180 •)180(177 •)182180165533634Maximum climablegradient37313041403837Fuel consumption accordingto 80/1 268/CEE standards(litres/100 km) (*)ifl>eFuel consumptionaccording to93/116/CE standards(litres/100km) (*)C02 exhaust emissions (g/km)Urbancycle (A) 9,3 11,2Constant speed90 kph (B) 5,5Constant speed120 kph (C) 7,5Av. consumption(CCMC proposal)A + B + CUrbanExtra-urbandCombined(*) See specification on previous page(%) Versions for specific markets (Germany)(A) With automatic transmission7,411,011,36,56,68,2_8,3_1941975,85,97,6_ 7 < 78.28,3JI3,813,88,38,310^10.3246^2467,54,64.76.5A 6 _026,3J3,58>~5,25,36,46,51711737,74.5A 46.56,26,238,5_8.65,15,2A. 36,4168171NOTEThe figures with the shaded background refer to the Fiat <strong>Brava</strong>Copyright by Fiat AutoVII-97Cancels and replaces3
IntroductionCapacitiesOO.oBPetrol* >
<strong>Bravo</strong>-<strong>Brava</strong>Technical dataEngineOO.ioCHARACTERISTICSj^Q| TD 100 CV|^Q| TD 75 CVCycleTimingType of fuel systemDIESEL 4 strokesingle overhead camshaftIndirect mechanical injection• • •Number of cylindersr 0Cylinder liner(bore) mm 82Stroke mm 90,48*OHMk| Capac ity cc 1910Pi= 9 Compressionratio20,7 ± 0,5Total volume of combustion chamber cc 24,6Max power EECkW(CV)74(100)55(75)(?*rpm 42004200daNm(kgm)20(20,4)14,7(15,)Max torque EECrpm 22502750Copyright by Fiat Auto 5
Technical dataEngine: cylinder head assembly and valve gear componentsOO.o<strong>Bravo</strong>-<strong>Brava</strong>WjEM\ TD 100 CV !@g| TD 75 CVDESCRIPTION7~^17-20^k1Cam liftclearance fortiming checkoperational clearan■em■em■em8,58,5Values in mm0,500,500,35 ± 0,050,35 = 0,058,58,5TIMING DIAGRAMSPIWTiming anglesABInlet■Qopens beforeTDCcloses afterBDC6°26°6°26°CDExhaustmopens beforeBDCcloses afterTDC26°6°26°6°6 Print no. 506.670/07
<strong>Bravo</strong>- <strong>Brava</strong>Technical dataEngine: fuel system and turbochargingOO.ioSPECIFICATIONSFiring orderInjection pumpInjectorNozzle holderNozzleInjector setting pressureInjection pump timing adjustment: pump pistontravel with cylinder no.1 at TDC (compressionstage)Engine idle speedTop engine speed with no loadLUCAS DPC-FT09,electronicLUCASLCD 011R02AA1 (*)LCR 6705344LUCAS RND 05DC6897143-150 barElectronic adjustment870-930/min4920-5020/min1-3-4-2BOSCH, mechanicalVER-679BOSCHBOSCH KCA 30S41BOSCH DN 0SD 321150-158 bar0.92 mm830-870/min5000-5100/min(*) Signal injector installed on cylinder no. 1TURBOCHARGING Turbocharger operated by exhaust gases with waste-gate pressure valve and air/airheat exchanger (intercooler)Turbocharger: typeGarrett GT 15Maximum turbo boost pressure< 1.05 bar 0.950 barCross section throughturbochargerCopyright Fiat Auto ■ VII -99*'' Sujj^eties- p"r$vip
Technical dataEngine: fuel systemOO.ioTEST DATA FOR BOSCH INJECTION PUMP, type VE R 679GENERAL TEST CONDITIONS-Test oil: ISO 4113-Test fluid temperature: 45° ± 1°C (reflux-outlet*)-Pump intake pressure: 0.35 bars-Clockwise rotationMaxChecktypeOutputIgnition(enrichment)Eliminationof enrichmentReflux output(•)IdleResidualflowArrest (••)Delay device(LFB)1234567891011121314151617181920RegulatorleverpositionMaxMaxMaxMaxMaxMaxMaxMaxMaxMaxMaxMaxMaxMaxMaxMinMinMin15001500Rotationspeedrpm1000150021006001000150021002400260028001004005256002100425500425--Advancecheckmm2.4-3.85.1-6.38.2-9.6-----------------SPECIFIC TEST CONDITIONS<strong>Bravo</strong>- Btava © ro7s- Bosch 1.688.901.022 Injectors- Nozzles: Bosch 1.688.901.922 (DNO SD 1510) setto 130 - 133 bar- Pipes: 2x6x450 mm.Transferpressurebar5.4-6.46.8-7.88.3-9-3---------------P. MAX(0.2±0.1)-Outputperelementmm/cycle---39.3-43.940.3-44.941-4541.3-45.926.2-36.28.4-18.4
DATA FOR CHECKING LUCAS FT09 INJECTION PUMP FOR 1910 TD 100 ENGINEGENERAL TEST CONDITIONS - Supply pressure: 0,1 bar -Engine idle speed- Test oil: ISO 4113 (SHELL S-9365) - Direction of rotation: clockwise (seen from 850±20 rpm- Temperature of test oil: 40° ± 1°C control side) - Fitting: 0±1° with cyl. n° 1- Injectors ISO 9008-025A - Injection piping: 2,5x6x330 mm at TDC- Injector setting 130-M33 bar - Max engine free running- Injectors RDNOSDC 6876 speed: 5000±50 rpmType of check or adjustmentOp.N°Adjust,leverpos.Rotationspeed rpmAv. capacityper cyl. mm 3 /-cycleAdvanceMax. discr. btwnflow ratesmm 3 /cycleOps. or checks to be carried outFilling and bleeding1Max0---Fill pump with test fluid through filler on coverElectrical supply2Max0---With supplier stabilized at 11V the control unit isthe interfaceAdvance instrument setting3Max0-0-Adjust acting on the potentiometer on the readerCheck hydraulic continuity4Max1000---Let the pump run for 3 minutes checking that thereis no air in the fluidLet oil temp, warm up5Max2000---Stabilize the temperature at 4CK40,5 °C (pumpoutlet)Dynamic fitting6Max1500-6°-Supercharging pressure 1 barAct on the variable pick-upMax no load check7Max253019±4-4Supercharging pressure 1 barRegulator interventioncheck8Max2330405±4-4Supercharging pressure 1 barMax capacity check9Max210056,5±27,5±0,54Supercharging pressure 1 barMax capacity check10Max125055,4±24,5±0,54Supercharging pressure 1 barStart of superhargingintervention11Max75040,2±2,51,5±0,54Supply pressure 0,15 barSupercharging devicegradient12Max750Q12-Q11= 11 ±204Supercharging pressure 0,45 bar
Technical dataEngine: fuel systemOO.io1I5iIMax. discr. btwnflow ratesmm 3 /cycleo= .■o
Technical dataGearbox and differential00.21-27<strong>Bravo</strong>-<strong>Brava</strong>|^Q| TD 75 |^M| TD 100GEARBOX=00=SynchronizersGearsoospring J&&.ring ((( )))(Porsche type) Vis^obaulk ringtypestraighttoothedhelicaltoothedType C 510.5.173,9093,9092,2382,2385 oo 1,4441,444Gear ratios 1,0291,0290,8150,7673,9093,909Copyright by Fiat Auto 11
<strong>Bravo</strong>-<strong>Brava</strong>Technical dataGearbox and differential00.2127|^Q| TO 75 jQpj TO 100DIFFERENTIAL- * -Ratiocrown wheel &pinion reduction17/57(3,352)20/63(3,15)13,102 12,3137,501 7,0491-4,840 4,5483,449 3,241Ratio at the wheels 2,731 2,41604Differential internal casing bearingffitoAdjustment of bearing pre-loading13,102 12,313conical roller bearingsby shimsThickness of shimsArjtbInterference toobtain exact bearingpre-loadingAXtClearance btwn planet and sat. gearsmm 0,07 1,70-2,89mmBearings not pre-loaded = 0,12bearings pre-loaded (350 daN) = 0,08mm ^ 0,104 «#no adjustmentis carried outAdjustment of cirnce btwn planet/sat, gears12 Print no. 506.670/07
Technical dataEngine: typical curvesOO.io<strong>Bravo</strong>-<strong>Brava</strong>AISINAUTOMATIC GEARBOXENGINE TYPEIcSii 16vGears .1.*i hOOSik.1.Gear ratiosooooooooooooooooooooooooo2,8071,4791,00,7352,769Idler ratio 1,019 (54/53)(2* Torquei converter 0 mm 216GI/2Quantityof oilRatio(multiplication)for engine torque-►total, with gearboxconverter, radiatorand pipes emptyreplacementonly2,1506 litres (5,4 kg)4,3 litres (3,9 kg)DIFFERENTIALII IIl-HI-Hn IICrown wheeland pinionreduction3,565 (82/23)ii nl-Hl-HII nPr, IIu ^ uRatio at the wheelsFinal ratiofoooooooooo< oooooooooovooooo3,633 (54/53 * 82/23)10,1975,3733,6332,67010,059Copyright by Fiat Auto 13
Technical dataFront suspension00.44<strong>Bravo</strong>-<strong>Brava</strong>Front suspension independent, Mac Pherson type with steel track control arms anchored to an auxiliarycross member. Offset coil springs and double acting telescopic shock absorbers. Anti-roll torsionbar.Coil springsENGINE TYPEVERSIONI^S| 16VA B CDiameter of wiremm12,3±0,0512,5 ± 0,0512,7 ± 0,05Number of turns3,753,753,75Direction of coilclockwiseclockwiseclockwiseHeight of spring releasedmm461461454j 320,5+■ 346,5 mm192--Height of spring J 34Q _ Hunder a load of: \368 mm-192-1 352 - 382 mm'--192The springs are subdivided into two categories,identifiable by a mark1 333,5 height of mm>192yellow (1) for Jthose under \ 354a load of:i( 367height of mmheight of mm-->192-->192[ 333,5height of mm
<strong>Bravo</strong> i§i mHGT20vIntroduction and technical dataindexoo.SPORT PACKINTRODUCTIONpage,■■■"■".
<strong>Bravo</strong> IB HGT20vIntroductionOO.oA "SPORT PACK" option is available for the <strong>Bravo</strong> 1998 20v HGT which makes its behaviour on theroad even more sporty.With this option the vehicle is equipped with special suspension and larger tyres which improve roadholding, agility and driving precision.In pratice it involves personalizing the vehicle aimed at more demanding customers with a passion forsports driving.The technical contents of the "SPORT PACK" are as follows:- flexible suspension elements which are more rigid to restrict rolling and pitching- height from the ground reduced at the front by 20 mm in order to lower the centre of gravity, improvethe aerodynamic coefficient (CX) and minimize the front aerodynamic ligtening at high speeds- special front wheel steering knuckles, with specific steering geometry for a high level of responsivenessand to minimize understeer round tight bends; this geometry allows the front wheels to"work" optimally, with consequent improvements to the driving as well;- special power assisted steering, which features a direct steering ratio (60 mm/turn, or 2 and 1/4turns lock to lock) which makes the steering responsive and precise; this direct steering associatedwith the specific variation in the toe in which the front wheels undergo during rolling (which improvesstability when entering bends) ensures complete control of the vehicle during more decidedvariations in trajectory;- special pressurized Sachs Boge shock absorbers, which improve the handling of the vehicle and atthe same time guarantee a high level of comfort over unmade roads;- larger 205/50 R15 tyres, which ensure road holding which is more appropriate to the driving characteristicsand the demands of Customers who love sporty driving.NOTEThe variation in the geometry and larger tyres mean that snow chains cannot be used.Copyright by Fiat Auto 1
Technical dataSteering00.41<strong>Bravo</strong> @ HGT 20vTyperack and pinionpower assisted2.3±- no. of turns lock to lockRatio•128 ±1,5 mm/ / rrr-0Turningcirclerack travel12miouterwheelai26° ± 30'iSteering angleinnerwheela234° ± 30'Steering col.with 2 universal joints2 P/7/?f no. 506.670/06
<strong>Bravo</strong> !§p» HGT20VTechnical dataFront suspension00.44Front suspension independent, Mac Pherson type with steel track control arms anchored to an auxiliarycross member. Offset coil springs and double acting, telescopic shock absorbers. Torsion anti-rollbar.Coil springsDiameter of wireNumber of turnsDirection of coilHeight of spring releasedmmmm13,5±0,054clockwise355Height of springunder a load of:340-360 daN(358-388 daN)*mm170The springs are subdivided into twocategories, identifiable by a markyellow (1) for 350 daN . . . ,those under (373 daN)* hei 9a load of:ht of mm>170green (1) for 350 daN u . u tthose under (373 daN)* he'Qht of mma load of:
Technical dataRear suspension00.44<strong>Bravo</strong> @i HGT20VRear suspension independent with cast iron track control arms. Coil springs and shock absorbers withvulcanized bushes. Torsion anti-roll bar. Rigid H auxiliary frame made up of transverse tubular elementand two pressed side members connected to it.Coil springDiameter of wireNumber of turnsDirection of coilHeight of spring releasedmrnmm11,8±0,054,5clockwise296,8untr'atoadT 275,303 daN mm194The springs are subdivided into twocategories, identifiable by a markyellow (1) for .__ . . . . . .those under 289 daN height of mma load of:>194green (1) forthose under 289 daN height of mma load of:
<strong>Bravo</strong> ©i HGT20vTechnical dataWheels00.44WHEEL GEOMETRYunladen car (■)camber (**)-1'± 30'caster (**)±^2°20' ± 30'Frontsuspensiontoe in-1 + 1 mmfront wheel offset▲fcSU^Rearsuspensionuicamber ('**)toe in-45' ± 30'1 + 5 mmrear wheel thrustangle A(**) Angles cannot be adjusted(■) With tyres inflated to the correct pressure and vehicle in running order with 5 litres of fuel(A) Angular values, which cannot be adjusted, used for the correct alignement of the vehicleCopyright by Fiat Auto 5
Technical dataWheels00.44<strong>Bravo</strong> !$pi HGT20vENGINE1Rfjffj || Tyre inflation■Sun] w pressure|nS»] i»in barPressed steel wheelrim typeRadial, tubelesstyreaverageloadFrontheavyloadaverageloadRearheavyload6J x 15"- 49205/50 ZR 15 P700Z(•)2,52,72,22,5SPARE WHEEL (*)4Bx15"-35115/70 R15 90M4,2(•)Not to be used with snow chains because they could interfere with the wheel arch6 Print no. 506,670/06
<strong>Bravo</strong>-<strong>Brava</strong> gp>^ Introduction and technical data1998 range Contents00.pageINTRODUCTIONIdentification data 1Performance - Fuel consumption 1TECHNICAL DATAENGINE IgpMSi/- Specifications 2Typical curves 2'Cylinder block/crankcase and associ- „ated componentsTiming system 4Timing diagrams 5Fuel system 6GEARBOX/DIFFERENTIALELECTRICAL EQUIPMENT- Starting 9Recharing 11This section contains data relating to cars fitted with a 1581 16v STEP A engine.For further information, refer to data in section 00 of the first and third volume.Copyright Fiat Auto IV-99 Stipf-rstcies previous vnrsion
<strong>Bravo</strong>-<strong>Brava</strong> t§l i 6vIntroduction1998 range Identification data ■ Performance - Fuel consumptionOO.oGEARBOXCHASSISENGINEVERSION182 AB 1AA01C<strong>Bravo</strong>•<strong>Brava</strong>666IgSl 16VZFA 182.000182 A4.000182 AB 1AA11B01D (A)182 BB 1AA11C182 BB 1AA11B01D (A)••••(A) Versions for specific markets (Germany)50Speed km/h(average load)87135184 (180)17850Gradient whenfully laden 37Fuel consumptionas per93/116/EC(litres/100 km) (*)BUrban 10.6 (10.8)Out-of-town 6.0 (6.1)Combined 7.7 (7.8)Exhaust C02 emissions (g/km) 183 (186)NOTE: Values shown in brackets refer to the Fiat <strong>Brava</strong>.(*) 93/116/EC fuel consumption figures were determined during homologation tests:- an urban cycle, i.e. a cold start foFIowed by a simulated varied urban route- out-of-town cycle, i.e. frequent accelerations in all gears to simulate normal out-of-town vehicle use, with speed between0 and 120 km/h.- Average combined fuel consumption is assumed to be 37% of the urban cycle and 63% of the extraurban cycle.Type of route, traffic situations, driving style, weather conditions, version/equipment/accessory level, presence of a roofrack, presence of special equipment and vehicle condition in general may lead to fuel consumption figures other thanthose measured as above.Exhaust CO2 emissions (in g/km) are measured over an average combined cycle.Copyright Fiat Auto
Technical dataEngineOO.io<strong>Bravo</strong>-<strong>Brava</strong> @)16v1998 rangeSPECIFICATIONS^ = y Compression^M^ratio10.5 ± 0.15k. kW/ ^ Maximum/ power/ ECr(BHP)rpm75.8(103.1)5750kMaximum" "\ torque\rECdaNm(kgm)rpm14.2(14.5)4000CV kWCEE CEE11090808060,1I^Si 16vTypical engine curves measured byEEC methodThe power curves illustrated can beobtained with the engine overhauledand run in, without a fan and with asilencer and air cleaner fitted at sealevel.2090120-100-7070-60-50-40-30-20-10-50-40-10-N«m kgmCEE CEENOTE The data and curve shown onthis page refer to the 158116v engine with order number464744050-3000 5000 6000 7000P4A02GA01Publication no. 506.670/14
<strong>Bravo</strong>-<strong>Brava</strong> $ 16v1998 rangeTechnical dataEngine: crankcase assemblyOO.io1110•fNK8|j^| 16vDESCRIPTION*n m0Piston 0 onPn >mPistonring grooves123Values in mm10.286.352 - 86.36286.359 - 86.37186.368 - 86.3780.41.520 - 1.5401.510 - 1.5303.010 - 3.03001231.470 - 1.4901.470 - 1.4903.000Piston rings0 BOSB >IPiston rings5-3 %tPiston ring grooves1230.40.035 - 0.0750.020 - 0.0600.010 - 0.030Copyright Fiat Auto 3
Technical dataEngine: Crankshaft and timing gearOO.io<strong>Bravo</strong>-<strong>Brava</strong> $ 16v1998 range10 612aj£ 1636 15!B| 16vDESCRIPTION01Values in mm24.016-24.041« 1£12aIIValveSmall end bushPiston pinSmall end bushguide seaton cylinder headValveseat02 ^a22.004-22.0090.009-0.0190 12.950-12.977■em45°±20'45°±20'about 2ID.Volume of combustionchamber in cylinder head cm' 33.3515n MSfrPiHiT H 2P 28.3-9.3 daN27.517.6-19.6 daNInternal valve springH218.54 Publication no. 506.670/14
<strong>Bravo</strong>- <strong>Brava</strong> l © **1998 rangeTechnical dataEngine: cylinder head and valve gear components00.10DESCRIPTION16^OOuter valve spring17a #rt17b ^ ^ Cam lift^FlM^P1HiP2H2HQ(£Values in mm23.4 - 25.6 daN33.546 - 50 daN24.58.5812a I Q B Tappet housings033.000 - 33.025TIMING DIAGRAMSTiming anglesABIntake+2Begins after TDCEnds after BDC4°38°CDExhaust®Ends before BDCEnds before TDC28°4°Copyright Fiat Auto 5
Technical data <strong>Bravo</strong>- <strong>Brava</strong> #*»Engine: fuel system1998 rangeOO.ioINTEGRATED ELECTRONIC INJECTION/IGNITIONSYSTEM COMPONENTSLiecTiomc coniioi umiIntake air pressure and temperature sensorVersions with manualgearboxVersions with automatictransmissionICpllGVI.A.W. 49 F.B4I.A.W. 49 F.L2M. Marelli TPRT 03Fuel vapour solenoid valveSIEMENS EC1Throttle bodyM. Marelli 46 SX F2Idle adjustment actuatorM. Marelli IB/02InjectorM. Marelli IWP 064Fuel pressure regulatorCoolant temperature sending unitTop Dead Centre and rpm sensorM. Marelli RPM 84SYLEA 402.183.01ELTH 2690350JAEGER CVM 02Throttle position sensor (potentiometer)Dual relay for electric fuel pump and injection-ignition controlunitElectric fuel pumpM. Marelli IPF 2CBITRONMARWALL ESS 291Lambda sensorNTK OZA 334-A1Fuel filterMARWALL FA 5325 INKnock sensorNTK KNE 03Ignition coilCOOPER BAE 920 A
<strong>Bravo</strong>-<strong>Brava</strong> $ 16v1998 rangeTechnical dataGearbox and differential00.21-27l^&i 16vGEARBOXTypeC.513.514.26WSynchronizersGearsooringtype(Porsche)freeringspurtoothedhelicaltoothedo3.909$ OOGear ratios2.2381.4441.0290.8163.909Copyright Fiat Auto 1
Technical dataGearbox and differential00.21-27<strong>Bravo</strong>-<strong>Brava</strong> @i 16v1998 rangeDIFFERENTIAL4*1*Ratio spurgear and pinionsetlisai lev3.353(17/57)13.107nj7.5044.8423.450Ratio at the wheels2.73613.107laDifferential internal casing bearingotaper roller typeBearing preload adjustmento* «#* (& 0.05mmThickness of shimsa^Interference toobtain exact bearingpre-loading0.10mmby shims1.70-2.60bearings not pre-loaded = 0.12bearings pre-loaded (350 dan) = 0.08Differential-planet gear backlash4 ^Adjusting differential-planet gear backlashmm < 0.10by shimsThickness of shims (& 0 0 5 )mm 0.80 - 1.258 Publication no. 506.670/14
<strong>Bravo</strong>-<strong>Brava</strong> @i 16v1998 rangeTechnical dataElectrical equipment: starting00.55STARTER MOTORTypeVoltage
Technical dataElectrical equipment: starting00.55<strong>Bravo</strong>-<strong>Brava</strong> 0i1998 rangeSTARTER MOTOR - WIRING DIAGRAM AND TYPICAL CURVESWiring diagram of M. Marelli M70R-1.3/12starter motorKWNm V2,135-1H1,8301,5m0,90,6- 1025- 100,3 5-J 0Typical curves for startermotorM. Marelli M70R-1.3/12(with epicyclic reductiongear)10 Publication no. 506.670/74
<strong>Bravo</strong>- <strong>Brava</strong> @» mTechnical data1998 range Electrical equipment: recharging00.55H^| 16ViQp) 16Vwith airconditioneriBpl 16V** |Bp) 161/**ALTERNATORMakeM.MarelliA115I-14V-40/75AM.MarelliA127IR-14V-40/85ABoschKCB1-14V-45/80ABoschKCB2-14V-50/90ABosch #KCB2-14V-55/105ARated system voltageV14VMaximum currentA75858090A (105)*Nominal current at 1800rpmr PNominal current at 6000 .rpmField winding resistancebetween the two slip Qrings (*)Direction of rotation (seen fromcontrol side)407525.87 - 2.613508545802.16 - 2.64Clockwise50 (55)*90 (105)*2.34 - 2.86(1.8- 2.2) #Diode power rectifiersBridge(*) Data obtained at an ambient temperature of 20°C.(•) For cars with air conditioner destined for ISRAEL' (**) Alternators without cooling system fitted from chassis no. 4788901.VOLTAGE REGULATORBuilt in electronicMakeRTM 151 BBR1Alternator speed for testrpm70007000Thermal stabilisation .current--Test currentA--Regulation voltage (*)V14.3 - 14.614.3 - 14.6(*) Data obtained at an ambient temperature of 23°C.Copyright Fiat Auto 11
-;\
<strong>Bravo</strong>-<strong>Brava</strong>1998 rangeIntroduction and technical dataContents00.pagepageINTRODUCTION- Identification data 1- Weights 3- Performance - Fuel consumption 4- Capacities 5- Fiat Lubricant product characteristics 6ELECTRICAL EQUIPMENT- Starting- Recharging- Electronic injection-ignitionSPECIAL TOOLSTIGHTENING TORQUES464849505362TECHNICAL DATAENGINE ^16v9*20vSTEPA- Characteristics 7- Typical curves 8- Crankcase and crankshaft 9- Cylinder head assembly and valve gear 14- Counter-rotating shaft 19- Lubrication 20- Cooling system - Fuel system 21- Components of integrated electronicinjection-ignition system 22ENGINE
<strong>Bravo</strong>-<strong>Brava</strong>1998 rangeIntroductionIdentification dataOO.oGEARBOXCHASSISENGINEVERSION3Doors5DoorslgS|l6v182 B2.000182 AP 1AA182 BP 1AA•--••! B | 20VZFA 182 000182 B3.000182 AQ1AA•-•|^H( JTD182 B4.000182 AR 1AA182 BR 1AA•--••NOTEThis section deals with the new engine versions in the 1998 range.For the remaining engine versions, refer to the <strong>Bravo</strong>-<strong>Brava</strong> manual, publication no. 506.670, andsubsequent updates.Copyright Fiat Auto 1
IntroductionIdentification data<strong>Bravo</strong>-<strong>Brava</strong>1998 rangeIcraJii&20vP4A02HA01P4A003A021. Vehicle type identification codeand chassis manufacture number)Bi JTD2. Engine type and number.3. Marking summary plate(EEC regulation.)rCO 1-2-MOTORE-ENGINEVERSIONE-VERSIONAB#EFGH11N 9 PER RICAMBI-N-FOR SPARES^ = —DKgKgKgKgMoN)A. Name of manufacturerB. Homologation numberC. Vehicle type identification codeD. Chassis manufacture numberE. Maximum authorized weight of vehicle fullyladenF. Maximum authorized weight of vehicle fullyladen plus trailer.G. Maximum authorized weight on first axle(front)H. Maximum authorized weight on second axle(rear)I. Engine typeL. Bodywork version codeM. Parts numberN. Corrected smoke absorption factor (only fordiesel engines)2 Publication no. 506.670/16
<strong>Bravo</strong>-<strong>Brava</strong>1998 rangeIntroductionWeightsOO.oWEIGHTS(values expressed in kg)ENGINEtagi16v|^P| 20vSTEP AJTD3 doors101011901170^^I^^^B^I^Pdoors1040-1195^ ^ _ 3 doorsJj) Of +600- Mttt*(53 5 doors151015701690-168017353 doors8509709205 doors850-9203 doors8509009205 doors850-920Maximum load permitted on roof808080Load on tow hook ballMinimum---(trailer wnn uraKing system jMaximum707070. Without brakingsystem400400400X/f^k C ^ ^ ^BI^^B 1A/I4.U l-__l,:_„system100013001300Loads that should never be exceededNOTE FOR VERSIONS WITH ACCESSORIES: With special equipment fitted (non-standard air conditioner, sun--roof, trailer tow hook), the unladen weight increases and maximum carrying capacity may decrease.Copyright Fiat Auto 3
IntroductionPerformance - Fuel consumptionOO.o<strong>Bravo</strong>-<strong>Brava</strong>1998 rangeENGINE16v1^23)20vSTEP Aj^^fll JT0425936Speed km/h(average load)76121110*941396397167145*182136173213187185*435436Gradientwhen laden37Fuel consumptionas per EC standards 93/116(litres/100 km)5«i**iiUrbancycleOut of towncycleCombinedcycle9.49.5*5.35.4*6.86.9*13.17.29.47.27.3*4.44.5*5.45.5*Exhaust emissions C02 (g/km)162164*222143146*Fuel consumption as per EC standards 93/116 was determined during the following official tests:- an urban cycle, i.e. a cold start followed by a simulated varied urban route- urban cycle, i.e. frequent accelerations in all gears to simulate normal out-of-town vehicle use, with speed between0 and 120 km/h.- The average combined fuel consumption test involves 37% of the urban cycle and 63% of the extraurban cycle.Type of route, traffic situations, driving style, weather conditions, version/equipment/accessory level, presence of aroof rack, presence of special equipment and vehicle condition in general may lead to fuel consumption figuresother than those measured as above.Exhaust CO2 emissions (in g/km) were measured over an average combined cycle.(*) 5D version (<strong>Brava</strong>)4 Publication no. 506.670/76
<strong>Bravo</strong>-Btava1998 rangeTechnical dataCapacitiesOO.oCapacitiesBPetrol > N.O. 95UnleadedDiesel*50%+9(A)^Total coolingsystem capacitysUnitAmountdW(l) (kg)1242 16v 501998 STEP A 601910 JTD 601242 16v1998 STEP A1910 JTD5.3(6.4B)7.4(7.2B)6.3(6.5B)Petrol engines:1242 16v 3.1 2.8SELENIA 20K(SAE 10W/40)Total capacity 1998 STEP A 5.5 4.91910 JTD 5.4 4.7Diesel engines1242 16v 2.8(2.5«)2.55(2.25»)SELENIATurbo Diesel(SAE 10 W/40)a _ TUTELAZC 75 SI NT,b = TUTELA° Gl/A Sit m5§l a = TUTELAGl/ATPartial capacity(periodic changes)12421998 STEP A1910 JTD16v1998 STEP A1910 JTD4.8(4.5«)4.9(4.3«)4.3(4.0*)4.23(3.75«)1.7 1.51.81.1b = K 8540.8(g)TUTELATOP 4(270°C)/3AREXONS+1(A) Distilled water(•) Only engine sump(■) For versions with air conditioner(*) For versions 1998 20v(") For versions 1242 16v10°C~ - 20°CTotal capacity3%50%100%
IntroductionFiat Lubricant product characteristicsOO.o<strong>Bravo</strong>-<strong>Brava</strong>1998 rangeNameproductDescriptionInternational designationUsageSELENIASAE15W/40Semisynthetic multigrade engine oil. Meets specificationsAPI SH, CCMC-G5 and UNI 20153Temperature- 25°C - 40°CSELENIA -..„„.,„SAE 10Turbow '*°DieselSemisynthetic multigrade engine oil. Meets specificationsAPI CD, ACEA B3-96Temperature- 15°C - 40°CTUTELA ZC 75 SINTTUTELA Gl/ATUTELA TOP 4 (270 C)K854Arexons DP1Paraflu"Diesel Mix ArexonsSAE 75W/90EP fluid. Meets specifications MIL-L-2105Dand API GL5Automatic transmission fluid - "DEXRON II".Synthetic fluid, F.M.V.S.S. n° 116 DOT 4 ISO 4925, CUNANC 956-01Lithium-based grease, consistency NLGI = 000, containingmolybdenum disulphideMixture of alcohol, water and tensio-active agents CUNANC 956-11Mono-ethylene glycol based anti-freeze for cooling systeminhibited mono-ethylene glycol, CUNA NC 596 - 16Additive for diesel fuel with protective action for diesel enginesManual gearboxesand differentialsAutomatic transmissionsPower assisted steeringHydraulic brakes and hydraulicclutchesRack and pinion steeringboxesUse neat or diluted inwindscreen washer systemsCooling circuitsPercentage to be used50% up to - 35°CTo be mixed with diesel(25 ccfor 10 litres)6 Publication no. 506.670/16
<strong>Bravo</strong>-<strong>Brava</strong>1998 rangeTechnical dataEngineOO.10CHARACTERISTICSCycleTiming gearFuel system typeInk 16v|5g|l| 20v STEP AOTTO, 4-STROKEtwin overhead camshaftIntegrated electronic injection-ignitionBOSCH M 1.5.5 MPI BOSCH ME 3.1Number of cylindersr 0fi^StrokeCylinder liner(bore)mm 70.80 82mm 78.86 75.65Bffl3~"I Cap acity cm 3 1242 1998FtCompressionratio10.2 10.7 ±0.15MaximumpowerECff^kW(PS)60(82)rpm 5500113(155)6500MaximumtorqueECdaNm(kgm)11.3(11.5)rpm 425018.6(19)3750Copyright Fiat Auto 1
■ ■ -■Technical dataEngine: typical curvesOO.io<strong>Bravo</strong>-<strong>Brava</strong>1998 rangeKpl levjf&2il| 20vkwCEE70 -16560 -55 -50454035302520;' /A\X-|i /.......—-H-NmCEE180f-150-120rpmkWCEE120100 -806040 --tl/-'—/--i~ -:\-[,■ - —_...NmCEE- 285- 245- 225205- 185- 165i- 145 rpm15 -I i '60101000 2000 3000 4000 5000 6000 700020 -.1000 200030004000500060007000195P4A08HA01P4A08HA02Speedwhen laden(rpm)800-100015002000Timeinminutes10'10'10'Loadatbrakeno loadno loadno loadBench test cycles for overhauled enginesWhen bench-testing serviced engines, it isnot advisable to run the engine at top speedbut observe the specifications in the table;finish running in the engine on the car.Engine power curves obtained by eec methodThe power curves illustrated can be obtained with the engine overhauled and run in, without a fan andwith a silencer and air filter fitted at sea level.8 Publication no. 506.670/16
<strong>Bravo</strong>-<strong>Brava</strong>1998 rangeTechnical dataEngine: crankcase assemblyOO.ioDESCRIPTIONValues in mm19.14-19.2021.72-21.8051.705-51.7090< 51.709-51.71363.705-63.718Main bearing supports 51.713-51.717A70.800-70.810 82.000-82.010-*-0Cylinder bore 0(S)BC70.810-70.820 82.010-&2.02070.820-70.830 82.020-82.030Piston«□ WX 12.570.760-70.770 81.952-81.96270.770-70.780 81.959-81.97170.780-70.790 81.968-81.9780 0.4weight differencebetween pistons±.5g, ,. Q p Piston"*-■ -4+- Cvlind Cylinder liner_A_0< B 0.030 - 0.0500.038-0.0580.039-0.0610.042-0.062Copyright Fiat Auto 9
Technical dataEngine: crankcase assemblyOO.ioDESCRIPTIONlfZ3| 16v mValues in mm<strong>Bravo</strong>-<strong>Brava</strong>1998 range20vSTEP APistonpin seat0 17.982 - 17.98620.002 - 20.007$O * 0 17.970 - 17.974 19.996 - 20.000Piston pin0 0.24-3 %£ Piston pin - Housing 0.008 - 0.016 0.002 - 0.011m1 1.190 - 1.230 1.220 - 1.240Piston2 1.190 - 1.230 1.210 - 1.230ring grooves32.490 - 2.530 2.010 - 2.0300UL1.170 - 1.190 1.180 - 1.1601.175 - 1.190 1.190 - 1.170Piston rings2.475 - 2.490 1.990 - 1.9700 0.40 - 0.060.040 - 0.0805-3 o a_3_|}_Pistonrin 9 sPiston ring grooves0 - 0.0550 - 0.0550.020 - 0.0500.020 - 0.060Piston ring5-1 *~^ P end °P en ' n 9 J]L^~~*~*~ in cylinder liner CLZ^^0.200 - 0.400 0.200 - 0.3500.250 - 0.450 0.250 - 0.5000.200 - 0.450 0.250 - 0.500i 0Bush housing orismallemailendonrlseatcoat 01 17.939 - 17.956 22.939 - 22.972i02 Connecting rod & 2bearing seat45.128 - 45.138 51.354 - 51.36610 Publication no. 506.670/16
<strong>Bravo</strong>-<strong>Brava</strong>1998 rangeTechnical dataEngine: crankcase assemblyOO.ioDESCRIPTIONValues in mm40.014 - 0.035--23.007 - 23.0277 J IlOlSmall end bush02 ^^-20.006 - 20.01 2m 7 qp Gudgeon pinH-/-44- Small end bush-0.006 - 0.020-.r. . Small end bush^n Bush housing-0.035 - 0.088Copyright Fiat Auto 11
Technical dataEngine: crankcase assemblyOO.10<strong>Bravo</strong>-<strong>Brava</strong>1998 rangeDESCRIPTIONValues in mmMainjournals0147.982-47.98847.988-47.99459.994-60.00059.988-59.998 01it/iLCrankpins0.247.994-48.00041.990-42.00859.982-59.9848.238-48.2448.232-48.2348.226-48.23L1 23.975-24.02526.575-26.625Crankshaft bearings 1.836 - 1.840 1.836 - 1.8401.843 - 1.847 1.839 - 1.8431.848 - 1.852 1.842 - 1.8460f< 0.254 - 0.5089-8 "ELF Mainbearings - Journals0.025 - 0.040 0.025 - 0.05210Connecting rodbearings|_1.536 - 1.5401.544 - 1.548 1.539 - 1.5431.542 - 1.5460 0.254 - 0.50812 Publication no. 506.670/16
<strong>Bravo</strong>-<strong>Brava</strong>1998 rangeTechnical dataEngine: crankcase assemblyOO.iotfggl 16v!(B| 20v STEP ADESCRIPTION10-8 9£Connecting rod Bbearings - Pins —0.024 - 0.060Values in mm0.030 - 0.05611Thrusthalf-rings2.310 - 2.360 2.342 - 2.3580.12711-8 ^ f. Crankshaft end float 0.055 - 0.265 0.059 - 0.161Diagram showing connecting rod- piston assemblyand direction of rotation in engine3. Area where matching cylinder liner number isstamped4. Engine direction of rotation(The arrow shows the direction of rotation of theengine as seen from the timing side)Value (in mm) of offset between connecting rod axisand piston axisD= 0.85 - 1.15 (for 1242 16v)D= 0.10 -0.60 (for 1998 20V STEP A)Copyright Fiat Auto 13
Technical dataEngine: cylinder head and valve gearOO.io<strong>Bravo</strong>-<strong>Brava</strong>1998 range18171516113i1420'19JIfEZEll 16v IQ^I 20v STEP ADESCRIPTIONCamshaft supports on cylinder headj^P) 20v 0STEP AValues in mm26.045-26.07012!_(•)19.100-19.15014 Publication no. 506.670/16
<strong>Bravo</strong>-<strong>Brava</strong>1998 rangeTechnical dataEngine: cylinder head and valve gearOO.io1817121 I> 153613 1142019H1^1 16vl^gPI 20v STEP ADESCRIPTIONIValues in mmValve guide bore incylinder head 0 9.959 - 9.989 12.950 - 12.97712rDrMla■Q 45° ± 20' 45° ± 5'm45° ± 20' 45° ± 5'Valveseat■em1.5 about 2Volume of combustionchamber in cylinder head cm 12.28 38.213-»tKQDfHQm-02Valve guide0 i ^ n 6.022 - 6.040 7.022 - 7.04002'10.010 - 10.030 13.010 - 13.03013-12 ^h02 >■QValve guideBore in cylinder head®0.05-0.10-0.250.049 - 0.051 0.033 - 0.08012Tappet housingon cylinder head 0 33.000 - 33.025Copyright Fiat Auto 15
Technical dataEngine: cylinder head and valve gearOO.io<strong>Bravo</strong>-<strong>Brava</strong>1998 rangeIczgi 16v j^^l 20v STEP ADESCRIPTIONValues in mmValve0 5.974 - 5.992■Q0 22.250 - 22.550m14-13 5tfValveValve guide15 A16* 'Internal valve springAHiCamshaft bearingsaExternal valve spring|Mz&,01 ,02 03ri±p_~_JT^-jS~j-i_--wrL|^|_rr-^u—'—LJBLJ—■—u [^H-L 0 jSL I 0 _L 0 , 0 i 017b $MF4a0 5.974 - 5.9920 22.250 - 22.550a■QPiP7Ha"PiiTTP2"H201020300.030 - 0.06622.5 daN3142.32335.000 - 35.01548.000 - 48.01549.000 - 49.0156.975 - 6.93029.900 - 30.20045° 30' ± 5'6.960 - 6.97525.900 - 26.20045° 30' ± 5'0.032 - 0.0650.047 - 0.08011.08 - 12.07daN29.521.58 - 23.54 daN2027.7 - 29.43 daN3448.46 - 52.38 daN24,526.000 - 26.01519.250 - 19.330&12-17a 1£12-17bCam liftCamshaftjournalsCylinder headmounts■e7.5m7.5010203radialaxial0.030-0.0700.030-0.0700.030-0.0700.030 - 0.0700.100 - 0.23016 Publication no. 506.670/16
<strong>Bravo</strong>-<strong>Brava</strong>1998 rangeTechnical dataEngine: cylinder head and valve gearOO.io181712* 115113i142019HIf9l 16v| ^ ^ |20v STEP ADESCRIPTIONValues in mm01 35.045-35.0701802 48.045-48.07018Camshaft bearings in camshaft housing-—n r-u-in_.—i_r^—U-^^-r-^^349.045-49.070Tappet housings0 28.400 - 28.421n,-^j-u-inz—Tappet0 28.354-28.370 32.959-32.9751912 5U? I appet13-l.c -w-n- Bore in cylinder head 0.025-0.066O p Tappet - Bore in cylin19-18 N h
Technical dataEngine: cylinder head and valve gearOO.io<strong>Bravo</strong>-<strong>Brava</strong>1998 rangeTIMING DIAGRAMSHWTiming anglesABInlet■estart beforeTDCend afterBDC0°32° 42'9° (*) after TDC49° (**)CDExhaustmstart beforeBDCend afterTDC32° 42'0°40°0°(*) With variable valve timing beginning 9° BTDC(**) With variable valve timing ending 31° after BDC18 Publication no. 506.670/16
<strong>Bravo</strong>-<strong>Brava</strong>1998 rangeTechnical dataEngine: counter-rotating shaftOO.ioDESCRIPTION25 Counter-rotating shaft drive2702-Values in mmvia oil pumpdriven geari_Pi 20 0 01 19.900 - 20.000^D 02 46.989 - 47.000Ball bearings for counter-rotating shaft-t250 19.980 - 19.99310Counter-rotating shaft journalsBearing seats in crankcase 0 46.975 - 47.00027-1 ^£ ^bBall bearingsCylinder block seatsOK. tn C3| |P I=)H bhatt journalsZb_z/4-k- ~ Ball bearings+0.011 - - 0.025+0.020 - - 0.003Copyright Fiat Auto 19
Technical dataEngine: lubricationOO.io<strong>Bravo</strong>-<strong>Brava</strong>1998 rangeLUBRICATIONValues in mmEngine lubrication systemOil pumpPump operatedforced circulation, vialobe gear pumpwith cartridge filter in linelobe gearviacrankshaftforced circulation, viagear pump with in-linecartridge oil filtergear, located in thefront crankshaft covervia chain drivenby the crankshaftOil pressure relief valveincorporated in crankshaft front coverFull flow filterInsufficient oil pressure sender unit--cartridgeelectrical\^^■sibetween pump housingand driven gear0.100 - 0.210-Ir^l^BlIgymEJbetween gear edges andpump case-0.110 - 0.180!■■—^between gear edgesand pump cover0.025 - 0.070-* &-0.016 - 0.086Full flow filterInsufficient oil pressure sender unitcartridgeelectricalQ p-*H«-between drive anddriven gears0.30(]C- [\ (Z^) t when idling1 barOperating pressure at 4000 rpmMat temperature of 100 Cw^9 I HiLionpressure relief valve springP1n '4 bar11.73 - 12.513520 Publication no. 506.670/16
<strong>Bravo</strong>- <strong>Brava</strong>1998 rangeCOOLINGCooling circuitcoolant pump driveTechnical dataEngine: cooling system - fuel systemOO.iolozi \)l6vICEEfSI l) 20v STEP Acoolant circulation via centrifugal pump, radiator,expansion tank and fan operated bythermal switchvia belt5■■■"'Thermalswitchforfanactivationstopstage 1 90° - 94°Cstage 295° - 99°C (■)stage 1 85° - 89°Cstage 290° - 94°C (■)Engine coolantthermostatFitting clearance betweenvanes and pump casingopening starts 81° - 85°Cmax opening 103°C 101°C-105°Cvalve travel9.5 mm%£Pressure for checking system water tightnessChecking exhaust valve onsupplementary expansion tank0.98 bar0.98 bar(■) Versions with climate controlFUEL SYSTEMMakeIntegrated electronic injection- ignitioninjection/ignitionIntegrated electronic injection- ignitioninjection/ignitionPumpelectrical, submerged in tankOutput^ 110 l/h^ 120 l/hFuel pressure regulator setting3.5 barChecking idle concentration of pollutant emissionsCO (%)HC (p.p.m.)C0 2 (%)Upstream of the catalytic converter0.4-1^ 600> 12Downstream of the catalytic converter< 0.35^ 90> 13Copyright Fiat Auto ^mm&mm^m 21
Technical dataEngine: fuel systemOO.io<strong>Bravo</strong>-<strong>Brava</strong>1998 rangeINTEGRATED ELECTRONIC INJECTION/IGNITIONSYSTEM COMPONENTSl|p> i6lIBS20v STEP AInjection system electronic control unitBosch 0.261.204.578Bosch 0.261.204.271Throttle bodyBosch 0.280.750.013-Motorized throttle body-Bosch 0.250.003.052Absolute pressure sensorBosch 0.261.230.013-InjectorBosch 0.280.155.816Bosch 0.280.155.770Electric fuel pumpBosch 0.580.313.011Air flow meter- Bosch 0.281.002.199Engine coolant temperature sensorELTH 2690350 - SYLEA 402.183.01Lambda sensorBosch 0.258.006.071Bosch 0.258.006.072Fuel vapour solenoid valveBosch 0.280.142.330Bosch 0.280.142.340Knock sensorBosch 0.261.231.007Bosch 0.261.231.131Hall effect injection timing sensor-Bosch 0.232.101.036TDC and rpm sensorBosch 0.281.210.124Bosch 0.261.210.16022 Publication n° 506.670/21
<strong>Bravo</strong>-<strong>Brava</strong>1998 rangeTechnical dataEngineOO.ioCHARACTERISTICSIfi^ JTD0NumberCycleTiming gearFuel system typeof cylindersDIESEL, 4 STROKEsingle overhead camDirect - Bosch Common Rail EDC-15Cr 0fiflStrokeCylinder liner(bore) mm 82mm 90.488ftI Cap acity cm 3 1910Compressionratio18.45 ± 0.5Total combustion chamber volume cm" 27.35Max power eecMax EC torquef*ikW(BHP)rpmdaNm(kgm)rpm77(105)400020.0(20.4)1500Copyright Fiat Auto 23
Technical dataEngine: typical curvesOO.io<strong>Bravo</strong>-<strong>Brava</strong>1998 rangekWCEEonBO -NmCEEinn7CIt) -70 -- 275ccDO -cnDU -250cc00- 225OU -4540—-k 2001CJD -inSv -- 1759C£0- 150on£\J ~\-15 -1C I00 1500 2000 2500 3000 3500 400045 0050IOC00 P4A24HA01rpmTestspeed(rpm)800-100015002000Timeinminutes10'10'10'Loadatbrakeno loadno loadno loadBench test cycles for overhauled enginesWhen bench-testing serviced engines, it isnot advisable to run the engine at top speedbut observe the specifications in the table;finish running in the engine on the car.Engine power curves obtained by EC methodThe power curves illustrated can be obtained with the engine overhauled and run in, without a fan andwith a silencer and air filter fitted at sea level.24 Publication no. 506.670/16
<strong>Bravo</strong>-<strong>Brava</strong>1998 rangeTechnical dataEngine: crankcase assemblyOO.ioDESCRIPTIONL i-*H*-L i-HH*~Values in mm21.75 - 22.251[HHtMain bearing supportsr 0 Cylinder bore 0II wLiL20_A_TX22.30 - 22.7021.75 - 22.2563.691 - 63.73282.000 - 82.01082.010 - 82.02082.020 - 82.030881.920 - 81.93081.930 - 81.940Piston0 >81.940 - 81.9500.43-1i«r3-1 3£Pistonprojection 0.845 - 1.105Weight differencebetween pistonsPistonCylinder bore± 5g0.070 - 0.090Copyright Fiat Auto 25
Technical dataEngine: crankcase assemblyOO.10<strong>Bravo</strong>-<strong>Brava</strong>1998 rangeffiQl \JTDDESCRIPTIONValues in mmPiston pinseat0 25.999 - 26.0042.685 - 2.715 (*)Piston ringgrooves2.020 - 2.0403.020 - 3.040O*025.982 - 25.988Piston pin0>4-3 ^ Piston pin - Housing 0.004 - 0.0140*k2.568 - 2.597 (")1.970 - 1.995Piston rings0 >2.970 - 2.9900.4 - 0.60.088 - 0.147c_3 ^ P Piston ringsPiston ring groovesK 1 q PPis on ringJo-J -4-|«- end opening
<strong>Bravo</strong>-<strong>Brava</strong>1998 rangeTechnical dataEngine: crankcase assemblyOO.10DESCRIPTIONValues in mmBush or small endpin seat0128.939 - 28.9720 2 Connecting rodbearing seat0253.897 - 53.909Difference in weightbetween con rods01± 2.5 g29.01 8 - 29.03802^=126.006 - 26.0124-7 %£7-6 ^8Small end bushPiston pinSmall end bushSmall end bushBush housingMainjournalsCrankpins 0201 2_3_A_C_L.Li0.018 - 0.0300.046 - 0.09959.994 - 60.00059.988 - 59.99459.982 - 59.98850.799 - 50.80550.793 - 50.79950.787 - 50.79326.80 - 27.2025.90 - 26.10Copyright Fiat Auto 27
Technical dataEngine: crankcase assemblyOO.io<strong>Bravo</strong>-<strong>Brava</strong>1998 rangeJTDDESCRIPTIONCrankshaft bearingsValues in mm1.836 - 1.8401.839 - 1.8430
<strong>Bravo</strong>-<strong>Brava</strong>1998 rangeTechnical dataEngine: cylinder head and valve gearOO.10I^P) JTDDESCRIPTIONnValveValve seatsguide bore incylinder headCamshaft bearing housings incylinder head|_ 0 1Lf2 [fa Wlfyp_j-i_r-T_PLjn_j--i_JT_rxj-i_n_ri-j-|l_TTjnj->-JT_n_r^--n-j - LJ~ uj-t - , ~iJaValues in mm0 13.950 - 13.977■Gm000045° ± 20'45° ± 20'about 2.7I 1A-JLfl-J-H-L Camshaft supports"0026.045 - 26.07019.100 - 19.150^^__n.—nnn_(*) Cap size0Tappet housing0 37.000 - 37.025Copyright Fiat Auto 29
Technical dataEngine: cylinder head and valve gearOO.io<strong>Bravo</strong>-<strong>Brava</strong>1998 rangeIB^ JTDDESCRIPTION13 I13-12 ^bValve guide0 ^ 3-0 2 0 P>Valve*M* "02830Valve guideBore in cylinder head0■e000aaValues in mm8.022 - 8.04014.010 - 14.0300.05 - 0.10 - 0.250.033 - 0.0807.974 - 7.99235.40 - 35.6045°30' ± 15'7.974 - 7.99234.40 - 34.6045°30' ± 5'14-13 Valve - Valve guide 0.030 - 0.066A16HiMxMH 236.69 - 39.63 daNH3655.91 - 60.82 daNValve springH026.50|0 |0 2 |0 3 J>tj *_r^_^_rT_*_r-unjL->_n_n_* 0Camshaft journals0|0026.000 - 26.01 523.10 - 23.70LiLi19.25 - 19.3030 Publication no. 506.670/16
<strong>Bravo</strong>-<strong>Brava</strong>1998 rangeTechnical dataEngine: cylinder head and valve gearOO.ioDESCRIPTIONValues in mm17-12 ^ pw17n—I_j-^—^J-U—U~LLJ—^-^i r—^—Cam liftradial0.030 - 0.070axial0.100 - 0.230■Qm19 □an Tappet 0 36.975 - 36.9958.58.519-12 ^ p Tappet - Cylinder head 0.005 - 0.050n ^_r-ir-rr"L20 4 ^ ^ Shim (A 0 ' 05 )3.25 - 4.90fortiming0.5017-20check^ ^*J®0.500.30 ± 0.050.35 ± 0.05Copyright Fiat Auto 31
Technical dataEngine: cylinder head and valve gearOO.10<strong>Bravo</strong>-<strong>Brava</strong>1998 rangeTIMING DIAGRAMSTiming anglesABInlet■Qstart beforeTDCend afterBDC0°32°CDExhaustmstart beforeBDCend afterTDC32°0°32 Publication no. 506.670/16
<strong>Bravo</strong>-<strong>Brava</strong>1998 rangeTechnical dataEngine: lubricationOO.ioLUBRICATIONEngine lubrication systemOil pumpPump drivenOil pressure relief valveValues in mmforced circulation, via lobe pumpwith in-line cartridge filterlobe gearsby crankshaftbuilt into frontcrankshaft coverM~r^|"■*—4- jF■HIbetween pump housingand driven gearbetween the upper sideof the gears and thepump cover0.080- 0.1860.025 - 0.056Full flow filtercartridgeInsufficient oil pressure sender unitelectricalVbar/ \^^y —*~Operating pressure at temperature of 100°C^4$^ F I Hil_lOil pressure relief valve spring -^3.43 - 4.9 bar6.27 - 7.06 daN36Copyright Fiat Auto 33
Technical dataEngine: cooling systemOO.io<strong>Bravo</strong>-<strong>Brava</strong>1998 rangeCOOLING SYSTEMCooling circuitWater pump operationathermalswitchfor fanactivationstopjffiEli JTDcoolant circulation via centrifugal pump, radiatorand two speed electrical fan controlled by enginemanagement control unitvia belt1 st speed 2nd speed93.5°C99°°C97°C 102.5°Copening begins 86° - 90°CEngine coolantthermostat max opening 101° - 105°Cvalve travel^9.5 mmInstallation fit between bladesof impeller and pump case %£ 0.40 - 0.75 mmRadiator tightness test pressureChecking setting of outlet spring onsupplementary expansion tank1 bar0.9 - 1.1 bar34 Publication no. 506.670/16
<strong>Bravo</strong>-<strong>Brava</strong>1998 rangeTechnical dataEngine: fuel system00.55COMPONENTS OF BOSCH COMMON RAILELECTRONIC FUEL SYSTEMControl unitDebimeterCoolant temperature sensorDiesel temperature sensorRpm sensorTiming sensorTurbocharger pressure sensorFuel pressure sensorInjectorPreheating control unitGlow plugEGR solenoidBosch 0.281.001.928Bosch 0.281.002.199Jaeger 402.183.01Bosch 0.281.002.209Bosch 0.281.002.214Bosch 0.281.002.213Bosch 0.281.002.215Bosch 0.281.002.210Bosch 0.445.110.002Bosch 0.281.003.21 5Bosch 0.250.202.02846419651Copyright Fiat Auto 35
Technical dataClutch00.18<strong>Bravo</strong>-<strong>Brava</strong>1998 rangeValues in mmTypedry, single plate with bearingOperating mechanismdiaphragm springSpring loadingdaN400485500*W-0i 02'Lining0012190134230155230155>tx/ ' Distance between^//pedal in end of travel^position and rest positionClutch release155 ±10mechanical140 ±5hydraulic36 Publication no. 506.670/16
<strong>Bravo</strong>-<strong>Brava</strong>1998 rangeTechnical dataGearbox and differential00.21-2712v20v STEP A\JTDGEARBOX*Synchronizerselasticring(Porsche type)ringType C.514.5.13 C.510.5.21oC.510.5.17ooGearswith narrowteethwith helicalteeth3.9093.5453.9092.1582.2382.238-i-*1OO1.3451.480*1.5201.444Gear ratios0.9741.121*1.1561.0290.8290.891*0.9700.7673.8183.9093.909(*) 5D version (<strong>Brava</strong>)Copyright Fiat Auto 37
Technical dataGearbox and differential00.21-27<strong>Bravo</strong>-<strong>Brava</strong>1998 rangelfS3| lev\20vJTDDIFFERENTIALSTEP A0 CSiSpurpinionsetTattogear and3.887(15/58)3.353(17/57)3.053(19/58)15.115 11.886 11.933nLr8.344 7.504 6.8325.2005.753*3.7664.357*Final drive ratio 3.2053.463*5.096 4.4083.876 3.1413.252 2.34114.763 13.107 11.933fld ^DDifferential internal casing bearingffitOAdjustment of bearing pre-loadThickness of shimsInterference toobtain exact bearingpre-loadingmm0.050.10 2.00 - 3.00mmtaper roller bearingsusing shims1.70 - 2.60bearings not pre-loaded = 0.12bearings pre-loaded (350 dan) = 0.08SoTDifferential-planet gear backlashmm ^ 0.10L*4 a*no adjustment necessaryAdjusting differential-planet gear backlashThickness of shims(*) 5D version (<strong>Brava</strong>)using shimsK Hmm 0.80 - 1.2538 Publication no. 506.670/16
<strong>Bravo</strong>- <strong>Brava</strong>98 rangeTechnical DataBrakes00.33IGUI levm\ 2 ovSTEP Am\ JTDFRONT BRAKES]Disc0 25711.80 - 12.10^ 11.10^ Allowed 10.20Values in mm283.8 - 284.221.90 - 22.1020.5520.2025719.80 - 20.1018.5518.20A.BrakepadsS < Allowed 1.5(L£}# 0 Caliper 0 54gj Master cylinder(pump)0 22.225 (7/8") 23.81 (15/15") 22.225 (7/8")Brake servoIso-Vac 8"vacuum servoacting on allfour wheelsISO-VAC 8"+7"vacuum servoacting on allfour wheelsIso-Vac 8"vacuum servoacting on allfour wheelsDistance ofhydraulic piston push rodfrom master cylindersupport plate22.45 - 22.65REAR BRAKESDrum^203.10-203.40180.00-180.25 (•)180.95203.10-203.40204.10> allowed181.35204.70Shoes ^ allowed 1.5Cylinders 0 22.00 22.00fc~Load proportioning valve(*) Version without ABSacting on rearwheelsacting on rearwheelsRatio (reduction) 0.36 0.36Copyright by Fiat Auto 39
Technical DataBrakes00.33<strong>Bravo</strong>- <strong>Brava</strong>98 range16vma>) 2 ovSTEP AICEIfih JTDREAR BRAKES+H«- 0Disc^ = ]Values in mm24010.80 - 11.1010.10^Allowed9.20-i- SBrakepads S < Allowed 1.5(U~#0 Caliper 0 34LOAD PROPORTIONING VALVEAdjustment figuresVehicleEngine typeWeightin luggage compartmentkgLoad to beapplieddaN<strong>Bravo</strong> lG§i| i 6v IGSI 16v9485.5*<strong>Brava</strong> If!!!) 16v IcH 16v6455*5.55.5<strong>Bravo</strong>IGZ§| m 16v85.575*5.5<strong>Brava</strong> iGp> 16v5546*<strong>Bravo</strong> lei®) TD75 ; TD100 ; JTD85.566* •5.55.5<strong>Brava</strong>JCEITill'*> TO75 : TD100 : JTD6446* •5.5<strong>Bravo</strong> ]fiS 20v85.575*(*) Weight to be applied for vehicles complete with all accessories(•) Weights referring to 1910 TD 100 and 1910 JTD versions only40 11-98 Ciincols nnd leplaces Print rf 506.670/79
<strong>Bravo</strong>-<strong>Brava</strong>1998 rangeTechnical dataSteering00.41ENGINEIgP levSTEP AJ^^JJTDTyperack and pinion power assistedno. of turnslock to lockRatio•rack travel142 ±1.5 mm//i0Turningcircle10.4 moffsidewheel0C131° 30' ±30'Steering anglenearsidewheel0C2 38° 1 5' ± 30'Steering columnwith 2 universal jointsCopyright Fiat Auto 41
Technical dataWheels00.44<strong>Bravo</strong>-<strong>Brava</strong>1998 rangeENGINE1ii ll TVreBill H I pressure|[[«9 4 * in barsWheel rim typeTubeless tyreradial tread, typeFrontRearaverageloadfullloadaverageloadfullload,«_igai^v<strong>Brava</strong><strong>Bravo</strong>5V4JX14" -376J x 14" -436J x 15" -405 1 / 2 JX14" -37175/65 R14 82T175/65 R14 82H185/55 R14 81H175/65 R14 82H2.22.32.22.5j^pl 20v<strong>Bravo</strong>6J x 15" -496Jx15" -49195/55 R15 84V205/50 ZR15 (■)2.52.72.22.4STEP Al^m<strong>Brava</strong>6J x 15" -405 1 / 2 J x 14" -376J x 14" -43185/55 R15 81 H185/60 R14 82H185/60 R14 82H2.32.32.22.5<strong>Bravo</strong>6J x 15" -406J x 14" -43185/55 R15 81 H185/60 R14 82HSPARE WHEEL (*)4Bx14" -434Bx15" -35105/70 R14 84M115/70 R15 90M4,2(*) Speed limit: 80 km/h(■) Do not fit chains because they could foul against the wheel arch42 Publication no. 506.670/16
<strong>Bravo</strong>-<strong>Brava</strong>1998 rangeTechnical dataWheels00.44WHEEL GEOMETRYunladen car (■)camber (**)-7'± 30'-33'± 30' (only for <strong>Bravo</strong> 1998)caster (**)±*
Technical dataFront suspension00.44<strong>Bravo</strong>-<strong>Brava</strong>1998 rangeFront suspension independent wheel, MacPherson type with forged steel wishbones anchored to asubframe. Offset coil springs and double-acting telescopic dampers. Anti-roll torsion bar.Coil springsENGINEj^Bj16vIf^^l20vSTEP AJTDDiameter of wire mm 12.2±0.05 13.2 ± 0.05Number of turns 3.7512.7 ± 0.05(12.9 ±0.05)*Direction of coilclockwiseHeight of spring released mm 449.2 (461)* 404.5 (419.6)* 454 (449)*303 - 335 daN(320.5 - 346.5 daN)* mm 192Spring heightundera load of:340-(352368 daN• 382 daN)*mm344 daN(369 daN)* mm 192352 ±382 daN(366 ±396 daN)* mm 192The springs are subdivided into two categories,identifiable by a mark:319 daN(333.5 daN)* a height of mm >192yellow (1) springsloadedto:green (1) springsloadedto:354 daN(367 daN)* a height of mm344 daN(369.2 daN)* a height of mm >192367 daN(381 daN)* height of mm319 daN(333.5 daN)* a height of mm354 daN(367 daN)* a height of mm^192344 daN(369 daN)* a height of mm 192«S192Shock absorbersType: telescopic, double-acting(low pressure gas type)Open (damping starts)Closed (steel against steel)StrokemmmmmmWAY-ASSAUTO518 ± 2.5361 ± 2.5157Stabilizer barDiameter of stabilizer bar mm 2344 Publication no. 506.670/76
<strong>Bravo</strong>-<strong>Brava</strong>1998 rangeTechnical dataRear suspension00.44Rear suspension independent with ductile cast iron tie rods. Coil springs and dampers with vulcanisedbushes. Anti-roll torsion bar. Rigid H-shaped subframe consisting of one transverse tubular element andtwo moulded rails fastened to it.Coil springVERSIONSBRAVO16vBRAVOBRAVA16vUSED JTDDiameter of wiremm11. 5±0.05(11.9±0.05)*. 11.8±0.0511.9±0.05Number of turns4.75(5)*4.55Direction of coilclockwiseHeight of spring releasedmm311 (309)*297309( 270 - 298 daN1 (286-316 daN)*mm194--Spring height under J 275 - 303 daNload of: \-194( 286 - 316 daN mm--194The springs are subdivided into two categories,identifiable by a mark:/ 284 daN , . . t .1 (301 daN)*h e'9ht of mm>194yellow (1) springs /loaded \ 289 daN height of mmlo.I1 301 daN height of mm-->194-->194/ 284 daN( (301 daN)* height of mmgreen (1) springs 1loaded \ 289 daN height of mm^194--^194--lo1 301 daN height of mm--^194(1) Springs of the same category must be fitted together(*) For 1910 JTD cars with air conditioning.Shock absorbersType: telescopic, double-acting(low pressure gas type)WAY-ASSAUTOOpen (damping starts)mm322.5 ± 2312 ± 2322.5 ± 2Closed (steel against steel)mm223 ± 2223 ± 2223 ± 2Strokemm99.58999.5Stabilizer barDiameter of stabilizer bar mm 17Copyright Fiat Auto 45
Technical dataElectrical equipment00.55<strong>Bravo</strong>-<strong>Brava</strong>1998 rangeSTARTERMOTORM. Marelli E80E-12V-0,9KWM. MarelliM70R-12V-1,4kW(with reduction unit)ALTERNATORM. MarelliA115I-14V-38/65AM. MarelliA115IM-14V-50/90A (•)M. MarelliA127IR-14V-50/80AM. MarelliA127IR-14V-55/100A (•)VOLTAGEREGULATORBATTERY12V-40Ah-200A12V-50Ah-250A*BUILT IN ELECTRONIC12V-50Ah-250AIGNITIONSYSTEMBuilt-in electronicinjection-ignitionM PI Bosch M 1.5.5Built-in electronicinjection-ignitionMPI Bosch Motronic ME 3.1IGNITIONCOILBosch0.221.503.407Bosch0.221.504.014SPARK PLUGSNGK RDCPR 8EKCCHAMPION RA4HCXCHAMPION RC8BY(•) For vehicles with air conditioner(*) For cars equipped with alarm system46 Publication no. 506.670/16
<strong>Bravo</strong>-<strong>Brava</strong>1998 rangeTechnical dataElectrical equipment00.55STARTER MOTORALTERNATORBOSCH DIAM 78,5 - 12V - 2,0 kWM. Marelli M70R - 12V - 1.8 kW(with reduction unit)M. MarelliA 127IR - 14V - 55/100AVOLTAGE REGULATORBuilt in electronicBATTERY12V - 60 Ah - 380APRE-HEATING ELECTRONICCONTROL UNITBOSCH 0.281.003.215ELECTRONIC CONTROL UNITENGINE FUEL SYSTEMCONTROLN.D.GLOW PLUGSBOSCH 0.250.202.028Copyright Fiat Auto 47
Technical dataElectrical equipment: starting00.55<strong>Bravo</strong>-<strong>Brava</strong>1998 rangeSTARTER MOTORTypeVoltagePower ratingRotation, pinion sideNo. of polesField coilEngagementOperationEnd float of armature shaftVkWmmM. MarelliM. MarelliM70R-12V-1.4kWE80-12V-0.9 kW(with reductionunit ) - ~12BOSCH DIAM 78.5- 12V - 2.0 kW(with reduction unit)M. MarelliM70R-12V-1.8kW(with gearing)0.9 1.4 2.0 1.84in I ineclockwisefree wheelsolenoid0.1 - 0.56permanent magnets4in-line-parallelData for bench testOperating test (*):currentspeedvoltagetorque developedArpmVdaNm180 (200)1720 (2200)9.5 (9.8-10)0.37 (0.38)360 . 38011508.151.3050019507.301.3040014009.601.40Engagement test (*):currentvoltagetorque developedAVdaNm324 (440)7.1 (7.6)3*0.97(^1.25)680 - 7004.93.1112005.53.01100-11504.4 - 4.65.0Free running test (*):currentVoltagespeedAVrpm40 (44-48)11.4 (11.4-11.5)8500 - 9000(11400-12300)60 - 804.9404070 - 8011.55450 - 5750120 - 140114750 - 5000RelayWindingresistancen \pull in fihold in Q0.30-0.32(0.32)1.2-1.3 (1.09)0.33 - 0.371.13-1.270.41.70.30-0.371.2-1.3LubricationInternal splines and shaft bushesVS + SAE10WSleeve and intermediate discTUTELA MR3(*) Data measured at environmental temperature of 20°C.NOTEThe insulation between commutator segments need not be lowered during service.48 Publication no. 506.670/76
<strong>Bravo</strong>-<strong>Brava</strong>1998 rangeALTERNATORIfgPllevTechnical dataElectrical equipment: recharging00.55'3ST' i6v oSTEP A20vm20vSTEP AC)f^^M JTDTypeM.MarelliA115I-14V-38/65AM.MarelliA115IM - 14V-50/90AM. MarelliA127IR - 14V-50/85AM. MarelliA127IR - 14V-55/100AVoltage ratingy14Maximum currentA659385105Current rating at1800rpmmmrpm38505055Current rating at6000 rpm^659385105Field winding resistancebetween the slip ringsQ2.42.232,6Direction of rotation(seen from drive side)Diode rectifiersclockwisepreconstituted bridge(*) Data measured at environmental temperature of 20°C.(•) For vehicles with air conditionerVOLTAGE REGULATORBuilt in electronicTypeRTM 151 ARTM 151 BAlternator speed fortestThermal stabilization .currentp6000-Test currentRegulation voltage (*)AV-14.05 - 14.35(*) Data measured at environmental temperature of 23°C.Copyright Fiat Auto 49
Technical dataElectrical equipment: electronic injection-ignition00.55<strong>Bravo</strong>-<strong>Brava</strong>1998 rangeINTEGRATED ELECTRONIC INJECTION-IGNITIONCONTROL MODULETypeFiring orderBosch 0.261.204.5781-3-4-2COIL WITH 4 HIGH TENSION OUTLETSTypeCodeOhmic resistance of primary winding at 20°COhmic resistance of secondary winding at 20°CQQBosch0.221.503.4070.45 - 0.5512000 - 14600TOP DEAD CENTRE AND RPM SENSORmake and typeBosch 0.281.210.124Sensor winding resistance at 20° C DDistance (gap) between sensor and toothof crankshaft pulley486 - 5940.8- 1.5ADVANCE ON ENGINEWith engine idling (850 ± 50 rpm)N.A.SPARK PLUGSMake and typeThreadElectrode gapmmNGK RDCPR8EKCCHAMPION RA4HCXM 14x1.250.850 Publication no. 506.670/16
<strong>Bravo</strong>-<strong>Brava</strong>1998 rangeTechnical dataElectrical equipment: electronic injection - ignition00.55INTEGRATED ELECTRONIC INJECTION - IGNITION SYSTEMTypeFiring orderBosch 0.261.204.2711 -2-4-5 - 3IGNITION COIL (1 FOR SPARK PLUG)TypeCodeOhmic resistance of primary winding at 20°COhmic resistance of secondary winding at 20°CQQBosch0.221.504.0140,48500TOP DEAD CENTRE AND RPM SENSORMake and typeSensor winding resistance at 20 °CGap between sensor and crankshaft pulleyteethQmmBosch 0.261.210.160774 - 9460.8-1.5KNOCK SENSORTypeCodeBosch0.261.231.131SPARKPLUGSMake and typeCHAMPION RC8BYThreadElectrode gapmmM 14x1.250.8Copyright Fiat Auto 51
Technical dataElectrical equipment: electronic injection00.55<strong>Bravo</strong>-<strong>Brava</strong>1998 rangeBOSCH COMMON RAIL ELECTRONIC FUELSYSTEMTypeSpontaneous firing orderBosch EDC15C1-3-4-2PREHEATING CONTROL UNITTypeCodeBosch0.281.003.21 5TOP DEAD CENTRE AND RPM SENSORMake and typeSensor winding resistance at 20 °CGap between sensor and crankshaft pulleyteethQmmBosch 0.281.002.214774 - 9460.8- 1.5TIMING SENSORTypeCodeBosch0.281.002.213GLOW PLUGSMake and typeBosch 0.250.202.028Engine attachment threadElectrical resistant at 20°CmfiM 12 x 1.2570052 Publication no. 506.670/16
<strong>Bravo</strong>-<strong>Brava</strong>Technical data1998 range Special tools00.AENGINEToolnumberTOOL DESCRIPTIONl|pjl6v iQS 20vj^Q| JTDSTEP AENGINE1806149001Fuel consumption tester•1820225000Stand for removing and refitting power unit•1822144000Oil sump removal wrench•1822145000Oil sump removal wrench•1850132000Wrench (13 mm) with 1/2" fitting for removing intake manifoldfastenings•1850184000Wrench for removing/refitting spark plugs•1850193000Spark plug wrench•1852154000Wrench, with 1 /2" fitting, for cylinder head bolts••1852159000Wrench for removing/refitting belt tensioner•1852161000Wrench for variable valve timing•1852162000Alternator pulley wrench•1860183000Pliers (0 75-110) for removing and refitting piston rings•••1860313000Installer for fitting oil seal to valve guide••1860313002Drift for press-fitting oil seal to valve guide•1860395000Drift for valve guide removal••1860395001Drift for removing valve guide•1860443000Pressure lever•Copyright Fiat Auto 53
Technical dataSpecial tools00.A<strong>Bravo</strong>-<strong>Brava</strong>1998 rangeENGINEToolnumberTOOL DESCRIPTIONlS»16vIg|f20vjffljj JTDSTEP A1860470000Tool for retaining cylinder head during overhaul•••1860490000Fixture to retain valve tightness test device 1895868000 (tobe used with 1860470000))•1860592000Universal hook, power plant lifting and handling•1860644000Extractor for half-cones, cups, springs and valves•1860700000Collar (0 60-125 mm) for fitting normal and oversized pistonsin cylinders••1860724000Tool to hold tappets for replacing plates while adjusting valveclearance (to be used with 1860443000)•1860744000Tool for turning crankshaft (at bench)•1860790000Tool for removing springs, cups, half-cones and valves (usewith 1860786000 - 1860787000 - 1860788000 and1860877000)•1860812000Tool for fitting valve guide•1860813000Guide for fitting oil seal to valve guide•1860814000Installer for applying oil seal to valve guide1860815000Adaptor for turning crankshaft'••1860816*000Drift for fitting oil pump gasket•1860817000Tool for locating cover gasket on crankshaft•1860818000Camshaft timing tools•1860821000Tool for removing small end bush•1860821000Tool for removing/fitting small end bush•54 Publication no, 506.670/16
<strong>Bravo</strong>-<strong>Brava</strong>Technical data1998 range Special tools00.AENGINEToolnumberTOOL DESCRIPTION@)l6w|^H| JTDSTEP A1860822000Oil pump timing adjustment tool•1860824000Tool for fitting camshaft seal•1860831000Wrench for timing pulley•1860833000Hexagonal, splined wrench for removing-refitting oil sump•1860834000Hexagonal, splined wrench for removing-refitting oil sump••1860835000Extractor for removing oil seal on valve guide•1860836000Tool for preventing crankshaft from turning•1860846000Tool to hold flywheel (operations at bench)••1860854000Pressure pump pulley extractor•1860859000Adaptor for removing-refitting power unit (use with1860859000 and 1860860000)•1860860000Support for removing-refitting power unit•1860877000Tool for dismantling and reassembling half-cones, cups,springs and valves•1860879000Universal handle•1860881000Tool for fitting rear crankshaft cover•1860893000Fuel pump cover wrench•••1860898000Flywheel retainer (on vehicle)•1860905000Tool for measuring T.D.C.•Copyright Fiat Auto 55
Techniqal dataSpecial tools00.A<strong>Bravo</strong>-<strong>Brava</strong>1998 rangeENGINEToolnumberTOOL DENOMINATIONIgpl levj^S| JTDSTEP A1860942000Angle wrench••1860955000Equipment for testing fuel supply circuit•1860961000Template for camshaft timing adjustment•1860985000Tools for timing and securing camshafts•1860986000Tool for removing nad fitting piston pin•1860987000Timing belt tensioning tool•1860988000Tappet retaining tool•1860989000Extractor for valve guide oil seal•1860990000Two-way installer for fitting crankshaft and camshaft frontcover oil seals•1860992000Tools for positioning pistons in line•1860993000Tool for fitting valve guide oil seals•1860994000Tool for removing and refitting valve guide•18610010321861001034Bracket to secure engine (distribution side) on rotating stand1861000000Bracket to secure engine (flywheel side) on rotating stand1861000000••1861001039Pair of brackets for fastening engine to rotary stand••1867029000Tool to hold flywheel•1870404000Stand for dial gauge used to measure cylinder liner depth orprotrusion••56 Publication no. 506.670/76
<strong>Bravo</strong>-<strong>Brava</strong>Technical data1998 range Special tools00.AENGINEToolnumberTOOL DESCRIPTIONlEpiiev ]Rpj 20v|Qpi STDSTEP A1870718000Blade for removing oil sump•1890385000Valve guide bore reamer•1895615000Tool to check piston pin unseating load (to be used with1895884000)•1895762000Torque wrench for checking auxiliary drive belts•. •1895868000Valve tightness tester••1895881000Dial gauge•1895890000Pressure gauge for measuring electric pump supply pressure•1895897000Graduated disc for cylinder head bolt angular tightening•CLUTCH1875086000 Clutch disk centering pin • •GEARBOX-DIFFERENTIAL1842133000Tool for dismantling differential bearing and gearbox gears•1842134000Tool for dismantling gearbox gears and hubs•1845028000Reaction block for removing differential bearings•1845057000Tool for removing layshaft 5th speed gear bush• '1845062000Tool to remove front axle shaft constant velocity joint (to beused with 1847017001)•Copyright Fiat Auto 57
Technical dataSpecial toolsO0.A<strong>Bravo</strong>-<strong>Brava</strong>1998 rangeENGINEToolnumberTOOL DESCRIPTIONlS»16vlS(20vjffiS) JTDSTEP A1847017001Striker (use with 1860889000)•••1847017004Plate for removing flanged shaft from differential gear (usewith 1847017001)•1847056000Extractor for differential output shafts•1850132000Wrench for differential housing seal cover retaining bolts•1850113000Wrench (12 mm), oil sump draining plug••1855035000Wrench (19 mm) for removing and refitting gearbox••1860691000Drift for removing and refitting gear stiffening ball plug•1860851000Beam for removing-refitting gearbox. •••1860851001Adaptor for beam used to remove-refit gearbox (use with1860851000)•••1860873000Bracket for removing-refitting gearbox••1860889000Two-way fitting for striker (use with 1847017001)•••1870007000Universal handle•' •1870152000Drift for fitting hubs and gears to main shaft and lay shaft•1870419000Part for fitting main shaft seal to gearbox bell housing (usewith 1870007000)••1870448000Tool for fitting front bearng inner race•1870469000Part for fitting differential bearing (use with 1870007000)•1870478000Tool for fitting 4th speed gear bush and rear bearing•58 Publication no. 506.670/16
<strong>Bravo</strong>-<strong>Brava</strong>Technical data1998 range Special tools00.AENGINEToolnumberTOOL DENOMINATIONifpliev lg§| 20vjfi9| JTDSTEP A1870629000Drift for fitting differential casing cover gasket (use with1870007000)• .1870630000Drift for fitting differential casing gasket (use with1870007000)•1870631000Drift for fitting main and layshaft bearing and gears•1870632000Drift for fitting bearings•1874541000Tool for fitting differential bearing outer race•1875016000Drift to fit gasket on axle shaft flange•1875017000Tool to remove and refit differential bearing rings (to be usedwith 1840005003)•1875088000Drift for fitting main and layshaft bearings•1881124000Pliers for main and layshaft rear bearing retaining rings•1895655000Tool to select differential bearing adjusting shims (to be usedwith 1895884000)•BRAKING SYSTEM1856132000Wrench (10-11 mm) for brake line unions•••1856133000Wrench for handling rear brake caliper self-adjusting device•1872273000Set of tools to hold cylinder pistons when installing brakeshoes••1895901000Tool for adjusting load proportioning valve position••STEERING1847035000 Puller for steering rod ball pins • • ' •Copyright Fiat Auto 59
Technical dataSpecial toolsO0.A<strong>Bravo</strong>-<strong>Brava</strong>1998 rangeENGINEToolnumberTOOL DESCRIPTIONI»i6v1^B> JTDSTEP ASUSPENSION SYSTEM1845028000Tool for removing front hub bearing inner race from flange (tobe used with 1840005003, 1840005302 and 1840005400)•••1847014000Puller, wheel hub cap•••1874551000Tool for retaining front damper rod while manoeuvring retainingnut•••1874555000Pneumatic tool for compressing suspension springs whe removingdampers•••1875055000Drift to fit front wheel hub bearings (to be used with1870007000)•••1875059000Installer, rear wheel hub caps•••ELECTRICAL EQUIPMENT1860893000Tool for removing fuel level gauge ring nut•••1860897000Tool for removing radio•••BODYWORK1860890000Wrench for removing-refitting door hinges•1878034000Remover, window regulator handles•1878077000Tool to remove door trim panels or plastic buttons•1878080000Fixture for positioning door stop rod during assembly of retainingpin (to be used in conjunction with 1878081000)•1878081000Pliers for removing/refitting door stop link retaining pin (usewith 1878080000 during assembly)•60 Publication no. 506.670/76
<strong>Bravo</strong>-<strong>Brava</strong>1998 rangeTechnical dataSpecial tools00.AENGINEToolnumberTOOL DESCRIPTIONIg§ll6v |^pf 2 0v|^Q) JTDSTEP AGENERAL-PURPOSE TOOLS1840005000Puller, universal1840206000Percussion extractor (use with special parts)1846017000Base for puller half-rings1847017001Percussion extractor (use with special parts)18610000001861000001Rotary stand for engine overhaul (used also for gearbox anddifferential)Pair of sections for brackets supporting the engine on rotatingstand 1861000000 18610000001870007000Universal handle18704040001871000000Support for measuring depth and protrusion (use with1895881000)Rotary column for servicing gearboxes and differential1876048000Mini Hylok Contact terminal extractor (MHF) dia. 2.15 mm1881138000Adjustable pliers for pipe retaining collars and tabs1882002010Tool panel to be fixed to wall or stand 1882003000 (withhooks)1882003000Stand to hold two tool panels1882011000Set of additional hooks (50) for tool panel1895113000189588100018958820001895884000Feeler gauge (0.05-0.10...0.80 mm) for checking valve clearanceCentesimal gauge for special tools (10 mm capacity; stemlength 16.7 mm) mm 10;Centesimal gauge for special tools (10 mm capacity; stemlength 88 mm)Centesimal gauge for special tools (10 mm capacity; stemlength 16.7 mm)Copyright Fiat Auto 61
Technical dataTightening torquesoo.<strong>Bravo</strong>-<strong>Brava</strong>1998 rangePARTThreadTighteningtorquesENGINEdaNm@ii6w!S| 20vSTEP AKpl-rrDENGINEBolt retaining main bearing caps to crankcaseBolt, cylinder head to engine blockM10x1.25M12M9M10M104 + 90°2 + 100°3 + .90° + 90°4 +90°+90°+90°6.5 +90°+90°+90°••'••••Nut retaining connecting rod capM84.1•Bolt retaining connecting rod capM82 + 60°••Bolt, flywheel to crankshaftM8M12x1.254.416•••Bolt retaining drive shaft to crankshaftM16x1.5left (*)2 + 90°•M16left (*)36••Bolt retaining flywheel and timing end coverM60.9•• 'Bolt retaining timing belt guardsM60.9••Bolt retaining camshaft driven gear and rearcamshaft gearsM12x1.2512•••Screw, camshaft capsM71.5•••Belt tensioner retaining boltM8x1.252.5•Bolt retaining coolant intake pipe to pumpM61•Bolt retaining coolant intake pipe to cylinder headM6M100.95••Coolant pump retaining boltM82.5••Bolt retaining thermostat to cyiinder headM82.5••(*) The bolt need not be greased62 Publication no. 506.670/16
<strong>Bravo</strong>-<strong>Brava</strong>Technical data1998 range ■ Tightening torquesoo.PARTThreadTighteningtorquesdaNmENGINESTEP Aj^H) JTDBolt retaining plate to oil pump caseM60.7•Screw, cylinder head to engine blockM90.9••Bolt retaining oil sump to crankcaseM6M812.5•••Nut retaining oil sump to coversM60,5•Sump drain plugM182••Oil dipstick pump retaining bolt and nutM60.9••Bolt retaining alternator to crankcase, used alsofor adjustmentM10x1.255•Bolt retaining engine to crankcaseM8M102.25••Bolt retaining bracket to engine mountM8M10x1.252.55••Bolt retaining alternator to slotM10x1.255•Nut retaining lower bracket to alternator mountand fasteningM127•. •Bolt retaining compressor to supportM8M102.55•••Power steering pump retaining boltM10x1.255Bolt retaining pulley to power steering pumpM10x1.255Spark plugsM12x1.252.7•Oil pressure switchM14x1.5M14x1.53.22.2••Coolant temperature sender unitM16x1.5taperedM16x1.5tapered3.42.5••Copyright Fiat Auto 63
Technical dataTightening torquesoo.<strong>Bravo</strong>-Btava1998 rangePARTThreadTighteningtorquesENGINEdaNmIgSlie, lnp( 20vSTEP Al^H) VTDCoolant temperature sender unit for i.e. systemM12x1.52••Bolt retaining sensors to crankcase and cylinderheadM60.9••Bolt retaining phonic wheel to crankshaftM60.9•Bolt retaining knock sensor to crankcaseM82.5•Oil temperature sender unit on sumpM14x1.52.2•Oil level sending unitM12x1.252••Bolt retaining auxiliary pulleyM8M82.22.5••Bolt retaining pulley to power steering pumpM10x1.255•Flanged bolt retaining auxiliary component fixedbelt tensionerM82.5•Bolt retaining automatic belt tensioner to alternatormountM8M102.57••Bolt retaining fixed belt tensioner to alternatormount and auxiliary partsM82.5•Bolt retaining fixed belt tensioner to air conditionercompressor mountM10x1.255• 'Bolt retaining tensioner bracket to engine mount(fora/c versions)M 10x1.255Bolt retaining belt tensioner to engine mountM8M102.55Bolt retaining reinforcement between front bracketand rear bracketM10x1.255•Bolt retaining alternator/compressor rear mountto crankcaseM10x1.255- •Bolt securing power steering mount to crankcaseM10x1.255•Bolt retaining power steering pump plateM82.2•64 Publication no. 506.670/16
<strong>Bravo</strong>-<strong>Brava</strong>Technical data1998 range Tightening torquesoo.PARTThreadTighteningtorquesdaNmENGINEfpliev |Jp 20vSTEP Aj^Hj JTDPower steering pump retaining boltM62.5•Bolt retaining pulley to power steering pumpM82.5••Compressor tensioner retaining boltM10x1.255Nut retaining compressor pivotM 10x1.255Screw retaining compressor to supportM82.2Alternator retaining boltM10x1.25M10x1.2558Bolt retaining rear tensioner to compressorM10x1.255Nut securing rear compressor/alternator mount toengine blockM10x1.255Power steering guard retaining boltM60.7Alternator retaining/tensioning boltM82.2Bolt retaining plate to engine blockM10x1.255Nut retaining cam cover to cylinder headM60.9••Bolt retaining cylinder head extension to cylinderheadM71.5Nut retaining rear cover to cylinder head extensionM60.9Nut retaining intake manifold to cylinder headM7M81.52.5•Nut retaining exhaust manifold to cylinder headM8x1.25M8x1.252.72.5••Bolt retaining coils to rear coverM40.2Coil retaining boltM60.9•Copyright Fiat Auto 65
Technical dataTightening torques00.<strong>Bravo</strong>-<strong>Brava</strong>1998 rangePARTThreadTighteningtorquesdaNmENGINElS| 16v |g|| 20vSTEP Aj^Qj JTDCoil cover retaining boltM60.9•Nut retaining upper part of intake manifold tolower partM60.9Adjustment screw for securing intake manifoldM60.9Plug sealing channels for bolts securing head extensionto cylinder headM161.5Tapered plug for tightening oil channel to cylinderhead extensionM14x1.51.5Nut for retaining front coverM60.9Tapered plug for sealing oil channel on head extension(timing end)M20x1.53Plugs sealing camshaft timing studsM16x1.51.5Bolts retaining belt guard to steel bushesM60.9Plug on head extension with resonator retainingseatM183Stud with screw for securing resonatorM8x1.252.5Bolts retaining cable channelsM60.9Heat shield retaining nutsM60.9Hexagonal, splined bolt retaining dust shieldM60.9•Half-axle mount retaining boltM105Bolt retaining connector beneath cam coverM60.9Bolt retaining reaction bracket tohalf-axle mountduct andM82.5Nut retaining intake manifold bracket and wiringchannelM82.566 Publication no. 506.670/16
<strong>Bravo</strong>-<strong>Brava</strong>Technical data1998 range Tightening torquesoo.PARTThreadTighteningtorquesdaNm@ll6vENGINElfi|20vSTEP At^mJTDBolt retaining damping flywheel to gearM82.5Timing belt tensioner retaining boltM105•Bolt retaining intake gear to variable valve timingM60.9Bolt retaining oil pump casing to capM60.9Bolt for heat exchanger connectionM203Bolt retaining coolant return line from heater tocylinder headM10x1.255Bolt retaining coolant delivery line to crankcaseM8x1.252.5Air conditioner shield retaining boltM60.9Adjustment bolt retaining nutM105Bolt, reaction bracket to half-axleM10x1.255••Nut for bolt between sump and half-axle mountM82.5••Bolt retaining power steering pump to rod mountM82.5•Bolt retaining power steering pulley to shaftM1610•Nut retaining oil vapour separator to intake ductM60.9•Flanged bolt retaining auxiliary mount tocrankcaseM8M102.55••Injector retaining bracket tightening nutM8M32x1.53.211.8•Fastening, exhaust manifold reaction bracket tocrankcaseM82.5•Bolt retaining injection pump to mount,crankcase endM83.2•Copyright Fiat Auto 67
Technical dataTightening torques00.<strong>Bravo</strong>-<strong>Brava</strong>1998 rangePART.ThreadTighteningtorquesENGINEdaNm@i6wSTEP Am&JTDBolt retaining injection pump to intake manifoldend mountM82.6Injection pump gear retaining nutM145Fuel temperature sensorM121.6Nut retaining fuel filter to intake manifoldM82.5Nut retaining turbocharger to exhaust manifoldM82.5Nut retaining manifold to turbochargerM82.5Union retaining oil delivery pipe to turbochargerM10M121.5Heat exchanger valve retaining fittingM206.5Bolt retaining nozzle assembly to crankcaseM60.9Bolt retaining front coolant intake union to cylinderheadM60.9Nut retaining thermostat to coolant outlet unionto cylinder head-M71.5Upper and lower alternator reaction bracket retainingboltM10x1.255Bolt retaining vacuum pump to cylinder headM82.5Nut retaining valve to exhaust manifoldM82.5Bolt retaining pipe to valveM82.5Air pressure sensorM60.9Preheating glow plugsM121.5Lines from fuel manifold to injectors - injector endM122.368 Publication no. 506.670/16
<strong>Bravo</strong>-<strong>Brava</strong>1998 rangeTechnical dataTightening torquesoo.PARTThreadTighteningtorquesENGINEdaNm@li6vSTEP Aj^H| JTDInjector fuel manifold lines » manifold endM143.2•Lines from pressure pump to fuel manifold - pumpendM143.2•Lines from pressure pump to fuel manifold - manifoldendM143.2•EXHAUSTFront bolt retaining exhaust pipe to differentialend bracketM81.8•Self-locking nut retaining flange to exhaust manifoldM83Bolt retaining first exhaust pipe section to manifoldM83.2Nut retaining front section to catalytic converterM83Bolt for collar retaining rear section to catalyticconverterM105Flanged bolt retaining brackets with side and railnutM82.8• •Flanged bolt retaining front pipe to turbine fittingM82.4•Front section bracket retaining boltM82.4•Front bracket retaining boltM82.4•Bolt retaining front exhaust pipe half-bracketconnection bracket to bracket anchored to differentialmountM82.5Bolt with safety washer retaining front section tocatalytic converterM82.5Bolt for retaining bracket with block to differentialend mountM82.5Nut retaining front exhaust pipe flange to manifoldM82.8Self-locking nut with metal insert retaining frontexhaust half-bracketM82.5Copyright Fiat Auto 69
Technical dataTightening torquesoo.<strong>Bravo</strong>-<strong>Brava</strong>1998 rangePARTThreadTighteningtorquesENGINEdaNm@ti6vSTEP AWSm JTDSelf-locking nut with tapered safety washer retainingbracket to crarikcaseM82.5•Nut joining rear pipe to catalytic converterM10x1.254•Lambda probeM18x1.53.6•••Nut retaining anti-fiex bracket to oil sumpM103•POWER UNIT MOUNTINGBolt retaining mount to gearbox-differential endM12x1.258.5• •••Bolt retaining engine to body, engine and gearboxendM83.2•••Bolt retaining bracket to gearbox-differential endM10x1.254.5•Bolt retaining bracket to gearbox-differential endM12x1.259•Bolt retaining connecting rod mount to bodyM83.8•Tapered bolt retaining connecting rod mount tobodyM82.8•Fastener, bracket to block and body - engine endM10x1.255•Fastener - engine mount to body - engine endM83.2•Nut retaining block to engine end mountM12x1.258•Flanged bolt retaining mount to gearboxM10x1.255•Nut retaining differential mount to gearboxM12x1.258••Screw, reaction link to bracket and to enginemountM10x1.255•Bolt retaining reaction link to bodyM8M82.83.8•Bolt retaining mount to engine sump, differentialendM12x1.258•70 Publication no. 506.670/16
<strong>Bravo</strong>-Btava1998 rangeTechnical dataTightening torquesoo.PARTThreadTighteningtorquesENGINEdaNmISP)20vSTEP AJ^Hj JTDBolt retaining brace to differential end mountM12x1.258•Bolt retaining differential end flexible block tobeamM83.6•••Bolt retaining bracket to gearbox - gearbox endM10x1.255•Power unit reaction link retaining boltM105•PEDAL UNITNut retaining accelerator pedal to pedal unitM60.5•Flanged nut retaining brake and clutch pedal unitmount to bodyM81.5•Broad-flanged bolt for automatic fittings retainingpedal unit to dashboardM82.6•Self-locking nut for retaining and adjusting clutchcontrol cable on gearboxM60.44•Self-locking nut retaining brake and clutch pedalpivot pin to pedal unitM83•EXTERNAL GEARBOX LINKAGEBolt retaining gear lever mount to floor panM60.74•Screw retaining bottom selection and engagementrod to gear leverM82.8•Nut retaining intermediate return pinM81.5•Nut retaining ball heads to leversM81.5•Nut for bolt retaining selection idler to gearboxM81.5•Bolt retaining reverse pipe to gearboxM82.4•Nut retaining ball heads to selection leverM81.5•Copyright Fiat Auto 71
Technical dataTightening torques00.Btavo-Btava1998 rangePARTThreadTighteningtorquesdaNmENGINEifpliev lEg| 20vSTEP AlSp| JTDBolt retaining reaction bracket to gearboxM82.4•••Nut retaining gearbox linkage to mountM60.74•••GEARBOX AND DIFFERENTIALNut retaining spring in speed rod positionM14x1.43Screw retaining plate to gear caseM82.5Screw retaining gear case cover and plateM82.5Screw retaining cover to bell housingM82.5Screw retaining gear case to bell housingM6M812.5Screw retaining reversing shaftM83.4Lock ring, main and layshaft, 5th speed gearM20x1.511.8Screw retaining gear control forksM61.8Bolt retaining speed selection and engagementshaft leverM82.5Reverse lever support retaining screwM61Screw retaining bush for gear shaftM61Screw retaining front drive axle ring gearM10x1.258.8Screw retaining differential case retaining flangeto gear caseM10x1.25M84.92.5Screw retaining speedometer supportM61.272 Publication no. 506.670/ 76
<strong>Bravo</strong>-<strong>Brava</strong>Technical data1998 range Tightening torquesoo.PARTThreadTighteningtorquesdaNmENGINEIgPliev lfi(20vSTEP Al^Q) JTDTapered, threadM22x1.54.6••Tapered threaded plug for filling gear case with oilM22x1.54.6••Screw retaining differential right shaft supportM6i••Tapered threaded plug for 1st-2nd speed rod seaton gear caseM18x1.52•- •Gear selection lever support retaining screwM8•1.5••Reversing light switchM14x1.253••BRAKING SYSTEMScrew with split safety washer retaining brakecarrier plate to suspension armM82.4••Bolt retaining front brake caliperM10x1.255.7••Bolt with tapered safety washer retaining frontbrake calipers to pillarM12x1.2510.5Bolt retaining front brake disc, rear brake disc, rearbrake drum (with wheel centring function)M81.2••Bolt with tapered safety washer retaining bracketassembly for braking systemM82.5••Fitting connecting hose to front brake caliperM10x11.4••Bleed screw on front and rear brake caliperM80.6••Fitting connecting hose to rear brake caliperM10x11.4Bolt retaining cylinder to rear brake carrier plateM60.8••Bleed screw on rear drum brake cylinder 0180M80.65•Brake pump restriction fitting (ABS version)M101.4• ••Copyright Fiat Auto 73
Technical dataTightening torquesoo.<strong>Bravo</strong>-<strong>Brava</strong>1998 rangePARTThreadTighteningtorquestiaNmENGINEl|p| 20vSTEP AJ^H| JTDMale fitting for flared hoses fastening rigid pipe torear drum brake cylinderM10x11.4Flanged nut retaining load proportioning valve tobracketM6 .0.76Self-locking nut with polyamide ring for bolt retainingEBD spring bracket to rear antiroll barM60.6Bolt for square load proportioning valve adjustmentleverM81.8POWER ASSISTED STEERING AND STEERINGPower steering retaining nuts and boltsUnion for return fitting from power steering totankM6M8M12x1.250.51.52Flanged bolt retaining box to beamM10x1.257Union for pump/power steering outlet fitting onpower steeringM14x1.53Self-locking nut retaining box link to pillarM 10x1.253.4Union for pump/power steering outlet fitting onpumpBolt with tapered safety washer retaining fork anduniversal jointM12M83.62Nut retaining steering wheel to steering columnM16x1.55Bolt with tapered end with safety washer forsteering column mount fastenerBolt with safety washer retaining airbag moduleto steering wheelBolt with tapered end and safety washer retainingstrut to column mountM8M6M82,20.82.2Nut retaining reinforcement strut to pedal unitM82.274 Publication no. 506.670/16
<strong>Bravo</strong>-<strong>Brava</strong>1998 rangeTechnical dataTightening torquesoo.PARTThreadTighteningtorquesENGINEdaNm@ll6vSTEP ABJTDFRONT SUSPENSIONBolt retaining front and rear of front beam to bodyBroad-flanged bolt retaining front of front beamto bodyM10x1.25M12x1.25M12x1.25810.810.8Flanged nut for nut fastening rear of front beam tobodyScrew with flat and tapered washer retaining frontand rear outside of plates joining wishbone tobeamScrew with flat and tapered washer retaining frontand rear interior of plate jointing wishbone tobeamFlanged nut fastening top of damper to blockM10x1.25M10x1.25M10x1.25M12x1.2586.96.910Screw with broad flange retaining top damperblock to bodySelf-locking nut retaining damper to pillarSelf-locking nut for bolt retaining wishbone pivothead to pillarScrew with tapered and flat safety washer retaininganti-roll bar support plate to beamM8M10x1.25M12x1.25M10x1.25M83.271074Self-locking nut retaining end of anti-roll bar toconnecting rodM10x1.257Self-locking nut retaining bar to front suspensionarmNut retaining front wheel hub to couplingWheel studM10x1.25M22x1.5M24*1.5M12x1.253.17+55°7+62°8.6Copyright Fiat Auto 75
Technical dataTightening torquesoo.<strong>Bravo</strong>-<strong>Brava</strong>1998 rangePARTThreadTighteningtorquesENGINEdaNm1^1 16vjgp 20vSTEP A|^B| JTDREAR SUSPENSIONScrew with broad flange retaining front flexibleblock to rear subframeM12x1.2510.8•••Screw with broad flange retaining rear flexibleblock to bodyM12x1.2510.8••- •Nut for stud retaining rear swinging arm to subframeM16x1.515•••Nut for screw retaining lower damper to suspensionM12x"l.258.8•••Screw retaining top of damper to mountM10x1.256•••Nut for pivot pin retaining rear hubM22x1.528•••Bolt retaining stabilizer bar to rear suspension armM10x1.255.6•••Bolt retaining stabilizer bar support plates to rearsuspension armM82.8•••Wheel studM12x1.258.6•••Nut for bolt retaining square lever to wishboneM81.5•••AIR CONDITIONERBolt retaining dehydrating filter inlet and outletductsM60.55•••Bolt retaining evaporator pipe to compressorM60.55•••Three-stage pressure switch fastenerM10x10.8•••ELECTRICAL EQUIPMENTNut retaining i.e. control unitM60.55•••Bolts and nuts retaining i.e. control unit.M60.55•••76 Publication no. 506.670/16
<strong>Bravo</strong>-<strong>Brava</strong>Technical data1998 range Tightening torquesoo.PARTThreadTighteningtorquesdaNmifplievENGINESTEP Al^Bl-TTDHeadlamp retaining nuts and boltsM60.55•••Third brake light retaining boltM50.2•••Bolt retaining earth to bodyM82.4•••BODYWORKBolt with hexagonal splined groove retaining luggagecompartment catchM82•••Bolt with tapered washer retaining side door lockM60.75•••Hexagonal socket screw retaining fixed side doorhingeM10x1.254.5•••Bolt retaining front bumpersM60.4•••Bolt retaining brackets to pretensionerM64-6•••AIR BAG SYSTEMBolt retaining air bag control unitM60.8•••Bolt retaining driver module to steering wheelM60.8•••Bolt retaining passenger module to facia beamM60.7•••Copyright Fiat Auto 77
<strong>Bravo</strong>-<strong>Brava</strong> ^ TD EngineContents'..■■>'., , ; •.(■-../■■V '■;' pageFUELSYSTEM- Fuel system with Lucas FTOi} pump 1-Introduction '' v 1.- Fuel system components 1- Location of fuel system components 2-Air intake circuit 3-".Fu'el feed circuit 4-Fuel circuit diagram r ■'■"■•'". 7.- Electric-electronic system ' r 8- Input arid output; signals betweenEGU/sehsors; and actuators 11- Wiring diagram 12- Blow-by gas recireulation diagram 17- Exhaust gas recireulation system, (E ; G.R.) ■■''''.''■,: 18Copyright Fiat Auto
<strong>Bravo</strong>-<strong>Brava</strong> ty TD EngineFuel system10.FUEL SYSTEM WITH LUCAS FT09 PUMPINTRODUCTIONThe devices making up the injection system are collectively responsible for introducing fuel into eachcylinder and ensuring the required quantity is provided to provide even, effective combustion.Efficient engine operation depends largely on precise injection.The following essential conditions must be satisfied:- each cylinder must be provided with the amount of fuel required by the engine during each cycle asdictated by rpm and load. In practice, this involves metering the fuel;- the fuel must be introduced at the most effective moment and the beginning of injection must alwaysbe repeated at the same point in the cycle. This point is chosen to bring conditions as close as possibleto the ideal engine operation cycle. It must be possible to alter this moment as the rpm changes;- the fuel must be nebulised into tiny droplets to facilitate ignition;- the droplets must possess sufficient kinetic energy to penetrate the mass of compressed air;- the fuel particles must be diffused as evenly as possible in all directions so that as much of the air in thecylinder as possible can be used for combustionThe main features of the 1910 TD indirect injection system are as follows:- fuel injection advance managed by an electronic control unit (ECU);- turbocharged by a turbocharger and intercooler- cross flow intake/exhaust ducts;- Exhaust gas recirculation system for removal of NOx (controlled by the electronic control unit);- Crankcase case reciculation system (Blow-by).These devices ensure that this version meets EC F2 emission requirements while also allowing better fuelreturns, lower noise levels and better handling.FUEL SYSTEM COMPONENTSThe fuel system is made up of the following main subsystems:- Air intake circuit- Fuel supply circuit- Electric/electronic circuit- Circuit for recirculating vapours from the crankcase (blow-by gases)- Exhaust gas recirculation circuit (E.G.R.)Copyright Fiat Auto 1
EngineFuel system10.LOCATION OF FUEL SYSTEM COMPONENTS<strong>Bravo</strong>-<strong>Brava</strong> |Q} TO1. Air temperature sensor2. Diagnostic socket3. Electronic control unit4. Injection pump5. Fast idle valve6. Borg Warner modulator valve7. Heater plugs8. E.G.R. valve. (Mitsubishi)9. Pre-heating control unit10. Rpm sensor11. Preheating control unit fuse12. Airflow meter (debimeter)13. Coolant temperature sensor14. Injectors2 Publication no. 506.670/06
<strong>Bravo</strong>-<strong>Brava</strong> ^TDEngineFuel system10.AIR INTAKE CIRCUITThe air intake circuit is turbocharged by means of a Garrett GT15 turbocharger with waste-gate.Air is taken in through intake (1) and flows through filter (5) before compression in exhaust gas-driventurbocharger (2). Air then flows through the heat exchanger (intercooler) (3).The air assumes optimal temperature and density properties and then flows to the intake manifold (7) fordistribution to the cylinders.1. Inlet fitting 5. Air cleaner2. Turbocharger 6. Air temperature sensor3. Heat exchanger (intercooler) 7. Inlet manifold4. Air flow meter (debimeter)Copyright Fiat Auto 3
EngineFuel system10.<strong>Bravo</strong>-<strong>Brava</strong> ^ TOFUEL FEED CIRCUITThe main components of the fuel system are as follows: tank, filter, injection pump and injectors.Fuel flows from tank (6) to injection pump (2) through filter (7). A pump (9) is fitted upstream from filter(7) to prime the fuel if necessary (e.g., after replacing the fuel filter).Rotary injection pump (2) ensures injectors (1) are properly supplied with fuel in the firing order1-3-4-2.Because of the particular shape ofthe tank, an air pocket could form atthe bottom during refuelling whichwould prevent the tank from beingcompletely filled. This is preventedby pipe (5), which allows air to flowout from the lowest part to ensurecomplete filling of the tank.1.2.3.4.5.InjectorsInjection pumpDelivery line from tank to filterReturn line (recirculation)Vent pipe6. Reservoir7. Fuel filter8. Fuel outlet line from filter to injection pump9. Hand-operated priming pump4 Publication no. 506.670/06
<strong>Bravo</strong>-<strong>Brava</strong> ^ TDEngineFuel system10.Injection pumpThe Lucas FT09 injection pump is designed specifically for indirect injection diesel pumps. New innovativefeatures optimise engine service characteristics under all operating conditions. More specifically,the pump reduces fuel consumption, harmful emissions and noise levels.The pump is rotary and its main characteristics are as follows:- Injection advance altered by an electronic control unit.- Centrifugal mass maximum flow regulator fitted to the pump shaft.- Pump is lubricated by the fuel used to drive the pump.- Extra fuel under conditions of fuel engine load or when full power is required.- Coded, electronic fuel flow stop device built into the immobiliser system (Fiat CODE).1. Idle speed adjustment screw2. Fitting for diesel return line to tank3. Throttle lever position sensor.4. Accelerator control lever5. Engine stop solenoid protective cover6. Fast idle actuator control device7. Fitting for diesel delivery line from filter8. Diesel delivery fitting to injectors9. Advance actuator10. Fast idle cableCopyright Fiat Auto 5
EngineFuel system10.<strong>Bravo</strong>-Btava ty TDPrinciple of operationFuel taken up from tank (11) and filtered by filter (12), flows to feed pump (7) which increases fuelpressure.Under the effect of the feed pump pressure regulator valve (2), the pressure increases in more or less linearfashion as engine rpm rises.Valve (2) also by-passes the feed pump (7) during priming.Fuel flows from the feed pump to metering device (6), which calculates the amount of fuel to be sent topumping element (4) and thus the effective output of the injectors.The position of metering device (6) is controlled by speed regulator (13) on the basis of accelerator pedalposition.The pumping element consists of two opposing plungers which slide radially in the rotor and are operatedby the profile of a ring with cams via rollers and sliding pads.The plungers lack return springs because they are pressed outward by centrifugal force and the pressureof the fuel entering during the supply stage.The rollers which drive the plungers come into contact with the cam profile at different points accordingto the length of travel during the fuel supply stage.This travel is dependent upon the amount of fuel entering the pumping chamber, regulated by the meteringdevice, and upon plunger expansion time determined by pump rotating speed.During the injection stage, the plunger control rollers come into contact with the cams and the plungersare pushed inward to raise the pressure and bring about injection.At the end of the injection stage, the plungers are pushed outward to lower the pressure. Fuel deliverystops and valve (5) seals off the outlet pipe.Valve (5) not only closes the delivery pipe but also instantaneously lowers the pressure in the pipe leadingto injector (10). This quickly shuts off injection to prevent the injector dripping.The maximum quantity of fuel which may be fed into the pumping element (4) during each cycle is determinedby a maximum flow regulator.Pressure inside pumping element (4) is maintained at a constant level by pressurisation valve (9).Turbocharging control valve (1) increases the fuel flow. Increased turbocharging pressure compresses amembrane located inside the valve to move a piston which transfers feed pressure to the sliding pad actuatorlocated inside pumping element (4). The sliding pads move to alter plunger travel and thus alsothe quantity of fuel injected.Solenoid (8), controlled by a electronic control unit, alters the pump delivery advance to bring about anincrease when engine load exceeds a given threshold.The engine stop solenoid (3) is protected by a tamper-proof cover.During engine operation, the solenoid remains active so that fuel may flow from feed pump (7) to the intakeduct.When the key is turned to switch off the engine, the solenoid is deactivated to shut off the fuel flow. Themetering device feed chamber is no longer supplied with fuel and the engine stops.6 Publication no. 506.670/06
<strong>Bravo</strong>-Btava j ^ TOFUEL CIRCUIT DIAGRAMEngineFuel system10.1. Turbocharging control valve2. Feed pressure regulator valve3. Engine stop solenoid4. Pumping element5. Outlet valve6. Metering device7. Feed pump8. Advance actuator control solenoid9. Pressurisation valve10. Injectors11. Tank1.2. Filter13. Speed regulatorCopyright Fiat Auto 1
EngineFuel system10.ELECTRIC-ELECTRONIC SYSTEM<strong>Bravo</strong>-<strong>Brava</strong> ty TOThe fuel system electric - electronic circuit comprises a wiring circuit, an electronic unit (control unit)and the following sensors and actuators:Rpm sensorCoolant temperature sensorAir flow meter (debimeter)Intake air temperature sensorInjector with controlsAccelerator lever position sensorFast idle control solenoidPreheating control unitElectronic control unitThe electronic control unit (ECU) is locatedbeneath the glove compartment (right handside) and is connected to the wiring by a 25pin connector. This receives all the data onengine service conditions transmitted by thevarious sensors in addition to atmosphericpressure information obtained by a sensor locatedinside the control unit. The control unituses this data in conjunction with specificprograms to implement the following operatingstrategies:- injection advance control- fast idle control- exhaust gas recirculation- glow plug pre/post heating control- air conditioning system controlRpm /TDCINJECTION ADVANCE CONTROLAcceleratorlever position __CoolanttemperatureAirtemperatureInjectorwith controlsECUlAtmosphericii pressure ■—AdvanceactuatorcontrolsolenoidThe electronic control unit uses data on enginerpm/TDC, accelerator lever position, airand coolant temperature and atmosphericpressure to calculate the optimal injectionadvance. It compares this with the actual valuetransmitted by the injector with controlsand adjusts the advance actuator controlsolenoid when required.8 Publication no. 506.670/06
<strong>Bravo</strong>-<strong>Brava</strong> ty TOFAST IDLE MANAGEMENTEngineFuel system10.CoolanttemperatureAir temperatureRpmAir conditionerECU -SolenoidfastidleThe control unit activates the fast idle whenat least one of the following conditions occurs:1. Intake air temperature less than 25° C andcoolant temperature less than 55° C.2. Air conditioner compressor on.3. Engine speed less than 750 rpm.EXHAUST GAS RECIRCULATION CONTROLCoolanttemperatureAccelerator leverpositionRpmIntake airquantityECUlAtmospher- ■i ic ■i pressure ■—BorgWarnerSolenoidThe control unit calculates the weight ratiobetween "clean" air taken in and the quantityof burnt gases which may be returned to theintake. On the basis of engine load, coolanttemperature and intake air quantity, the controlunit controls the Borg Warner modulatorvalve which in turn activates the EGR valvevia a vacuum signal in order to recirculate theexhaust gas.RpmGLOW PLUG PRE/POST HEATING MANAGEMENTCoolanttemperatureAir temperatureAccelerator leverpositionBattery voltageHfc»___ECU -Glow plugpreheatingcontrolunitThe electronic control unit (ECU) controlsthe glow plug preheating control unit directlyto manage pre and post heating times, mainlyon the basis of coolant and intake air temperature.When calculating post-heating times,the control unit also takes into account acceleratorlever positin and rpm. Heating timesare reduced when there is a high demand forengine power.Copyright Fiat Auto 9
EngineFuel system10.Coolanttemperature__<strong>Bravo</strong>-<strong>Brava</strong> ^ TDAIR CONDITIONING SYSTEM CONTROLRpmAir conditioneractivation request _Battery voltageECUi Atmospher-1i ic i1pressure '—AirconditionercompressorP4A10EJ01When the air conditioner is turned on, thecompressor absorbs power from the engine,which tends to stall when only idling. Thecontrol unit activates the fast idle functiondescribed previously to prevent this problemoccurring.The control unit also deactivates the compressorif one of the following conditions occurs:1. Coolant temperature greater than 110 °C.2. A given rpm threshold is exceeded (about4500).3. High engine power demand (high acceleration).Under conditions 1 and 2 the compressor is reactivated when coolant temperature or rpm drop belowthe intervention threshold.Under condition 3, power is cut off only temporarily and automatically restored after a few seconds evenif the power requirement is still high.Injector with controlsThe injector with controls informs the electronic control unit of the true injection advance (beginning ofinjection stage, i.e. when the needle valve begins to move).On the basis of the signal, the control unitcorrects the advance set by the injector actuatoruntil the rated value is reachede.The injector is fitted to cylinder (1) andequipped with a device to identify the exactmoment at which the injection stage beginsand wiring to send a signal to the electroniccontrol unit.The injector contains a coil (2), a needlevalve (3) and an adjustment pin (1). The coilis electrically activated and generates a magneticflow which affects the needle valve (3).When the needle valve begins to open thenozzle for fuel injection, the magnetic flowalters in coil (2). The control unit identifiesthis as the moment when injection beginsand bases its advance adjustment strategy onthis reading.10 Publication no. 506.670/06
<strong>Bravo</strong>-<strong>Brava</strong> ^ TOINPUT AND OUTPUT SIGNALS BETWEEN ECU/SENSORS AND ACTUATORSEngineFuel system10.1. Electronic control unit2. Injection pump3. Glow plug control unit4. Heating/ventilation system5. Glow plug warning light6. Injection system failure warning light7. Borg Warner solenoid8. Diagnostic socket9.10.11.12.13.14.15.16._Rev counterRpm sensorBatteryInjector with controlsAir flow meter (debimeter)Fast idle valveCoolant temperature sensorAir temperature sensorP4A09EJ04Copyright Fiat Auto 11
EngineFuel system10.<strong>Bravo</strong>-<strong>Brava</strong> ty, TOWIRING DIAGRAM12 Publication no. 506.670/06
<strong>Bravo</strong>-<strong>Brava</strong> ^ TDEngineFuel system10.Key to wiring diagram1. Heater plugs warning light2. Rev counter signal3. Air conditioner relay4. Air conditioner activation button5. Fiat/Lancia Tester fault diagnosis point6. Injector with controls7. Rpm and TDC sensor8. Coolant temperature sensor9. Accelerator lever position sensor10. Intake air temperature sensor11. Injection system failure warning light12. Debimeter13. Preheating control unit14. System relay15. Borg Warner solenoid (E.G.R)16. Battery17. Ignition switch18. Fast idle valve19. Solenoid for advance adjustment deviceRpm and phonic wheel sensorSpecifications:Gap0.8 - 1.5 mmWinding resistance860 ohm ± 10% at 20°C1. Rpm sensor2. Phonic wheelThe rpm sensor is fitted on the crankcase and faces a phonic wheel located inside the crankcase and fastenedto the crankshaft.The steel phonic wheel is fitted with two reference dowels on the outer part of the circumferenc, eachone located 10° after top dead centre.When these dowels or teeth pass beneath the sensor, the gap brings about a change in the magnetic fluxwhich in turn induces a current in the sensor coil windings.This signal provides the control unit with information on engine rpm.Copyright Fiat Auto 13
EngineFuel system10.Air flow meter (Debimeter)<strong>Bravo</strong>-Btava ^ TOThe air flow meter (Debimeter) is hot film type. In this system, a heated membrane is placed in a measurementchannel through which air is taken into the engine.The film membrane is maintained at a constant temperature (~120°C above air temperature) by an adjacentheating coil.The mass of air flowing through the measurement channel tends to remove heat from the membrane. Tokeep the membrane at constant temperature, a certain current must therefore flow through the heatingcoil. This current is measured by means of a Wheatstone bridge.The measured current is therefore proportional to the flowing air mass.NOTE1. Connector2. Measuring channel3. Hot film sensorA= Air intakeThis debimeter measures air mass directly (not volume) and thus eliminates problems of temperature,altitude, pressure etc.Operating descriptionThe Wheatstone bridge (R3, R2, Rs, Rt+ R1 format) is in equilibrium when Rs is about 120°C more thanair temperature.The air flowing through the membrane removes heat from Rs, and the bridge becomes imbalanced. Thissitaution is deteced by the circuit connected to IC1, which controls transistor T1 to an extent proportionalto bridge imbalance. T1 then sends more current through Rh to heat Rs and thus restore thebridge to equilibrium.Circuit IC2 measures the current flowing through Rh. This current maintains the bridge in equilibriumand is thus proportional to the mass of air flowing through the air meter.^Uk(=)C4 R5w—c=hIC2R3Q|R2IC1UsubRHRS1RTR1"CTtr-tr12 3 4Wiring diagram of air flow meter14 Publication no. 506.670/06
<strong>Bravo</strong>-<strong>Brava</strong> )^ TDK^^CE?^v—'\,\ w iv /wMXCoolant temperature sensorEngineFuel system10.ftUJS|S/ -y/ #i/Coolant temperature is measured by a sensorcontaining an NTC resistance, which altersresistance in inverse proportion to temperatureas shown in the diagram./.foil (sty\ /^O 2 *\^C)oj-^ ^ 0*NP\.The control unit records a voltage changeproportional to the current intensity flowingthrough the sensor.When fitting the sensor, take care not totighten to more than 15 NmR NTC4 000 _TEMPERATURE (° C)itnnN5010-100 120 130■>■(°C)23. 2.6 3 3.4VOLTAGE (V)4£ 4£Copyright Fiat Auto 15
EngineFuel system10.Preheating control unit<strong>Bravo</strong>-<strong>Brava</strong> ^ TDThe glow plugs are controlled by the preheatingcontrol unit under the direct controlof the electronic control unit.The unit contains a smart relay which sendsfeedback to the electronic control unit in orderto inform it of faults in the preheating unitor short-circuits in the glow plugs.The figure shows the connectors located onthe base of the preheating control unit andthe pin-outs.Connections1. Vehicle earth2. Not connected3. Ignition switch (+15)4. Electronic control unit (pre-postheatingactivation)5. Electronic control unit (fault diagnosis)8. Battery positive9. Glow plugs10. Glow plugsAir temperature sensorThe intake air temperature sensor is separatefrom the air flow meter in this version. It is anormal Negative Temperature Coefficient(NTC) sensor: its electric resistance drops astemperature increases.Because the control unit input circuit is designedas a voltage divider, this voltage isdistributed between a resistance in the controlunit and the sensor NTC resistance.The control unit is therefore able to assesssensor resistance changes through voltagechanges and obtain temperature information.16 Publication no. 506.670/06
<strong>Bravo</strong>-<strong>Brava</strong> ty TD EngineFuel system10.BLOW-BY GAS RECIRCULATION DIAGRAM)Crankcase emissions are made up of a mixture of air, diesel and burnt gases which leak through the pistonrings, in addition to lubrication oil vapour.This mixture is defined "blow-by" or "vent" gas.Vent gases from the crankcase and cylinder head flow through pipe (3) to separator (2) where they losepart of their oil content in the vortex. This falls back to the sump through pipe (4) in the form of droplets(4).The remaining gases flow through pipe (5) and are directed to the intake circuit.Cylinder head gas outlet pipe (1) contains a flap trap (6) to prevent the pipe catching fire due to flameflash-back.Copyright Fiat Auto 17
EngineFuel system10.EXHAUST GAS RECIRCULATION SYSTEM (E.G.R.))<strong>Bravo</strong>-<strong>Brava</strong> ffi TDThis system directs a proportion of the exhaust gases to the intake under certain engine operating conditions.The process dilutes the fuel mixture with inert gases to lower the temperature peak in the combustionchamber. This reduces the formation of nitrogen oxides to bring about a 30-50 % reduction in emissions.Exhaust gas recirculation is allowed only at medium-low loads, when the air - fuel ratio is very high andengine operation is not impaired by the presence of inert gases instead of air.The recirculation system is controlled by electronic control unit (1), which receives input signals from apotentiometer on the accelerator lever (on the injection pump) and from the rpm and coolant temperaturesensors. It produces an output signal which controls the Borg Warner modulator solenoid andhence the E.G.R. (2).The E.G.R. is connected to the atmosphere through filter (3). According to an imput signal, the valve directsa higher or lower vacuum from the brake servo vacuum pump (4) to the Pierburg EGR valve (5).If the vacuum is sufficient, this valve opens to bring the exhaust manifold into communication with theintake manifold.The amount of gas recirculated can therefore be altered by adjusting Pierburg E.G.R. valve opening continuouslyon the basis of maps saved in the ECU memory and the degree of opening, which is in turn dependenton signals received.1. Electronic control unit2. Borg Warner modulator solenoid controllingEGR.3. Atmospheric intake filter4. Vacuum pump for brake servo5. E.G.R. valve.A. Gas from the exhaust manifoldB. Gas sent to intake18 Publication no. 506.670/06
<strong>Bravo</strong>-<strong>Brava</strong> ^TD ioo Engine■' _____ Index10.REMOVING-REFITTINGpage- Removing - refitting power unit 1REPLACING AUXILIARY SHAFT BELT- Removing - refitting^ alternator andpower assisted steering drive belt 12REPLACING TIMING BELT- Removing timing drivebelt ';■',.■■ 13- Refitting and Pensioning timing driveBelt 15REMOVING - REFITTING CYLINDER HEAD- Removing cylinder head 18- Refitting cylinder head gasket 24-Refitting and tightening cylinder head 25REPLACING WATER PUMP- Replacing water pump 26REMOVING - REFITTING RADIATOR- Removing - refitting radiator 27- Procedure for filling engine cooling circuit(version with heating and air conditioningfor 75 and 100 cvversions) 28DIAGRAM SHOWING ENGINE LUBRICATION SYSTEM 31Copyright by Fiat Auto
<strong>Bravo</strong>-<strong>Brava</strong> ^ mn TD tooEngineRemoving - refitting10.3^*11" " " i ^ \LsS^O^x QV\ /vREMOVING - REFITTINGPosition the vehicle on a lift, remove the frontwheels and disconnect the battery negativeterminal. Then proceed as follows.1. Remove the upper engine guard.2. Disconnect the battery positive terminal,unscrew the nut securing the battery to itscradle and remove from the engine bay.3. Unscrew the retaining bolts shown andremove the air shroud shown in the figure.4. Raise the lift and remove the lower enginebay guard.4""""o^X^t-v-/x^^*\AH )(uSi^^^r'i^"^\§3§lHPCopyright Fiat Auto 1
EngineRemoving - refitting10.<strong>Bravo</strong>-<strong>Brava</strong> ^ TDIOO1. Use tool 1878077000 to undo the stud,unscrew the bolts and release the dustguard from its seat.2. Remove the wheel arch guard shown.3. Disconnect sleeve (1) connecting turbine- intercooler and air outlet sleeve (2) fromintercooler to intake manifold.4. Position the hydraulic jack to support thepower unit and remove the engine mounton the body. Lower the engine and removethe intercooler with bracket. Repositionthe engine mount when the operationis complete.5. Position a container to recover the enginecoolant, then disconnect the coolant intakesleeve from the radiator.2 Publication no. 506.670/08
<strong>Bravo</strong>-<strong>Brava</strong> igty TO 100EngineRemoving - refitting10.1. Remove the pipe indicated by disconnectingfrom the clip located on the intakemanifold.2. Remove the coolant intake and outletpipes from the points shown.3. Unscrew the relay case cover bolt shownin the figure.4. Unscrew the nuts illustrated and place therelay box to one side in the engine bay5. Unscrew bolts (1), loosen bolt (2) andthen remove the battery cradle.Copyright Fiat Auto 3
EngineRemoving - refitting10.<strong>Bravo</strong>-<strong>Brava</strong> ty TDIOO1. Loosen clips (1), unscrew bolts (2), disconnectconnection (3) and then disconnectthe first section of the air intake pipecomplete with debimeter.2. Loosen clip (1), unscrew screw (2) disconnectelectrical connections (3) andthen disconnect the second section of theair intake pipe.3. Open both clips and release cable (1), disconnectcable (2) and then move glowplug ECU (3) with its bracket to one side.4. Disconnect the two pipes leading from theheater unit from the thermostat.5. Disconnect both fan electrical connections.4 Publication no. 506.670/08
<strong>Bravo</strong>-<strong>Brava</strong> ^ TD100EngineRemoving - refitting10.P4A06FX021. Unscrew both bolts retaining the radiatorto the body, then remove the radiator - fanassembly.2. Disconnect the clutch release cable fromthe anchorages on the gearbox.3. Disconnect the gear selection and engagementcables from the points indicated,taking care not to damage the cablesas the head is removed.4. Disconnect both expansion tank pipesfrom the points indciated.5. Disconnect fuel outlet and inlet lines (1)and (2) and pipe (3) carrying fuel fromthe diesel filter to the injection pump.Copyright Fiat Auto 5
EngineRemoving - refitting<strong>Bravo</strong>-<strong>Brava</strong> ty TDIOO1. Unscrew the nuts, disconnect both electricalconnections shown and then removethe diesel filter.2. Remove the rear sound-proofed guard byunscrewing the bolts shown.3. Disconnect the accelerator cable from thepoints shown.4. Disconnect the pipe from modulator valve(1), the pipe from fast idle valve (2) andthen disconnect the electrical connectionsshown and the vacuum pump sleeve forbrake servo (3) from the point shown.5. Remove the reaction bracket completewith mount by unscrewing the retainingbolts shown.6 Publication no. 506.670/08
<strong>Bravo</strong>-<strong>Brava</strong> ^ TD100 EngineRemoving - refitting1. Drain the power steering pump fluid anduse an appropriate container to collect thefluid.2. Disconnect the pipe carrying fluid to thepower steering pump from the reservoir.3. Disconnect the earth lead from the gearbox4. Remove the front section of the exhaustpipe from the connector and from both vibration-resistantbrackets.5. Disconnect the front section of the exhaustpipe from the catalytic converter,then remove from the vehicle.Copyright Fiat Auto 7
EngineRemoving - refitting10.<strong>Bravo</strong>-<strong>Brava</strong> ijp TDIOO1. Disconnect the supply lead from thestarter motor.2. Disconnect the return fitting from thepower steering pump.3. Remove the wiper arms by prising up theplastic protection and unscrewing the underlyingnut.4. Remove the pollen filter plastic protection.5. Undo the nuts retaining the engine wiringmount bracket to the body.8 Publication no. 506.670/08
<strong>Bravo</strong>-<strong>Brava</strong> ^TD100EngineRemoving - refitting10.P4A09FX021. Working from inside the vehicle, removethe glove compartment by unscrewing theretaining bolts shown.2. Disconnect connector from the i.e. controlunit and withdraw the relay from its bracket.Then withdraw the engine wiring assemblyand attach to the power unit.3. Disconnect the half-axles by undoing thebolts securing the constant velocity jointsto the gearbox flange.4. Unscrew bolt (1) and loosen bolt (2) retainingthe suspension pillar. Then turnthe pillar outward to release the drive shaftfrom its attachment on the differential.Copyright Fiat Auto
EngineRemoving - refitting10.<strong>Bravo</strong>-<strong>Brava</strong> ^ TDIOORemove the bolts indicated from the bellhousing in order to position the tool usedto remove the power unit.2. Position tool 1860860000 used to mountthe power unit on the hydraulic jack andfasten to the power unit using the toolsshown.The hydraulic jack must have a capacityof at least 1000 kg and it mustbe sufficiently high to allow the powerunit to be removed from below.When calculating the height, considerthe maximum height setting of thelift and the minimum height setting ofthe hydraulic jack.Remove the engine oil heat exchangerfrom the fastenings shown, then secure tothe power unit.10 Publication no. 506.670/08
<strong>Bravo</strong>-<strong>Brava</strong> ^ TD100EngineRemoving - refitting10.1. Remove the central power unit mount byunscrewing the bolts retaining it to thebody.2. Remove the timing end engine mount byunscrewing the central bolt.3. Disconnect the gearbox end enginemount by unscrewing the retaining boltsshown.4. Lower the hydraulic jack and remove thepower unit from below the vehicle.|MI Lower the hydraulic jack gradually**^ and check that the power unit is correctlypositioned and balanced on themounting tool.Position the power unit on a stand using ahydraulic hoist.Use a hydraulic hoist to move thepower unit, once it has been re/easedfrom the mounting tool.NOTETo refit the power unit, carry out removaloperations in reverse order.Prepare the engine bay to fit the powerunit. Take care to arrange all electricalleads, pipes etc. so that they do not get inthe way when the engine is refitted;P4A11FX04Copyright Fiat Auto 11
EngineReplacing auxiliary belt10.<strong>Bravo</strong>-<strong>Brava</strong> ^ TD100- Take great care not to damage individual components when the power unit is fitted- When fitting the coo/ant lines, align groove on rubber hose with ridge on associated rigidsleeve. When filling the cooling system, refer to section on "Removing-refitting radiator".fjV^Ensure that the power unit mounting points are properly secured.Clutch pedal height.REMOVING - REFITTING ALTERNATORDRIVE BELT AND POWER STEERINGPUMPRemovingPosition the vehicle on a lift, remove the rightfront wheel, disconnect the battery negativeterminal and then proceed as follows.1. Remove the wheel arch guard by unscrewingthe retaining bolts shown. Usetool 1870077000 to prise up the studshown.Turn the tensioning device in the arroweddirection and release belt tension beforeremoving.Check the condition of the drive belt.In particular, check for cracks, tears,surface wear (smooth or shiny in appearance)and dry or hard parts withconsequent loss of grip. Rep/ace beltif even one of the above defects ispresent.12 Publication no. 506.670/08
<strong>Bravo</strong>-<strong>Brava</strong> ^ TD100EngineReplacing timing belt10.3s4&^*""""o^X^ts^.v\MRefitting1. Fit the new belt as shown in the figure.Prevent the belt coming into contactwith oil or solvents which could affectthe elasticity of the rubber withconsequent loss in grip.WWi &P4A01FX04Return the tensioning device to the positionshown in the figure. The preloadedtensioner spring will ensure the belt is correctlytensioned after the crankshaft hasbeen turned a few times.REMOVING TIMING BELTBefore removing the timing belt, theauxiliary belt must be removed as describedpreviously.3. Remove the lower power unit guard.Remove the gearbox guard by unscrewingthe retaining bolts shown and positionflywheel retainer 1860898000 to securethe flywheel in position.Copyright Fiat Auto 13
EngineReplacing timing belt10.<strong>Bravo</strong>-<strong>Brava</strong> ^ TD1001. Remove the auxiliary drive pulley and theflywheel retainer described previously.2. Remove the lower timing belt guard.3. Unscrew the retaining bolts shown andremove the reaction rod complete withmounting bracket.4. Remove the lower timing belt guard.5. Loosen the tensioner nut, release belt tensionand then remove.14 Publication no. 506.670/08
<strong>Bravo</strong>-<strong>Brava</strong> ^ TD 100EngineReplacing timing belt10.REFITTING AND TENSIONING TIMINGBELT1. Remove bolt (1) retaining the oil pumpand replace the bolt with the pin of tool1860905000.2. Fit the timing belt onto the crankshaftgear.3. Position tool 1860905000 on thecrankshaft gear and pin (3); turn thecrankshaft through small movements untildowel (2) fits into hole (1). The first cylinderis set to T.D.C. in this position.4. Use tool 1860831000 to turn the timingbelt pulley until notch (1) on the pulley isaligned with notch (2) on the cam cover.P4A15FX04Copyright Fiat Auto
EngineReplacing timing belt<strong>Bravo</strong>-<strong>Brava</strong> ^TDIOOP4A16FX01P4A16FX021. Loosen the three injection pump pulley retainingbolts.2. Turn the injection pump pulley until pin1860965000 fits into the point shown.3. Finish fitting the timing belt by assemblingcomponents in the following order:1. Crankshaft gear2. Fixed guide pulley3. Timing pulley4. Injection pump pulley5. Automatic tensioner6. Coolant pump16 Publication no. 506.670/08
<strong>Bravo</strong>-<strong>Brava</strong> ty TD100EngineReplacing timing belt10.Apply a force at the point indicated on theautomatic tensioner and move the tensionermobile pointer to the position ofgreatest tension. Then lock the belt tensionerretaining nut.Fasten the injection pump pulley by tighteningthe retaining bolts to the specifiedtightening torque and remove pin1860965000 from its housing.Turn the crankshaft through two turns inits normal direction of rotation, release thebelt tensioner retaining nut and align fixedindicator (1) on the tensioner mount withthe belt tensioner mobile indicator. Securethe tensioner nut and then tighten to thespecified torque. Refit parts removed previouslyby carrying removal operations inreverse order.Copyright Fiat Auto 17
EngineRemoving - refitting cylinder head10.4^M|<strong>Bravo</strong>-<strong>Brava</strong> ^ TDIOO22N>^QI mREMOVING CYLINDER HEADPlace the vehicle on a lift, remove the frontwheels, disconnect the battery negative terminaland then proceed as follows.1. Remove the upper cylinder head protectionby unscrewing the retaining nuts.2. Disconnect the battery positive terminal(1), unscrew nut (2), raise bracket (3)and then remove the battery.3. Unscrew the retaining bolts indicated toremove the air intake shown.4. Loosen the clip shown and disconnect theair intake sleeve from the inlet manifold.18 Publication no. 506.670/08
<strong>Bravo</strong>-<strong>Brava</strong> ^ TD100EngineRemoving - refitting cylinder head10.3C/^ssn?1. Unscrew both retaining screws and removethe partition shown.2. Disconnect both electrical connectionsshown, unscrew the nuts, disconnectboth fuel fittings and then remove thediesel filter.^II y yipt= L —
EngineRemoving - refitting cylinder head<strong>Bravo</strong>-<strong>Brava</strong> ^TDIOO1. Disconnect the fuel vapour cut-offsolenoid from the EGR by unscrewing thenuts indicated and remove the bracketshown.2. Unscrew the bolts indicated, separate theEG R valve from the pipe and then remove.3. Disconnect the fuel recovery line (1) fromthe fuel return sleeve and pipe (2) fromthe intake manifold.4. Use wrench 1852138000 to unscrew thefittings of the diesel supply lines on the injectors.5. Unscrew the diesel supply line fittingsfrom the injection pump and then removethe pipes themselves.Publication no. 506.670/08
<strong>Bravo</strong>-<strong>Brava</strong> ^ TD100EngineRemoving - refitting cylinder head10.1. Open the wiring guard shown and disconnectthe electrical connection of thepulse injector.2. Raise the lift and remove the lower enginebay guard.3. Unscrew the retaining bolts shown andrelease the exhaust pipe from the vibration-resstant bracket shown.4.5. Remove both brackets holding the turbineto the engine block.Copyright Fiat Auto 21
EngineRemoving - refitting cylinder head<strong>Bravo</strong>-<strong>Brava</strong> ^ TD 1001. Position a suitable container to collect thecoolant, then disconnect the pipe shownand drain the coolant.2. Use tool 1860967000 to unscrew the fittingon the head, unscrew bolt (1), disconnectclips (2) and remove coolant pipe(3) from the cylinder head.3. Disconnect the pipe shown from thecylinder head.4. Disconnect the pipes shown from thethermostat.5. Disconnect the sensor and coolant temperaturesending unit electrical connections.P4A22FX0522 Publication no. 506.670/08
<strong>Bravo</strong>-<strong>Brava</strong> ty ID 100EngineRemoving - refitting cylinder head10.P4A23FX02wfimfrnJ^Remove the auxiliary belt and thetiming belt as described previously.1. Unscrew the retaining bolts shown andremove the timing belt side cover.2. Unscrew the bolts retaining the exhaustmanifold to the cylinder head, unscrewthe nut shown and prise the EGR valverigid pipe from the manifold, then releasethe exhaust manifold from the pins.3. Unscrew the nuts shown and disconnectthe glow plug supply leads.4. Unscrew the bolts retaining the intakemanifold to the injection pump mountbracket.Copyright Fiat Auto 23
EngineRemoving - refitting cylinder head10.<strong>Bravo</strong>-<strong>Brava</strong> ^ TDIOO1. Remove the cam cover.2. Use wrench 1852152000 to unscrew thebolts retaining the cylinder head to the engineblock, then remove together with theintake manifold.FITTING CYLINDER HEAD GASKETCheck the amount by which the pistonprotrudes from the upper surface of theengine block and fit a cylinder head gasketof the thickness shown in the table in orderto ensure the compression ratio remainsas specified. Fit the gasket to theengine block by inserting the locating pinsand ensure that the wording "ALTO"[TOP] is facing the operator.Average pistonprotrusionup to 0.80 mm0.80 to 0.90 mmmore than 0.90 mmCylinderhead gasketthickness1.6 mm1.7 mm1.8 mmNo. ofnotches-12Reference notchpositionThe cylinder head gasket is AS-TADUR type. This type of gasket ismade from a special material whichundergoes a process of polymerisationwhile the engine is running andtherefore hardens considerably duringuse. The following conditionsmust be satisfied in order to ensurepolymerisation occurs:keep the gasket sealed in its plastic bag;take out only shortly before fitting;do not oil the gasket or contaminate withoil. Ensure cylinder head and crankcasesurfaces are thoroughly clean.24 Publication no. 506.670/08
<strong>Bravo</strong>-<strong>Brava</strong> ^ TD100EngineRemoving - refitting cylinder head10.REFITTING AND TIGHTENING CYLINDER HEAD1. Position the cylinder head on the engineblock, then tighten the retaining bolts totorque. Ensure that the tightening ordershown in the figure is followed for eachtightening stage.Oil screws and washers and leave to drainfor at least 30 minutes; screw in bolts to atorque of 2 daNm, then carry out finaltightening to a torque of 6.5 daNm usingwrench 1852154000.§m3lo^^^^/yv^f^^^^(^RSr^/^^C*^w3.Tighten bolts through an angle of 270° inthree different stages (90°+90°+90°) usingwrench 1852154000 applied to tool1860942000.Copyright Fiat Auto 25
EngineRemoving - refitting coolant pump10.<strong>Bravo</strong>-<strong>Brava</strong> ^ TD100REPLACING COOLANT PUMPBefore removing the coo/ant pump,take off the auxiliary belt and the timingbelt as described previously.1. Position a suitable container to collect thecoolant and disconnect the coolantsleeves shown from the points illustrated.Use tools 1860831001 and 1860831000to unscrew the camshaft pulley retainingnut.3. Remove the coolant pump from the cylinderhead.26 Publication no. 506.670/08
<strong>Bravo</strong>-Btava ^ TD 100EngineRemoving - refitting radiator10.P4A03FX02REMOVING - REFITTING RADIATORPlace the vehicle on a lift, remove the frontwheels, disconnect the battery negative terminaland then proceed as follows.1. Unscrew the retaining bolts shown andremove the air intake illustrated.2. Position a container to collect the coolantand then disconnect the pipes shown todrain the coolant.3. Disconnect the fan and thermostaticswitch electrical connections.4. Unscrew the bolts retaining the fan to theradiator (indicated in figure) and then removethe fan.P4A27FX02Copyright Fiat Auto 27
EngineRemoving - refitting radiator10.<strong>Bravo</strong>-<strong>Brava</strong> ^ TD100P4A05FX011. Unscrew the bolts retaining the radiator tothe body, release from the lower pins andthen remove from the upper part of the enginebay.COOLING SYSTEM Fl LLING PROCEDURE (Heated and air conditioned version with 75 bhp and 100bhp engines)- Ensure all cooling system components (engine, heater, radiator etc.) are completely empty.- Open bleed fitting (A) on the heater outlet sleeve, open bleed fitting (B) on the cylinder head rigidcooling pipe; and open bleed fitting (C) on the radiator. For versions with air conditioner, also openbleed fitting (D) on the radiator.- Disconnect sleeve (E) connecting expansion tank/thermostat from the point indicated, blow compressedair into the sleeve to empty the pipe. Re-connect when this operation has been carried out.- Slowly pour in coolant (mixture of 50% water and 50% paraflu) to fill the system until fluid emergesfrom bleed fitting (A) on the heater outlet sleeve, then close the bleed fitting.- Carry on pouring in coolant until fluid emerges from bleed fitting (B) on the rigid pipe, then close thebleed fitting.- Continue filling until fluid emerges from bleed fitting (C) on the radiator, then close. Close bleed fitting(D) at the same time as fitting (C) for air conditioned versions.- Complete the operation by filling until the fluid reaches the level of the MAX notch on the expansiontank.- Start the engine and allow to idle for about 2 or 3 minutes.- Then pump the accelerator at regular intervals to increase the revs to about 3000 rpm. Add coolant tothe expansion tank if necessary, but do not exceed the level of the MAX notch.- Wait until the fan has come on at least twice and then turn off the engine.- Allow the engine to cool and top up, if necessary, to a level between the MIN and MAX notches onthe expansion tank.NOTE // fluid boils while the engine is running as described above, interrupt the procedure in order to find thedefective component responsible for the problem, and rep/ace it. Then repeat the filling procedure.28 Publication no. 506.670/08
<strong>Bravo</strong>-<strong>Brava</strong> jg} TD100EngineRemoving - refitting radiator10.Location of engine cooling circuit bleed fittings for 75 bhp and 100 bhp engines (heated and air conditionedversion)Heated versionVersion with a/cCopyright Fiat Auto 29
<strong>Bravo</strong>-<strong>Brava</strong>DIAGRAM SHOWING ENGINE LUBRICATION SYSTEMEngineLubrication10.OperationSUPPLY CIRCUITRETURN CIRCUITThe engine lubrication system is pressurizedthrough a geared pump incorporated in thecrankcase front cover and operated directly by thecrankshaft.A relief valve controls the system pressure.During the intake, the oil is filterd through a gauzefilter and later by a replaceable cartridge on the supplyline.A thermostatic valve fitted on the oil filter mountinghas the following function:- at a temperature of < 75°C, the oil passes directlyinto the oil filter cartridge and then to the engine;- at a temperature of > 90°C, the thermostaticvalve is open and allows the oil to pass into thecooling radiator to lower the temperature and ensurebetter lubrication.A main longitudinal duct in the cylinder block-/crankcase allows the lubrication of the crankshaft,the pistons and the connecting rods.A duct allows the lubrication of the cylinder headand all the engine timing system components.Two special pipes allow the lubrication of the turbocharger.1. Oil pump2. Oil pressure relief valve3. Float with gauze filter4. Oil filter cartridge5. Engine oil cooling radiator6. Thermostatic valve7. Main longitudinal duct8. Supply duct to the camshaft9. Supply pipe to the turbocharger10. Oil return pipe to the sump from the turbocharger11. Oil supply pipe from the thermostaticvalve to the radiator12. Oil return pipe from the radiator to thethermostatic valve13. Oil return to the sump14. Engine oil pressure warning light switchCopyright by Fiat Auto ::|-99 - Update 31
<strong>Bravo</strong>- <strong>Brava</strong> IP''«*'98 rangeBOSCH Ml.5.5 INTEGRATED INJECTION - IGNITION SYSTEMIntroductionOperating diagramDiagram showing information inputand outputs between cdritrol unit andBOSCH M1.5.5 injection-ignitionsystem sensors and actuators in theengine bay.- Location of BOSCH M1.5.5 injection-ignitionsystem components inthe engine baySYSTEMCONTROL STRATEGIES- injection management- Fiat-CODE anti-theft function managementIgnition managementEngine idle speed managementActivated carbon filter flushingmanagementClimate control system managementRadiator fan managementFAULT DIAGNOSISTester connection locationRecovery strategyELECTRIC/ELECTRONIC CIRCUIT- BOSCH M1.5.5 system control unitpin-out- BOSCH M1.5.5 system wiring diagramFuse and relay locationEngine speed and f DC sensor- Lambda sensorEngine coolant temperature sensorIntake air pressure and temperaturesensor . "Vehicle speed sensor- Power steering sensor- Knock sensorIgnition coilsINTAKE CIRCUITThrottle bodyEngine idle speed actuator andthrottle position sensorpage12345691012.121314151515161718182224252627272728293030FUEL FEED CIRCUITFuel circuit diagramFuel carrier assemblyFuel manifoldInjectorsSafety inertia switchEngineContents10.page313232333334EMISSION CONTROL DEVICES 35Catalytic converterEngine exhaust assembly diagramEvaporation control circuit diagramEvaporation control system componentsDiagram showing crankcase blowbygaS recirculationCHECKS, ADJUSTMENTS ANDREPAIRS TO THE BOSCH Ml.5.5SYSTEM- Checking emission levelsChecking engine idle speed- Checking ignition advanceFuel feed circuit testsFUEL CARRIER UNITRemoving-refittingFUEL MANIFOLD AND INJECTORS- Removing-refitting manifoldRemoving-refitting injectorsTHROTTLE BODYRemoving-refittingTHROTTLE CONTROL CABLEAdjustmentRemoving-refittingENGINE IDLE ADJUSMENTACTUATOR/THROTTLE POSITIONSENSORRemoving-refittingENGINE CONTROL UNIT- Removing-refitting353637384041414242434848494950515152525253535454Copyright Fiat Auto
EngineContents10.LAMBDA PROBE- Removing-refittingENGINE SPEED AND TDCSENSORRemoving-refittingChecking gappage5454545454<strong>Bravo</strong>-<strong>Brava</strong>'98 rangeCOPYRIGHT Fiat Auto S.p.A.Any reproduction of the text orillustrations isprohibited.The information contained in this publication issupplied as a guide and may no longer be upto date as a result of modifications made, bythe Manufacturer at any time for reasons of atechnical or commercial nature or to meet legalrequirements in different countries.Fiat Auto S.p.A.D.M.C.- M.D.S.Servizi al Cliente - Post VenditaLargo Senatore G. Agnelli, 5-10040 VolveraPrint n° 506.670/20 - March 1999 - 920Printed by Satiz S.p.A. -Turin (Italy)order n° "604.46.829*To - (Italy)Print n° 506.670/20
<strong>Bravo</strong>-<strong>Brava</strong> |S| **Engine98 range Fuel system10.BOSCH 1.5.5 INTEGRATED INJECTION/IGNITION SYSTEMIntroductionThe BOSCH 1.5.5 system fitted on the 1242 16v ie engine belongs to the category of static advance,digital, electronic ignition systems integrated with phased, intermittent type electronic fuel injectionsystems.The integrated system can be divided into the following sub systems:ELECTRICAL/ELECTRONIC CIRCUITAIR INTAKE CIRCUITFUEL SUPPLY CIRCUITEMISSION CONTROL DEVICESThe system is capable of detecting the following parameters by means of appropriate sensors:- the engine rotation speed;- the correct sequence of TDC in the explosion stroke for the cylinders (injection timing);- the absolute pressure in the inlet manifold;- the intake air temperature;- the position and the variation speed of the accelerator butterfly;- the temperature of the engine coolant;- the possible presence of detonation;- the speed of the vehicle;- the battery voltage;- the possible engagement of the air conditioning;- the possible end of travel of the power assisted steering.This information, usually in analogue format, is converted into digital signals by analogue/digital (A/D)converters so that they can be used by the control unit.The management programme (software) is stored in the control unit memory and consists of a series ofstrategies, each of which manages a precisely defined system control function.Through the use of the information (input) listed earlier, each strategy processes a series of parametersusing data maps stored in special areas of the control unit memory and then operates the system actuators(output), which consist of devices which allow the engine to operate, such as:- injectors;- ignition coil;- relay feeds;- implementation solenoid valves;- interface with the vehicle (diagnostic warning light, diagnostic instrument, etc.).NOTE The BOSCH 1.5.5 injection I ignition system does not require any adjustment as it is the self-adjustingtype.NOTE In the drawings and diagrams, the numbers indicate the corresponding engine control unit pins(number/A for connector A, number/B for connector B).Copyright by Fiat Auto 1
EngineFuel system10.<strong>Bravo</strong>-<strong>Brava</strong> ^98 range16vBOSCH 1.5.5 INJECTION/IGNITION SYSTEM FUNCTIONAL DIAGRAM1. Engine control unit2. Battery3. Ignition switch4. Engine control system relay5. Electric fuel pump relay7. Drip tray (including: electric pump, pressureregulator, filter, gauge)8. Inertia switch9. Radiator fan relay(s)10. Radiator fan13. Climate control connection14. CODE connection15. Diagnostic equipment connection16. Rev counter17. System failure light18. Speedometer19. Injectors20. Spark plugs21. Ignition22. Charcoal filter solenoid valve24. Lambda sensor25. Power assisted steering sensor26. Coolant temperature sensor27. Detonation sensor28. Engine idle adjustment actuator and butterflyposition sensor29. Engine rpm and TDC sensor30. Absolute pressure and air temperaturesensor2 Print no. 506.670/16
<strong>Bravo</strong>-<strong>Brava</strong> @» lev98 rangeEngineFuel system10.DIAGRAM SHOWING INFORMATION ENTERING/LEAVING THE CONTROL UNIT ANDBOSCH 1.5.5 INJECTION/IGNITION SYSTEM COMPONENTS/¥7i71. Engine control unit2. Battery3. Ignition switch4. Engine control system relay5. Electric fuel pump relay6. Electric fuel pump9. Radiator fan relay(s)10. Radiator fan11. Compressor engagement relay12. Compressor14. CODE control unit15. Diagnostic equipment connection16. Rev counter17. System failure light18. Speedometer19. Injectors20. Spark plugs21. Ignition22. Charcoal filter solenoid valve24. Lambda sensor25. Power assisted steering sensor26. Coolant temperature sensor27. Detonation sensor28. Engine idle adjustment actuator and butterflyposition sensor29. Engine rpm and TDC sensor30. Absolute pressure and air temperaturesensorCopyright by Fiat Auto 3
EngineFuel system10.<strong>Bravo</strong>-<strong>Brava</strong> ^98 range16vLOCATION OF BOSCH 1.5.5 INJECTION/IGNITION SYSTEM COMPONENTSIN THE ENGINE COMPARTMENT1. Engine control unit2. Battery4. Engine control system relay5. Electric fuel pump relay6. System fuse7. Electric pump fuse15. Diagnostic equipment connection19. Injectors20. Spark plugs21. Ignition22. Charcoal filter solenoid valve24. Lambda sensor25. Power assisted steering sensor26. Coolant temperature sensor27. Detonation sensor28. Engine idle adjustment actuator and butterflyposition sensor29. Engine rpm and TDC sensor30. Absolute pressure and air temperaturesensor31. Main fuses (maxi-fuse)4 Print no. 506.670/16
<strong>Bravo</strong>-<strong>Brava</strong> &| 16v98 rangeEngineFuel system10.SYSTEM MANAGEMENT STRATEGIESOperating principleAny engine operating point is identified by two parameters;- rotation speed;- engine load.If these parameters are known by means of appropriate processing it is possible to calculate and then implementthe injection (quantity of fuel supplied and timing with explosion stroke TDC), the ignition (correctignition advance) and any other functions for each engine operating point.In the BOSCH 1.5.5 system the rotation speed is measured directly via the relevant sensor whilst the engineload is determined indirectly, calculating "factor tl" (representing the actual engine load) accordintto the absolute pressure and the temperature of the air, both measured in the inlet manifold.Special maps are experimentally determined for the engine and the vehicle for the injection and the ignition,which (for a certain number of speed-load parameter pairs) contain the ignition advance and injectiontiming values required for the correct operation of the engine.For any engine operating point not exactly included in those stored in the maps, the values are determinedthrough mathematical interpolation from these figures.The injection time values calcluated are also corrected according to the signal coming from the Lambdasensor which, on the basis of suitable operating strategies, ensures that the mixture strength is constantlyaround the stoichiometric value.The system is known as the "speed-density-Lambda" type because the injection time is basically determinedfrom these three parameters.All the particular operating situations which require adjustments to the ignition advance and injectiontiming values calculated are managed by the engine control unit on the basis of the signals coming fromthe various system sensors.Management of the signalsNOTE These signals refer to the collection of signals coming from the sensor on the crankshaft whichare characterized by a precise sequence which the control unit is capable of recognizing.During starting, the control unit recognizes the ignition and the injection timing which are vital for thesubsequent operation of all the strategies.This recognition takes place in two successive stages:- by interpreting the succession of signals coming from the flywheel sensor, on the crankshaft, the controlunit recognizes TDC for the pair of cylinders 1-4.- using a particular strategy the control unit, by failing to operate a particular injector, is capable, byevaluating the consequent variation in speed (not perceptible to the driver) of recognizing whichcylinder the injector which is not operated belongs to and therefore of determining the correct cylindersequence (software timing).Copyright by Fiat Auto 5
EngineFuel system10.In particular/the signal is composed as follows.<strong>Bravo</strong>-<strong>Brava</strong> ig| 16v98 rangeThere are sixty teeth on the flywheel, two of which have been removed to create discontinuity: the anglebetween the two consecutive teeth is therefore 6°:The synchronism point is recognized at the end of the first tooth following the two missing teeth: the flywheelis fitted so that as the engine passes this tooth cylinders 1 and 4 are 17 teeth before TDC.1. Engine rpm and TDC sensor2. Gap3. Flywheel 60-2 teeth4. Signal corresponding to two missing teeth5. Flywheel signal (engine speed sensor)MANAGEMENT OF THE INJECTIONThe injection management strategies are designed to provide the engine with the. correct quantity of fuelat the desired moment according to the engine operating conditions.The management of the injection basically consists of calculating the injection time, determining the injectionphase and then the implementation by operating the injector.The "basic" injection time is calculated by means of mathematical interpolation of the speed-load map:the figures contained in the map, which have been obtained experimentally, also depend on the characteristicsof the injector.The "final" injection time "is determined by means of a calculation algorhythm in which the "basic" injectiontime is corrected by a series of coefficients which take into account the different engine operatingconditions which are highlighted by the various system sensors.6 Print no. 50&670/16
<strong>Bravo</strong>-<strong>Brava</strong> £pi **Engine98 range Fuel system10.Controlling the mixture strengthNOTEThe mixture strength is defined and the ratio is indicatd by the greek letter a (a/fa).quantity of air drawn in by the enginequantity of fuel injectedThe stoichiometric ratio is defined and the ratio is indicated by ost.theoretical quantity of air required to burn all the fuel injectedquantity of fuel injectedThe mixture strength is defined and the ratio is indicated by the greek letter X (lambda):quantity of air drawn in by the enginetheoretical quantity of air required to burn all the fuel injectedIt can easily be deduced that ast= X.The stoichiometric ratio depends on the type of fuel: for current unleaded petrol it is about 14.7 - 14.8and corresponds to a Lambda of 1:A mixture is called rich when the quantity of air is lower than the stoichiometric figure and in that casethe Lambda is X 1.The strategy is designed to correct the "basic" injection times so that the mixture strength constantly oscillatesat a high Hertz frequency:NOTE 1 Hz - 1 oscillation per secondIn- cut-off conditions,or- in full load engine conditions,or- with the engine cold (coolant and air temperature below around 20 °C)the strategy is disabled.Self-adjustmentThe control unit is equipped with a self-adjustment function which has the task of memorizing any differencesbetween the basic map and the corrections set by the Lambda sensor which occur repeatedlyduring operation. These differences (due to the ageing of the system and engine components) are permanentlystored in the memory, allowing the adjustment of the system operation to the gradual alterationsinthe engine and components compared to when they were new.The strategy is disabled during the opening of the charcoal filter solenoid valve.If the control unit is replaced, a road test must be carried out which allows the engine to reach operatingtemperature and the control unit to intervene (especially during stops whilst idling) imposing the self--adjustment function.Copyright by Fiat Auto
Engine <strong>Bravo</strong>-<strong>Brava</strong> j_pi i*Fuel system98 range10.Starting and operation when coldDuring cold starting the management of the injection is simultaneous (full-group), i.e. not phased: thissituation persists until the coolant reaches a certain temperature (about 0°C), after which the managementbecomes phased.Whist the starter motor is working the injection time is determined by a special map and depends on thetemperature of the coolant: once the engine has been startedup, the regular speed-load map is used forthe calculations.During operation when cold, since the mixture is naturally weakened as a result of the reduced evaporationand the strong condensation of the fuel on the internal walls of the inlet manifold, the "basic" injectiontime "is increased by a multiplication coefficient which depends on the engine temperature andspeed.Operation in full load conditionsThe strategy is enabled when the butterfly exceeds a certain level, which, in turn, depends on the enginespeed.In this situation the injection time is determined by a special map which depends on the engine load andspeed conditions.Operation in acceleration and deceleration conditionsThe acceleration and deceleration conditions are interpreted by the system as a trasition stage betweentwo conditions, setting off and arriving: this transition can be positive (acceleration) or negative (deceleration).The transition management strategy is very complex, having to take a large number of factors into account.In general, the injection time is increased for positive transitions and reduced for negative ones.The extent of the correct basically depends on the variation in the engine load: however, other factorssuch as the speed of movement of the butterfly, the engine speed, the gear engaged (obtained from theratio between the engine speed and the vehicle speed), the temperature of the engine (coolant and intakeair) which are interconnected also have an impact.The "basic" injection time is multiplied by a coefficient which is, in turn, the sum of two coefficients: thefirst takes into account the temperature of the engine and opening speed of the accelerator butterfly; thesecond depends on the engine rotation speed.In particular, if the increase in the injection time is feasible at an injector which has just closed, the controlunit reopens the injector (extra pulse), in order to compensate for the mixture strength extremelyquickly: thcsubsequent injections are already increased on the basis of the coefficients mentioned previously.Operation in cut off conditionsThe control unit enables the cut-off strategy when the temperature of the engine exceeds a certain level.The cut-off strategy is implemented when the control unit recognizes that the butterfly is in the minimumposition (signal from the butterfly potentiometer): it is disabled when the engine is cold to avoiddriveability problems.The engine supply is re-enabled when the butterfly is recognized to be in a non closed position or whenthe engine speed goes below a level which depends on the coolant temperature.8 Print no. 506.670/16
<strong>Bravo</strong>-<strong>Brava</strong> igjuevEngine98 range \ Fuel system10.Rotation speed restricterThis strategy restricts the maximum speed which can be reached by the engine enabling the cut-off.There are two different cut-off thresholds:- static restriction (the engine speed approaches the level slowly): maximum speed = 6670 [rpm];- dynamic restriction (the speed approaches the level rapidly): maximum speed = 6500 [rpm];Operation of electric fuel pumpThe electric fuel pump is operated by the engine control unit by means of a relay.The pump is stopped:- if the engine speed goes below 50 [rpm]- after a certain time (about 5 seconds) if the ignition key is in the ON position and the engine has notbeen started up (timed inhibition);- if the inertia switch has intervened.Operation of injectorsThe operation of the injectors is the sequential, phased type. However, during cold starting, the injectorsare operated in parallel up to a certain temperature.The timing of the injectors varies according to the engine speed.MANAGEMENT OF THE FIAT CODE ANTI-THEFT FUNCTIONThe system is equipped with an anti-theft function. This function is achieved through the presence of aspecial (FIAT CODE) control unit, capable of conversing with the engine control unit, and an electronickey equipped with a special transmitter for sending a recognition code.Each time the key is turned to the OFF position, the Fiat CODE system completely deactivates the enginecontrol unit.When the key is turned to the ON position the following operations take place in order:1. the engine control unit (whose memory contains a secret code) sends the FIAT CODE control unit arequest to send the secret code to deactivate the immobilization of the functions;2. the Fiat CODE control unit responds by only sending the secret code after having, in turn, receivedthe recognition code transmitted by the ignition key;3. the recognition of the secret code allows the immobilization of the engine, control unit to be deactivatedand normal operation resumed.NOTEIf a FIAT CODE anti-theft system is fitted, during the fault diagnosis, DO NOT CARRY OUT thetest using another engine control unit. In such a case, the Fiat CODE control unit would transferthe (-unrecognized) recognition code to the test control unit which could then no longer beused on other vehicles.Copyright by Fiat Auto 9
EngineFuel system10.<strong>Bravo</strong>-<strong>Brava</strong> igi i 6v98 rangeMANAGEMENT OF THE IGNITIONThe management of the ignition basically consists of determining the desired ignition advance accordingto the engine operating conditions and its implementation through the operation of the power transistorlocated inside the control unit.The "basic" advance value, calculated on the basis of the engine load and speed conditions, is then correctedaccording to the different engine operating conditions.The primary winding for each coil receives the battery voltage via the relay and is connected to the powertransistor incorporated in the engine control unit, whose transmitter is connected to earth, whilst basereceives the operating voltage from the control unit.According to the engine rotation speed and the ignition advance to be implemented, the engine controlunit establishes the moment for the start of the condution of the primary winding, in such a way as toreach the desired current intensity (saturation) in the primary winding immediately before this current isinterrupted.This moment obviously varies in terms of the angle in relation to TDC for the explosion stroke for eachcylinder and the greater the advance, the greater the engine rotation speed because the time required tosaturate the current in the coil primary winding is more or less constant: it is determined using suitablecoefficient stored in the memory (dwell management).The moement for the start of conduction is also corrected on the basis of the battery voltage.The engine control unit therefore determines the moment the current in the primary coil is interruptedtransforming the advance degrees into the time required by the engine to cover this angle: this time constitutesthe advance in relation to TDC for the explosion stroke with which the current is interrupted atthe base of the transistor.The moment the current at the base of the power transistor is interrupted, the connection to earth for theprimary coil is interrupted and consequently there is a high tension discharge at the secondary winding.10B 19BB!Q^&A%mT2IT© dO (GJ-U-LB^-&m28B 38B1R 2ji 3jn 4fl 6J-LTLTLTL 31. Engine rpm and TDC sensor and flywheel2. Control unit input signal3: Signal converter in the control unit (squarewave)4. Internal power module5. Coil6. Spark plugs10 Print no. 506.670/16
<strong>Bravo</strong>-<strong>Brava</strong>tiBkievEngine98 range Fuel system10.StartingDuring starting the normal management of the advance is not possible on account of the considerablefluctuations in the rotation speed which do not allow the dwell and the advance to be calculated correctly.The control unit implements a fixed advance for the entire time the engine is driven by the starter motor.Operation at high temperaturesThis strategy is enabled when the intake air temperature exceeds a certain level.The "basic" advance value is reduced according to this temperature.Operation in cut off conditionsThe injection advance is reduced on entry into cut-off: from the moment the supply of fuel is restored,the advance gradually returns to the "basic" value.Operation during take-offThis strategy is designed to reduce the advance when the vehicle moves off from a stationary position.-ARPMAOC'i>v +ARPMOperation with the engine idlingWhen the engine is idling, the management ofthe advance is implemented independently ofthe "basic" advance.The advance value during idling is corrected in amanner which is inversely proporational to thevariation in the speed in relation to the pre-setspeed which, in turn, depends on the temperatureof the coolant.In particular, the advance is increased if thespeed decreases and is decreased if the speedincreases, in order to ensure the stability of theactual speed.P4A12JJ01Aoc: correction of the ignition advance during idling+ A RPM: the speed during idling is higher than the nominal speed- ARPM: the speed during idling is lower than the nominal speedControl of the detonationThis strategy has the task of detecting the presence of the phenomenon of detonation, by processing thesignal coming from the relevant sensor. The strategy continuously compares the signal coming from thesensor with a threshold, which is, in turn, constantly updated, to take into account background noiseand the ageing of the engine.If the system recognizes the presence of detonation, the strategy reduces the ignition advance, in stepsof 3° up to a maximum of 9° until the phenomenon disappears. Later on, the advance is gradually restoredeither until the basic value is reached or until the phenomenon occurs again.The strategy also has a self-adjustment function which memorizes the reductions in the advance whichare continuously repeated to adapt the advance to the different conditions in which the engine finds itself(for example, the use of a low octane rating fuel). The strategy is capable of restoring the advance tothe map value if the conditions which caused the reduction no longer exist.Copyright by Fiat Auto 11
EngineFuel system10.MANAGEMENT OF THE ENGINE IDLE SPEED<strong>Bravo</strong>- <strong>Brava</strong> igiuev98 rangeThe general objective of this strategy is to keep the engine speed around the value memorized (enginewarm: 800 [rpm]) the position assumed by the butterfly depends on the engine speed and the vehiclespeed.- Starting.When the key is inserted, the butterfly assumes a position which depends on the temperature of the engineand the battery voltage (open-loop position).- Engine running and accelerator pedal released.The engine speed varies according to the temperature of the engine and is kept constant close to thisvalue by altering the position of the butterfly to compensate for any fluctuations in the speed.This takes place, in particular, when external loads are applied (power assisted steering, heated rearwindscreen, etc).If the air conditioning and the fans, both managed by the control unit, are switched on and the powerassisted steering is in the end of travel position, which is signalled by a switch, the strategy manages thebutterfly in advance of the engagement of the load.- Normal driving.Under these circumstances, the actuator is in the open-loop position.- Deceleration.In deceleration conditions outside of idling, the control unit controls the position of the butterflythrough a special (dash-pot) curve, in other words it slows down the return of the butterfly towards theclosed position; this produces a reduction in the braking effect of the engine.In addition, if the vehicle is in deceleration conditions, the information concerning its speed correlatedto the engine speed, makes it possible to manage the dash-pot effect in an optimum manner by adpatingit to the gear engaged.MANAGEMENT OF THE ACTIVE CHARCOAL FILTER SCAVENGINGThis strategy controls the position of the active charcoal filter solenoid valve in the following way:- during starting, the solenoid valve remains closed, preventing the fuel vapours from enriching the mixture;s- after cold starting, the solenoid valve remains closed for the entire time the engine is warmin up;- with the engine Warm, the control unit operates the solenoid valve in duty-cycle to control the quantityof fuel vapours sent to the inlet (scavenging of the charcoal filter), according to the engine speedand load conditions. In particular, the system alternates scavenging and non-scavenging periods: theself-adjustment function is activated during the latter, but disabled during the scavening stage.- in cut-off conditions, the solenoid valve remains closed.12 Print no. 506.670/16
<strong>Bravo</strong>-<strong>Brava</strong>^ievEngine98 range Fuel system10.MANAGEMENT OF THE CLIMATE CONTROL SYSTEMThe injection/ignition control unit is connected to the climate control system, because:1. it receives the request to switch on the compressor and operate the appropriate interventions (additionalair);2. it gives the go ahead to switch on the compressor when the conditions required by the strategies havebeen verified;3. it receives information on the state of the four stage pressure switch and operates the appropriate interventions(operation of the radiator fan).As far as point 1 is concerned, if the engine is idling, the control unit increases the air flow rate, alteringthe position of the butterfly in advance of the engagement of the compressor and conversely it returnsthe butterfly to its normal position after the compressor is switched off.The engine idle speed is also increased the entire time the compressor is activated (engine warm: 900[rpm].As far as point 2 is concerned, the control unit automatically operates the disengagement of the compressor:- for several seconds (timed disengagement):- in conditions where the engine power requirements are high (strong acceleration);- during vehicle take-off;- as long as the following critical conditions persist:- temperature of the engine coolant above a certain level (engine overheating);- engine speed below 700 rpm.Copyright by Fiat Auto 13
EngineFuel system10.<strong>Bravo</strong>-<strong>Brava</strong> igi 16v98 rangeMANAGEMENT OF THE RADIATOR FANNOTESince the coo/ant temperature is detected by the appropriate sensor there is no longer a thermalcontact on the radiator.The engine control unit operates the engagement of the radiator fan according to the temperature of thecoolant andwhether or not there is a climate control system.In the case of versions with climate control, there are two fan operating speeds, managed according todifferent logics, entirely independent of one another.- According to the coolant temperature.Low speed: this is switched on when the temperature of the coolant reaches Ti = 96.5 °C;high speed: this is switched on when the temperature of the coolant reaches T2 = 102 °C.The fan is switched off with a temperature hysteresis of around 3 °C.- According to the condition of the four stage pressure switch.Low speed: this is switched on when stage II of the pressure switch is triggered;high speed: this is switched on when stage III of the pressure switch is reached.TT2Lf 1/ l/ 1/ 1^^-*vT1^12/ T/ 1/ 1/ lX i0T\ \ / j1 1OFFi\ J ii v -^ iio ;i i !IIi2OFF! o ^ *"1 I |1 I! i 2 I :i I i1 ; ON ; |3OFFOFFONtwTi = 96.5 XT2 = 102 °CON: pressure switch activatedOFF: pressure switch deactivated1. Fan state. 0 = off1 = low speed2 = high speed2. Four stage pressure switch level II3. Four stage pressure switch level III4. Engine coolant temperature progress14 Print no. 506.670/76
<strong>Bravo</strong>-<strong>Brava</strong> ig| 16v98 rangeEngineFuel system10.DIAGNOSTICAThe system is equipped with an autodiagnostic function which is designed to verify an irregular state forthe following components:Actuatorsinjectorscoilscharcoal filter solenoid valveengine idle adjustment actuatorelectric fuel pump relayclimate control relays (if fitted)Sensorsengine speed sensorvehicle speed sensorLambda sensorbutterfly position sensorcoolant temperature sensordetonation sensorLocation of diagnostic connectorIf a fault is detected and confirmed, it is permanentlystored in the memory and the relevantsensor is excluded from the system until normaloperation has been restored.The detection of a confirmed fault usually involvesthe warning light in the dashboard corrjingon: it goes out when the fault conditions nolonger exist.NOTE During starting, the warning light is:- on for about 4 seconds,- off for 0.1 seconds;- kept on I off permanently according towhether or not "permanent" errors arepresent.Working with the diagnostic equipment, it is possible to carry out a complete fault diagnosis of the system,which consists of three stages:- display of a series of functional parameters (with the engine switched off or running);- display of the errors and their cancelling;- activation of certain actuators (active diagnosis).Recovery strategyIf a fault is detected with the sensors/actuators, the control unit, where possible, replaces the missing information,reconstructing it using software (recovery) to allow the opertion of the engine.Copyright by Fiat Auto 15
EngineFuel system10.<strong>Bravo</strong>-<strong>Brava</strong> ig| 16v98 rangeELECTRICAL/ELECTRONIC CIRCUITWiringThe system has two distinct sets of wiring forthe control unit connectors: the engine sidewiring (B) which connects the componentsfitted on the engine to the engine control unitand the vehicle side wiring (A) which connectsthe other components to the controlunit and constitutes the interface with the vehiclewiring.vehicle side wiring (A)supply from the batterysupply from the ignition switchfusessystem relay feedsradiator fan relay(s)climate control compressor relay (if fitted)CODE control unit connectioncontrol panel connectiondiagnostic equipmentengine side wiring (B)engine speed sensorabsolute pressure and air temperature sensorcoolant temperature sensordetonation sensorLambda sensorpower assisted steering end of travel sensorinjectorsidle speed actuator/butterfly position sensorignitioncharcoal filter solenoid valveLayout of system earth pointsIn order to increase electro-magnetic compatibilityand operational reliability, specialcare has been taken over the number and thelocation of the earth points, as can be seenthe diagram:- main earth directly on the battery negative;- engine control system earth on the cylinderblock/crankcase near the detonation sensor.16 Print no. 506.670/16
<strong>Bravo</strong>-<strong>Brava</strong>98 rangelevBOSCH 1.5.5 SYSTEM CONTROL UNIT PIN-OUTEngineFuel system10.Connector B (engine side)1 Sensors earth2 Detonation sensor signal3 Intake air temperature sensor signal4 Butterfly position sensor signal5 Coolant temperature sensor signal6 Operation of injector for cylinder 17 Operation of injector for cylinder 48 Operation of Lanbda sensor heater9 N.c.10 Operation of coil for cylinders 2/311 Detonation sensor earth12 Absolute pressure sensor signal13 Butterfly position sensor signal14 N.c.15 N.c.16 Operation of injector for cylinder 317 Operation of injector for cylinder 218 N.c.19 Operation of coil for cylinders 2/320 N.c.21 Lambda sensor earth22 Engine speed sensor positive23 N.c.24 N.c.25 N.c.26 Operation of idle speed actuator27 N.c.28 Operation of coil for cylinders 1/429 Sensor supply30 Lambda sensor signal31 N.c.32 Engine speed sensor negative33 N.c.34 Operation of charcoal filter solenoid valve35 Operation of idle speed actuator36 N.c.37 N.c.38 Operation of coil for cylinders 1/4Connector A (vehicle side)1 N.c.2 Operation of rev counter3 Operation of fuel pump relay4 Operation of high speed fan relay5 N.c.6 N.c.7 Control unit supply from relay (+30)8 Engine started signal (from ignition switch)9 Operation of engine control system relay10 N.c.11 Line K12 Operation of system failure light13 Operation of low speed fan relay14 N.c.15 N.c.16 CODE connection17 Control unit supply from relay (+30)18 Control unit supply (+30)19 Operation of compressor relay (if fitted)20 N.c.21 N.c.22 Power assisted steering sensor signal23 N.c.24 N.c.25 N.c.26 N.c.27 Vehicle speed sensor signal28 N.c.29 N.c.30 N.c.31 Operation of compressor engagement32 N.c.33 N.c.34 Four stage thermostat signal (if fitted)35 Four stage thermostat signal (if fitted)36 N.c.37 N.c.38 N.c.Copyright by Fiat Auto 17
EngineFuel system10.<strong>Bravo</strong>-<strong>Brava</strong> ^16v98 rangeBOSCH 1.5.5 SYSTEM WIRING DIAGRAMConnector A (vehicle side)1 2 3 4 5 i 1 8 9 It 11 12 13 14 15 It 17 IB 19 X7 mmmmmwmmwmwmwe[] [] [] []c ■9A/\'0z>LZj10li002KJ0i^oO£)■© O£)eOOoe£)o eo€)O Qo oe eooo# 121314L H ^18 Print no. 506.670/16
<strong>Bravo</strong>-<strong>Brava</strong> igji ievEngine98 range Fuel system10.1. Control unit2. Radiator fan3. Electric fan high speed relay4. Electric fan low speed relay5. Engine control system relay6. Fuel pump relay7. Front cable connection8. Battery9. Ignition switch10. Inertia switch11. Electric fuel pump12. Air conditioning control unit (on button)13. Four stage pressure switch14. Compressor relayA. 30AfuseB. 40AfuseC. 40AfuseD. 7.5AfuseE. 7.5A fuseF. 7.5A fuseG. 7.5AfuseH. 15AfuseL 15AfuseBosch 1.5.5 system wiring diagram keyConnector A (vehicle side)Copyright by Fiat Auto 19
EngineFuel system10.<strong>Bravo</strong>-<strong>Brava</strong> igi **98 rangeBOSCH 1.5.5 SYSTEM WIRING DIAGRAMConnector B (engine side)srt\1 2 3 4 5 i 7 8 9 10 II 12 13 14 15 16 17 II 19 ait)i)iJ«)iil|iiiii>!)W>»i)II)«)i)IDl»)a)«'lt'JL■^3 ~J-S>5tlt^56GU oGGGOOGGG°G29GO GOOOGG GOO OQQ€IT~ ^**t.i 8mk:1 V3 12I(Mi(M)fil1120 Print no. 506.670/16
<strong>Bravo</strong>-<strong>Brava</strong>^ievEngine98 range Fuel system10.Bosch 1.5.5 system wiring diagram keyConnector B (engine side)1. Control unit2. Active charcoal filter solenoid valve3. Detonation sensor4. Coolant temperature sensor5. Engine idle adjustment actuator/butterfly position sensor6. Absolute pressure and air temperature sensor7. Front cable connection8. Lambda sensor9. Engine speed sensor10. Coil11. Injector sectionCopyright by Fiat Auto 21
EngineFuel system10.<strong>Bravo</strong>-<strong>Brava</strong> iggi 16v98 rangeLOCATION OF FUSES AND RELAYSNOTEFor more information, see Group55-Electrical equipmentMain fuses (maxi-fuse)A. System fuseB. Fuse controlled by the ignition22 Print no. 506.670/16
<strong>Bravo</strong>-<strong>Brava</strong> |p lev98 rangeENGINE RPM AND TDC SENSOREngineFuel system10.The engine rpm and TDC sensor (1) is fixedto the cylinder block/crankcase and is facingthe flywheel on the crankshaft pulley.Operating principleThe sensor consists of a tubular casing (1)containing a permanent magnet (3) and anelectrical winding (2). As a result of passingthe flywheel teeth, the magnetic flow producedby the magnet (3) oscillations accordingto the variation in the gap.These oscillations create an electro-motiveforce in the winding (2) producing an alternatelypositive voltage (tooth facing the sensor)and negative voltage (gap facing thesensor). The peak sensor output voltage depends,all other factors being equal, on thedistance between the sensor and the tooth(gap).I_n1 2-JT_3IWiring connector1 i32B-22BThe sensor resistance can be measured bydisconnecting the connector and connectingand ohmmeter to the sensor.Resistance: 9600+10% ohm at 20 CCopyright by Fiat Auto 23
EngineFuel system10.<strong>Bravo</strong>-<strong>Brava</strong> )§i lev98 rangemV11000-800-600-400-200-0 -0,995 *•" ^1\l,UUO1 l fl l l i i i i »■0,7 0,8 0,9 1,0 1,1 1,2 1,3LAMBDA SENSORThe Lambda sensor measures the oxygencontent in the exhaust gases: it is fitted on theexhaust pipe upstream of the catalytic silencer.The sensor output signal is sent to the controlunit for fee-back correction of the mixturestrength.When the sensor provides a low signal (voltagebelow 200 mV), the control unit recognizesa lean mixture and increases the injectiontime; later, when the sensor signal is high(voltage above 800 mV), the control unit recognizesa rich mixture and decreases the injectiontime.This sequence is repeated at a frequency inorder of tens of Hertz so that the engine constantlyoperates with a mixture strength closeto the stoichiometric ratio.For temperatures below 300 °C, the ceramicmaterial is not activated, therefore the sensordoes not send plausible signals: to ensurerapid heating during starting and maintainthe temperature during idling, the sensor isfitted with a heater with the electrical resistancealways switched on.The sensor can rapidly be put out ofaction by the presence of even slightamounts of lead in the fuel.X=1 Ideal mixture (stoichiometric)A. 1 Lean mixtureExcess air; the CO values tend to be lowX 1 Rich mixtureLack of air; the CO values tend to be highWiring connectorThe sensor heater resistance can be measuredby disconnecting the connector andconnecting an ohmmeter as shown in the diagram.Resistance: 4.5+0.5 ohm at 20 °C24 Print no. 506.670/16
<strong>Bravo</strong>- <strong>Brava</strong> & lev1998 rangeENGINESENSORCOOLANTEngineFuel system10.TEMPERATUREINJECTION NTCc-20-10010202530Q15970962059753816250020441679°C405060708090100Q1150807576418309231176NTCINS1 ■RUMENTC8090100110120Q300.8-313.2226.3-234.1172-177132.9-136.1103.6-106.6This sensor is fitted on the thermostat.It is made up of brass casing which affordsprotection for the actual resistive elementsconsisting of two NTC (Negative TemperatureCoefficient) type thermistors whose electricalresistance decreases as the temperature increases).The two thermistors are separate and provideinformation concerning the temperature to theinstrument panel (A) and the engine managementcontrol unit (B), respectively.The reference voltage for the latter is 5 Volt:since the control unit intake circuit is designedas a voltage divider, the reference voltage isshared between a resistance in the control unitand the actual sensor.As a result, the control unit is capable ofevaluating the variations in the sensor resistancethrough the changes in voltage, therebyobtaining information concerning the temperature.The table shows the progress of the sensor,which can be measured by disconnecting theconnector and connecting an ohmmeter as illustratedin the diagram.
EngineFuel system10.t / /S ^~ ~-S==^<strong>Bravo</strong>- <strong>Brava</strong> © ^1998 rangeINTAKE AIR PRESSURE AND TEMPERATURE SENSORThe intake air pressure and temperature sensoris an integrated component that measurespressure and temperature inside the inletmanifold. The injection control unit uses bothitems of information to define the amount ofair taken in by the engine. This information isthen used to compute injection time and ignitionpoint. The sensor is fitted on the intakemanifold.^\ / / /Temperature (°C)-40-20010203040506080100Resistance (M)52600-3870017500-135006500-53004200-34002700-23001850-15501300-1050920-750650-530360-290210-160Connector wiringChecking the resistanceThe table shows resistance values that thetemperature sensor (NTC thermistor) may assumeas temperature changes. These valuesmay be measured by connecting an ohmmeteras shown in the diagram.26 Publication n° 506.670/21
<strong>Bravo</strong>-<strong>Brava</strong> igji 16v98 rangeVEHICLE SPEED SENSOREngineFuel system10.This sensor is positioned at the differentialoutput, by the left driveshaft coupling andtransmits information concerning the vehiclespeed to the speedometer: the signal is thensent to the engine control unit.The sensor is the Hall effect type and is calibratedso that a given distance correspondsto each impulse: it is therefore possible to determinethe speed of the vehicle on the basisof the frequency of the impulses.POWER ASSISTED STEERING SENSORThis sensor, fitted on the pump outlet highpressure pipe, consists of a pressure switchwhich closes when the hydraulic pressureexceeds a set value corresponding to thesteering in the end of travel position: the informationis used to managing the idle speedcontrol actuator in advance of the absorptionof power due to the steering.DETONATION SENSORThis is a piezoelectric type sensor fitted onthe cylinder block/crankcase, symmetrical inrelation to the pairs of cylinders 1 -2 and 3-4.This position is determined by the need todetect the onset of detonation in the sameway in all cylinders.When the engine is knocking, vibrations of aparticular frequency are produced in thecylinder block/crankcase which are transformed,by the sensor, into a voltage signalwhich is proportional to their intensity.11BP4A27JJ04Wiring connectorCopyright by Fiat Auto 27
EngineFuel system10.<strong>Bravo</strong>-<strong>Brava</strong> @t 16v98 rangeIGNITION COILSThe ignition circuit is the inductive discharge,static advance type where the high tension isprovided from two twin outlet coils fitted atthe side of the cylinder head.The coils used are the closed magnetic circuittype with the windings in a plastic containerimmersed in epoxide resin. Each coil is connectedto the two spark plugs by means ofhigh tension leads with dielectric properties.In this type of coil the current in the secondarywinding (discharge current) alwayshas the same polarity: therefore one end ofthe circuit has a positive potential and theother a negative potential.This implies that the discharge current in thesecondary winding always flows in the samedirection and therefore the sparks for the twocylinders connected to the coil strike In theopposite way:- in the spark plug with the positive centreelectrode the spark strikes from the earthelectrode towards the centre one;- in the spark plug with the negative centreelectrode the spark strikes from the centreelectrode towards the earth one.As a result the wear of the electrodes betweenthe two spark plugs in question is different.Since the intensity of the spark depends onthe resistance between the electrodes (dielectric),whilst the spark in the cylinder inthe cross-over stage is weak (lost spark), atalsmot atmospheric pressure in the cylinderat the end of the compression stroke, thespark is intense (working spark) by virtue ofthe high pressure in the chamber.J_n1 2n_3LIT—l10B19B28B38BWiring connector28 Print no. 506.670/16
<strong>Bravo</strong>-<strong>Brava</strong> igi ±G VEngine98 range Fuel system10.INTAKE CIRCUITThis consists of the various components which ensure that the air flow rate required by the engine iscorrectly directed in different operating conditions.P4A29JJ011. Inlet vent2. Air filter3. Resonator4. Engine idle speed adjustment actuator and butterfly position sensor5. Butterfly casing6. Inlet manifoldCopyright by Fiat Auto 29
EngineFuel system10.<strong>Bravo</strong>-<strong>Brava</strong> igi lev98 rangeBUTTERFLY CASING1. accelerator control lever2. idle speed adjustment actuator and butterflyposition sensor3. accelerator cable adjustment bracket4. anti-tamper screwThe butterfly casing has the task of meteringthe quantity of air drawn in by the engine(and consequently the power developed) accordingto the driver's request via the accelerator.The butterfly casing is fixed to the inlet manifold:the butterfly is opened by means of alever which has a gradual opeing law (smallbutterfly opening angles for a good part ofthe accelerator pedal travel and greater anglesin the last part of the travel.With the pedal completely released (enginedecelerating or idling) the position of thebutterfly is regulated by the engine idle adjustmentactuator in order to be able to supplythe additional air required according tothe engine conditions. The actuator also includesthe butterfly position sensor.ENGINE IDLE SPEED ACTUATOR AAANDBUTTERFLY POSITION SENSORThe actuator, fitted on the butterfly casing,consists of a direct current motor operated bya circuit inside the engine control unit whichregulates the position of the butterfly: it hasthe task of ensuring the additional air for theengine with the accelerator pedal released,under all circumstances when necessary(idling, deceleration, external loads applied).The maximum actuator opening angle isaround 30°.The actuator contains a twin track potentiometer:- the first track goes from the closed positionto 30° and is used to control the butterflywith the accelerator pedal released;- the second track goes from the closed positionto the maximum butterfly openingposition and is used for the normal enginemanagement.Wiring connector30 Print no. 506.670/16
<strong>Bravo</strong>-<strong>Brava</strong> @t **Engine98 range Fuel system10.FUEL SUPPLY CIRCUITThis circuit consists of the following components:- Fuel tank- Drip tray complete with pump, filter, pressure regulator and gauge- Supply pipe- Returnless type fuel manifold complete with injectorsFUEL CIRCUIT DIAGRAM1. Air bleed connector2. Injectors connector3. Supply pipe4. Tank filler pipe5. Drip tray complete with pump, filter, pressure regulator and gauge6. Fuel tankCopyright by Fiat Auto 31
EngineFuel system10.<strong>Bravo</strong>-<strong>Brava</strong> gty 16v98 rangeFUEL DRIP TRAYASSEMBLYElectric fuel pumpThe pump is housed insde the fuel tank on aspecial drip tray which also supports the fuelgauge and it has a filter on the pump inlet.The pressure regulator is fitted on the pumpsupply.The pump is the single stage peripheral flowtype and is designed to run on unleaded fuel.The rotor is moved by a d.c. electric motorsupplied by a relay and controlled by thecontrol unit to ensure:- that the pump cuts out if the engine speedgoes below a minimum level;- timed operation (about 5 seconds) eachtime the ignition key is turned to the ONpsition, even if the engine is not started up;- operation with the engine started up.1. Electric fuel pump2. Fuel filter3. Fuel gauge with float4. Pressure regulator5. Gauze pre-filterThe pump is fitted with an excess pressurevalve which short circuits the supply with theinlet if the pressure in the supply circuit exceedsaround 5 bar to prevent the electricmotor from overheating.In addition, a one-way valve in the supply,prevents the entire fuel circuit from beingdrained when the pump is not working.Fuel filterThe fuel filter is in the housing surroundingthe pump and does not require periodic replacement.Fuel pressure regulatorThis is a differential, diaphragm device, adjustedduring manufacture to a pressure of3.50±0.05 bar and located in the top part ofthe drip tray.The fuel, under pressure (1), coming from thepump, exerts force on the valve (3), opposedby the calibrated spring (2). When the setpressure is overcome, the valve opens and theexcess fuel (4) returns to the tank, thereby stabilizingthe pressure in the circuit.32 Print no. 506.670/16
<strong>Bravo</strong>-<strong>Brava</strong> lopi 16v98 rangeFUEL MANIFOLDEngineFuel system10.The fuel manifold, which has the task of distributingthe fuel to the injectors, is madefrom die-cast aluminium and incorporatesthe housings for the injectors and the airbleed valve.The fuel inlet has a rapid attachment. Sincethe system is the returnless type, there is norecirculation pipe.1. Fuel manifold2. Injectors3. Fuel supply connector4. Bleed valveINJECTORSThe injectors have the task of supplying theamount of fuel required for the operation ofthe engine: the fuel is injected into the inletduct, immediately upstream of the inlet valve.The injectors are the top-feed type and thereis an electrical winding connected to theconnector (3) terminals.I1 2LWhen the current passes through the winding,the magnetic field which is created attractsthe shutter causing the opening of theinjector and the flow of fuel.There are two seals on the fuel manifold side(1) and the inlet manifold side (2).A reference (4) determines the angular positionof the injector and the correct position ofthe jets in relation to the inlet valves.+ —6B17B16B 7BWiring connectorThe injector resistance can be measured bydisconnecting the connector and connectingan ohmmeter as shown in the diagram.a(r r 5TOP-^li^^ 'yiResistance value: 14.5±5% ohm.Copyright by Fiat Auto 33
EngineFuel system10.cNC NA Cr^gVDiI NCX NA\I ^ jINERTIA SAFETY SWITCH<strong>Bravo</strong>-<strong>Brava</strong> l$i 16v98 rangeThe inertia switch has the task of interruptingthe electrical supply for the electric fuel pumpif the vehicle is subject to violent deceleration(an impact) to prevent the fuel from comingout and causing the vehicle to catch fire incase the fuel manifold or the supply pipe isdamaged.The switch consists of a steel ball in a conicalshaped housing which is kept in position bythe attraction force of a permanent magnet.The ball can be released from the magneticclip, due to the action of the accelerationfrom the inertia forces, and gradually comeout of the conical housing with an upwardsmovement which depends on the angle ofthe cone.There is a rapid release mechanism whichforms a normally closed (NC) circuit. Whenit is struck by the ball, the mechanismchanges position into a normally open (NA)circuit, thereby interrupting the electricalsupply to the electricpump and causing it tocut out.The calibration of the switch causes it to interveneat acceleration above 1.2 g (approx11.7 m/s2, corresponding to an impact at aspeed of around 25 kph).To restore the connection to earth for theauxiliary electric pump, move the seat backwardsand press the switch until the click isheard.After even an apparently slight impact, if there is a smell of fuel or there are noticeable leaks fromthe fuel system, do not turn the switch back on, but search for the cause of the problem andeliminate it to avoid fire hazards.If this is not the case and there are no leaks and the vehicle is ready to be driven again, press thebutton to reactivate the electric pump.34 Print no. 506.670/16
<strong>Bravo</strong>-<strong>Brava</strong> £p i 6vEngine98 range Fuel system10.EMISSION CONTROL DEVICESThe devices used for this purpose have two aims:- to keep down the levels of pollutant substances in the exhaust, through the catalytic silencer;- to eliminate the dispersion towards the outside of unburnt hydrocarbons, through the (fuel) anti-evaporationsystem and the (lubricant) oil vapour recirculation system.CATALYTIC SILENCERThe catalytic silencer is a device which makes it possible to simultaneously keep down the levels of thethree main pollutants in the exhaust: unburnt hydrocarbons (HC), carbon monoxide (CO) and nitrogenoxide (NOx).Two types of chemical reaction take place inside the catalyzer:- oxidation of the CO and the HC, converted into carbon dioxide (CO2) and water (H2O);- reduction of the NOx, converted into Nitrogen (N2).These reactions can take place extremely quickly thanks to the presence, inside the catalyzer structure(ceramic support), of a layer of active substances (platinum and rhodium) which greatly accelerate theconversion speed of the harmful substances.The effectiveness of this conversion process is, however, affected by the fact that the mixture strengthwith which the engine is operating is constantly oscillating around the stoichiometric value, which isachieved thanks to the feed-back control carried out by the control unit on the basis of the Lambda sensor.Lastly, the conversion processes are activated at temperatures in excess of 300-350 °C: it is therefore vitalfor the catalyzer to reach this temperature as quickly as possible in order to work properly.1. Ceramic monolith2. Metal support3. Steel outer casingP4A35JJ01m0When work has to done near the catalytic silencer, the vehicle should be left to rest for some timebecause the operating temperature (inside) the catalyzer is between 500 and 850 °C.There are basically two things which destroy the inside of the catalyzer:- the presence of lead in the fuel, which lowers the degree of conversion to practically nil ("leadpoisoning") and also irreparably damages the Lambda sensor;- the presence of completely unburnt fuel in the exhaust gases, due to failed ignition, whichcauses an increase in temperature which melts the ceramic support. Consequently, the highttension leads should not be disconnected with the engine running for any reason: in the caseof tests, the silencer should be replaced with an equivalent section of pipe.Copyright by Fiat Auto 35
EngineFuel system10.ENGINE EXHAUST ASSEMBLY DIAGRAM<strong>Bravo</strong>-<strong>Brava</strong> @ i 6v98 rangeKey1. Lambda sensor2. Exhaust manifold3. Catalytic silencer4. Silencer5. CO intake36 Print no. 506.670/16
<strong>Bravo</strong>-Btava leg* 16v98 rangeDIAGRAM SHOWING ANTI-EVAPORATION CIRCUITEngineFuel system10.The anti-evaporation system is designed to prevent the fuel vapours, consisting of the lightest particlesof hydrocarbons which form in the tank from being discharged into the atmosphere.1. vapour supply pipe to the butterfly casing2. Charcoal filter solenoid valve3. Charcoal filter4. Vapour supply pipe from the tank to thecharcoal filter5. Safety and ventilation valve6. Multi-purpose valve7. Tank8. Injection/ignition control unitCopyright by Fiat Auto 37
Engine<strong>Bravo</strong>- <strong>Brava</strong> @ii 6 vFuel system ■■_ '_ 98 range10.ANTI-EVAPORATION SYSTEM COMPONENTSMulti-purpose valveThis valve is used to carry out various functions, namely:- to prevent the flow of liquid fuel if the tank is too full or if the vehicle overturns in the case of an accident.- to allow the breathing of the fuel vapours towards the active charcoal filter;- to allow the ventilation of the tank if there is a vacuum inside.The valve consists of a float body (2), a heavy ball (3), a plate thrust against the valve body by a spring(5) and a shim (8) thrust against the plate (4) by the spring (9). The operation of the multi-purposevalve can be summed up in the following cases, depending on how full the fuel tank is:a. if the tank is full, the float (2) shutters the port (1) preventing the liquid fuel from reaching the activecharcoal filter preventing it from being damaged;b. jf the level of the fuel in the tank decreases, the float (2) goes down and rests on the ball (3) openingthe port (1); when the pressure exerted by the fuel vapours on the plate (4) overcomes thespring (5) loading, a ring section opens between the actual plate and the valve body, allowing thefuel vapours to come out of the duct (6) and reach the active charcoal filter;P4A42IJ01 -02c. if the level of the fuel in the tank decreases to such an extent as to produce a vacuum inside the tank,this acts on the shim (8) and, overcoming the spring (9) loading, recalls it downwards allowing theventilation of the tank through the port (7).d. if the vehicle overturns, irrespective of how full the tank is, the ball (3), weighing down on the float(2), pushes it against the port (1) preventing the escape of fuel which would be dangerous and cre :ate a fire hazard.P4A42IJ03-0438 Print no. 506.670/16
<strong>Bravo</strong>-<strong>Brava</strong> ig| 16v98 rangeEngineFuel system10./ \Safety and ventilation valveThis valve is located in the fuel filler cap and,depending on the pressure in the tank, carriesout the following functions:- When the pressure inside the fuel tank exceeds0.13 - 0.18 bar, it allows the excessvapours to be discharged outwards (safetyfunction).- If, conversely, there is a vacuum of 0.020 -0.030 bar in the tank, it allows the intake ofair (ventilation function).UT 1^5—3 ?4 '"6 y1—J—1Charcoal filterThe charcoal filter is located in the rightwheel arch; to gain access to it, remove therear part of the right front wheel arch liner.It consists of granules of charcoal (4) whichtrap the petrol vapours entering through theintake (5).The scavenging air which enters through theintake (1), through the paper filter (3),comes into contact with the granules and directsthem towards the outlet (2) and fromthere towards the cut-out valve.The air, having entered through the intake(5), can also be recalled by the vacuum in thetank to ventilate the actual tank. The partition(6) ensures that the air drawn in comesinto contact with all the granules of charcoalassisting the release of petrol vapours towardsthe inlet manifold.There are also two springs (7) which allowthe mass of granules to expand when thepressure increases.7 —T So o olio • o «MiCopyright by Fiat Auto 39
EngineFuel system10.<strong>Bravo</strong>-<strong>Brava</strong> I0i 16v98 rangeCharcoal filter solenoid valveThe function of this valve is to control thequantity of fuel vapours drawn in by the activecharcoal filter and directed to the inletmanifold by means of the injection/ignitionelectronic control unit.If this valve has no supply, it is closed, preventingthe fuel vapours from excessively enrichingthe mixture.T. Inlet connector2. One-way valve3. Spring4. Shutter5. Outlet opening6. Solenoid valve7. Outlet connectorWiring connectorDIAGRAM SHOWING RECIRCULATIONOF GASES COMING FROM THE ENGINECRANKCASE (BLOW-BY)This system controls the emission, from thecylinder block/crankcase, of the breathergases made up of air/petrol mixtures andburnt gases which escape through the pistonring seals, in addition to the lubricant oilvapours, recirculating them to the inlet.With the accelerator butterfly open, the gasesfrom the upper cover reach the main air intakepipe through the pipe (1) which contains aspark-out (5) to prevent combustion due toflame returns from the butterfly casing (2).With the accelerator butterfly closed (engineidling), the vacuum in the inlet manifolddraws in the gases (in limited quantities) directlythrough the small pipe (4) and the calibratedport (3).40 Print no. 506.670/76
<strong>Bravo</strong>-<strong>Brava</strong> @i ±6 VEngine98 range Fuel system10.CHECKS, ADJUSTMENTS AND REPAIR OPERATIONS ON THE BOSCH 1.5.5 SYSTEMThe following precautions should be observed when working on a vehicle equipped with theBosch 7.5.5 system:- do not start up the engine when the electrical connectot terminals are badly connected orslack at the battery poles;- do not use a rapid battery charger to start the engine;- never disconnect the battery from the electrical system with the engine running;- in order to charge the battery it must be disconnected first from the electrical equipment;- if the vehicle goes in a drying oven after painting at temperatures in excess of 80 °C, it is necessaryto remove the engien control unit from the vehicle;- do not connect/disconnect the control unit multiple connectors with the ignition switch in theON position;- always disconnect the negative battery lead before carrying out electrical welding on the vehicle.The system has a memory which is directly supplied by the battery, even with the ignition switchedoff, where the self-adjustment values are stored. Disconnecting the battery will involve theloss of this information which can only be learnt once again after a certain period: this operationshould therefore be limited as far as possible.CHECKING EMISSIONS CONCENTRATIONThis system manages the advance, the carbon monoxide (CO) content and the idle air flow rate with nopossibility for manual adjustment. However, a check on the content of the exhaust gases upstream anddownstream of the catalyzer can provide useful indications on the injection/ignition system operatingconditions, the engine parameters or the catalyzer.Checking idle concentration of CO and HC upstream of the catalytic silencerTo check the concentration of carbon monoxide (CO) and unburnt hydrocarbons (HC) upstream of thecatalyzer, proceed as follows:1. Undo the cap located on the exhaust pipe, upstream of the catalyzer, and tighten the tool in itspla ce.2. Connect a suitably calibrated CO-tester to the tool.3. Start up the engine and let it reach operating temperature.4. Check that the engine speed is correct.5. Check that the idle concentration of CO is within the recommended values (see table); if this isnotthe case, check:- that the Lambda sensor is working properly, using the diagnostic equipment;- for the presence of air penetration in the area surrounding the Lambda sensor housing;- the injection and ignition system (in particular the state of wear of the spark plugs).6. In the same conditions, check that the HC concentration is below 500 p.p.m.7. If these values are not found, tune the engine, paying particular attention to:- the valve gear timing;- the engine compression.Copyright by Fiat Auto 41
EngineFuel system10.<strong>Bravo</strong>-<strong>Brava</strong> @» i 6v98 rangeP4A42JJ01Table summarizing pollutant emission tolerance valuesCO (%)HC (p.p.m.)C02 (%)Upstream of the catalyzer0,4-1^ 500> 12Downstream of the catalyzer< 0,35< 90^ 13Checking concentration of CO and HC at the exhaustThe exhaust concentration of carbon monoxide (CO) and unburnt hydrocarbons (HC) is measured byinserting a suitably calibrated tester sensor at least 30 cm into the end of the exhaust pipe.1. Check that the idle CO and HC concentrations correspond to the recommended figures (see table).2. If the HC value is outside of the recommended limit, whilst that measured previously upstream of thecatalyzer was correct, the engine parameters are correct and the cause of the problem should thereforebe sought in the decreased efficiency of the catalyzer.CHECKING ENGINE IDLE SPEEDIf the engine idle speed does not correspond with the one recommended, as the system is the self-adjustingtype no adjustments can be carried out. It is therefore necessary to check that the acceleratorlinkage is correctly adjusted and the cause of the problem should be sought by carrying out a completefault diagnosis using the diagnostic equipment.IGNITION ADVANCE CHECKThe diagnostic equipment must be used to check the ignition advance angles at the different speed.42 Print no. 506.670/16
<strong>Bravo</strong>-<strong>Brava</strong> iffit 16v98 rangeCHECKS ON THEFUEL SUPPLY CIRCUITEngineFuel system10.THESE OPERATIONS SHOULD BECARRIED OUT IN THE PRESENCEOF A SUITABLE VAPOUR PURIFICATION AND EXHAUST SYSTEM.Checking the fuel supply circuit pressureCheck the supply pressure and the seal of thefuel supply system following the instructionsgiven below using equipment 1860955000,fitted with two adaptors which should bemade as described below:BS- adaptor (A): use a new type rapid attachmentfemale terminal and a length of pipecontained in Kit no. 1860955003 and anold type rapid attachment male terminalcontained in Kit no. 1860955001;- adaptor (B): use a new type rapid attachmentmale terminal and a length of pipecontained in Kit no. 1860955003 and anold type rapid attachment male terminalcontained in Kit no. 1860955001;Configure the adaptors as illustrated in thediagram.The arrow indicates the the side to insertin the test equipment 1860955000(pressure gauge)Discharging the fuel pressure in the supply circuitThe fuel supply circuit is kept at a constant pressure of about 3.2 bar even with the engine switched off;therefore before carrying out any operations on the supply pipe, the pressure in the system must be discharged,using adaptor no. 1870684000 and a special container to collect the excess fuel in.Proceed as described below:- Remove the protective cover from the attachment on the fuel manifold;- introduce the male end of the adaptor into the container and fitthe rapid connector on the attachmenton the fuel manifold, as illustrated in the diagram; in this way the small amount of excess fuel, whichcreates pressure, is discharged into the container and it is therefore possible to carry out the checks onthe fuel supply system;- disconnect the adaptor from the attachment and refit the protective cover.Copyright by Fiat Auto 43
EngineFuel system10.Checking fuel supply circuit pressure<strong>Bravo</strong>-<strong>Brava</strong> ipi 16v98 rangePrepare the test equipment 1860955000 using the adaptors produced previously and fitted as illustratedin the diagram below placing the ball valves (a)', (b) and (d) in the maximum open position and valve(c) in a closed position.1. Complete electric fuel pump2. Fuel supply pipe3. Adaptor (A)4. Test equipment no. 18609550005. Adaptor (B)6. Fuel manifold7. Rapid attachment connectorAfter having discharged the pressure, remove the end of the fuel supply pipe (2) from the rapid connector(7), following the instructions on the previous pages, connect it to the female connector of the adaptor(A), connect the new male end of the adaptor (B) to the rapid connector (7) and ©heck that the connectorsare correctly fitted! ■Turn the ignition key to the ON position and observe whether the pressure on the gauge (e), after increasingto about 3.5 bar, settles down at around 3.2 bar (the fall in pressure is due to the fact that afteroperating for several seconds the pump is deactivated if the engine is not started up).If there is a fall in pressure to below the values mentioned above, check the seal of the section of the systemUpstream of the fuel manifold and check the seal of the injectors following the instructions givenbelow.Fuel supply pipe leakage testKeep the test equipment in the position described in the previous paragraph, close valve (b), keepingvalve (c) closed and valve (a) in the maximum open position.Turn the ignition key to the ON position and observe whether, after increasing to around 3.5 bar, thepressure on the gauge (e) settles down at around 3.2 bar (the decrease in pressure is due to the fact thatafter the pump has been working for several seconds it is deactivated if the engine is not started up).44 Print no. 506.670/16
<strong>Bravo</strong>-<strong>Brava</strong> @i 16v98 rangeEngineFuel system10.If there is a decrease in pressure to below the values mentioned above, check the section of the systemupstream of the manifold and if there are no leaks or damage to the fuel supply pipe, replace the electricfuel pump drip tray assembly because the pressure regulator is housed in the actual unit and CANNOTbe replaced.If, after repeating the check, the pressure exceeds the recommended figure and is considerably higher,replace the electric fuel pump beucase there are operating problems with the pressure regulator housedin it.If the pressure corresponds to the recommended figure, check the seal of the fuel manifold and the injectorsfollowing the procedure described in the paragraph below.Injector leakage test1. Complete electric fuel pump2. Fuel supply pipe3. Adaptor (A)4. Test equipment No. 18609550005. Adaptor (B)6. Fuel manifold7. Rapid attachment connector8. InjectorsKeep the test equipment in the same position as described in the previous paragraph, place valve (b) inthe maximum open position, keeping valve (c) closed and valve (a) in the maximum open position.Turn the ignition switch to the ON position and observe whether, after increasing to around 3.5 bar, thepressure on the gauge (e) settles down at a pressure of about 3.2 bar, then close valve (a) and checkthat the pressure remains constant for at least a minute; if this is not the case, there is a leak from one ormore injectors.Copyright by Fiat Auto 45
EngineFuel system10.<strong>Bravo</strong>-<strong>Brava</strong> @ 16v98 rangeRemoving the test equipmentRemove the test equipment 1860955000 with the key in the OFF position, following these instructions:- introduce the end of the pipe connected to the valve (c) into a suitable container;- open the valve (c) and drain the excess fuel into the container;- keep the pipe in the container and disconnect the end of the supply pipe from the female connector forthe adaptor (A) keeping the connection upwards;- let the fuel in the pipes flow into the container;- disconnect the end of the adaptor (B) from the rapid connector and let the residual fuel flow from thepipes into the container;- reconnect the fuel supply pipe.H
Btavo-<strong>Brava</strong>^tievEngine98 range Fuel system10.- discharge the fuel pressure inside the supply pipe and disconnect the pipe from the rapid connector,following the instructions in the previous paragraphs;- attach the end of the supply pipe to the female rapid connector for the FLOWTRONIC equipment andthe male connector to the rapid connector;- position the equipment in the engine compartment, place the connecting electrical cable inside thevehicle and connect the actual equipment as described in the instructions which come with theequipment;- proceed with the fuel consumption test in accordance with regulation 93/116 CE and check that thefigures correspond with those given in section 00 - Technical data.1. Complete electric fuel pump 4. FLOWTRONIC equipment2. Fuel supply pipe 5. Rapid connector3. Female rapid connector 6. Fuel manifold- carry out the fuel consumption road test in accordance with directive 93/116 CE (litres per 100 km):URBAN CYCLE - this includes a cold start, followed by a simulated urban journey;EXTRA-URBAN CYCLE - this includes frequent acceleration, in all the gears, simulating normal out oftown usage; the speed varies between 0 and 120 kph;AVERAGE COMBINED CONSUMPTION - this involves 33% of the urban cycle and 67% of the extra-urbancycle;check that the figures measured correspond to those in the section "Introduction and technical data".NOTETraffic conditions, driving styles, atmospheric conditions, trim levels / accessories, whether aroof rack is fitted, the presence of special equipment and the general state of the vehicle, canlead to fuel consumption figures which differ from those obtained using the procedures describedabove.Copyright by Fiat Auto 47
EngineFuel system10.<strong>Bravo</strong>-<strong>Brava</strong> ty> 16v98 rangeFUEL DRIP TRAY ASSEMBLYNOTE In order to extract the assembly fromthe tank, the fuel should not be higherthan the halfway mark.Removing-refittingProceed with removing the fuel drip tray assemblyas follows:- remove the buttons (arrow) fixing the luggagecompartment lining using tool187807700 and remove it, then lift uppanel cover to gain access to the dust cover;- undo the bolts (arrow) and remove thedust cover;- disconnect the supply pipe (1), thebreather pipe (2) and the electrical connector(3);-using tool 1860893000 remove the ringnut securing the drip tray and extract thedrip tray from the tank, taking care not todamage the seal.When refitting, repeat the operations carriedout for the removal in the reverse order; at theend, make sure that there are no fuel leaks.48 Print no. 506.670/16
<strong>Bravo</strong>-<strong>Brava</strong> ig| 3116V98 rangeFUEL MANIFOLD AND INJECTORSEngineFuel system10.NOTE Before removing the manifold, dischargethe pressure inside followingthe instructions given at the start ofthis chapter.Removing-refitting fuel manifoldProceed with removing the manifold as follows:- remove the bands shown (arrow); then,undo the two bolts (detail) and remove theinlet hose complete with resonator;rotating the accelerator lever, release theend of the accelerator cable from the lever(A) then remove the adjuster from thebracket (B) and move the accelerator cableaway;disconnect the engine idle speed actuatorconnector (1);undo the bolts (arrow) fixing the upperhalf of the manifold and remove the vapourrecirculation pipe (2).Copyright by Fiat Auto 49
EngineFuel system10.<strong>Bravo</strong>-<strong>Brava</strong> ty 16v98 range- disconnect the air temperature and pressuresensor connector (2) and the injectorscable connector (1) and remove the charcoalfilter intake pipe (3);- partly raise the half-manifold and removethe brake servo vacuum inlet pipe (arrow);- disconnect the rapid connector (4), undothe fixing bolts (5) then remove the completefuel manifold.When refitting, repeat the operations describedfor the removal in the reverse order.Removing-refitting injectorsTo remove the injectors, proceed as follows:- Disconnect the electrical connection (1).- Remove the safety clip (2).- Remove the injector (3) which is a press fit.|MH Never act on the electrical connectorMM to remove the injector.Before refitting, check the conditionof the seals.50 Print no. 506.670/16
<strong>Bravo</strong>- <strong>Brava</strong> ©> **'98 rangeTHROTTLE BODYRemoving-refittingEngineFuel system10.Proceed as follows to remove thebody:throttle- remove the collars indicated (arrowed), thenunscrew both bolts (detail) and remove theintake sleeve with resonator;- release the accelerator cable terminal fromlever (A), then remove the adjustment blockfrom bracket (B) and place the acceleratorcable aside;- disconnect the engine idle speed actuatorconnector (1);- unscrew the four retaining bolts (arrowed)and remove the throttle body.Reverse removal instructions to refit.Adjust the accelerator cable as described in thefollowing paragraph.NOTE If the throttle body is replaced, connecta tester (Examiner) to the tester connectionand run the required procedureto zero and self-learn engine idle adjustmentactuator (M.D.S.) data.yCopyright Fiat Auto V 99 Cancels and replaces 51
EngineFuel system<strong>Bravo</strong>- Btava © **'98 rangeZeroing- Ensure the ignition key is turned off.- Check that the climate control system is off, the accelerator pedal is not depressed and the acceleratorcable is correctly adjusted (see next paragraph).- Connect switch MPX 97 (tool 1806365000) to the tester connection and move the handle to position 3.- Connect a tester (Examiner).- Set the Examiner to "Control Unit Test" mode.- Turn the ignition key on.- Set the Examiner to "active test" mode, then select "Reset self-adaptive parameters" and "Idle actuator".- Confirm reset and wait for the "Executed" message.- Turn the ignition off and wait for 30 seconds.Self-learning- Turn the ignition on and wait for 30 seconds.- Use the Examiner to re-establish communication with the engine control system.- Set the Examiner to "Parameters" mode and select "Idle identification test - executed" and "Idle identificationsignals - synchronised" from the "Selection" menu.NOTE If at least one of the parameters is not as specified, turn the ignition off and repeat the procedure.If the parameter is still not as specified, check the test lead is connected properly and the equipmentworking properly.- Turn the ignition off and wait for 30 seconds.- Start the engine without operating the accelerator pedal and wait for the fan to come on.- Disconnect the tester.- Carry out a test run for a few kilometres, then ensure idle speed is as specified when the engine is warm.A\ : j>^r^t 5*r01 2ACCELERATOR CONTROL CABLEAdjustment- slacken lock nut (1);- adjust nut (2) to alter the clearance of acceleratorcable (3) to achieve completethrottle closure (adjustment screw 5 in contact)and a cable clearance (4) of 5 mmwith the pedal released.Proceed as follows:tighten to reduce the clearanceloosen to increase the clearance- tighten the locknut following adjustmentOnce the cable has been adjusted to set idlespeed, connect the tester to the appropriateconnection and check that throttle opening isat least 80° with the pedal fully depressed.52 V- 99 Supersedes previous version Publication no. 506. 670/20
<strong>Bravo</strong>- <strong>Brava</strong> |p> ^'98 rangeRemoving-refittingEngineFuel system10.Disconnect the accelerator cable as follows:- working from inside the vehicle (A), disconnectthe control cable from its anchorage onaccelerator pedal (B);- turn the accelerator lever to disengage theaccelerator cable terminal from lever (C).Then remove the adjustment block frombracket (D) and move the accelerator cableaside.Reverse removal instructions to refit.ENGINE IDLE ADJUSTMENT ACTUATOR/THROTTLE POSITION SENSORNOTE The engine idle adjustment actuator/throttleposition sensor should bedisconnected from the throttle bodyonly in case of rep/acement_becauseremoving/refitting causes damage tocertain components (e.g. internalsealing rings) and correct componentoperation cannot be guaranteed oncethe component is refitted.Removing-refittingTo remove the actuator, disconnect the connectorand unscrew the retaining bolts (arrowed).NOTE It is compulsory to zero and self-learnengine idle adjustment actuator(M.D.S) data as described in the"THROTTLE BODY" paragraph.Copyright Fiat Auto V-99 Cancisls
EngineFuel system<strong>Bravo</strong>- <strong>Brava</strong> 9 *»'98 rangeENGINE CONTROL UNITRemoving - refittingRemove the control unit as follows:- disconnect both connectors in two stages:A) turn the metal hook up to release theconnection;B) pull away the connection;- unscrew the control unit retaining bolts andremove.Proceed as follows to refit the connector:- move the connector into contact with thecontrol unit;- turn the metal hook until completely closed.NOTE If the engine control unit is replaced,connect a tester (EXAMINER) to thetester connection and and run the selflearningprocedure for engine idle adjustmentactuator (M.D.S) data as describedin the "THROTTLE BODY"paragraph.LAMBDA SENSORRemoving - refittingDisconnect electrical connection (1) and removesensor (2) from its seat on the exhaustmanifold.When refitting, spread the threading with lubricantgrease resistant to high temperature.Engine RPM and TDC sensorRemoving-refittingDisconnect the electrical connection.Unscrew the retaining bolt and remove thesensor.Check the gapCheck the distance between sensor and phonicwheel teeth (gap).Gap: 0.5 - 1.5 mmNOTE Whenever the sensor mount is serviced(e.g. gap not as specified, sensor notaligned etc.), the sensor must be correctlypositioned and aligned with itsmount as described in the engineservice manual.54 V-99- Supersedes previous version Publication no. 506. 670/20
<strong>Bravo</strong>98 range^\ 20 vpageBOSCH MOTRONIC ME 3.1.4 M.P.I.INTEGRATED INJECTION/IGNITIONSYSTEM1- Introduction1- General description of the injectionsystem1- General description of the ignitionsystem1- Injection/ignition system functionaldiagram2- Functions of the system3SYSTEM MANAGEMENTSTRATEGIES- Adjustment of the injection time4- Adjustment of the ignition advance 4- Check on the cold starting4- Check on the enrichment of the mixtureduring acceleration4- Fuel cut-off during deceleration4- Check on the engine idle speed5- Restriction of the maximum enginespeed (protection outside of revs)- Check on combustion through theLambda sensor- Fuel vapour recovery6- Control of the detonation6- Control of the phase transformer6- Check on the inlet manifold6- Self-adjustment of the system7- Autodiagnosis7- Connection with the engine immobilizerdevice (Fiat CODE)7- Management of the climate control system 8- Management of the radiator fan8AIR INTAKE CIRCUITDIAGRAM SHOWING INFORMATIONENTERING/LEAVING THE CONTROLUNIT AND SENSORS/ACTUATORSDIAGRAM SHOWING FUEL SUPPLYCIRCUITDIAGRAM SHOWING FUEL ANTI-EVAPORATION CIRCUITSYSTEM FOR RECIRCULATING GASESCOMING FROM THE ENGINE CRANK-CASE (BLOW-BY)ENGINE EXHAUST ASSEMBLY DIAGRAMINJECTION/IGNITION SYSTEMWIRING DIAGRAM- Connection between control unit/ignitioncoils and injectorsLOCATION OF INJECTION/IGNITIONSYSTEM COMPONENTS10111213141516FUSES AND RELAYSDIAGNOSTIC SOCKETINJECTION/IGNITIONSYSTEM COMPONENTS- Injection/ignition system wiring- Injection/ignition electroniccontrol unit- Ignition coils- Timing sensor- Rpm and TDC sensor- Detonation sensors- Electric fuel pump- Fuel supply manifold- Injectors- Accelerator pedal potentiometer- Brake pedal switch- Clutch pedal switch- Air flow meter- Butterfly casing actuator- Lambda sensor- Speedometer sensor- Phase transformer- Coolant temperature sensor- Inertia switchEngineIndexANTI-EVAPORATION SYSTEMCOMPONENTS- Charcoal filter and fuel vapour cut outsolenoid valve10.page17181818182122232425252627272728293031323435CHECKS/ADJUSTMENTS AND REPAIR OPERATIONS ON THE BOSH ME3.1 INJECTION/IGNITION SYSTEMOUTSIDE OF THE FAULT DIAGNOSIS 37- Control of the engine idle speed 38- Checking concentration of pollutantemissions 38DIAGNOSTICS- Detecting faults- Memorizing the error and structure ofthe errors memory- Classification of the defect- Frequency counter- Signalling a fault- Cancelling the error- Connector with the diagnosticequipment- List of errors- Parameters displayed- Active diagnosis- Recovery- Permanent memory363640404040404041414142424242Copyright by Fiat Auto
<strong>Bravo</strong> ft98 rangeEngineFuel system10.BOSCH MOTRONIC ME 3.1 M.P.I. INTEGRATED INJECTION/IGNITION SYSTEMIntroductionThe Bosch Motronic system fitted on the 1998 5 cylinder 20 valve engine belongs to the category ofstatic advance, inductive discharge, digital electronic ignition systems integrated with sequential,phased type electronic fuel injection systems.This system has only one electronic control unit, a single set of wiring and one set of joint sensors.Its function is to inject the exact amount of petrol, into the engine inlet manifold, upstream of the inletvalves, designed to mix with the air introduced into the cylinder so that the correct mixture strength isformed.The Motronic ME 3.1 guarantees efficient operation, ensuring optimum performance and fuel economyand a reduction in harmful emissions through a response in real time to the different engine operatingconditions.General description of the injection systemThere are basically two conditions which must always be satisfied in the preparation of the air/fuel mixturefor the smooth running of the engine:1. the metering (air/fuel ratio) should be kept as constant and as close as possible to the stoichiometricvalue, to ensure that combustion takes place quickly avoiding unnecessary fuel consumption;2. the mixture should be composed of petrol vapours dispersed in the air as finely and uniformly as possible.As far as the optimum metering, on the other hand, is concerned, it is calculated by the control unit afterthe following measurements have been taken:- the exact quantity of intake air by the air flow meter;- the engine rotation speed by the rpm sensor;- the power request by the accelerator pedal potentiometer;- the engine coolant temperature by the sensor on the thermostat support;- the measurement of the oxygen content of the exhaust gases by the Lambda sensor.This information is processed by a micro-calculator in the injection/ignition electronic control unitwhich determines the basic injection time through experimentally obtained values which are stored in aspecial memory in the above mentioned control unit.General description of the ignition systemThe ignition system is the static advance, inductive discharge type (i.e. without a high tension distributor)with the power modules insde the electronic control unit.The system has a single coil for each spark plug; the advantages of this solution are;- less electrical overloading- gurantee of constant discharge at each spark plugThe electronic control unit contains a memory where the entire series of optimum advance values whichthe engine can use for its operating range on the basis of the engine speed and load conditions arestored.In the case of detonation, it is possible to selectively delay the ignition in the individual cylinder, recognizedby the combination of values trasmissted by the detonation and timing sensors.Copyright by Fiat Auto 1
EngineFuel system10.INJECTION/IGNITION SYSTEM FUNCTIONAL DIAGRAM<strong>Bravo</strong> igi20v98 rangeP4A02LJ011. Fuel tank filler cap2. Fuel tank3. Electric fuel pump with filter and pressureregulator4. Accelerator pedal potentiometer5. Variable geometry manifold solenoidvalve6. Battery7. Ignition switch8. System relay feed9. Climate control compressor10. Inertia switch11. Vehicle speed sensor12. Diagnostic socket13. Rev counter14. System failure warning light15. Air flow meter16. Butterfly casing electronic actuator17. Clutch pedal switch18. Fuel manifold19. Injectors20.21.22.23.24.25.26.27.28.29.30.31.32.33.34.35.36.37.38.Phase transformer solenoid valveBrake pedal switchIgnition coilsEngine timing sensorAir filterEngine rpm sensorDetonation sensorsCoolant temperature sensorFuel vapour solenoid valveCharcoal filterCoolant overheating warning lightLambda sensorCatalytic silencerInjection/ignition control unitSafety valveFuel vapour separatorMulti-purpose valveFiat CODE control unitCoolant temperature gauge2 Print no. 506.670/16
<strong>Bravo</strong> 10» 20v98 rangeEngineFuel system10.These values have been obtained experimentally, by means of a long series of practical tests carried outon prototypes at the engine test bench, to identify the advances which give the best compromise betweenthe conflicting requirements of maximum power and a reduction in fuel consumption and harmfulexhaust emissions.These optimum advances have then been memorized in the system control unit. During the operation ofthe engine, the control unit is constantly informed of the (engine) speed and load conditions and on thisbasis it "selects" the optimum advance from its memory to strike the spark at the spark plug for the cylinderin the explosion stroke with the optimum advance.In addition, the control unit corrects this value, depending on other factors such as the engine coolanttemperature, intake air temperature, detonation and butterfly valve position, so that the ignition point isalways optimum.The information required by the control unit to operate the single coils is transmitted by means of electricalsignals sent by the following sensors:a. An rpm sensor which produces a single phase alternating signal whose frequency indicates the enginespeed.b. An air flow meter with a temperature sensor which, on the basis of the quantity/temperature of theair drawn in by the engine, transforms these figures into electrical signals, sending them to the electroniccontrol unit.c. Two detonation sensors which, located in the upper part of the cylinder block/crankcase, onebetween cylinders 1 and 2 and the other between cylinders 4 and 5, respectively, allow the controlunit to recognize the cylinder where detonation (or the onset of detonation) is taking place and onlycorrect the ignition advance for the spark plug of the cylinder concerned.d. An accelerator pedal potentiometer which transforms the angular value of the actual pedal intoan electrical signal allowing the control unit to recognize minimum, partial and full load conditions.Functions of the injection/ignition systemIn addition to electronically controlling the moment of ignitionand the air flow rate during idling, in orderto allow the engine to run smoothly when the ambient parameters and loads applied vary, the controlunit should control and manage the injection in such a way that the stoichiometric (air/fuel) ratio isalways within the optimum value.The electronic control unit establishes the operating «time» for the injectors using a relatively simple rulewhich can be summarized as follows.Taking the physical properties of the fuel (viscosity and density) and the difference in pressure betweenthe pressure of the fuel and the pressure in the inlet manifolds as constant, the quantity of fuel to be injectedonly depends on the injector «opening time».The injection/ignition system basically carries out the following functions:adjustment of injection time;adjustment of ignition advance;check on cold starting;check on the enrichment during acceleration;fuel cut-off during deceleration;check on engine idle speed;restriction of the maximum engine speed;control of combustion through the Lambdasensor;fuel vapour recovery;- control of the detonation;- control of the phase transformer;- check on the inlet manifold- self-adjustment of the system;- autodiagnosis;- connection with the engine immobilizer device(Fiat CODE);- management of the climate control system;- management of the radiator fans.Copyright by Fiat Auto 3
Engine <strong>Bravo</strong> ^20,Fuel system98 range10.Adjustment of the injection timeSYSTEM MANAGEMENT STRATEGIESDigital technology has made it possible to achieve optimum fuel economy and performance using programmedmaps, stored inside the electronic control unit memory, dependent of the engine speed andload.The control unit controls the injectors with great speed and precision, calculating the opening time onthe basis of the engine load (speed and air flow rate), also taking into account the battery voltage andthe temperature of the engine coolant.The injection is sequential and phased for each cylinder (the moment of injection is not simultaneous forall the cylinders) and takes place at the optimum injection point.Adjustment of ignition advanceThanks to a map stored in its memory, the control unit is capable of calculating the advance according tothe engine load conditions (minimum, partial, full according to the engine speed and air flow rate), thetemperature of the intake air and the temperature of the engine coolant.It is possible to selectively delay the ignition at the cylinders required, recognized by means of the combinationof values recorded by the detonation and cam angle sensors.Check on the cold startingUnder these circumstances there is a natural weakening of the mixture as a result of the poor turbulence ofthe particles of fuel at low temperatures, the reduced evaporation and the condensation on the internalwalls of the inlet manifold, all of which is exacerbated by the increased viscosity of the lubricant oil.The electronic control unit recognizes this condition and corrects the injection time on the basis of the signalfor the temperature of the coolant, the temperature of the intake air, the battery voltage and the enginespeed.The ignition advance depends exclusively on the engine speed and the temperature of the enginecoolant.During cold starting the control unit controls an initial simultaneous (full-group) injection for all the injectorsand after recognition of the reference on the flywheel, it switches to the normal, sequential,phased operation. Starting when warm takes place straightaway in a phased sequential manner.Check on the enrichment of the mixture during accelerationThe control unit detects the acceleration request from the signal supplied by the accelerator pedal potentiometerand, as a result, increases the injection times and modifies the opening of the butterfly valveto reach the desired engine speed quickly.If in response to an acceleration request, the variation in the signal supplied by the air flow meter exceedsa pre-set increase, the control unit not only adapts the injection to the new requirements, but alsofurther increases it for several seconds to improve the responsiveness.Fuel cut-off during decelerationWhen the accelerator pedal is released and beyond a pre-set engine speed threshold, the injection controlunit cuts off the supply to the injectors.With no supply, the engine speed starts to decrease at a rate which depends on the vehicle driving conditions.Before reaching the idle speed, the dynamics of the engine speed dcrease are verified.If they are above a certain value, the fuel supply is partly reactivated on the basis of a logic which involvesthe "gentle accompaniment" of the engine during idling.4 Print no. 506.670/16
<strong>Bravo</strong> ^ 2ov Engine98 range Fuel system10.Having reached this condition, the normal functions for idling and cut-off during deceleration are onlyreactivated when the fuel cut-off threshold is exceeded to prevent the engine from not running smoothly.The levels for restoring the supply and the cut-off vary according to the engine temperature.There is another fuel cut-off logic in the control unit which intervenes in partial deceleration conditions,in other words when the engine load is lower.The function is only activated if the new condition persists for a pre-set time and after the ignition advanceangle has been adjusted for the new situation.Check on the engine idle speedThe control unit recognizes the "idle" condition (accelerator pedal released) from the signal supplied bythe accelerator pedal potentiometer and according to the signals from the brake and clutch pedalswitches and the electrical consumers being switched on (climate control and radiator fan)and operatesthe butterfly valve motor to produce an idle speed of 700±50 rpm.The idle is also corrected by varying the ignition angle because it has a quicker effect.The correct self-learning of the minimum and maximum butterfly opening positions is therefore essentialfor the effective control of the idle speed; it should be carried out at least once in production and eachtime the engine control unit or the motorized butterfly casing are replaced.The self-adjustment function allows the adjustment of the idle, in time, to any variations in the conditionsof the components which manage the idle.Restriction of the maximum engine speed (protection outside of revs)When the engine speed exceeds 6,800 rpm, the electronic control unit reduces the operating times ofthe injectors to prevent the engine from being overloaded, also protecting it outside of revs.If the engine idle speed exceeds 7,000 rpm, the control unit activates the fuel cut-off function, restoringthe operation of the injectors when the speed goes below a certain level.Check on combustion using the Lambda sensorThe Lambda sensor informs the control unit of the quantity of oxygen present in the exhaust and thereforethe correct metering of the air/fuel mixture by means of a voltage signal at two levels correspondingto a lean mixture and a rich mixture, respectively.To obtain an ideal mixture for the operation of the three-way catalyzer and keep emissions to a minimum,the petrol injected must be kept to a pre-established (stoichimetric) ratio in relation to the intakeair, measured from the unit value of the Lambda parameter (=1); in the case of a lean mixture it is >1, inthe case of a richmixture it is 1), the sensor provides a low voltage level(
EngineFuel system10.Fuel vapour recovery<strong>Bravo</strong> @ 2o v98 rangeThe fuel vapours (pollutant according to regulations) are sent to an active charcoal filter and from theseto the engine where they are burnt; this takes place by means of a solenoid valve which is only operatedby the control unit when the engine load condition is such as to allow correct combustion without theoperation of the engine being "disturbed": in effect, the control unit compensates for this quantity of incomingpetrol by reducing the supply to the injectors.Control of the detonationThis function is designed to detect the presence of the phenomenon of detonation (engine knock), byprocessing the signal coming from the appropriate sensors. The control unit continuously compares thesignals coming from the sensors with a threshold value which is, in turn, constantly updated to take intoaccount background noise and the ageing of the engine.The control unit is therefore capable of detecting the presence of detonation (or the onset of detonation)and reduces the ignition advance (by 3° up to a maximum of about 9°), until the phenomenon disappears.Later on, the advance is gradually restored to the basic value.In acceleration conditions, a higher threshold is used, to take into account the increased engine noise underthese circumstances. The detonation control strategy is also equipped with a self-adjustment functionwhich memorizes the reductions in the advance which are continuously repeated to adpat the map to thedifferent conditions in which the engine finds itself.Control of the phase transformerThe control unit controls the solenoid valve forthe phase transformer hydraulic actuator (fittedon the camshaft, inlet side) by means of a relay.The transformer has two operating positions:A. OFF position (power, reduced engine loadsand idling), corresponding to the normalcamshaft value;B. ON position (torque), corresponding to an18° crankshaft advance for the camshaft.1. Transformer in ON position2. Accelerator pedal fully depressed3. Maximum speed limitThe transformer, normally in the OFF position, isswitchedto the ON position according to theengine load and rotation speed, as illustrated inthe diagram.In any case, the ON position is only enabled forcoolant temperatures above 40°C.Obviously the control of the phase transformer operates with a hysteresis field, in other words the levelat which the solenoid valve is activated is always higher than the level at which is it deactivated; this isdesigned to avoid balance conditions and too rapid a succession from one timing diagram to anotherwith obvious operating problems.Check on the inlet manifoldThe control unit controls the geometry of the inlet manifolds to optimize the quantity of air drawn in bythe engine.The control unit selects short ducts for speeds above 4500 RPM and high engine loads.In other engine operating conditions, the control unit selects a configuration with long ducts.6 Print no. 506.670/16
<strong>Bravo</strong> ! SP 20v98 rangeSelf-adjustment of the systemEngineFuel system10.The control unit is equipped with a self-adjustment function which is designed to recognize thechanges which take place in the engine due to the bedding in processes over a period of time and theageing of both the components and the engine itself.These changes are memorized in the form of modifications to the basic map and are designed to adaptthe operation of the system to the gradual alterations to the engine and components compared withwhen new.This adjustment function also makes it possible to compensate for inevitable differences (due to productiontolerances) in any components which are replaced. This means that all vehicles can have thebest results without special adjustment and control operations.AutodiagnosisThe ME 3.1 injection/ignition system is also equipped with an "autodiagnostic" function whichmemorizes any faults in the sensors and actuators, making it easier to identify and correct them. A faultis signalled by the warning light in the instrument panel coming on.Connection with the engine immobilizer device (Fiat CODE)To increase protection against theft attempts, the vehicle has been equipped with an engine immobilizersystem (Fiat CODE) which only allows the injection/ignition control unit to be activated by an electroniccode.Each time the key is turned to the OFF position, the FIAT CODE system completely deactivates the injection/ignitioncontrol unit.If the ignition key is turned from OFF to ON, the following operations take place in order:1. The injection/ignition control unit sends the Fiat CODE control unit a request for a secret code in orderto deactivate the immobilizer function.2. The Fiat CODE control unit responds by only sending the secret code after having, in turn, receivedthe recognition code transmitted by the ignition key, which contains a special transponder.3. The recognition of the secret code allows the de-activation of the immobilizer function and the injection/ignitioncontrol unit can activate the normal system management programme.A special two-way serial line allows the exchange of data between the injection/ignition control unitand the Fiat CODE control unit.If there is a fault with the Fiat CODE system, the enginecan be started up using the emergency procedure.munitGiven the presence of the Fiat CODE system DO NOT carry out tests using another injection/ignitioncontrol unit during the fault diagnosis and Ior operating checks. In such a case, theFiat CODE control unit would transfer the (unrecognized) recognition code to the test controlwhich could then no longer be used on other vehicles.Copyright by Fiat Auto 7
Engine <strong>Bravo</strong> fll *»Fuel system98 range10.Management of the climate control systemThe injection/ignition control unit is operationally connected to the climate control system, in that:1. it receives a request to switch on the compressor from the climate control control unit via pin F6 andcarries out the relevant operations (additional air);2. it gives the go ahead to switch on the compressor via pin F13, when the conditions planned by thestrategies are verified;3. it receives information concerning the state of the four stage pressure switch from pins F9 and F41and operates the appropriate interventions (operation of the radiator fan).As far as point 1 is concerned,, if the engine is idling, the control unit increases the flow rate of the airpassing through the motorized butterfly casing before the compressor is switched on and conversely itreturns the actuator to the normal position after the compressor is switched off.On the other hand, as far as point 2 is concerned, the control unit switches off the compressor automatically:- for several seconds (timed disengagement):- when the engine power request conditions are high (strong acceleration);- during engine take-off;- as long as the following critical conditions persist:- at engine coolant temperatures above a certain value;- at engine speeds above or below a certain threshold.Management of the radiator fanThe control unit directly controls the operation of the radiator fan according to the temperature of theengine coolant and the engagement of the climate control system.The fan is switchedon when the temperature exceeds 98°C (1st speed) and 10VC (2nd speed). It isswitched off with a hysteresis of 2°C below the temperature threshold.AIR INTAKE CIRCUITThe 1998 5 cylinder 20 valve engine is fitted with a special system of air inlet ducts. The manifold consistsof two half shells and an internal rocker element (module) which, operated by a special pneumaticactuator, can assume two positions and alter the length of the inlet ducts (variable geometry).In this way it is possible to produce give long (torque) ducts or five short (power) ducts.The two different length ducts operate alternately allowing maximum thermal efficiency at differentspeeds.By selecting the appropriate length for the inlet duct it is possible to ensure that the fluctuations in thecolumn of gas entering, due to the inlet, are timed with the movement of the valve, to increase the effectof the inertia of the gaseous mass in the cylinder.It is therefore possible to achieve better thermal efficiency than normal.The device obviously operates with a hysteresis field, in other words, the changes from a "power" ductand viceversa, do not always take place at the same engine speedThis is to avoid the possible creation of balance conditions and too rapid a succession from one lengthto another with obvious operating problems.8 Print no. 506.670/16
<strong>Bravo</strong> ifl *
EngineFuel system10.DIAGRAM SHOWING FUEL SUPPLY CIRCUIT<strong>Bravo</strong> 0» 20v98 rangeP4A10LJ011. Fuel supply manifold 4. Electric fuel pump with filter and pressure2. Fuel supply pipe to the injectors regulator3. Tank 5. Injectors6. Breather pipeThe fuel is supplied by an electric pump immersed in the tank which draws in the fuel and sends it to thefilter and from there to the injectors.The fuel supply system is the returnless type, in other words with one single connecting pipe betweenthe fuel tank and the engine.This system makes it possible to:- keep the risk of the vehicle catching fire in the case of an accident to a minimum;- reduce the emission of fuel vapours in the atmosphere.The electric fuel pump is enclosed in a casing which also incorporates the fuel pressure regulator, the fuelgauge and the fuel filter.The system is also fitted witn an inertia switch which interrupts the supply from the electric fuel pump inthe case of an impact.10 Print no. 506.670/16
<strong>Bravo</strong> ft 20v98 rangeDIAGRAM SHOWING FUEL ANTI-EVAPORATION CIRCUITEngineFuel system10.1. Fuel vapour cut out solenoid valve 5. Safety and ventilation valve2. Charcoal filter 6. Float valve3. Multi-purpose valve 7. Tank4. Fuel vapour separator 8. Injection/ignition control unitThe anti-evaporation system is designed to prevent the fuel vapours, consisting of the lightest particlesof hydrocarbons which form in the tank, from being discharged into the atmosphere.The system works, above all, at high outside temperatures, when the temperature of the fuel increasesand consequentlythe tendency towards evaporation increases; in this situation, there is an increase inthe pressure inside the tank (7).In particular, even when the tank (7) is full, when the vehicle is stationary, the float valves (6) remainopen, as they are located higher than the breather pipe and therefore they allow the vapours to reach theseparator (4), from where, when they condense, they mainly return to the tank (7).In the case of spillage whilst driving or if the vehicle overturns, the float valves (6) close, preventing fuelfrom escaping.When the pressure inside the tank reaches approximately 30-40 mbar, the multi-purpose valve (3)opens and the fuel vapours reach the charcoal filter (2). The valve (3) also allows an intake of air intothe tank through the charcoal filter, for example after the level of the fuel decreases with the consequentvacuum created inside the tank.With the engine running, the control unit (8) controls the fuel vapour cut out solenoid valve (1), which allowsthe intake of vapours by the engine and the consequent scavenging of the charcoal filter (2).If, as a result of the malfunction of a component, the pressure inside the tank increases to dangerous levels,the safety valve (5), located near the cap, allows the pressure to be discharged outwards. If necessary,this valve can open in the other direction to ventilate the tank and prevent the vacuum reaching excessivelevels.Copyright by Fiat Auto 11
Engine <strong>Bravo</strong> ^20vFuel system98 range10.SYSTEM FOR RECIRCULATING GASES COMING FROM THE ENGINE CRANKCASE (BLOW-BY)This system controls the emissions, from the cylinder block/crankcase, of the breather gases made up ofair/petrol mixtures and burnt gases which escape from the piston seals, in addition to lubricant oilvapours, recirculating them to the inlet.The breather gases, directed by special partitions, rise by the engine oil filler, then pass throughthe coils(7),under the tappet cover, where they lose some of the oil they contain which goes to the camshafts,through the pipe (6), in the form of droplets.The pipe (6) is shaped like a siphon to prevent the escape of breather gases and only allow the recirculationof drops of oil.With the butterfly open, the gases come out of the intake (5) and are sent, via the connector (4) on theair hose, upstream of the butterfly valve, to be drawn into the manifold.With the butterfly closed, the vacuum in the inlet manifold draws in the gases through the intake (1) andthey reach the connector (3) on the inlet manifold, via the pipe (2), which contains a PCV (PositiveCrank Ventilation) relief valve (8) which shutters the inlet.The PCV valve can, in effect, be modulated and the quantity of gases which pass through is proportionalto the vacuum in the inlet manifold.When the butterfly valve is completely open (condition A), the vacuum inside the inlet manifold is minimal,the spring (10) is fully extended and the PCV valve allows the maximum flow of breather gases.Conversely, with the butterfly completely closed (condition B), the vacuum inside the manifold is maximum,which causes the movement of the small piston (9) which shutters the section of the flow ofbreather gases inside the PCV valve thereby limiting the intake of the actual gases into the manifold.P4A12LJ0112 Print no. 506.670/16
<strong>Bravo</strong> 'Ipt 20v98 rangeENGINE EXHAUST ASSEMBLY DIAGRAMEngineFuel system10.1. Exhaust manifold2. Lambda sensor3. Catalytic silencer4. Silencers5. Presa COThe control of the mixture strength, which is the closed-loop type, is activated by the Lambda sensorwhich measures the oxygen content of the exhaust gases upstream of the catalytic silencer.The Lambda sensor measurements allow the electronic control unit to continuously correct the quantityof petrol injected keeping the air/fuel ratio constant.This ensures the control of the harmful exhaust emissions, a job completed by the three way catalyticconverter (catalytic silencer).The efficient operation of the catalytic silencer and consequently containing the toxicity of the exhaustgases depends on the air/fuel ratio which the engine receives.The three-way catalytic converter makes it possible to simultaneously keep down the levels of the three pollutantgases present in the exhaust gases: unburnt hydrocarbons (HC), carbon monoxide (CO), nitrogen oxides(NOx).Two types of chemical reaction take place inside the converter:- oxidation of the CO and the HC, converted into carbon dioxide (C0 2 ) and water (H 2 0);- reduction of the NOx, converted into Nitrogen (N 2 ).The following would put the catalytic converter out of use and make it irreparable:- the presence of lead in the petrol which lowers the degree of conversion to such levels that the presenceof the catalytic converter in the system is useless;- the presence of unburnt petrol in the converter: in effect, a flow of petrol for 30s in an ambient of 800°C (temperature inside the silencer) is sufficient to cause the catalyzer to melt and break.It is vital for the injection/ignitin system to be in perfect working order, therefore the spark plug leadsshould never be disconnected with the engine running and, the catalytic converter shouldbe replaced with an equivalent section of pipe in the case of tests.Copyright by Fiat Auto 13
EngineFuel system10.<strong>Bravo</strong> 0i 20v98 rangeINJECTION/IGNITION SYSTEM WIRING DIAGRAM14 Print no. 506.670/16
<strong>Bravo</strong> ! §520v98 rangeConnection between control unit/ignition coils and injectorsEngineFuel system10.Key:1.2.3.4.5.6.7.8.9.10.11.Injection/ignition system failurewarning lightRev counter signalEngagement of climate controlDiagnostic socketFiat CODE control unitVehicle speed sensorRpm and TDC sensorDetonation sensor 1Detonation sensor 2Coolant temperature sensorEngine coolant temperaturegauge12. Timing sensor13. Butterfly casing actuator14. Four stage pressure switch15. Ignition switch16. Flow meter17. Air conditioning compressor18. Radiator fan 1 st speed resistance19. Air conditioning compressor electro-magnetcoupling relay20. Radiator fan 1st speed relay21. Radiator fan 2nd speed relay22. Coolant overheating warning light23. Radiator fan24. Variable geometry manifold fan25. Clutch pedal switch26. Injection/ignition system relayfeed27. Phase transformer solenoid valve28. Fuel vapour solenoid valve29. Brake pedal switch30. Battery31. Electric fuel pump and Lambdasensor relay32. Inertia switch33. Electric fuel pump34. Lambda sensor35-39. Injectors N°s 1 to 540-44. Ignition coils for cylinders N°s 1 to545. Accelerator pedal potentiometerCopyright by Fiat Auto 15
EngineFuel system10.LOCATION OF INJECTION/IGNITION SYSTEM COMPONENTS<strong>Bravo</strong> ft 20v98 rangeKey1. Phase transformer solenoid valve2. Injectors3. Fuel vapour cut out solenoid valve4. Injection/ignition control unit5. General system protective fuse6. Flow meter/air temperature sensor7. Motorized butterfly casing8. Coolant temperature sensor9. Vehicle speed sensor10. Variable geometry manifold actuatorsolenoid valve11. Rpm sensor12. Lambda sensor13. Ignition coils14. Timing sensor15. Diagnostic socket16. Detonation sensors16 Print no. 506.670/16
<strong>Bravo</strong> i§p 20v98 rangeFUSES AND RELAYSEngineFuel system10.NOTE For more information, see Group55-Electrical equipmentMain fuses (maxi-fuse)A. system fuseB. fuse controlled by the ignitionCopyright by Fiat Auto 17
EngineFuel system10.<strong>Bravo</strong> 01 20v98 rangeDIAGNOSTIC SOCKETThe exchange of data between the injection/ignitioncontrol unit and the diagnosticequipment takes place via a two direction serialline (line K) using the standard Boschcommunication protocol.The transmission is in positive logic and thecoding takes place via the NRZ method (NonReturn Zero) at a baud rate of 4.8 kbaud (208us/bit ±5%)INJECTION/IGNITION SYSTEM COMPONENTSLocation of diagnostic socketThe arrow in the diagram shows the locationof the diagnostic socket.The injection/ignition system basically consists of wiring, an electronic control unit (I.E. control unit)and the following sensors/actuators:Sensors- Speedometer sensor- Rpm and T.D.C. sensor- Detonation sensors- Coolant temperature sensor- Timing sensor- Butterfly valve position sensor (integratedin the butterfly casing actuator)- Intake air temperature sensor- Intake air temperature and flow rate sensor(flow meter)- Lambda sensor- Accelerator pedal potentiometer- Brake pedal switch- Clutch pedal switchActuators- Butterfly casing actuator- Phase transformer solenoid valve- Fuel vapour cut out solenoid valve- Variable geometry manifold solenoid valve- Electric fuel pump (including filter andpressure regulator)- Injectors- Ignition coils- Spark plugsINJECTION/IGNITION SYSTEM WIRINGThe various system components are connected by two distinct sets of wiring.The engine side wiring (connector M) connect the components fitted on the engine to the injection controlunit; the vehicle side wiring (connector F) connects the other components to the control unit and constitutesthe interface with the other vehicle wiring.The two connectors (M and F) are the same and both have 64 pins, but due to the presence of specialkeys it is not possible to mix up the control unit connector wiring.INJECTION/IGNITION ELECTRONIC CONTROL UNITThe injection/ignition electronic control unit is located in the engine compartment, fixed to a bracket tothe side of the inlet manifold.The control unit processes the signals coming from the various sensors through the application of softwarealgorhythms and operates the actuators (in particular the injectors and the pressure regulator) inorder to ensure the optimum engine operation.The control unit is the "flash E.P.R.O.M." type which can be reprogrammed from the outside without involvingthe hardware.18 Print no. 506.670/16
<strong>Bravo</strong> © 20v98 rangeIdentification of the control unit connections (Pin-out)EngineFuel system10.16s324864M-©oooooooooooooo300000000000000DOOOOOOOOOOOOOO-oooooooooooooooooooooooooooooooooooooooooooooooooooooooooooooooooooooooConnector F1.2.3.4.5.6.Engine coolant overheating warning lightNot connectedFiat CODE control unitNot connectedNot connectedRequest to engage climate control systemcompressorSupply for accelerator pedal potentiometer18. Signal for accelerator pedal potentiometer1Request to engage radiator fan low speedNot connectedNot connectedNot connectedEngagement of climate control systemcompressorNot connectedSupply from batterySupply from relayNot connectedNot connectedNot connectedNot connectedNot connectedNot connectedNot connected9.10.11.12.13.14.15.16.17.18.19.20.21.22.23.Connector M1. Butterfly casing motor (-)2. Not connected3. Injector for cylinder 44. Variable geometry manifold actuator5. Fuel vapour cut out solenoid valve6. Reference earth for detonation sensor 27. Not connected8. Not connected9. Not connected10. Not connected11. Not connected12. Not connected13. Not connected14. Ignition coil for cylinder 315. Ignition coil for cylinder 416. Ignition coil for cylinder 117. Butterfly casing motor (+)18. Not connected19. Injector for cylinder 120. Injector for cylinder 321. Not connected22. Detonation sensor 1 signal23. Lambda sensor signalCopyright by Fiat Auto 19
EngineFuel system10.<strong>Bravo</strong> >0I 20v98 rangeConnector F24. Accelerator pedal potentiometer 1 earth25. Accelerator pedal potentiometer 2 earthand air flow meter26. Not connected27. Brake pedal switch28. Not connected29. Not connected30. Electric fuel pump relay31. Go ahead for fuel system relay32. Supply from relay33. Not connected34. Not connected35. Rev counter signal36. Not connected37. Not connected38. Not connected39. Not connected40. Accelerator pedal potentiometer 2 signal41. Request to engage radiator fan highspeed42. Not connected43. Not connected44. Vehicle speed signal45. Not connected46. Injection system failure47. Supply from ignition switch48. Supply from relay49. Not connected50. Go ahead to engage radiator fan lowspeed51. Not connected52. Not connected53. Diagnostic socket line K54. Intake air temperature signal55. Not connected56. Accelerator pedal potentiometer 2 supply57. Intake air quantity signal58. Not connected59. Clutch pedal switch60. Not connected61. Not connected62. Go ahead to engage radiator fan highspeed63. Reference voltage for flow meter64. Not connectedConnector M24. Butterfly casing potentiometer 1 signal25. Coolant temperature26. Butterfly casing, temperature sensor potentiometers1 and 2 reference earth27. Not connected28. Not connected29. Not connected30. Not connected31. Ignition coil for cylinder 532. Ignition coil for cylinder 233. Butterfly casing motor (-)34. Lambda sensor heater earth35. Injector for cylinder 236. Phase tranformer solenoid valve37. Not connected38. Detonation sensor 2 signal39. Not connected40. Butterfly casing potentiometer 2 signal41. Not connected42. Timing sensor signal43. Not connected44. Not connected45. Not connected46. Not connected47. Not connected48. Not connected49. Butterfly casing motor ( + )50. Not connected51. Timing sensor reference voltage52. Injector for cylinder 553. Not connected54. Detonation sensor 1 reference earth55. Lambda sensor reference earth56. Not connected57. Not connected58. Buterfly casing potentiometer 1 and 2supply59. Engine rpm sensor60. Not connected61. Not connected62. Not connected63. Not connected64. Not connected20 Print no. 506.670/16
98 range20vIGNITION COILS (0.221.504.014)EngineFuel system10.The ignition is the static advance eletronictype with a single coil for each spark plug;this solution eliminates the high tension circuit,increasing reliability and safety and decreasingthe risk of interference due to hightension leads and connections.It involves a regular coil which raises thevoltage of the impulse sent to the sparkplugs: each individual coil, located in thecylinder head, supplies a spark plug directlywithout intermediate cables.P4A21LJ01Checking ignition coil primary circuit resistanceThe resistance is checked by connecting anohmmeter to the connector external pins ( 1and 3):Primary winding resistance: 0.73 ohmElectrical specificationsPrimary winding inductancePrimary winding resistanceAnti-interference resistance2,5 mH0,73 Q1 KQDiagram showing electrical connectionsA. Control signalX. Primary windingY. Secondary winding1. Supply from ignition switch2. Single coil3. Electronic control unit4. Spark plugP4A21LJ02Wiring connectorP4A21LJ03The numbers in the boxes, connected to pin1, indicate the corresponding control unitpins arranged in the order of the cylindernumbers.Copyright by Fiat Auto21
EngineFuel system10.<strong>Bravo</strong> *£l 20v98 rangeTIMING SENSOR (0.232.101.026)In the Bosch Motronic ME 3.1 system the injectionis the sequential, phased type, in otherwords the fuel is injected in sequence for eachcylinder during the inlet stroke.In order to achieve this, in addition to the rpmand TDC signal, the electronic control unit alsouses a timing signal to determine the injectionpoint.The signal sent to the control unit is producedby a Hall effect sensor fitted by the camshaftdrive pulley, exhaust side.1. Deflector (pulley ring)2. Magnetic materialOperating principleP4A22LJ01A semi-conductor layer, which the current passes through, immersedin a normal magnetic field (lines of force perpendicular tothe direction of the current) produces a difference in power,known as "HALL" voltage.If the intensity of the current remains constant, then the voltageproduced only depends on the intensity of the magnetic field; theintensity of the magnetic field only needs to vary periodically inorder to produce a modulated electrical signal, whose frequencyis proportional to the speed at which the magnetic field changes.To achieve this change, a metal ring (internal part of the pulley)with an opening passes through tiie sensor. As it moves the metalpart of the ring covers the sensor, blocking the magnetic fieldwith a consequent low output signal; conversely, when theopening is present and consequently there is a magnetic field,the sensor produces a high signal.As a result the high signal alternates with the low signal once for every two revoluations of the engine,namely when cylinder N°1 is 78° before TDC.This signal, together with the rpm and TDC signal, allows the control unit to recognize the cylinders anddetermine the injection point. For each engine revolution, the control unit checks that the timing signalis present; if this signal is missing for two consecutive revolutions, the control unit signals a fault (warninglight in the instrument panel comes on) and the engine cannot be started up.Wiring connectorThe numbers indicate the corresponding controlunit pinsI1 23IRemoving- refittingThis operation involves the removal of thetoothed belt from the timing drive and the exhaustside camshaft pulley.When these operations have been carried out:- disconnect the electrical connector;- undo the fixing bolts and remove the sensor.When refitting, reverse the order of the operations,following the instructions for refitting andtensioning the toothed belt.M51 M 26M42NOTEThe sensor does not require any typeof adjustment.22 Print no. 506.670/16
<strong>Bravo</strong> ijgl 20v98 rangeEngineFuel system10.RPM AND TDC SENSOR(0.261.210.160)This sensor which detects the engine speedand TDC is the inductive type, i.e. it operatesthrough the variation of the magnetic fieldproduced by the passing of the teeth on atoothed pulley (flywheel) inside the cylinderblock/crankcase fixed to the crankshaft rearcounter-weight. In this way the sensor isfixed to the cylinder block/crankcase and thegap and the angular position no longer needto be checked or adjusted.The teeth which pass in front of the sensor alterthe gap between the pulley and the sensor;the flow, which varies as a result, producesan alternating voltage whose frequencydepends on the number of revs.The flywheel consists of 58 teeth plus aspace equivalent to the size of the two missingteeth.1. Rpm sensor2. Toothed pulley3. Engine flywheelThe reference defined by the space of the twomissing teeth constitutes the basis for detectingthe synchronism point (TDC).Removing-refittingPosition the vehicle on a lift, then, workingfrom the lower part of the vehicle:- disconnect the electrical connector;- undo the bolt fixing the sensor and removeit from its housing.Wiring connectorThe sensor is connected to the electroniccontrol unit (pins M10 and M59) by twistedcables covered with an anti-interference outercasing.The numbers indicate the correspondingcontrol unit pinsChecking the resistanceThe sensor resistance can be measured bydisconnecting the connector and connectingan ohmmeter to the sensor.Resistance: 774-946 ohm at 20°CCopyright by Fiat Auto 23
EngineFuel system10.<strong>Bravo</strong> 101 20v98 rangeChecking the gapThe rpm and TDC sensor is fixed directly tothe cylinder block/crankcase and thereforethe gap and the angular position do not needadjusting. If a fault is suspected, the gap canbe checked as follows:- remove the rpm and TDC sensor;- check that the distance between the surfaceof the sensor and the flywheel toothcorresponds to the total length of the sensorprobe (34.5mm) with the gap (0.8 -1.5mm).When measuring the distance, it is vitalto be at right angles to the flywheeland corresponding to a tooth and not agap.DETONATION SENSORS (0.261.231.131)l* * i-i_rM22P I/I54M38 M6The detonation sensors are located in themonobloc under the inlet manifolds and betweencylinders 1 -2 and 4-5, respectively.These sensors have a bush to prevent inappropriatetorque tightening.If they are replaced, do not place washersor shims between the cylinder block-/crankcase and sensor contact surfaces.When the engine is knocking (detonation),vibrations of a certain frequency are producedin the cylinder block/crankcase.This phenomenon produces a mechanicalripercussion on a piezoelectric crystal whichsends a signal to the control unit which, onthe basis of this signal, reduces the ignitionadvance (by 3° up to a maximum of 9.7°) untilthe phenomenon disappears. Later, theadvance is gradually restored to the basic value.Wiring connectorThe sensors are connected to the electroniccontrol unit (Pins M22/M54 and M38/M6)by twisted cables covered in an anti-interferenceouter casing.The numbers indicate the correspondingcontrol unit pins.24 Print no. 506.670/76
<strong>Bravo</strong> ifil 20v98 rangeEngineFuel system10.LECTRIC FUEL PUMP (0.580.313.011)The electric fuel pump is located inside thefuel tank, in a special housing which also includes:- the fuel pressure regulator;- the fuel gauge;- the fuel filter.1. Electric fuel pump;2. Fuel filter;3. Fuel gauge with float;4. Pressure regulator;5. Gauze pre-filter;The electric fuel pump has an electric motorwith a permanent magnet (1), which operatesthe pump (2) impeller and a supportcover (3) which contains the electrical andhydraulic connections.The electric pump is the single stage typewith high performance in low voltage andtemperature conditions.It has the following advantages comparedwith pumps which operate on the volumetricprinciple:- lighter;- smaller dimensionsFUEL SUPPLY MANIFOLDThe fuel manifold is fixed to the inside of the inlet manifold and its function is to send the fuel to the injectors.The fuel manifold is made from die-cast aluminium and incorporates the housings for the injectors.The fuel inlet has a fixing with a bolt with a tapered seal.Copyright by Fiat Auto 25
EngineFuel system10.<strong>Bravo</strong> 101 20v98 rangeINJECTORS (0.280.155.770)The twin jet type injectors are fitted on the inlet manifolds, immedeiately before the inlet valve.These injectors have been specially designed for engines with 4 valves per cylinder and allow the jets tobe directed towards the two inlet valves.The fuel jets comes out of the injector at a pressure of 3 bar and are instantly atomized forming twocones of around 10° each.The operation of the injectors is the ((sequential phased» type, i.e. the five injectors are operated accordingto the engine cylinder inlet sequence, whilst the supply can already start for each cylinder during theexpansion stroke until the inlet stroke has already begun.The injectors are fixed by the fuel manifold, which presses them into their housings in the inlet manifolds.In addition they are secured to the fuel manifold by means of «safety clips». Two rubber seals (10)and (11) ensure the seal on the inlet manifold and the fuel manifold.1. Injector body2. Needle3. Magnetic core4. Coil spring5. Winding6. Injector nose7. Adjustable spring8. Fuel filterWiring connectorThe numbers indicate the corresponding controlunit pins arranged in the order of the cylindernumbers.I«29. Electrical connection socket10. Fuel seal11. Vacuum sealChecking the resistanceThe injector resistance can be measured by disconnectingthe connector and connecting anohmmeter as shown in the diagram.Resistance value 16.2 ohmh_i— —i_rF16 F32F481 2 3 4 5M1S M35 M20 M3 M52P4A26LJ02D = ^26 Print no. 506.670/16
<strong>Bravo</strong> 0» 20v98 rangeEngineFuel system10.ACCELERATOR PEDAL POTENTIOMETER(0.281.002.203)2^vliSVIJlSi~~^\ij—^L 3w%&^1The position of the accelerator pedal is transformedinto an electrical voltage signal andsent to the injection control unit by the potentiometerconnected to the appropriatepedal.The accelerator pedal position signal is processedtogether with the information relatingto the engine speed to obtaine the injectiontimes and pressure.The sensor is made up of a casing (1) fixed tothe pedals by a flange, which contains a shaft(2), in an axial position, connected to twopotentiometers (3): one main one and onesafety one.A coil spring on the shaft guarantees the correctpressure resistance, whilst a secondspring ensures the return on release.F8 -]17" L6 5 'J2-r3[- F56Wiring connectorThe numbers indicatecontrol unit pinsthe correspondingF25-- F24C7r/PAt\riiiBRAKE PEDAL SWITCHThere is a switch (1) on the brake pedalwhich operates the brake lights; the sameswitch sends a signal to pin F27 of the injectioncontrol unit.The "brake pedal pressed" signal is usedby the control unit for:- understanding that there is a decelerationsituation;- checking the plausibility of the signalcoming from the accelerator potentiometer.CLUTCH PEDAL SWITCHThere is a switch (2), on the clutch pedal, connected to pin F59 of the injection control unit.The "clutch pedal activated" signal is used by the injection control unit to distinguish the gear engagedand gear shift conditions.Copyright by Fiat Auto 27
EngineFuel system10.AIR FLOW METER (0.281.002.199)<strong>Bravo</strong> @ 20v98 rangeThe flow meter is on the air inlet hose and is the"hot film" type.The intake air temperature sensor is inside theflow" meter.The operation is based on a heated diaphragmplaced in a measuring duct through which theintake air entering the engine flows.The hot film diaphragm is kept at a constanttemperature (about 120 °C above the temperatureof the intake air) by the heating resistance.The mass of air passing through the measuringduct tends to remove heat from the diaphragmtherefore, in order to keep the latter at a constanttemperature, a current has to pass throughthe resistance.This current, being proportional to the mass ofair flowing to the engine, is measured by a suitableWheatstone bridge and the signal obtainedis sent to the injection control unit.1. Covers2. Electronic card3. Sensor4. Support plate5. Support6. Seal (O-Ring)7. Temperature sensor1. Air temperature sig- 4. Reference voltagenal(5V)2. Battery voltage 5. Air flow rate signal3. MassNOTEThis flow meter directly measures themass of air (and not the volume) therebyeliminating problems of temperature,altitude, pressure etc.Description of the operationThe Wheatstone bridge (made up of resistorsR1,R2,R3,R4) is balanced when R3 is about120 °C higher than the temperature of the air.The air which passes through the diaphragm removesheat from R3, then the bridge is unbalanced.This situation is detected by the circuit at IC1which operates the transistor T1, in a mannerwhich is proportional to the bridge imbalance,which then allows more current to pass throughRh in order to heat R3 and restore the bridgebalance.Circuit IC2 measures the current passingthrough Rh.This current, allows the equilibrium of thebridge to be maintained and is therefore proportionalto the mass of air passing through the airflow meter.28Print no. 506.668/16
<strong>Bravo</strong> ©98 range1A *> i i 4 51Wiring connectorEngineFuel system10.The numbers indicate the corresponding controlunit pins.F54-( >JO+:F57I-F63I—F25BUTTERFLY CASING ACTUATORThe actuator is fixed to the inlet chamber andregulates the quantity of air drawn in by the engine.According to the signal coming from the acceleratorpedal potentiometer, the injection controlunit control the opening of the butterfly bymeans of a direct current motor incorporated inthe butterfly casing actuator.The butterfly casing actuator is fitted with twopotentiometers connected in parallel so thatone controls the other and viceversa.If there is a problem with the two potentiometersor if there is no supply, the control unit reducesthe engine torque, according to the positionof the accelerator pedal.If the butterfly casing actuator or the injectioncontrol unit are replaced, the following "self-- learning" procedure must be carried out:- Place the ignition key in the ON position andkeep it in this position for 30 sees- Place the ignition key in the OFF position for5 sees- Return the key to the ON position and start upthe engineWiring connectorThe numbers indicate the corresponding controlunit pins.Copyright by Fiat Auto 29
EngineFuel system10.<strong>Bravo</strong>^2ov98 rangeLAMBDA SENSOR (B.258.040.092)1. Connecting cable2. Protective sleeve3. Planar sensor element4. Ceramic support pipe5. Sensor housing6. Ceramic seal7. Protective pipemV1000 -80060040020009.8a— ^\!0.9 1iIia. Rich mixture (lack of air)b. Lean mixture (excess air)b1.1 1.2The Lambda sensor is the "planar" type and isfitted on the front section of exhaust pipe andinforms the injection control unit of theprogress of the combustion (stoichiometricratio).To obtain an optimum mixture the quantity ofair drawn in by the engine must equal thetheoretical quantity for burning all the fuel injected.In this case the Lambda factor (X) i.e. the ratiobetween the quantity of air drawn in andthe theoretical quantity of air (required toburn all the fuel injected) is equal to 1.Therefore:X = 1 ideal mixtureX > 1 lean mixtureX < 1 richmixtureThe Lambda sensor, in contact with the exhaustgases, produces an electrical signal,whose voltage value depends on the concentrationof oxygen present in the actual gases.This voltage is characterized by a sharp variationwhen the composition of the mixturemoves away from the value X = 1.The heating of the Lambda sensor is managedby the injection control unit proportionalllyto the temperature of the exhaust gases.This prevents thermal shocks to the ceramiccasing due to contact with the condensationwater, present in the exhaust gases, with theengine cold.The measuring cell and the heater are incorporatedin the "planar" (stratified) ceramicelement with the advantage of heating thecell rapidly to allow a closed loop control(=1) within a few seconds of the engine beingstarted up.Wiring connectorThe numbers indicate the correspondingcontrol unit pins.30 Print no. 506.670/16
<strong>Bravo</strong> @ 20v98 rangeEngineFuel system10.RraThe sensor can be rapidly put out of action by even small amounts of lead in the fuel.Checking the resistanceThe resistance of the heater and the sensorcan be measured by disconnecting the connectorand connecting an ohmmeter asshown in the diagram.Resistance = 500-1000 ohm at 20°CSPEEDOMETER SENSORThe speedometer sensor (vehicle speed sensor)is positioned at the differential outpur,by the left driveshaft coupling and transmitsinformation concerning the vehicle speed tothe control unit: the signal is also used for theoperation of the speedometer.The sensor is the Hall effect type (see paragraphon "engine timing sensor") and is calibratedso that each impulse corresponds to adistance of one metre; it is possible to knowthe speed of the vehicle from the frequencyof the impulses.The control unit uses this information for improvingthe management of the engine idleadjustment actuator and for the CUT-OFFstrategy.Wiring connectorThe numbers indicate the correspondingcontrol unit pinsCopyright by Fiat Auto 31
EngineFuel system10.PHASE TRANSFORMER<strong>Bravo</strong> i0» 2 ov98 rangeIn order to achieve a good compromise between good performance in terms of power at high speedsand good torque at low speeds, a phase transformer (with electronic operation and hydraulic implementation)has been fitted on this engine for the inlet camshaft.This device makes it possible to vary the timing diagram (inlet stroke) according to the load required bythe engine; this parameter is processed by the MOTRONIC control unit on the basis of the electrical signalsreceived by the air flow meter and the rpm sensor and is sent as a commant to the phase transformersolenoid valve.The construction of the device involves a main assembly fitted on the inlet camshaft which is designedto alter the angular position of the actual shaft in relation to the drive pulley.In addition, there is an impelementation valve, operated by a solenoid valve, both on which are on the inletmanifold and are hydraulically connected to the main assembly by means of suitable ducts.The operating principle is as follows:- with the temperature of the coolant below 40 °C and when the engine is idling or the speed exceeds apre-set level, the solenoid valve (1) is de-energized, therefore the valve body (2), thrust by the opposingspring (3), remains raised not allowing the oil, which is arriving from the duct (A), to reach thetransformer.In this case the timing of the inlet valves remains unaltered.With the coolant temperature above 40 °C and the engine speed below a pre-set level with the butterflyangle greater than around 8°, the solenoid valve (1) is energized, thereby pushing the valve body(2) downwards. In this position, the oil, coming from the duct (A), enters the piston chamber (B) andfrom there flows through a special port into the duct (C) inside the latter.The oil can only leave the above mentioned duct through the upper port (in contact with the oil supplyduct to the transformer (D)) because the lower port is not in contact with the drainage duct (E) asthe valve body (2) is lowered.The oil passes through ducts (D) and (F), reaches the chamber (G) moving axially towards the engineand the piston (4), which hqs helical teeth on the outside, is forced to rotate in a clockwise direction(seen from the timing side) on account of the above mentioned axial movement.Its rotation is transmitted, by means of a straight toothed splining, to the pinion (5) which, bolted ontothe threaded element of the camshaft (6), transmits the rotation to the shaft, altering the timing ofthe inlet valves with an advance of 9°.When the solenoid valve is de-energized, the valve body (2) returns to the initial position, interruptingthe flow of oil under pressure to the chamber (G), but allowing the return of oil to the drainage, thanksto the force of the opposing spring (7).An additiona duct guarantees the lubrication of the camshaft bearing even when the device is not activated.The oil which reaches chamber (H) of the solenoid valve through seepage, is discharged through thedrainage duct (E).RecoveryIn the case of a problem with the solenoid valve, the final stage (driver) in the control unit is deactivated.32 Print no. 506.670/16^
<strong>Bravo</strong> ! |jp» 20v98 rangeEngineFuel system10.Diagram showing operation of the phase transformer1. Solenoid valve-2. Valve body3. Valve body spring4. Piston5. Pinion6. Camshaft element7. Piston spring8. Battery9. Injection/ignition system relay10. Injection/ignition control unit11. Ignition switchCopyright by Fiat Auto 33
EngineFuel system10.<strong>Bravo</strong>
<strong>Bravo</strong> !gi 20v98 rangeINERTIA SWITCHEngineFuel system10.In order to increase the safety of the occupants,in the case of an impact, the vehicle isequipped with an inertia switch located insidethe passenger compartment, fixed to theleft side panel.This sensor reduces the risk of fire (as a resultof fuel escaping) deactivating the auxiliaryelectric pump which supplies the injectioncircuit.The inertia switch consists of a steel ball fittedin a (tapered) housing and kept in positionby the attraction force of a permanentmagnet.If the vehicle is involved in a violent crash,the ball is released from the magnetic clip andopens the normally closed (NC) electricalcircuit) interrupting the connection to earthfor the electric pump and as a result the supplyto the injection system.To restore the connection to earth for theauxiliary electric pump, the seat must bemoved backwards and the switch presseduntil it is heard to click.Even after an apparently slight impact, if there is a smell of fuel or there are leaks from the fuelsystem, do not turn the inertia switch back on, but first search for the cause of the problem andremedy it to prevent the risk of fire.Inertia switch components1. Complete inertia sensor2. Outer casing3. Button4. Upper side5. Engagement side6. Permanent magnet7. Permanent magnet housing8. Steel ballC. Common terminalN.C. Normally closed contactN.A. Normally open contactCopyright by Fiat Auto .:>
EngineFuel system10.<strong>Bravo</strong> IP 20v98 rangeANTI-EVAPORATION SYSTEM COMPONENTSCharcoal filter and fuel vapour cut out solenoid valveThese components form part of the fuel vapour recovery and anti-evaporation system. The charcoal filteris located in the right wheel arch and the rear section of the right front wheel arch liner has to be removedto gain access to it.The cut out solenoid valve is located in the engine compartment under the inlet manifold.Charcoal filterThis consists of charcoal granules (4) whichtrap the petrol vapours entering through the inlet(5).The air which enters through the intake (1),passes through the paper filter (3), comes intocontact with the charcoal granules removingthe petrol vapours and directing them towardsthe outlet (2) and from there to the cut out solenoidvalve.The air, having entered through the intake (5),can also be recalled by the vacuum in the tankfor ventilating it. The partition (6) ensures thatthe air drawn in comes into contact with all thegranules of charcoal assisting the release of thepetrol vapours to the inlet manifold.There are also two springs (7) which allow theexpansion of the mass of granules when thepressure increases.Vapour cut out solenoid valve(0.280.142.340)The function of this valve is, by means of theelectronic control unit, to control the quantity ofpetrol vapours drawn in by the charcoal filterand directed to the inlet manifold.If this valve is not supplied, it is open; by turningthe key to the ON position, it closes, in preparationfor operation. In effect, if energized the solenoidvalve (6) attracts the shutter (4) which,overcoming the spring (3) loading, closes theport (5) preventing the flow of petrol vapours.1. Inlet connector2. One-way valve3. Spring4. Shutter5. Outlet port6. Electro-magnet7. Outlet connectorThe operation is controlled by the electroniccontrol unit in the following way:- during starting the solenoid valve remainsclosed, preventing the petrol vapours from excessivelyenriching the mixture;- with the engine started up, the electroniccontrol unit sends the solenoid valve a signalwhich modulates the opening.In this way the control unit controls the quantityof petrol vapours sent to the inlet, avoiding substantialvariations (especially during idling) inthe mixture strength.NOTE The solenoid valve must be fitted in the correctposition: the arrow on the casing shouldbe pointing towards the vacuum pick up onthe inlet manifold.36 Print no. 506.670/17
<strong>Bravo</strong>- <strong>Brava</strong> 9 **99 rangeChecking the resistanceEngineFuel system10.The resistance of the solenoid valve can bemeasured by disconnecting the connector andconnecting an ohmmeter as illustrated in thediagram.Resistance: 17.5-23.5 ohm at 20 °CWiring connectorThe numbers indicate the corresponding controlunit pinsCHECKS - ADJUSTMENTS AND REPAIR OPERATIONS ON THE BOSCH MOTRONIC ME 3.1INJECTION/IGNITION SYSTEM IN ADDITION TO THE FAULT DIAGNOSISWHEN WORKING ON A VEHICLE EQUIPPED WITH A MOTRONICSYSTEM, OBSERVE THE FOLLOWING PRECAUTIONS:INJECTION/IGNITION- do not start up the engine with the terminals for the electrical connections not properly connectedor slack at the battery poles;- do not use a rapid battery charger to start the engine;- never disconnect the battery from the on board system with the engine running;- when recharging the battery, disconnect it first from the system;- if the vehicle goes into a drying oven after painting, at temperatures in excess of 80 °C, then theinjection/ignition electronic control unit must be removed first;- never connect or disconnect the electronic control unit multiple connector with the ignitionswitch in the ON position;- a/ways disconnect the negative battery lead before carrying out electrical we/ding on the vehicle.It should be remembered that this system has a memory which is a/ways supplied (stand-bymemory) which contains all the self-adjustment figures. If the battery is disconnected then thisinformation is lost and can only be acquired again after a certain length of time so this operationshould be carried out as infrequently as possible.If the engine control unit or the motorized butterfly casing is being replaced, the self-learning proceduremust be carried out for the return spring inside the butterfly casing and maximum/minimum motorizedbutterfly valve angular positions.Copyright Fiat Auto 37
Engine <strong>Bravo</strong>- <strong>Brava</strong> 9 **Fuel system98 rangeLearning procedureNOTE During the /earning procedure, from the moment the ignition is turned to the ON position until theend of the procedure, do not press the accelerator pedal, the brake pedal or the clutch pedal.Manual learning:- Turn the ignition key to the ON position.- Wait for 60 seconds; during this period the return spring inside the butterfly casing and the maximum/minimumangular positions of the motorized butterfly valve are checked.- Turn the ignition key to the OFF position.- Wait for 10 seconds; during this period the values acquired are recordd in the control unit EEPROM.Learning with diagnostic equipment signal "learning ended with positive outcome".- Connect the diagnostic equipment.- Place the ignition key in the ON position.- Wait until the diagnostic equipment gives the positive learning outcome signal.- Turn the ignition key to the OFF position.- Wait until the diagnostic equipment signals that the procedure is over.ENGINE IDLE SPEED CHECKIf the engine idle speed is not 750±50 rpm and the injection/ignition control unit is the self-regulatingtype, then it is not possible to carry out any adjustments, therefore it is necessary to check that the acceleratorlinkage is correctly adjusted and the cause of the problem should be sought by carrying out a completefault diagnosis using the diagnostic equipment.CHECKING CONCENTRATION OF POLLUTANT EMISSIONSThrough the self-adjusment of the system, the Motronic ME 3.1 system guarantees a continuous check onthe idle speed and CO percentage, thereby making any outside adjustment operations superfluous (thereare no adjustment screws). However, a check on the content of the exhaust gases, downstream fo thecatalyzer, can provide precious information on the operating conditions of the injection/ignition system,the engine parameters or the catalyzer.Checking idle CO and HC concentration upstream of the catalytic silencerTo check the concentration of carbon monoxide (CO) and unburnt hydrocarbons (HC) upstream of thecatalyzer, proceed as follows:1. Undo the cap or nut on the exhaust pipe, upstream of the catalyzer and tighten the tool in its place.2. Connect a suitably calibrated CO tester probe to the tool.3. Start up the engine and let it reach operating temperature.4. Check that the speed corresponds to the recommended figure.5. Check that the idle CO concentration is within the recommended figures given in the table overleaf; ifthis is not the case, it is necessary to check:- that the Lambda sensor is working properly, using the diagnostic equipment;- for the presence of air penetration in the area surrounding the Lambda sensor housing;- the injection and ignition system ( in particular, the wear of the spark plugs).6. In the same conditions, check that the concentration of HC is below 600 p.p.m.7. If these values are not measured, check the engine tuning, paying particular attention to:the ignition advance value - the valve clearances - the valve gear timing - the engine compression.38 Print n° 506.670/20
<strong>Bravo</strong> ft 20v98 rangeEngineFuel system10.Checking exhaust concentration of CO and HCThe exhaust concentration of carbon monoxide (CO) and unburnt hydrocarbons (HC) is measured byinserting a suitably calibrated CO tester probe at least 30 cm into the end of the exhaust pipe as shown in \the diagram.If the shape of the end of the exhaust pipe is such that the sensor cannot be fully introduced, a special extensionpipe which guarantees the seal in the join area must be added.1. Check that the idle CO and HC concentrations are the same as those in the table.2. If the HC value differes from the recommended limit, whilst that measured previously upstream of thecatalyzer was correct, the engine parameters are correct and the cause of the problem should thereforebe sought in the decreased efficiency of the catalyzer.Table summarizing pollutant emission tolerance figuresCO (%)HC (p.p.m.)CO2 (%)Upstream of the catalyzer0,4 - 1600> 12Downstream of the catalyzer^ 0,35^ 90> 13P4A39LJ0139
Engine <strong>Bravo</strong> 0)**Fuel system98 range10.DIAGNOSTICSThe complete fault diagnosis of the system can be carried out through an active dialogue using the diagnosticequipment.If a fault is detected with the sensors, the electronic control unit replaces the data coming from the faultysensor with pre-memorized (recovery) data to allow the operation of the engine. If a fault is detected it ispermanently stored in the memory and the sensor is excluded from the system until the signal is compatibleonce again.The same procedure is applied if the fault involves an actuator or control flap. The detection of a faultand the replacement with recovery data involves the signalling of the fault by the specific warning lightin the instrument panel coming on.The following parameters can, in the case of a failure, be managed by the control unit: flow meter,coolant temperature sensor, butterfly casing actuator, Lambda sensor, air temperature sensor, batteryvoltage and detonation sensors. In the case of faults in the control unit, the rpm sensor or the electric fuelpump, the system does not identify the fault and the vehicle stops. On request, the operator can readthe faults on the control unit using the diagnostic equipment.Detecting faultsThis is done whilst carrying out the basic function through which the sensor/actuator is managed.Memorizing the error and the structure of the errors memoryErrors are memorized in the control unit in the order in which they occur. The location, type of error andenvironmental conditions (specific for each type of error) are measured the moment the fault is detectedfor all errors. There is also a frequency counter.Classification of the defectIf a defect is recognized for the first time or the error state persists for a time t > 0.5s, the defect is memorizedas "permanent". If this defect later disappears, it is memorized as "intermittent" and "not present".If it then reappears, it is memorized as "intermittent", but becomes "present".The classification of a fault as "permanent" activates the recovery functions; when the fault disappearsthe normal reading or implementation function is resumed.Several types of fault are classified as "important", i.e. in terma of anti-pollution regulations. The presenceof these faults is signalled to the driver by the failure warning light in the instrument panel comingon.Frequency counterEach error is assigned a frequency counter, which is used to determine the moement in which a fault nolonger present has been memorized. The first time a fault is detected, the counter is set at 10. If the faultdisappears, the counter remains at the current value. If it reappears, it is increased by 1 (with an upperlimit 50).The counter is decreased each time the engine is started up and the fault has not reappeared. If thecounter reaches zero, the fault is automatically cancelled from the memory.If the counter has decreased and the fault reappears, the counter returns to 10 (if it was already above10, it is not altered).Signalling a faultThe failure warning light comes on when a defect is memorized as "present" and "important".The delay time between detecting the fault and the warning light coming on is 0.1 seconds; the delaytime between the fault disappearing from the memory and the warning light going out is 4 seconds.The warning light comes on each time the ignition key is turned to the ON position. If "important" faultsare aleady present, the warning light goes out after 4 seconds.40 Print no. 506.670/16
<strong>Bravo</strong> ft 20v98 rangeEngineFuel system10.Cancelling errorsWhen the frequency counter reaches 0, the fault and the parameters associated with it are cancelled.The immediate cancelling of the entire errors memory takes place through the "cancel errors memory"command sent by the diagnostic equipment.Connector with the diagnostic equipmentThe diagnostic socket to which the diagnostic equipment (Examiner or SDC station) is connected is locatedat the front of the engine compartment on the right hand side (see diagram on page 18).The exchange of data between the control unit and the diagnostic equipment takes place via a two-wayserial line (line K) using the standard Bosch communication protocol.The diagnostic equipment can supply the following information:- display of the errors;- display of the engine parameters;- active diagnosisList of errorsDescriptionRpm sensorAir temperature sensorCoolant temperature sensorBatteryLambda sensorInjectorButterfly casing actuatorPetrol vapour solenoid valveRelays actuatorsControl unitFlow meterTiming sensorDetonation sensorSpeedometer sensorPhase transformerElectric fuel pumpFiat CODENature of the errorsSignal lossImplausible signalC.A-C.C.Voltage not plausibleC.C.C.A.-C.CPotentiometer signal not plausibleC.C.C.A.-C.C.Faults in the operation of the microprocessor or thecontrol unit memories are signalled.Implausible signalImplausible signalImplausible signalMissing or implausible signalC.C.C.CCode not recognized or not receivedCopyright by Fiat Auto 41
Engine <strong>Bravo</strong> 10)^Fuel system98 range10.Parameters displayedEngine rpmInjection timeAdvanceIntake air temperatureCoolant temperatureButterfly valve opening angleBattery voltageLambda sensorSelf-adjustmentFlow meterEngine knock (detonation)Vehicle speedPetrol vapour cut out solenoid valveFiat CODEAtmospheric pressureActive diagnosisThe following tests can be activated using the diagnostic equipment:- Phase transformer- Injector- Failure warning light- Petrol vapour solenoid valve- Air conditioning- Idle speed actuator- Cancelling errors.RecoveryIf there are faults with the sensors, the control unit replaces the figure transmitted by the sensor with aRecovery value which, depending on the different problems, is either stored in the control unit memoryor is constructed specially using the other information available in order to allow the vehicle to reach aService Centre.Permanent memoryThe control unit is equipped with a «permanent» type memory (EEPROM), i.e. it keeps a record of theerror even when the cause of the problem no longer exists and if the ignition is switched OFF and a«volatile» memory (RAM) where the information concerning the error is lost as soon as the cause of theproblem ceases.This also allows the more effective identification of error of an occasional nature.Before ending the fault diagnosis, the contents of the «permanent» memory should be cancelled usingthe diagnostic equipment in Active diagnosis.The contents of the «permanent» errors memory can be cancelled in the following ways:1 - Using the diagnostic equipment in active diagnosis.If this is not the case, when the diagnostic equipment is reconncted, the errors already examined will besignalled.2 - If the cause of the error is longer present and the engine has been started up 5 times (running for atleast 20 minutes) with an interval of at least 2 minutes between each starting up.Disconnecting the control unit from the system, even for very long periods, does not cancel thecontents of the ((permanent)) memory.42 Print no. 506.670/16
<strong>Bravo</strong>-<strong>Brava</strong> ^98 rangeJTDEngineIndex10.pageFUEL SYSTEM 1- Introduction 1- System management strategies 1- Functional diagram showing fuelsystem 2INJECTION SYSTEM WIRINGDIAGRAM 6- Injection electronic control unit 8- Diagram showing information entering/leavingthe injection control unitand sensors/actuators 10- Rpm sensor 11- Timing sensor 1 2- Air flow meter 12- Injectors 13- Engine coolant temperature sensor 14- Fuel temperature sensor 14- Fuel pressure sensor 14- Heater plugs control unit 15- Accelerator pedal potentiometer 15- Brake pedal switch 16- Clutch pedal switch 16- Excess pressure sensor 16- Atmospheric pressure sensor 16FUEL SUPPLY CIRCUIT 17- (Auxiliary) immersed electric pump assemblyand fuel gauge 18- Fuel filter 18- Pressure pump 19- Fuel pressure regulator 19- Multi-purpose valve 20- Supply manifold (rail) 20- Inertia safety switch 21AIR SUPPLY CIRCUIT 22- Turbocharger 23- Exhaust gas circuit 23EMISSION CONTROL DEVICE 23- Catalytic converter 23- Exhaust gas recirculation circuit(EGR) 24- EGR modulating valve 25- Recirculation circuit for vapours comingfrom the crankcase (blow-by) 26Copyright by Fiat Auto
<strong>Bravo</strong>-<strong>Brava</strong> Hfy JTD98 rangeEngineFuel system10.FUEL SYSTEMINTRODUCTIONThe Fiat <strong>Bravo</strong> and <strong>Brava</strong> 1.9 JTD are equipped with a 4 cylinder in line 1920 cc turbodiesel engine withtwo valves per cylinder, a counter-balance shaft, an overhead camshaft, supercharged by a turbochargerwith an intercooler and with electronic fuel injection.The fuel system ensures the correct operation of the engine and can be divided into the following circuits:- fuel supply circuit with common rail type injection;- air supply circuit;- exhaust circuit;- oil vapour recirculation circuit from the crankcase;- exhaust gas recirculation circuit (EGR).The optimum operation of the various fuel system "circuits" is achieved through an electronic controlsystem managed by a special control unit.The main feature of the fuel system is the common rail type injection of the fuel. This is a high pressureelectronic injection system for direct injection fast diesel engines.The main features of the common rail system are:- availability of high injection pressures (up to 1350 bar);- possibility of modulating these pressures (from a minimum of 150 bar up to a maximum of 1350 bar)indepedent of the engine rotation speed and load;- capacity to operate at high engine speeds (up to 6000 rpm);- precision injection operation (advance and duration of the injection);- reduction in fuel consumption;- reduction in emissions.FUEL SYSTEM MANAGEMENT STRATEGIESThere is a management programme (software) in the control unit memory which consists of a series ofstrategies, each of which manages a precise system control function.By using information supplied by the various sensors (input), each strategy processes a series of parameters,using maps stored in special areas of the control unit memory and then operates the system actuators(output) which are the devices which allow the operation of the engine.The main aim of the management strategies is to determine the exact quantity of fuel which should beinjected into the cylinders at one time (injection advance) and the pressure to achieve the best enginebehaviour in terms of power, consumption, fumes, emissions and driveability.The main system management strategies are, basically, as follows:- control of quantity of fuel injected;- control of injection advance;- control of injection pressure;- control of auxiliary electric fuel pump;- control of injection during deceleration(Cut-off);- control of idle speed;- control of maximum speed restriction;- control of maximum torque restriction;- control of fuel temperature;- control of engine coolant temperature;- control of heater plugs;- control of exhaust fumes;- control of exhaust gas recirculation (EGR);- control of engagement of climate control system;- control of engine immobilizer function (FiatCODE);- autodiagnosis.Copyright by Fiat Auto 1
EngineFuel system10.<strong>Bravo</strong>-<strong>Brava</strong> ify98 rangeFUNCTIONAL DIAGRAM SHOWING FUEL SYSTEMn r\' N ^ J J-! IIHi V26STO28Ur a 29yL1. Auxiliary electric fuel pump2. Heater plugs control unit3. Vehicle speed4. Rev counter5. Heater plugs warning light6. Infocenter (system failure indication)7. EGR valve modulator8. Pressure regulator9. Excess pressure sensor10. Fuel temperature sensor11. Fuel pressure sensor12. Injection system relay13. Electronic control unit14. Injectors15. Heater plugs16. Rpm sensor17.18.19.20.21.22.23.24.25.26.27.28.29.Engine coolant temperature sensorClimate control system connectorDiagnostic socketFiat CODE system connectorFlow meterTiming sensorPotentiometer on accelerator pedalSwitch on clutch pedalSwitch on brake pedalFuel filterPressure pumpReturn manifold (low pressure)Supply manifold (high pressure)2 Print no. 506.670/16
<strong>Bravo</strong>-<strong>Brava</strong> if^Engine98 range Fuel system10.Controlling the quantity of fuel injectedOn the basis of the signals coming from the accelerator pedal potentiometer, the flow meter and the rpmsensor, the control unit operates the fuel pressure regulator and the injectors, as appropriate.The timing and consequently the injection sequennce, is determined by the starting of the engine usingthe signals coming from the rpm sensor and the timing sensor (synchronization stage); later, the injectiontiming is implemented using only the rpm sensor signal and the injection sequence 1 -3-4-2.The control unit inhibits the injection in the following cases:- fuel pressure value above 1500 bar;- fuel pressure value below 120 bar;- engine speed above 6000 rpm.At operating temperature the maximum duration of the injection (injector opening time) is 1500 ns,whilst during starting it can reach 3000 ns.Control of injection advanceThe electronic control unit determines the injection advance mainly on the basis of the quantity of fuel tobe injected.Later on, the injection advance is corrected according to the temperature of the engine coolant and thespeed in order to compensate, whilst the engine is warming up, for the increase in the ignition delay dueto the low temperatures in the combustion chambers.Control of injection pressureThis check is esepcailly important because the injection pressure affects the following parameters:- the quantity of fuel introduced into the cylinders for the duration of the injection time;- the atomization of the fuel injected;- the penetration of the jet;- the delay between the electrical operation of the injector and the effective start and end of injection.The above mentioned parameters have a considerable effecton the behaviour of the engine, especially asfar as the power supplied, exhaust emissions, noise and driveability are concerned.On basis of the engine load, the injection control unit operates the pressure regulator to ensure a linepressure which is always optimum.With the engine cold, the injection pressure is corrected on the basis of the engine coolant temperatureand speed in order to satisfy the engine requirements at different operating temperatures.Control of the auxiliary electric fuel pumpThe auxiliary electric fuel pump, immersed in the tank, is supplied by the injection control unit via a relaywhen the ignition key is in the ON position.The supply to the electric pump is inhibited when one of the following conditions occurs:- after the ignition key has been in the ON position for a certain length of time and the engine has notbeen started up;- if the inertia switch has been operated.Control of injection during deceleration (cut-off)The cut-off strategy is implemented when the injection control unit receives the information from thepotentiometer that the accelerator pedal is released.Under these circumstances, the control unit removes the supply to the injectors and reactivates beforethe idle speed is reached.Copyright by Fiat Auto 3
Engine<strong>Bravo</strong>-<strong>Brava</strong> ityFuel system . 98 range10.Control of the idle speedOn the basis of the signals coming from the rpm sensor and the engine coolant temperature sensor, theinjection control unit controls the pressure regulator and varies the operating times for the injectors tokeep the idle speed stable.Under certain circumstances, in order to control the idle speed, the control unit also takes the batteryvoltage into account.Control of the maximum speed restrictionAccording to the engine speed, the injection control unit restricts the maximum speed through twotypes of intervention:- as the maximum speed is approached, it decreases the quantity of fuel injected, reducing the line pressure;- when 6000 rpm is exceeded, it inhibits the operation of the injectors.Control of the maximum torque restrictionDepending on the engine speed, the injection control unit calculates the torque limit and maximum permissiblefumes parameters based on pre-defined maps stored in the memory.It then corrects the above parameters using engine coolant temperature and vehicle speed data and usesthe values obtained in this way for metering the quantity of fuel to be injected involving the pressureregulator and the injectors.Control of fuel temperatureThe injection control unit is constantly informed of the temperature of the fuel by the sensor on the returnmanifold.If the temperature of the fuel exceeds a certain level (about 110 °C), the control unit reduces the linepressure acting on the pressure regulator and leaving the injection times unaltered.Control of engine coolant temperatureThe injection control unit is constantly informed of the temperature of the engine coolant by the sensoron the thermostat.If the temperature of the engine coolant exceeds certain values, the control unit implements the followingstrategies:- it reduces the quantity of fuel injected acting on the pressure regulator and the injectors (power reduction);- it operates the engine cooling radiator fan.Control of heater plugsThe injection control unit controls the operation of the heater plugs control unit so that the temperaturein the combustion chambers is at a level which assists the self-ignition of the fuel and consequently facilitatesstarting.In effect the injection control unit controls the operation of the heater plugs control unit for a certainlength of time both before starting (pre-heating) and after starting (post-heating) and also controls thecoming on of the warning light in the instrument panel.The pre-heating and post-heating times plus the coming of the heater plugs warning light all vary accordingto the temperature of the engine coolant.4 Print no. 506.670/16
<strong>Bravo</strong>-<strong>Brava</strong> ty Engine98 range Fuel system10.Control of exhaust fumesThrough this function the injection control unit limits any exhaust fumes which could occur duringstrong acceleration.In order to satisfy this requirement, the control unit processes the signals supplied by the acceleratorpedal potentiometer, the rpm sensor and the intake air quantity sensor (flow meter) and operates the fuelpressure regulator and the injectors to correctly meter the quantity of fuel to be injected.Control of exhaust gas recirculationOn the basis of the signals supplied by the rpm, intake air quantity, engine coolant temperature and acceleratorpedal position sensors, the injection control unit calculates the operating times for the EGRsolenoid valve so that the exhaust gases are partly recirculated in certain engine operating conditions.Control of engagement of air conditioning systemThe injection control unit manages the operation of the air conditioning system compressor electromagnetcoupling following a logic aimed at preventing operating conditions which would adversely affectengine performance.When the compressor is switched on, the injection control unit increases the quantity of fuel duringidling so that the engine can meet the request for more power and interruptsthe supply to the compressorin the following conditions:- request for high power for the engine (strong acceleration);- excessive engine coolant temperature.Control of engine immobilizer functionThe system is equipped with an engine immobilizer function. This function is achieved through thepresence of a special control unit (Fiat CODE), capable of dialogue with the injection control unit andan electronic key, with a special transmitter for sending a recognition code.Each time the key is turned to the OFF position, the Fiat CODE system completely deactivates the injectioncontrol unit.When the ignition key is placed in the ON position, the following operations take place in order:1. the injection control unit (whose memory contains a secret code) sends the Fiat CODE control unit arequest for the latter to send the secret code to deactivate the immobilizer function;2. the Fiat CODE control unit responds by only sending the secret code after having, in turn, receivedthe recognition code transmitted by the ignition key;3. the recognition of the secret code allows the de-activation of the injection control unit immobilizerfunction and normal operation to be resumed.AutodiagnosisThe complete electronic fault diagnosis of the injection system can be carried out by connecting thespecial equipment (EXAMINER or SDC station) to the diagnostic socket.The system is also equipped with an autodiagnostic function which recognizes, memorizes and signalsany failures.If a fault is detected at the sensors or actuators, the signal reconstruction (recovery) strategies are immediatelyactivated to ensure the operation of the engine at an acceptable level. The vehicle can thereforebe driven to a Service Centre to have the appropriate repairs carried out.Copyright by Fiat Auto 5
0--3-52 2-1 3-51 3-38o—o-o-o-1-4 1-5 1-6 5-2 5-9 5-7 5-4 5-5 5-3 4-234-11 4-4 4-1 4-141 2 3 4 5^ ///\ //\ //\ //\63) (SS> 6R) ©
<strong>Bravo</strong>- <strong>Brava</strong> @> Engine1998 range Fuel system10.Key to injection system wiring diagram components1. Vehicle speed2. Rev counter3. Engine cooling fan low speed relay4. Radiator fan high speed activation relay5. Potentiometer on accelerator pedal6. Excess pressure sensor7. Fuel pressure sensor8. EGR system modulator solenoid9. Fuel pressure regulator10. Glow plug preheating warning light on control panel11. Injection system failure warning light12. Air conditioner control relay13. Coolant temperature sensor14. RPM sensor15. Fuel temperature sensor16. Tester connection17. Fiat CODE control unit18. Four stage pressure switch19. Injection electronic control unit20. Timing sensor21. Fuse (7.5A) protecting injection control unit ( + 15 power supply from ignition switch)22. Fuse (7.5A) protecting injection control unit (+30 power supply from battery)23. Injection system main relay24. 30A fuse protecting injection system25. Auxiliary fuel pump supply relay26. Glow plug preheating control unit27. Intake air flow and temperature sensor (debimeter)28. Brake pedal switch29. Clutch pedal switch30. Ignition switch31. Battery32. Inertia switch33. Auxiliary fuel pump (submerged in tank)34. 60A fuse protecting glow plug control unit35. Cylinder no.1 glow plug36. Cylinder no.2 glow plug37. Cylinder no.3 glow plug38. Cylinder no.4 glow plug39. Cylinder no.1 injector40. Cylinder no.2 injector41. Cylinder no.3 injector42. Cylinder no.4 injectorCopyright Fiat Auto VH-'SS -r-Sijpsrsodej phevfoiis version 7
EngineFuel system10.INJECTION ELECTRONIC CONTROL UNIT<strong>Bravo</strong>-<strong>Brava</strong> 9^1998 rangeThe injection control unit processes signals from the various sensors by applying software algorithms andcontrols the actuators accordingly (particularly the injectors and pressure regulator) to achieve the bestpossible engine service conditions.The control unit is "flash E.P.R.O.M." type, i.e. it can be reprogrammed from outside without andy needto adjust the hardware.The injection control unit contains a built-in absolute pressure sensor and is connected to the wiring bya134 pin connectorIdentifying injection control unit connections (pin-out)13 24 27OOOOOO OOOOOOQlOOOOO OOOOOOOS26 1 20 11-01 Battery positive (+30) from main1 -02 Not connected1 -03 Not connected1-04 Earth1-05 Earth1-06 Earth1 -07 Battery positive (+30) from main1-08 Battery positive (+30) from main1 -09 Not connected2-01 Glow plug timer signal2-02 Clutch pedal switch2-03 Climate control system activation2-04 Not connected2-05 Not connected2-06 Not connected2-07 Not connected2-08 Brake pedal switchrelayrelayrelayrequest2-092-102-112-122-132-142-152-162-172-182-192-202-212-222-232-243-013-023-03Not connectedNot connectedNot connectedNot connectedPositive (+15) from ignition switchNot connectedNot connectedNot connectedNot connectedNot connectedNot connectedNot connectedNot connectedNot connectedLow radiator fan speed activationquestNot connectedFuel temperature sensor earthNot connectedNot connectedre-8 Publication n° 506.670/21
<strong>Bravo</strong>-<strong>Brava</strong> ^ JTD98 range3-043-053-063-073-083-093-103-113-123-133-143-153-163-•173-■183--193--203--213--223--233--243--253--263-273-283-293-303-313-323-333-343-353--363--373--383--393--403--413--423-433-443-453-463-473-481:183-513-524-014-024-034-044-05Not connectedAccelerator pedal potentiometer 1 supplyNot connectedNot connectedAccelerator pedal potentiometer 2 earthAccelerator pedal potentiometer 2 signalAccelerator pedal potentiometer 1 signalNot connectedNot connectedFiat CODE control unitNot connectedNot connectedNot connectedNot connectedNot connectedNot connectedGo ahead to engage climate control fromfour stage pressure switchAccelerator pedal potentiometer 2 supplyNot connectedAccelerator pedal potentiometer 1 earthFuel temperature sensor signalNot connectedVehicle speed signal (from ABS)Not connectedDiagnostic sockect connection (line K)Not connectedAuxiliary electric fuel pump supply (immersedin the tank)Not connectedNot connectedNot connectedNot connectedNot connectedNot connectedEGR modulating solenoid valve supplyHeater plugs timer controlNot connectedRpm signal to the rev counterNot connectedNot connectedHeater plugs warning lightNot connectedRequest to engage engine radiator fanhigh speedMain relay go aheadNot connectedInjection system failureEGR modulating valve earthHeater plugs timer controlAuxiliary electric pump relay feed goaheadFlow meter supplyTiming sensor earthTiming sensor signalFlow meter earthNot connected4-06 Excess pressure sensor signal4-07 Excess pressure sensor earth4-08 Excess pressure sensor supply4-09 Not connected4-10 Not connected4-11 Flow meter supply4-12 N.C.4-13 Fuel pressure sensor supply4-14 Flow meter signal4--154--164--174--184--194--204--214-224-234-244-254-264-274-284-294-304-314-324-334-344-354-364-374--384--394--405--015 -0245 035- 045-055-065-075-085-09EngineFuel system10.Four stage pressure switchNot connectedRpm sensor screeningNot connectedNot connectedNot connectedFuel pressure regulatorNot connectedAir temperature sensor signalFuel pressure sensor signalNot connectedRpm sensor signalEngine coolant temperature sensor earthNot connectedNot connectedNot connectedFuel pressure regulatorClimate control system relayNot connectedFuel pressure sensor earthNot connectedEngine coolant temperature sensor signalRpm sensor earthNot connectedNot connectedNot connectedN.C.Supply for injectors for cylinders 1 andOperation of injector for cylinder no. 4Supply for injectors for cylinders no. 2and 3Operation of injector for cylinder no. 3Not connectedOperation of injector for cylinder no. 2N.C.Operation of injector for cylinder no. 1Copyright by Fiat Auto 9
EngineFuel system10.<strong>Bravo</strong>-<strong>Brava</strong> Ity98 rangeDIAGRAM SHOWING INFORMATION ENTERING/LEAVING THE INJECTION CONTROL UNITAND SENSORS/ACTUATORS1.2.3.4.5.6.7.8.9.10.11.12.Auxiliary electric fuel pumpClimate control compressorEGR modulating valveRev counterEngine radiator fansHeater plugs control unitAccelerator pedal potentiometerBrake and clutch pedal switchesFuel pressure sensorIntake air temperature and quantity sensor(flow meter)Engine coolant temperature sensorFuel temperature sensor13.14.15.16.17.18.19.20.21.22.23.24.Excess pressure sensorTiming sensorRpm sensorVehicle speedBatteryFour stage pressure switchFiat CODE control unitDiagnostic socketFuel pressure regulatorInjectorsHeater plugs warning lightInjection system failure10 Print no. 506.670/16
<strong>Bravo</strong>-<strong>Brava</strong> f^ JTD98 rangeRPM SENSOREngineFuel system10.The rpm sensor is fitted on the cylinder block-/crankcase facing the flywheel on thecrankshaft.The sensor is the inductive type, in other wordsit operates through the variation in the magneticfield produced by the teeth on the flywheel(60-2 teeth) passing in front of the sensor element.The injection control unit uses the rpm sensorsignal to determine the crankshaft angular positionand speed.OperationThe passage from full to empty due to whetheror not there is a tooth, determines a variation inthe magnetic flow sufficient to produce an alternatingvoltage from the counting of the teethon the flywheel.The peak rpm sensor output voltage depends,all things being equal, on the distance betweenthe sensor and the flywheel teeth.1. Metal bush2. Permanent magnet3. Sensor body4. Winding5. Core6. Flywheel7. Electrical connectionH~P1rv.EHM nZ EjrliOTo obtain the correct signals, the recommendeddistance between the flywheel andthe sensor (gap) should be between 0.8 and1.5 mm.This distance cannot be adjusted therefore ifthe gap is outside of the tolerance, check thecondition of the sensor and the flywheel.VI3Winding resistance: 860 Ohm ±10% at 20 CPMflfflllllli«1. Maximum mangetic flow2. Minimum magnetic flow3. Alternating voltageCopyright by Fiat Auto 11
EngineFuel system10.<strong>Bravo</strong>-<strong>Brava</strong> ty98 rangeTIMING SENSORThis Hall effect type sensor is fitted on the cylinder and is facing the camshaft pulley (exhaust).There is an opening in the pulley which allows the timing sensor to detect the engine timing positionand signal it to the injection control unit.The injection control unit uses the timing sensor signal to recognize TDC at the end of the compressionstroke.OperationA semiconductor layer, through which a current flows, immersed in a normal magnetic field (lines offorce perpendicular to the direction of the current), produces a difference in power known as Hall voltage.If the intensity of the current remains constant, the voltage produced only depends on the intensity ofthe magnetic field; therefore if the intensity of the magnetic field simply varies periodically this producesa modulated electrical signal, whose frequency is proportional to the speed at which the magnetic fieldchanges.To produce this change, a metal ring (inner part of the pulley) with an opening passes through the sensor.As it moves, the metal part of the ring covers the sensor blocking the magnetic field with a consequentlow output signal; conversely, by the opening where the magnetic field is present, the sensor produces ahigh signal.This signal, together with the signals relating to the rpm and TDC, allow the injection control unit to recognizethe position of the pistons and determine the injection point.AIR FLOW METERThe flow meter is located on the air inlet hoseand is the hot film type.The intake air temperature sensor is incorporatedinside the flow meter.OperationThe operating principle is based on a heated diaphragmin a measuring duct through which theintake air which enters the engine flows.The hot film diaphragm is kept at a constanttemperature (about 120 °C higher than the temperatureof the inlet air) by the heating resistance.The mass of air passing through the measuringduct tends to remove heat from the diaphragmtherefore, in order to keep the latter at a constanttemperature, a current is passed throughthe resistance.This current, being proportional to the mass ofair which flows to the engine, is measured usinga Wheatstone bridge and the signal obtained issent to the injection control unit.1. Covers2. Electronic card3. Sensor4. Support plate5. Support6. Seal (O-Ring)7. Temperature sensor12 Print no. 506.670/16
<strong>Bravo</strong>-<strong>Brava</strong> $fyEngine98 range Fuel system10.I I INJECTORSThe injectors, fitted on the cylinder head, are theelectro-magnetic type, operated directly by theinjection control unit.The injectors are equipped with a high pressuresupply duct and a recirculation pipe at ambientpressure; the supply duct is connected to thesupply manifold (rail) with pipes designed towithstand the high operating pressures.The injector can be divided into two parts:- actuator/nozzle consisting of a pressure rod(1), pin (2) and jet (3);- solenoid valve consisting of a coil (4) andvalve (5).OperationThe operation of the injectors can be divided intothree stages:^V-- 38P4A13KJ011. rest positionThe coil (4) is de-energized and the shutter (6)is in the closed position and does not allow theintroduction of fuel into the cylinder: FoFawhere Fc is the force produced by the pressurewhich acts on the control area (7) of the pressurerod (1) and Fa is the force produced by thepressure acting on the supply volume (8).1. Pressure rod2. Pin3. Jet4. Coil5. Valve6. Shutter with ball7. Control area8. Supply volume9. Control volume10. Fuel outlet connector (low pressure)11. Control manifold12. Supply manifold13. Electrical connection14. Fuel inlet connector (high pressure)15. Spring2. start of injectionThe coil (4) is enerigzed and raises the shutter(6). The fuel flows from the control volume (9)to the return manifold causing a decrease inpressure in the control area (7). At the sametime, the line pressure through the supply manifold(12) exerts a force Fa>Fc on the supplyvolume (8) raising the pin (2) with the consequentintroduction of fuel into the cylinders.3. end of injectionThe coil (4) is de-energized and returns theshutter (6) to the closed position which restoresa balance which returns the pin (2) to theclosed position and consequently the injectionends.Copyright by Fiat Auto 13
EngineFuel system<strong>Bravo</strong>-<strong>Brava</strong> igj^98 rangeENGINE COOLANT TEMPERATURE SENSORThis sensor is fitted on the thermostat and detectsthe temperature of the engine coolant bymeans of an NTC thermistor with a negative resistancecoefficient.The sensor is produced using semiconductortechnology, therefore if the temperature of thesensor element increases as the temperature ofthe coolant increases, the resistance value decreasesas a result.As the variation in the resistance is not linear,the same increase in temperature is greater atlower temperatures than at higher temperatures.1. NTC resistance2. Sensor body3. Electrical connectorFUEL TEMPERATURE SENSORThis sensor is fited on the return manifold anddetects the temperature of the fuel through anNTC thermistor which has a negative resistancecoefficient.For the operation of the sensor, refer to the previousdescription dealing with the coolant temperaturesensor.FUEL PRESSURE SENSORThis sensor is fitted in the centre of the fuel supplymanifold (rail) and has the task of supplyingthe injection control unit with a return("feed-back") signal for:- regulating the injection pressure;- regulating the duration of the injection.14 Print no. 506.670/16
<strong>Bravo</strong>-<strong>Brava</strong> ty98 rangeHEATER PLUGS CONTROL UNITEngineFuel system10.The operation of the heater plugs takes placethrough the heater plugs control unit under thedirect control of the injection control unit.There is an "intelligent" relay inside the heaterplugs control unit which sends feed-back to theinjection control unit which is thereby informedof any failure in the heater plugs control unit ora short circuit to earth of the heater plugs.The diagram illustrates the connectors at thebase of the heater plugs control unit and thepin-out:P4A15KJ011. Earth2. Connected to earth3. Injection control unit (pin 3-38)4. Injection control unit (pin 3-51)5. Injection control unit (pin 2-1)8. Battery positive (+30)G. Heater plugs (only 4 outlets are used)ACCELERATOR PEDAL POTENTIOMETERP4A16KJ02The position of the accelerator pedal is transformedinto an electrical voltage signal and issent to the injection control unit by the potentiometerconnected to the pedal.The accelerator pedal position signal is processedtogether with the information relating tothe speed to obtain the injection times and pressure.The sensor is made up of a casing (1) fixed tothe pedals by a flange, which contains a shaft(2), in an axial position, connected to the twopotentiometers (3): one main one and one safetyone.There is a coil spring on the shaft which ensuresthe correct resistance to the pressure, whilst asecond spring ensures the return on release.Copyright by Fiat Auto 15
EngineFuel system10.<strong>Bravo</strong>-<strong>Brava</strong> ty98 rangeBRAKE PEDAL SWITCHThere is a switch (1) on the brake pedalwhich operates the brake lights; the sameswitch sends a signal to pin 2-8 of the injectioncontrol unit.The "brake pedal pressed" signal is usedby the control unit:- for understanding that there is a decelerationsituation;- for checking the plausibility of the signalcoming from the accelerator potentiometer.CLUTCH PEDAL SWITCHThere is a switch (2) on the clutch pedal connected to pin 2-2 of the injection control unit.The "clutch pedal operated" signal is used by the injection control unit to distinguish the gear engagedand gear shift conditions.EXCESS PRESSURE SENSORThis sensor is fitted on the inlet manifold andthe signal transmitted to the injection controlunit is used for:- regulating the injection pressure;- regulating the duration of the injection.The diagram at the side shows the sensor andthe electrical connector with the pin-out:1. Pressure signal2. Earth3. SupplyATMOSPHERIC PRESSURE SENSORThe atmospheric pressure sensor is incorporated inside the injection electronic control unit and has thetask of measuring the atmospheric pressure in order to correct the air flow rate value measured and thereference air flow rate for controlling the EGR function.16 Print no. 506.670/16
<strong>Bravo</strong>-<strong>Brava</strong> ^ JTD98 rangeFUEL SUPPLY CIRCUITEngineFuel system10.The fuel supply circuit is operationally divided into a low pressure circuit and a high pressure circuit.The low pressure circuit consists of a tank, multi-purpose valve, auxiliary electric pump immersed in thetank and return manifold.The high pressure circuit consists of a radiaijet pressure pump, supply manifold and injectors.1. Fuel tank2. Immersed (auxiliary) electric pump assemblycomplete with fuel gauge3. Multi-purpose valve4. Pressure pump drive pulley5. Diesel filter cartridge6. Pressure.pump7. High pressure pipes8. Supply manifold (rail)9. injectors10. Fuel recirculation pipe (return for the injectors)11. Return manifold12. Pressure regulator13. Fuel temperature sensor14. Fuel pressure sensor15. Diesel heater16. Thermal switchCopyright by Fiat Auto 17
EngineFuel system10.<strong>Bravo</strong>-<strong>Brava</strong> tym>98 rangeIMMERSED (AUXILIARY) ELECTRIC PUMPAND FUEL GAUGEThis assembly is basically composed of:- a roller type electric pump;- a fuel level gauge;- a fuel filterThe electric pump immersed in the fuel is thevolumetric roller type with a motor with brushesand permanent magnets.The impeller (1), driven by the electric motor,creates volumes (2) which move from the inletport (3) to the supply port (4).1. Impeller2. Volumes3. Inlet port4. Supply port5. Rollers6. Outer ring7. Excess pressure valveThese volumes are defined by rollers (5) which,during the rotation of the motor, adhere to theoutside ring (6).The electric pump has two valves: one single-acting\£alve to preven the fuel circuit frombeing drained (when the pump is not working);the second excess pressure valve (7) which recirculatesthe supply with the inlet when thepressure exceeds 5 bar.FUEL FILTERThe fuel filter is located in the engine compartment,fixed to the inlet manifold.The filter is the cartridge type with a filter element(1) made up of a pack of paper discs witha filtering surface area of around 5300 cm 2 anda filtering capacity of 4 - 5 mm.The filter has a fuel pre-heating device (2) controlledby a thermal switch (3) fitted on the actualfilter.When the temperature of the diesel is below 6"C, an electrical resistance heats it up to a maximumof 15 °C before sending it to the pressurepump.There is a plug (4) bolted to the base of the fuelfilter cartridge for draining the water.1. Filter cartridge2. Diesel pre-heating device3. Thermal switch4. Water drain plug18 Print no. 506.670/16
<strong>Bravo</strong>-<strong>Brava</strong> ty98 rangeEngineFuel system10.PRESSURE PUMPThe pressure pump is the radialjet type withthree radial pistons (total capacity 0.657 cc)and is operated by the timing belt.Each pumping unit consists of:- a piston (5) operated by a cam (2) fixed tothe pump (6) shaft;- an inlet valve with a shim (3);- a supply ball valve (4).The pressure pump should receive a pressure ofat least 0.5 bar; for this reason, the fuel system isequipped with an auxiliary electric pump immersedin the tank.The pressure pump is lubricated and cooled bythe same diesel fuel through ducts and is capableof supplying a maximum pressure of 1350bar.1. Cylinder2. Cam3. Inlet valve4. Supply ball valve5. Piston6. Pump shaft7. Dieselinlet connector - low pressure - fromfuel filter8. Diesel supply connector - high pressure - tomanifold (rail)9. Diesel supply connector - low pressure - recirculationP4A19KJ02FUEL PRESSURE REGULATORThe fuel pressure sensor is fitted on the pressurepump and, operated directly by the injectioncontrol unit, regulates the supply pressure of thefuel to the injectors.P4A19KJ03The pressure regulator basically consists of thefollowing components:1. Shutter with ball2. Pin3. Valve4. Pre-loading spring5. Coil6. Casing7. KeeperCopyright by Fiat Auto 19
EngineFuel system10.MULTI-PURPOSE VALVE<strong>Bravo</strong>-<strong>Brava</strong> fy98 rangeThe multi-purpose valve is located on the fueltank and carries out the following tasks:- pressurizing the tank- ventilation- seal in case of overturnPressurizing the tankThe tank pressure is kept at between 55 and 75mbar through a small valve resting on the edge.P4A20KJ01This valve is supported by a steel plate and has an opposing spring.When the pressure in the tank exceeds the recommended value, it overcomes the resistance of the springand allows the valve to rise, allowing the flow of vapours.When the pressure returns to within the limits, the valve closes.VentilationIn certain operating conditions, a vacuum may be created in the tank due to:- heat variations;- fuel consumption.The function of the valve, in this case, is to restore the pressure inside the tank by drawing in air.Any irregularity in this function can cause misfiring or the vehicle to come to a halt through problemswith the supply of the electric pump.Seal in the case of overturning (roll-over)The roll-over function is designed to prevent fuel coming out of the tank if the vehicle turns over or is atan angle.During normal operation (round bends, acceleration, braking, etc.) the fuel splashes around in the tankand could escape.The extreme sensitivity of this valve to roll-over prevents fuel from escaping.SUPPLY MANIFOLD (RAIL)The supply manifold (rail) is fitted on the cylinder head, inlet side.It dampens the fuel pressure fluctuations due mainly to the:- operation of the pressure pump;- opening of the injectors.The fuel pressure sensor-is fitted in the centre of the supply manifold.The (high pressure) hydraulic connections are through special steel pipes.20 Print no. 506.670/16
<strong>Bravo</strong>-<strong>Brava</strong> @i98 rangeJTDINERTIA SAFETY SWITCHEngineFuel system10.In order to increase the safety of the occupants,in the case of an impact, the vehicle is equippedwith an inertia switch located inside the passengercompartment, fixed to the left of the sidepanel.This sensor reduces the risk of fire (as a result offuel escaping) by deactivating the auxiliaryelectric pump which supplies the injection circuit.The inertia switch consists of a steel ball fitted ina (tapered) housing and kept in position by theattraction force of a permanent magnet.If the vehicle is involved in a violent crash, the ball is released from the magnetic clip and opens the normallyclosed (N.C.) electrical circuit interrupting the connection to earth for the auxiliary electric pumpand, as a result, the supply to the injection system.To restore the connection to earth for the auxiliary electric pump, the seat must be moved backwardsand the switch pressed until it is heard to click.Even after an apparently minor impact, if there is a smell of fuel or there are leaks from the fuelsystem, do not turn the inertia switch back on, but search first for the cause of the problem andremedy it to avoid the risk of fire.Inertia switch components1. Complete inertia sensor2. Outer casing3. Button4. Upper side5. Engagement side6. Permanent magnet7. Permanent magnet housing8. Steel ballN.C. N.A. CC Common terminalN.C. Normally closed contactN.A. Normally open contactCopyright by Fiat Auto XI-98 - Cancels and replaces 21
EngineFuel system10.<strong>Bravo</strong>-<strong>Brava</strong> @i^98 rangeAIR SUPPLY CIRCUITThe air supply circuit is supercharged by means of a variable geometrye GARRET turbocharger and anintercooler.The turbocharger is the reduced inertia type, based on a new supercharging concept where the use ofthe turbocharger is designed to increase the torque in the most frequently used range (e.g. low speeds).The intake air, after having passed through the filter (1), is compressed by the turbocharger (4) operatedby exhaust gases, cooled by the heat exchanger (intercooler) (5) and sent to the inlet manifold (6) fromwhere it is distributed to the cylinders.Diagram showing air supply circuitP4A22KJ011. Inlet vent2. Air filter3. Intake air flow meter4. Turbocharger5. Air/air heat exchanger (intercooler)A. To the turbochargerB. To the inlet manifold22 Print no. 506.670/77
<strong>Bravo</strong>-<strong>Brava</strong> ^98 rangeTURBOCHARGEREngineFuel system10.It is basically made up of two impellers (1) fittedon one shaft (2), which rotates on floatingbearings lubricated via a duct (3) from the enginelubrication circuit.The oil used discharges part of the large amountof heat given off by the exhaust gases at the turbine.There is a waste-gate valve (4), operated by apneumatic actuator (5), on the turbocharger,which shutters the flow of exhaust gases to theturbine, according to the engine power/torquerequest.1. Impellers2. Shaft3. Lubrication4. Waste-gate valve5. ActuatorP4A23KJ01EXHAUST GAS CIRCUITThe engine exhaust gases flow through the manifoldidizing catalytic converter and then to the silencer.Special protection limits the heat given offTo the turbocharger and, through a pipe, to the oxthebodyshell.EMISSION CONTROL DEVICESCATALYTIC CONVERTERP4A23KJ02The catalytic converter is a post-treatment devicefor oxidizing the CO, HC and particle matter,transforming them into carbon dioxide(CO2) and water vapour (H2O).The catalyzer consists of a ceramic honeycombstructure (1), whose cells are impregnated withplatinum (2), which acts as a catlyst for the oxidationreactions.The exhaust gases which pass through the cellsheat the catalyzer, triggering off the conversionof the pollutants into inert compounds.The chemical reaction of the oxidation of theCO, HC and particle matter is effective at tempearturesof between 200 °C and 350 °C.Above'350 °C, the sulphur contained in thediesel fuel starts to oxidize, producing sulphurdioxide and sulphur trioxide.Copyright by Fiat Auto 23
EngineFuel system10.<strong>Bravo</strong>-<strong>Brava</strong> ^ JTD98 rangeEXHAUST GAS RECIRCULATION CIRCUIT (EGR • Exaust Gas Recirculation)This system makes it possible to send part of the exhaust gases to the inlet in certain engine operatingconditions.This dilutes the fuel mixture with the inert gases lowering the peak temperature in the combustionchamber; this contains the formation of nitrogen oxides (NOx), giving a reduction of 30-50% at the exhaust.The recirculation of exhaust gases is only allowed at medium-low loads, when the air/fuel ratio is veryhigh and the operation of the engine is not adversely affected by the presence of inert gases in place ofthe air.The recirculation is controlled by the injection control unit (1) which, basically according to the signalsfrom the accelerator pedal potentiometer, the rpm sensor and the engine coolant temperature sensor,supplies an output signal for operating the modulating valve (2).On the basis of the signal received, the latter, connected to the atmosphere by means of a small filter (3),transmits a lesser or greater vacuum, coming from the brake servo vacuum pump (5), to the EGR valve(4).If the vacuum is sufficient, the valve (4) opens placing the exhaust manifold in contact with the inletmanifold.Diagram showing exhaust gas recirculation24 Print no. 506.670/16
<strong>Bravo</strong>-<strong>Brava</strong> |Q} JTD98 rangeEngineFuel system10.EGR MODULATING VALVEThe vacuum coming from the vacuum pump for the brake servo reaches the chamber (E) from the duct(F) (case I), because the force of the spring (6) acts on the moving element (4) and the valve (5) allowsits passage.The vacuum then affects the chamber (B), through the compensation port (D) and the surface of theshutter (3).When the forces acting on the disc (3) are in equilibrium, the atmospheric pressure in the duct (A) entersthe chamber (B), moving the moving element downwards (case II), so that the valve (5) shuttercloses the duct (F) and places chamber (E) in contact with chamber (C) at atmospheric pressure, decreasingthe value of the vacuum in the duct (E).The decreased vacuum value or the increase inthe absolute pressure in the chamber (E) raisesthe moving element (4) (case I), closing thepassage (C) and placing the valve (5) in theideal condition (E in contact with F) and the cycleis repeated.Copyright by Fiat Auto 25
EngineFuel system10.<strong>Bravo</strong>-<strong>Brava</strong> Ify98 rangeRECIRCULATION CIRCUIT FOR VAPOURSCOMING FROM THE CRANKCASE (BLOW-BY)The crankcase emissions are composed of mixturesof air/diesel and exhaust gases which escapefrom the piston rings, in addition to lubricantoil vapours.They are defined as blow-by or breather gases.The breather gases coming from both thecrankcase (2) and the cylinder head (5) reachthe separator (1).In the separator (1) the gases lose some of theoil dissolved in them which return to the sumpvia the pipe (3) in the form of drops.The remaining gases, on the other hand, are directed,through the pipe (4) to the intake circuit.26 Print no. 506.670/16
<strong>Bravo</strong>- <strong>Brava</strong> @> JTD1998 rangeEngineFuel system10.1. Remove the return manifold by looseningboth retaining nuts2. Undo the manifold end pipe fittings fromthe rail leading to the injectors and removethem3. Undo the retaining nuts and remove firstlythe bracket and then the injectors.NOTEWhen refitting, carry out removal procedurein reverse order. Tighten thefittings between return manifold andinjectors to the specified torque ofi 2daNmCopyright Fiat Auto■.jl;---."-r' ii.':•■'-■,■• >>:■'- ''■■■-..' .■"■'■'.■ T^^lfcrse|tfes,5rW/lC34as;ve«il^)f1■ :..■29
EngineFuel system<strong>Bravo</strong>-<strong>Brava</strong> ty1998 rangeREMOVING-REFITTING RAILDisable the alarm (if present) by means ofthe switch under the junction unit cover.Disconnect the terminals and remove thebattery1. Disconnect the flow meter electrical connection.2. Loosen the collars and remove the first pipesection between the air filter case and turbocharger.3. Loosen the bands and remove the secondpipe section between the air cleaner caseand turbocharger.30 ' VII 99-"Supersedps"prevails veFsion Publication n° 506.670/21
<strong>Bravo</strong>- <strong>Brava</strong> ijp **1998 rangeEngineFuel system1. Remove the return manifold by looseningboth retaining nuts.2. Remove the fuel delivery pipe from thepressure pump to the rail pipe.3. Disconnect the electrical connection fromthe fuel pressure sensor4. Unscrew the remaining nut securing therail and remove.NOTE To refit, carry out removal instructionsin reverse order. Tighten the fittings ofpipes between return manifold andinjectors and of the fuel delivery pipefrom the pressure pump to the specifiedtorque of 2 daNm.Copyright Fiat Auto ■^■i%^^^^^^S^^x^^4i^i^':\i 33
EngineFuel system<strong>Bravo</strong>- <strong>Brava</strong> @ 1998 range- Disable the alarm (if present) by means ofthe switch beneath the junction unit cover.- Disconnect the terminals and remove thebattery.1. Disconnect the electrical connection for theflow meter.2. Loosen the collars and remove the first sectionof piping between air cleaner casingand turbocharger.3. Remove the second section of piping betweenair cleaner casing and turbocharger.4. Undo the retaining bolts and remove theupper engine protection cover.34 ,' -VH-B9'" Strpotsectes prev
<strong>Bravo</strong>- <strong>Brava</strong> |p JTD1998 rangeRefittingEngineFuel system10.Reverse procedure described for removal tothe point where the pressure pump is refitted.Then refit and tension the timing belt andauxiliary drivebelt.Check that the timing belt and auxiliary drivebeltdo not show signs of cracking or wearthat could impair operation.Tighten thefittings of the pipes carrying fuelfrom the pressure pump to the rail to a torqueof 2 daNmFitting and tensioning timing drive belt1. Fit the timing belt to the crankshaft gearprovisionally and remove the bolt indicatedfrom the oil pump.Position tool 1860905000 on the crankshaftdrive gear and pin (3); turn thecrankshaft through small movements untillocating dowel (2) fits into hole (4) onthe tool. In this position, cylinder no. 1 isexactly aligned with TDC.Secure the tool to the crankshaft drivegear using the bolt shown.Copyright Fiat Auto 41
EngineFuel system10.<strong>Bravo</strong>- <strong>Brava</strong> £p> 1998 rangeLower the lift1. Turn the toothed drive pulley to align thetiming notches.Raise the lift and finish fitting the timing belt.Check the timing.Use a screwdriver to apply a force to theautomatic tensioner to adjust the tensionerto maximum tension. Then tighten thetensioner bolt to the mount. Remove tool1860905000 and turn the engine throughtwo revolutions in its normal direction ofrotation.Loosen the nut securing tensioner (3) andapply leverage with a screwdriver so thetensioner does not go completely slack.Then align mobile pointer (1) on the tensionerwith fixed reference (2). Thentighten tensioner bolt (3) to the specifiedtorque.42 VJ.I-99. .- i Siip0rsecles ptetflo'uS veriiion Print n° 506.670/27
Untitled Documentfile:///D|A'olume%203/Fuel%20System.htm08/07/2006 16:45:03
<strong>Bravo</strong>-<strong>Brava</strong> ifp TD 100EngineIndex10.FUEL SYSTEM. ■Fuel system with Lucas FT09 pump- Introduction- Composition of the fuel system- Location of fuel system components- Air intake circuit- Fuel supply circuitInjection pump- Operating principle- Fuel circuit diagram- Flow rate supplement.- Adjusting injection advance- Transfer pump- Transfer pump regulating valve- Hydraulic head- Cam seal- High pressure suppfy valve -- Cut out solenoid- Supercharging control valve- Speed regulatorElectrical/electrqnic circuit- Electronic'control uhit- Injection pump management- Fast, idle management- Exhaust gas recirculation management- Air conditioning system management- Heater plugs pre/post heating management- Instrument injector- Signals arriving at and leaving controlunit/sensors and actuators- Wiring diagram- Engine rpm sensor and flywheel- Air flow meter- Coolant temperature sensor- Pre-heating control unit- Air temperature sensor- Diagram showing recirculation of gasescoming from the engine crankcase(blow-by)- Exhaust gas recirculation system(E.G.R.)Removing-refitting injection pumppage11123456789910111112121314151516161717181819202122232424252627Copyright by Fiat Auto ' -l K m" Can^S ,**« «*»!«•»
<strong>Bravo</strong>-<strong>Brava</strong> ty TD100EngineFuel system10.INJECTION PUMPThe Lucas FT09 injection pump has been specifically designed for indirect injection diesel engines withspecial innovative features which ensure optimum engine running in all operating conditions; in particular,it allows a decrease in consumption, harmful emissions and noise levels.The function of the injection pump is to accurately meter the quantity of fuel and to inject it at high pressureinto the combustion chamber for each cylinder at a precise moment in the engine cycle; the quantityof fuel metered is therefore atomized at high pressure by the injector.It is vital for the injection pump to be working accurately and reliably because the cycle is repeated thousandsof times per minute; therefore variations in the injection point (advance) or the quantity of fuel injected(metering) are not permissible for the entire life of the engine.The injection pump is characterized by being rather small in size; it is the rotary distributor type, compactin structure and does not require any external lubrication because it is lubricated by the filtered diesel fuelwith which it is always filled during operation.The internal pressure prevents penetration of dust, water or other foreign bodies which would be harmfulto its operation; in addition the special design of the hydraulic circuits prevent the accumulation ofair.To facilitate both starting and the supply of full power, irrespective of the climate conditions, the pump isequipped with an automatic flow rate supplement system which increases the amount of fuel injected.The pump comprises a single pumping element, made up of two opposing pistons, which is an integralpart of the distribution rotor. The rotor, in turn, rotates inside a unit known as the hydraulic head.Each piston comes into contact with the internal lobes of a cam seal by means of an assembly made upof a roller and a roller carrier plate.The adoption of a single pumping element ensures a uniform supply of fuel for each cylinder and dispenseswith balancing the supplies, an operation which is otherwise strictly necessary in all pumps fittedwith separate pumping elements.The fuel, carefully metered during the intake stage into the pumping element, is distributed to each injectorat the exact moment thanks to a system of ports in the hydraulic head and the rotor.When it receives the command from the electronic control unit, the pump can alter the injection advanceand is therefore capable of adjusting the start of the injection in the engine cycle so that it takes place atthe optimum time in all operating conditions.The pump is also equipped witha mechanical centrifugal regulatorto accurately check the enginespeed.1.2.4.5.6.7.8.9.10.Idle speed adjustment screwConnector for diesel returnpipe to the tankAccelerator control leverposition sensorAccelerator control leverElectro-stop valve anti--tamper coverFast idle deviceConnector for diesel supplypipe from the filterConnector for diesel supplypipe to the injectorsAdvance actuatorFast idle control cableCopyright by Fiat Auto IX-96 - Cancels and replaces 5
EngineFuel system10.<strong>Bravo</strong>-<strong>Brava</strong> ^ TD *>oOperating principleThe fuel, taken from the tank (11) and filtered by the filter (12), reaches the transfer pump (7) which hasthe task of further increasing the pressure of the fuel.Through the effect of the transfer pump pressure regulator valve (2), this pressure increases in a fairlylinear manner as the engine speed increases.The valve (2) also has the task of shortcircuiting the transfer pump (7) during priming.From the transfer pump the fuel reaches the meter (6) which determines the quantity of fuel to be sent tothe pumping element (4) and consequently the capacity for the injectors.The position of the meter (6) is controlled by the speed regulator (13) and depends on the position ofthe accelerator pedal.The pumping element comprises two small opposing pistons which slide radially in the rotor and are operated,by means of rollers and sliding plates, by the profile of a cam seal.The pistons do not have return springs because they are thrust outwards by centrifugal force and thepressure of the fuel entering the supply stage.The rollers which operate the pistons come into contact with the cam profile at different points accordingto the greater or lesser stroke during the supply stage.This stroke depends on the quantity of fuel entering the pumping chamber, regulated by the meter andthe expansion time of the pumping pistons dictated by the rotation speed of the pump.During the injection stage the piston control rollers come into contact with the cam seal cams; the pistonsthemselves are thrust inwards causing an increase in pressure and consequently injection.At the end of the injection stage, the pistons are thrust outwards creating a decrease in pressure, the fuelis no longer supplied and the valve (5) closes the supply pipe.In addition to closing the supply pipe, the valve (5) has the function of instantly lowering the pressure inthe pipe which is in contact with the injector (10) and therefore cuts off the injection promptly to preventthe injector from dripping.The maximum quantity of fuel which can be introduced into the pumping element (4) each cycle is determinedby a maximum flow rate regulator.The pressure inside the pumping element (4) is kept at a constant value by the pressure valve (9).The solenoid valve (8), operated by the electronic control unit, makes it possible to alter the advance forthe start of the pump delivery increasing it when the engine load exceeds a given level.The engine cut out solenoid valve (electrostop) (3) is suitably protected by a special anti-tamper cover.During the operation of the engine, the solenoid valve remains energized allowing the flow of fuel fromthe transfer pump (7) to the supply duct.When the key is turned to switch off the engine, the solenoid valve is de-energized cutting off the flowof fuel; the meter supply chamber is no longer supplied and the engine cuts out.6 IX-96 - Cancels and replaces Print no. 506.670/08
<strong>Bravo</strong>-<strong>Brava</strong> ^ TD100EngineFuel system10.FUEL CIRCUIT DIAGRAM1. Supercharing control valve2. Transfer pressure regulator valve3. Engine cut out solenoid valve (Electrostop)4. Pumping element(a) front section view(b) side section view5. Supply valve6. Meter7. Transfer pump8. Advance actuator solenoid valve9. Pressure valve10. Injectors11. Tank12. Filter13. Speed regulatorCopyright by Fiat Auto IX-96 - Cancels and replaces 7
EngineFuel system10.Flow rate supplement<strong>Bravo</strong>-<strong>Brava</strong> ty TD100In order to facilitate both starting up the engineand the supply of full power, a system isfitted which, by altering the stroke of thepumping element pistons, allows an increasein the maximum fuel flow rate.The three following operating modes are ofspecial interest:1) Operation during startingWhilst the engine is being started up, the intaketransfer pressure (1) is relatively lowwhich allows the spring (2) to overcome theforce exerted by the pistons (5) and extend insuch a way as to move the sliding plates (3)outwards.®jwa^Under these circumstances the pistons (4)are in contact with the shorter side of theplates (3) with a consequent increase of thestroke and therefore also the value of themaximum flow rate.2) Operation with turbocharger not operatingDuring normal operation, the intake transferpressure (1) is greater than the opposingforce exerted by the spring (2) and this allowsthe pistons (5) to move the slidingplates (3) inwards.In this way the pistons (4) are in contact withthe longer side of the plates (3) with a consequentdecrease in the stroke and consequentlythe value of the maximum flow rate.3) Operation with turbocharger workingThe operation of the turbocharger causes anintake pressure (6) at the control valve (7)which causes the movement of an internalpiston which places the transfer pressure inletduct (8) in contact with the return ducts(9 and 10).The decrease in pressure at the piston (5), allowsthe spring (2) to overcome the pressureof the inlet fuel (1).The extending of the spring (2) causes themovement of the plates (3) with a consequentincrease of the piston (4) stroke andthe value of the fuel flow rate..8IX-96 - Cancels and replaces Print no. 506.670/08
<strong>Bravo</strong>-<strong>Brava</strong> ^ TD 100EngineFuel system10.Adjusting injection advanceThe injection advance adjustment systemmakes it possile to vary the start of the injectionso that it takes place at the optimum timein all engine operating conditions.The system comprises a small piston (2)which slides in the cylinder (3) and is opposedby the spring (5).This piston is connected to the cam seal (6)by means of a threaded pin with a sphericalhead (4).If the solenoid valve (7) is not activated, thetransfer pressure (1), acting on the piston(2), moves the actual piston overcoming theresistance of the spring (5) and causes therotation of the cam seal (6), through the pin(4), in relation to the pump control shaft, towardsthe maximum advance position.1. Fuel inlet2. Small piston3. Cylinder4. Pin5. Spring6. Cam seal7. Solenoid valve8. Fuel outletThe activation of the solenoid valve (7) allowsthe fuel to flow towards the vehicle tankvia the return pipe (8). This causes a decreasein the pressure acting on the piston(2) allowing the spring (5) to extend fullyand, rotate the cam seal towards the miminimumadvance position by means of the pin(4).In this way by varying the solenoid valve (7)opening/closing frequency, the electroniccontrol unit modulates the value of the pressureacting on the piston (2) thereby continuouslyregulating the start of the injection.Transfer pumpThe transfer pump, which is the volumetrictype (inlet and pressure), consists of a rotor(1), an eliptical seal (3) and two rigid brushes(2).1. Transfer pump rotor2. Brushes3. Eliptical sealDuring rotation, the brushes (2) slide in therotor (1) following the profile of the elipticalseal (3) which is offset in relation to the rotor.As the volume in the chamber increases, avacuum is created upstream of the blade withthe consequent intake of fuel from the tank;the volume decreases downstream of thevane and consequently the fuel in the circuitis supplied under pressure.Copyright by Fiat Auto IX-96 - Cancels and replaces 9
Engine <strong>Bravo</strong>-<strong>Brava</strong> ^ TD ±ooFuel system10.Transfer pump regulating valveThe transfer pump regulating valve is housed in the hydraulic head and carries out three distinct functions:- creating the transfer pressure;- controlling this pressure by maintaining a precise relationship between the transfer pressure and therotation speed;- pressurizing the fuel metering circuit each time it proves necessary.The regulating valve consists of a valve casing (4) which contains a piston (2) and a spring (3).The force applied by the spring (3) can be adjusted by means of an external screw (5) and is opposed byanother spring (1) which keeps the piston (2) in its original position.Increasing the rotation speed of the transfer pump, increases the flow rate and consequently also increasesthe pressure acting on the piston (2).When the piston (2) moves it compresses the regulating spring (3) and gradually places the ports (8)and (9) in contact allowing the fuel to return to the transfer pump inlet via the passage (7).By increasing and decreasing the opening for the ports (8) and (9), the valve makes it possible to regulatethe transfer pressure value.The valve also has the function of filling the transfer pump to ensure priming during the starting stage.During this stage the lack of inlet pressure allows the spring (3) to extend and move the piston (2)which compresses the spring (1); the fuel in the connector (7) enters through the port (8) and, passingthrough the piston (2), comes out of the duct (10) reaching the transfer pump.1. Opposing spring2. Transfer pump regulating piston3. Regulating spring4. Regulating valve body5. Transfer pump adjustment screw6. Lock nut7. Regulated fuel return passage to the transfer pump8. Adjustment port9. Filling port10. Fuel inlet from the transfer pump10,x " 96 " Canccls and replaces Print no 506.670/08
<strong>Bravo</strong>-<strong>Brava</strong> ijp TD100EngineFuel system10.Hydraulic headThe functions of metering, pumping and distributing take place in the main section of the injectionpump, known as the hydraulic head.The hydraulic head is composed of two groups:- the hydraulic head stator;- the distributor rotor, made up of a single element and two pumping pistons.The distributor rotor is coupled with the housing in the hydraulic head, whilst the pumping pistons arecoupled with the housings in the rotor. This means that these parts are not interchangeable with othersbut constitute a single assembly.The fuel subject to the transfer pressure entersone of the ports in the hydraulic headl;the opening of this port is controlled by themovement of the metering valve connectedto the mechanical regulator.During the charging cycle, two ports in therotor are aligned with two filling ports for thehead stator. A metered quantity of fuel, regulatedby the metering valve, enters the pumpingelement and moves the pumping pistons(3) away, pushing the group formed by theroller (1) and the roller carrier (2) outwards.By rotating the rotor interrupts the alignmentbetween the charging and filling ports (endof charging cycle).By continuing the rotation, one of the fuelsupply ports coincides with one of the highpressure outlets.1. Roller2. Roller carrier3. Small piston4. Cam seal1. Cam seal2. Cam seal boltCam sealThe internal surface of the cam seal has lobes(1) which are diametrically opposite and ismachined with precision.The shape of the lobes causes the pressuremovement in the pump, determines the durationof the injection stage and standardizesthe supply cycles.The cam seal bolt (2) connects the latter tothe injection advance adjustment system.When the pump starts the injection cycle, thetwo roller and roller carrier units which are incontact with the pistons, start to move inwardsunder the force of the two opposinglobes.This is the start of the injection.Whilst the rotor continues to rotate, therollers move upwards, until they reach thetop of the lobes.This marks the end of the injection.Continuing the injeciton cycle, the rollerslose contact with the cam seal and the hydraulichead rotor returns to the low pressurecondition ready for a new pressurizing cycle.Copyright by Fiat AutoIX 96 - 0;iru:«l.-. jml ri;pl,irx-!>11
EngineFuel system10.1. Washer2. Valve body3. Washer4. Supply valve5. Spring6. Spring guide7. High pressure outlet connector<strong>Bravo</strong>-<strong>Brava</strong> ^ TD100High pressure supply valvesThe supply valves are enclosed between thehigh pressure outlet connectors (7) and thehead stator.The seal between the valve casing, the headand the connector is achieved by means oftwo steel washers (1 and 3).The assembly consists of a valve body (2)and a valve (4) matched together.The maximum movement of the supply valveis restricted by the spring guide (6).The spring (5) thrusts the valve (4) againstthe valve body (2), keeping it in its seat.At the end of the injection cycle, the supplyvalves "recall" a certain amount of fuel fromthe high pressure pipes to ensure the rapidclosing of the nozzles and, combined withthe cam seal profile, the maintenance of theresidual pressure in these high pressurepipes.Cut out solenoidThe engine can be made to cut outby completely removing the supply.This is achieved by means of asolenoid valve (3) bolted onto thehydraulic head which operates betweenthe flow of transfer pressure(1) and the flow of the meteringvalve (4).The cut out solenoid, also knownas the Electrostop, is directly connectedto the Fiat CODE systemand for this reason it is suitablyprotected by an anti-tamper cover.1. Passage for transfer pressure2. Piston3. Solenoid assembly4. Passage of fuel towards themetering valve12IX " 96 - Cancels and replaces Prmt no 506.670/08
<strong>Bravo</strong>-<strong>Brava</strong> ^ TD100EngineFuel system10.Supercharging control valveThe function of the supercharging control valve is to adjust the value of the maximum fuel flow rate accordingto the variations in the pressure of the intake air created by the turbocharger.The supercharging control valve is composed of a valve body (1) which contains a piston (2) whichrests on a spacer (3).There are two different size diaphragms (4) at each side of the spacer (3).The supercharging pressure, produced by the turbocharger, enters between the two diaphragms via theconnector (7).The supercharging valve is fitted in the transfer pressure circuit somewhere between the transfer pumpand the supplementary flow rate device.It varies the pressure acting on the supplementary device pistons according to the pressure of the airsupplied by the turbocharger.On accelerating the engine speed increases and consequently so too does the pressure produced by theturbocharger which reaches the supercharing control valve gradually moving the diaphragms (4) whichcompress the spring (5).The valve piston (2) moves opening the discharge port (8) producing a drop in pressure behind the supplementaryflow rate device pistons.Under these circumstances the supplementary device spring can gradually thrust the system towardsthe "supplement engaged" position.This movement allows the control valve piston (2) to gradually open a port (8) which allows the fuel tobe discharged via the diesel return pipes to the vehicle tank and makes it possible to reduce the pressurewhich builds up upstream of the supplementary device pistons.1. Valve body2. Piston3. Spacer4. Diaphragms5. Spring6. Adjustment screw7. Connector for the superchargingpressure8. Discharge of the transferpressure9. Recovery connectorCopyright by Fiat Auto tX-96 - Cancels and replaces 13
EngineFuel system10.<strong>Bravo</strong>-<strong>Brava</strong> ^TDWOSpeed regulatorThe speed regulator connects the accelerator lever (1) to the metering valve (7). Its function is to controlthe idle speed (and the fast idle) and the maximum engine speed.The minimum/maximum regulator unit (mini/maxi device) (2) consists of a pre-loaded spring housedin a steel tube which connects the accelerator lever (1) to the upper part of the regulator plate (3). Theregulator plate, in turn, causes the metering valve (7) to rotate by means of a connecting rod (5).A spring (14), fixed to the front section of the regulator plate, controls the idle speed.The mass carrier (10), which is fixed to the control shaft (11), contains a certain number of masses (9)subject to a centrifugal force which varies according to the engine rotation speed.In idling conditions the centrifugal force acting on the masses is weak and the regulator plate is balancedbetween the force exerted by the masses (9) and the force of the spring (14) resting on the idleshaft.During acceleration, the accelerator lever (1) moves the metering valve (7), via the regulator rod (5), towardsthe completely open position.The centrifugal force exerted by the masses increases, but remains lower than the pre-loading of themini/maxi device (2) spring.This means that the connection between the metering valve (7) and the accelerator lever (1) is direct.During the adjustment stage, or when the speed reached increases the centrifugal force of the masses tosuch an extent as to overcome the mini/maxi device spring pre-loading force, the regulator controls theposition of the metering valve (7).In this case the connection between the metering valve (7) and the accelerator lever (1) is no longer direct.1. Accelerator lever2. Mini/maxi device3. Regulator plate4. Regulator bracket5. Regulator rod6. Regulator rod spring7. Metering valve8. Regulator sleeve9. Regulator masses10. Mass carrier11. Drive shaft12. Idle shaft13. Idle lever14. Idle spring14 IX-96 - Cancels and replaces Print no. 506.670/08
<strong>Bravo</strong>-Btava ty TD100EngineFuel system10.ELECTRICAL/ELECTRONIC CIRCUITThe electrical/electronic circuit for the fuel system basically comprises wiring, an electronic control unitand the following sensors and actuators:- Rpm sensor- Coolant temperature sensor- Air flow meter- Intake air temperature sensor- Instrument injector- Accelerator lever position sensor- Fast idle solenoid valve- Pre-heating control unitElectronic control unitThe electronic control unit (ECU) is located below the glove compartment (right side) and is connectedto the wiring by means of a 25 pin connector.It receives all the information relating to the engine running conditions transmitted by the various sensorsin addition to atmoshperic pressure information obtained by means of a sensor inside the actualcontrol unit.Through this data and with the aid of special programmes, the control unit is capable of carrying out thefollowing operating strategies:- injection advance management- fast idle management- exhaust gas recirculation management- air conditioning system management- heater plugs pre/post heating managementLocation of electronic unitCopyright by Fiat Auto,x - 96 " Carw5els and «Placae T 5
EngineFuel system10.<strong>Bravo</strong>-<strong>Brava</strong> ty TD iooINJECTION ADVANCE MANAGEMENTBy means of information relating to the engine speed/TDC, accelerator lever position, atmospheric pressure,temperature of the intake air and temperature of the engine coolant, the electronic control unit calculatesthe optimum injection advance value and compares it with the actual value transmitted by theinstrument injector and, if necessary, it operates the advance actuator solenoid valve so that the start ofthe injection always takes place at the most appropriate moment for all engine operating conditions.The engagement of the fast idle function is implemented by the control unit when at least one of the followingconditions prevail:1. intake air temperature below 25 °C and engine coolant temperature below 55 °C;2. air conditioning compressor on;3. engine speed below 750 rpm.16iXii6" Cancels u in i-pU cs Prjnt no 506. 67 0/08
<strong>Bravo</strong>-<strong>Brava</strong> ^ TD100 EngineFuel system10.EXHAUST GAS RECIRCULATION MANAGEMENTThe electronic control unit calculates the weight ratio between the "clean" intake air and the quantity ofburnt gases which can be returned to the intake. Depending on the engine load, the temperature of thecoolant, the atmospheric pressure and the quantity of intake air, the electronic control unit operates theBorg Warner solenoid valve which, in turn, activates the EG R valve, by means of a vacuum signal, therebyallowing the partial recirculation of the exhaust gases.AIR CONDITIONING SYSTEM MANAGEMENTWhen the air conditioning is switched on, the compressor absorbs power from the engine which, whenidling, tends to cut out. In order to prevent this problem, the control unit activates the fast idle functiondescribed previously.Another function carried out by the control unit is that of interrupting the compressor supply if one ofthe following conditions occurs:1. Coolant temperature more than 110 °C;2. Exceeding of a certain rpm level (around 4500);3. High engine power request (strong acceleration).In conditions 1 and 2 the supply is restored when the coolant temperature or engine rpm values go belowthe intervention level.In condition 3 the interruption is only momentary and the supply is automatically restored after severalseconds even in the high power request still exists.P4A17EJ02Copyright by Fiat Auto1X-96 - Cancels and replaces17
EngineFuel system10.HEATER PLUGS PRE/POST HEATING MANAGEMENT<strong>Bravo</strong>-<strong>Brava</strong> ^ TD100The electronic control unit directly controls the heater plugs control unit managing the pre and postheating times mainly according to the values for the engine coolant temperature and the intake air temperature.In order to calculate the post-heating times, the control unit also assesses the accelerator lever positionand rpm values, decreasing these times if there is a high engine power request.1. Electronic control unit2. Accelerator lever position sensor3. Air temperature sensor4. Rpm sensor5. Coolant temperature sensor6. Heater plugs control unitInstrument injectorThe instrument injector informs the electronic control unit of the actual injection advance (start of theinjection stage or of the start of the movement of the needle valve).According to the signal the control unit correctsthe advance set by the injection actuatoruntil the nominal value is reached.The injector is fitted on the cylinder (1) and isequipped with a device for recognizing theexact moment of the start of the injectionstage and with wiring for sending a signaland informing the electronic control unit.Inside the injector there is a coil (2), a needlevalve 93) and an adjustment pin (1). The coilis electrically supplied and produces a magneticflow which affects the needle valve (3).When the latter initiates the opening of thenozzle for injecting the fuel, this causes avariation in the magentic flow in the coil (2)which the control unit recognizes as the startof the injection and on which the advanceadjustment strategy is based.18lX " 96 - Cancels and «»Pfaces Prjnt no 506. 670 /08
<strong>Bravo</strong>-<strong>Brava</strong> ig} TD100EngineFuel system10.SIGNALS ARRIVING AT AND LEAVING THE CONTROL UNIT/SENSORS AND ACTUATORS1. Electronic control unit2. Injection pump3. Heater plugs control unit4. Climate control system5. Heater plugs warning light6. Injection system failure warning light7. Borg Warner solenoid valve8. Diagnostic socket9. Rev counter10. Engine rpm sensor11. Battery12. Instrument injector13. Airflow meter14. Fast idle valve15. Coolant temperature sensor16. Air temperature sensorCopyright by Fiat Auto IX-96 - Update 19
EngineFuel system10.<strong>Bravo</strong>-<strong>Brava</strong> )g} TD100WIRING DIAGRAM20 IX-96 - UpdatePrint no. 506.670/08
<strong>Bravo</strong>-<strong>Brava</strong> ^ TD 100EngineFuel system10.Wiring diagram key1. Heater plugs warning light2. Rev counter signal3. Climate control relay4. Climate control on button5. Fiat/Lancia Tester diagnostic socket6. Instrument injector7. Rpm and TDC sensor8. Coolant temperature sensor9. Fuel introduction lever position sensor10. Intake air temperature sensor11. Injection system failure warning light12. Flow meter13. Pre-heating control unit14. System relay feed15. Fuel vapour solenoid valve16. Battery17. Ignition switch18. Fast idle valve19. Advance adjustment device solenoidEngine rpm sensor and flywheelFeatures:Gap0,8 H- 1,5 mmWinding resistance860 ohm ± 10% at 20°C1. Rpm sensor2. FlywheelThe engine rpm sensor is fitted on the crankcase and is facing a flywheel, located inside the crankcaseand fixed to the crankshaft.The flywheel has 2 reference dowels at 180° from one another, on the outer part of the circumference.When these dowels or teeth pass under the sensor, as a result of the variation of the gap, this causes avariation in the magnetic flow which produces a current in the coil windings in the sensor.This signal, sent to the control unit, allows the engine speed to be detected.Copyright by Fiat AutoIX-96 - Update 21
EngineFuel system10.Air flow meter<strong>Bravo</strong>-<strong>Brava</strong> ig} TD100The air flow meter is the "heated film" type; the operating principle is based on a heated diaphragmwhich is placed in a measuring channel through which the intake air which enters the engine flows.The film diaphragm is kept at a constant temperature (~ 120°C higher than the temperature of the air) bythe heating resistance which is in contact with it.The mass of air which passes through the measuring channel tends to remove heat from the diaphragmtherefore, in order to keep it at a constant temperature, a certain current should flow through the heatingresistance; this current is measured by a suitable Wheatstone bridge.The current measured is therefore proporational to the mass of air flowing through.1. Connector2. Measuring channel3. Hot film sensorA= Air intakeP4A22EJ01NOTE This flow meter directly measures the mas of air (and not the volume) thereby eliminating prob -/ems of temperature, altitude, pressure, etc.Description of the operationThe Wheatstone bridge (made up of R3, R2, Rs, Rt+R1) is in equilibrium when Rs is at around 120°Chigher than the temperature of the air.The air which passes through the diaphragm removes heat from Rs, therefore the bridge is not in equilibrium.This situation is detected by the circuit at IC1, which operates transistor T1 in a manner which isproportional to the imbalance of the bridge with the result that more current passes through Rh to heatup Rs and the equilibrium of the bridge is restored.Circuit IC2 measures the current which passes through Rh. This current makes it possible to maintainthe equilibrium of the bridge and is consequently proportional to the mass of air which passes throughill its air fluw me lei.IC2T1 J*UkRsfi"C4 R5HI-R2IC1OTTcrcr12 3 4RTy^IRS TAir flow meter wiring diagram22IX-96 - Update Print no. 506.670/08
'■><strong>Bravo</strong>-<strong>Brava</strong> ^ TD100^S($h^ - A ^ >^v yInn) wMMCoolant temperature sensorEngineFuel system10.uffiLU-—J k*M I V^~\r\ \ i^jy- 5 :PJv LJ QI.[10)\0^m/ -y1^^ ooy/ #\P\.The temperature of the engine coolant ismeasured by a sensor which comprises anNTC resistor where the resistance varies in amanner which is inversely proportional to thetemperature, as illustrated in the diagram.The control unit detects the variation in voltageproportional to the current intensity circulatingin the sensor.The sensor should be fitted taking care not toexceed the tightening torque of 15 NmRNTC4OOO-V^\v \uuTEMPERATURE (° C)Rftft4080/U6040201001010'30 20 10 0 80T-100 120 130*» CO£2 2.6 3 &4VOLTAGE (V)44 4.6Copyright by Fiat Auto IX-96 - Update 23
EngineFuel system10.<strong>Bravo</strong>-<strong>Brava</strong> ^ TD100Pre-heating control unitThe operation of the heater plugs takes placevia the pre-heating control unit, under the directcontrol of the electronic control unit.There is an "intelligent" relay inside whichsends a return response (feed-back) to theinjection control unit which is informed inthis way of any failures of the pre-heatingcontrol unit or short circuit to earth of theheater plugs.The diagram shows the connectors on thepre-heating control unit base and the relevantpin-out.Connections1. Vehicle earth2. Not connected3. Ignition switch (+15)4. Electronic control unit (pre-post heatingactivation)5. Electronic control unit (fault diagnosis)8. Battery positive9. Heater pJugs10. Heater plugsAir temperature sensorThe intake air temperature sensor is, on thisversion, separate from the air flow meter: itcomprises a standard NTC (Negative TemperatureCoefficient) where the electrical resistancedecreases as the temperature increases.Since the control unit intake circuit is designedas a voltage divider, this voltage is dividedbetween a resistance in the control unitand the sensor NTC resistance.As a result the control unit is capable of evaluatingthe variations in the sensor resistancethrough the changes in voltage and therebyobtain information concerning the temperature.24 IX-96 - UpdatePrint no. 506.670/08
<strong>Bravo</strong>-<strong>Brava</strong> ty TD100EngineFuel system10.DIAGRAM SHOWING RECIRCULATION OF GASES COMING FROM THE ENGINE CRANKCASE (BLOW-BY)The engine crankcase emissions are composed of a mixture of air, diesel fuel and burnt gases which escapefrom the piston seals in addition to lubricant oil vapours. They are defined as blow-by or breathergases.The breather gases coming from both the cylinder block/crankcase and the cylinder head through thepipe (3), reach the separator (2) where, following the vortex action to which they are subjected, theylose part of the oil dissolved in them which returns to the sump through the pipe (4) in the form of droplets.The remaining gases, on the other hand, are directed, via the pipe (5), to the inlet circuit.There is a spark-out (6) fitted inside the gas outlet pipe (1) on the cylinder head to prevent combustiondue to flame returns.Copyright by Fiat AutoIX " 96 ' Update 25
EngineFuel system10.<strong>Bravo</strong>- <strong>Brava</strong> ifp ro *>oEXHAUST GAS RECIRCULATION SYSTEM (E.G.R. - Exhaust Gas Recirculation)This system makes it possible to send part of the exhaust gases to the inlet in certain engine operatingconditions.This dilutes the fuel mixture with the inert gases lowering the peak temperature in the combustionchamber: in this way the formation of nitrous oxides (NOx) is contained, with a 30^-50% at the exhaust.The recirculation of burnt gases is only possible at medium to low loads, when the air/fuel ratio is veryhigh and the operation of the engine is not penalized by the presence of inert gases in place of the air.The recirculation system is operated by the electronic control unit (1) which receives input signals fromthe potentiometer at the accelerator control lever (on the injection pump) and from the rpm and enginecoolant temperature sensors and provides an output signal to operate the Borg Warner E.G.R. solenoidvalve (2).The latter, connected to the atmosphere via a small filter (3), transmits a lesser or greater vacuum, accordingto the signal received, coming from the special brake servoc vacuum pump (4) to the PierburgE.G.R. valve (5).If the vacuum is sufficient, this valve opens, placing the exhaust manifold in contact with the inlet manifold.The quantity of gases recirculated can therefore be varied by regulating the opening of the E.G.R. valvecontinuously, using the maps stored in the control unit memory relating to the degree of opening accordingto the signals received.1. Electronic control unit 4. Brake servo vacuum pump2. Borg Warner modulating valve 5. E.G.R. valve3. Filtrino presa atmosfericaA - GasesP4A26EJ01coming from the exhaust manifoldB. Gases sent to the inlet26IX-96 - Update Print no. 506.670/08
<strong>Bravo</strong>-<strong>Brava</strong> ^ TO 100EngineFuel system10.REMOVING-REFITTINGPUMPINJECTIONPosition the vehicle on a lift, disconnect thepositive battery terminal, remove the rightfront wheel and proceed as follows:1. Remove the bolts shown and remove theright front wheel arch liner.2. Loosen the bolts shown which fix theauxiliary shaft drive pulley.3. Act on the automatic tensioner to loosenthe tension at the auxiliary shaft drive belt,then remove the belt.4. Remove the lower protection for the timingdrive belt.Copyright by Fiat Auto IX-96 - Update 27
EngineFuel system10.<strong>Bravo</strong>-<strong>Brava</strong> ig} TD100Disconnect the engine colant pipe afterhaving loosened the fixing band.Undo the bolts shown, then remove thereaction connecting rod and the mountingbracket (engine side).Undo the fixing bolts and remove the timingbelt upper shield.Loosen the nut securing the timing belttensioning device, then remove the actualbelt.28IX-96 - Update Print no. 506.670/08
<strong>Bravo</strong>-<strong>Brava</strong> am ^ TD looEngineFuel system10.1. Stop the rotation of the injection pumpdrive pulley by tightening the two servicebolts (1) in the special openings in thepump support, then undo the bolts (2)fixing the pulley, undo the bolts (1) andremove the pulley.2. Acting at the points shown, disconnectthe diesel supply pipes from the filter tothe pump, the diesel return pipes from thepump to the tank and the diesel returnpipes from the injectors to the pump.3. Undo the fixing bolts and remove thesound insulation shield.4. Disconnect the electrical connections,disconnect the diesel supply pipe betweenthe tank and the filter, undo the fixingnuts and remove the diesel filter.Copyright by Fiat Auto,X " 96 " u P date 29
EngineFuel system10.<strong>Bravo</strong>-<strong>Brava</strong> igty TD1001. Let the band (1) slide in the directionshown by the arrow, then remove the acceleratorcable from the injection pumpreleasing it from the attachment pin andremoving- it from the mounting and adjustmentbracket (2).2. Disconnect the electrical connectionsshown3. Disconnect the pipe (1) from the oilvapour separator (2). Undo the nuts fixingthe separator (2); a third nut (not illustrated)is at the lower side of the separator.4. Disconnect the pipe (1) which connectsthe oil vapour separator to the tappet coverand move the actual separator towardsthe engine compartment rear partition.30 IX-96 - Update Print no. 506.670/08
<strong>Bravo</strong>-<strong>Brava</strong> ^ TD100EngineFuel system10.Disconnect the vaccum pipe from the inletmanifold and from the fast idle actuatoracting at the points shown.Using spanner 1852138000 undo theconnectors for the fuel supply pipes at theinjectors.Undo the connectors shown at the pumpusing a spanner and remove the fuel supplypipes.Remove the injection pump acting on thefixings shown in the diagram;.To refit the injection pump reverse theorder of the operations carried out forthe removal with the exception of thetiming belt.Before refitting the timing belt it isnecessary to check the timing andthen the tension of the belt as specifiedin the paragraph "Replacing timingbelt" in the chapter "Removing-refittingpower unit".Copyright by Fiat AutotX " 96 " U P date 31
<strong>Bravo</strong>-<strong>Brava</strong> @« 16v'98 rangeEngineFuel system10.M. MARELLI- WEBER I.A.W.-49F INTEGRATED FUEL INJECTION-IGNITIONIntroductionpageSYSTEM MANAGEMENTSTRATEGIES 1Functional diagram of fuel injectionignition2- Management of fuel injection 3- Management of ignition 9- Management of engine starting blockfunction (Fiat CODE) 12- Management of radiator fan 12- Management of engine idle control 13- Management of fuel vapour recirculation 13- Management of fault diagnosis 13- Management of climate control system 14Diagram of input/output informationbetween control unit and sensors/actuatorsof the fuel injection-ignition 15Diagram of air intake system 16Diagram of fuel supply system 17Diagram of fuel evaporation controlsystem 18Diagram of crankcase gas recirculationsystem (blow-by) 19Wiring diagram of fuel injection- ignition20Diagram of exhaust assembly 22Location of components of fuel injection-ignition23FUSES AND RELAYS OF FUEL INJECTION-IGNITION 24DIAGNOSTIC SOCKET 24EARTH POINTS 24COMPONENTS OF THE FUELINJECTION-IGNITION 25- Wiring of fuel injection-ignition 25- Fuel injection-ignition electronic controlunit 25- Engine rpm and TDC sensor 29- Knock sensor 31- Throttle body 32- Throttle position sensor 33- Coolant temperature sensor 35Engine idle speed actuatorIntake air temperature and pressuresensorElectric fuel pumpFuel manifoldCharcoal filter and fuel vapour cut -offvalveMulti-function valveVehicle speed sensorSafety and ventilation valveFuel injectorsInertial safety switchIgnition coilsLambda probepage363839404042434344454648CHECKS-ADJUSTMENTS AND REPAIR INTERVENTIONS ON THE FUELINJECTION/IGNITION 51- Adjusting throttle cable 51- Removing-refitting fuel manifold andfuel injectors 51- Removing-refitting fuel tank 53- Removing-refitting throttle cable 56- Checking engine idle speed 57- Checking concentration of pollutingemissions 57- Checks on fuel supply circuit 59FAULT DIAGNOSIS 62- Recognition and storage in memory oferrors 62- Error frequency counter 62- Error deletion 62- Management of system fault warninglight 62- Communication between control unitand diagnostic equipment 63- Parameters displayed 63- List of errors 63- Active diagnosis 64Copyright Fiat Auto
<strong>Bravo</strong>-<strong>Brava</strong> )§l i»Engine'98 range Fuel system10.M.MARELLI-WEBER I.A.W.-49F INTEGRATED FUEL INJECTION-IGNITIONIntroductionThe I.A..W.-49F system fitted to the 1581 i.e. 16v engine belongs to the group of digital electronic ignitionsystems with static advance and static timing, integrated with an electronic fuel injection system ofthe intermittent multiple synchronized type.The identification codes of the system are as follows, depending on the version:- I.A.W.-49F.B4 for version with manual gearbox- I.A.W.-49F.L2 for version with automatic transmission.This system thus has only one control unit, a single set of wiring and a set of sensors common to bothsystems.Its function is to inject into the engine's inlet port, upstream of the inlet valves, an exact quantity ofpetrol to be mixed with the air introduced into the cylinder, so as to obtain a correct mixture strength.The I.A.W.-49F system ensures efficient operation thus optimizing performance and consumption, andreducing harmful emissions, by providing a response in real time to the engine's different operating conditions.The system can be divided into the following sub-systems:- Electrical/electronic system- Air intake system- Fuel supply system- Emission control systemsVia suitable sensors, the system can measure the following parameters:1. instantaneous engine rpm;2. the position of each pair of pistons in relation to TDC of cylinder 1;3. air intake temperature;4. angular position of the throttle valve;5. engine coolant temperature;6. actual mixture strength (via the Lambda probe);7. pressure in the inlet manifold;8. vehicle speed;9. battery voltage;10. when the air conditioner (if present) is switched on;11. the presence of any knocking.This information, generally analogue, is converted into digital signals by the analogue/digital converters(A/D) in order to be used by the control unit.Finally, it is important to note that the I.A.W.-49F fuel injection-ignition does not require any adjustmentas it is self-adjusting and self-adapting.SYSTEM MANAGEMENT STRATEGIESThe management program (software) resides in the control unit's memory; it consists of a series ofstrategies, each of which manages a precise control function of the system.By using the information (inputs) listed above, each strategy works out a series of parameters, based onthe data maps stored in appropriate areas of the control unit's memory, and then drives the system's actuators(outputs), the devices which enable the engine to operate, namely:1. fuel injectors;2. ignition coils;3. various types of solenoids;4. electric fuel pump;5. engine idle speed actuator;6. control relays.Copyright Fiat Auto 1
EngineFuel system10.<strong>Bravo</strong>-<strong>Brava</strong> $'98 rangeievFUNCTIONAL DIAGRAM OF FUEL INJECTION-IGNITION(r18inr~rro o o o15 81. Safety and ventilation valve2. Fuel tank3. Electric fuel pump4. Engine idle actuator5. Relays controlling radiator fan high andlow speeds6. Battery7. Ignition switch8. Fuel injection relay9. Fiat CODE control unit10. Inertial switch11. Vehicle speed sensor12. Diagnostic socket13. Rev counter14. Fuel injection fault warning light15. Fuses protecting fuel injection - ignitionsystem16. Main fuse box17. Throttle valve position sensor18. Fuel supply manifold19. Fuel injectors20. Air cleaner21. Spark plugs22. Ignition coils23. Coolant temperature gauge24. Air temperature and pressure sensor25. Rpm and T.D.C. sensor26. Knock sensor27. Coolant temperature sensor28. Fuel vapour cut-off solenoid29. Activated charcoal filter30. Air conditioner compressor31. Lambda probe32. Catalytic converter33. Fuel injection - ignition control unit34. Multi-function valve35. Coolant overheating warning light36. Air conditioner compressor relay37. Air conditioner relay38. Automatic transmission2 Publication no. 506.670/14
<strong>Bravo</strong>-<strong>Brava</strong> $ **Engine'98 range Fuel system10.The management strategies ensure the best ignition advance and fuel delivery, thus providing the correctmixture strength at all times as the engine load and environmental conditions vary.The system management strategies are basically as follows:-management of fuel injection;-management of ignition;-management of engine starting block function (Fiat CODE);-management of radiator fan;-management of engine idle control;-management of fuel vapour recirculation;-management of fault diagnosis;-management of climate control system.MANAGEMENT OF FUEL INJECTIONThe fuel injection management strategy aims to supply to the engine the correct quantity of fuel at therequired instant, in accordance with the engine's operating conditions.The fuel injection-ignition uses a "SPEED DENSITY-LAMBDA" indirect measuring system, which measuresangular speed of rotation, density of intake air and mixture strength control (feedback control).In practice, the system uses the ENGINE SPEED (rpm) and AIR DENSITY (pressure and temperature)data to measure the quantity of air drawn in by the engine.The quantity of air drawn in by each cylinder for each engine cycle depends not only on the density ofthe air drawn in, but also on the unit cylinder capacity and the volumetric efficiency.Air density is the density of the air drawn in by the engine and calculated in accordance with the absolutepressure and temperature, both measured in the inlet manifold.Volumetric efficiency is the parameter relating to the cylinder fill coefficient measured in accordancewith experimental tests conducted on the engine throughout its operating range, and subsequentlystored in the electronic control unit's memory.After establishing the quantity of air drawn in, the system must provide the quantity of fuel in accordancewith the desired mixture strength.The end-of-injection or delivery timing pulse is contained in a map stored in the control unit's memory,and varies depending on the engine speed and pressure in the inlet manifold. In effect these are processingoperations carried out by the control unit to control the sequential opening and timing of the four injectors,one per cylinder, for the length of time strictly necessary for forming an air-petrol mixture asclose as possible to the stoichiometric ratio.The fuel is injected directly in the manifold near the inlet valves at a differential pressure of about 3 bar.The speed (rpm) and air density (pressure and temperature) are used to measure the quantity of intakeair; when this has been determined, the quantity of fuel is metered in accordance with the desired mixturestrength. The other sensors present in the system (coolant temperature, throttle valve position, batteryvoltage, etc.) enable the electronic control unit to correct the basic strategy for all the particular operatingconditions of the engine.Making the air-fuel ratio fluctuate around stoichiometric values is the essential condition for both correctand long-lasting operation of the catalytic converter, and for reducing polluting emissions.Copyright Fiat Auto 3
Engine <strong>Bravo</strong>-<strong>Brava</strong> >£p i 6vFuel system'98 range10.The stoichiometric ratio is obtained using a heated Lambda probe. This probe, by means of constantanalysis of oxygen present in the exhaust gases, informs the control unit which, on the basis of datamemorized in it, can correct in real time the mixture strength (air-petrol) if it is not stoichiometric.This system has no method of recording the engine idle speed and CO level in the exhaust gases, or ofthe throttle valve position.Mixture strength control (feedback control)NOTEThe following ratio is defined as mixture ratio, and it is indicated by the letter a (alpha):a =quantity of air drawn in by enginequantity of injected fuelThe following ratio is defined as stoichiometric mixture and is indicated by ast:ast=quantity of theoretical air for burning all the injected fuelquantity of injected fuelThe following ratio is defined as mixture strength and is indicated by the Greek letter X (lambda):quantity of air drawn in by the enginequantity of theoretical air for burning all the injected fuelIt is easy to observe that oc/ocst=X.The stoichiometric ratio depends on the type of fuel: for the current non-ethylated (unleaded) petrols, itis about 14.7 -14.8, which corresponds to a Lambda strength = 1 (ratio 14.8:1 means that 14.8 parts airare required to burn 1 part petrol).The mixture is rich when the quantity of air is less than the stoichiometric value, and in this case lambda< 1;The mixture is weak when the quantity of air is greater than the stoichiometric value, and in this caselambda >1;The strategy has the function of correcting the "basic" fuel injection times so that the mixture strengthfluctuates continuously between 0.98 and 1.02.The oscillation frequency varies depending on the engine load and speed; it is in the region of a fewHertz (about 0.5 - 4 Hertz).NOTE1 Hz = 1 oscillation per secondIn the following conditions:- cut-off,- throttle 60% open (at low engine speeds this value is lower)- engine temperature below 25 °Cthe strategy is disabled.4 Publication no. 506.670/14
<strong>Bravo</strong>-<strong>Brava</strong> @» i*Engine'98 range Fuel system10.Self-adaptivityThe control unit has a strength self-adaptivity function, which memorizes any deviations between basicmapping and corrections imposed by the Lambda probe which may arise peristently during operation.These deviations (due to ageing of the components of the system and engine) are memorized permanently,allowing the operation of the system to adapt to the gradual alterations of the engine and componentsin relation to the characteristics when new. To delete the corrections memorized, use the appropriatefunction on the diagnistic equipment. The corrections are NOT lost even if the battery or controlunit are disconnected.The strategy is disabled during the period when the fuel vapour cut-off solenoid is open. If the controlunit is replaced, it is advisable to run the engine at idle speed for a few minutes (hot engine) to allow thecontrol unit to re-memorize the corrections. Corrections at speeds higher than idle speed are memorizedduring normal driving conditions.The control unit also has a self-adaptivity function which corrects the opening of the idle speed actuatorat idle speed on the basis of variations due to leaks from the throttle body or natural ageing of the engine.This specific correction is lost if the battery or control unit are disconnected.Starting and post-startingDuring starting, it is not possible to recognize instantaneously the engine timing, and so it is not possibleto effect phased fuel injection for the first injection of each cylinder.During the first few engine revolutions, a first simultaneous injection (full group) is effected becausesignificant fluctuations in engine speed do not permit correct calculation of the injection timing; only afterdoes injection become phased.The "basic" injection time is increased by a multiplicative coefficient for as long as the engine is drivenby the starter motor.After starting, the coefficient is gradually reduced until it disappears within^ a particular time periodwhich is all the longer the lower the engine temperature. /k' kONar^OFFtk: enrichment coefficientt : timea : decrease in relation to enginetemperatureP4A06IJ01ON: engine driven (crank)OFF: engine started (run)Copyright Fiat Auto 5
Engine <strong>Bravo</strong>-<strong>Brava</strong> ^ **Fuel system'98 range10.Operation when coldUnder these conditions, the mixture is naturally weakened by poor turbulence of the fuel particles at lowtemperature, low evaporation and high condensation on the inner walls of the inlet manifold, all heightenedby the greater viscosity of the lubricating oil which, as is known, at low temperature increases theresistance to rolling of the engine's mechanical components.The electronic control unit recognizes this condition and corrects the fuel injection time on the basis ofthe coolant temperature signal.Consequently:P4A06IJ01- At very low temperatures, the fuel injector remains open for longer (tj) graph (b), with a low air/petrolratio (rich mixtures).- The more the engine temperature increases, the shorter the fuel injector's opening time, (tj) graph (a),consequently the higher the air/petrol ratio (poor mixtures).During the engine warming-up period, the electronic control unit also drives the stepper motor whichdetermines the quantity of air necessary for ensuring the engine's self-sufficient speed.The idle speed is decreased proportionally as the temperature increases until the nominal value is obtained(850 ± 30 rpm) when the engine is up to temperature. The electronic control unit, by driving thestepper motor, keeps the idle speed constant even when the electrical and mechanical loads vary.Connection with the automatic transmissionThe control unit adjusts the engine idle speed in accordance with the load which occurs when the selectorlever is moved to a gear ratio and transmits to the automatic transmission control unit information relatingto the reduction in torque (pin 36), coolant temperature (pin 5) and throttle valve position (pin16).The control unit reduces the torque delivered by the engine (mainly by intervening on the ignition advance)during gear changes, when it receives an appropriate signal from the automatic transmissioncontrol unit (pin 49).Operation at full loadUnder full load conditions, the basic injection time must be increased to obtain the maximum power deliveredby the engine.The full load condition is detected by the control unit via values supplied by the throttle position and absolutepressure sensors.On the basis of this information, the control unit makes the appropriate correction, increasing the basicinjection time.6 Publication no. 506.670/74
<strong>Bravo</strong>-<strong>Brava</strong> ^ **Engine'98 range Fuel system10.Operation in decelerationDuring this stage of use of the engine, two strategies are superimposed:1. A negative transient strategy for maintaining a stoichiometric quantity of fuel supplied to the engine(less pollution).This stage is recognized by the control unit when the throttle potentiometer signal changes from ahigh voltage value to a lower value.2. A strategy for soft accompaniment at low speed (dash-pot) to attenuate the variation of deliveredtorque (less engine braking).When the potentiometer signal indicates closed throttle and the idle speed is high, the control unit,acting on the engine idle speed actuator, gradually decreases the air flow passing through the bypass.Barometric correctionThe atmospheric pressure varies in accordance with altitude, causing a variation in the volumetric efficiencysuch as to require correction of the basic strength (injection time).The correction of the injection time will depend on the variation in altitude and will be updated automaticallyby the electronic control unit whenever the engine is switched off and under particular conditionsof throttle valve position and engine speed (typically at low rpm and throttle wide open) (dynamc adjustmentof barometric correction).Operation in cut-offThe fuel cut-off strategy is effected when the control unit recognizes the throttle valve in idle position(signal from throttle potentiometer) and the engine idle speed exceeds 1350 rpm (1750 rpm for versionwith automatic transmission). The control unit enables the cut-off only when the engine temperatureexceeds 0° C.The recognition of the throttle valve in a non-closed position of the engine idle speed below 1270 rpm(1650 rpm for version with automatic transmission) re-enables the fuel supply to the engine.For very high engine speeds, cut-off is also effected when the throttle valve is not fully closed, but withparticularly low pressure in the inlet manifold (partial cut-off).Rpm.Version with manualgearbox1. 1350 rpm2. 1270 rpm1N. A\vVersion withtransmission1. 1750 rpm2. 1650 rpmautomatic2A. entry into cut-off80 °CTEMP. H20B. exit from cut-offCopyright Fiat Auto 1
EngineFuel system10.<strong>Bravo</strong>-<strong>Brava</strong> ty 16v98 rangeOperation in accelerationIn this stage, the control unit increases as appropriate the quantity of fuel required by the engine (to obtainthe maximum torque) in accordance with signals coming from the following components:- throttle potentiometer;- absolute pressure sensor;- rpm and TDC sensor.The "basic" injection time is multiplied by a coefficient in accordance with the temperature of the enginecoolant, how quickly the throttle opens and the pressure increase in the inlet manifold.If the sudden variation in injection time is calculated when the injector is already closed, the control unitre-opens the injector (extra pulse) to be able to compensate the strength as quickly as possible; subsequentinjections are instead increased in accordance with the above-mentioned coefficients.P4A08IJ01A. normal injection timeB. re-opening of injector(extra pulse)C. injection time includingenrichmentOFF. engine at stationaryspeedON. engine in transientOver-rev protectionWhen the engine speed exceeds for over 10 seconds the value of 6700 rpm or instantaneously the "limit"value of 6900 rpm imposed by the manufacturer, the engine is in "critical" operating conditions.When the electronic control unit recognizes that the above-mentioned speed has been exceeded, it inhibitsthe driving of the fuel injectors.When the rpm returns to a non-critical value, driving of the injectors is resumed.Electric fuel pump operationThe electric fuel pump is driven by the engine control unit via a relay.The pump is stopped:- if the engine falls below 50 rpm;- after a certain period (about 5 seconds) with the ignition on without the engine being started(time-lagged enablement);- if the inertial switch has intervened.Fuel injector operationThe injectors are driven in a phased sequential manner. However, during starting, the injectors are firstdriven in parallel (full-group).The injector phasing varies in accordance with the engine speed and intake air pressure in order to improvecylinder filling with advantages in terms of consumption, driveability and pollution.8 Publication no. 506.670/14
<strong>Bravo</strong>-<strong>Brava</strong> $ 16v'98 rangeEngineFuel system10.MANAGEMENT OF IGNITIONThe ignition circuit is of the static type with inductive discharge, i.e. without high tension distributorwith power modules located inside the fuel injection-ignition electronic control unit.The system has two double-output high tension coils combined in a single container and connected directlyto the spark plugs.The primary winding of each coil is connected to the power relay (so is supplied by the battery voltage)and to the pins of the electronic control unit for the earth connection.After the engine has started, the electronic control unit manages the basic advance obtained from specialmapping in accordance with the following input parameters:- engine speed (rpm);- absolute pressure value (mmHg) measured in the inlet manifold.This advance is corrected in accordance with the temperature of the coolant and intake air.The value of the advance angle is also corrected under the following conditions:- during starting;- in transient acceleration and deceleration periods;- under cut-off conditions;- to stabilize the idle speed;- if there is engine knocking;- when required by the automatic transmission control unit (gear change).In order for the ignition system to function correctly, the electronic control unit must recognize the signalpicture.A. Rpm sensor signalB. Power controlC. Current circulating in the primarywinding of a coila. Ignition advance relating to thecylinder TDCThe interval or variation of the signal caused by the absence of 2 teeth on the phonic wheel, between the58th and 1 st teeth (also called synchronization tooth) which occurs for every rotation of the crankshaftpulley, is the reference signal which allows the electronic control unit to recognize an advance of 114° inrelation to TDC of the pair of pistons 1 -4 corresponding to the leading edge of the 20th tooth.After acquiring the correct signal picture with reference to the TDC signal through the power module(internal) (5), the electronic control unit (see figure on next page) establishes the point of commencementof conduction (supply) of the primary circuits of the coils (6).Copyright Fiat Auto 9
EngineFuel system10.<strong>Bravo</strong>-<strong>Brava</strong>^'98 rangeThe leading edge of the signal (graph B-figure on preceding page) thus represents the moment whenalternative conduction of the primary windings "could" occur. This point is established solely by thecontrol unit's power module. The conduction time required by the H.T. coils for storing energy is alsodefined by the DWELL management strategy. It depends on the time taken by the current in the primarycircuit of the coil to reach 6A, on the battery voltage and the calculation algorithm carried out by the microprocessorwhich uses coefficients stored in an appropriate memory; all this naturally depends on theengine rpm.With reference to the figure on the preceding page, the falling edge of the signal, (B) end-of-conductionpoint (or fall to zero of the current), is instead a "categoric order" to stop the current circulating in the primarywinding, and it represents the point of ignition advance (a) calculated by the computer (the advance - (a) -varies depending on the rpm).The control unit thus manages both the advance of the spark to the various cylinders in relation to topdead centre, and the conduction time required by the coil for storing energy, alternately controlling thetwo power stages which permit current to circulate in the primary windings (pins 59 and 66) of the coils(6) for sufficient time to guarantee a nominal 6 A.tJlTLat/~~59fUTj~Lrti_nru■TLTLB|/~66WV+ 12V4_n_n_r_Functional diagram of the ignition1. RPM and TDC sensor.2. Phonic wheel.3. Signal picture taken from phonic wheel(60-2) teeth.The TDCs correspond to teeth 20 and 50.4. Succession of rectangular wave form signalsof constant amplitude.5. Ignition power module (inside the controlunit).6. Ignition coils.7. Spark plugsNOTEThe numbers in squares indicate the corresponding control unit pins.In the instant when the control unit stops driving one of the two power stages, the passage of current isinterrupted. This causes, by induction, an increase in voltage (up to 30kV without load) on the secondarywinding.10 Publication no. 506.670/14
<strong>Bravo</strong>-Btava ^'98 range16vEngineFuel system10.When examining the voltages required for the spark between the plug electrodes, it may be noted that inthe cylinder at the compression stroke, this voltage is high (over 10kV) while in the cylinder in the exhauststroke the voltage is low (about 5kV).The high voltage distribution is static, i.e. characterized by the absence of a rotor arm and cap, and thusthe distributor is in effect eliminated. This offers a considerable advantage to the system as it is knownthat the insulation characteristics of the rotor arm and cap play a fundamental role; any dispersion of insulationtowards earth can be detrimental to ignition, especially during winter or in heavy rain.The spark plugs of cylinders 1 -4 and 2-3 are connected directly (two by two) by high tension cables tothe terminals of the coil's secondary winding, and their connection may be considered to be serial as thecylinder head joins them. This solution is also called "lost spark" as the energy accumulated by the coilwill be almbsYexclusively discharged on the electrodes of the spark plug located ini the cylinder undercompression, allowing the mixture to be ignited. The other spark is naturally not used, as there is no mixtureto be ignited in the cylinder, only an environment of used gas at the exhaust stage.30 86 85 87®-i rfrsAhIt >3K r.67 53d.GHSUUULMMJTnnnnnnnUMMJUUpnnnnmn15/54n-^r;2 31. Rpm and TDC sensor2. Crankshaft pulley with phonic wheel3. Battery4. Ignition switch5. Spark plugs6. Ignition coils7. Fuel injection relay8. Fuel injection-ignition electronic controlunit9. Fuel injection-ignition system fuse10. Fuse protecting fuel injection-ignitioncontrol unitCopyright Fiat Auto 11
Engine <strong>Bravo</strong>-<strong>Brava</strong> © i*Fuel system'98 range10.Knock controlThe purpose of this strategy is to detect the presence of knocking, by processing the signal coming fromthe relevant sensor. The strategy continuously compares the signal coming from the sensor with a threshold,which in turn is constantly updated to take account of background noise and ageing of the engine.If the system recognizes the presence of knocking, the strategy reduces the ignition advance until thephenomenon disappears. The advance is then gradually restored to the basic value or until the phenomenonarises again. In particular, increases in advance are made gradually, while decreases are madeimmediately.Under conditions of acceleration, the strategy uses a higher threshold, to take account of the increasednoise of the engine in this condition.The strategy also has a self-adaptive function which memorizes, in a non-permanent manner, decreasesin advance that are repeated continuously, so as to adjust the advance to the different conditions of theengine (e.g. use of low octane number fuel). The strategy can restore the advance to the threshold valuestored in memory when the conditions that gave rise to the decrease in advance disappear.MANAGEMENT OF THE ENGINE STARTING BLOCK FUNCTION (FIAT CODE)The system has an engine starting block function. This function is carried out by a specific control unit(Fiat CODE), which can dialogue with the fuel injection-ignition control unit, and an electronic key,which has a special transmitter for sending a recognition code.Whenever the ignition is switched off, the Fiat CODE system completely disables the fuel injection-ignitioncontrol unit.When the ignition is switched on, the following operations take place:1 - the fuel injection control unit (whose memory contains a secret code) sends a request to the FiatCODE control unit to send the secret code to disable the function block;2 - the Fiat CODE control unit responds by sending the secret code only after first receiving the recognitioncode transmitted by the ignition key;3 - recognition of the secret code permits the disablement of the block on the fuel injection-ignitionelectronic control unit and the normal operation of the latter.NOTE Because of the presence of the Fiat CODE system, during fault diagnosis and/or operatingchecks, DO NOT CARRY OUT tests using another fuel injection-ignition control unit. If youdo, the Fiat CODE control unit would transfer the (unknown) recognition code to the test controlunit, which would then be unusable on other vehicles.MANAGEMENT OF RADIATOR FANThe control unit checks the operation of the radiator fan directly, in accordance with the engine coolanttemperature and whether the climate control system is switched on.The fan comes on when the temperature exceeds 97 °C (1 st speed) and 102 °C (2nd speed). It is switchedoff with a hysteresis of 3 °C below the threshold for switching on.The high and low speed functions are managed by the intervention of specific relays located in the controlunit of the climate control system, and controlled by the control unit.12 Publication no. 506.670/14
<strong>Bravo</strong>-<strong>Brava</strong> $ i»Engine'98 range Fuel system10.MANAGEMENT OF ENGINE IDLE CONTROLThe general aim of the strategy is to keep the engine idle speed around the value stored in memory (hotengine: 850 rpm): the position assumed by the actuator depends on the engine conditions:Starting stageWhen the ignition is switched on, the actuator assumes a position in relation to the engine coolant temperatureand battery voltage (open loop position).Warming-up stageThe rpm is corrected mainly in relation to the coolant temperature.With the engine up to temperature, depends on the signal coming from the engine rpm sensor; when externalloads are switched on, the control unit manages the steady idle.Deceleration stageUnder overrun conditions above idle speed, the control unit controls the position of the engine idle actuatorby means of a particular flow curve (curva di dash-pot), i.e. it slows down the return of the shuttertowards its sealing seat, thus optimizing the engine braking effect.MANAGEMENT OF FUEL VAPOUR RECIRCULATIONThe strategy controls the position of the cut-off solenoid as follows:- during starting, the solenoid remains closed, preventing the fuel vapours from making the mixture excessivelyrich; this condition remains until the coolant reaches a temperature of 65° C;- when the engine is up to temperature, the electronic control unit sends the solenoid a square-wavesignal (duty cycle control) which modulates its opening.In this way the control unit controls the quantity of fuel vapours sent to the inlet manifold, thus preventingsignificant changes in mixture strength.In the operating conditions listed below:- throttle valve in closed position- speed below 1500 rpm- pressure in inlet manifold below a limit value calculated by the control unit in accordance with the rpmsolenoid control is inhibited, and the solenoid is kept in the closed position; this is to improve the engine'soperation.MANAGEMENT OF FAULT DIAGNOSISA complete electronic diagnosis of the fuel injection-ignition is obtained by connecting the appropriateequipment (EXAMINER or SDC station) to the diagnostic socket.The system also comprises a self-test function which recognizes, stores in memorey and indicates anyfaults.If a fault is detected on sensors or actuators, signal reconstruction (recovery) strategies are immediatelyactivated to ensure engine operation at an acceptable level without impairing its functionality. It is thuspossible to drive the vehicle to a repair garage for the appropriate operations.Copyright Fiat Auto 13
EngineFuel system10.MANAGEMENT OF CLIMATE CONTROL SYSTEM<strong>Bravo</strong>-<strong>Brava</strong> 0k i
<strong>Bravo</strong>-<strong>Brava</strong> ©i 16v'98 rangeEngineFuel system10.DIAGRAM OF INPUT/OUTPUT INFORMATION BETWEEN CONTROL UNIT AND SENSORS/ACTUATORS OF THE FUEL INJECTION-IGNITION1. Electronic control unit2. Speedometer sensor3. Fiat CODE control unit4. Rev counter5. Engine idle speed actuator6. Fuel injectors7. Fuel vapours solenoid8. Diagnostic socket9. Spark plugs10. Ignition coils11. Engine coolant overheating warninglight12. Fuel injection fault warning light13. Coolant temperature gauge14.15.Air conditionerEngine coolant temperature sensor16. Intake air temperature and pressure sensor17. Throttle valve position sensor18. Knock sensor19. Rpm and TDC sensor20. Ignition switch21. Lambda probe22. Electric fuel pump23. Relays controlling radiator fan high andlow speeds24. Automatic transmission25. Speedometer / mileometerCopyright Fiat Auto 15
EngineFuel system10.<strong>Bravo</strong>-<strong>Brava</strong> $'98 rangeDIAGRAM OF AIR INTAKE SYSTEMThe air intake system comprises various components which convey the necessary air flow to the engineunder the various operating conditions.1. Inlet manifold2. Intake air pressure and temperature sensor3. Connection for fuel anti-evaporation system4. Inlet connection for crankcase gases(blow-by) for recirculation of exhaustgases during idling5. Brake servo connection6. Connection for engine coolant outlet pipe7. Engine idle speed actuator8. Top resonator9. Main inlet for crankcase gases10. Throttle body11. Connection for engine coolant inlet pipe,for heating throttle body12. Air cleaner13. Bottom resonator14. Inlet vent16 Publication no. 506.670/14
<strong>Bravo</strong>-<strong>Brava</strong> $ i*Engine'98 range Fuel system10.DIAGRAM OF FUEL SUPPLY SYSTEMP4A17IJ011. Fuel injectors 4. Vent pipe2. Fuel supply manifold 5. Electric fuel pump with filter and pressure3. Fuel delivery pipe to injectors regulator6. TankThe fuel is fed into the system by an electric pump immersed in the tank, which draws in the fuel andsends it to the filter and then to the fuel injectors.The fuel supply system is of the "returnless" type, i.e. with only one connecting pipe between the fueltank and engine.This system makes it possible to:- minimize the possibility of the vehicle catching fire in the event of an accident;- reduce fuel vapour emissions into the atmosphere.The fuel pump is enclosed in the cage which also incorporates the fuel pressure regulator, fuel gaugesender and fuel filter.The system also has an inertial switch which cuts off the supply from the fuel pump in the event of acrash.Copyright Fiat Auto 17
Engine <strong>Bravo</strong>-<strong>Brava</strong> $ i»Fuel system'98 range10.DIAGRAM OF FUEL EVAPORATION CONTROL SYSTEMP4A18IJ011. Petrol vapour cut-off valve 5. Tank2. Activated charcoal filter 6. Fuel vapour inlet connection in inlet man-3. Safety and ventilation valve 'f°'d4. Multi-function valve 7. Fuel injection-ignition control unitThe tank ventilation system is of the "closed" type.This system prevents the petrol vapours which form in the tank or fuel supply system from discharginginto the atmosphere and releasing the light hydrocarbons (HC) they contain, thus causing pollution.The system consists of a tank (5), a multi-function valve (4) for controlling the vapour flow, a two-waysafety and ventilation valve (3) located in the fuel filler, an activated charcoal filter (2) and a vapourcut-off valve (1) which is controlled by the control unit (7).18 Publication no. 506.670/14
<strong>Bravo</strong>-<strong>Brava</strong> $ i»Engine'98 range Fuel system10.DIAGRAM OF CRANKCASE GAS RECIRCULATIOIM SYSTEM (BLOW-BY)The system controls the emissions, from the crankcase, of the vent gases which consist of air-petrol mixturesand burnt gases leaking through the piston rings, and also lubricating oil vapours, and recirculatesthem to the inlet.With the throttle valve open, the vent gases coming from the crankcase reach the connecting duct betweenthe air cleaner-throttle body (3) through the pipe (2), inside which there is a flame trap (1) toprevent combustion phenomena due to flame returns from the throttle body (4).With the throttle valve closed (engine idling), the vacuum in the inlet manifold draws in the gases (in asmall quantity) directly through the pipe (5) and calibrated hole (6).Copyright Fiat Auto 19
EngineFuel system10.<strong>Bravo</strong>-<strong>Brava</strong> ^'98 rangeWIRING DIAGRAM OF FUEL INJECTION-IGNITION(*) Connection only present on cars fitted with four-stage pressure switch.20 Publication no. 506.670/14
<strong>Bravo</strong>-<strong>Brava</strong> $ i*Engine'98 range Fuel system10.Key to components on fuel injection-ignition wiring diagram1. Fuel injection-ignition electronic control unit2. Battery3. 40A main fuse protecting ignition-dependent devices4. 30A main fuse protecting fuel injection-ignition5. Ignition switch6. 15A fuse protecting fuel injection fault warning light7. 7.5A fuse protecting various components of fuel injection and supply ( + 15) to fuel injection controlunit8. 7.5A fuse supplying (+30) fuel injection control unit9. Relay supplying electric fuel pump, lambda probe, fuel vapour cut-off solenoid, ignition coils and fuelinjectors10. 15A fuse protecting lambda probe and fuel vapour cut-off solenoid11. Lambda probe12. Inertial switch13. Electric fuel pump14. Rev counter15. Engine coolant overheating warning light16. Air conditioner control unit and relays controlling radiator fan high and low speeds17. Spark plugs18. Ignition coils19. Fuel vapour cut-off solenoid20. Fuel injectors21. Fuel injection-ignition fault warning light22. Fiat CODE control unit23. Vehicle speed sensor24. Pressure switch (the pressure switch may be three or four stage)25. Engine idle actuator (stepper motor)26. Automatic transmission control unit27. Throttle valve position sensor28. Intake air temperature and pressure sensor29. Coolant temperature sensor30. Coolant temperature gauge31. Diagnostic socket32. Knock sensor33. Rpm and TDC sensorCopyright Fiat Auto 21
Engine <strong>Bravo</strong>-<strong>Brava</strong> l(pi «*Fuel system'98 range10.DIAGRAM OF EXHAUST ASSEMBLYP4A22IJ01On the I.A.W. system, the closed-loop control of the mixture strength is activated by the Lamba sensorwhich measures the oxygen content present in the exhaust gases upstream of the catalytic converter.The Lamba probe's measurements enable the electronic control unit to make continuous corrections ofthe mixture strength, keeping the air/fuel ratio constant.In this way, there is control of the harmful emissions in the exhaust, which is completed by the trivalentcatalytic converter.The efficient operation of the catalytic converter and consequently reduction in toxicity of the exhaustgases depends on the air/fuel ratio with which the engine is supplied.The trivalent catalytic converter simultaneously reduces the three polluting gases present in the exhaustgases: unburnt hydrocarbons (HC), carbon monoxide (CO) and nitrogen oxides (NOx).Two types of chemical reactions take place inside the converter:- oxidation of the CO and HC, converted into carbon dioxide (C0 2 ) and water (H 2 0)- reduction of NOx, converted into nitrogen (N 2 ).The causes which quickly and irreparably put the catalytic converter out of use are:- presence of lead in petrol, which reduces the level of conversion such that its presence in the system isfutile;- presence of unburnt petrol in the converter; a flow of petrol lasting 30 s in an environment of 800°C(silencer's internal temperature) is sufficient to cause the converter to melt and break. It is absolutelynecessary for the ignition system to be working perfectly, so under no circumstances should thespark plugs be removed when the engine is running; during tests, the silencer must be replacedwith an equivalent piece of pipe.22 Publication no. 506.670/14
<strong>Bravo</strong>-<strong>Brava</strong> ©98 range16vEngineFuel system10.LOCATION OF INJECTION/IGNITION SYSTEM COMPONENTSComponents key1 Intake air pressure and temperature sensor2 Lambda sensor coupling3 Injection system relay4 Protective fuses5 Engine idle speed actuator6 Butterfly valve position sensor7 Vehicle speed sensor8 30A general system protective fuse9 Diagnostic socket10 Battery11 Earth at negative battery terminal12 Connection between injection earth andbodyshell earth13 Injection/ignition control unit14 Coolant temperature sensor15 Ignition coils16 Join between injection cable and frontcable17 Injectors cable coupling18 Injectors19 Rpm and TDC sensor20 Lambda sensor21 Detonation sensor22 Spark plugs23 Fuel vapour cut out solenoid valve24 Charcoal filterCopyright by Fiat Auto 111 -98 - Cancels and replaces 23
EngineFuel system<strong>Bravo</strong>-<strong>Brava</strong> $98 range16vINJECTION/IGNITION SYSTEM RELAYAND FUSESGeneral system protective fuse (fig. 1)The general fuse (30A) protecting the injection/ignitionsystem (1) is housed inside thepower fuse box; to gain access to it, remove thecover releasing it from the side clips.Fuses and relay (fig. 2)The following components are housed on abracket positioned against the rear wall of theengine compartment:1. System relay2. 7.5A fuse protecting +15/54 supply3. 7.5A fuse protecting +30 supply4. 15A fuse protecting Lambda sensor and fuelvapour solenoid valveEARTH POINTS (fig. 3)In order to improve electro-magnetic compatibilityand operational reliability, the earth pointshave been positioned as follows:- The main earth for the injection/ignition systemis directly connected to the negative batteryterminal.- The earth for the injection/ignition controlunit housing (1) is connected to thebodyshell earth on the control unit mountingbracket.DIAGNOSTIC SOCKET (fig. 4)The diagnostic socket for connecting the specialequipment (SDC station or EXAMINER) ispositioned at the side of the power fuse box.P4A24IJ0424 III-98 - Cancels and replaces Print no. 506.670/14
<strong>Bravo</strong>-<strong>Brava</strong> ^'98 range16vEngineFuel system10.COMPONENTS OF THE FUEL INJECTION-IGNITIONThe fuel injection-ignition mainly comprises wiring, an electronic control unit and the following sensorsand actuators:SensorsRpm and TDC sensorKnock sensorThrottle position sensorCoolant temperature sensorIntake air pressure and temperature sensorActuators- Engine idle speed actuator- Electric fuel pump- Fuel vapour cut-off solenoid- Fuel injectors- Ignition coils- Vehicle speed sensor- Lambda probeFUEL INJECTION-IGNITION WIRINGThe various components of the system are connected by a single wiring loom with various types of connectors,laid in special runs mounted on the engine (prewiring).FUEL INJECTION-IGNITION ELECTRONIC CONTROL UNITThe electronic control unit of the fuel injection-ignition used on this version is specific and connected tothe electrical wiring by means of two connectors, the top connector with 52 pins and the bottom connectorwith 28 pins.__It is a digital microprocessor unit characterized by a high calculation capacity, precision, reliability, versatility,low energy consumption and absence of maintenance.The task of the electronic control unit is to process the signals coming from the various sensors by applyingsoftware algorithms, and to control the actuators (in particular the fuel injectors, ignition coilsand idle speed actuator) in order to achieve the best possible engine operation.The structure of the electronic control unit is characterized by the following parts:- Data acquisition and coding section- Microprocessor- ROM memory- RAM memory- EEPROM memory- Driversa. Data acquisition and coding sectionIt consists of a set of electronic components (A/D converters) assigned to receiving the data in the formof analogue electrical signals. The signals are then converted into digital signals, processed and stored.Copyright Fiat Auto 25
Engine <strong>Bravo</strong>-<strong>Brava</strong> @i i»Fuel system'98 range10.b. MicroprocessorThis electronic component calculates and manages the acquired data; in this respect it should beconsidered an actual computer mainly responsible for the following: interrogating the memories,comparing the data being processed with the sample data and managing the actuator control circuits.c. ROM (Read Only Memory)This contains all the programs necessary for the operation of the microprocessor; moreover, as it ispermanently programmed before installation in the control unit, its data can be read but not modified.The ROM is a storage component, so even if the battery terminals are disconnected, the instructionsit contains remain stored in memory.d. RAM (Random Access Memory)The RAM is a transition memory in which the data, in addition to being read, can also be stored inmemory.It is used for both temporary storage of input data in order to render them available for subsequentprocessing, and also for the storage of signals for coding operating faults, which can arise on the sensors,actuators or certain functions of the control unit.The RAM is divided into two sections: the first is volatile and is allocated to data storage; it is enabledwhen the ignition is on and cancelled when the ignition is switched off.The non-volatile section (RAM STAND-BY) is used to store in memory the self-adapting correctionsof the aperture during idling, of the engine idle actuator and the angle position of the fully closed throttlevalve. It is also assigned to memorizing the engine parameters and adapting them over time; thismeans that the control unit, using mainly the Lambda probe's signal, modifies and stores in memory acorrective factor of the injection time which influences the mixture strength.To be maintained, the self-adapting corrections of the idle speed actuator require the continuouspresence of the battery supply (memory in STAND-BY).If the battery, double relay or control unit connector are disconnected, the parameters are reset. Normaluse of the car will restore the adaptation process and the memorization of the new parameters.e. EEPROM (Electrical Erasable Programmable Read Only Memory)This is a particular type of memory which can be deleted electrically and reprogrammed several times.Its functions include receiving from the STAND-BY RAM records of faults arising during engine operation,and transmitting this information via the diagnostic socket to the diagnostic equipment (EXAMINER or SDC station). To delete confirmed faults, use the diagnostic equipment in active diagnosis.The presence of a non-volatile memory also means that data relating to system faults are stored evenif the battery is disconnected, and also indications of faults even after the latter disappear.f. Drivers (final power stages for driving the actuators)These are circuits driven directly by the microprocessor and the specific integrated circuit, and theyserve to supply the actuators, namely: fuel injectors, idle control motor, fuel vapour cut-off valve andfuel pump relay.26 Publication no. 506.670/74
<strong>Bravo</strong>-<strong>Brava</strong> @i 16v'98 rangeEngineFuel system10.Removing-refittingPull the locking device (1) upwards anddisconnect the top connector (2).2. Pull the locking device (1) downwardsand disconnect the bottom connector (2)then undo the nuts (3).3. Remove the bracket (1) and move it aside,then remove the fuel injection-ignitionelectronic control unit (2).Under no circumstances may fuel injection control units be exchanged between different vehiclesto check whether they are working.During diagnosis, before replacing the control unit, make sure that the component under examinationis really not working, as when a new control unit is supplied, the secret code of the FiatCODE system is memorized, rendering the control unit totally unusable on other cars.Voltage may be present on unconnected pins, so no connection should be made otherwise therewill be the risk of short circuit with damage to the control unit.The multi-connector should be inserted and withdrawn with the ignition off (key removed).Copyright Fiat Auto 27
EngineFuel system10.<strong>Bravo</strong>-<strong>Brava</strong> ty 16v'98 rangeIdentification of fuel injection-ignition control unit connections (pin outputs)© @ @ @ © @ @ @ © © © ^^ ^ ® © © © @ © © @ @ © © ©© © © @ © © @ @ @ @ © (
<strong>Bravo</strong>-<strong>Brava</strong> ©i lev'98 rangeEngineFuel system10.RPM AND TDC SENSOR(Jaeger CVM02)The sensor (1) for rpm and reference of thecrankshaft angle (identification of TDC) issecured to the engine block and is oppositethe phonic wheel (7) located on thecrankshaft pulley.Principle of operationThe sensor consists of a tubular case (1)containing a permanent magnet (3) andelectrical winding (2). The magnetic flowcreated by the magnet (3) causes oscillationsfollowing the change of gap, because of thepassage of the teeth of the phonic wheel.These oscillations induce an electromotiveforce in the winding (2) at the^ends oiwhichthere is a voltage which is alternately positive(tooth opposite the sensor) and negative(gap opposite the sensor). Provided all otherfactors are equal, the peak output voltagefrom the sensor depends on the distance betweensensor and tooth (gap).The phonic wheel has sixty teeth, two ofwhich are removed to create a reference; thepitch of the wheel thus corresponds to an angleof 6° (360° divided by 60 teeth). The pointof synchronization is recognized at the end ofthe first tooth following the two missing teeth;when this space passes under the sensor, theengine is with the piston pair 1 -4 at 114° beforeTDC.1. Sensor2. Winding3. Permanent magnet4. Sensor connector5. Output signal6. Signal correspondingto the two missingteeth7. Crankshaft pulleywith phonic wheelCopyright Fiat Auto 29
EngineFuel system10.<strong>Bravo</strong>-<strong>Brava</strong> £| 16v'98 range1 1n n1 2—i5367377Wiring connectorThe sensor is connected to the control unit bymeans of twisted cables covered by a shieldedanti-interference sheath.Pin 1 - SignalPin 2 - EarthPin 3 - ShieldingNOTE The numbers in boxes indicate thecorresponding control unit pins.Removing - refittingDisconnect the wiring connector.Undo the screw indicated and remove thesensor.Checking the gapCheck the distance between the sensor andphonic wheel teeth (gap).Gap: 0.5 -1.5 mmNOTE If work has to be done on the rpm and TDC sensor mounting (e.g. gap outside tolerance limits,sensor misaligned, etc.), the procedure must be carried out for correct positioning of the sensorand its mounting, and setting its timing, as described in the engine overhaul manual (publicationno. 504.589/20).Checking resistanceThe sensor's resistance can be measured bydisconnecting the connector and connectingan ohmmeter to the ends of the sensor.Resistance 1134 -1386 ohm at 20 C30 Publication no. 506.670/14
<strong>Bravo</strong>- <strong>Brava</strong> 9 **1998 rangeKNOCK SENSOR(KNE-03)EngineFuel system10.This sensor is the piezoelectric type and is fittedon the cylinder block/crankcase in a positionwhich is symmetrical in relation to thepairs of cylinders 1 -2 and 3-4.This position is determined by the need todetect the onset of knock in the same way forall cylinders.When there is engine knock, vibrations of aparticular frequency are produced .The effect generates mechanical repercussionson a piezoelectric crystal that sends a signal toa control unit. The control unit then reducesthe ignition advance on the basis of this signaluntil the effect disappears. The advance isthen gradually restored to the baseline value.Principle of operationAAAThe molecules in a quartz crystal are electricallypolarised.Under rest conditions (A), the molecules arenot aligned in any particular direction.When the crystal is subject to pressure or impact(B), the molecules line up and the degreeto which they align is directly proportional tothe pressure on the crystal. This alignmentcreates a voltage at the crystal terminals.A. Rest positionB. Position under pressureChecking the resistanceThe sensor resistance can be measured by disconnectingthe connector and connecting anohmmeter to the sensor terminalsResistance 532 - 588 ohm at 20CConnector wiring1 n r-i 11 2—i3The sensor is connected to the control unit bytwisted cables covered in a shielded noninterferencesheath.Pin 1 - EarthPin 2 - SignalPin 3 - ShieldingThe numbers in boxes indicate the correspondingcontrol unit pins.Removing-refitting705663Disconnect the electrical connection, undo theknock sensor retaining bolt and remove.Copyright Fiat Auto 31
EngineFuel system10.THROTTLE BODY<strong>Bravo</strong>- <strong>Brava</strong> @ *»1998 rangeThe throttle body meters the quantity of air drawn in by the engine (and consequently the power developed)according to the driver's request via the accelerator.The throttle body is secured to the intake manifold by four bolts: the butterfly is opened by means of linkagewhere small butterfly opening angles correspond to the pedal being slightly pressed and large anglescorrespond to it being greatly depressed.With the pedal completely released (engine decelerating or idling) the necessary additional air is suppliedby the engine idle adjustment actuator: under these circumstances, the throttle opening lever is in the endof travel position against an anti-tamper screw which prevents the throttle from getting stuck in a closedposition.To prevent condensation and ice formation that could arise during certain exterior conditions, i.e. lowtemperature and/or high humidity, the throttle body is heated by recycling a small amount of coolant fromthe engine thermostat through a chamber inside the body.The throttle valve position sensor and engine idle speed actuator are fitted to the throttle body.In the pre-modification version, the engine idle actuator and throttle valve position sensor are bolted to thethrottle body. In the post-modification version, they are built into the throttle body.The anti-tamper screw isadjusted by flushing inthe factor and shouldnever be tampered with.1. Engine coolant delivery pipe attachment2. Engine coolant return pipe attachment3. Engine idle speed actuator bolted to the throttle body (pre-modification solution)4. Throttle valve position sensor bolted to the throttle body (pre-modification solution)5. Throttle valve6. Throttle opening linkage7. Throttle valve adjustment and antitamper screw (do not tamper with)8. Engine idle speed actuator built into the throttle body (post-modification solution)9. Throttle valve position sensor built into the throttle body (post-modification sensor)32 Print n° 506.670/21
<strong>Bravo</strong>- <strong>Brava</strong> W X6v1998 rangeEngineFuel system10.THROTTLE VALVE POSITION SENSORA. Sensor used on premodification carsB. Sensor used on postmodification carsThe sensor consists of a potentiometer with itsmobile part controlled by the throttle valvespindle.The potentiometer is enclosed in a plasticcontainer. In solution A adopted on premodificationmodels, the potentiometer case is fittedwith two tabs. These have two UNSLOTTED holes to anchor and position the sensorin relation to the throttle valve. In solution Badopted on post-modification cars, the sensoris integral with the throttle body.A three-pin socket (ABC) on the containerensures an electrical connection to the electronicinjection-ignition control unitDuring operation, the electronic control unitsupplies the potentiometer with a voltage of 5Volts. The parameter measured for injectionmanagement is throttle position from idle tofull opening.The following graph shows sensor voltage outputfor different throttle opening angles.The output voltage tells the control unit howfar the throttle valve is opened and it correctsmixture concentration accordingly.When the throttle is closed, a voltage signal issent to the control unit,which recognises idleand cut-off (discerning between them on thebasis of engine rpm).1 kV5-1 ' J^ JSThe potentiometer is linear (single ramp type).Its main features are as follows:0.15-Cy-u+ 3
EngineFuel system<strong>Bravo</strong>-<strong>Brava</strong> © 16v1998 rangeWiring connectorsThe numbers in squares indicate the correspondingcontrol unit pins.Pin A - EarthPin B - PositivePin C- SignalChecking the resistanceSensor resistance may be measured as follows:- connect an ohmmeter across sensor pins Aand B and check a fixed resistance of 1200ohms;- check an ohmmeter between sensor pins Aand C and check that resistance varies from0 to 1200 ohm ± 20% when the throttle ismoved.RecoveryThe system assumes a value calculated on thebasis of rpm and pressure in the inlet manifold.If the pressure sensor fails at the sametime, a throttle opening of about 50° is assumedas a fixed value.Strategies to gradually decrease rpm at idlespeed (dashpot) are blocked.Idle speedself-adaption is blocked.Mixture concentration self-adaption isblocked.Removing-refittingProcedure for premodification carsDisconnect the electrical connection, undo thetwo fixing bolts and remove the sensor.NOTEThe sensor is secured to the throttlebody by two tabs with two nonslottedholes. Sensor angular positiondoes not require adjustment becausethe control unit recognises throttleclosed or fully open positions bymeans of special self-adaptive algorithms.NOTE Whenever the potentiometer bolts are loosened or removed, they must be replaced because thethreads are covered by a light layer of loctite. This secures the bolt once only.NOTE On post-modification cars, the throttle valve position sensor is built into the throttle body.34 :^j^^4^p^^^^^kgijSjH#!|^ | Publication n° 506.670/21
<strong>Bravo</strong>- <strong>Brava</strong> 916v1998 rangeENGINESENSORCOOLANTEngineFuel system10.TEMPERATUREThe sensor is fitted on the thermostat case;lt ismade up of brass casing which affords protectionfor the actual resistive elements consistingof two NTC (Negative TemperatureCoefficient) type thermistors whose electricalresistance decreases as the temperature increases).The two NTC thermistors are separate andsupply temperature inforfmation to a specificindicator on the instrument panel and the injection-ignitioncontrol unitThe reference voltage for the injection systemNTC element is 5 Volt: since the control unitintake circuit is designed as a voltage divider,the reference voltage is shared between a resistancein the control unit and the actual sensor.As a result, the control unit is capable ofevaluating the variations in the sensor resistancethrough the changes in voltage, therebyobtaining information concerning the temperature.1. NTC for injection system2. NTC for indicator on instrument panelRecoveryINJECTION NTCc-20-10010202530Q15970962059753816250020441679C405060708090100Q1150807576418309231176NTCINSTRUMENT6090120Q512-602184-20876-88Assumes last temperature reading or a fixedvalue of 80°C if intake air temperature exceedsa certain value.Mixture concentration self-adaption is inhibited.The radiator fan is activatedIdle self-adapation is inhibitedChecking the resistanceThe table alongside shows resistance valuesthat the NTC elements may assume as temperaturechanges. These values can be measuredby disconnecting the connector andconnecting an ohmmeter across the sensorpins.Removing-refittingDisconnect the electrical connection and removethe sensor.ETightening torque 2.2 daNmConnector wiringThe numbers in boxes indicate the respectivecontrol unit pins.Connection to coolant temperature gauge on instrumentpanel
EngineFuel system<strong>Bravo</strong>- <strong>Brava</strong> 9 **1998 rangeENGINE IDLE SPEED ACTUATOR(step motor)1. Bearing 5. Screw2. Worm screw 6. Anti-turn grooves3. Coils 7. Plunger4. MagnetA. Actuator used on premodification carsB. Actuator used on postmodification carsThe actuator is secured to the throttle body and consistsof:- an electric stepp motor with two windings in thestator and a rotor which includes a certain numberof pairs of permanent magnetic poles;- a worm screw type reduction gear which convertsrotary motion into rectilinear motion.To run at idle speed, i.e with throttle (4) fully closed,the engine needs a certain amount of air (Qo) andfuel to overcome internal frictionand maintain itsspeed of rotation. The amount of air (Qo) that leaksthorugh closed throttle (4) with the engine idlingmust be increased while the engine is warming up orwhen external services or loads are activated (e.g.automatic air conditioner etc.) by an additionalquantity of air (Q) to allow the engine to maintain aconstant rpm. To achieve this result, the system usesa step motor (1) secured to throttle body (5) andcontrolled by a drive circuit (6) located inside theinjection-ignition control unit. The motor drives apush-rod equipped with a plunger (3), which altersthe cross section of by pass duct (2) and thus theamount of air (Qo + Q) taken up by the engine. Tocontrol this type of action, the control unit uses angularengine speed and coolant temperature signalsfrom the relevant sensors.6Q. Air flow regulated by actuator (variable)+ 12V o-r,212040 "H® © © © iCLI L,D A.- L,B ISMS) (54^) !—*—zr^ IJMllllIQo -Air f,owleakingthrough throttle (constant)36 Publication n° 506.670/21
<strong>Bravo</strong>- <strong>Brava</strong> 0>16v1998 range8,9 mmQiQoEngineFuel system10.The step motor is very precise and offers highresolution (about 220 steps per second).Pulses sent by the electronic control unit tothe engine are converted from rotary motioninto linear movement (about 0.04 mm/step)via a worm screw mechanism. The plungerthen works to alter the cross section of the bypass port.The constant minimum air flow (Qo) due toair leaking beneath the throttle valve is adjustedduring production and ensured by atamperproof cap. Maximum air flow (Q2) occurswhen the plunger is fully retracted (about220 steps corresponding to 8.9 mm).Air flow follows the law shown in the graphalongside for intermediate values.Motor strategy200 220The number of working steps depends on engine condition:- Ignition stageWhen the ignition key is inserted, the control unit makes the step motor take up a position dependentupon coolant temperature and battery voltage.- Warm-up stageRPM is adjusted according to coolant temperature- With engine warm:Idle management depends on a signal from the engine rpm sensor. The control unit manages sustainedidle mode when external loads are activated.- During decelerationThe electronic control unit identifies deceleration stage from throttle potentiometer position.It controls step motor position via the idle flow law (dashpot law), i.e. it slows the return of plunger (3)to its seat so that a quantity of air bypassed from hole (2) reaches the motor and reduces levels of pollutantsin exhaust gases.RecoveryActuator operation disabled, fuel vapour recirculation self-adaptation inhibited and speed limited to 1200rpm.Removing-refitting engine idle speed actuator (step motor)Procedure for premodification cars- disconnect the battery negative terminal.- unscrew both retaining bolts and withdraw the actuator;- check the condition of the o-ring and remove any impurities from the seat in the case;- refit the actuator and check that the plunger fits properly into its seat without forrcing.Step motor bolt tightening torque 0.35 -0.45da NmNOTE The engine idle speed actuator is builtinto the throttle body in postmodificationcars.Connector wiringThe numbers in squares indicate the controlunit pins.Copyright Fiat Auto 37
EngineFuel system<strong>Bravo</strong>- <strong>Brava</strong> W16v1998 rangeINTAKE AIR PRESSURE ANDPERATURE SENSOR (T-PRT 03) TEM-The intake air pressure and temperature sensoris a built-in component that measures thetemperature and pressure of air inside the intakemanifold.. The injection control unit usesboth items of information to define theamount of air taken in by the engine. This informationis then used to compute injectiontime and ignition point. The sensor is fitted tothe inlet manifold.Self-diagnosis and recoveryThe self-diagnostic system monitors both sensoroutput signals.It identifies the following for both signals:. n—.t\ x^/^ ^\ ; i ir)--
<strong>Bravo</strong>-<strong>Brava</strong> $'98 range16vEngineFuel system10.ELECTRIC FUEL PUMP(ESS 291)The electric pump assembly basically comprises:- an electric fuel pump (1);- a fuel filter (2);- a float type level indicator (3);- a diaphgragm pressure regulator (4);- a mesh prefilter (5).The fuel pump is of the single-stage typewith peripheral flow, with high performanceunder low voltage and temperature conditions.The advantages compared with pumpswhich operate on the positive-displacementprinciple are its lighter weight and small dimensions.Removing-refitting electric fuel pumpThe electric pump is located in the tank; to removeit:Remove the attachment buttons (arrowed)using tool 1878077000.Lift the boot carpet.Undo the screws (arrowed) and remove thedust cover.Disconnect the wiring connection for thepump and fuel gauge sender unit.Disconnect the fuel delivery pipe.Undo the ring nut securing the fuel pump tothe tank using tool 1860893000 and a ringspanner.Remove the electric fuel pump assembly.Copyright Fiat Auto 39
'EngineFuel system10.<strong>Bravo</strong>-<strong>Brava</strong>
<strong>Bravo</strong>-<strong>Brava</strong> ^ 16v'98 rangeEngineFuel system10.Fuel vapour cut-off solenoid (EC1)The function of this valve is to control, via the fuel injection-ignition electronic control unit, the quantityof fuel vapours drawn in by the activated charcoal filter and directed to the inlet manifold.If there is no supply, this valve is in the closed position, preventing the fuel vapours from making themixture excessively rich.Its operation is controlled by the electronic fuel injection-ignition as follows:- during starting, the solenoid remains closed, preventing the fuel vapours from making the mixture toorich; this condition remains until the coolant reaches a pre-established temperature (about 65 °C)- with the engine up to temperature, the electronic control unit sends a square-wave signal to thesolenoid, which modulates aperture depending on the full/empty ratio of the signal.In this way the control unit controls the quantity of fuel vapours sent to the inlet manifold, thus avoidingsignificant changes in mixture strength.In the operating conditions listed below:- throttle in idle position- engine speed below 1500 rpm- bottom inlet manifold pressure at a limit value calculated by thecontrol unit in accordance with the rpmthe solenoid control is inhibited, and the solenoid is kept in theclosed position, to improve engine operation.Longitudinal section of fuel vapour cut-off valveValve core.Counter spring.Magnetic winding.Pipe connected to inlet manifold.Pipe connected to activated charcoal filter.Wiring connectorThe numbers in boxes indicate the correspondingcontrol unit pins.RecoverySolenoid control is inhibited.Self-adaptivity of fuel vapour recirculation isinhibited.Self-adaptivity of mixture strength is inhibited.Checking the resistanceThe solenoid's resistance can be measured bydisconnecting the connector and connectingan ohmmeter as shown in the figure.Resistance: 17.5 - 23.5 ohm to 20 °CCopyright Fiat Auto 41
EngineFuel system10.<strong>Bravo</strong>-<strong>Brava</strong> ^'98 range16vMULTI-FUNCTION VALVE (SIRIO 0175.00)This valve is used for carrying out various functions, such as:- prevent the passage of liquid fuel, when the tank is too full or if the vehicle overturns in an accident;- permit the venting of fuel vapours towards the activated charcoal filter;- permit ventilation of the tank if it contains a vacuum.The valve consists of a float (2), a heavy ball (3), a plate (4) pushed home against the valve body by thespring (5), a shim (8) pushed home against the plate (4) by the spring (9). The operation of the multifunctionvalve may be summarized in the following cases, depending on how full the fuel tank is:b.if the tank is full, the float (2) blocks the hole (1), preventing the liquid fuel from reaching the activatedcharcoal filter, thus preventing damage to the latter;if the fuel level falls, the float (2) descends and rests on the ball (3), opening the hole (1); when thepressure exerted by the fuel vapours on the plate (4) exceeds the load of the spring (5), aring-shaped gap opens between the plate and the valve casing, which allows the fuel vapours toemerge from the pipe (6) and reach the activated charcoal filter;c. if the reduction in fuel level in the tank is such that it creates a vacuum in the tank, this vacuum actson the plate (8) and, overcoming the load on the spring (9), recalls it downwards, allowing the tankto ventilate through the hole (7);d. if the vehicle overturns, however full the tank is, the ball (3), weighing down on the float (2), pushesthe latter against the hole (1), preventing dangerous leakage of fuel and resulting risk of fire.42 Publication no. 506.670/14
<strong>Bravo</strong>-<strong>Brava</strong> $ i*Engine'98 range Fuel system10.VEHICLE SPEED SENSOR(SOGECO)The sensor is positioned at the differentialoutput, near the left drive shaft coupling, andit transmits to the control unit the vehiclespeed information: the signal is also used forthe operation of the speedometer.The sensor is of the Hall-effect type (see"timing sensor" sub-section), and transmits16 pulses/revolution; thus the vehicle speedcan be obtained on the basis of the pulse frequency.Removing - refittingDisconnect the wiring connection and removethe sensor.^^^Tightening torque 0.8 daNmWiring diagramSAFETY AND VENTILATION VALVE-Z.This valve is located in the fuel filler and itperforms the following functions dependingon the pressure in the tank:- When the pressure inside the fuel tank exceeds0.13 - 0.18 bar, it discharges the surplusvapours to the outside (safety function).- If instead there is a vacuum in the tank of0.020 - 0.030 bar, it allows air to enter(ventilation function).Copyright Fiat Auto 43
EngineFuel system10.FUEL INJECTORS (IWP 064)<strong>Bravo</strong>-<strong>Brava</strong> ©i 16v'98 rangeThe fuel injectors are of the double jet "top-feed" type (with spray angled in relation to the injector axis).They are specific to engines with 4 valves per cylinder, and enable the jets to be directed towards thetwo inlet valves.The jets of fuel at a differential pressure of 3 bar emerge from the injector, are instantly atomized andform two propagation cones.The control logic of the injectors is of the "phased sequential type"; in other words the four injectors aredriven in accordance with the intake sequence of the engine's cylinders, while delivery may start foreach cylinder at the expansion stage up until the intake stage already started.The injectors are fixed by the fuel manifold, which presses them into their seatings in the inlet pipes.They are also anchored to the fuel manifold by means of "safety stops". Two Viton rubber rings (1) and(2) ensure the seal on the inlet pipe and fuel pipe.The fuel is supplied from the top (3) of the injector, whose body contains the winding (4) connected tothe terminals (5) of the wiring connector (6).NOTE During removal and refitting, do not apply stresses exceeding 120 N on the connector (6) of the injectorin order not to impair its operation,m \t\\\v///// \\\\\///// m\\Wiring connectorCheck the resistance• * >INOTE+12V©12 3 471797872P4A44IJ02The numbers in boxes indicate the correspondingcontrol unit pins positionedin the order of cylinder numbers.The injector's resistance can be measured bydisconnecting the connector and connectingan ohmmeter as shown in the figure.Resistance: 13.7 -15.2 ohm at 20 °C44 Publication no. 506.670/14
<strong>Bravo</strong>-<strong>Brava</strong> ^ 16v'98 rangeINERTIAL SAFETY SWITCHEngineFuel system10.2J^U®In order to increase the safety for the vehicle'soccupants in a crash, the car has an inertialswitch located in the interior compartmentunder the driver's seat.This sensor reduces the possibility of fire(caused by fuel leaking from the fuel injectionsystem) by disabling the fuel pumpwhich feeds the injection circuit.The switch consists of a steel ball mounted ina housing (conical seating) and held in positionby the force of attaction of a permanentmagnet.In the event of a violent crash of the vehicle,the ball is released from the magnetic stopand it opens the normally closed (N.C.) electricalcircuit, interrupting the earth connectionof the fuel pump and consequently thefeed to the fuel injection system.To restore the fuel pump's earth connection,push back the seat and press on the switchuntil you hear it engage.\€^£/^E^727>Removing-refitting1. Push the driver's seat back fully, undo thebolts indicated and remove the plasticcover.2. Undo the bolts indicated, disconnect thewiring connection and remove the switch.After a crash, even if apparently minor,if the smell of fuel is perceived orthere are leaks from the fuel system,do not reset the switch until you havefound and eliminated the fault, in orderto avoid the risk of fire.N.C. N.A. CComponents constituting the inertialswitch1.2.3.4.5.6.7.8.Complete inertial switchSheathButtonTopEngagement side,Permanent magnetPermanent magnet seatingSteel ballC= Shared terminalN.C. Normally closedN.A. Normally openCopyright Fiat Auto 45
EngineFuel system10.<strong>Bravo</strong>-<strong>Brava</strong> *0i 16v'98 rangeIGNITION COILS(Bae 920A)(Beru 0.040.100.029)The coils are bracketed onto the camshaftcovers; they are of the closed magnetic circuittype, formed by a segment pack whose centralcore, broken by a thin gap, carries bothwindings.The windings are located in a moulded plasticcontainer and encapsulated in an epoxyresin and quartz compound which gives themexceptional dielectric, mechanical and thermalproperties, as they can withstand hightemperatures. The vicinity of the primary tothe magnetic core reduces magnetic flowlosses, ensuring maximum connection to thesecondary.1. H.T. connector for cylinder 1 plug2. H.T. connector for cylinder 2 plug3. H.T. connector for cylinder 3 plug4. H.T. connector for cylinder 4 plug5. L.T. connector for control unit connection6. Primary circuit7. Gap8. Secondary circuit59+12VJLUMJLsJ VV LuMMJLnnmnnnn®©66nnnnmnnWiring connectorNOTEThe numbers in boxes indicate thecorresponding control unit pins.I2 H i- 1—1I® ® © ©59 66I i+12V46 Publication no. 506.670/14
<strong>Bravo</strong>-<strong>Brava</strong> $ 16v'98 rangeEngineFuel system10.Checking winding resistancePrimary circuit (A cylinders 1 -4, B cylinders2-3)Place the leads of an ohmmeter in contactwith the positive terminal (central pin) andnegative terminal (pin 1 for circuit A and pin2 for circuit B).The resistance of the primary circuit read onthe instrument must be between 0.44 and0.53 ohm at 23°C.Secondary circuit (C cylinders 1 -4, D cylinders2-3)Connect the leads of an ohmmeter betweenthe two high-tension output terminals.The resistance of the secondary circuit readon the instrument must be between 4500 and5500 ohm at 23 °C.RecoveryInhibition of the injectors corresponding tothe cylinders where there is no ignition.Open-loop check of mixture strength.If there is a short circuit to positive, the commandin progress is disabled and there is aretry.In the case of open circuit or short circuit toearth, a fixed charge time is assumed.Removing refitting1. Disconnect the high-tension cables andwiring connector from the ignition coilsassembly.2. Undo the bolts (arrowed) and remove theignition coils.Copyright Fiat Auto 47
EngineFuel system10.<strong>Bravo</strong>-<strong>Brava</strong> I0i 16v'98 rangeLAMBDA PROBE (NTK 0ZA334-A1)This is the sensor which measures the oxygen content in the exhaust gases.The sensor's output signal is sent to the electronic control unit to adjust the air-petrol mixture, in order tomaintain the mixture's stoichiometric ratio as close as possible to the theoretical value.To obtain an optimum mixture, the quantity of fuel injected must be as close as possible to the theoreticalquantity which would be required to be fully burnt in relation to the quantity of air drawn in by theengine.In this case the Lambda (X) factor is 1; in fact:X=QUANTITY OF AIR DRAWN INQUANTITY OF THEORETICAL AIR REQUIRED TO BURN ALL THE INJECTED FUELVOLTAPFmV1000 -0.9801.020800-600-400-200-RICH MIXTURESI:tWEAKMIXTURES0,7 0,8 0,9 1,0 1,1 1,2 1,3AIR COEFFICIENT XX= 1 Ideal mixtureThe CO is within legal limitsX^ 1 Weak mixtureExcess air; the CO tends to be lowX^ 1 Rich mixtureLack of air; the CO tends to be highNOTEWhile the coefficient X expresses the excess or shortfall of air supplied to the engine in relationto the value theoretically required, the air-petrol mixture is a ratio between these two substanceswhich, combined together, react chemically. For today's engines, this means that theyrequire 14.7-14.8 parts of air to burn 1 part petrol.The probe is mounted upstream of the catalytic converter.This consists of a ceramic casing (1) based on zirconium dioxide, covered with a thin layer of platinumclosed at one end, inserted in a protective pipe (2) and housed in a metal casing (3), which provides furtherprotection and permits assembly onto the exhaust manifold. The outer part (B) of the ceramic is exposedto the exhaust gas current, while the inner part (A) communicates with the ambient air.The operation of the probe is based on the fact that at temperatures exceeding 300°C, the ceramic materialbecomes a conductor of oxygen ions. Under these conditions, if the quantitiy of oxygen on the twosides (A and B) of the probe is in different percentages, a voltage variation between the two ends is generated,which is an indicator of the difference in quantity of oxygen in the two environments (air sideand exhaust gas side).48 Publication no. 506.670/14
<strong>Bravo</strong>-<strong>Brava</strong> $ 16v'98 rangeEngineFuel system10.ettggSsj/ / / /~71.2.3.4.Electrode (+) in contactwith the externalairElectrode (-) in contactwith the exhaustgasesCeramic casingProtective pipeMetal casingHeating elementWhen the probe provides a low voltage level (below 200 mV), the control unit recognizes that the mixturestrength is weak (lambda »1) and increases the quantity of fuel injected. When the probe provides ahigh voltage level (over 800 mV), the control unit recognizes that the mixture strength is rich (lambda «1) and reduces the quantity of fuel injected.The Lambda probe thus varies the injection times so that the engine operates with a Lambda coefficientconstantly fluctuating between about 0.980 and 1.020.For temperatures below 300°C the ceramic material is not active, so the probe does not send usable signalsand a particular circuit present in the control unit blocks the closed loop adjustment of the mixturestrength during the warming up of the probe.To ensure that operating temperature is quickly reached, the probe has a heating element (4) suppliedby the battery.The probe can be quickly put out of service by even small quantities of lead in the fuel.Checking the resistanceThe resistance of the heater and probe can bemeasured by disconnecting the connectorand connecting an ohmmeter as shown inthe figure.Heater resistance = 4.3 - 4.7 ohmRecoveryThe Lambda data are ignored (open loop).Wiring connectorThe numbers in boxes indicate the correspondingcontrol unit pins.Copyright Fiat Auto 49
EngineFuel system10.<strong>Bravo</strong>-<strong>Brava</strong> ^'98 rangeRemoving - refitting lambda probe- Place the car on ramps.- Disconnect the battery's negative cable.- Disconnect the wiring connector installedagainst the rear wall of the engine compartment.Remove the Lambda probe from its seatingon the exhaust pipe.When refitting, smearANT I SEIZE MA -TERIA-BORON NITRIDE N.G.K.SPARK PLUG CO-L TD. grease on thethreaded part.ETightening torque 3.5 - 4.5 dalUm50 Publication no. 506.670/14
<strong>Bravo</strong>-<strong>Brava</strong> lQ| 16v'98 rangeEngineFuel system10.CHECKS - ADJUSTMENTS AND REPAIRS ON THE FUEL INJECTION/IGNITIONTHE FOLLOWING INSTRUCTIONS SHOULD BE FOLLOWED WHEN WORKING ON A CARFITTED WITH I.A.W. FUEL INJECTION-IGNITION:- do not start the engine when the electrical connectors are connected incorrectly or are loose on thebattery terminals;- do not use a fast battery charger to start the engine;- never disconnect the battery from the on-board network with the engine running;- to fast charge the battery, first disconnect the latter from the on-board network;- if the car is placed in a drying oven after painting at temperatures exceeding 80°C, remove the fuelinjection-ignition electronic control unit;- do not connect or disconnect the control unit's multi-connector with the ignition on;- always disconnect the battery negative before carrying out electric arc welding on the car.Remember that this system has a permanently supplied memory which stores the learnt self-adaptivi -ty values of the engine idle speed actuator. Disconnecting the battery will lead to the loss of this information,so should be done as little as possible.ADJUSTING THROTTLE CABLEThe throttle cable is adjusted by undoing thenut (1) and moving the clip (2).REMOVING-REFITTING FUELFOLD AND FUEL INJECTORSPosition the clip (2) so that the head of thethrottle cable enters freely in the slot withoutchanging the idle speed, then lock the nut(D-MANI-Remove the first section of the oil dipstickand oil filler pipe, then disconnect the injectorcable connector (1).Copyright Fiat Auto 51
EngineFuel system10.<strong>Bravo</strong>-Btava I0t 16v'98 range1. Undo the bolts jointing the two sections ofthe inlet manifold and remove the first section(1).2. Undo the bolts securing the fuel supplymanifold and the bolts securing the secondsection of the inlet manifold to the engineblock, and remove it.3. Remove the fuel pipe and remove the manifoldcomplete with fuel injectors.4. Then remove the fuel injectors as follows:- Disconnect the electrical connector (1).- Remove the safety clip (2).- Remove the fuel injector (3), which is apress fit.Never pull the electrical connectorto remove the injector.Before refitting, check the conditionof the seals.52 Publication no. 506.670/74
<strong>Bravo</strong>-<strong>Brava</strong> ffi 16v'98 rangeEngineFuel system10.REMOVING-REFITTING FUEL TANKBefore removing-refitting the tank, drain thefuel, place the car on ramps and disconnectthe battery's negative pole. Then proceed asfollows:Lift the boot trim after removing the retainingbuttons using the wrench1878077000. Remove the protectivecover shown in the insert by undoing theattachment screws.Disconnect the wiring connections fromthe pump and fuel gauge sender unit. Disconnectthe vent pipe (1) by undoing theretaining nut, and the fuel return pipe (2)and delivery pipe (3) by undoing the retainingclips.Undo the ring nut securing the electricpump to the tank using tool 1860893000together with a ring spanner.Undo the cap and remove the fuel fillergaiter from its seating.Copyright Fiat Auto 53
EngineFuel system10.<strong>Bravo</strong>-<strong>Brava</strong> I0fc 16v'98 range* L_JWiV,Remove the bolt (arrowed) and plug securingthe fuel filler to the bodywork.j/\r^jf(Ai-jS'2-3. Open the clips shown by the arrows andrelease the handbrake cables from theattachments on the fuel tank.\f))1 AF4. Place a suitable hydraulic jack under thetank, to support it during removal-refitting.Then remove the bolt and front plugssecuring the tank to the bodywork.54 Publication no. 506.670/14
<strong>Bravo</strong>-<strong>Brava</strong> 0i 16v'98 rangeEngineFuel system10.1. Remove the bolts and rear plugs securingthe tank to the bodywork.2. Gradually lower the hydraulic jack, checkingthat the tank is correctly balanced,then disconnect the fuel vapour recoverypipe.3. If necessary, also disconnect the vent pipe(2) on the tank.4. Fuel tank.Copyright Fiat Auto 55
EngineFuel system10.<strong>Bravo</strong>-<strong>Brava</strong> &'98 range16vREMOVING-REFITTIIMG THROTTLE CABLEDisconnect the battery lead then proceed asdescribed below:1. Working from inside the car, disconnectthe throttle cable from its attachment onthe accelerator pedal.2. In the engine compartment, rotate thethrottle valve lever (1) and disconnect thethrottle cable. Then withdraw the cable(2) from the mounting bracket.3. Withdraw the rubber buffer from the anchoragehole on the bulkhead wall, andwithdraw the complete throttle cable.4. Complete throttle cable.When fitting, adjust the throttle cableas described in the "Adjusting throttlecable" section.56 Publication no. 506.670/14
<strong>Bravo</strong>-<strong>Brava</strong> @i i*Engine'98 range Fuel system10.CHECKING ENGINE IDLE SPEEDIf the engine idle speed is not 850 ± 50 rpm, and as the fuel injection-ignition is self adjusting, no adjustmentscan be made, so it is not necessary to check the correct adjustment of the throttle linkage.Faults should therefore be sought by means of full diagnosis using the Fiat/Lancia Tester.CHECKING CONCENTRATION OF POLLUTING EMISSIONSVia the self-adaptivity of the system, the fuel injection-ignition ensures continuous control of the idlespeed and CO level, thus rendering any external adjustment unnecessary (there are no adjustmentscrews). However, a relative check on the contents of the exhaust gases upstream and downstream ofthe catalytic converter can give useful information on the operating conditions of the fuel injection-ignition,the engine parameters or the catalytic converter.Checking CO and HC concentration during idling upstream of the catalytic converterTo check the concentrations of carbon monoxide (CO) and unburnt hydrocarbons (HC) upstream ofthe catalytic converter, proceed as follows:1. Undo the plug or nut located on the exhaust pipe, upstream of the catalytic converter, and screw inthe tool.2. Connect the probe of a suitably calibrated CO tester to the tool.3. Start the engine and bring it up to temperature.4. Check that the rpm is correct.5. Check that the CO concentration during idling is as specified in the table below; if not, check:- the correct operation of the Lambda probe using the Fiat/Lancia Tester;- the presence of air leaks in the area surrounding the Lambda probe seating;- the fuel injection and ignition system (especially the state of wear of the spark plugs).6. Check under the same conditions that the HC concentration is below 600 p.p.m.7. If these values are not found, tune the engine, checking the following in particular:- ignition advance;- valve clearances;- timing;- engine compression.Table of tolerances for polluting emissionsCO (%)HC (p.p.m.)CO2 (%)Upstream of catalyzer0.4 - 1600^ 12Downstream of catalyzer
EngineFuel system10.<strong>Bravo</strong>-<strong>Brava</strong> $'98 range16vChecking CO and HC concentration in the exhaustThe concentration of carbon monoxide (CO) and unburnt hydrocarbons (HC) in the exhaust is measuredby inserting the probe of a suitably calibrated CO tester in the end of the exhaust pipe for at least30 cm, as shown in the figure.If the shape of the end of the exhaust pipe will not allow the probe to be inserted fully, add an appropriateextension tube which seals properly at the join.1. Check that the CO and HC concentrations during idling are as specified in the table.2. If the HC value is outside the specified limit, while the measurement upstream of the catalytic converterwas correct, the engine parameters should be considered to be correct, and so the cause of thefault should be sought in reduced efficiency of the catalytic converter.58 Publication no. 506.670/14
16v<strong>Bravo</strong>- <strong>Brava</strong> 91998 rangeCHECKS TO FUEL SUPPLY CIRCUITEngineFuel system10.Checking fuel supply pressureCheck fuel supply pressure as follows:-unscrew the nuts indicated by the arrowsand remove bracket (1);-disconnect the injector supply connector(2);-set cock (4) of tool 1860955000 to openposition and cocks (5) and (6) to closedposition;-position tool 1860955000and connect tothe fuel manfold using adaptor 1870684000(3). Then reconnect injectorsupply connector(2);NOTE Tool 1860955000 comes with adaptors for connection to various types of injection system. Beforeconnecting the system, set up the equipment using the appropriate adaptors.-start the engine and check that the reading on the pressure gauge remains stable at 3.5 bar ± 0.2 bar,then turn off the engine.-operate the fuel pump with the engine off using a tester and running the fuel pump test while in activediagnosis mode.-check the pressure is stable at 3.5 ± 0.2 bar;-disconnect device 1860955000 from the fuel manifold and refit bracket (1).Copyright Fiat Auto VM : JJS i~'.5i!pu-.Mfc'4'piv!i-^
EngineFuel system<strong>Bravo</strong>- <strong>Brava</strong> ®» **1998 rangeChecking fuel supply pressure using atester.Fuel supply pressure can also be checked usingan EXAMINER or SDC. In this case, remove theprotective bracket as described in the previousparagraph, connect the tester to transducer (2),which must be connected to the fuel manifoldby means of fitting (1).Testing fuel consumptionTest fuel consumption as follows:-remove the protective bracket and disconnect the injector supply connector as described in the previousparagraph on fuel supply pressure testing;0thefuel supply circuit is maintained at a constant pressure of 3.5 bars even with the engine off.Before disconnecting the delivery pipe, it is therefore necessary to drain pressurised fuel as describedbelow-obtain a suitable container(5) and insert pipe (4) into it;-connect the other end of pipe (4) to the fuel manifold using special adaptor 1870684000 (3);-drain off fuel under pressure into container (5);-disconnect fuel manifold adaptor (3) and pipe (4), then reconnect the injector supply connector;60 '. W»M-"5tn3f*SB6lftif prwqus vei^i'dii'. Publication n° 506.670/21
<strong>Bravo</strong>-<strong>Brava</strong> 1016v'98 rangeEngineFuel system10.- disconnect the fuel delivery pipe from the quick-fit connector located against the rear wall of the enginecompartment and, using the connectors of the test equipment 1860955000, make the connectionsto the Flowtronic device (1806149001) as follows:1. Cut and withdraw the end (A) of the connector (2), then connect the end (B) to the connector ofthe rigid pipe (3) and the end (A) to the inlet pipe into the Flowtronic (4).2. Insert the connector (5) into a piece of pipe (6) and lock it with a metal clip, then connect the end(A) to the pipe (1) previously disconnected and the end (B) to the outlet pipe from the Flowtronicdevice (4).- carry out a fuel consumption road test in accordance with the Directive 93/116/CE (litres x 100 km):URBAN CYCLE - includes one cold start, followed by a simulated varied urban journey.OUT-OF-TOWN CYCLE - includes frequent accelerations, in all gears, simulating normal out-oftownuse of the vehicle; the speed varies between 0 and 120 km/h.AVERAGE COMBINED CONSUMPTION - includes 37% urban cycle and 63% out-of-town cycle.NOTEThe type of journey, traffic situations, style of driving, weather conditions, level of fittings/extras/accessories,presence of roof rack, presence of special equipment and the general conditionof the vehicle can lead to different fuel consumption values from those measured by theabove-mentioned procedures.- check that the values measured correspond to those given in the "Introduction and technical data"section.Copyright Fiat Auto 61
Engine <strong>Bravo</strong>-<strong>Brava</strong> @t i*Fuel system'98 range10.FAULT DIAGNOSISFull diagnosis of the fuel injection-ignition is possible by active dialogue with the Examiner or SDC station.If faults in the sensors are detected, the electronic control unit replaces the data coming from the faultysensor with pre-memorized data (recovery) to allow the engine to continue operating.Detection of the fault leads to its permanent storage in memory and the exclusion of the sensor from thesystem until the signal becomes compatible again.The same procedure is applied if the fault affects an actuator or its control port. The detection of the faultand the replacement with recovery data leads to indication of a fault by the warning light on the instrumentpanel coming on.The devices which, in the event of a fault, can be managed by recovery from the control unit are:- Idle speed actuator - Coolant temperature sensor- Ignition coils - Knock sensor- Fuel vapour recirculation solenoid - Throttle position sensor- Air temperature and pressure sensor - Lambda probeIn the event of faults in the control unit or rpm sensor, the system, even though it detects the fault, cannotreplace it with recovery data and the car stops. The faults can be detected in the memory of the controlunit using the Examiner or SDC station.Error recognition and memorizationThe error is detected via a system of validations which operates as follows.When an error is detected, this is checked for a certain period of time to avoid possible interference onthe diagnostic line. If the fault passes this stage, it is considered to be present and is stored in RAM (filterederror). It is then checked that the error remains present for a further period of time (called validationtime); if this stage is also passed, the error is finally memorized (validated error) and the fault warninglight comes on. The stage of writing the error in EEPROM takes place after the ignition is switched off.Error frequency counterA frequency counter is assigned to each error in order to determine the moment when a fault which is nolonger present was memorized. On first detection of a validated error, the counter is set to a fixed set value.The counter is decremented whenever the car is started without the fault reappearing. If the counterreaches zero, the fault is automatically deleted from EEPROM.Error deletionErrors can be deleted from EEPROM in two ways:- by means of the diagnostic equipment (Examiner or SDC station), in active diagnosis- by resetting the error frequency counter.NOTE Disconnecting the control unit from the system, even for long periods, does not delete datarecorded in the EEPROM.Management of the system fault warning lightTo check its operation, the control unit lights up the warning light and leaves it on for about 4 secondswhenever the ignition is switched on. The warning light then comes on whenever there is a validated error,i.e. for as long as the fault situation remains, and it goes out when the fault disappears.62Publication no. 506.670/14i
<strong>Bravo</strong>-<strong>Brava</strong> ^ 16v'98 rangeCommunications between control unit and diagnostic equipmentEngineFuel system10.In the engine compartment, there is a socket for connecting the diagnostic equipment.The data exchange between control unit and diagnostic equipment takes place by means of a bidirectionaldiagnostic line (line K) and the communication protocol follows the Key Word 2000 standard.Data transmission takes place in NRZ positive logic at a baud rate of 10400 Baud.The diagnostic equipment can provide the following information:- Display of engine parameters;- Display of errors;- Active diagnosis.Parameters displayedEngine rpmFuel injection timeAbsolute pressure in the inlet manifoldIntake air temperatureEngine coolant temperatureThrottle valve aperture angleBattery voltageNumber of open/close steps of the engine idlespeed actuatorAdvanceMixture strength correction (Lambda probe)Vehicle speedSelf-adaptivityError counterIgnition coil charging time (Dwell)Petrol vapours solenoidStart counterEngine loadFiat CODEList of < errorsRpm sensorThrottle potentiometerAbsolute pressure sensorAir temperature sensorCoolant temperature sensorBatteryLambda probeFuel injectorsIgnition coilsIdle speed actuatorFuel vapours solenoidActuators relaysControl unitSelf-adaptive parametersSpeed sensorKnock sensorFiat CODEAbsence of signalA.C.-D.C.A.C.-D.C.A.C.-D.C.A.C.-D.C.Supply> 16.2VSupply< 6VImplausible signalD.C.A.C.-D.C.A.C.-D.C.A.C.-D.C.A.C.-D.C.A.C.-D.C.Operating faults in the microprocessor or control unit memories are indicated.It is indicated whether the limits of self-adaptivityof the control unit have been reached.This indicates that the engine conditions aretoo far beyond the standards, so the causesshould be sought in mechanical faults.Implausible signalSpeed exceeds maximum speedA.C.-D.C.Code not recognized or not receivedCopyright Fiat Auto 63
EngineFuel system10.<strong>Bravo</strong>-<strong>Brava</strong> !0i 16v'98 rangeActive diagnosisDuring active diagnosis, some components can be activated and some particular functions can be carriedout, for example the error deletion command, as shown in the table below.In active diagnosis, the ignition must be on and, only for some functions, the engine must be running.Function/ActuatorElectric fuel pumpFuel injectorsIgnition coilsError deletion commandFuel vapours solenoidRev counterAir conditioner relayFuel injection fault warning lightCoolant overheating warning lightEngine idle speed actuatorFiat CODEMethod of activationActivation of the relay for 30 sActivation for 4 ms per s 5 timesActivation for 2 ms per s 5 timesDeletion of validated errorsActivation for 20 ms per s 7 timesActivation at 125 Hz for 2 sActivation of the relay for 30 sActivation of the warning light for 30 sActivation of the warning light for 10 sActivation for 32 steps forwards/backwardsRecovery procedure to permit engine startingRadiator fanActivation for 10 s at both high and lowspeeds64 Publication no. 506.670/14
<strong>Bravo</strong>-<strong>Brava</strong> l@i 16vAuto transmission & differentialContents21-27.pagepageDESCRIPTION AND OPERATION■> Description- Selector lever- Torque converter,- Lock-up clutch- Oil pump- Epicyclic gear sets- Control components- Hydraulic control system- Transmission of drive- Safety control unit- Electronic control system '- Control module'- Operating strategies- Gear change solenoids- Lock-up clutch control solenoid- Pressure contrpl solenoid- Selector lever position sensor- Gearbox oil temperature sensor- Main shaft rpm sensor - Vehicle speedsensor-' Kick-down switch- Stop lights switch- Throttle valve position signal- Engine coolant temperature signal1334556391315161926272728292930303030DRIVE SHAFTS- Removing-refitting- Dismantling-reassembly- Refitting- Transmission componentsVALVE ASSEMBLY- Removing-refitting valve assembly- Kick-down switch636465666769- Wiring diagram- Diagnosis3132SERVICING AND ADJUSTMENTS- Changing gearbox oil 39- Checking oil level 39- Gear change cable 40- Gear change lever position sensor ' 46- Removing-refitting gear change controlunit (control module) 48- Removing-refitting safety control unit 49-. Removing-refitting gearbox oil coolingfan and radiator ' 49- Main shaft rpm sensor - Vehicle speedsensor 50REMOVING-REFITTING- Removing-refitting gearbox- Precautions5160Copyright Fiat Autos vl-96 J Update
<strong>Bravo</strong>-<strong>Brava</strong> !§|i 6vAuto transmission and differentialComponents and operation21-27.DESCRIPTIONIntroductionThe Fiat <strong>Brava</strong> 1581 16v Torque uses an AISIN 60-40 LE automatic gearbox and differenetial unit,4-speed version AW 596/Y024, specially designed for front-wheel drive vehicles with transverse-mountedengine, fitted with an electronic control system connected to the engine management control unit.P4A01AB011. Gearbox-differential unit2. Selector lever3. Control moduleThe automatic transmission electronic control logic resides in an "intelligent" control unit (or controlmodule), located under the cushion of the rear seat on the right.The control module is connected to the various sensors/actuators located on the gearbox, engine anddashboard, the control unit of the fuel injection/ignition for exchanging information relating to the engineand the instrument panel for displaying the operating conditions.The mechanical unit of the automatic transmission comprises:- an oleodynamic torque converter, with a lock-up clutch which locks the converter in the higher ratios;- two epicyclic gears, located on the main shaft;- a band brake B1, a multiple disc brake B2 and four multiple disc clutches, operated hydraulically; thereare also two free wheels, which lock the various gearing components to obtain the four forward gearsand reverse gear;- a parking lock, consisting of a gear with ratchet gear which locks the gearbox when the gear lever is inthe P (Park) position.The control module interacts in the hydraulic operation of the gearbox, issuing the appropriate operatingcommands to the clutches and brakes via four solenoids, contained in a valve unit located at the front ofthe automatic transmission.Copyright Fiat Auto 1
Auto transmission and differentialComponents and operation21-27.Cross section of automatic transmission and differentialBtavo-<strong>Brava</strong> I^Bi 16vC1 C3 CO ST1 B2 ST2 T1 B1 C21. Torque converter2. Lock-up clutch3. DifferentialB1. Band brakeB2. Multiple disc brakeCO. Multiple disc clutchC1. Multiple disc clutchC2. Multiple disc clutchC3. Multiple disc clutchD. Clutch carrier drumE. Motion input shaftFO. Free wheelF1. Free wheel P4A 02 ABOI11. Main shaft motion output gear12. Layshaft gearK1. Epicyclic gear set P1 crown wheelK2. Epicyclic gear set P2 crown wheel51. Epicyclic gear set P1 sun gear52. Epicyclic gear set P2 sun gearST1. Epicyclic gear set P1 planet gearST2. Epicyclic gear set P2 planet gearST3. Epicyclic gear set P2 outer planet gearT1. P1 and P2 epicyclic gear train carrierU. Relay shaft2 Publication no. 506.670/06
<strong>Bravo</strong>-<strong>Brava</strong> lAj 16vAuto transmission and differentialComponents and operation21-27.SELECTOR LEVERTo select a gear, use the selector lever located on the central console, which comprises a safety button(2) to protect against accidental gear engagements. It is connected to the automatic transmission via aflexible cable, and it acts on the valve unit and on an electrical device through which a coded electricalsignal indicating the lever's position (P, R, N, D, 3, 2, 1) is transmitted to the control module.1. Selector lever2. Safety button (to prevent accidental gearengagement)3. Lever position display4. NORMAL/SPORT button (this is forswitching over from NORMAL mode toSPORT mode and vice versa)5. ICE button (for driving on slippery roads)The following positions may be set using the selector lever:P ParkR ReverseN NeutralD DriveThe drive wheels are locked (the engine can be started)Reverse ratio (the reversing lights come on)Neutral position (the engine can be started)Automatic operation of the gearbox on all four ratios3 3rd gear Automatic operation of the gearbox on the first 3 gears (the change to 4th gear is inhibited)2 2nd gear Automatic operation of the gearbox on the first 2 ratios (the change to 3rd and 4thgears is inhibited)1 1st gear Operation only in 1st gear (with engine braking effect)TORQUE CONVERTERThe purpose of the torque converter is to hydraulically transmit power from the engine to the gearbox,and to increase the torque when the vehicle is accelerating. The rotary motion is transmitted to theepicyclic gearing through two shafts:- the gearbox main shaft which engages in the hub of the converter turbine.- the layshaft which engages on the lock-up clutch;The converter comprises (see figure on next page) a pump P connected to the crankshaft, a turbine Tconnected to the gearbox main shaft, and a stator S connected to the gearbox outer casing. The converteris filled completely with oil which, because of the kinetic energy impressed upon it by the pump,permits the transmission of the driving torque.Copyright Fiat Auto 3
Auto transmission and differentialComponents and operation21-27.<strong>Bravo</strong>-<strong>Brava</strong> !§§u 6lP. PumpS. StatorP4A04AB01T. TurbineNOTEThe torque converter does not sustain any kind of wear as there is no mechanical connectionbetween the driven part and the driving part.The impeller P is connected to the crankshaft and, rotating in a clockwise direction, acts as a pump, transmittingits energy to the oil.The centrifugal force pushes the oil towards the periphery of the impeller, where it flows at high speed towardsthe turbine T. Here the oil's kinetic energy impresses a clockwise rotary movement to the turbine.The oil then passes through the stator S, where it is diverted in accordance with an angle which permits itreturn to the pump with high efficiency. The stator is connected to the gearbox casing by means of a freewheel engagement system, which prevents its rotation in an anti-clockwise direction and provides a reactiontorque, proportional to the oil flow diversion, which is added to that of the turbine.The ratio between the torque acting on the turbine and that provided by the pump is known as the torquemultiplication ratio and is proportional to the difference in speed of rotation between the pump and turbine.With the wheels stopped, the torque is around double that delivered by the engine.As the turbine speed increases, the torque multiplication decreases continuously and tends to reach theratio of 1:1, corresponding to a turbine speed of 85-90% of the pump speed. When the turbine andpump speeds are almost the same, the stator is enveloped by an oil flow directed at an angle whichmakes it change its direction of rotation and, as it is not blocked by the free wheel, it rotates in a clockwisedirection without impediment and the torque converter behaves like a simple hydraulic joint.LOCK-UP CLUTCHIn first, second and reverse gears, the driving torque is transmitted by the torque converter.In third and fourth gears, the torque is transmitted first hydraulically by the converter, and secondly mechanicallyvia the lock-up clutch. The lock-up clutch, by connecting the pump to the converter's turbinewhen the speed increases, eliminates the internal slipping of the converter and provides a mechanicalcoupling between the engine and the gearbox main shaft.The locking of the torque converter allows the performance of the transmission to be improved at highspeeds, leading to a reduction in fuel consumption on long motorway journeys.The lock-up clutch is switched on by the control module via the lock-up solenoid SL, at the higher gears(3rd and 4th gears), when it is no longer necessary to multiply the driving torque supplied by the torqueconverter.The solenoid SL opens, discharging the oil pressure from the chamber A, while the pressure in the convertercontinues to act on the face B: the clutch, fitted on the turbine hub, is then pushed against thecasing connected to the converter's pump, thus locking the converter.4 Publication no. 506.670/06
<strong>Bravo</strong>-<strong>Brava</strong> @ 16vAuto transmission and differentialComponents and operation21-27.1. Flywheel attachments2. Casing connected to pump3. Lock-up clutch4. Turbine5. Pump6. Stator7. Motion input shaftOIL PUMPThe oil pump used for the AISIN automatictransmission is of the inner gear type.It is located between the torque converter andgearbox casing, and is driven directly by theconverter pump impeller.The functions of the oil pump are as follows:- to provide the necessary pressure to thehydraulic control system and the gearboxcontrol components (clutches and brakes);- to send an oil flow into the torque convertercase in order to cool it and to be able tooperate the lock-up clutch;- to lubricate the moving components of thegearbox;- to circulate oil in the cooling system.Structure of the oil pump1. Inlet side2. Delivery sideEPICYCLIC GEARSThe AISIN automatic transmission uses twoepicyclic gear sets for obtaining the five transmissionratios (4 forward gears + reverse gear).The rear gear set P1 is a simple epicyclicgear set comprising a sun gear ST, fourplanet gears ST1 and a crownwheel K1.The front gear set P2 consists of anepicyclic gear set comprising a sun gearS2, four inner planet gears ST2, four outerplanet gears ST3 and a crownwheel K2.The shafts of the planet gears ST1, ST2and ST3 are attached to the gear traincarrier T1.• " P1Epicyclic gear sets P1 and P2K1. Crownwheel of P1K2. Crownwheel of P251. Sun gear of P152. Sun gear of P2ST1. Planet gears of P1ST2. Inner planet gears of P2ST3. Outer planet gears of P2T1. Gear train carrierCopyright Fiat Auto 5
Auto transmission and differentialComponents and operation21-27.<strong>Bravo</strong>-<strong>Brava</strong> ig|i 6lCONTROL COMPONENTSThe control components of the automatic transmission consist of clutches, multiple disc brakes, bandbrakes and free wheels, which prevent the relative rotation between two components of the epicyclicgear sets, or between one of them and the outer casing, to achieve the four forward gears and reversegear.ClutchesFour clutches are used in the AISIN automatic transmission, and they are all of the multiple disc type.They are activated by the valve assembly located in the gearbox hydraulic control system.When engaged, the clutch C1 couples the gearbox input shaft E to the clutch carrier drum D.When engaged, the clutch C2 couples the gearbox input shaft E with the shaft E on which there are thetwo sun gears S1 and S2 of the gear sets P1 and P2.When engaged, the clutch C3 couples the clutch carrier drum D with the crownwheel K1 of the epicyclicgear set P1; in this way the crownwheel K1 receives motion from the gearbox input shaft E through C1-C3.When engaged, the clutch CO couples the clutch carrier drum D with the crownwheel K2 of theepicyclic gear set P2; in this way the crownwheel K2 receives the motion from the gearbox input shaft Ethrough C1-C0.6 Publication no. 506.670/06
<strong>Bravo</strong>-<strong>Brava</strong> ©^Auto transmission and differentialComponents and operation21-27.BrakesThere are two brakes in the AISIN automatic transmission, one of the multiple disc type (B2), and oneband brake (B1).They are activated by the valve assembly located in the gearbox hydraulic control unit.The band brake B1 blocks the rotation of the sun gears S1 and S2 (connected to each other), whichform part of the gear sets P1 and P2.The multiple disc brake B2 blocks the rotation of the crownwheel K2 of the gear set P2.Copyright Fiat Auto 7
Auto transmission and differentialComponents and operation21-27.<strong>Bravo</strong>-<strong>Brava</strong> @u 6lFree wheelsThe free wheels consist of two concentricraces and a cage enclosing aset of asymmetrical pawls, whichpermit the relative rotation of the tworaces in a particular direction (A),while in the opposite direction thepawls jam, preventing relative rotationand providing a reaction torque.P4A08AB01P4A08AB02The roller clutch FO connects the clutch carrier drum D and crownwheel K1 of the gear set P1 when theclutch C1 is active, and the motion comes from the gearbox input shaft.The roller clutch F1 prevents the anti-clockwise rotation of the crownwheel K2 of the gear set P2.HYDRAULIC CONTROL SYSTEMP4A08AB03The operation of the automatic transmission is made possible by the operation of the clutches andbrakes, via hydraulic actuators driven by valves which move in accordance with the commands issuedby the contrdi module. The feed is provided by a gear pump, driven directly by the engine through thetorque converter.A cooling radiator and fan controlled by a thermal switch keeps the oil temperature within pre-establishedlimits.8 Publication no. 506.670/06
<strong>Bravo</strong>-<strong>Brava</strong> @ 16vAuto transmission and differentialComponents and operation21-27.TRANSMISSION OF MOTIONThe diagram below illustrates in a simplified manner the composition of the gear sets and control components(clutches, brakes and free wheels) of the gearbox.The same wiring diagram will be used on the following pages to illustrate the intervention of the variouscontrol components during the different stages of operation.ZZZ/B1. Band brakeB2. Multiple disc brakeCO. Multiple disc clutchC1. Multiple disc clutchC2. Multiple disc clutchC3. Multiple disc clutchD. Clutch carrier drumE. Motion input shaftFO. Free wheelFree wheelMain shaft motion output gearLayshaft gearCrownwheel - epicyclic gear set P1Crownwheel - epicyclic gear set P2Sun gear - epicyclic gear set P1Sun gear - epicyclic gear set P2Planet gear for epicyclic gearset P1Inner planet gear for epicyclicgear set P2Outer planet gear for epicyclicgear set P2P1 and P2 epicyclic gear traincarrierRelay shaftThe table below gives the conditions of activation of the components depending on the gear engagedand the position of the selector lever.SelectorleverpositionPRND321Gear engagedParkReverse (*)Neutral (**)Neutral1st2nd3rd4th1st2nd3rd1st2nd3rd(1st)*(2nd)*ControlsolenoidsS1OOS2 SLoooooooooooooooooooooC1OoooooooooooClutchesC2ooC3oooooooooooooooCOooooBrakesB100o00B2ooFreewheelsF1 FONOTE 0=Solenoidactivated (*) Speed 7km/h (•) Intermediate selection inmanual scale.OOoooooooooooooCopyright Fiat Auto 9
Auto transmission and differentialComponents and operation21-27.<strong>Bravo</strong>-<strong>Brava</strong> igl^Neutral (selector lever on position IM)The gearbox input shaft E rotates in a clockwise direction.The clutch C3 couples the crownwheel K1 to the clutch carrier drum D, to permit the transmission ofmotion without delays or stresses, caused by the simultaneous engagement of several clutches andbrakes, when the selector lever is positioned on R or D (1st gear).The multiple disc clutches C1 - CO - C2 and brakes B2 - B1 are disengaged, so the epicyclic gear setsP1 and P2 do not receive motion, thus isolating the differential relay shaft U from the gearbox inputshaft E.NOTEThe parking lock is off, so the planet gears ST1 - ST2 - ST3 are free to rotate around the sungears SI and S2, allowing the vehicle to move if it is on a slope.Park (selector lever on position P)The control components are as describedfor position IM, with thesole difference that the parkinglock (ratchet P) is engaged, preventingthe vehicle from moving.First gear (selector lever on position1)The gearbox input shaft E rotatesin a clockwise direction.The crownwheel K1 is coupled tothe input shaft E by the engagementof the multiple disc clutchC1, the clutch carrier drum D andthe clutch C3 (already engagedwith IM or P selected).The clutch C3 locks the free wheelFO. The crownwheel K2 is lockedto the gearbox casing by the engagementof the multiple discbrake B2. The brake B2 locks thefree wheel F1. The planet gearsST1, driven by the crownwheelK1 of the epicyclic gear set PI, rotatein a clockwise direction andvia the sun gears S1 and S2transmit motion, reduced and in aclockwise direction, to the planetgears ST2 of the epicyclical gearset P2.The planet gears ST3, driven bythe planet gears ST2, rotate in ananti-clockwise direction and, bythe reaction on the locked crownwheelK2, shift and rotate in clockwisedirection the gear train carrierT1 and gear 11.The gear 11 transmits motion to thewheels via the gear 12 and the differentialrelay shaft U.NOTE Engaging the brake B1 in 1st and reverse allows the engine to brake the vehicle in deceleration.10 Publication no. 506.670/06
<strong>Bravo</strong>-<strong>Brava</strong> \^ 16vAuto transmission and differentialComponents and operation21-27.First gear (selector lever on position D-3-2)With the selector lever on one of the three positions, the gearbox functions in the same way and with thesame transmission ratio as with the selector lever at position 1, with the only difference that the crownwheelK2 of the front gear set P2 is not locked by the brake B2.As the torque which acts on the crownwheel K2 is much higher than that acting on the gear train carrierT1, the crownwheel would rotate in an anti-clockwise direction, but the free wheel F1 prevents this rotation,permitting transmission of motion to the gear train carrier and so to the differential relay shaft U,as in the previous case.However, in this case there is noengine braking effect, as thecrownwheel K2 can rotate freely ina clockwise direction, allowing thegear train carrier T1 to rotate at ahigher speed than that imposed bythe transmission ratio.Second gear (selector lever on position D-3-2-1*)* selected manually (recovery)The gearbox input shaft E rotates in a clockwise direction.The crownwheel K1 is coupled to the input shaft E by the engagement of the multiple disc clutch C1,clutch carrier drum D and clutch C3 (already engaged with IM or P selected).The clutch C3 locks the free wheel FO.zzzyr\■ ^ DThe sun gear S1 is locked to thegearbox casing by the engagementof the band brake B1.The planet gears ST1, driven bythe crownwheel K1 of theepicyclic gear set PI, rotate in aclockwise direction, shifting ontothe locked sun gear SI; they thentransmit motion in a clockwise directionto the gear train carrier T1and the gear 11 coupled to it.The gear 11 transmits motion to thewheels via the gear 12 and the differentialrelay shaft.P4A11AB02Copyright Fiat Auto 11
Auto transmission and differentialComponents and operation21-27.<strong>Bravo</strong>-Btava iggne,Third gear (selector lever on position D-3)The gearbox input shaft E rotates in a clockwise direction.The crownwheels K1 and K2 are coupled to the input shaft E by the engagement of the clutch C1,clutch carrier drum D and the clutches C3 and CO.The clutch C3 locks the free wheel FO.The epicyclic gear sets PI (S1 - ST1 - K1) and P2 (S2 - ST2 - ST3 - K2) lock onto each other whentheir transmission ratios are different.The planet gears ST1, ST2 andST3, locked, drive the gear traincarrier T1 in a clockwise directionat the same speed as the inputshaft E (ratio 1:1).The gear 11 transmits motion to thewheels via the gear 12 and the differentialrelay shaft U.Fourth gear (selector lever on position D)The gearbox input shaft E rotates in a clockwise direction.The crownwheel K2 is coupled to the input shaft E by the engagement of the multiple disc clutch C1,the clutch carrier drum D and the clutch CO.The free wheel FO allows the crownwheel K1 to rotate in a clockwise direction.The sun gear S2 is locked on the gearbox casing by the engagement of the band brake B1.The planet gears ST2, driven bythe crownwheel K2 via the planetgears ST3 r shift onto the lockedsun gear S2, rotating the gear traincarrier T1 in a clockwise direction.The clockwise shift of the geartrain carrier T1 makes the planetgears ST2 rotate in a clockwise directionon the locked sun gear S2and the planet gears ST3 in an anti-clockwisedirection.The anti-clockwise rotation of theplanet gears ST3 on the crownwheelK2 achieves a further increasein clockwise rotation of thegear train carrier T1.The result is that the speed of thegear train carrier T1 and the gear IIis higher than that of the drivingcrownwheel K2, obtaining 4th gear.12 Publication no. 506.670/06
<strong>Bravo</strong>-<strong>Brava</strong> lfpuevAuto transmission and differentialComponents and operation21-27.Reverse (selector lever on position R)The gearbox input shaft E rotates in a clockwise direction.The sun gears S1 and S2 are coupled by the input shaft E, by the engagement of the multiple disc clutchC2The clutch C3 locks the free wheel FO and couples the crownwheel K1 to the clutch carrier drum D.The crownwheel K2 is locked to the gearbox casing via the multiple disc brake B2.The brake B2 locks the free wheel F1.The sun gear S2, coupled to the input shaft E, transmits motion anti-clockwise to the planet gears ST2and clockwise to the planet gears ST3.The planet gears ST3, rotating clockwise, shift onto the locked crownwheel K2, thus making the geartrain carrier T1 and gear II rotate anti-clockwise, obtaining reverse gear.P4A13AB01SAFETY CONTROL UNITThe safety functions of the AISIN automatic transmission are managed by a special electronic controlunit and may be divided into two categories:1. warning functions, which cause a buzzer to sound when:- the selector lever is shifted to position R;- a front door is opened when the selector lever is at a position other than P;- the engine is switched off with the selector lever in a position other than P;2. functions which oblige the driver to carry out particular actions to allow:- the selector lever to be moved from position P with the engine running only with the brake pedalpressed;- the ignition key to be withdrawn only with the selector lever in position P.Copyright Fiat Auto 13
Auto transmission and differentialComponents and operation21-27.<strong>Bravo</strong>-<strong>Brava</strong> i§|i 6 vHI +30-•—332311 31 fll4501202OAW.26 27729730715IPA IC IB |AS3ESTP/NJD Mn Ma7 10t13rStop1282532(g)1712 4 6 1 10 9 11 7Wiring diagram of safety control unit connections2. Selector lever position sensor8. Rear earth11. Left dashboard earth12. Starter motor relay13. PARK position additional switch14. 15A fuse protecting STOP lights15. STOP lights switch17. Automatic transmission safety electroniccontrol unit20. 5A fuse protecting control module23. Ignition switch25. Speedometer signal generator26. Ignition switch solenoid27. Shift-lock solenoid28. STOP lights29. Front left button controlling courtesylight and door open indicator30. Front right button controlling courtesylight and door open indicator31. Right dashboard earth32. Reversing lights33. Battery14 Publication no. 506.670/06
<strong>Bravo</strong>-<strong>Brava</strong> !g| 16vAuto transmission and differentialComponents and operation21-27.ELECTRONIC CONTROL SYSTEMThe electronic control system of the AISIN automatic transmission comprises a control module, someswitches and sensors which inform the control module of the different operating conditions and four actuatorswhich receive commands from the control module and interact with the hydraulic control systemto obtain the engagement of the different gears.The control module also sends signals to the instrument panel and exchanges information with the fuelinjection/ignition control unit and diagnostic socket.Location on the car of the control system components of the AISIN AW 596/Y024 automatic transmission1. Transmission control module2. NORMAL/SPORT mode switch3. ICE mode switch4. Kick-down switch5. Stop lights switch6. Instrument panel7. Main shaft rpm sensor (black)8. Vehicle speed sensor (grey)9. Gearbox oil temperature sensor10. Diagnostic socket11. Selector lever position sensor12. Gear engagement solenoid S113. Gear engagement solenoide S214. Lock-up clutch solenoid SL15. Pressure control solenoid STHCopyright Fiat Auto 15
Auto transmission and differentialComponents and operation21-27.<strong>Bravo</strong>-<strong>Brava</strong> @| i6 vCONTROL MODULEThe control module contains the electronic control logic of the automatic transmission, where the variousfunctions are memorized, and is located under the rear seat.The control module receives information concerning the operation of the automatic transmission fromthe various switches and sensors located on the gearbox, engine and dashboard, and issues the appropriatecommands to four solenoids contained in a valve assembly located at the front of the automatictransmission, and to the fuel injection/ignition electronic control unit for reducing the driving torqueunder particular operating conditions.Control module functionsIn accordance with the commands received from the driver via the various switches and also the signalscoming from the sensors concerning the operating conditions, the control module ensures the correctoperation of the gearbox by means of the following functions:- actuation of gear changes,- locking of torque converter (lock-up function),- execution of driving mode,- hydraulic pressure varations,- check on gear change times,- check on gear changes,- safety function,- self-test function.P4A16AB0116 Publication no. 506.670/06
<strong>Bravo</strong>-<strong>Brava</strong> ifigimAuto transmission and differentialComponents and operation21-27.Diagram of input and output information to/from control module1. Control module2. NORMAL/SPORT mode switch3. ICE mode switch4. Kick-down switch5. Stop lights switch6. Main shaft rpm sensor7. Vehicle speed sensor8. Gearbox oil temperature sensor9. Selector lever position sensor10. Gear engagement solenoids S1 and S211. Lock-up clutch solenoid SL12. Pressure control solenoid STH13. Instrument panel14. Gearbox oil cooling fan relay15. Fuel injection-ignition control unit16. Diagnostic socketCopyright Fiat Auto 17
Auto transmission and differentialComponents and operation21-27.<strong>Bravo</strong>-<strong>Brava</strong> \^ 16vIdentification of control module connectionsL13 L12 L11mr~L2L1L26 L25 L24L15 L14iHlElf5l!=^L22L21 L20L19 L18 L17 L16 Ofcr=i_J==L_rHF~LTIR8 R7 R6 R5 R4 R3 R2 R1□□□□□□□□□□□□□□=L_r==u=tHR16 R15 R14 R13 R12 R11 R10 R9View of connector side of control modulePinConnectionPinConnectionR1R2R3R4R5R6R7R8R9R10R11R12R13R14R15R16Input for throttle aperture signal (fuelinjection/ignition control unit pin 44)Earth for speed sensor cablesMain shaft rpm sensor (-)Vehicle speed sensor (-)NORMAL/SPORTmode switchKick-down switchSelector lever position switch (C)NCOutput for torque reduction signal (fuelinjection/ignition control unit pin 32)Input for engine coolant temperaturesignal (fuel injection/ignition controlunit pin 5)Main shaft rpm sensor (+)Vehicle speed sensor (+)NCICE mode switchNCSelector lever position sensor (PA)L1L2L3L4L5L6L7L8L9L10L11L12L13L14L15L16L17L18L19L20L21L22L23L24L25L26Pressure control STH solenoid (-)Earth on carSelector lever position sensor (A)NCGearbox oil temperature sensor (-)NCNCEarth on vehicleSTOP lights switchDisplay on instrument panel- Selector lever position- Driving mode- Fault/high gearbox oil temperaturesensorPressure control solenoid STH (+)Battery positiveSolenoid S1NCNCSelector lever position sensor (B)NCGearbox oil temperature sensor ( + )Gearbox oil cooling fan relayNCDiagnostic socket earth (line G)Diagnostic socket (line L)Diagnostic socket (line K)Lock-up clutch solenoid SLKey-dependent positive (MAR)Solenoid S218 Publication no. 506.670/06
<strong>Bravo</strong>-<strong>Brava</strong> \^ 16vAuto transmission and differentialComponents and operation21-27.OPERATING STRATEGIESActuation of gear changesThe change from one gear to the higher or lower gear depends on the accelerator pedal position, the vehiclespeed, the engine's characteristic parameters and the driving mode selected by the driver.The control module sends an ON/OFF signal to the solenoids S1 and S2.They consent or prevent the oil from reaching the brakes and clutches necessary for obtaining the differenttransmission ratios, changing their condition from ON to OFF and vice versa as shown in the tablebelow.GearSolenoid S1Solenoid S2The 3rd-4th gear change is prevented whenthe engine coolant temperature is below75°C.1st2nd3rd4thONONOFFOFFOFFONONOFFThe control module has specific gear changeprograms memorized for each driving mode(NORMAL, SPORT, ICE), which will be describedon the following pages in the sectionrelating to the driving modes.Locking of torque converter (lock-up function)The engagement of the lock-up clutch for locking the torque converter depends on the gear engaged,the accelerator pedal position, the vehicle speed and the selected driving mode.The control module sends a duty-cycle signal to the lock-up control solenoid SL, which discharges theoil pressure in the chamber on the flywheel side, causing the clutch to be engaged and the converter tobe locked.The control module has two specific programs for locking the torque converter memorized for the NORMAL and SPORT driving strategies, while for the ICE strategy the torque converter is not locked.These programs are described on the following pages in the section concerning the driving modes.The converter is not locked under the following conditions:1. when the control system receives a fault signal from one of the components and executes the recoverystrategy;2. when the brake pedal is pressed and the gearbox input speed is below a certain value;3. when the throttle valve is closed (accelerator pedal not pressed) and the vehicle speed is below 125km/h with the selector lever on position D;4. when the engine coolant temperature is below 75°C.During the 3rd-4th gear change, with lock-up clutch engaged, the control module sends to the solenoidSL a signal with variable duty cycle, so as to temporarily disengage the lock-up clutch, to improve thequality of the gear change.Execution of driving modeThe control module is designed to control the operation of the automatic transmission in accordancewith three different driving modes.The three driving modes allow the driver to select the different capabilities of the automatic transmissionin accordance with the momentary requirements of use:- NORMAL to obtain the maximum driving comfort, while minimizing fuel consumption;- SPORT to obtain the maximum performance of the vehicle;- ICE to increase driving safety under slippery conditions.Copyright Fiat Auto 19
Auto transmission and differentialComponents and operation21-27.<strong>Bravo</strong>-<strong>Brava</strong> I@|i6vAt every start-up, the system is set to the NORMALmode.When the NORMAL/SPORT pushbutton (1) ispressed, the NORMAL mode is changed to SPORTmode and vice versa.When the ICE pushbutton (2) is pressed (with thelever in position D), the system uses the ICE mode andexcludes the other two modes. When the NORMAL/SPORT button is pressed, the NORMAL strategyis resumed.1. NORMAL/SPORT pushbutton switch2. ICE pushbuttonThe change from one strategy to the other may be done at any time during driving.The selected strategy is displayed beside the indication of the selector lever position on the instrumentpanel.PRND321I ICE SPORT NORMALDisplay of the operating strategy used andthe selector lever positionThe behaviour of the AISIN automatic transmission, in accordance with the driving mode (NORMAL,SPORT or ICE) used, is described below.The characteristic curves of change between the four ratios and the locking of the lock-up clutch areshown, both during progression and during reduction of the ratio (scaling), expressed as a function ofthe percentage of aperture of the throttle valve and the vehicle speed.Operation with NORMAL stategyThe NORMAL strategy is selected by the control module whenever the engine is started up.With this operating stragegy, very gentle operation is ensured, aimed at optimizing driving comfort andeconomy of operation., Apertura farfallaKDi I2H1T] "Tip'21 i :p2[ J2-$ i100%90%80%70%60%50%40%30%20%10%Km/h10 20 30 40 50 60 70 80 90 100 110 120 130 140 150 160 170 180 190 200 210 220 230P4A20AB03Gear changeprogram20 Publication no. 506.670/06
<strong>Bravo</strong>-<strong>Brava</strong> &t 16vAuto transmission and differentialComponents and operation21-27.KD100%90%L A pert ura farfallaI 3iI-0FF!i 'l3Lf ON !1 1 1: [1 4L -OFF:;I ;1 4L-iON|80%70%60%40%30%20%10%I i I ', i I 'ii|:I : ; i :i I I I I !iI—-j—i- ; -1 I]11i i i ! i I i ■ ! ! i ! 1 i i ! ! ! ! ! ; i i Km/h110 20 30 40 50 60 70 80 90 100 110 120 130 140 150 160 170 180 190 200 210 220 230P4A21AB01Loci-upprogramOperation in SPORT modeKD , Apertura farfallaJ1H2 | 3-2100%90%80%70%60%50%40%30%20%10%0%! ?-■I1i ! i:"!' JI :■! : ! i■ |. i I ■ ;■ ii| i! ! ! : [ !; iiiiriii_|! 2^3 !i l l : ! ; Km/h10 20 30 40 50 60 70 80 90 100 110 120 130 140150The control module switches to SPORTmode when the NORMAL/SPORT pushbuttonlocated on the left of the selector lever ispressed.This mode of use of the gearbox is designedto make full use of the power so as to obtainmaximum performance from the vehicle; forthe same aperture of the throttle valve, thechanges to the higher ratios are automaticallyshifted to a higher engine speed.The SPORT mode does not use 4th gear(cruising gear).Gear change programKDi Apertura farfalla100%90%80%70%60%50%40%30%20%10%0%3L-OFF!3L-ONKm/h10 20 30 40 50 60 70 80 90 100 110 120 130 140150P4A21AB03The SPORT mode is excluded in the followingcases:1. if the NORMAL/SPORT pushbutton ispressed again;2. if the ICE pushbutton switch is pressed;3. operation under recovery conditions.Lock-up programCopyright Fiat Auto 21
Auto transmission and differential <strong>Bravo</strong>-<strong>Brava</strong> @n 6 ,Components and operation21-27.Operation in ICE modeThe ICE mode can be selected by pressing the ICE pushbutton located on the right of the selector lever,when the latter is at position D. This strategy improves driving safety on slippery roads by ensuring thatthe vehicle sets off gently by selecting 2nd gear on departure.When the ICE mode is selected, the lock-up clutch is not locked.KDL Apertura farfalla100%90%80%70%60%50%40%30%20%10%0%3->2 > ■! 4 H3 j:ixi;J.:;i:i:-::: t■:■: :;::: :: t i: ; : : :i: + *ii- i 1: tit i: :: t i lLiitJ12-3 M M! !3-I4 !10 20 30 40 50 60 70 80 90 100 110 120 130 140 150 160 170 180 190 200 210 220 230 "Km/hGear changeprogramThe ICE mode is excluded in the following cases:1. if the NORMAL/SPORT button is pressed;2. if the selector lever is at a position other than D;3. if the engine is switched off;4. if the transmission fluid temperature is over 150°C;5. operation under recovery conditions.The table below illustrates the ratios which the gearbox uses automatically while the vehicle is driving,in relation to the driving mode used and the selector lever position, and shows the transmission ratioused on departure.SelecteddrivingmodeSelectorleverpositionRatioselected ondepartureAutomatic management1 2 3 4D1stNORMAL31st21st11st31stSPORT21st11stICED2nd22 Publication no. 506.670/06
<strong>Bravo</strong>-<strong>Brava</strong> @u 6lAuto transmission and differentialComponents and operation21-27.Hydraulic pressure variationsThe pressures in the hydraulic system are regulated by the control module, in order to achieve the followingfunctions:- increase in line pressure when cold;- reduction in line pressure in the N-R change;- modulation of driving pressure.Increase in line pressure when coldWith the selector lever at position N, when the transmission oil temperature is below 10°C and the vehiclespeed is below 7 km/h, the control module sends a signal for a period of 5 seconds to the solenoidSTH, to increase the line pressure, so enabling the N-D and N-R engagement time to be reduced.This function is excluded in the following cases:- transmission oil temperature over 20°C;- vehicle speed over 7 km/h;- selector lever position other than N.Reduction of line pressure in N-R changeWhen the selector lever is moved from position N to position R, the control module sends a signal to thesolenoide STH to control the line pressure.This makes the line pressure fall, so as to reduce the jolt caused by the engagement of reverse gear.Modulation of driving pressureThe driving pressure of the hydraulic valves (throttle pressure) is increased by the control module, dependingon the aperture of the throttle valve and the vehicle speed.Control of gear change timesComparing the ratios between the input and output speeds, provided by the main shaft rpm sensor s andvehicle speed sensor respectively, with the memorized values of the transmission ratios of the differentgears, the control module assesses the time used for the gear changes.Controlling gear changesIn an automatic transmission, the engagement of gears causes jolts resulting from the sudden variationin transmission ratios; these are more pronounced when engaging 1 st gear and reverse gear, which permithigher transmission ratios.These jolts caused by the engagement of 1 st gear and reverse gear are inconveniently perceptible for theoccupants and also cause stresses on the gearbox gears.To reduce these stresses and improve driving comfort, the AISIN automatic transmission uses the followingfeatures:- engagement of 1st gear or reverse gear with a reduction in driving torque (garage function);- N-D change with pitch control (squat);- N-R change with reduction in line pressure.Engagement of 1st gear or reverse gear (garage function)When the selector lever is moved as follows:- from P or N to R;- from N to D (3-2-1);with this function the control module sends a signal to the fuel injection-ignition control unit so as to reducethe driving torque, reducing the jolt caused by the engagement of 1st gear or reverse gear.Copyright Fiat Auto 23
Auto transmission and differentialComponents and operation21-27.N-D change with pitch control (squat)<strong>Bravo</strong>-<strong>Brava</strong> ig|i 6 vWhen the selector lever is moved from position N to position D, the control module temporarily engages2nd gear, and thenn changes to 1 st gear. In this way the jolt caused by the engagement of 1 st gear and theresulting pitching movement of the vehicle are reduced.N-D433"93i."2a13tThis function only intervenes if the following conditionsarise simultaneously:- brake pedal pressed (stop lights on);- throttle valve closed (throttle aperture 0%);- vehicle speed below 7 km/h;- driving mode is NORMAL or SPORT;- when the selector lever is moved from positionN to position D.Inhibition of reverse gearWith the selector lever at position R, with a vehicle speed of over 7 km/h, the control module sends a signalto the gear change solenoids (solenoid 1 not activated -OFF- and solenoid 2 activated -ON-) inhibitingreverse gear.The inhibition of reverse is deactivated in the following cases:- vehicle speed below 5 km/h;- selector lever position other than R.Self-testThe electronic control system constantly monitors the sensors, control solenoids and all the other electroniccomponents, in order to detect faults and malfunctions immediately; these errors are memorized inthe control module and can be read using the FIAT/LANCIA Tester.Error detection conditionsThe control module can detect errors in the various components only under particular conditions. Withthe ignition set to ON or START, and in all other conditions, the following errors can be detected:- error in gear change solenoid S1;- error in gear change solenoid S2;- error in lock-up clutch control solenoid SL;- error in pressure control solenoid STH;- error in selector lever position sensor;- error in throttle position sensor;- error in kick-down switch;- error checking transmission of driving torque reduction signal;- error in gearbox oil temperature sensor when it still indicates an oil temperature of below 10°C afterthe engine coolant has reached 75°C.With the engine running, the following are detected:- error in battery voltage;- error in coolant temperature sensor after a period of 10 minutes.24 Publication no. 506.670/06
<strong>Bravo</strong>-<strong>Brava</strong> !@i 16vAuto transmission and differentialComponents and operation21-27.With the vehicle moving, the following are detected:- error in main shaft rpm sensor;- error in vehicle speed sensor;- error in transmission ratio, when the ratio between the main shaft rpm and vehicle speed differs formore than one second from the memorized transmission ratios;- error in gearbox mechanism, when the gear change time exceeds 1.3 seconds or when the changedown to a lower ratio is effected at a higher speed than the maximum permitted speed.Memorization of errorsIn the case of significant faults, the red warning light (1) on the instrument panel comes on.If the gearbox oil temperature is over 150°C, the red warning light (1) remains permanently on.For each error, the control module memorizes:- the component which caused the error (e.g. pressure control solenoid);- the classification of the error (Present or Intermittent);- the type of error (A.C./D.C. GND/D.C. Vbatt/etc).P4A25AB01Error deletionThe errors memorized by the control module can be deleted by active diagnosis with the FIAT/LANCIATester or by disconnecting the battery for over 10 seconds.Recovery strategiesIf the control module detects a fault, the red warning light on the instrument panel flashes to warn thedriver and, at the same time, the appropriate recovery strategy is activated to allow the car to reach thenearest Authorized Garage.Main componentsIf the control module has memorized one of the following errors:- errors in gear change solenoids S1 or S2;- error in pressure control solenoid STH;- error in selector lever position sensor;- error in throttle position sensor;- error in main shaft rpm sensor;- error in vehicle speed sensor;- error in transmission ratio;- error in checking transmission of drivingtorque reduction signal;- error in battery voltage;- error in gearbox mechanism;Copyright Fiat Auto 25
Auto transmission and differentialDescription and operation21-27.<strong>Bravo</strong>-<strong>Brava</strong> igjuavThe recovery stragegy involves the deactivation of all the solenoids, so no automatic gear changes are effected,the torque converter is not locked and the hydraulic pressure is not varied.The vehicle can travel because each position of the selector lever corresponds to the engagement of a particulartransmission ratio, by the movement of the hydraulic distributor.Selector lever positionRD321Gear engagedReverse4th4th3rd1stLock-up control solenoidIn the case of error, the torque converter locking function is disabled.Coolant temperature sensorIn the case of error, a substitutive value of 75°C is assigned.Kick-down switchIn the case of error, it is considered ON if the throttle valve aperture is greater than 73.5%, OFF if it lessthan 70%.GEAR CHANGE SOLENOIDSThe gear change .solenoids S1 (A) and S2(B) are located at the front of the gearboxand they manage the gear changes. Thesolenoids are actually normally closed (N.C.)electrovalves which, receiving a signal fromthe control module, change their position toallow the engagement of the different transmissionratios, in accordance with the followingtable.GearSolenoid SISolenoid S21stONOFF2ndONON-51 nin.8 7 6 5 3 1□ o D a □ n-4.16 15 14 13 12 11 10 9 .□ □ a a n n n p3rd4thOFFOFFONOFFL26L13Gearbox sensors/actuators connector(view of contact side)The resistance of the gear change solenoidsS1 and S2 can be measured by disconnectingthe connector and connecting an ohmmeteras shown in the figure.Resistence: 13 ± 2 ohm at 20°CP4A26AB0226 Publication no. 506.670/06
<strong>Bravo</strong>-<strong>Brava</strong> lfi| 16vAuto transmission and differentialDescription and operation21-27.LOCK-UP CLUTCH CONTROL SOLENOIDThe lock-up clutch control solenoid SL is locatedat the front of the gearbox and managesthe locking of the torque converter.The solenoid, controlled by a duty cycle signalsent by the control module, intercepts thepassage of oil, discharging the pressurewhich acts on the rear face of the clutch.The clutch, fitted on the turbine hub, ispushed by the pressure in the converter actingon its front face, against the casing joinedto the converter pump, so locking it.P4A27AB02The resistance of the lock-up clutch controlsolenoid SL can be measured by disconnectingthe connector and connecting an ohmmeteras shown in the figure.P4A27AB03Resistance: 13 ± 2 ohm at 20Cr:51 n8 7 6 5 4 3 2 1□ □ □ □ □ □ a n16 15 14 13 12 11 10 9D D D D D D D Di_r^L24AP4A27AB04Gearbox sensors/actuatorconnector (view of contactside)PRESSURE CONTROL SOLENOIDThe line pressure control solenoid STH is locatedat the front of the gearbox and it managesthe changes in hydraulic pressures.The solenoid, also controlled by a duty cyclesignal sent by the control module, regulatesthe hydraulic pressure acting on the brakesand clutches in order to reduce the gear engagementtimes when cold and the jolting onengagement of reverse.P4A27AB05The solenoid also regulates the pressure drivingthe hydraulic valves in accordance withthe throttle valve aperture and the vehiclespeed.Copyright Fiat Auto 27
Auto transmission and differentialDescription and operation21-27.Btava l^i 16vThe resistance of the line pressure controlsolenoid STH can be measured by disconnectingthe connector and connectingan ohmmeter as shown in the figure.Gearbox sensors/actuatorsconnector (view ofcontact side)P4A28AB03Resistance: 3.5 ± 0.2 ohm at 25CSELECTOR LEVER POSITION SENSORThe sensor, located at the top of the gearbox casing, detects the position of the selector lever (to whichit is connected mechanically) and informs the control module via an appropriate electrical signal.The module lights up the warning light on the instrument panel.The sensor also switches on thereversing lights when reverse isengaged, and enables the startermotor only when the selectorlever is at position N or P.The combination output signalspresent on the various terminalsof the sensor is shownin the following table.*dalteleruttore ^ filimotore aw.5 4 3 2 110[9 [8 f 7 '"Lever position sensor connector (viewof contact side)ConnectorsTerminalsSignalsPRND321Start.6 10ST MREVE7 9D E(SE8 1 2 3 4IG A B C PA28 Publication no. 506.670/06
<strong>Bravo</strong>-<strong>Brava</strong> ifi| 16vAuto transmission and differentialDescription and operation21-27.GEARBOX OIL TEMPERATURE SENSORThe sensor is located in the gearbox casing and detects thetransmission oil temperature through the variation in NTC resistanceon the sensitive part of the sensor.The information provided by the control module is used to increasethe line pressure when cold in order to reduce the gearchange times.The resistance of the gearbox oil temperature sensor can bemeasured by disconnecting the connector and connecting anohmmeter as shown in the figure.Wiring diagramP4A29AB02LEI8 7 6n5 4 3 2□ □ □ □ a □ n16 15 14 13 12 11 10□ □ □ □ a □ □L18L5P4A29AB03Gearbox sensors/actuators connector(view of contact side)Resistance: 6445 ± 645 ohm at 10C247 ± 16 ohm at 110 C111 ± 6 ohm at 145 CMAIN SHAFT RPM AND VEHICLE SPEED SENSORThe two magnetic induction sensors located on the gearboxcasing allow the control module to check the correct operationof the gearbox with regard to transmission ratios and gearchange times, and to conduct diagnoses on the operation of thesensors.The main shaft rpm sensor detects the speed of rotation of thegearbox main shaft, conneted to the torque converter turbine,via a 20-tooth phonic wheel on the outer surface of the clutchC1.The sensor sends to the control module a pulse signal (20 pulsesper shaft revolution) proportional to the input speed of rotationof the gearbox.The vehicle speed sensor detects the speed of rotation of thegearbox layshaft, connected to the differential pinion, by meansof a 12-tooth phonic wheel constituted by the parking lockgear.The sensor sends the control modue a pulse signal (12 pulsesper shaft revolution) proportional to the output speed of rotationof the gearbox, i.e. to the vehicle speed. This signal is usedto effect the gear changes.Gearbox sensors/actuators connector (view of contact side)Copyright Fiat Auto 29
Auto transmission and differentialDescription and operation21-27.<strong>Bravo</strong>-<strong>Brava</strong> iten 6 v'—
<strong>Bravo</strong>-<strong>Brava</strong>WIRING DIAGRAMAuto transmission and differentialDescription and operation21-27.KeyH33F/L/T19FR23nsfi 20 VM^21flv£U1 014TFITtuIGIRy47 10|»ii(x)912
Auto transmission and differentialDescription and operation21-27.<strong>Bravo</strong>-<strong>Brava</strong> ig|i 6 vDIAGNOSISOperating problems in the AISIN electronic automatic transmission may be caused by the engine, controlsystem or automatic transmission itself.The fault-finding procedure begins with very simple operations, carried out in order of difficulty, initiallyaimed at establishing whether the fault depends on the engine, control system or gearbox.Electrical faults are revealed by the self-test funcction of the control module, by the flashing of the redlight on the instrument panel.Preliminary testsChecking oil levelNOTEThe gearbox oil level must be checked with the engine and gearbox at normal operating temperatures(gearbox oil: 70 - 80°C), so the vehicle must be driven for a suitable period of time beforethe check.HOT=r^^pCOLDa=^j§3To check the level of the gearbox oil, proceed asfollows:- park the vehicle on flat ground and apply thehandbrake;- with the engine idling, gently move the selectorlever from position P to position 1, then returnit to P;- withdraw the dipstick (1) and clean it;- insert the dipstick fully into its seating;- withdraw the dipstick again and check that theoil level lines up with the notch on the side ofthe stick marked HOT.If the oil level is low, identify and eliminate theleaks, then top up the level.Also check the condition of the oil; if is black orsmells burnt, it should be changed.Checking selector lever positionWhen the selector lever is moved from position Nto the other positions, check that it moves freelywithout stiffness into any position, and that theposition indicator on the instrument panel indicatesthe correct position.Checking starter switchIf the engine does not start when the selectorlever is at position N or P, or vice versa it startswhen the lever is in a position other than N or P,the selector lever control cable must be adjustedas described on page 45, by adjusting the head(1) and locking it with the locknut (2). Finallycheck the correct position of the selector leverposition sensor as described on page 47.32 Publication no. 506.670/06
<strong>Bravo</strong>-<strong>Brava</strong> fiuev Auto transmission and differentialDescription and operation21-27.Checking idle speedCheck that the idle speed is correct.Tests with FIAT/LANCIA TesterGuided fault finding on the electrical part can be conducted by connecting the FIAT/LANCIA Testerwith M39-A memory to the control module's diagnostic socket.Full diagnosis of the system consists of three stages:1. display of a set of operating parameters (with the engine running);2. display of errors and elimination of the causes (guided diagnosis);3. activation of the actuators (active diagnosis).1. Display of operating parametersThe following operating parameters are displayed:- selector lever position;- gear engaged;- vehicle speed;- throttle valve angle of aperture;- STH pressure control solenoid;- kick-down switch,- brake pedal contact;- engine coolant temperature;- gearbox oil temperature;- gearbox main shaft rpm;- driving torque reduction function;- battery voltage.2. Display of errors and elimination of causes (guided diagnosis)At the beginning of diagnosis, the F/L Tester reads the errors memorized by the control module.When an error is detected, the F/L Tester emits an acoustic signal and displays a message relating to theerror.A list of the possible causes of the error is then displayed.After all the necessary repairs or replacements have been carried out and all the faults eliminated, the errorswill be automatically deleted by the F/L Tester.Guided diagnosis can also be carried out by checking step by step the efficiency of the circuits and operationof the various sensors/switches.Once the faults have been eliminated, a road test should be carried out with the engine and gearbox upto temperature for at least 10 minutes, and then the F/L Tester should be used to check that there are nofaults in the system.3. Activation of actuators (active diagnosis)The following actuators can be activated by a command sent from the F/L Tester, with the engine offand the selector lever at position N:- gear change solenoids S1 and S2;- lock-up clutch control solenoid SL;- line pressure control solenoid STH.This test is useful for checking the operation of the actuators, as the ticking caused by the internal movementof the solenoids can be heard.Errors memorized by the control module can also be deleted under active diagnosis (provided they areno longer present or the conditions are not recreated).NOTEErrors can also be deleted by disconnecting the battery for over 10 seconds.Copyright Fiat Auto 33
Auto transmission and differentialDescription and operation21-27.<strong>Bravo</strong>-<strong>Brava</strong> ^16vStall speed testThis test serves to check the performance of the transmission and engine, and is conducted by measuringthe maximum rpm that can be reached by the engine with the selector lever at position D and R.E nThe duration of the stall speed test must not exceed 5 seconds.P4A34AB01To conduct the stall speed test, proceed as follows:- chock the vehicle by placing wedges under the wheels;- apply the handbrake fully;- start the engine and bring it up to temperature;- press the brake pedal down hard with the left foot;- move the selector lever to position D;- press the accelerator pedal down fully with the right foot and quickly read the maximum speedreached by the engine.Stall speed: 2300 ±150 rpmRepeat the sequence of operations, but moving the selector lever to position R.Stall speed: 2300 ±150 rpmStall speedLower than specified value in bothD and RHigher than specified value in DHigher than specified value in RHigher than specified value in bothD and RPossible causes* Insufficient engine power* Incorrect operation of freewheel on stator of torqueconverter* Insufficient line pressure* Clutch C1 and C3 slipping* Incorrect operation offree wheel F1* Insufficient line pressure* Clutch C2 slipping* Clutch C3 slipping* Brake B2 slipping* Insufficient line pressure* Clutch C3 slipping34 Publication no. 506.670/06
<strong>Bravo</strong>-<strong>Brava</strong> !pu 6 vAuto transmission and differentialDescription and operation21-27.Gear engagement time testThis test is for checking the condition of clutches C2 and C3 and the brake B2, and is conducted bymeasuring the time taken to engage first gear or reverse gear.mTo obtain a reliable result, carry out several measurements and take the average value. Allow oneminute to pass between two consecutive measurements.To measure the gear engagement time, proceed as follows:- apply the handbrake fully;- start the engine, warm it up to temperature and check that the idle speed is correct;- move the selector lever from position N to D;- using a chronometer, measure the time elapsing between the movement of the selector lever and perceptionof engagement of 1st gear.IM-D engagement time: less than 0.7 sRepeat the sequence of operations, except moving the selector lever from position N to R.N-R engagement time: less than 1.2 sEngagement timeHigher than specified value from N to DHigher than specified value from N to RPossible causes* Insufficient line pressure* Clutches C1 and C3 slipping* Incorrect operation offree wheel F1* Insufficientn line pressure* Clutch C2 slipping* Clutch C3 slipping* Brake B2 slippingCopyright Fiat Auto 35
Auto transmission and differentialDescription and operation21-27.Btavo-Btava iggu 6vHydraulic testTo measure the line pressure, proceed as follows:- place the car on ramps, then working fromunder the vehicle remove the gearbox oilscrew plug and screw in its place the connector1860870000;- pass the pipe 1895411000 from the top ofthe engine compartment so as to connectone end of the pipe to the connector1860870000, and connect the other end tothe pressure gauge 1895424000. Positionit so that it is visible from the driver's seat;P4A36AB0336 Publication no. 506.670/06
<strong>Bravo</strong>-<strong>Brava</strong> ^ 16vAuto transmission and differentialDescription and operation21-27.chock the vehicle by placing wedges under the wheels;4A34ABOIapply the handbrake fully;press the brake pedal down hard with the left foot;start the engine, warm it up to temperature and check that the idle speed is correct;move the selector lever to position D;read the measurement of the line pressure during idling;fully press the accelerator pedal with the right foot and quickly read the line pressure at the engine'sstall speed.PW The stall speed test must not exceed 5 seconds in duration.Repeat the last two operations with the selector lever on position R.SpeedIdlingStallPosition D (and 1 -2-3) Position R (and IM-P)3.7 - 4.3 bar5.4 - 6.3 bar3.8 - 4.4 kg/cm 2 5.5 - 6.4 kg/cm 210.8 - 12.5 bar 14.1 - 16.9 bar11.0-12.8 kg/cm 2 14.4 - 17.2 kg/cm 2Line pressureHigher than specified value inboth D and RPossible causesFault in pressure control solenoidRegulating valves faultyLess than specified value in both D and RFault in pressure control solenoidRegulating valves faultyOil pump faultyLess than specified value only in DLeaks in hydraulic circuit in forward gearsLess than specified value only in RLeaks in hydraulic circuit in reverse and neutraCopyright Fiat Auto 37
Auto transmission and differentialDescription and operation21-27.<strong>Bravo</strong>-<strong>Brava</strong> @u 6 vRoad testsThese tests are for checking that the automatic transmission is working correctly under actual conditionsof use.Carry out the following tests with the gearbox oil at normal operating temperature.Test in position D with NORMAL or SPORT driving modeMove the selector lever to position D and carry out the following tests with the accelerator pedal in twofixed positions, corresponding to 50% and 100% of the throttle valve aperture.A) Changes to higher gearsMake sure that the gear changes 1 -2, 2-3 and 3-4 occur at the correct points of the gear change program(see diagrams on pages 20, 21 and 22).B) Jolts and slippingIn the same way, check that the jolts and slipping caused by the gear changes 1 -2, 2-3 and 3-4 are normal.C) Locking lock-up clutchAt a speed of about 85 km/h, gently press the accelerator pedal and check that the engine rpm does notchange suddenly.D) Vibrations and noisesCheck under normal driving conditions that there are no vibrations or unusual noises.E) Kick-down operationProceeding in second, third and fourth gears, with the selector lever on position D, fully press the acceleratorpedal to close the kick-down switch and check that the limit speeds for the changes 2-1, 3-2 and4-3 conform to the gear change program.F) Engine brakeDriving in fourth gear, move the selector lever sequentially from position D to positions 3, 2 and 1 andperceive the engine braking effect at each of these gear changes.Tests in position 3, 2 and 1 with NORMAL or SPORT driving modeThe above tests are repeated for each selector lever position.Test in position RMove the lever to position R, fully press the accelerator pedal to start the vehicle, checking that the slippingis normal.Test in position PStop the vehicle on a downhill slope, and after moving the lever to position P, release the brake pedal.Check that the locking pawl prevents the vehicle from moving.Test with manual operation of the gearboxDisconnect the control module connectors. Test the vehicle on the road, making sure that whenever theselector lever is moved, the gear changes take place in accordance wiht the table below.Selector lever positionPRND321Gear engagedParkReverseNeutral4th4th3rd1stNOTEWith the selector lever at position N, the vehicle must not move spontaneously on a flat road.With the selector lever at position P, the locking pawl must stop the vehicle moving even on adownhill road.38 Publication no. 506.670/06
<strong>Bravo</strong>-<strong>Brava</strong> fii 16vAuto transmission and differentialServicing and adjustments21-27.CHANGING GEARBOX OILDrainingDrain the gearbox oil after a road journey sothat the oil reaches operating temperature.Then carry out the following operations:- undo the plug (1) and allow the oil todrain;- retighten the plug (1) after replacing theseal, and tighten it to a torque of between2.35-5.49 daNm.FillingWithdraw the dipstick and, using a clean funnelso as not to contaminate the oil, pour inthe required quantity of gearbox oil. To facilitatethe operation, remove the air cleaner. Afterfilling, check that there are no leaks fromthe drain plug.Periodical oil change: 3 litres- 2.7 kgRecommended gearbox oil: TUTELA GI/2CHECKING OIL LEVELNOTE The gearbox oil level must bechecked with the engine and gearboxat normal operating temperature(gearbox oil temperature: 70 -80°C), so the vehicle must be drivenfor an appropriate period of time beforethe check.To check the gearbox oil level, proceed asfollows:- park the vehicle on flat ground and applythe handbrake;- with the engine idling, gently move the selectorlever from position P to position 1,then return it to P;- withdraw the dipstick (1) and clean it;- insert the stick fully into its seating;- again withdraw the dipstick and check thatthe oil level lines up with the notch on theside of the stick marked HOT.If the oil level is low, identify and eliminateany leaks, then add oil to top up the level.If the check has to be conducted at alow oil temperature, check that the oillevel is within the notch on the side ofthe dipstick marked COLD. If possible,recheck the oil level at the correcttemperature (70 - 80 °C).P4A32AB01Copyright Fiat Auto 39
Auto transmission and differentialServicing and adjustments21-27.Btavo-<strong>Brava</strong> @n 6 vAlso check the condition of the oil, and in particular that there is no white contamination causedby contact with the coolant from the oil cooling circuit, and that there are no metal particles dueto wear of internal components or a burnt smell.WARNINGS- If the; oil level is low. Lhere may he a reduction in the line pressure owing :o the fact that the oilpump draws in an, resulting in malfunctioning of the transmission.■ If the oil level is higher than normal, there may be oil leaks from the veni pipe.- Contamination of the oil wilh water 01 the use of an oil with different characteristics from therecommended oil causes higher consumption and malfunction of the transmission.GEAR CHANGE CABLERemovingDisconnect the battery's negative cable, thenproceed as described below:1. Remove the air intake duct by undoing thebolts shown in the figure, which secure itto the front cross panel.2. Lift the cover protecting the battery positivepole and disconnect the cable; undothe nut securing the battery to the cage,then remove the battery from the enginecompartment.3. Remove the cover from the relay and fusebox by undoing the screw indicated.3 . ^~~~^ . I 1 IL.^^//P^KS'IF A'~~~~^~~~-%^~s*v\iraOi~h> J>LUj^J1?WHr-40 Publication no, 506.670/06
<strong>Bravo</strong>-<strong>Brava</strong> lAi 16vAuto transmission and differentialServicing and adjustments21-27.P4A41AB03P4A41AB02Remove the nuts securing the relay and fusebox to the battery cage, then move the boxover to one side.Disconnect the i.e. control unit supply connector.Disconnect the earth cable (1), remove thenuts securing the i.e. control unit mountingbracket, then remove the control unit from theengine compartment. The nuts indicated alsosecure the starter motor supply wiring and thefront cable/fuel injection cable connection.Remove the bolts (1) and slacken the bolt(2) securing the battery cage to the bodyshell. Before removing the cage, disconnectthe cable clip underneath.Remove the split pin and washer shown inthe figure; lift the gear change cable head soas to disconnect it from the gear changelever position sensor.P4A41AB04Copyright Fiat Auto 41
Auto transmission and differentialServicing and adjustments21-27.<strong>Bravo</strong>-<strong>Brava</strong> ifi^P4A42AB02Lift the gearbox control cable retaining bracket torelease it from the mounting bracket.Working from inside the car, position the selectorlever on P, remove the retaining bolt on the frontof the selector lever handle and then withdraw thehandle upwards, then remove the selector leverposition indicator panel.Release the driving mode switch panel, disconnectthe electrical connectors and withdraw thepanel.Remove the plastic trim from the handbrake lever;slacken the tension from the relevant cable and disconnectthe wiring connector for the handbrake onindicator.Place the car on ramps and carry out the followingoperations from under the car:4[ii,— B [i__^^~ x ^ _^ll==tx^y■ w ^ 1/===== jjffV. NS^J/" ~-"*\YP4A42AB03P4A42AB045. Remove the heat shield indicated.6. Disconnect the cables operating the handbrakefrom the mounting and release them from thebracket.6\ «Jb-/ yxm|a\r^^\* y \x \\ \ / P4A42AB0S\P4A42AB0742 Publication no. 506.670/06
<strong>Bravo</strong>-<strong>Brava</strong> \^ 16vAuto transmission and differentialServicing and adjustments21-27.P4A43AB021. Disconnect the Lambda probe wiringconnector, then disconnect the first sectionof the exhaust pipe from the exhaustmanifold.2. Remove the first section of the exhaustpipe by undoing the attachments to thecatalytic converter.3. Undo the bolts securing the gear changeinternal linkage mounting and handbraketo the body shell.4. Withdraw the internal gear change linkagemounting downwards.5. Internal linkage assembly.4 ^ ^llSsXf^P^^^(f ((IyL\iSko jr TZ%kPI^SsM\_ ..fe==^—~) /P4A43AB04Copyright Fiat Auto 43
Auto transmission and differentialServicing and adjustments21-27.<strong>Bravo</strong>-<strong>Brava</strong> igp^1®\*Q^ sK\1. Remove the split pin (1) and bracket (2)securing the gear change cable to the selectorlever.2. Undo the nuts securing the selector levermounting and remove the mounting.3. Disconnect the gear change cable fromthe selector lever mounting; then replacethe cable.Dismantling selector lever4. Undo the bolt securing the clip retainingthe supply cables to the shift-lock deviceand additional PARK position switch.P4A44AB035. Undo the nuts securing the additionalPARK position switch (1); if the shift-lockdevice (2) has to be worked on, undo thebolts shown in the figure.4(3 ^^T^o\v (Bo9&1c-=•*P4A44AB0544 Publication no. 506.670/06
<strong>Bravo</strong>-<strong>Brava</strong> ifii 16vAuto transmission and differentialServicing and adjustments21-27.RefittingRefit the gear change cable and selector leverby reversing the procedure for removal, bearingin mind the following:- check that the gear change lever is positionedat P (lever fully forward);- check that the selector lever is also set toposition P;fit the gear change cable head (1) to thelever located on the gearbox. If the cablelength needs to be adjusted, adjust thehead (1) by screwing it or unscrewing it onthe threaded part of the cable, then lock itwith the nut (2). Finally fit the washer andsplit pin;operate the selector lever and check that, ateach position, you can hear the gearchange lever clicking into position.Complete the assembly by securing the batterycage, i.e. control unit, battery and air intakeduct.Finally carry out the following checks:- the engine must only start with the selectorlever in position P or N;- each position of the selector lever must beaccompanied by the relevant indications onthe indicator panel and instrument paneldisplay.Copyright Fiat Auto 45
Auto transmission and differentialServicing and adjustments21-27.<strong>Bravo</strong>-<strong>Brava</strong> igBuevGEAR CHANGE LEVER POSITION SENSORRemovingRemove the air intake duct, battery, relay andfuse box (move it to one side) the i.e. controlunit and battery cage, as described for the removalof the gear change cable, position theselector lever at P, then carry out the followingoperations:1. Disconnect the wiring connector from thegear change lever position sensor.2. Remove the split pin and washer so as todisconnect the gear change cable from thelever on the sensor.3. Undo the nut securing the lever to thesensor, then remove the lever.4. Release the central nut from the washerand remove the nut, then undo the twoside bolts securing the sensor and removethe sensor.46 Publication no. 506.670/06
<strong>Bravo</strong>-<strong>Brava</strong> Ai 16vAuto transmission and differentialServicing and adjustments21-27.P4A47AB02RefittingRefit the selector lever position sensor as follows:P4A47AB031. position the sensor, tighten the central nutand lock it with the washer;2. from position P (fully rotated in a clockwisedirection) move the pin of the leverto position N (rotating the pin two notchesin an anti-clockwise direction);3. rotate the sensor so that the projection onthe top surface (1) lines up with the sidemachining on the pin (2), then lock thesensor in this position by tightening thetwo side screws.It is advisable to position the sensorusing an ohmmeter connected betweenterminals 6 and 10 of the supplyconnector. Rotate the sensor tothe centre of the area in which theohmmeter detects continuity (contactsN and P closed), then tightenthe sensor screws.Copyright Fiat Auto 47
Auto transmission and differentialServicing and adjustments21-27.<strong>Bravo</strong>-<strong>Brava</strong> ig|i 6 vFinish refitting the selector lever positionsensor by reversing the procedure for removal.Finally carry out the following checks:- the engine must only start with the selectorlever in position P or N;- each position of the selector lever must be accompaniedby the relevant indications on the indicatorpanel and instrument panel display.REMOVING-REFITTING GEAR CHANGECONTROL UNIT (CONTROL MODULE)The gear change control unit is located underthe rear seat cushion, on the right. Beforeproceeding with removal, disconnect thebattery's negative pole, then:iff^-A!Jv"^^^1 fl\\\ (P1. Remove the rear seat cushion by undoingthe bolts securing the retaining brackets tothe body shell.2. Lift the trim under the rear seat cushion,then remove the bolts and nut securingthe control unit mounting bracket to thebody shell.3. Rotate the control unit mounting bracket,disconnect the supply wiring, then undothe nuts securing the control unit to thebracket.WARNINGS- Handle the control unit carefully to avoidany impact.- Do not remove the control unit cover or tryto dismantle it.- Do not touch the connector pins directly.- Insert the connector fully into the controlunit until it clicks.P4A48AB0348 Publication no. 506.670/06
<strong>Bravo</strong>-<strong>Brava</strong> Ai 16vAuto transmission and differentialServicing and adjustments21-27.REMOVING-REFITTINGTROLUNITSAFETY COIM-The safety control unit is located under thefront passenger's seat. To remove it, first disconnectthe battery's negative pole, then proceedas described below:Push the front passenger's seat fully backso as to gain access to the safety controlunit. Undo the bolts securing the controlunit to the body shell, disconnect the supplywiring connector, then remove thecontrol unit.REMOVING-REFITTING GEARBOX OILCOOLING RADIATOR AND FANPlace the car on ramps, disconnect the battery'snegative pole, remove the front leftwheel, drain the gearbox oil and then proceedas described below:2. Remove the air intake duct by undoing thebolts shown in the figure, securing it tothe front cross panel.3. Disconnect the cooling fan supply wiringconnector.4. Raise the car and, working from the leftwheelarch, undo the bolts securing thecooling fan, then remove the fan.P4A49AB02Copyright Fiat Auto 49
Auto transmission and differentialServicing and adjustments21-27.<strong>Bravo</strong>-<strong>Brava</strong> @u 6 v41. To remove the gearbox oil cooling radiator,first remove the fan, then disconnect thecoolant inlet and outlet pipes from the radiator.2. Undo the nuts shown in the figure, securingthe radiator.To refit, reverse the procedure for removal,topping up the gearbox oil to the correctlevel.MAIN SHAFT RPM SENSOR - VEHICLESPEED SENSORRemoving-refittingPlace the car on ramps, disconnect the battery'snegative pole, remove the front leftwheel, then:3. Remove the left wheelarch trim in order to gainaccess to the sensors.4. To remove the main shaft rpm sensor (1)(black), disconnect the relevant supply connector(2), then undo the bolt securing thesensor to the gearbox casing and removethe sensor by pulling it upwards.To remove the vehicle speed sensor (3)(grey), disconnect the supply connector(4), then undo the bolt securing the sensorto the gearbox casing and remove the sensor.—®^M^Check the resistance between the terminals:- Main shaft rpm sensor: 387 - 473 Q- Vehicle speed sensor: 648 - 792 QIf the resistance is not within these values, replacethe sensor concerned.HAlwaysreplace the seal; smear it withgrease to avoid damage during fitting.P4A50AB0450 Publication no. 506.670/06
<strong>Bravo</strong>-<strong>Brava</strong> tti levAuto transmission & differentialRemoving-refitting21-27.^^//i^TS^HJ(( f\V ^REMOVING-REFITTING GEARBOXPlace the car on ramps, disconnect the battery'snegative pole, remove the front wheelsand drain the gearbox oil, then proceed asdescribed below:1. Remove the air intake duct by undoing thebolts shown in the figure, securing it tothe front cross panel.2. Remove the air inlet pipe by undoing theclips shown in the figure, then remove itfrom the engine compartment completewith resonator.3. Left the cover protecting the battery's positivepole and disconnect the cable; undothe nut securing the battery to the cage,then remove the battery from the enginecompartment.4. Remove the relay and fuse box cover byundoing the bolt indicated.ill\N^3fm ]nffest-P4A40AB03Copyright Fiat Auto 51
Auto transmission & differentialRemoving-refitting21-27.<strong>Bravo</strong>-<strong>Brava</strong> !&i 16v1. Remove the nuts securing the fuse and relaybox to the battery cage, then move thebox over to one side.2. Disconnect the i.e. control unit supplyconnector.3. Disconnect the earth cable (1), remove thenuts securing the i.e. control unit mountingbracket, then remove the control unit from theengine compartment. The nuts indicated alsosecure the starter motor supply cables and thefront cable/fuel injection cable connection.4. Remove the bolts (1) and slacken the bolt(2) securing the battery cage to the bodyshell. Before removing the cage, disconnectthe cable retaining clip underneath.5. Remove the split pin and washer shown inthe figure; lift the gear change control cablehead so as to disconnect it from thegear change lever position sensor.P4A41AB0552 Publication no. 506.670/07
<strong>Bravo</strong>-<strong>Brava</strong> At levAuto transmission & differentialRemoving-refitting21-27.P4A53AB021. Remove the nuts securing the gearchange control cable mounting bracket,and move it over to one side.2. Disconnect the earth cable shown in thefigure, from the gearbox.3. Disconnect the connectors shown in thefigure of the selector lever position sensorand solenoids (gear change, lock-upclutch control and pressure control) afterreleasing them from the retaining clips.4. Disconnect the connector shown in thefigure.5. Disconnect the speedometer drive cable.P4A63AB05Copyright Fiat Auto 53
Auto transmission & differentialRemoving-refitting21-27.<strong>Bravo</strong>-<strong>Brava</strong> Icp 16v1. Remove the bolt (1) securing the retainingbracket for the pipes shown in the figure.2. Remove the windscreen wiper arms (rightand left) by undoing the central fixing nut,after removing the protective cap.3. Remove the plastic covers from the spaceunder the windscreen, to allow the enginesupport tool to be installed during removaland refitting of the gearbox.4. Remove the gearbox top mountings.5. Fit a suitable supporting eye at the pointshown in the figure, to hook up the powerunit during removal of the gearbox.P4A54AB0554 Publication no. 506.670/07
<strong>Bravo</strong>-<strong>Brava</strong> @ievAuto transmission & differentialRemoving-refitting21-27.1. Fit the engine support crossbeam1860851000 and the special adaptor1860851001 at the appropriate mountingpoints.P4A55AB02a. Front mounting: fit the tool in the bonnetcatch seating, so that it rests on thefront cross member.b. Rear mounting: fit the tool level withthe central reinforcement of the fire--proof bulkhead.c. Secure the cross member hook to theeye positioned previously, near thethermostat.a—'^^^
Auto transmission & differentialRemoving-refitting21-27.<strong>Bravo</strong>-Btava Ai 16v/1. Relieve the staking then remove the wheelhub nut (gearbox side and timing gearside).2. Remove the plastic wheelarch trim on thegearbox side by undoing the screws andretaining button shown in the figure. Toremove the trim, also disconnect the brakepad wear sensor connector (repeat theoperation on the other side).m 1847038000 'SBfi 8)) r— J ~^3. Remove the nut securing the track rod endto the vertical link, then remove the latterfrom the vertical link arm using the puller1847038000 (repeat the procedure on theother track rod end).4. Remove the bolts securing the vertical link(gearbox side and timing gear side) to theshock absorber.56 Publication no. 506.670/07
<strong>Bravo</strong>-<strong>Brava</strong> ^ 16vAuto transmission & differentialRemoving-refitting21-27.1. Rotate the vertical link so as to withdrawthe drive shaft from the wheel hub (repeatthe procedure for the other drive shaft).2. Disconnect the drive shaft on the gearboxside from the differential, levering on theanchorage point, and move it away fromthe working area.3. Disconnect the drive shaft on the timinggear side from the differential, levering onthe anchorage point.4. Differential oil seals.When withdrawing the drive shafts,take care not to damage the differentia/sea/s. Withdraw them perfectlyhorizontally.Remove the connectors shown in the figurein order to disconnect the oil pipesfrom the gearbox. Then place the pipesover to one side.P4A57AB04Copyright Fiat Auto 57
Auto transmission & differentialRemoving-refitting21-27.<strong>Bravo</strong>-<strong>Brava</strong> lA| 16v1. Remove the guard shown in the figurefrom the bottom of the gearbox.2. Remove the bolts securing the converterto the flywheel. First undo the two visiblebolts, then turn the crankshaft to gain accessto the remaining bolts (total of 6).3. Undo the bolt shown in the fibure fromthe valve assembly cover to allow thegearbox support tool to be installed.4-5. Place the gearbox support tool1860873000 on a hydraulic jack, thensecure it to the gearbox at the pointsshown in the figure. To fit the tool correctly,also fit a bracket (1), to be manufacturedon site, of the dimensionsshown in the insert (dimensions inmm).58 Publication no. 506.670/07
<strong>Bravo</strong>-<strong>Brava</strong> ^ **Auto transmission & differentialRemoving-refitting21-27.1. Remove the power unit central mountingby undoing the bolts shown in the figure.2. Remove the power unit mounting on thegearbox side by undoing the bolts shownin the figure.3. Remove the bottom bolts securing thegearbox to the engine.4. Gently separate the bellhousing from theengine, then manoeuvre the converterback into its seating. For greater safety, fita bracket, to be manufactured on site,screwing it into the seat of the bolt securingthe gearbox bottom guard, to preventthe converter falling out of its seating.P4AB9AB04Copyright Fiat Auto
Auto transmission & differentialRemoving-refitting21-27.<strong>Bravo</strong>-<strong>Brava</strong> Si 16v1. Manoeuvre the hydraulic jack as appropriateto release the gearbox from the surroundingparts. Gradually lower the jackand withdraw the gearbox.■^HHHTake particular care to prevent theconverter falling out of its seating.NOTEWhen refitting, fit the gear changecontrol cable, then carry out thechecks described for removal of thecable.Top up the gearbox oil level and checkthat there are no leaks from the drainplug (tighten to 2.35 - 5.49 daNm).PRECAUTIONSAfter releasing the cable from the supporttool, do not place it directly on the floor, toavoid damaging its structure and the externalcomponents. Interpose a suitably shapedwooden wedge.0= vi—===J^\^y^k-p- V\ \\ \ A / \ 7 f f ) Wi" 1^P^R^F\ /JHs=i£^l_%*Js&If the gearbox is replaced, before fitting thenew transmission, remove the bracket (1) inthe converter seating and the plugs on the differentialoutlet, fitted to stop foreign bodiesentering the gearbox. Remove the abovementionedplugs perfectly horizontally, toavoid damaging the oil seals (2) on the differentialand to prevent the spring (3) inside theseals from falling out.L_(?s!c^£\ / ^ .^M*60 Publication no. 506.670/07
<strong>Bravo</strong>-<strong>Brava</strong> At 16vAuto transmission & differentialRemoving-refitting21-27.Do not damage the converter centring nosewhile fitting the gearbox. If the point is damaged,it could fail to fit onto the cranskshaftcorrectly, and consequently damage the converterand oil pump.Before fitting the transmission, make surethat the converter is fitted properly on the oilpump. If it is not fitted properly, the bush andoil pump gearing could be damaged.P4A61AB02Make sure that the distance between theholes of the bolts securing the converter tothe flywheel and the gearbox front surface is29.4 mm.P4A61AB03When fitting the gearbox, check that the centringpins are positioned correctly, and alsocheck that there is no gap between the contactline between the engine and gearbox casing.Copyright Fiat Auto 61
Auto transmission & differentialRemoving-refitting21-27.<strong>Bravo</strong>-<strong>Brava</strong> iSi 16vWhen coupling the converter to the flywheel,use bolts of the correct length (M8x1.25bolts with tapered shakeproof washer drawing46450230, of the dimensions indicated inthe figure) and make sure that they are notmixed up with other bolts.1. Bolts which are too long could damagethe other end of the converter and deformthe clutch seal.2. Bolts which are too short may not withstandthe input torque and could break.XECMO)( \^ ' 1' '11—111i r-'■HWn"P4A62AB02When fitting the drive shafts, take particularcare not to damage the differential oil seal (2)on the splined part (1) of the drive shaft. Insertthe drive shaft perfectly horizontally. Ifthe seal is damaged, it could cause oil leaks.Make sure that the drive shaft is cleanbefore assembly to avoid foreignbodies entering into the differential.P4A62AB0362 Publication no. 506.670/07
<strong>Bravo</strong>-<strong>Brava</strong> lg| i
Auto transmission & differentialDrive shafts21-27.<strong>Bravo</strong>-<strong>Brava</strong> &♦ 16v1. Rotate the vertical link in order to withdrawthe drive shaft from the wheel hub(repeate the procedure for the other side).2. Disconnect the drive shaft on the gearboxside from the differential, levering on theanchorage point.3. Disconnect the drive shaft on the timinggear side from the differential, levering onthe anchorage point.NOTE When refitting, reverse the procedure forremoval, tightening the wheel hub nut tothe specified torque.To remove and refit the drive shafts,bear in mind the warnings mentionedunder removing-refitting the gearbox.DISMANTLING-REASSEMBLY4. Place the drive shaft in a vice, then removethe clips retaining the protective gaiter onthe sliding joint on the gearbox side.64 Publication no. 506.670/07
<strong>Bravo</strong>-Btava m ^ i6vAuto transmission & differentialDrive shafts21-27.1. Remove the circlip retaining the slidingjoint (gearbox side), then remove the jointby withdrawing it from the drive shaft.2. Undo the clips retaining the protectivegaiter on the constant velocity joint on thewheel side, then remove the gaiter fromthe side opposite the drive shaft.3. Degrease the inside of the constant velocityjoint. Using tools 1847017001 and1860889000, and holding the circlip insidethe joint at the same time, remove thejoint from the drive shaft.P4A65AB034. Check that the drive shaft is not deformedor out of true, and that the surface in contactwith the seal is not worn.REFITTINGWhen refitting, reverse the proceduredescribed for removal.Whenever a gaiter is removed, it isadvisable to replace it, and it is importantto fill both the constant velocityjoint or sliding joint and thegaiter with TUTELA MRM2 grease.Copyright Fiat Auto 65
Auto transmission & differentialDrive shafts21-27.<strong>Bravo</strong>-<strong>Brava</strong>&b 16vDrive shaft-joint coupling, wheel sideShaft classificationJoint classificationCategoryColourCategoryColour23GreenWhite23GreenWhiteWhen refitting, the constant velocity jointsmust be coupled to the shaft as indicated inthe table. Conduct a final check on the joint,to make sure that there are no signs of seizureor scoring.TRANSMISSION COMPONENTS1. Constant velocity joint2-4. CJips retaining constant velocity jointprotective gaiter3. Constant velocity joint protective gaiter5. Drive shaft6-8. Clips retaining sliding joint protectivegaiter (gearbox side)Sliding joint protective gaiter(gearbox side)Sliding joint66 Publication no. 506.670/07
<strong>Bravo</strong>-<strong>Brava</strong> @i 16vAuto transmission & differentialValve assembly21-27.Replacing differential oil sealDisconnect the drive shaft from the differentialas described above, then remove the oilseal from the differential, using a screwdriveras a lever.When refitting, use the drift 1870629000with an appropriate handle.wj^m Operate with care to avoid damaging'JVR the oil seal and causing leaks.REMOV1NG-REFITTINGVALVE ASSEMBLYPlace the car on ramps, disconnect the battery'snegative pole, drain the gearbox oil,then proceed as described below, workingfrom under the vehicle:1. Place a hydraulic jack under the bellhousing,then remove the power unit mountingon the gearbox side to allow the valve assemblycover to be removed.2. Undo the bolts securing the valve assemblycover and remove the cover.3. Disconnect the valve assembly solenoidsupply connectors, disengage the gearboxoil temperature sensor (1) from its mountingbracket and move the wiring aside.Copyright Fiat Auto 67
Auto transmission & differentialValve assembly21-27.2<strong>Bravo</strong>-<strong>Brava</strong> Itti 16v*S^/v%m'/\^*J%&£M r|w"13^ ,4A /5\\ho J//>S^// ^^v^// 2^ (niltr—W1. Undo the bolts shown in the figure securing the valveassembly, then remove the complete assembly.Refitting2-3. Insert the lever (1) of the selector valve in the hole ofthe lever (2).4. Position the valve assembly and tighten the fixing bolts.Connect the solenoid supply connectors and fit thegearbox oil temperature sensor on the mounting bracket._^_ The valve assembly bolts are of different lengths.MJfl Arrange the bolts as shown in the figure.5. Using solvent, clean off any sealant residues from thevalve assembly cover. Apply a bead of silicone sealant1 -1.5 mm thick along the edge of the cover, cleaning offany surplus inside the cover.P4A68AB04P4A68AB0568 Publication no. 506.670/07
<strong>Bravo</strong>-<strong>Brava</strong> Ai iev@ @ @Auto transmission & differentialValve assembly21-27.1. Fit the valve assembly cover and tightenthe bolts.77?e bolts securing the valve assemblycover are of different lengths. Arrangethe bolts as shown in the figure andtighten them to a torque of 1.96 -2.74 daNm.NOTE Fit the gearbox oil drain plug and tightento a torque of 2.35-5.49 daNm. Top upthe oil level, then check that there are nooil leaks from the valve assembly coveror drain plug.Finish refitting the valve assembly by reversingthe procedure for removal.KICK-DOWN SWITCHThe kick-down switch is located on the acceleratorpedal. To remove this switch, releasethe lugs which secure the switch to themounting bracket. Disconnect the supplyconnector (1), then replace the switch.It is virtually essential to rep/acethe kick-down switch if it is removed,as the retaining lugs couldbreak during removal.Copyright Fiat Auto 69
<strong>Bravo</strong>-<strong>Brava</strong>^ie,Gearbox and differential98 range Removing-refitting21.27pageREMOVING-REFITTING- Removing 1- Refitting 1- Drive shafts 7EXTERNAL CONTROLS 8- Diagram showing external gearboxcontrols 8- Removing-refitting 9- Dismantling at the bench 12Copyright by Fiat Auto
<strong>Bravo</strong>-<strong>Brava</strong> igl mi6v98 rangeGearbox and differentialRemoving-refitting21.27REMOVING-REFITTINGRemovingPosition the vehicle on a lift, remove the frontwheels then proceed as described below.Undo the three fixing bolts and removethe air intake disconnecting it firstly fromthe air filter.4 /[ /Cr^^^> \^v^ ^ ^ ^ ^y^"P4A01BB03^w^^Tw2. Disconnect the negative battery lead, removethe protective cover for the positivepole, disconnect the terminal and separatethe latter from the starter motor supplyleads; undo the nut securing the battery tothe drip tray, then remove the latter fromthe engine compartment.3. Undo the bolt securing the relay casingcover and remove it, then undo the nutsfixing the casing to the battery drip trayand place the casing at the side./I /P4A01BB044. Remove the battery drip tray undo thebolts fixing it to the bodyshell.Copyright by Fiat Auto 1
Gearbox and differentialRemoving-refitting21.271 ^ \ ^ _ ^ ^7\jC/
<strong>Bravo</strong>-Btava98 range16vGearbox and differentialRemoving-refitting21.271. Remove the wiper arms, then remove theplastic shield for the pollen filter acting onthe special bolts illustrated in the diagram.2. Position the cross member 1860851000for supporting the engine at the points illustrated.a. Front support: fit the tool in the housing inthe bonnet lid lock so that it rests on thefront cross member.b. Rear support: position the tool by the centrereinforcement for the flame partition.P4A03BB05c. Fix the hook for the cross member to theheater water supply pipe so that the engineis resting in the centre.Copyright by Fiat Auto 3
Gearbox and differentialRemoving-refitting21.27<strong>Bravo</strong>-<strong>Brava</strong> igp **98 range1. Remove the button fixing the dust shieldto the bodyshell, then undo the bolts andrelease the shield from the housing. Repeatthe operation for the dust shield onthe other side.2. Remove the bolts fixing the shock absorberto the steering knuckle and rotatethe steering knuckle towards the inside,releasing the brake pipe from the shockabsorber. Repeat the operation on theother side.3. Undo the fixing nut the steering track rodend to the steering knuckle, then, usingtool 1847038000, disconnect it from thesteering knuckle. Repeat the operation forthe steering track rod end on the otherside.4. Position a container for recovering thetransmission fluid, then undo the plugshown and drain the oil from the gearbox.4 Print no. 506.670/17
<strong>Bravo</strong>-<strong>Brava</strong> igluev98 rangeGearbox and differentialRemoving-refitting21.271. Disconnect the gearbox side drive shaftfrom the differential using leverage at theengagement point and move it away fromthe work area.2. Disconnect the timing side drive shaft usingleverage at the engagement point;then move the driveshaft away from thework area.3. Undo the lower bolts fixing the startermotor to the gearbox, disconnect the electricalconnections then remove the actualstarter motor.4. Remove the engine flywheel shield actingon the fixing bolts.5. Undo the bolt fixing the gearbox to theengine.Copyright by Fiat Auto5
Gearbox and differentialRemoving-refitting21.27<strong>Bravo</strong>-<strong>Brava</strong> I0u
<strong>Bravo</strong>-<strong>Brava</strong> igi lev98 rangeGearbox and differentialRemoving-refitting21.27Using the hydraulic jack, suitably maneouvrethe gearbox so that it is releasedfrom the centering pins, then remove itfrom the engine compartment slowly loweringthe hydraulic jack.RefittingBefore refitting the gearbox - differentialunit, it is necessary to checkthat the thrust bearing has remainedin the bell housing and is not interferingwith the clutch. Carry out the operationsdescribed below:Check that the thrust bearing is correctlymatched with the gearbox main shaft controllever, checking that the teeth on thethrust bearing mesh with the control leveras shown in the diagram.Fix the clutch release lever, in a fully retractedposition, on the bell housing, then,using the hydraulic jack move the gearbox- differntial unit near the clutch, centre iton the special references and fix it to theengine. For future operations, reverse theorder of the operations carried out for theremoval.DRIVE SHAFTSP4A07BB03For the removing-refitting and the dismantlingof the drive shafts, refer to the "Driveshafts" paragraph for the 1370 12v version.Copyright by Fiat Auto 7
Gearbox and differentialExternal controls21.27<strong>Bravo</strong>-<strong>Brava</strong> igp^98 rangeDIAGRAM SHOWING EXTERNAL GEARBOX CONTROLS2§££^< 7^ ^ ^ ^ ^ ^ ^ ^ ^ \^^^^^^s/^%,9 W-tfii^V|j^^Xo^/5 "^~^\ ^ 61W/7 24^*^Jir^ull'^^j.1. External controls support2. Gear lever3. Selector linkage on lever4. Engagement linkeage on lever5. Gear engagement cable6. Gear selector cable7. Cable mounting bracket8. Selector linkage on gearbox9. Engagement linkage on gearbox8 Print no, 506.670/17
<strong>Bravo</strong>-<strong>Brava</strong> igi 16v98 rangeGearbox and differentialExternal controls21.27P4A01BB02REMOVING-REFITTINGPosition the vehicle on a lift, and proceedwith the removal of the external controls asdescribed below.Disconnect the negative battery lead, removethe protective cover for the positivepole, disconnect the terminal and separatethe latter from the starter motor supplyleads; undo the nut securing the battery tothe drip tray, then remove the latter fromthe engine compartment.2. Remove the gear lever cover from the vehicleinterior.3. Remove the handbrake protective boot,then disconnect the electrical connectionunderneath.4. Undo the bolt securing the relay casingcover and remove it, then undo the nutsfixing the casing to the battery drip trayand place the casing at the side.Copyright by Fiat Auto 9
Gearbox and differentialExternal controls21.27i / / /Cjlxeo!^wks" ^\XK^^^^^J§Lfc\yxi*@<strong>Bravo</strong>-<strong>Brava</strong> igl^98 range^ /P4A01BB04P4A02BB041. Remove the battery drip tray undo thebolts fixing it to the bodyshell.2. Disconnect the end of the gear engagementcable and undo the bolts fixing it tothe mounting bracket.3. Disconnect the end of the gear selectorcable, then move the gear selector and engagementcable assembly to the side ofthe engine compartment.4. Raise the vehicle and disconnect thehandbrake cables from the support and releasethem from the bracket.5. After having disconnected the electricalconnection for the Lambda sensor, undothe bolts fixing the exhaust pipe to themanifold.4 = ~ 5\A>^-
<strong>Bravo</strong>-<strong>Brava</strong> igi lev98 rangeGearbox and differentialExternal controls21.271. Undo the nuts fixing the first section ofthe exhaust pipe to the catalytic converter,then remove the pipe.2. Release the exhaust pipe from the rubbermounting shown in the diagram.3. Undo the bolt fixing the exhaust pipe frontmounting bracket.4. Undo the bolt fixing the exhaust pipe rearmounting bracket, then extract it from thevehicle.5. Remove the heat shield acting on the fixingsillustrated.P4A11BB04Copyright by Fiat Auto 11
Gearbox and differentialExternal controls21.27<strong>Bravo</strong>-<strong>Brava</strong> Ipu*98 range1. Undo the front and rear bolts fixing thesupport for the external gearbox controlsand handbrake.- Carefully lower the external controls supportassembly from its housing, then removethe cables from the engine compartmentand extract the assembly from the vehicle.DISMANTLING AT THE BENCH2. Remove the gear lever assembly, undoingthe bolts, then remove the rubber cablecover.3. Remove the two clips securing the cablesto the lever support.4. Disconnect the cables from the lever support:the engagement one is a press fit andthe selector one is fixed by a circlip.12 Print no. 506.670/17
<strong>Bravo</strong>-<strong>Brava</strong> igi 16v98 rangeGearbox and differentialExternal controls21.271870668000P4A13BB021. Remove the gear lever mechanism, undoingthe bolts fixing it to the support.2. Using tool 1870668000, remove the knobfrom the gear lever, the internal spring andthe reverse gear inhibitor outer sleeve.3. Remove the circlip (1) and dismantle thegear lever mechanism.Copyright by Fiat Auto 13
<strong>Bravo</strong>-<strong>Brava</strong>Braking system jIndex i33. j■ipage \i■ ■ ■ ■ ■ " ■ ■ ■ ■■ ' '■ 1ELECTRONIC $BRAKE FORCEDISTRIBUTION (EBD) 1 j■- Wiring diagram showing braking sys- 1tern with ABS ' ■ 3II- Description of the EBD function (Elec-81|tronic Brake - force Distribution) 3 f■ ■ I- EBD operation 4 |- ABS system failure warning light 5 1' ' ■ ■ ' • !- EBD function failure signal 5 |- Wiring diagram of ABS system inte- Igrated with EBD function 6 j- Fault diagnosis 6 |VARIANTS FOR 98 RANGE- Wheel rpm (active) sensorsCopyright by Fiat Auto
<strong>Bravo</strong>-<strong>Brava</strong>Braking systemEBD device33.ELECTRONICALLY OPERATED BRAKE FORCE DISTRIBUTION DEVICE (EBD)TheTeves MK20 ABS system, described in the relevant chapter of this manual, is coupled with the EBDfunction (Electronic Brake-force Distribution), which electro-hydraulically controls the distribution ofthe pressure sent to the brakes between the front and rear axles.This function is controlled by the ABS electronic control unit which uses the same sensors andactuators as the ABS circuit to calculate and implement the distribution of the braking pressure.The introduction of this function makes the use of the conventional mechanical load proportioningvalve superfluous and it is removed from the rear brake hydraulic circuit.In addition, the optimum exploitation of the rear brakes is ensured as the device is capable of constantlysending the ideal braking pressure to prevent the rear wheels from locking.The diagrams overleaf illustrate the location of the device components, the majority of which are thesame as on the ABS system.Key for diagrams showing braking system with ABS integrated with EBD functionHydraulic circuit for right front and left rear brakeHydraulic circuit for left front and right rear brake1. Hydraulic control unit with electronic control unit incorporated2. Brake pump3. Brake servo4. Brake fluid reservoir5. Rpm sensors for front wheels6. Front disc brakes7. Warning light signalling ABS system failure8. Brake lights switch9. Handbrake lever10. Handbrake warning light or low brake fluid level11. Rpm sensors for rear wheels12. Rear drum brakes (excluding 1998 20v)13. Rear disc brakes (only for 1998 20v)Copyright by Fiat Auto 1
Braking systemEBD device33.<strong>Bravo</strong>-<strong>Brava</strong>Diagrams showing braking system with ABS system integrated with EBD functionP4A02BD012 Print no. 506.670/13
<strong>Bravo</strong>-<strong>Brava</strong>Braking systemEBD device33.Description of the EBD function (Electronic Brake-force Distribution)The introduction of the EBD function to the ABS system allows the distribution of the brake force betweenthe front and rear axles using a specific electronic control unit function.With this in mind, the electronic control unit constantly compares the speed of the front and rear wheelsby means of speed sensors and controls the hydraulic unit in order to prevent the rear wheels from locking,always ensuring maximum adhesion to the ground in all load conditions.The EBD function makes the use of the hydraulic load proportioning valve acting on the rear axle loadsuperfluous so it has therefore been removged from the braking circuit.The graph below illustrates the operation of the EBD device (curve D) in relation to the pressure in thebraking system (curve A), the ideal braking pressure for the rear axle (curve B) and the reduction in thebraking pressure for the rear axle normally implemented by the conventional load proportioning valve(curve C).Forza frenanteasse anterioreA. Distribution implemented by the brakingsystemB. Ideal distributionC. Distribution implemented by the mechanicalload proportioning valveD. EBD controlAs it can be noted, the EBD function for the ABS system is capaable of adapting to the ideal pressurecurve, always taking advantage of the adhesion available in all braking conditions.Copyright by Fiat Auto 3
Braking systemEBD device33.<strong>Bravo</strong>-<strong>Brava</strong>The integration of the EBD function into the normal implementation logic of the ABS system allows thesimultaneous operation of the two strategies; as a result, the system normally intervenes to keep the"creeping" of the rear wheels within values very close to the ideal ones with the possibility, however, ofintervening with the ABS strategy when one rear wheel tends to lock (for example on a surface withpoor adhesion).The graph below illlustrates the braking pressure implementation strategy, operated by the electroniccontrol unit, according to the input data, represented by the signal for the rotation speed of the wheelsof the two axles., iV[ Km/h ](JEJJF)P[bar]i——"~ V—-®\*Controllo EDBControllo ABS> H — *■E. Rear wheel speedF. Front wheel speedG. Front wheel pressureH. Rear wheel pressureOperation of the EBD deviceThe braking pressure for the rear axle is implemented by the control unit in a similar way to the descriptionof the operation of the ABS system during the pressure increase, maintenance and reduction stages.4 Print no. 506.670/13
<strong>Bravo</strong>-<strong>Brava</strong>Braking systemEBD device33.ABS failure warning lightOn vehicles equipped with ABS and an EBDdevice, there is a special ABS failure warninglight.The new type of warning light, known as "INTELLIGENT", comprises an LED (D2) controlledby an electronic circuit which, as illustratedin the diagram at the side, allows thewarning light to come on both if there is an actualfailure in the ABS system and if the connectionbetween pin 16 of the control unit (1)and the instrument panel (2) is interrupted orshort circuited to earth.D1: Protective diodeD2: LEDR1 and R2: Load resistancesEBD function failure signalA failure in the EBD function is signalled simultaneously by the braking system failure warning light (1)in the dashboard and the ABS system failure warning light (2) both coming on.P4A05BD02The warning light (1) in the dashboard coming on without the ABS warning light (2) coming on meansthat there is not an EBD malfunction, but that there is a different fault (low brake fluid level, handbrakeapplied).Conversely, the ABS warning light only coming on without the warning light (1) coming on, indicates afailure in the ABS system as described in the relevant chapter of this manual without the operation of theEBD device being adversely affected.If there is a failure in the EBD function, the distribution of the brake force between the front and rearaxles starts to fail with the consequent risk of the rear wheels locking during braking.Copyright by Fiat Auto 5
Braking systemEBD device33.Wiring diagram for ABS system integrated with EBD function<strong>Bravo</strong>-<strong>Brava</strong>The wiring diagram for the ABS system with EBD only varies from the wiring diagram for the ABS systemon its own through the addition of the connection of the ABS control unit with the braking systemwarning light (low brake fluid level/handbrake applied).{(
<strong>Bravo</strong>-<strong>Brava</strong>98 rangeBraking systemActive sensors33.WHEEL RPM (ACTIVE) SENSORSThe ABS Bosch 5.3 system adopted on the 98 range, uses new design sensors known as "active" for detectingthe speed of the wheels.The operation of "active sensors" is based on the variation of the internal electrical resistance accordingto the intensity and the direction of the lines of force of an external magnetic field, producing a squarewave signal whose frequency varies according to the rotation speed of the wheel, but whose range isconstant.The external magnetic field is produced by a so-called "multi-polar ring", consisting of an elastomerequipped with a certain quantity of magnetic particles which, by means of a special magnetization technique,are positioned in such a way as to form different magnets with alternating North - South polaritiesaround the circumference.The multi-polar ring can be fitted on the wheel bearing seal or on the (rear wheel) hub.The sensor is supplied by the ABS electronic control unit and produces a square wave signal whoserange is almost constant and whose frequency is proportional to the rotation speed of the wheel.The use of this new type of sensor offers the following advantages compared with traditional magneticinduction type sensors:- less sensitivity to the distance between the sensor and the magnetic ring;- improved immunity to electro-magnetic fields;- the capacity of the sensor to measure the speed of the wheel down to zero (rather than 2.5 kph forpassive sensors);- a reduction in the weight and size on the vehicle.1. Active sensor body2. Multi-polar ring3. Gap4. Example of an output signal from the wheel rpm sensorCopyright by Fiat Auto 1
Braking systemActive sensors33l<strong>Bravo</strong>-<strong>Brava</strong>98 rangeThe recommended distance (gap), to obtain the correct signals, between the end of the sensor and themulti-polar ring should be between:0.16 - 1.71 mm for the front wheels0.37 - 1.13 mm for the rear wheelsThis distance cannot be adjusted therefore if the gap measured is outside of the tolerance, check thecondition of the sensor and the multi-polar ring.NOTE Each time an rpm sensor is fitted, it should be lubricated with water-repellant grease, to avoidthe effects of heat variations, over a period of time, causing deterioration and making it difficultto extract.Positioning of front wheel sensorPositioning of rear wheel sensor8 Print no. 506.670/17
<strong>Bravo</strong>-<strong>Brava</strong>98 rangeAuxiliary unitsIndex50.pageCLIMATE CONTROL- Foreword- Thermostatically adjusted climatecontrol- Operating logic- Controls- Connection with the engine controlunit- System components- Autodiagnosis- Duct/distributor assembly- Location of climate control systemcomponents- SCROLL compressor SCS08- Operation of the electronic control unitfor the compressor- Maintenance and service operations- Draining the system x- Compressor1123461113161719202425ADDITIONAL HEATER- Introduction 27- Location of components on vehicle 29For anything not dealt with, refer tothe previous edition (print no.506.670/01)Copyright by Fiat Auto
<strong>Bravo</strong>-<strong>Brava</strong>98 rangeAuxiliary unitsClimate control50.INTRODUCTIONThe climate control system in the vehicle passenger compartment may consist of one of the followingsystems:- THERMOSTATICALLY ADJUSTED CLIMATE CONTROL- MANUALLY OPERATED HEATERP4A01 CHOITHERMOSTATICALLY ADJUSTED CLIMATE CONTROLThe system with thermostatic adjustment has SEMI-AUTOMATIC CONTROL of the vehicle climatecontrol system;In effect, it automatically manages the following, according to the desired temperature requested for thepassenger compartment:- air temperature at the vents- fan speed (continuous variation)Manual operation, on the other hand, is required for:- fixed fan speed (4 speeds)- engaging the compressor (air refrigeration circuit)- engaging the air recirculation- "MAX DEF" functionLastly, the adjustment of the distribution of the air flows to the various air vents is totally manual (bymeans of bowden cables).Copyright by Fiat Auto 1
Auxiliary unitsClimate control50.<strong>Bravo</strong>-<strong>Brava</strong>98 rangeOPERATING LOGICA special electronic control unit manages the automatic operation of the system controlling the thermodynamicparameters to ensure a comfortable climate (temperature and humidity) for the vehicle occupants.P4A02CH01According to the requests received and the temperature conditions detected, the control unit carriesout/sets certain functions aimed at adjusting the temperature of the passenger compartment to meet therequirements.2 Print no. 506.670/16
<strong>Bravo</strong>-<strong>Brava</strong>Auxiliary units98 range Climate control50.CONTROLSThe left knob (1) is for selecting the REQUESTED TEMPERATURE (between 18 and 30 °C): it is connectedto a potentiometer which detects the various angular positions and transmits a signal to the electroniccontrol unit for a total of 15 different positions (one per degree centigrade) with two extreme positions"LO" ana* "HI" corresponding to the maximum cold and maximum hot settings, respectively.The centre knob (2) is for adjusting the AIR VENTILATION: it is also connected to a potentiometerwhich detects the various angular positions and sends a signal to the electronic control unit. There arefour possible air flow rates which can be set manually (1, 2, 3 and 4), whilst in the "AUTO" position thesystem itself autbmatically selects the most suitable flow rate for reaching or maintaining the desiredtemperature.NOTENOTEPosition "0" indicates minimal ventilation: the fan is off and there is only a slight flow of air atthe vents.With the compressor on, the fanis always "forced" at the first speed, even with the knob at "0".There are two different maps inside the control unit which correlate the air flow rate and thespeed of the fan: the pollen filter on the outside air inlet ensures that the flow rate is lower - inrelation to the fan speed - in the "dynamic air" condition compared with the "recirculation"condition.The right knob (3) is for selecting the FLOW DISTRIBUTION for the air towards the passenger compartmentand is achieved in five different ways: the selection is made manually via a cable which controlsthe movement of the distribution flaps.Pressing button (4) enables the operation of the COMPRESSOR (air refrigeration circuit); if the buttonis released, the operation ceases. Engagement is entirely manual: the compressor is only always enabledin the "MAX DEF" setting even with the button released.Pressing button (5) engages the AIR RECIRCULATION function inside the passenger compartment; releasingthe button produces a "dynamic"air flow from the outside.Engagement is entirely manua): the recirculation function is only excluded in the "MAX DEF" settingeven if the button is pressed.Copyright by Fiat Auto 3
Auxiliary unitsClimate control50.<strong>Bravo</strong>-<strong>Brava</strong>98 range"MAX-DEF" FunctionWith the distribution knob turned completelyin a clockwise direction the "MAX DEF"rapid demisting function is activated by aspecial microswitch. This function involves:- maximum air flow rate- mixture with maximum heat available- recirculation switched off, whatever positionthe button (5) is in- compressor enabled, whatever position thebutton (4) is'in- signal requesting engagement of heatedrear windscreen : this engagement is managedby the integrated services control unit(see Group 55)Compressor engagementWhen the button shown in the diagram ispressed this enables the OPERATION OFTHE COMPRESSOR (air refrigeration circuit);if the button is released, the operationceases.The effective engagement of the compressor,however, depends on the following conditions:- outside temperature below 5°C: (switchesoff below 4°C and switches on again above6°C)- temperature detected by the frost sensor:(switches off below 3.5°C and switches onagain above 5°C)P4A04CH02It should be rememebered that the compressor can also be switched off through the intervention of thefour stage pressure switch or the engine control unit. This logic dependson the different engine jnanagementcontrol units, as detailed below:CONNECTION WITH THE ENGINE CONTROL UNITThe electronic control unit for the climate control system sends a command signal to the engine controlunit giving the go ahead required for engaging the compressor.There are two different types of connection according tothe type of engine control unitA: 1242 - 1581 - 1998 - 1910 JTD enginesB: 1910 TD 75 engine (Soft)NOTE For the 1747 version, refer to the details in the previous edition (print no.506.670/01).NOTEForthe 1910 TD 75 version, which does not have an engine control unit, the go ahead for operatingthe compressor is given by a special thermal switch and by the EGR control unit, as well asthe four stage pressure switch.4 Print no. 506.670/16
<strong>Bravo</strong>-<strong>Brava</strong>98 rangeAuxiliary unitsClimate control50.Case A: the engine management control unit (1) receives the signal to engage the compressor (a) directlyfrom the control switch (2): the same signal also arrives as a go ahead (b) after having passedthrough the climate control control unit (3) and the four stage pressure switch (4): if the pressure is inthe refrigeration circuit is not correct, this signal is, in effect, interrupted. Lastly, if other particular exclusionconditions exist (e.g. maximum power request, idling, etc.), then the control unit (1) sends thecommand (c) to engage the compressor (6) via the relay (5).fT?!! ►"-853087-30E34> 1©l'tf»t-ti,© liLLJ®iuSL®12 2£1242 -1581 -1998 -1910 JTD Engines1. Injection control unit2. Climate control controls3. Climate control control unit4. Four stage pressure switch5. Compressor relay6. CompressorCase B: the signal (a) to engage the compressor is sent, from the control switch (2), via the climate controlcontrol unit (3), the four stage pressure switch (4) and the thermal swrtch (7), to the compressorengagement relay (5). If the conditions for disengaging the compressor (6) exist, (for example maximumpower request, idle speed, etc.), then a signal (b) is sent by the EGR control unit (1) to a remotecontrol switch (8) and the compressor is switched off.P4A05CH02191OTD 75 engine (Soft)1. EGR control unit2. Climate control controls3. Climate control control unit4. Four stage pressure switch5. Compressor relay6. Compressor7. Thermostatic switch on water pump8. Remote control switch for disengagingcompressorCopyright by Fiat Auto 5
Auxiliary unitsClimate control50.<strong>Bravo</strong>-<strong>Brava</strong>98 rangeSYSTEM COMPONENTSElectronic control unitThe electronic control unit manages the automatic operation of the system controlling the thermodynamicparameters to produce a comfortable climate (temperature and humidity) for the occupants of thevehicle.At is located in the lower part of the duct-distributor assembly, fixed to it by two bolts and is easilyaccessible from the passenger compartment. The connector for the diagnostic equipment is found nextto it.Connector BConnector AP4A06CH01TERMINALFUNCTIONTERMINALFUNCTION1"MAX DEF"1Earth (NOT USED)23456789101112Compressor engagementEarth (NOT USED)Ventilation potentiometerRequested temperature potentiometerTreated temperature sensorEngagement of recirculationDiagnostic line KDiagnostic line LPotentiometer supply - 5V -+30 from batteryEarth for sensors2345678910111213Passenger compartmenttemperature sensorOutside temperature sensorN.C.Mixture actuator feed-backFrost sensorInstrument panel displayFan operation'Earth for electric fanMixture control (LO) - 5V -Mixture control (Ml) - 5V -Compressor operation+ 15 from key1415Recirculationcontrol - 5V -Recirculationcontrol - 5V -engagementexclusion16Rearscreen6 Print no. 506.670/16
<strong>Bravo</strong>-<strong>Brava</strong>98 rangeAuxiliary unitsClimate control50.Outside air temperature sensorIt is on the right external rear view mirror.It consists of an NTC sensor where the resistancedecreases with the temperature - (R at25°C = 10 kOhm), with an operating range ofbetween -30°C and +50°CTreated air temperature sensorIt is inside the distributor assembly immediatelyupstream of the distribution flaps for theair flows to the various vents.It consists of an NTC sensor (R at 25°C = 10kOhm), with an operating range of betweenOX and +80°CWiring diagramP4A07CH03Requested temperature potentiometerThis potentiometer is connected to the temperatureknob and detects the various angularpositions, sending a signal to the electroniccontrol unit for a total of 15 different positions(one for each degree centigrade) withtwo extreme positions "LO" and "HI".It receives a 5V supply from the control unitand has a controlled earth and gives a signalwhich corresponds to the position of theknob:R1 - R16= 681 Ohm ± 7%Copyright by Fiat Auto7
Auxiliary unitsClimate control50.Wiring diagram1R1 R2 R3 R4 R5 R6 R7(-) (+)forin1 2 3 4 5 6□ C3 □ O □ □7 8 9 X) 11 12□ D a □ n □P4A08CH027. Recirculation function switch2. Compressor enablement switch3. Passenger compartment temperaturesensor<strong>Bravo</strong>-<strong>Brava</strong>98 rangeRequested air flow rate potentiometerThis potentiometer is connected to the airventilation knob and detects the various angularpositions, sending a signal to the electroniccontrol unit: there are.four possible airflow rates which are set manually (1, 2, 3 e4), plus an "AUTO" position and "0".It receives a 5V supply from the control unitand has a controlled earth and gives off a signalcorresponding to the position of theknob:Rl-R7=1500Ohm±l%Recirculation function switchPressing this switch engages the recirculationfunction which is managed completelymanually:Compressor enablement switch (air refrigerationcircuit)Pressing this switch enables the operation ofthe compressor (air refrigeration circuit).Passenger compartment temperature sensorThis is located in the climate control controlpanel between the recirculation and compressorswitches.It consists of an NTC sensor (R at 25°C = 2.2kOhm), with an operating range of between+5°C and +45X. The sensor is "ventilatated",in other words it incorporates a small fanwhich is always supplied so that the temperaturereading is not affected by stagnant airinside the dashboard giving a misleading picture.These last three components make up a singleelement which is connected by a singleconnector.TerminalFUNCTIONTerminalFUNCTION123456Motor for ventilated sensor (+)Motor for ventilated sensor (-)Earth for passenger compartment temperature sensorSignal for passenger compartment temperature sensorMAX-DEFN.C.789101112Compressor operationWarning lights operation (NC)+ 15Ideogram lights ( + )Ideogram lights (-)Recirculation control8 Print no. 506.670/16
<strong>Bravo</strong>-<strong>Brava</strong>98 rangeAuxiliary unitsClimate control50.MAX DEF function switchA special switch activates the MAX DEFfunction: it is located on the distributionknob: it is an IM.A. contact which is closedwith the knob completely turned in a clockwisedirection.Wiring diagram H iMixture electrical actuatorThe adjustment of the temperature of thetreated air is carried out through the actuatorwhich mixes the hot air and the cold air actingon the flap which either does or does notsend the flow of air entering the heater radiator,through which the hot water comingfrom the engine passes through.A motor with a 12 V supply controls the rotarymovement of a drive pin which acts directlyon the mixture flap. A potentiometerdetects the actual positionand acts as "feedback"to the control unit.Total rotation angle between max. hot andmax. cold = 62°Ratio u/U for max. hot = 0.707Ratio u/U for max. cold = 0,26P4A09CH02Electrical recircuiation actuatorThe outside air intake flap is rotated by meansof the recircuiation actuator which acts onthe flap itself moving from position (A) "dynamicair" to position (B) "recircuiation".There are NO intermediate positions.A motor with a 12 V supply controls the rotarymovement of a drive pin which acts directlyon the flap. Reversing the polarity resultsin a movement in the opposite direction.P4A09CH03Copyright by Fiat Auto9
Auxiliary unitsClimate control50.<strong>Bravo</strong>-<strong>Brava</strong>98 rangeFrost sensorThe frost sensor is located inside the duct-distributorassembly, fitted directly on theevaporator and detects the temperaturewarning the control unit, if necessary, toswitch off the compressor to avoid freezing.It consists of NTC sensor (R at 25°C = 10kOhm), with an operating range of between-5°C and +25°C.Electric fan with electronic speed regulatorThis fan which sends the outside or recirculationair towards the duct-distributor receivesa 12 V supply and is operated at differentspeeds continuously by an electronic regulatorpositioned nearby.1. Electric fan2. Electronic regulator30 .15The electronic regulator receives an inputsignal from the control unit and transforms itinto a continuously variable power earth signalto operate the fan.CGND) 21 - «|Wiring diagramfemSA. Electric fanB. Electronic regulatorC. Electronic control unitP4A10CH0310 Print no. 506.670/16
<strong>Bravo</strong>-<strong>Brava</strong>98 rangeAuxiliary unitsClimate control50.AUTODIAGNOSISUsing suitable control logics for the sensors and adjustment with "self-learning" for the actuators, theelectronic control unit is capable of recording and storing and series of problems and faults which canoccur in the system.When confronted with these problems, the control unit continues to manage the operation of the systemreplacing any incorrect values detected with appropriate recovery values which ensure a minimum levelof operation for the system even if it is not ideal.Two types of errors are memorized:- occasional errors, which are zeroed when the key is turned OFF- permanent errors: if an error occurs more than 5 times in a certain period it is considered permanentand is stored in the control unit memory; these errors are NOT zeroed when the key is turned OFF, butonly after a specific external command (diagnostic equipment).The control unit has two methods for reading errors it is storing:- by means of the diagnostic equipment- through the display in the on board panel enabled by reading the outside temperature.As an error detected by the control unit occurs (even an occasional type error), the words "Error Cli" appearon the on board panel display to indicate that the system has memorized a fault.By pressing the "outside temperature" button in the centre of the dashboard if these words remain, thismeans that the error involves the outside temperature sensor, if, on the other hand the correct temperaturevalue appears, this means that the error relates to other system components and it is then possible toidentify the fault memorized through the following procedure;- Turn the left knob completely in a clockwisedirection (HI position)- Turn the right knob completely in a clockwisedirection (MAX DEF position)- Turn the centre knob (to position 0)MAR'Turn the ignition key from the OFF positionto the ON positionWithin 10 seconds, turn the centre knob,placing it in the following positions:"0" - "AUTO" - "0" - "AUTO" - "0"Copyright by Fiat Auto 11
Auxiliary unitsClimate control50.<strong>Bravo</strong>-<strong>Brava</strong>98 rangeAt this point the control unit will send a series of messages to the on board panel display: an error code,in accordance with the table below, will be displayed in place of "Cli".MALFUNCTIONS WHICH CAN BE DETECTEDC.C. to treated temperature sensor earthC.A. or C.C. indistinguishable treated temperature sensorC.C. to outside temperature sensor earthC.A. or CX. indistinguishable outside temperature sensorC.C. to passengger compartment temperature sensor earthC.A. or C.C. indistinguishable passenger compartmenttemperature sensorC.C. to frost sensor earthC.A. or C.C. indistinguishable frost sensorMixture actuator malfunctionC.C. to requested temperature potentiometer earthC.A. or C.C. indistinguishable requested temperature potentiometerC.C. to ventilation potentiometer earthC.A. or C.C. indistinguishable ventilation potentiometerC.C. to mixture earth feedbackC.A. or C.C. indistinguishable mixture feedbackFan operation malfunctionC.C. to 5 V supply earthC.C. to ■+ battery supply 5VDISPLAY CODE12143234424452546582849294B2B4D5E2E3If several errors are present, they are displayed every 3 seconds.Having concluded all the rrors, the milometer is displayed once again.If the codes differ from those mentioned above, bear in mind that the first figure or letter identifies thecomponent, whilst the second figure identifies the type of fault, namely:1. Open circuit - 2. Short circuit to earth - 3! Short circuit to + battery - 4. Short circuit and open circuitindistinguishable - 5. General actuator malfunction.If a system fault diagnosis is carried out AFTER A REPAIR OPERATION which have involveddisconnecting the battery and/or control unit, it is necessary to:- turn the ignition switch to the ON position,- wait for around 30 seconds: the control unit will carry out a "self-learning" cycle,- return the ignition key to the OFF position,- carry out fault diagnosis as illustrated and described previously.12 Print no. 506.670/16
<strong>Bravo</strong>-<strong>Brava</strong>Auxiliary units98 range Climate control50.DUCT / DISTRIBUTOR ASSEMBLYThe assembly illustrated in cross section in the diagram below is the main component of the system andconsists of a duct (1) and a heater-distributor assembly (2).The duct (1) consists of two parts, a lower one and an upper one; the right part of the latter is shaped insuch a way that it matches perfectly with the right upper surface of the dashboard (area below the windscreenby the bulkhead between the engine compartment and the passenger compartment) which it isin contact with.There are two rectangular shaped openings in the upper part of the duct at the top on the right side; thefirst is in an almost horizontal position matching with the one in the dashboard and therefore in contactwith the outside ambient, whilst the other one is facing the passenger in an almost vertical position, allowingthe intake of air in the passenger compartment.There is a flap (3) fitted on the inside of the duct, at the top, which is directed by a special actuatorwhich can take up a position between closed and one of the above mentioned two openings.There is an electric fan (4) fitted inside the duct in the lower part by the above mentioned openingswhich, when supplied at different voltages, can rotate at different speeds.The heater-distributor assembly basically consists of a casing which houses the following, in order:- a mixture flap in the centre which, directed by a knob via a cable either does or does not allow the entireair flow introduced by the fan (4) or part of it to come into contact with the finned surface of theheater radiator (5);- the heater radiator (5) in the centre at the bottom, with inlet and outlet connectors projecting beyondthe right side surface of the above mentioned assembly;- four flaps, at the top and the front, which, directed by a knob via a special actuator, a toothed sectorand a splined disc with a distribution function, either shutter or completely close the section of the internalducts which direct the air to the footwell vents, the front vents and the vents for demisting thewindscreen.The evaporator (6) is located between the duct (1) and the distributor (2).P4A13CH01Copyright by Fiat Auto 13
Auxiliary unitsClimate control50.<strong>Bravo</strong>-<strong>Brava</strong>98 rangeDynamic / recirculation airThe special actuator rotates the air intake flap (P) between the two extreme positions: the one if figure Acloses the internal air intake and consequently the electric fan only draws in outside air; the latter is inhibitedand recirculation air is drawn in if the flap is positioned as illustrated in figure B.BHot/cold air mixingThe special actuator rotates the flap (M) between the extreme positions (LO) and (HI).In the (LO) position, the flow of air drawn in by the fan is distributed to the various vents without undergoingany variation in temperature because it is impossible to come into contact with the heater radiator(R) finned surface.When the mixture flap is in the limit position (HI) the entire flow of air introduced by the electric fan hasto come into contact with the heater radiator fins with hot air at the maximum possible temperature beingdistributed to the various vents.When the mixture flap is in an intermediate position between the two positions mentioned above, onlypart of the air flow introduced by the electric fan comes into contact with the heater fins.LOHIP4A14CH0414 Print np. 506.670/16
<strong>Bravo</strong>-<strong>Brava</strong>98 rangeAuxiliary unitsClimate control50.Air distributionBy turning the right knob in a clockwise directionthe four flaps are rotated so that theair is distributed as illustrated on the variousideograms, i.e. starting from to the front ventsonly, ending with the windscreen vents, as illustratedin the diagrams below.P4A1SCH01View of positioning of thevarious distribution flapswhen the knob is rotatedcompletely in an anticlockwisedirectionP4A15CHQ2WP4A15CH03View of positioning of thevarious distribution flapswhen the knob is rotatedcompletely in a clockwisedirectionCopyright by Fiat Auto 15
Auxiliary unitsClimate control50.<strong>Bravo</strong>-<strong>Brava</strong>98 rangeLOCATION OF CLIMATE CONTROL SYSTEM COMPONENTSThe climate control system consists of the following components:- a variable flow rate compressor (SKROLkfor 1242 16v and 1910 JTD versions - NIPPONDENSO TV12SC for other versions) which is fixed to the engine by brackets;- a condenser which is a heat exchanger fitted in front of the engine coolant radiator;- a drier filter which is located near the left side of the condenser;- an evaporator which is the second heat exchanger for the system and is located in the above mentionedassembly;- an expansion valve which is fitted on the evaporator inlet duct;- various rigid and flexible pipes which connect the various system components;- a threee stage pressure switch which is fitted on the drier filter.There are two small pipes, fitted to the high and low pressure pipes, with a needle valve which is designedto drain and repressurize the system.P4A16CH011. Compressor2. Condenser3. Drier filter4. Evaporator5. Expansion valve6. Pipe between compressor and condenser7. Pipe between condenser and drier filter8. Pipe between filter and evaporator9. Pipe between evaporator and compressor10. Three stage pressure switch11. Needle valve for draining the system (lowpressure side)12. Needle valve for draining and repressurizingthe system (high pressure side)16 Print no. 506.670/76
<strong>Bravo</strong>-<strong>Brava</strong>98 rangeAuxiliary unitsManually operated climate control50.SCROLL SCS08 COMPRESSORThe compressor used on this vehicle is the scroll type and is equipped with a system which deactivates itwhen the evaporator reaches temperatures where freezing may take place.The compressor consists of a fixed scroll (1) which has a casing and an orbital scroll (2); the movementof the two scrolls, which takes place through the camshaft (3) connected to the pulley, produces achamber in which the volume decreases during rotation allowing compression.The adoption of this compressor, consisting of only two moving parts, has resulted in the following advantages:- no seals are required;- there are no leaks, either radial or axial;- low load losses through the absence of internal valves and pipes;- the wear of the spirals produces an improved seal of the side panels of the actual spirals;- the absence of valves, knocking and impulses reduces noise levels.P4A17CH011. Fixed scroll (casing)2. Orbital scroll3. Camshaft4. Camshaft seal5. Shield6. Compressor supply electrical connection7. Balancing massCopyright by Fiat Auto 17
Auxiliary unitsManually operated climate control50.<strong>Bravo</strong>-<strong>Brava</strong>98 rangeCompression mechanismThe contact between the compressor fixed scroll and the orbital scroll produces a chamber (1) in whichthe gas is imprisoned with the volume tending to gradually decrease as the orbital scroll rotates. Asshown in the sequence illustrated, the compression chamber is alternately open for the supply of gas,closed for transportation and open once again (at the outlet connector) for the discharge of the gas underpressure.The volume defined by the two scrolls decreases determining the compression mechanism for the gasstored. The pressure gradually increases until the gas arrives at the centre zone where operating pressureis reached; at this point thegas is released through the outlet connector to the condenser.P4A18CH01The sequence illustrates the different gas compression stages; the compression takes place after threecomplete revolutions of the orbital scroll. Naturally, the cycle is continuous therefore the moment acompression stroke takes place, a gas inlet stroke occurs simultaneously and the previous phase endswith the escape of the gas under pressure.18 Print no. 506.670/17
<strong>Bravo</strong>-<strong>Brava</strong>98 rangeAuxiliary unitsManually operated climate control50.OPERATION OF THE COMPRESSOR ELECTRONIC CONTROL UNITThe system for activating/deactivating the compressor is operated by an electronic control unit (electronicthermostat) (3), which acts on the compressor clutch according to the temperature of the evaporator,measured by an N.T.C. type sensor (2).If the temperature of the evaporator reaches values below 3.5 °C, the electronic unit releases the compressorcoupling relay and consequently the compressor coupling.The compressor coupling is disengaged if the driver accelerates fully and when the engine temperaturereaches 107 °C, to prevent overheating. These control operations are carried out by the fuel injectioncontrol unit.+ 15 INT/A , ' ' /V\© -J-©1. Air conditioning on switch2. Air temperature sensor on the evaporator3. Compressor electronic control unit (electronicthermostat)4. Four stage pressure switchAir temperature sensor on the evaporatorThe temperature sensor is an N.T.C. resistance and is kept in place, by means of a retaining spring, on theevaporator fins, on the downstream side of the air flow and is not accessible from the outside.The control unit which deactivates the compressor according to the temperature of the air measured atthe evaporator outlet is calibrated as follows:ONDFF 4 „3,5±0,5°CA k5,0 ± 0,5 °CP4A19CH02In particular, the control unit activates the coupling when the temperature of the air exceeds 5.0 ±0.5 °Cand deactivates it when the temperature goes below 3.5 ±0.5 °C.Copyright by Fiat Auto 19
Auxiliary unitsManually operated climate control50.<strong>Bravo</strong>-<strong>Brava</strong>98 rangeMAINTENANCE AND SERVICE OPERATIONSLubricant oilThe compressor is lubricated by about 80±20 cc of ND8 oil. Only this type of oil (ND8)should be used for topping up or oil changes.In case of service operations which involve replacing some of the system components such as the condenseror the evaporator, 40 cc of oil must be added for each of the parts replaced. If the compressor isbeing replaced, it is available as spares with the recommended quantity of oil. For this reason, before fittingit on the vehicle the amount of oil corresponding to that remaining in the system must be removedfirst. In order to do this it is necessary to:HHH The compressor is available as spares pressurized with nitrogen to prevent dampness and impu-^Q^ rities from entering; therefore when refitting, remove the inlet and outlet connector plugs slowly■ ^ " with the compressor positioned exactly as illustrated in the diagram below (with the cover facingupwards).1. Pour the quantity of oil in the compressor which is being replaced into a graduated test tube (C) takingcare to let it drain well.2. Pour the quantity of oil in the new compressor into a graduated test tube (D) taking care to let it drainwell.3. Remove the excess quantity of oil(E) corresponding to the difference between the quantity of oil intest tube (C) and test tube (D) (E = D - C).The oil is extremely hygroscopic: avoid leaving the containers open.Avoid leaving the compressor or any other component disconnected from the system forlonger than is necessary.Do not tilt the compressor or turn it upsidedown.P4A20CH02Determining the quantity of lubricant oil to be introduced into the compressor20 Print no. 506.670/17
<strong>Bravo</strong>-<strong>Brava</strong>98 rangeAuxiliary unitsManually operated climate control50.Any time the compressor is removed or moved, it should be positioned with the cover facingupwards as illustrated in fig. 7 to prevent oil leaks and the fouling of the compressor.P4A21CH02P4A21CH03Before carrying out operations which could cause the escape of refrigerant fluid, the air conditioningsystem must be drained. Protective gloves and goggles should be worn during this operation.In order to facilitate the draining operation, the engine and the system should be left to run for atleast 10-15 minutes.NOTEIf the O-ring seals are being replaced, use green or black coloured seals, making sure that theyare current production ones which are resistant to R134A fluid. Do not, under any circumstances,use old production black seals because they are permeable.NOTE If the system pipes are dismantled, it is advisable to seal the disconnected ends of the pipeswith suitable plugs if they are not going to be refited immeidately to prevent dampness or foreignbodies from entering.\^YY /$/^s\/w&ytetN //WAX^\ \ \VrConnecting the equipment to the vehicle airconditioning systemCarry out the following operations in order:- Check that the equipment taps are closedand that the electrical control knobs are inposition 0 (off), then engage the connectorfor the light blue flexible pipe with the needlevalve on the section of pipe which connectsthe evaporator to the compressor.P4A21CH04Copyright by Fiat Auto 21
Auxiliary unitsManually operated climate control50.<strong>Bravo</strong>-Btava98 rangeAttach the connector for the red flexiblepipe to the needle valve on the four stagepressure switch connector.P4A22CH02IMOTEMove the ring nut shown by the arrowcompletely upwards before fittingthe connector on the needlevalve.22 Print no. 506.670/17
<strong>Bravo</strong>-Bmva98 rangeAuxiliary unitsManually operated climate control50TChecking air conditioning system pressure(A) low pressure circuit gauge(B) high pressure circuit gauge1. Low pressure tap (LOW)2. High pressure tap (HIGH)3. Light blue low pressure pipe4. Red high pressure pipe5. Cleaner 134 equipmentThe pressure is checked using the Cleaner 134 equipment with the engine running (rotation speed ofaround 1500 rpm) and the outside temperature 20 - 28 X, after having connected the pipes as illustratedon the previous page; under these circumstances the pressure gauge readings should be:low pressure circuit (pressure gauge A): 1.5 - 3.0 barhigh pressure circuit (pressure gauge B): 11 -16 barNOTE The radiator/condenser cooling fan is switched on at a high pressure circuit pressure of15 - 16bar.Quantity of R 134 A refrigerant fluid contained in the system: 650 ± 25 cc.Copyright by Fiat Auto 23
Auxiliary unitsManually operated climate control50.<strong>Bravo</strong>-<strong>Brava</strong>98 rangeDRAINING THE SYSTEMBefore carrying out any operationwhich could result in R 134 A fluidescaping, the climate control systemmust be drained.During the operation of draining thesystem, wear protective gloves andgoggles for protection against contactwith any jets of R 134 A fluid.In order to faciliate the draining of the fluidfrom the vehicle air conditioning system, theengine should be started up and the systemleft to run for 10-15 minutes before commencingthe draining operations.To drain the vehicle climate control system,use the Cleaner 134 equipment manufacturedby ICF and carry out the following operations:1. Undo the plug for the needle valve (lowpressure side) which is at the end of a pipeon the pipe which connectors the evaporatorto the compressor.2. Undo the plug for the needle valve (highpressure side) which is at the end of a pipewhich is an integral part of the connector,at the end of the pipe which connects thecondenser to the drier filter.3.4. Fit the rapid attachment connector forthe ends of the blue (low pressure side)and red (high pressure side) flexibleconnecting pipes for the Cleaner R134equipment on the above mentioned needlevalves; then carry out the operationsfor recovering and recycling the refrigerantfluid descried and illustrated in the<strong>Bravo</strong>-<strong>Brava</strong> 2nd volume Manual (printno. 506.670/01).NOTE To improve safety, the rapid attachmentconnectors for the pipes connectedto the equipment and theneedle valves have different diameters:the low pressure side ones arelarger and the high pressure sideones are smaller. Before attachingthe rapid attachment connectors tothe needle valves, the knurled ringnut shown by the arrow must bemoved upwards.24 Print no. 506.670/17
<strong>Bravo</strong>-<strong>Brava</strong>98 rangeAuxiliary unitsManually operated climate control507COMPRESSORRemoving1. Position the vehicle on a lift, disconnectthe negative battery lead and drain the climatecontrol system, carry out the followingoperations in order:- disconnect the connector and release itfrom the retaining band;2. raise the vehicle and remove the right frontwheel, remove the clip and undo the boltsshown in the diagram, fixing the wheelarch liner to the bodyshell.3. Undo the bolts shown in the diagram andremove the lower shield from the enginecompartment.4. Acting on the belt tensioning device,loosen the tension of the single enginecomponents drive belt; release the beltfrom the pullies and remove it.IMOTE Avoid the belt coming into contactwith oil or solvents which could affectthe elasticity of the rubber witha consequent loss of grip. Alsocheck that there are no cracks orcuts on the belt or else it will haveto be replaced.P4A25CH03Copyright by Fiat Auto25
Auxiliary unitsManually operated climate control50.<strong>Bravo</strong>-<strong>Brava</strong>98 rangeUndo the bolt shown in the diagram andrelease the pipe from the compressor inletduct;seal both the end of the pipe and the compressorduct using suitable plugs;undo the bolt shown and release the pipefrom the compressor supply duct;seal both the end of the pipe and the compressorduct using suitable plugs;P4A26CH02undo the bolts shown in the diagram andremove the compressor;RefittingTo refit, simply reverse the order of the operationscarried out for the removal.P4A26CH0326 Print no. 506.670/17
<strong>Bravo</strong>-<strong>Brava</strong> iQty JTD98 rangeAuxiliary unitsAdditional heater50.INTRODUCTION'The heating inside the vehicle via the heater unit is insufficient, with the engine cold, especially in thecase of diesel engines which reach operating temperature more slowly.An additional heating system is offered for these engines which is activated when the engine is first runninguntil a certain temperature is reached.The system consists of an additional heating device, located on the engine coolant supply pipe to theheater unit.This device contains three spark plugs which are very similar to those used for pre-heating the combustionchamber.Location of car interior coolantplugsheaterThe additional heater containing the three heater plugs is located on the coolant supply pipe to theheater unit.The coolant temperature sensor is located on the same pipe, immediately upstream towards the enginethermostat.The three relays are connected by the diesel filter, on a special bracket fixed to the engine compartmentbulkhead.The system control unit is located under the dashboard, behind the glove compartment.Operating logicThe operation of the heater plugs is controlled by an electronic control unit which operates one, two orthree heater plugs thereby giving a supply 200W, 400W or 600WThis control logic depends on:- the temperature of the coolant leaving the engine;- the power level available;- the engine speed.The first information is supplied by a special temperature sensor located on the supply pipe towards theheater; the control logic deactivates the heater plugs when the temperature of the coolant coming fromthe engine exceeds 70 °C.The control unit also takes into account the parameter of the temperature of the air in the engine compartment;it is not measured by a special sensor, but is assumed to be the same as the temperature of thecoolant during starting; the switching off figure decreases from 70 °C to 65 °C if the temperature of theair is assumed to be greater.Copyright by Fiat Auto XI-98 - Update 27
Auxiliary unitsAdditional heater50.<strong>Bravo</strong>-<strong>Brava</strong> @w98 rangeThe second piece of information is the electrical power available and is obtained from the battery voltagevalue; of the voltage is above 12.8 V, the operation of the heater plugs is enabled, below this figure one,two or all three heater plugs are gradually deactivated.This parameter is checked every 10 seconds in order to keep the power absorbed constantly under controlso that the battery is not run down.The information concerning the engine speed is used to prevent the operation of the heater plugs withthe engine switched off, the enabling takes place at around 660 rpm.The supply of one, two or three heater plugs is operated by two relays:1 st level is activated by the first relay.2nd level is activated by the second relay.3rd level is activated by both relays.There is a third relay/remote control safety switch which interrupts the supply for the heater plugs if theearth contact is not correct; the metal device containing the heater plugs is, in effect, connected to theengine earth by means of a special cable loom; if this connection is interrupted, the relay stops the currentsupply to the heater plugs.28 XI-98 - Update Print no. 506.670/17
<strong>Bravo</strong>-<strong>Brava</strong> @t JTD98 rangeAuxiliary unitsAdditional heater50.LOCATION OF COMPONENTS ON VEHICLEComponents key3. Power fuse box350. Relay for heating passenger compartmentcoolant351. Safety relay for heating passenger compartmentcoolant352. Relay for heating passenger compartmentcoolantP4A29CH01353. 70A protective fuse for passenger compartmentcoolant heater plugs355. Passenger compartment coolant heaterplugs357. Passenger compartment coolant heaterplugs control unitCopyright by Fiat Auto XI-98 - Update 29
<strong>Bravo</strong>-<strong>Brava</strong>Electrical systemContents55.pageRADIO- AD 185M radio cassette player, 1- Description of operation of modelAD 185M radio , 2- Switching radio on 2- Adjusting volume 2- Adjusting tone 2- Adjusting balance 2- - Selecting frequency range 3r- Tuning automatic search3- Tuning manual search ' 3- Manual memorization of a station 4- Listening to a memorized station. 5, - Automatic memorization of 5 stationsin the FM-RDS band (Autostore) 5- Cassette player 6- Fast forward winding of cassettetape 7- Fast rewind of cassettetape ' , 7- Autoreverse function 8- Equalization ' t 8- Clock function , 8T- Display information '10- Care and maintenance 10Copyright Fiat Auto
<strong>Bravo</strong>-<strong>Brava</strong>Electrical systemRadio55.AD 185 M RADIO AND CASSETTE PLAYERSome versions of the cars are fitted as standard with a radio which comprises the following main components:- non-removable AD 185 M radio and cassette player which is located at the centre of the instrumentpanel; its front, customized for FIAT, is fully integrated in the line of the dashboard;- two loudspeakers located on the inside panels of the front doors;- fishpole aerial located at the front centre of the car roof.1. Knob for switching on the radio and adjusting the volume;2. Cylindrical knob for adjusting the tone and and adjusting the sound balance between the two loudspeakers;3. Wave band selection button (FM1 - FM2 - MW - LW);4. Button for automatic or manual search in order of increasing frequency of transmitting stations.5. Button for automatic or manual search in order of decreasing of transmitting stations.6. Button for preselecting transmitter no. 1 - selection of priority of indication of time / radio frequencyon display.7. Button for preselecting transmitter no. 2 - adjustment of hours in decreasing order.8. Button for preselecting transmitter no. 3 - adjustment of hours in increasing order.9. Button for preselecting transmitter no. 4 - adjustment in increasing order of minutes.10. Button for preselecting transmitter no. 5 - adjustment in decreasing order of minutes.11. Button for switching between displaying radio frequency / time and for selecting time adjustment.12. Spot on which to press the door covering the cassette insertion slot, in order to lift the door.13. Button for fast rewind of the cassette tape and for ejecting the tape from its seating (press togetherwith button 14).14. Button for fast forward winding of the cassette tape and for ejecting the tape from its seating (presstogether with button 13).15. Display of wave band / frequency of station being listened to / stereo transmission / search sensitivity/ time.16. Button for selecting Traffic Program mode.Copyright Fiat Auto 1
Electrical systemRadio55.<strong>Bravo</strong>-<strong>Brava</strong>DESCRIPTION OF OPERATION OF MODEL AD 185 M RADIOSWITCHING RADIO ONADJUSTING VOLUMEPress the buttonIncrease volumeDecrease volumeADJUSTING TONEPress the button(•)P4A048L06Emphasize high tonesP4A048L07Press the button again aftercompleting the adjustment(O) Emphasize low tonesADJUSTING BALANCEPress the buttonP4A048L09Withdraw the button until it clicks(•) Emphasize sound fromright loudspeaker(O) Emphasize sound fromleft loudspeakerPress the button again aftercompleting the adjustment2 Publication no. 505.670/07
<strong>Bravo</strong>-<strong>Brava</strong>Electrical systemRadio55.SELECTING FREQUENCY RANGErLWfFMFMHDSIRDSIIIBriefly press the button severaltimes until the display showsthe abbreviation of the desiredfrequency band.LW=Long waveMW= Medium waveFM = frequency modulationFM-RDS = Divided into three sub-bandswith the indications RDS I, RDS II, RDS IIIfor stations which transmit in RDS.NOTE RDS FUNCTION (Radio Data System)The RDS system permits, with the enabled transmitters, automatic tuning of the optimum frequencyof the selected station; you can therefore continue listening to the station without havingto change frequency when you change zone. Naturally it must be possible to receive thestation in question in the area you are passing through.The name of the station transmitting in RDS appears on the display.MEMORIZATION OF LAST STATION LISTENED TOThis takes place automatically for each frequency band which is tuned when you switch on the radio orchange frequency band.TUNING AUTOMATIC SEARCHBriefly press the button severaltimes until you select the desiredfrequency band.Briefly press one of the twotuning buttons.The sensitivity of the search increases in the 2nd and 3rd re-scan of the entire range of frequencies: from the3rd pass, the letters DX appear on the display.To immediately select the maximum search sensitivity, keep one of the two above-mentioned buttonspressed until the letters DX are displayed.Hvl Do not keep the button pressed for long, otherwise manual tuning search would be selected inf* the LW, MW or FM bands.Copyright Fiat Auto 3
Electrical systemRadio55.<strong>Bravo</strong>-<strong>Brava</strong>TUNING - MANUAL SEARCHP4A03CL02P4A03CL03Briefly press the button several Keep one of the buttons Press (**) one of the two buttimesuntil the desired fre- pressed until the letters "MAN" tons again to select the desiredquency band is selected. appear flashing on the display. station.{**) "Press the button briefly to change frequency gradually and in stages, and press the button foriongerfor a iast frequency change. >NOTEThe manual search function is NOT active for the FM-RDS bands.After 60 seconds, or after pressing one of the buttons illustrated below and identified by the numbers 1 to5, you pass from automatic tuning mode and the letters "MAN" flashing on the display disappear,If one of the five buttons is pressed, the radio is tuned to the station previously memorized with that button.NOTEWhen the frequency band is selected, you change from manual to automatic search.MANUAL MEMORIZATION OF A STATIONYou can memorize the station you are listening to within the selected frequency band by using of the 5numbered buttons (figure below), which must be pressed until the station is again heard and the numberof the button pressed appears on the display.The settings remain memorized even if there is a cut in the supply to the radio.4 Publication no. 505.670/07
<strong>Bravo</strong>-<strong>Brava</strong>Electrical systemRradio55.LISTENING TO A MEMORIZED STATIONCD0.0 BAfter selecting the desired frequency range bymeans of quick presses on the BAND button,briefly press one of the five buttons (see figureat bottom of previous page) for memorizingthe stations, and the number of the latter appearson the display.When the tuned station transmits programmesin stereo, the symbol 00 appears on the display(see figure), but if the incoming signal is weak,the reproduction is automatically changedfrom stereo a mono.AUTOMATIC MEMORIZATION OF 5 STATIONS IN THE FM-RDS BAND (AUTOSTORE)In this mode you can memorize up to five stations for each of thethree bands FMRDS I, FMRDS II and FMRDS III.Proceed as follows:- Press the BAND button until the desired band is selected.- Keep the BAND button pressed until the tape is switched off andthe letters "AST" are displayed.The buttons numbered 1 to 5 (see figure at bottom of precedingpage) automatically memorize the stations which have a strong signalat that moment in the selected band.A maximum of two re-scans of the entire range of frequencies are executed, with increasing search sensitivity,and this operation is concluded when tape is switched on again and the letters AST disappear.The radio is tuned to the station memorized on button 1.TP function (Traffic Program)Some stations belonging to the RDS I, RDS II and RDS III bandsalso transmit information on the traffic conditions.With the TP (Traffic Program) function you can:a) search only the RDS stations which transmit traffic information;b) receive traffic information even if the cassette player is in operation;c) receive traffic information at a pre-set minimum volume evenwith the radio volume set to zero.NOTEInstructions are given below for carrying out each of theoperations described in points a), b) and c) above.Copyright Fiat Auto 5
Electrical systemRadio55.<strong>Bravo</strong>-<strong>Brava</strong>Point a)- Select an RDS I, RDS II or RDS III band as described above;- briefly press the "TP" button so that the letters "TP" are displayed.If the outgoing transmitter is not enabled to supply traffic information,the radio will automatically tune to the nearest transmitter enabled todo so.If you wish to search other stations enabled for the service, press thetuning buttons (A).To memorize the transmitters with the "TP" function activated, carryout the memorization operations (see "Memorization of a station"sub-section).As an alternative to manual memorization, keep the "BAND" button pressed until the cassette isswitched off, to effect automatic memorization (see "Automatic memorization in the FM-RDS band -Autostore")Point b)If you wish to receive traffic information, before inserting the cassette tape, tune to an RDS TP transmitter.If traffic information is transmitted from the latter during listening of the tape, the tape will automaticallystop temporarily and Will resume automatically when the message tias •finished.Point c)You can receive traffic information even if you are not listening to the radio. After tuning to an RDS TPtransmitter and setting the volume to zero, if that transmitter transmits traffic information, it will be heardat a pre-set minimum volume.MP4F06CL01In some countries there are stations which do not transmit traffic information, even with the TPfunction activated.EON (Enhanced Other Network) functionIn some countries there are circuits which group together several transmitters enabled to transmitt trafficinformation.In these cases, listening to the programme of the RDS TP will be temporarily interrupted to receive trafficinformation, whenever this information is transmitted by one of the transmitters on the same circuit.To exclude the EON function, press the "TP" button briefly.CASSETTEPLAYERCassette tape reproductionPress vertically on the two arrowsat the top of the door onthe tape insertion slot, untilyou hear the click of the clipdisengaging.6 Publication no. 505.670/07
<strong>Bravo</strong>-<strong>Brava</strong>Electrical systemRadio55.Insert the cassette tape fully into its slot until itclicks into position; if the radio is on, it automaticallystarts playing the tape and the word"TAPE" appears on the display.If the radio is switched off during listening of the tape and is then switched on again, the tape automaticallystarts at the point where it was interrupted.To change to radio, press simultaneously thebuttons shown in the figure, which cause thecassette tape to be ejected from its compartment.The word "TAPE" disappears from thedisplay and the radio is switched on.The cassette tape can be ejected even if the radiois off.FAST FORWARD WINDING OFTHE CASSETTE TAPETo close the cassette compartment, press verticallyon the arrows at the top of the door, untilthe lock clicks.FAST REWIND OF THE CASSETTETAPEFully press the button indicatedFully press the button indicatedTo stop the forward winding or rewinding of the cassette tape, gently press the button next to the onepreviously pressed.Copyright Fiat Auto 7
Electrical systemRadio55.<strong>Bravo</strong>-<strong>Brava</strong>AUTOREVERSE FUNCTIONAt the end of the tape, the side of the tape ischanged automatically (Autoreverse).The side of the tape being listened to isshown on the display.To change the side of the tape, gently pressthe buttons shown in the figure until you heara click.P4A043L22EQUALIZATIONThe equalization of the cassette reader is automatically selected to read chromium tapes (Cr02).CLOCK FUNCTIONThe clock function display* hours and ! *ninutes.A colon, between the tjoiirs mdjmnutes,-flashes at «i frequency of onceM second.The dock is still displayed when the radio isoff.P4A08CL01Display modesWhen the radio is on, two display modes are possible, with these characteristics:Mode1
<strong>Bravo</strong>-<strong>Brava</strong>Selecting display modesElectrical systemRadio55.«w*»M 188:88Ma88.-88Proceed as follows:- keep the button (6) pressed until the colon between the hours and minutes stops flashing, and the letters"M1" or "M2" appear depending on the selected display mode;- press the (1) button to select the other display mode;- briefly press the button (6) again to confirm the selection; the colon between the hours and minutesstarts flashing again and the letters "M1" or "M2" disappear.Setting correct timeVv\Tl\ r~ 6I-M ,'88:88t1s88:88 ]Keep the button (6) pressed until the colon betweenthe hours and minutes stops flashing andthe letters "M1" or "M2" appear depending onthe selected display mode;Adjust the hours and minutes on the display asfollows:- to decrease the hours press button (2);- to increase the hours press button (3);- to decrease the minutes press button (4);- to increase the minutes press button (5).If the buttons (2-3-4-5) are pressed briefly, the hours and minutes are increased/decreased by one unit.Press the buttons for longer to change the hours/minutes display quickly.Once the correct time has been set, press the button (6) briefly again; this starts from 0 seconds so theclock can be set accurately. The colon between the hours and minutes starts flashing again and the letters"M1" or "M2" disappear.Changing priority between display of time/frequencyBriefly press the button (6) to switch between the display of the clock and the messages relating to theradio function, for a duration of 10 seconds; after which the indication which has priority depending onthe selected display mode with reappear automatically.Copyright Fiat Auto 9
Electrical systemRadio55.<strong>Bravo</strong>-<strong>Brava</strong>Power cutIf the power supply to the radio is cut off(even for a few minutes), when it is reconnected,the display shows "00 : 00" with thedigits flashing and the colon fixed, indicatingthat the clock has to be reset.DISPLAY INFORMATION1. Number of preselected transmitting station.2. Indication of RDS sub-bands.3. Selection of Traffic Program mode.4. Symbol of sensitivity of search of transmittintstations.5. Colon between hours and minutes (in clockfunction).6. Symbol indicating listening to transmissionin stereo.7. Direction of feed of cassette (in cassetteplaying function).8. Distinctive letters of wave band.9. Numbers indicating tuning frequency withdecimal point of frequency.10. Hours and minutes (in clock function).CARE AND MAINTENANCENever expose the cassettes to heat or to direct sunlight, and always put them back in their boxes afteruse. It is recommended that you use high-quality tapes, and not longer than C-90 in order to ensure excellentreproduction at all times.Clean the trim cover only with a soft anti-static cloth. Detergents and polishes could damage the surface.Impurities on the reading head coming from the tapes could, over a period of time, cause a reduction inthe high tones during reproduction. It is therefore advisable to clean the reproduction head periodicallywith a special non-abrasive head-cleaning cassette.10 Publication no. 505.670/07
<strong>Bravo</strong>-<strong>Brava</strong>Rear view of radioElectrical systemRadio55.TECHNICAL CHARACTERISTICSNo. of output channelsMusical output powerNominal output powerLoad impedance2About 8W peak(per channel)About 4W RMS4 OhmCONNECTOR A SEATINGCONNECTOR B SEATINGN°ConnectionN°Connection5Key dependent (+15)3Right loudspeaker6Lighting4Right loudspeaker7Supply (+30)5Left loudspeaker8Earth6Left loudspeakerNOTEThe terminals not mentioned in the tables are not connected.Wiring diagram•SN NZRG SN|GNBN NZ+»**12 3 4 5 6 7 7 6 5 4 3 2 1m(?) +3053)0; 30 lbJ)5D GL3 (« I » IO)21. Earth on right dashboard2. Radio3. Loudspeaker on left door4. Loudspeaker on right door5. Battery supply (+ 30)6. Lighting supply7. Key supply (+ 15)8. Fishpole aerialCopyright Fiat Auto 11
<strong>Bravo</strong>-<strong>Brava</strong> ^ TDElectrical systemContents55.page- Wiring diagrams- Connector blocks- K e y ■?.13136Copyright Fiat Auto
Electrical systemWiring diagrams—<strong>Bravo</strong>-<strong>Brava</strong>NAME1910(75 bhp)S1910(100 bhp)<strong>Bravo</strong>1910(75 bhp)sxGT1910 1910(100 bhp)(100 bhp|1910(75 bhp)S1910(100 bhp)1910(75 bhp)<strong>Brava</strong>SXELELX1910 1910 1910(100 bhp)(100 bhp)(100 bhpVersion with air conditionerEngine cooling system - Water temperature gauge55555555555Starting system - Recharging system and warning light - Low engine oil pressure warning light - Heater plugs warning light - Fuel injectionfault warning light - Fiat CODE system fault warning light - Rev counter9999999Starting system - Recharging system and warning light - Low engine oil pressure warning light - Heater plugs warning light - Fuel injectionfault warning light - Fiat CODE system fault warning light - Rev counter13131313Version without air conditionerEngine cooling system - Water temperature gauge - Car interior ventilation1717171717171717171717Windscreen wash/wipe - Rear window wash/wipe - Electric horns - Heated rear window and warning light - Headlamp washer2121212121212121212121Air conditioner2925292525292529252525Fuel level gauge and reserve warning light - Handbrake on/law brake fluid level warning light - Speedometer - Trip recorder/mileagecounter and relevant reset button - Water temperature gauge - Lew engine oil pressure warning light - Front brake pade wear warninglight - Heater plugs warning light - Rev counter3333333737333333334141Instrument panel connections45454549494545454553534A66ZL4A67ZLCopyright Fiat Auto
<strong>Bravo</strong>-<strong>Brava</strong> ^ TDElectrical systemWiring diagrams55.Electrical symbolsMSide lightsIXIChoke (starter)30 -IS'- 1 | Ign.switch discharge=DMain beam headlamps&xWater in fuelfilterIDDipped headlampsHeated seatffiPlug preheatingIndicators with centraldoor lockingMSeat belts*=®nTurbo compressorpressureElectric hornsJ > 4J^ Heated rear window OrRear fog lampsFront fog lampsORight indicatorA.B.S.(O)Brake padwearHEngine cooling systemHazardII®Turbo compressorpressureV Windscreen wiperIndicatorsD£Auto transmission fluidtemperatureElectric sunroofHandbrake on and lowbrake fluid120Km/hSpeed limitsCatalytictemperatureconverterQRechargingaFuel gaugeResistort /Engine oil pressure=feCoolant temperatureDiodeCopyright Fiat Auto 1
Electrical systemWiring diagrams55.<strong>Bravo</strong>-<strong>Brava</strong> ^ TOElectrical symbolsWarning light
<strong>Bravo</strong>-<strong>Brava</strong> ^ TO Electrical systemWiring diagrams55.Electrical symbols388 Digital speedometerDigital rev counter_ EbilliniumDigital fuel gaugeEx3Analogue fuel gaugePAnalogue coolant temperaturegaugeat »EconometeriniiiiiiiiiDigital coolant temperaturegauge^ 3\Eb\Engine oil temperatureK"\MsEngine oil pressure gauge| VoltmeterCopyright Fiat Auto 3
Electrical systemWiring diagrams55.<strong>Bravo</strong>-<strong>Brava</strong> ^ TDExplanation to reading wiring diagram177.•+HIIIIIF'10R »11 50 50 50 80179 COJR nn B94 I r[5flh I 0®40^CCARN.U. RN■ RN-»-RN—' LSTOP96II-AR-RNRUC RURNl*95B181■ 15■RU -€■16R -*< 4-€•17■ 5—€»18• E12 3 4 5 6 7 8 9 1011121314j i***lCCBCBf N.DCBubM.Effl]12A^rrrARAR*•C-»- CN.D.AR+ N.D*AR AR RU17 13m 1c^NZ--NZ■ 208■ 219■ 22■•10■€•23II -* 11-€■24-RN-* 12-€■25-BR-* i«13 r-176N.D. 174n Gu n10) 178180 (OJKey to referencesA Component numberB Connection numberC Connector identification on componentD Connecting pin number,E Ultrasound-soldered joint taped into wiringloom4 Publication no. 506.670/06
<strong>Bravo</strong>-<strong>Brava</strong> A TOVersion with air conditionerEngine cooling system - Water temperature gauge - (See key following diagrams)'H§p7f=4"HHIililili^Electrical systemWiring diagrams55.238® 129 E 154 H 23? S, 70 S 123A E172XIXIR L 1 [L BNifrIANm,nLocation of componentsnmI ft IB60A40A"*>60A80flI'AMI fN ffl 4N.D.12286 as 3d a?^HL126«N AG | N N.D.I BNN -*- N -AG N.O.HEN.D.L IBN1L IBMLr£:f]236C15D-1>-flfi—*—AR-N.D.n¥n 123U1312 0 ? 6 5 4;ARAG N CB121Iip±tN *■LNLN-AG- ■AG-flfi-^-'-^-IR-ANHlm127B-^H 1 " 1585522 (a« N.D.-I fcB —HB NZ AR17 14 1?H12Ijiywpj ill infraite|pre,iaiti31.—If ■ ■!Lbad* See air conditioner diagramCopyright Fiat Auto 5
Electrical systemConnector blocks55.<strong>Bravo</strong>-<strong>Brava</strong>EC Front/engine cables connectionMN127■ HB6AHM6AAR4DL6ACN6ARN121 97 Connection between front left cables/cable on relay bracketVersion with air conditionerEngine cooling system - Water temperature gaugeKey to components3 Power fuse box;A 60A fuse protecting fuel injection systemB 40A fuse protecting ignition systemC 60A fuse protecting additional optional extrasD 80A fuse protecting fuse and relay unit4 Fuse and relay unit:E1 Ignition switch discharge relay6 Instrument panel:7 Wu e temperatUre gaU9enh8 Front left earth10 Battery earth on body shell11 Battery12 Ignition switch22 Left dashboard earth42 Right dashboard earth55 Front/engine cables connection121 Three-stage pressure switch122 Engine cooling fan low speed control relay123 Engine cooling fan high speed timer123A Engine cooling fan high speed control relay126 Front/air conditioner cables connection127 Connection between front left cables/cable onrelay bracket128 Front/air conditioner cables connection129 40A power fuse protecting engine cooling fan154 Engine cooling fan158 Coolant temperature sensor for instrument170 Engine cooling fan limiting resistor172 Two-stage thermostat236 Front/air conditioner cables connection237 Additional engine cooling fan238 40A power fuse protecting engine cooling fanN.D. Ultrasound-soldered joint taped in wiring loomI N123I LN123.ANn.d.lARn.d.l1 26 Front/air conditioner cables connection 1 28 Front/air conditioner cables connectionI R129IHN 238.The cables involved in the wiring diagram are marked with a solid square6 Publication no. 506.670/06
<strong>Bravo</strong>-<strong>Brava</strong> 10Electrical systemWiring diagrams55.Model: 1910 100 BHPStarting system - Recharging system and warning light - Low engine oil pressure warning light - Heater plugs warninglight - Fuel injection fault warning light - Fiat CODE system fault warning light - Rev counter - (See key following diagrams)See air conditioner wiring dia- "" Not present on versions with heater "" Variant connection for S version *** Not present on S versiongrain4A0SZLCopyright Fiat Auto 7
Electrical systemConnector blocks55.<strong>Bravo</strong>-<strong>Brava</strong>55Front/engine cables connectionModel: 1910 100 BHPStarting system - Recharging system and warning light - Low engine oil pressure warning light - Heater plugs warninglight - Fuel injection fault warning light - Fiat CODE system warning light - Rev counter55AFront left/engine cables connectionKey to components3 Power fuse box:A 60A fuse protecting fuel injection systemB 40A fuse protecting fuel injection systemC 60A fuse protecting additional optional extrasD 80A fuse protecting fuse and relay unit4 Fuse and relay unit6 Instrument panel:A Low generator charge warning lightB Low engine oil pressure warning lightL Fiat CODE system fault warning lightM Fuel injection fault warning light0 Plug preheating warning lightW Rev counter8 Front left earth10 Battery earth on body shell11 Battery12 Ignition switch19 Rear right earth22 Left dashboard earth42 Right dashboard earth55 Front/engine cables connection55A Front left/engine cables connection55C Front left/engine cables connection56B Fuel gauge sender unit57 Inertial switch121 Three-stage pressure switch124 Air conditioner compressor control relay127 Connection between front left cables/cable on relaybracket131 Fiat CODE electronic control unit139 Diagnostic socket for fuel injection142 Low oil pressure warning light switch143 Alternator145 Starter motor152 10A fuse protecting fuel injection157 Water temperature sensor for fuel injection192 Air temperature sensor200 Inertial switch relay201 Plug preheating control unit222 Earth for fuel system223 Wheel speed sensor224 Instrumented fuel injector225 Flowmeter226 Diagnostic socket for Fiat CODE system228 Heater plugs229 Engine cut-off electrostop239 Heated diesel filter relay240 20A fuse protecting heating diesel filter relay241 Fuel pump electronic control unit242 Fuel injection relay243 Engine advance adjustment solenoid244 Fast idle solenoid245 E.G.R. solenoid246 Heated fuel filter247 Heated fuel filter thermal contact248 Potentiometer on fuel pumpN.D. Ultrasound-soldered joint taped in wiring loomConnection between front left cables/cable on relay bracket127I R239I HN 239I NZ 239.8 Publication no. 506.670/06
<strong>Bravo</strong>-<strong>Brava</strong>Electrical systemWiring diagrams55.Version: 1910 75BHPStarting system - Recharging system and warning light - Low engine oil pressure warning light - Heater plugs warninglight - Fuel injection fault warning light - Fiat CODE fault system warning light - Rev counter (See key following diagrams)4"fHl|HHl|l^"-145 m 142 143 , [H] 201 E]222 229 251 252 223See air conditioner diagram '* Not present on versions with heater *** Variant connection for S version **** Not present on S versionCopyright Fiat Auto 9
Electrical systemConnector blocks55.<strong>Bravo</strong>-<strong>Brava</strong>55Front/engine cables connectionP4A15ZL01Model: 1910 75 BHPStarting system - Recharging system and warning light - Low engine oil pressure warning light - Heater plugs warninglight - Fuel injection fault warning light - Fiat CODE system fault warning light - Rev counter55AFront left/engine cables connectionKey to components3 Power fuse box:A 60A fuse protecting fuel injection systemB 40A fuse protecting ignition systemC 60A fuse protecting additional optional extrasD 80A fuse protecting fuse and relay unit4 Fuse and relay unit6 Instrument panel:A Low generator charge warning lightB Low engine oil pressure warning lightL Fiat CODE system fault warning lightM Fuel injection fault warning light0 Heater plug warning lightW Rev counter8 Front left earth10 Battery earth on body shell11 Battery12 Ignition switch19 Rear right earth22 Left dashboard earth42 Right dashboard earth55 Front/engine cables connection55A Front left/engine cables connection56B Fuel gauge sender57 Inertial switch127 Connection between front left cables/cable on relaybracket131 Fiat CODE electronic control unit139 Diagnostic socket for fuel injection142 Low oil pressure warning light switch143 Alternator145 Starter motor157 Water temperature sensor for fuel injection200 Inertial switch control relay201 Plug preheating control unit222 Earth for fuel system223 Wheel speed sensor226 Diagnostic socket for Fiat CODE system228 Heater plugs229 Engine cut-off electrostop239 Heated diesel filter relay240 20A fuse protecting heated diesel filter relay245 E.G.R. solenoid246 Heated fuel filter247 Heated fuel filter thermal contact248 Potentiometer on fuel pump249 E.G.R. electronic control unit250 Water temperature sensor for preheating control unit251 K.S.B. thermal switch252 K.S.B. earth253 Relay for switching off compressorN.D. Ultrasound-soldered joint taped in wiring loom127Connection between front left cables/cable on relay bracket10 Publication no. S06.S70I06
<strong>Bravo</strong>-<strong>Brava</strong>Version without air conditionerElectrical systemWiring diagrams55.Engine cooling system - Water temperature gauge - Car interior ventilation - (See key following diagrams)■MINN129XI1541~TR N^—ip170Em,n 172122 [inTtlRNI LRN60A40A 6008"■ R —*— RN-N.D.N.D. 1 *— N - 1 - LN■ N -i- H -N.D.umHB 554mBUsHZ15D--ClJ-i3-AN—•—AN-N.D.j N.D.N.D.- H158MI312I1103 8 7 6 5 4 5m'-t-fft'fBAR flG N CB G11171206 [J]20222 « N.D.N.D.^Z^N.D." ca_jipi_ipi30|M|M iitttifaitg|FE12 SI* See side lights diagramCBAGHBNZ AR17 U 1?I^GR|UG|1Nd42 207iUGlRBBlHN208Copyright Fiat Auto 11
Electrical systemConnector blocks55.<strong>Bravo</strong>-<strong>Brava</strong> £&LccFront/engine cables connectionVersion without air conditionerP4A19ZL01202 Bulbs f° r illuminating symbols onheater/air conditioner controls1 7Q Resistor for engine cooling fanEngine cooling system - Water temperature gauge - Car interior ventilationKey to components3 Power fuse box:A 60A fuse protecting fuel injection systemB 40A fuse protecting ignition systemC 60A fuse protecting additional optional extrasD 80A protecting fuse and relay unit4 Fuse and relay unitE1 Ignition switch discharge relay6 Instrument panel:X Coolant temperature gauge7 Stalk unit8 Front left earth10 Battery earth on body shell11 Battery12 Ignition switch22 Left dashboard earth42 Right dashboard earth55 Front/engine cables connection122 Engine cooling fan low speed relay129 40A power fuse protecting engine cooling fan154 Engine cooling fan158 Coolant temperature sensor for gauge170 Engine cooling fan limiting resistor171 Heater unit172 Two-stage thermostat202 Bulbs for heater/air conditioner unit206 Heater/air conditioner electric fan207 Speed control switch for heater/air conditioner unit208 Limiting resistor for heater/air conditioner unitN.D. Ultrasound-soldered joint taped in wiring loom171Heater cables connection12 Publication no. 606.670/06
<strong>Bravo</strong>-BtavaElectrical systemWiring diagrams55.Windscreen wash/wipe - Rear window wash/wipe - Electric horns - Heated rear window and warning light - Headlampwasher - (See key following diagrams)a HIii1160H40H■ ■80A60Ais 4 -*",
Electrical systemConnector blocks55.<strong>Bravo</strong>-<strong>Brava</strong> A 7Front right/left cables connection24Windscreen wiper motorWindscreen wash/wipe - Rear window wash/wipe -washerKey to components3 Power fuse box:A 60A fuse protecting fuel injection systemB 40A fuse protecting fuel injectionC 60A fuse protecting additional optional extrasD 80A fuse protecting fuse and relay unit4 Fuse and relay unit:E1 Ignition switch discharge relayE2 Horn relayE3 Heated rear window relay7 Stalk unit:A Windscreen wiper speed control switchB Windscreen wash/headlamp wash/rear window washcontrolswitchC Rear window wiper switchD Flasher buttonE Dipped beam/main beam switchF Side lights switchG Indicators/hazard lights intermittent switchH Direction indicators switchI Horn button8 Front left earth9 Front right earth10 Battery earth on body shell11 Battery12 Ignition switch13 Front right/left cables connection18 Rear left earth22 Left dashboard earth24 Windscreen wiper motorElectric horns - Heated rear window and warning light - Headlamp25 Windscreen/rear window wash pump26 Rear window wiper motor27 Rear connections contact assembly with built-in boot lightswitch28 Dashboard/longitudinal cables connection34 Switches control unit:A Alarm on warning lightB Rear fog lamps switchC Rear fog lamps relayD Rear fog lamps warning lightE Heated rear window switchF Heated rear window warning lightG Symbol light on switch assemblyH Front fog lamps warning lightI Front fog lamps switch39 Heated rear window46 Left horn47 Right horn70 Dashboard/front cables connection97 Headlamp washer pump98 Headlamp washer intermittent switch99 20A fuse protecting headlamp washer127 Front left cables/cable on relay bracketN.D. Ultrasound-soldered joint taped in wiring loomOR Dashboard/longitudinal cables connection■ CB7D , , MB70<strong>Brava</strong> onlyDashboard/front cables connectionThe cables involved in the wiring diagram are marked with a solid square14 Publication no. 506.670106
Btavo-<strong>Brava</strong>Model: 1910 100 BHPElectrical systemWiring diagrams55.Air conditioner - (See key following diagrams)»hflll|l|lll|IIM^40A60A 80A60AXoE]R238 X]237JHN 128RLRN^RN.ftBNf4154f?ll !■!TS—srL R L L BNN.D.170123AL.LN.D. ftRnlANnjnfif,Jf-AGN.D.HC122236-AG-ffl-AG-■flG-W-ft■ N -H- h172AG IJN131,1 i.l ll ,1|121[^N.D.AN AN127123 124 ImmfriLNIARII ARIAG AN| ns| NAN N AN BN+ M.El HRfl241' 13 AJ ;i■T10 ■ 11 ■JN.D22mas: 312: ?r-C3D3 ? 6 5 n 21 i?ianTpBCB E30j«/5*5C ml ■HIsio12 mISste-G-H- ca—»-CB-N.D.j «G CUIHRId rril (HIpS- ,IBNI L120E!R^TJ120 B208 [*]¥N | Gil|UG=bm210GR 1p 4l Pfiftj202209©RN AN^Ptf^-cu-fN.Dft2Q7203PHI UANI C [NN.D.206i ; T\N.D.»U NJJ to _ tn Ii205NO a55m(y wN1232235Copyright Fiat Auto 15
Electrical systemConnector blocks55.<strong>Bravo</strong>-<strong>Brava</strong> ffiBiCCFront/engine cables connection1 26 Front/air conditioner cables connection1 28 Front/air conditioner cables connectionVersion: 1910 100 BHPAir conditionerKey to components3 Power fuse box:A 60A fuse protecting fuel injection systemB 40Afuse protecting ignition systemC 60Afuse protecting additional optional extrasD 80A fuse protecting fuse and relay unit4 Fuse and relay unit:E1 Ignition switch discharge relay7 Stalk unit8 Front left earth9 Front right earth10 Battery earth on body shell11 Battery12 Ignition switch13 Front right/left cables connection22 Left dashboard earth55 Front/engine cables connection120 Air conditioner cables connection121 Three-stage pressure switch122 Engine cooling fan low speed control relay123 Engine cooling fan high speed timer123A Engine cooling fan high speed relay124 Air conditioner compressor relay126 Front/air conditioner cables connection127 Connection between front left cables/cable on relaybracket128 Front/air conditioner cables connection129 40A power fuse protecting engine cooling fan147 Compressor for air conditioner154 Engine cooling fan170 Cooling fan limiting resistor1 72 Two-stage thermostat202 Bulbs for lighting heater/air conditioner unit203 Air conditioner controls:A Switch for switching on air conditionerB Switch controlling air conditioner recirculation204 Relay controlling air conditioner electric fan 1st speed205 Air conditioner fan relay206 Heater/air conditioner electric fan207 Switch controlling speed of heater/air conditioner208 Limiting resistor for heater/air conditioner209 Actuator controlling external air/recirculation flap210 Electronic thermostat cables connection211 Electronic thermostat (N.T.C.)232 Compressor earth235 Air conditioner compressor cables connection236 Front/air conditioner cables connection237 Additional engine cooling fan238 40A fuse protecting engine cooling fan241 Fuel pump electronic control unitN.D. Ultrasound-soldered joint taped in wiring loom■1 07|RN237BN170B■ R154Connection between front left cables/cable on relay bracketAN 123 IAR123IThe cables involved in the wiring diagram are marked with a solid square16 Publication no. 506.670/06
<strong>Bravo</strong>-<strong>Brava</strong>Electrical systemWiring diagrams55.Model: 1910 75 BHPAir conditioner - (See key following diagrams)4"Hniiiiiinigfjr10 1140A60A80A60AXIher238 XI23? 154mL B L L BN170a123flJPN 128I J L m N.D.ITN.D. «»3QE Sff I ■—tJ ■'EH ANIAGJ faeN.U.AGNAll f|.122236-M-ffi-AG-172a [Ti, n~"ffi^T~121nm 233 RAN AN N.D. 123L w124 IHiKNINI 'iff, 441J I+ N.D.E I SfN.D.DDHi^i /JC15D s123 1L_3: 59 7 6 5 4 3 2 1 1713GNII CB E2212 US120S120 ■CULBTKj^-ii ri-^h208 [a]211X 203GBpNfUsJ202 ran©RH AHLbi&rf"HW-,tlfillHll C | N253203ffl 8? 37 85 B6d HN I IIG I^2491 2 3 i 5 6 7 8 3 1011^m(0 »?20655-13 S iji 235cu-tH.DjU "~tM . U .1 I N I N i "cvLN.D.H«J.. C "IN TjT- NaLtJ207^l5a*l)N204a232Copyright Fiat Auto 17
Electrical systemConnector blocks55.<strong>Bravo</strong>-<strong>Brava</strong>ECFront/engine cables connectionModel: 1910 75 BHPAir conditionerKey to components3 Power fuse box:A 60A fuse protecting fuel injection systemB 40A fuse protecting ignition systemC 60A fuse protecting additional optional extrasD 80A fuse protecting fuse and relay unit4 Fuse and relay unit:E1 Ignition switch discharge relay7 Stalk unit8 Front left earth9 Front right earth10 Battery earth on body shell11 Battery12 Ignition switch13 Front right/left cables connection22 Left dashboard earth55 Front/engine cables connection120 Air conditioner cables connection121 Three-stage pressure switch122 Engine cooling fan low speed relayEngine cooling fan high speed timerEngine cooling fan high speed relay124 Air conditioner compressor relay126 Front/air conditioner cables connection127 connection between front left cables/cable on relay brack-123123Aet128 Front/air conditioner cables connection129 40A power fuse protecting engine cooling fan147 Compressor for air conditioner154 Engine cooling fan170 Engine cooling fan limiting resistor172 Two-stage thermostat202 Bulbs lighting heater/air conditioner unit203 Air conditioner controls:A Switch for switching on air conditionerB Air conditioner recirculation switch204 Air conditioner fan 1 st speed relay205 Air conditioner fan relay206 Heater/air conditioner electric fan207 Heater/air conditioner speed control switch208 Limiting resistor for heater/air conditioner209 Actuator controlling exterior air/recirculation flap210 Electronic thermostat cables connection211 Electronic thermostat (N.T.C.)232 Compressor earth233 Thermostat on coolant pump235 Air conditioner compressor cables connection236 Front/air conditioner cables connection237 Additional engine cooling fan238 40A fuse protecting engine cooling fan249 E.G.R. electronic control unit253 Relay switching off compressorN.D. Ultrasound-soldered joint taped in wiring loom1 26 Front/air conditioner cables connection •1 Oft Front/air conditioner cables connection|RN237■ R1541 07 Connection between front left cables/cable on relay bracketThe cables involved in the wiring diagram are marked with a solid square18 Publication no. 506.670fi
<strong>Bravo</strong>-<strong>Brava</strong> IB 7DElectrical systemWiring diagrams55.Version: S -SXFuel level gauge and reserve warning light - Handbrake on/low brake fluid level warning light - Speedometer - Triprecorder/mileage counter and relevant reset button - Water temperature gauge - Lew engine oil pressure warning light -Front brake pad wear warning light - Heater plugs warning light - Rev counter - (See key following diagrams)eg fm[o_4Hlllllhi3MM MM600 400 600800YY YY560 56B - 19Not present on S versionVariant connection for soft versions (75cv)1 Variant connection for S versionCopyright Fiat Auto 19
Electrical systemConnector blocks55.<strong>Bravo</strong>-<strong>Brava</strong>13Front right/left cables connectionDash./longitudinal cables connection<strong>Brava</strong> onlyVersion: S - SXFront/engine cables connectionFuel level gauge and reserve warning light - Handbrake on/low brake fluid level warning light - Speedometer - Trip recorder/mileagecounter and relevant reset button - Water temperature gauge- Low engine oil pressure warning light - Frontbrake pad wear warning light - Heater plugs warning light - Rev counterKey to components3 Power fuse box:A 60A fuse protecting fuel injection systemB 40A fuse protecting ignition systemC 60A fuse protecting additional optional extrasD 80A fuse protecting fuse and relay unit4 Fuse and relay unit6 Instrument panel;B Low engine oil pressure warning lightJ Fuel reserve circuit control moduleJ1 Low fuel level warning lightK Fuel gauge0 Heater plugs warning lightQ Front brake pad wear warning lightR Handbrake on / low brake fluid level warning lightV Speedometer control moduleV1 SpeedometerW Rev counterX Coolant temperature gaugeZ Trip recorder / mileage counterZ1 Trip recorder reset button8 Front left earth9 Front right earth10 Battery earth on body shell11 Battery12 Ignition switch13 Front/left cables connection19 Rear right earth22 Left dashboard earth28 Dashboard/longitudional cables connection42 Right dashboard earth55 Front/engine cables connection56 Fuel gauge sender assemblyA Fuel level sensorB Electric fuel pump70 Dashboard/front cables connection88 Low brake fluid level sensor89 Left brake pad wear sensor89A Left brake pad wear sensor cables connection90 Handbrake on warning light switch137 Vehicle speed sensor142 Low oil pressure warning light switch158 Coolant temperature sensor for gauge201 Plug preheating control unit223 Wheel speed sensor228 Heater plugs241 Fuel pump electronic control unit249 E.G.R. electronic control unitN.D. Ultrasound-soldered joint taped in wiring loomN.D. for soft version (75cv)' 201 for soft version (75cv)(JB Instrument panelGR n.d..The cables involved in the wiring diagram are marked with a solid square20 Publication no. 506.670/06
<strong>Bravo</strong>-<strong>Brava</strong> QiElectrical systemWiring diagrams55.Version: SX - GTFuel level gauge and reserve warning light - Handbrake on/low brake fluid level warning light - Speedometer - Water temperaturegauge- Low engine oil pressure warning light - Front brake pad wear warning light - Heater plugs warning light -Rev counter - (See key following diagrams)4A37ZLP4A37ZL01Copyright Fiat Auto 21
Electrical systemConnector blocks55.<strong>Bravo</strong>-<strong>Brava</strong> A n>Front right/left cables connectionOftDash./longitudinal cables connectionCB7D , , MB 70<strong>Brava</strong> onlyFront/engine cables connectionVersion: SX - GTFuel level gauge and reserve warning light - Handbrake on/low brake fluid level warning light - Speedometer - Water temperaturegauge- Low engine oil pressure warning light - Front brake pad wear warning light - Heater plugs warning light -Rev counterKey to components3 Power fuse box:A 60A fuse protecting fuel injection systemB 40A fuse protecting ignition systemC 60A fuse protecting additional optional extrasD 80A fuse protecting fuse and relay unit4 Fuse and relay unit6 Instrument panel:B Low engine oil pressure warning lightJ Fuel reserve circuit control moduleJ1 Low fuel level warning lightK Fuel gaugeO Heater plugs warning lightQ Front brake pad wear warning lightR Handbrake on / low brake fluid IBVOI warning lightV Speedometer control moduleV1 SpeedometerW Rev counterX Coolant temperature gauge8 Front left earth9 Front right earth10 Battery earth on body shell11 Battery12 Ignition switch13 Front right/left cables connection19 Rear right earth28 Dashboard/longitudinal cables connection42 Right dashboard earth55 Front/engine cables connection56 Fuel gauge sender assemblyA Fuel level sensorB Electric fuel pump88 Low brake fluid level sensor89 Left brake pad wear sensor89A Left brake pad wear sensor cables connection90 Handbrake on warning light switch137 Vehicle speed sensor142 Low oil pressure warning light switch158 Coolant temperature sensor for gauge223 Wheel speed sensor241 Fuel pump electronic control unitN.D. Ultrasound-soldered joint taped in wiring loomCD Instrument panelGR n,d. _N22 .The cables involved in the wiring diagram are marked with a solid square4A40ZL22 Publication no. 506.670/06
<strong>Bravo</strong>-<strong>Brava</strong> «&Electrical systemWiring diagrams55.Version: EL - ELXFuel level gauge and reserve warning light - Handbrake on / law brake fluid level warning light - Speedometer - Triprecorder/mileage counter and relevant reset button - Water temperature gauge - Low engine oil pressure warning light -Front brake pad wear warning light - Heater plugs warning light - Rev counter - (See key fallowing diagrams)+ N.89 + LaK$ 89 @EC*■ HIIIII60A 40A60A80A137J~LTOT|A] 223158241e 15 9142iu- C B — • — C B -N.D.CB 91!4^^i 2 3 * 5111213U-C2J--C10J1N HG441 2 3 i 5 6 7 a 3ai L 4^4>B70N.D.■ H -•- H -HG L HRHBN R BR CL | Hn CHlHB GN BN NZ HRBN HR12 3 4 5 6 7 8 31011121314151617181920 12 3 4 5 5 7 8 91011121314151617131920 1 2 3 4 5 6 7 B28 I j - | " 'IN?90K[ ^42(ft)tt 6^vByM) 1912 O56A 56BCopyright Fiat Auto 23
Electrical systemConnector blocks55.<strong>Bravo</strong>-<strong>Brava</strong>13Front right/left cables connectionOftDash./longitudinal cables connectionCB 7D MB 70<strong>Brava</strong> onlyFront/engine cables connectionVersion: EL - ELXFuel level gauge and reserve warning light - Handbrake on/low brake fluid level warning light - Speedometer - Trip recorder/mileagecounter and relevant reset button - Water temperature gauge - Low engine oil pressure warning light - Frontbrake pad wear warning light - Heater plugs warning light - Rev counterKey to components3 Power fuse box:A 60A fuse protecting fuel injection systemB 40A fuse protecting ignition systemC 60A fuse protecting additional optional extrasD 80A fuse protecting fuse and relay unit4 Fuse and relay unit6 Instrument panel:B Low engine oil pressure warning lightJ Fuel reserve circuit control moduleJ1 Low fuel level warning lightK Fuel gaugeO Heater plugs warning lightQ Front brake pad wear warning lightR Handbrake on / low brake fluid level warning lightV Speedometer control moduleV1 SpeedometerW Rev counterX Coolant temperature gaugeZ Trip recorder/mileage counterZ1 Trip recorder reset button8 Front left earth9 Front right earth10 Battery earth on body shell11 Battery12 Ignition switch13 Front right/left cables connection19 Rear right earth28 Dashboard/longitudinal cables connection42 Right dashboard earth55 Front/engine cables connection56 Fuel gauge controllerA Fuel level sensorB Electric fuel pump70 Dashboard/front cables connection88 Low brake fluid level sensor89 Left brake pad wear sensor89A Left brake pad wear sensor cables connection90 Handbrake on warning light switch137 Vehicle speed sensor142 Low oil pressure warning light switch158 Coolant temperature sensor for gauge223 Wheel speed sensor241 Fuel pump electronic control unitN.D. Ultrasound-soldered joint taped in wiring loomCA Instrument panelCD Instrument panel■ n 70 ..._-. VN55Gn n.dIN 55 \■ flNsn ___j£j£^^HP>^CHNn.d.____J|OTJCn.tl. _ / ^ | | | sy^cir^L*^>■ IIGW / / / 4|ra_L/'■ HM55 J I. - BF189|MN 131CL 55 1. nvwsPJCN55 /1 1The cables involved in the wiring diagram are marked with a solid square24 Publication no. 506.670106
<strong>Bravo</strong>-<strong>Brava</strong>Version: S - SXElectrical systemWiring diagrams55.Instrument panel connections - (See key following diagrams)ft 4-ffif-14-1 10[a] nI 89 «* Not present on S version** Variant connection for soft versions (75cv) Variant connection for SX versionCopyright Fiat Auto 25
Electrical systemConnector blocks55.gA■ rwo■ LN55MBumInstrument panelgB Instrument panel■en n.d.■ N22<strong>Bravo</strong>-<strong>Brava</strong>OOfcWDashboard/longitudinal cables connectionCB7D .MB 70Version: S - SXInstrument panel connections<strong>Brava</strong> onlyFront/engine cables connectionKey to components3 Power fuse box:A 60A fuse protecting fuel injection systemB 40A fuse protecting ignition systemC 60A fuse protecting additional optional extrasD 80A fuse protecting fuse and relay unit4 Fuse and relay unit6 Instrument panel:A Low generator charge warning lightB Low engine oil pressure warning lightC Left direction indicator warning lightD Right direction indicator warning lightE Side lights warning lightF Instrument panel symbol lightsG Main beam headlamps warning lightH Air Bag fault warning lightI ABS fault warning lightJ Fuel reserve circuit control moduleJ1 Low fuel level warning lightK Fuel gaugeL Fiat CODE system fault warning lightM Fuel injection fault warning light0 Heater plugs warning lightQ Front brake pad wear warning lightR Handbrake on / low brake fluid level warning lightV Speedometer control moduleV1 SpeedometerW Rev counterX Coolant temperature gaugeZ Trip recorder / mileage counterZ1 Trip recorder reset button7 Stalk unit:D Headlamp flasher buttonE Dipped beam/main beam headlamps switchF Side lights switchH Direction indicators switch10 Battery earth on body shell11 Battery12 Ignition switch22 Left dashboard earth28 Dashboard/longitudinal cables connection42 Right dashboard earth55 Front/engine cables connection56 Fuel gauge controllerA Fuel level sensorB Electric fuel pump53 Lighting brightness adjustment rheostat70 Dashboard/front cables connection88 Low brake fluid level sensor89 Left brake pad wear sensor89A Left brake pad wear sensor cables connection90 Handbrake on warning light switch95 Front cables/A.B.S. cables connection114 Air Bag electronic control unit117 Air Bag/dashboard cables connection131 Fiat CODE electronic control unit137 Vehicle speed sensor142 Low oil pressure warning light switch143 Alternator153 Coolant temperature sensor for gauge181 Electrohydraulic control unit for anti-lock braking system (A.B.S.)201 Plug preheating control unit223 Wheel speed sensor228 Heater plugs241 Fuel pump control unit249 E.G.R. electronic control unitN.D. Ultrasound-soldered joint taped in wiring loomN.D. for soft version (75cv)201 for soft version (75cv)Front cables/A.B.S. cables connection 117 *'95 r Bag/dashboard cables connection26 Publication no. 506.670/06
<strong>Bravo</strong>-<strong>Brava</strong>Version: SX - GTElectrical systemWiring diagrams55.Instrument panel connections - (See key following diagrams)"£} [Ml «r HIIIIIIf] B9 Hmmmm4 |i ii «r"19 K 17 » 15 HL'i "b 4 fs *I "l44zuuI ? 3 * 5 6 7 8 3 101 2 1 i 5 1112:r 1 !-F^'^Tl2 3455 IQilll 5 J 3 ML HBCBI HRl IK HNlftS■t-t f"( 1^3 55CHI Htll LN HHfCLm| 117 suJf 956S -'H GR 6 L( •N.DM.D.+N.D. j f N.D.MJ HHJLN GRJCL HGI CN|HB fiU UrlJGrl BhiI H FINI N NZ HRlLGN.D2 3 4 7 3 3 lQnm3l
Electrical systemConnector blocks55.<strong>Bravo</strong>-<strong>Brava</strong>gD Instrument panel■GR n.d._■ N22 .OgDashboard/longitudinal cables connectionCB7D . MB 70<strong>Brava</strong> onlyVersion: SX - GTFront/engine cables connectionInstrument panel connectionsKey to components3 Power fuse box:A 60A fuse protecting fuel injection systemB 40A fuse protecting ignition systemC 60A fuse protecting additional optional extrasD 80A fuse protecting fuse and relay unit4 Fuse and relay unit6 Instrument panel:A Low generator charge warning lightB Low engine oil pressure warning lightC Left direction indicator warning lightD Right direction indicator warning lightE Side lights warning lightF Instrument panel symbol lightsG Main beam headlamps warning lightH Air Bag fault warning lightI Anti-lock braking system fault warning lightJ Fuel reserve circuit control moduleJ1 Low fuel level warning lightK Fuel gaugeL Fiat CODE fault warning lightM Fuel injection fault warning light0 Heater plugs warning lightQ Front brake pad wear warning lightR Handbrake on / low brake fluid warning lightV Speedometer control moduleV1 SpeedometerW Rev counterX Coolant temperature gauge7 Stalk unit:D Headlamp flasher buttonE Dipped beam/main beam headlamps switchF Side lights switchH Direction indicators switch10 Battery earth on body shell11 Battery12 Ignition switch22 Left dashboard earth28 Dashboard/longitudinal cables connection42 Right dashboard earth55 Front/engine cables connection56 Fuel gauge controllerA Fuel level sensorB Electric fuel pump58 Lighting brightness adjustment rheostat88 Low brake fluid level sensor89 Left brake pad wear sensor89A Left brake pad wear sensor cables connection90 Handbrake on warning light switch95 Front cables/anti-lock braking system (A.B.S.) connection114 Air Bag electronic control unit117 Air Bag/dashboard cables connection131 Fiat CODE electronic control unit137 Vehicle speed sensor142 Low oil pressure warning light switch143 Alternator158 Coolant temperature sensor for gauge181 Electrohydraulic control unit for anti-lock braking system (A.B.S.)223 Wheel speed sensor241 Fuel pump electronic control unitN.D. Ultrasound-soldered joint taped in wiring loomQC Front cables/anti-lock braking system(A.B.S.) cables connection117 ^' r Bag/dashboard cables connection28 Publication no. 506.670/06
<strong>Bravo</strong>-<strong>Brava</strong> B 7B Electrical systemWiring diagrams55.Version: EL - ELXInstrument panel connections - (See key following diagrams)mVariant connection for versions without alarm (see door locking)Copyright Fiat Auto 29
Electrical systemConnector blocks55.<strong>Bravo</strong>-<strong>Brava</strong>gD Instrument panel■en n.d.NN22 .Og Dashboard/longitudinal cables connectiontW CB7D_MB70<strong>Brava</strong> onlyVersion: EL - ELXFront/engine cables connectionInstrument panel connectionsKey to components3 Power fuse box:A 60A fuse protecting fuel injection systemB 40A fuse protecting ignition systemC 60A fuse protecting additional optional extrasD 80A fuse protecting fuse and relay unit4 Fuse and relay unit6 Instrument panel:A Low generator charge warning lightB Low engine oil pressure warning lightC Left direction indicator warning lightD Right direction indicator warning lightE Side lights warning lightF Instrument panel symbol lightsG Main beam headlamps warning lightH Air Bag fault warning lightI Anti-lock braking system fault warning lightJ Fuel reserve circuit control moduleJ1 Low fuel level warning lightK Fuel gaugeL Fiat CODE system fault warning lightM Fuel injection fault warning lightO Heater plugs warning lightQ Front brake pad wear warning lightR Handbrake on/low brake fluid level warning lightS Stop lights fault indicator electronic controlmoduleT Stop lights fault warning lightU Doors open warning lightV Speedometer control moduleVI SpeedometerW Rev counterX Coolant temperature gaugeZ Trip recorder/mileage counterZ1 Trip recorder reset button7 Stalk unit:D Flasher buttonE Dipped beam/main beam headlamps switchF Side lights switchH Direction indicators switch10 Battery earth on body shell11 Battery12 Ignition switch16 Rear left lights cluster17 Rear right lights cluster22 Left dashboard earth28 Dashboard/longitudinal cables connection40 Stop lights switch42 Right dashboard earth55 Front/engine cables connection56 Fuel gauge controllerA Fuel level sensorB Electric fuel pump58 Lighting brightness adjustment rheostat70 Dashboard/front cables connection88 Low brake fluid level sensor89 Left brake pad wear sensor89A Left brake pad wear sensor cables connection90 Handbrake on warning light switch95 Front cables/anti-lock braking system (A.B.S.) cables connection100 Alarm electronic control unit114 Air Bag electronic control unit117 Air Bag/dashboard cables connection131 Fiat CODE electronic control unit137 Vehicle speed sensor142 Low oil pressure warning light switch143 Alternator158 Coolant temperature sensor for gauge181 Electro hydraulic control unit for anti-lock braking system (A.B.S.)223 Wheel speed sensor241 Fuel pump electronic control unitN.D. Ultrasound-soldered joint taped in wiring loomQC Front/anti-lock braking system (A.B.S.)cables connection1 •! 7 Air Bag/dashboard cables connection■ LGRBAR 13330 Publication no. 506.670/06
<strong>Bravo</strong>-<strong>Brava</strong> ty TD Electrical systemConnector blocks55.CONNECTOR BLOCKS *INTRODUCTIONpageInterpretation of the codes on the connectorblocks 58Wiring colour code 58Connector blocks 59* With regard to the 1910 Turbo D engine,the connector blocks have been added fromthe previous publication; for aspects not covered,refer to the <strong>Bravo</strong>-<strong>Brava</strong> publication no.506.670/02.Copyright Fiat Auto 31
Electrical system <strong>Bravo</strong>-<strong>Brava</strong> ^TDConnector blocks55.iniTRC DUCTS OniInterpretation of the codes on the connectorblocksA Connector block identificationnumber referring to the wiring diagramsBCable colour identification codeCIdentification number of the cable'sdestination blockDThe abbreviation n.d. identifies anultrasound-soldered joint taped intothe wiring loomP4A58ZL01Cable colour codesABCGHLMNRSVZABAGANARAVLight blueWhiteOrangeYellowGreyBlueBrownBlackRedPinkGreenPurpleLight blue -WhiteLight blue ■YellowLight blue ■BlackLight blue ■RedLight blue ■GreenBGBLBNBRBVBZCACBCIMGIMGLGRGVHGHNHRHVWhite-YellowWhite-BlueWhite-BlackWhite-RedWhite-GreenWhite-PurpleOrange-Light blueOrange-WhiteOrange-BlackYellow-BlackYellow-BlueYellow-RedYellow-GreenGrey-YellowGrey-BlackGrey-RedGrey-GreenLBLGLNLRLVMBMNIMZRBRGRNRVSNVBVNVRZBBlue-WhiteBlue-YellowBlue-BlackBlue-RedBlue-GreenBrown-WhiteBrown-BlackBlack-PurpleRed-WhiteRed-YellowRed-BlackRed-GreenPink-BlackGreen-WhiteGreen-BlackGreen-RedPurple-White4A58ZL32 Publication no. 506.670/06
<strong>Bravo</strong>-<strong>Brava</strong> Ifpi TO236 Front/air conditioner cables connecti onElectrical systemConnector blocks55.037 Additional engine cooling fanN172238 ^^ ^use P rotect ' n 9 engine cooling fan 239 Heated diesel filter control relayR127NZ12724.H 20A fuse protecting heated diesel filtercontrol relay242 Fuel injection control relayRn.dN222243 Engine advance adjustment solenoid 244 Fast idle adjustment solenoidCopyright Fiat Auto 33
Electrical systemConnector blocks55.<strong>Bravo</strong>-<strong>Brava</strong> ^ TD241 ^ue ' P um P electronic control unitSB 244.245E.G.R. solenoid246Heated fuel filterHV249* HV241Variant connections for 100 BHP version247Heated fuel filter thermal contact 248 Potentiometer on fuel pumpGn.d.*-V241 *-G249V249AR241 *-AR249Variant connections for 100 BHP version34 Publication no. 506.670/06
<strong>Bravo</strong>-<strong>Brava</strong> ^ TD249E.G.R. electronic control unitElectrical systemConnector blocks55.250 Water temperature sensor for preheatingcontrol unitG 248.VG 157 .B n.d..iflF^lrIffi). AR 248. MG55EKBtHEIig 131*1 ElmR n.d. __fT _ HV 245BR 139N222V248.Cn.d.251Thermal switch for K.S.B.252Earth for K.S.B. deviceC251253 R e ' av f° r switching off compressorCopyright Fiat Auto 35
Key to compnents:3 Power fuse box:A 60A fuse protecting fuel injection systemB 40A fuse protecting ignition systemC 60A fuse protecting additional optionalextrasD 80A fuse protecting fuse and relay unit4 Fuse and relay unit:E1 Ignition switch discharge relayE2 Horn relayE3 Heated rear window relay6 Instrument panel:A Low generator charge warning lightB Low engine oil pressure warning lightC Left direction indicator warning lightD Right direction indicator warning lightE Side lights warning lightF Instrument panel symbol lightsG Main beam headlamps warning lightH Air Bag fault warning lightI Anti-lock braking system fault warninglightJ Fuel reserve circuit control moduleJ1 Low fuel level warning lightK Fuel gaugeL Fiat CODE fault warning lightM Fuel injection fault warning light0 Heater plugs warning lightQ Front brake pad wear warning lightR Handbrake on / low brake fluid levelwarning lightS Stop lights fault indicator electroniccontrol moduleT Stop lights fault warning lightU Door open warning lightV Speedometer control moduleVI SpeedometerW Rev counterX Water temperature gaugeZ Trip recorder/mileage counterZ1 Trip recorder reset button7 Stalk unit:A Windscreen wiper speed switchB Windscreen wash/headlamp wash/rear window wash switchC Rear window wiper switchD Headlamp flasher buttonE Dipped beam/main beam headlampsF Side lights switchG Indicators/hazard lights intermittentswitchH Direction indicators switchI Horn button8 Front left earth9 Front right earth10 Battery earth on body shell11 Battery12 Ignition switch13 Front right/left cables connection18 Rear left earth19 Rear right earth22 Left dashboard earth24 Windscreen wiper motor25 Windscreen/rear window washer pump26 Rear window wiper motor27 Rear connections contact assembly withbuilt-in boot light switch28 Dash./longitudinal cables connection34 Switch controls unit:A Alarm on warning lightB Rear fog lamps switchC Rear fog lamps relayD Rear fog lamps warning lightE Heated rear window switchF Heated rear window warning lightG Switch controls unit symbol lightH Front fog lamps warning lightI Front fog lamps switch39 Heated rear window42 Right dashboard earth46 Left horn47 Right horn55 Front/engine cables connection55A Front left/engine cables connection55C Front left/engine cables connection4A64ZL
56 Fuel gauge controllerA Fuel level sensorB Electric fuel pump57 Inertial switch58 Lighting brightness adjustment rheostat70 Dash./front cables connection88 Low brake fluid level sensor89 Left brake pad wear sensor89A Left brake pad wear sensor cables connection90 Handbrake on warning light switch95 Front/anti-lock braking system (A.B.S.)cables connection97 Headlamp washer pump98 Headlamp washer intermittent switch99 20A fuse protecting headlamp washer114 Air Bag electronic control unit117 Air Bag/dashboard cables connection120 Air conditioner cables connection121 Three-stage pressure switch122 Engine cooling fan low speed relay123 Engine cooling fan high speed timer123A Engine cooling fan high speed relay124 Air conditioner compressor relay126 Front/air conditioner cables connection127 Connection between front left cables/cableon relay bracket128 Front/air conditioner cables connection129 40A power fuse protecting engine coolingfan131 Fiat CODE electronic control unit137 Car speed sensor139 Diagnostic socket for fuel injection142 Low oil pressure warning light switch143 Alternator145 Starter motor147 Compressor for air conditioner152 10A fuse protecting fuel injection154 Engine cooling fan157 Water temperature sensor for fuel injection158 Water temperature sensor for gauge170 Engine cooling fan limiting resistor171 Heater unit172 Two-stage thermostat181 Electrohydraulic control unit for anti-lockbraking system (A.B.S.)192 Air temperature sensor200 Inertial switch relay201 Plug preheating control unit202 Heater/air conditioner light bulbs203 Air conditioner controls:ABSwitch for switching on air conditionerAir conditioner recirculation controlswitch204 Engine cooling fan 1st speed control relay205 Air conditioner fan control relay206 Heater/air conditioner fan207 Heater/air conditioner speed controlswitch208 Heater/air conditioner limiting resistor209 Actuator controlling exterior air/recirculation210 Electronic thermostat cables connection211 Electronic thermostat (N.T.C.)222 Earth for fuel system223 Wheel speed sensor224 Instrumented fuel injector225 Flowmeter226 Diagnostic socket for Fiat CODE system228 Heater plugs229 Engine cut-out electrostop232 Compressor earth233 Thermostat on coolant pump235 Air conditioner compressor cables connection236 Front/air conditioner cables connection237 Additional engine cooling fan238 40A fuse protecting engine cooling fan239 Heated diesel filter relay240 20A fuse protecting heated diesel filter relay241 Fuel pump electronic control unit242 Fuel injection control relay243 Engine advance adjustment solenoid244 Fast idle solenoid245 E.G.R. solenoid246 Heated fuel filter247 Heated fuel filter thermal contact248 Potentiometer on fuel pump249 E.G.R. electronic control unit250 Water temperature sensor for preheatingcontrol unit251 K.S.B. thermal switch252 K.S.B. earth.253 Relay for switching off compressorN.D. Ultrasound-solderedwiring loomjoint taped intoCable colour code:ABCGHLMNRSVZABAGANARAVBGBLBNBRBVBZCACBCNGNGLGRGVHGHNHRHVLBLGLNLRLVMBMNNZRBRGRNRVSNVBVNVRZBLight blueWhiteOrangeYellowGreyBlueBrownBlackRedPinkGreenPurpleLight blue-WhiteLight blue-YellowLight blue-BlackLight blue-RedLight blue-GreenWhite-YellowWhite-BlueWhite-BlackWhite-RedWhite-GreenWhite-PurpleOrange-Light blueOrange-WhiteOrange-BlackYellow-BlackYellow-BlueYellow-RedYellow-GreenGrey-YellowGrey-BlackGrey-RedGrey-GreenBlue-WhiteBlue-YellowBlue-BlackBlue-RedBlue-GreenBrown-WhiteBrown-BlackBlack-PurpleRed-WhiteRed-YellowRed-BlackRed-GreenPink-BlackGreen-WhiteGreen-BlackGreen-RedPurple-White
<strong>Bravo</strong>-<strong>Brava</strong>^Electrical systemContents55.pageElectrical symbols 1How to read the wiring diagrams 4Wiring diagrams 5Key to wiring diagrams 37Copyright Fiat Auto
Electrical systemWiring diagrams55]<strong>Bravo</strong>-<strong>Brava</strong>^>'98 rangeNAMES<strong>Bravo</strong>SXS<strong>Brava</strong>SX ELELX1581 16v 1581 16v 1581 16v 1581 16v 1581 16v 1581 16vSide lights and warning lamp - Dipped beam headlamps - Main beam headlamps and warning light - Parking lights - Numberplate lights -555555Front fog lamps and warning light - Rear fog lamps and warning light777777Version with air conditionerEngine cooling system - Water temperature gauge999999Anti-lock braking system (A.B.S.) and fault warning light - Hand brake on/low brake fluid level warning light111111111111Fiat-CODE system and fault warning light131313131313Starting - Electronic ignition and fuel injection - Recharging and warning light - Low engine oil pressure warning light - Fuel injectionfault warning light - Rev counter151515151515Model without air conditionerEngine cooling system - Water temperature gauge - Car interior ventilation171717171717Direction indicators and warning lamp - Hazard warning lights and warning lamp - Stop lights - Reversing lights191919192121Fuel level gauge and reserve warning light - Hand brake on/low brake fluid level warning light - Speedometer - Trip recorder/totalmileage counter and trip recorder reset button - Water temperature gauge - Low engine oil pressure warning light - Rev counter -Front brake pad wear warning light232323232525Air conditioner272727272727Courtesy light - Symbol illumination292929292929Instrument panel connections313131313333Diagnostic socket connections353535353535Copyright Fiat Auto
<strong>Bravo</strong>-<strong>Brava</strong>Electrical systemWiring diagrams55.Electrical symbols-:oo~Side lights\AChoke (starter)3D -15'- 1 1 Switch discharge=DMain beamWater in fuelfiltertoDipped headlampsHeated seatffiHeater plugIndicators flashingwith central door lockingMSeat beltsR&JCompressor turbopressureElectric horns444Heated rear windowaRear fog lampsWindscreen wiper
Electrical systemWiring diagrams55.<strong>Bravo</strong>-<strong>Brava</strong>Electrical symbolsWarning light
<strong>Bravo</strong>-<strong>Brava</strong>Electrical symbolsElectrical systemWiring diagrams55.388Digital speedometerDigital rev counter_ BIIIIIIIIIIIIIDigital fuel gauge%^L Analogue fuel gaugehMARC*IUiyAnalogue coolant temperaturegaugeEconometerminiDigital coolant temperaturegaugeKLEJEngine oil temperature5^Engine oil pressure gaugeVoltmeterCopyright Fiat Auto 3
Electrical systemWiring diagrams55.How to read the wiring diagrams<strong>Bravo</strong>-<strong>Brava</strong>177,n 104HIIIIIK"'■ R »11 50 50 50 ""179 (OJOil yR nn B34^rARN.D. RNl•RN-^-RN- 1 L40STOPR —p96II-AR-RNRURURN95BBEI 181-RU —£•16R -fi I—6-1?12 3 4 5 6 7 8 910111213MCBCBf N.D.C CBf±5LJ3r*rtttists posmiftJB12AR*N.D.AR*AR AR RUi 17 19» 1N.D.*NZNZn -;•■ 20I■ 21• 9• 22• 10-£•23■ 11—
<strong>Bravo</strong>-<strong>Brava</strong>'98 rangeElectrical systemWiring diagrams55.Side lights and warning lamp - Dipped beam headlamps - Main beam headlamps and warning light - Parking lights -Number plate lights -Location of components
Electrical systemConnections55.<strong>Bravo</strong>-<strong>Brava</strong>''98 rangeFront left lights clusterDipped beam relay6BInstrument panelConnection between front right/left cablesSide lights and warning lampNumber plate lightsDipped beam headlamps - Main beam headlamps and warning light - Parking lights -Key to components1 Front left lights cluster2 Front right lights cluster3 Power fuse box:A 30A fuse protecting fuel injectionB 40A fuse protecting ignitionC 60A fuse protecting additional optional extrasD 80A fuse protecting fuse and relay unit4 Fuse and relay unit5 Dipped beam relay6 Instrument panel:E Side lights warning lightG Main beam headlamps warning light7 Stalk unit:D Flasher buttonE Main beam/dipped beam headlamps stalkF Side lights stalk8 Front left earth9 Front right earth10 Battery earth on body shell11 Battery12 Ignition switch1 3 Connection between front right/left cables14 Left number plate light15 Right number plate light16 Rear left lights cluster17 Rear right lights cluster18 Rear left earth19 Rear right earth22 Left dashboard earth286 Short-circuiting connectionN.D. Ultrasound-soldered joint taped in wiringloom16Rear lights clusterOnly for <strong>Bravo</strong>Only for <strong>Brava</strong>The cables involved in the wiring diagram are marked by a solid squarePublication no. 506.670/74
<strong>Bravo</strong>-<strong>Brava</strong>'98 rangeElectrical systemWiring diagrams55.Front fog lamps and warning light - Rear fog lamps and warning lightLocation of componentssN V ®4--m.il IN.D.30A40AU60A80AL29N.D.-M-7»-N-N.D., , E f-cl70 ^ 33 ^WElMMMm 30 16 T/m >*%^\^SJ)^o ^£EEE■IT"iir/18 «h®- NN-dH" 19Not present on <strong>Bravo</strong>Copyright Fiat Auto 7
Electrical systemConnections55.OQFront/front fog lamps cables connection30Front left fog lamp<strong>Bravo</strong>-<strong>Brava</strong> ®'98 range31Front right fog lamp32Front fog lamp relayFront fog lamps and warning light - Rear fog lamps and warning light3320A fuse protecting front fog lamps34Switches controls unitKey to components3 Power fuse box:A 30A fuse protecting fuel injectionB 40A fuse protecting ignitionC 60A fuse protecting additional optional extrasD 80A fuse protecting fuse and relay unit4 Fuse and relay unit7 Stalk unit:D Flasher buttonE Dipped beam/main beam headlamps stalkF Side lights stalk8 Front left earth10 Battery earth on body shell11 Battery12 Ignition switch16 Rear left lights cluster17 Rear right lights cluster18 Rear left earth19 Rear right earth22 Left dashboard earth29 Front/front fog lamps cables connection30 Front left fog lamp31 Front right fog lamp32 Front fog lamp relay33 20A fuse protecting front fog lamps34 Switch controls unit:A Alarm on warning lightB Rear fog lamps switchC Rear fog lamps relayD Rear fog lamps warning lightE Heated rear window switchF Heated rear window warning lightG Switch controls unit symbol lightH Front fog lamps warning lightI Front fog lights switch70 Dashboard/front cables connection286 Short-circuiting connection287 Short-circuiting connectionN.D. Ultrasound-soldered joint taped in wiringloomDashboard/front cables connectionNot present on S version** Applies only to EL/ELX versionThe cables involved in the wiring diagram are marked with a solid squarePublication no. 506.670/14
<strong>Bravo</strong>-<strong>Brava</strong>'98 rangeVersion with air conditionerEngine cooling system - Water temperature gaugeElectrical systemWiring diagrams55.Location of componentsN"hfiMWfc— KN—I40A 30A 80A 6M129 154170uRN R R B-. -Lit 283m122 123A^ffi:5 ]I. A *, ■-i JN ARit l i — i l ,LJ ABBN.D. i-BN i-BhI—RVG — J .il120ICN.D. f c-c-c 1127N.D.m 195nARI-jprCBCB»I5/5
Electrical systemConnections55.6 A - B - CInstrument panel<strong>Bravo</strong>-<strong>Brava</strong>'98 rangeIHB5513Front right/left cables connection120Air conditioner cables connectionVersion with air conditionerEngine cooling system - Water temperature gaugeKey to components3 Power fuse box:30A fuse protecting fuel injectionB 40A fuse protecting ignitionC 60A fuse protecting additional optionalextrasD 80A fuse protecting fuse and relay unit4 Fuse and relay unit:E1 Ignition switch discharge relay6 Instrument panel:X Water temperature gauge8 Front left earth10 Battery earth on body shell11 Battery12 Ignition switch42 Right dashboard earth55 Connection between front cables/fuel gaugecontrol120 Air conditioner121 Three-stage pressure switch1 22 Engine cooling fan low speed control relay123A Engine cooling fan high speed control relay127 Connection between front left cables/cableon relay carrier bracket1 28 Front/air conditioner cables connection1 29 50A power fuse protecting engine coolingfan154 Engine cooling fan170 Engine cooling fan limiting resistor195 Ignition/fuel injection electronic controlunit (1581)279 Engine coolant temperature double senderunit283 Front cable/resistor connectionN.D. Ultrasound-soldered joint taped in wiringloom1 07 Connection between front left cables/cable on relay carrier bracketP4A1 8EL0110 Publication no. 506.670/74
<strong>Bravo</strong>-<strong>Brava</strong>'98 rangeElectrical systemWiring diagrams55.Anti-lock braking system (A.B.S.) and fault warning light - Hand brake on/low brake fluid level warning lightLocation of components177© 4?-HH.'ili|iHF'10 N7tX B ^3OA40A 60A80A179M B94r{10AM L®40IBNccN.D. RN|rRN-^-RN- 1 L-RN-- R -r"2 3*5578 910 1112 U MCBAR|AR*HBNBNN.biBNRNclRVh 95• 3-RV--BNf.15T-7T"■17M- -6181€•»N -"■1 ■ 11,,0;,f N.D.J H>PTfjr(0)17812 SS•c-»—c -N.D.+ N.D.* AR _ AR RV BNEft gift Bit,17 I! !Variant connections for EL - ELX versionsN.D. k +R - -■!• 10■11■11—e- 36■ i: ,—1176+-« NZ-55ZJU 174N N.D.180 (©)da l^^M^^^X~7>^kJ rJ^i ) Wff\ YWQ ^J8ify/^HJffiggPS^STL/MM5 \j n 'MrTfay-d^X^M^If FTG^riSr^Copyright Fiat Auto 11
Electrical systemConnections55.<strong>Bravo</strong>-<strong>Brava</strong>'98 rangeQ/l^^5A fuse protecting anti-lock braking systern(A.B.S.)95Front cables/anti-lock braking system(A.B.S.) connection>i TC Diagnostic socket for anti-lock braking1 # wsystem (A.B.S.)1 80 Sensor on rear right wheel for anti-lockbraking system (A.B.S.)1 1 Anti-lock braking system (ABS) electronic control unitAnti-lock braking system (A.B.S.) and fault warning light - Hand brake on/low brake fluid level warning lightKey to components3 Power fuse box:A 50A fuse protecting fuel injectionB 50A fuse protecting ignitionC 50A fuse protecting additional optional extrasD 80A fuse protecting fuse and relay unit4 Fuse and relay unit6 Instrument panel:I Hand brake on/low brake fluid warning light8 Front right earth10 Battery earth on body shell11 Battery12 Ignition switch40 Stop lights switch88 Low brake fluid level sensor94 5A fuse protecting anti-lock braking system(A.B.S.)95 Front cables/anti-lock braking system(A.B.S.) connection96 60A fuse protecting electrical system174 Power earth for anti-lock braking system(A.B.S.)176 Diagnostic socket for anti-lock braking system(A.B.S.)177 Sensor on front left wheel for anti-lock brakingsystem (A.B.S.)178 Sensor on rear left wheel for anti-lock brakingsystem (A.B.S.)179 Sensor on front right wheel for anti-lockbraking system (A.B.S.)180 Sensor on rear right wheel for anti-lock brakingsystem (A.B.S.)181 Anti-lock braking system (ABS) electroniccontrol unit.)N.D. Ultrasound-soldered joint taped in wiringloomThe cables involved in the wiring diagram are marked with a solid square12 Publication no. 506.670/74
<strong>Bravo</strong>-<strong>Brava</strong> IB|'98 rangeFiat-CODE system and fault warning lightElectrical systemWiring diagrams55.Location of components104H11 Hill--40A30A60A80A131I I I I I I i 2 3 4 5 6 7a ;;A Al l» il [■ ■*.*.* ■ ]■■ ml w rWE199in282N.D. 1 Si srR R RNII*-' 2 3 4 5 6 7 G 91011121]N.D.iAR|AR*195N.D.I I UN I N S C N NM RN.D..,„ I I I-N-»-N-HM-"w280sCCB■m= N.D.fS^a^ 4; m12 m—©-N.D.**=®1*N1— NftN- N-(S)Hl.Variant connections for EL - ELX versionsCopyright Fiat Auto 13
Electrical systemConnections55.Fuse and relay unitC AInstrument panel<strong>Bravo</strong>-<strong>Brava</strong> ®'98 rangeApplies only to S/SX versionApplies only to EL/ELX versionBCInstrument panel131Fiat-CODE electronic control unit1 39 Diagnostic socket for fuel injectionFiat-CODE system and fault warning lightKey to components-=H— MN6AI3 Power fuse box:A 30A fuse protecting fuel injectionB 40A fuse protecting ignitionC 60A fuse protecting additional optional extrasD 80A fuse protecting fuse and relay unit4 Fuse and relay unit6 Instrument panel:L Fiat-CODE fault warning light9 Front right earth10 Battery earth on body shell11 Battery12 Ignition switch13 Right/left cable connection131 Fiat-CODE electronic control unit139 Diagnostic socket for fuel injection195 Ignition/fuel injection electronic control unit(1581)199 Aerial for Fiat-CODE system280 7.5 A fuse protecting ignition switch282 7.5 A fuse protecting Fiat-CODE/electronicfuel injectionN.D. Ultrasound-soldered joint taped in wiringloom280 7.5A f uge protecting ignition switch282 7.5A ' use protecting Fiat-CODE/electronicfuel injectionThe cables involved in the wiring diagram are marked with a solid square14 Publication no. 506.670/14
<strong>Bravo</strong>-<strong>Brava</strong>'98 rangeElectrical systemWiring diagrams55.Starting - Electronic ignition and fuel injection - Recharging and warning light - Low engine oil pressure warning light -Fuel injection fault warning light - Rev counter-HvfliiiiiF""8 >iH§)-KZ-C^fri
Electrical systemConnections55.CAInstrument panel6BInstrument panel<strong>Bravo</strong>-<strong>Brava</strong>'98 range55AFront left/engine cables connectionP4A27EL01Starting - Electronic ignition and fuel injection - Recharging and warning light - Low engine oil pressure warning light -Fuel injection fault warning light - Rev counterKey to components3 Power fuse box:A 30A fuse protecting fuel injectionB 40A fuse protecting ignitionC 60A fuse protecting additional optional extrasD 80A fuse protectiing fuse and relay unit4 Fuse and relay unit6 Instrument panel:A Low generator recharging warning lightB Low engine oil pressure warning lightM Fuel injection fault warning lightW Rev counter9 Front right earth10 Battery earth on body shell11 Battery1 2 Ignition switch13 Front right/left cables connection19 Rear right earth42 Right dashboard earth55 Front cables/fuel gauge control connection56 Fuel gauge control unitA Fuel gauge sensorB Electric fuel pump57 Inertial switch121 Three-stage pressure switch131 Fiat-CODE electronic control unit132 Petrol vapours cut-off solenoid (canister)136 Knock sensor1 37 Car speed sensor138 Idle adjustment actuator139 Diagnostic socket for fuel injection141 Heated Lambda probe142 Low oil pressure warning light switch143 Alternator144 Rpm and T.D.C. sensor145 Starter motor146 Potentiometer on throttle valve150 Fuel injection control relay155 Ignition coils assembly156 Spark plugs162 Fuel injector (1st)163 Fuel injector (2nd)1 64 Fuel injector (3rd)165 Fuel injector (4th)1 94 Fuel injection cables/fuel injector flange connection195 Ignition/fuel injection electronic control unit (15S1)278 Integrated air temperature/pressure sender unit279 Engine coolant temperature double sender unit280 7.5A fuse protecting ignition switch281 30A fuse protecting Lambda probe/canister solenoid282 7.5injectionfuse protecting Fiat-CQDE/electronic194Fuel injection cables/injector flange connectionP4A2BEL01The cables involved in the wiring diagram are marked with a solid square16 Publication no. 506.670/74
<strong>Bravo</strong>-<strong>Brava</strong>'98 rangeElectrical systemWiring diagrams55.Model without air conditionerEngine coaling system - Water temperature gauge - Car interior ventilationo 4HIIIII3-r W129S]154284H AGH30A40A60A8OAC+ N.D.c55 E:E1 IS^iSI-AN—•—AN-N.D.1413121110 9 B 1 6 b 4 5T'Tff'fBAR AG N CB G■i-^-GNm^^m171N.D."T"206 [*]202MM|]5/H|»caCBN.D.L5L***|«/i eslpcc12 O?®hrCBAG* N *HB NZ AR ARl42 207N.D.1G&-GR-" N.D.n1VG|RBVGlAN 6d208* Variant connections for EL - ELX versions** See side lights diagramCopyright Fiat Auto 17
Electrical systemConnections55.<strong>Bravo</strong>-<strong>Brava</strong>'98 rangeCA CD e r Instrument panel1 29 ^^ power fuse protecting engine coolingfan1 Cri Engine cooling fan171Heater unit cables connectionEngine cooling system - Water temperature gauge - Car interior ventilationKey to components3 Power fuse box:A 30A fuse protecting fuel injectionB 40A fuse protecting ignitionC 60Afuse protecting additional optional extrasD 80A fuse protecting fuse and relay unit4 Fuse and relay unitE1 Ignition switch discharge relay6 Instrument panel:X Coolant temperature gauge7 Stalk unit8 Front left earth10 Battery earth on body shell11 Battery12 Ignition switch22 Left dashboard earth42 Right dashboard earth55 Front cables/fuel gauge control connection129 50A power fuse protecting engine coolingfan154 Engine cooling fan1 71 Heater unit195 Ignition/fuel injection electronic control unit(1581)202 Heater/air conditioner light bulbs206 Heater/air conditioner electric fan207 Heater/air conditioner speed control switch208 Limiting resistor for heater/air conditioner279 Engine coolant temperature double senderunit284 Engine cooling fan relayN.D. Ultrasound-soldered joint taped in wiringloom207 Electric fan speed control switch 07Q Engine coolant temperature double sender* # 3 unitThe cables involved in the wiring diagram are marked with a solid square18 Publication no. 506.670/74
<strong>Bravo</strong>-<strong>Brava</strong>'98 rangeElectrical systemWiring diagrams55.Version: S - SXDirection indicators and warning lamp - Hazard warning lights and warning lamp - Stop lights - Reversing lightsN-®Hi' 19 ' 7Not present on <strong>Bravo</strong>Copyright Fiat Auto 19
Electrical systemConnections55.6AInstrument panel22Left dashboard earth<strong>Bravo</strong>-<strong>Brava</strong>i'98 rangeAN4HI13Front right/left cables connectionVersion: S - SXDirection indicators and warning lamp - Hazard warning lights and warning lamp - Stop lights - Reversing lightsA'l AAdditional stop light rear cables connectionKey to components1 Front left lights cluster2 Front right lights cluster3 Power fuse box:A 30A fuse protecting fuel injectionB 40A fuse protecting ignitionC 60A fuse protecting additional optional extrasD 80A fuse protecting fuse and relay unit4 Fuse and relay unit6 Instrument panel:C Left direction indicator warning lightD Right direction indicator warning light7 Stalk unit:H Direction indicators stalkI Horn button8 Front left earth9 Front right earth10 Battery earth on body shell11 Battery12 Ignition switch13 Front right/left cables connection16 Rear left lights cluster17 Rear right lights cluster18 Rear left earth19 Rear right earth20 Front left side repeater21 Front right side repeater22 Left dashboard earth23 Hazard lights switch unitA Hazard warning lights warning lampB Hazard lights control switchC Hazard lights unit symbol light40 Stop lights switch41 Additional stop light41A Additional stop light rear cables connection1 59 Reversing lights switchN.D. Ultrasound-soldered joint taped in wiringloomThe cables involved in the wiring diagram are marked with a solid squareP4A36EL0120 Publication no. 506.670/14
<strong>Bravo</strong>-<strong>Brava</strong>'98 rangeElectrical systemWiring diagrams55.Version: EL - ELXDirection indicators and warning lamp - Hazard warning lights and warning lamp - Stop lights - Reversing lightsN-(§H' 19Not present on <strong>Bravo</strong>Copyright Fiat Auto 21
Electrical systemConnections55.<strong>Bravo</strong>-<strong>Brava</strong> I'98 range6BInstrument panel6CInstrument panel13Front right/left cables connectionVersion: EL - ELXDirection indicators and warning lamp - Hazard warning lights and warning lamp - Stop lights - Reversing lightsRear right earth Af A Additional stop light rear cables connec-19^'** tionKey to components1 Front left lights cluster2 Front right lights cluster3 Power fuse box:A 30A fuse protecting fuel injectionB 40A fuse protecting ignitionC 60A fuse protecting additional optional extrasD 80A fuse protecting fuse and relay unit4 Fuse and relay unit6 Instrument panel:C Left direction indicator warning lightD Right direction indicator warning lightT Stop lights fault warning light7 Stalk unit:H Direction indicators stalkI Horn button8 Front left earth9 Front right earth10 Battery earth on body shell11 Battery12 Ignition switch13 Front right/left cables connection16 Rear left lights cluster17 Rear right lights cluster18 Rear left earth19 Rear right earth20 Front left side repeater21 Front right side repeater22 Left dashboard earth23 Hazard warning lights switch unitA Hazard warning lights warning lampB Hazard warning lights switchC Hazard warning lights unit symbol light40 Stop lights switch41 Additional stop light41A Additional stop light rear cables connection42 Right dashboard earth159 Reversing lights switchN.D. Ultrasound-soldered joint taped in wiring loomThe cables involved in the wiring diagram are marked with a solid square22 Publication no. 506.670/14
<strong>Bravo</strong>-<strong>Brava</strong> ®'98 rangeVersion: S - SXElectrical systemWiring diagrams55.Fuel level gauge and reserve warning light - Handbrake on/low brake fluid level warning light - Speedometer - Triprecorder/total mileage counter and reset button - Water temperature gauge - Low engine oil pressure warning light - Revcounter - Front brake pad wear warning lightj B9 =m« ■—■$ B9 B4HI IIII—1afr R -70HBLN M G L HGCNM NZ HGLHBP 55
Electrical systemConnections55.<strong>Bravo</strong>-<strong>Brava</strong> 0i'98 rangeFront right/left cables connection22 Dashboard/longitudinal cables connectionOnly for <strong>Brava</strong>Version: S - SXFuel level gauge and reserve warning light - Hand brake on/low brake fluid warning light - Speedometer - Trip recorder/-total mileage counter and reset button - Water temperature gauge - Low engine oil pressure warning light - Rev counter -Front brake pad wear warning lightFront/engine cables connectionKey to components3 Power fuse box:A 30A fuse protecting fuel injectionB 40A fuse protecting ignitionC 60A fuse protecting additional optional extrasD 80A fuse protecting fuse and relay unit4 Fuse and relay unit6 Instrument panel:B Low engine oil pressure warning lightJ Fuel reserve circuit control moduleJ1 Low fuel level warning lightK Fuel gaugeQ Front brake pad wear warning lightR Hand brake on/low brake fluid level warning light13 Front right/left cables connection19 Rear right earth28 Dashboard/longitudinal cables connection42 Right dashboard earth55 Front cables/fuel gauge control connection56 Fuel gauge control unitA Fuel gauge sensorB Electric fuel pump70 Dashboard/front cables connection88 Low brake fluid level sensor89 Left brake pad wear sensor89A Left brake pad wear sensor cables connectionDashboard/front cables connectionV Speedometer control moduleV1 SpeedometerW Rev counterX Coolant temperature gaugeZ Trip recorder/total mileage counterZ1 Trip recorder reset button8 Front left earth9 Front right earth10 Battery earth on body shell11 Battery12 Ignition switch90 Handbrake on warning light switch137 Vehicle speed sensor142 Low oil pressure warning light switch195 Ignition/fuel injection electronic control unit (1581)279 Engine coolant temperature double sender unitN.D. Ultrasound-soldered joint taped in wiring loomNot present on S version** Applies to EL/ELX versionN100BCn.d.The cables involved in the wiring diagram are marked with a solid square24 Publication no. 506.670/74
<strong>Bravo</strong>-<strong>Brava</strong>^iElectrical system'98 range Wiring diagrams55.Version: EL - ELXFuel level gauge and reserve warning light - Hand brake on/low brake fluid warning light - Speedometer - Trip recorder/total mileage counter and reset button - Water temperature gauge - Low engine oil pressure warning light - Front brakepad wear warning light - Rev counter -P4A45EL01Copyright Fiat Auto 25
Electrical systemConnections55.<strong>Bravo</strong>-<strong>Brava</strong> Qi'98 range13Front right/left cables connection28Dashboard/longitudinal cables connectionOnly for <strong>Brava</strong>Version: ELFuel level gauge and reserve warning light - Hand brake on/low brake fluid level warning light - Speedometer - Triprecorder/total mileage counter and reset button - Water temperature gauge - Low engine oil pressure warning light - Frontbrake pad wear warning light - Rev counter55Front/engine cables connectionKey to components3 Power fuse box:A 30A fuse protecting fuel injectionB 40A fuse protecting ignitionC 60A fuse protecting additional optional extrasD 80A fuse protecting fuse and relay unit4 Fuse and relay unit6 Instrument panel:B Low engine oil pressure warning lightJ Fuel reserve circuit control moduleJ1 Low fuel level warning lightK Fuel gaugeQ Front brake pad wear warning lightR Hand brake on/low brake fluid warning lightV Speedometer control moduleVI SpeedometerW Rev counterX Coolant temperature gaugeZ Trip recorder/total mileage counterZ1 Trip recorder reset button8 Front left earth9 Front right earth10 Battery earth on body shell11 Battery12 Ignition switch13 Front right/left cables connection19 Rear right earth22 Left dashboard earth28 Dashboard/longitudinal cables connection42 Right dashboard earth55 Front cables/fuel gauge control connection56 Fuel gauge control unitA Fuel gauge sensorB Electric fuel pump70 Dashboard/front cables connection88 Low brake fluid level sensor89 Left brake pad wear sensor89A Left brake pad wear sensor cables connection90 Handbrake on warning light switch137 Car speed sensor142 Low oil pressure warning light switch195 Ignition/fuel injection electronic control unit (1581)279 Engine coolant temperature double sender unitN.D. Ultrasound-soldered joint taped in wiring loom70Dashboard/front cables connection" Not present on S version ** Applies to EL/ELX versionN 100BC n.d.The cables involved in the wiring diagram are marked with a solid square26 Publication no. 506.670/14
<strong>Bravo</strong>-<strong>Brava</strong>'98 rangeElectrical systemWiring diagrams55.Air Donditioner■Ml III I-*-R —IB I A I □ ! C I40A 30A BOA 60ALN I VG IJ AB GN129RN R RJ U154aN.O. i-BNLB8NLI— 1L283123A5128525Ah—srN RN RNN.D.-RN-»-RN-N.D.-C -f- Cc122m124K Bi JO a;I KG I MNRN AN232235$EI mK153^123N.D.-L—•—RN-R$fiia-8 1 6 S O 2 ! I7'6AG NGNB- R -9 - G -N.D.f-AN—f120 H#210 L|r209I®RN ANLb^ffi127rt°vGR RN vllANIC IN- N -•- N -N.D.N.D.:203206-MNWC147 [#][Z! 195I ce (;Q_£f I12 mCB-«-CB 1N.D. ICBAGCVIHRIBNI L208120 M202-cv-fN.D.I—-H 'IHRI ?bA N ^ NR207 205RvNifcz*J 204P4A49EL01Copyright Fiat Auto 27
Electrical systemConnections55.<strong>Bravo</strong>-<strong>Brava</strong>'98 range1 o Front right/left cables connection120Air conditioner cables connectionAir conditionerKey to components3 Power fuse box:A 30A fuse protecting fuel injectionB 40A fuse protecting ignitionC 60A fuse protecting additional optional extrasD 80A fuse protecting fuse and relay unit4 Fuse and relay unit:El Ignition switch discharge relay7 Stalk unit8 Front left earth9 Front right earth10 Battery earth on body shell11 Battery12 Ignition switch13 Front right/left cables connection22 Left dashboard earth120 Air conditioner cables connection121 Three-stage pressure switch122 Engine cooling fan low speed relay123A Engine cooling fan high speed relay124 Air conditioner compressor control relay127 Connection between front left cables/cable on relaycarrier bracket129 50A power fuse protecting engine cooling fan147 Compressor for air conditioner154 Engine cooling fan170 Engine cooling fan limiting resistor195 Ignition/fuel injection electronic control unit (1581)02 Heater/air conditioner light bulbs203 Air conditioner controls unit:A Switch for switching on air conditionerB Switch for air conditioner recirculation204 Air conditioner fan 1st speed control relay205 Air conditioner fan relay206 Heater/air conditioner electric fan207 Heater/air conditioner speed control switch208 Limiting resistor for heater/air conditioner209 External/recirculation air flap actuator210 Electronic thermostat cables connection211 Electronic thermostat (N.T.C.)232 Earth for compressor235 Air conditioner compressor cables connection283 Front cable/resistor cable connection285 25A fuse protecting headlamp washer/compressor relayN.D. Ultrasound-soldered joint taped in wiring loom1 0 7 Connection between front left cables/cable on relay carrier bracket■ Cn.d.Cn.d.l ■ MN 13RN 285 ■ ■ L126MN 124B ■ RN n.d.The cables involved in the wiring diagram are marked with a solid square28 Publication no. 506.670/14
<strong>Bravo</strong>-<strong>Brava</strong> @'98 rangeCourtesy light - Symbol illuminationElectrical systemWiring diagrams55.4——llllll JUJL- M°30A40A 60AB0A107Bu—KMVariant connections for S - SX versionsNot present on <strong>Bravo</strong>P4AB3EL01Copyright Fiat Auto 29
Electrical systemConnections55.6 B Instrument panel2 2 Left dashboard earth<strong>Bravo</strong>-<strong>Brava</strong>'98 rangeOnly for ELX versionCOCourtesy light brightness adjustment rheostatUCourtesy light button on front left pillarCourtesy light - Symbol illuminationP4A66EL01g2Courtesy light button on front right pillarQAGlove compartment light bulb with integratedswitchKey to components3 Power fuse box:A 30A fuse protecting fuel injectionB 40A fuse protecting ignitionC 60A fuse protecting additional optional extrasD 80A fuse protecting fuse and relay unit4 Fuse and relay unit6 Instrument panel:F Instrument panel symbol lights7 Stalk unit:D Flasher buttonE Main beam/dipped beam headlamps stalkF Side lights stalk10 Battery earth on body shell11 Battery12 ignition switch18 Rear left earth22 Left dashboard earth27 Rear connections contact assembly with built-inboot light34 Switch controls unit:A Anti-theft "on" warning lightB Rear fog lamps control switchC Rear fog lamps relayD Rear fog lamps warning lightE Heated rear window switchF Heated rear window warning lightG Switch controls unit symbol lightH Front fog lamps warning lightI Front fog lights switch42 Right dashboard earth48 Radio with clock58 Lighting brightness adjustment rheostat59 Courtesy light button on front left pillar60 Courtesy light button on front right pillar61 Courtesy light button on rear left pillar62 Courtesy light button on rear right pillar64 Glove compartment light with built-in switch65 Boot light / anti-theft device "on"69 Cigarette lighter107B Car interior courtesy light286 Short-circuiting connectionN.D. Ultrasound-soldered joint taped in wiring loomCE Boot light bulb/anti-theft device "on" "1 OVB ^ar ' nter ' or courtesy lightThe cables involved in the wiring diagram are marked with a solid square30 Publication no. 506.670/74
<strong>Bravo</strong>-<strong>Brava</strong>'98 rangeElectrical systemWiring diagrams55.Version: S - SXInstrument panel connectionsNot present on S versionsCopyright Fiat Auto 31
Electrical systemConnections55.<strong>Bravo</strong>-<strong>Brava</strong>'98 rangeDash./longitudinal cables connectionOnly for <strong>Brava</strong>Front/engine cables connectionVersion: S - SXInstrument panel connectionsKey to components3 Power fuse box:A 30A fuse protecting fuel injectionB 40A fuse protecting ignitionC 60A fuse protecting additional optional extrasD 80A fuse protecting fuse and relay unit4 Fuse and relay unit6 Instrument panel:A Low generator recharging warning lightB Low engine oil pressure warning lightC Left direction indicator warning lightD Right direction indicator warning lightE Side lights warning lightF Instrument panel symbol lightsG Main beam headlamps warning lightH Air Bag system fault warning lightI Anti-lock braking system fault warning lightJ Fuel reserve circuit control moduleJ1 Low fuel level warning lightK Fuel gaugeL Fiat-CODE system fault warning lightM Petrol/diesel fuel injection fault warning lightQ Front brake pad wear warning lightR Hand brake on / low brake fluid level warning lightV Speedometer control unitV1 SpeedometerW Rev counterX Coolant temperature gaugeZ Trip recorder / total mileage counter21 Trip recorder reset button7 Stalk unit:D Flasher buttonE Main beam/dipped beam headlamps stalkF Side lights stalkH Direction indicators stalk9 Front right earth10 Battery earth on body shell11 Battery12 Ignition switch13 Front left/right cables connection22 Left dashboard earth28 Dashboard/longitudinal cables connection42 Right dashboard earth55 Front/fuel gauge control cables connection56 Fuel gauge control unitA Fuel level sensorB Electric fuel pump70 Dashboard/front cables connection88 Low brake fluid level sensor89 Left brake pad wear sensor89A Left brake pad wear sensor cables connection90 Handbrake on warning light switch95 Front cables/anti-lock braking system (A.B.S.) connection114 Air Bag electronic control unit117 Air Bag/dashboard cables connection131 Fiat CODE electronic control unit1 37 Car speed sensor142 Low oil pressure warning light switch143 Alternator181 Electrohydraulic control unit for anti-lock braking system(A.B.S.)195 Ignition/fuel injection electronic control unit (1581)279 Engine coolant temperature double sender unitN.D. Ultrasound-soldered joint taped in wiring loom70Dashboard/front cables connection=H45R4J|HL n.d.NZ n.d.M n.d. *N100AG4D■R6AHL98M29NZ n.d.H4DN100BN100BN100B* Not present on S version "* Applies only to EL/ELX versionQEFront/anti-lock braking system (A.B.S.)cables connectionThe cables involved in the wiring diagram are marked with a solid squareN100BCn.d.111 Air Bag/dashboard cables connection32 Publication no. 606.670/14
<strong>Bravo</strong>-<strong>Brava</strong> 0i'98 rangeElectrical systemWiring diagrams55.Version: EL - ELXInstrument panel connectionsi P ttUMM R -^n^— 4B9IH RNBR + N.D.Variant connections for versions without alarm (See central door locking)Copyright Fiat Auto 33
Electrical systemConnections55.<strong>Bravo</strong>-<strong>Brava</strong>i'98 range28 Dash./longitudinal cables connectionOnly for <strong>Brava</strong>Front/engine cables connectionVersion: EL - ELXInstrument panel connectionsKey to components3 Power fuse box:A 30A fuse protecting fuel injectionB 40A fuse protecting ignitionC 60A fuse protecting additional optional extrasD 80A fuse protecting fuse and relay unit4 Fuse and relay unit6 Instrument panel:A Low generator recharging warning lightB Low engine oil pressure warning lightC Left direction indicator warning lightD Right direction indicator warning lightE Side lights warning lightF Instrument panel symbol lightsG Main beam headlamps warning lightH Air Bag fault warning lightI Anti-lock braking system fault warning lightJ Fuel reserve circuit control moduleJ1 Low fuel level warning lightK Fuel gaugeL Fiat-CODE system fault warning lightM Fuel injection fault warning lightN Maximum turbocharging pressure warning light0 Heater plugs warning lightQ Front brake pad wear warning lightR Hand brake on/low brake fluid level warning lightS Electronic module for car stop lights fault indicator systemT Stop lights fault warning lightU Door open warning lightV Speedometer control moduleV1 SpeedometerW Rev counterX Water temperature gaugeZ Trip recorder / total mileage counterZ1 Trip recorder reset button7 Stalk unit:D Flasher buttonE Main beam/dipped beam headlamps stalkF Side lights stalkH Direction indicators stalk9 Front right earth10 Battery earth on body shell11 Battery12 Ignition switch13 Front right/left cables connection16 Rear left lights cluster17 Rear right lights cluster22 Left dashboard earth28 Dashboard/longitudinal cables connection40 Stop lights switch42 Right dashboard earth55 Front/fuel gauge control cables connection56 Fuel gauge control unitA Fuel level sensorB Electric fuel pump58 Lighting brightness adjustment rheostat70 Dashboard/front cables connection88 Low brake fluid level sensor89 Left brake pad wear sensor89A Left brake pad wear sensor cables connection90 Handbrake on warning light switch95 Fro nt/anti-lock braking system (A.B.S.) cables connection100 Alarm system electronic control unit114 Air Bag electronic control unit117 Air Bag/dashboard cables connection131 Fiat-CODE electronic control unit137 Car speed sensor142 Low engine oil pressure indicator switch143 Alternator181 Electronic control unit for anti-lock braking system (A.B.S.)195 Ignition/fuel injection electronic control unit (1581)279 Engine coolant temperature double sender unitN.D. Ultrasound-soldered joint taped in wiring loomP4A63EL0170Dashboard/front cables connectionNot present on S versionQCH4SR4J|HL n.d.NZ n.d.M n.d. *Front/anti-lock braking system (A.B.S.)cables connectionN100AG4D■ R6AHLS8M29NZ n.d.H4DN100BN100B■ N100B** Applies only to EL/ELX versionThe cables involved in the wiring diagram are marked with a solid squareN100BCn.d."11 "7 Air Bag/dashboard cables connection34 Publication no. 506.670/74
<strong>Bravo</strong>-<strong>Brava</strong>'98 rangeElectrical systemWiring diagrams55.Diagnostic socket connectionsLocation of components'Mlllll0 I12 3+5673 321N S'SI131N.D.- N-» NN.D.HH 12 l" B " " * r114E130E• N --- N -. N-i-N-195103NZ|Nffl100j N.D.YM N.D.176174(|)NNZN.D.-N-*-N-»Kl-T=f 139Copyright Fiat Auto 35
Electrical systemConnections55.<strong>Bravo</strong>-<strong>Brava</strong> ©'98 range1 O Front right/left cables connection103 Diagnostic socket for alarm114 *' r ^as e ' ectron ' c control unit1JQDiagnostic socket for Air-bag system131Fiat-CODE electronic control unitDiagnostic socket connectionsKey to components9 Front right earth10 Battery earth on body shell13 Front right/left cables connection100 Alarm electronic control unit1 03 Diagnostic socket for alarm114 Air Bag electronic control unit130 Diagnostic socket for Air Bag system131 Fiat-CODE electronic control unit139 Diagnostic socket for fuel injection148 Earth for electronic fuel injection174 Power earth for anti-lock braking system(A.B.S.)176 Diagnostic socket for anti-lock braking system(A.B.S.)181 Anti-lock braking system (ABS) electroniccontrol unit.)195 Ignition/fuel injection electronic control unit(1581)N.D. Ultrasound-soldered joint taped in wiringloom1 4Q Diagnostic socket for fuel injection1 ^g Diagnostic socket for A.B.SThe cables involved in the wiring diagram are marked with a solid square36 Publication no. 508.670/14
<strong>Bravo</strong>-<strong>Brava</strong> iglElectrical system'98 range Key55.Key to components1 Front left lights cluster2 Front right lights cluster3 Power fuse boxA 50A fuse protecting fuel injection (60AforD versions)B 50A fuse protecting ignitionC 50A fuse protecting additional optionalextrasD 80A fuse protecting fuse and relay unit4 Fuse and relay unit:E1 Ignition switch discharge relay5 Dipped beam relay6 Instrument panel:A Low generator recharging warning lightB Low engine oil pressure warning lightC Left direction indicator warning lightD Right direction indicator warning lightE Side lights warning lightF Instrument panel symbol lightsG Main beam headlamps warning lightH Air Bag system fault warning lightI Anti-lock braking system fault warninglightJ Fuel reserve circuit control moduleJ1 Low fuel level warning lightK Fuel gaugeL Fiat CODE fault warning lightM Petrol fuel injection fault warning lightQ Front brake pad wear warning lightR Hand brake on / low brake fluid warninglight Car stop lights fault warning lightV Speedometer control moduleV1 SpeedometerW Rev counterX Water temperature gaugeZ Trip recorder / total mileage counterZ1 Trip recorder reset button7 Stalk unit:A Windscreen wiper speed control stalkB Windscreen wiper headlamp washer/rearwindow wiper stalkC Rear window wiper switchD Flasher buttonE Dipped beam/main beam headlampsstalkF Side lights stalkH Direction indicators stalkI Horn button8 Front left earth9 Front right earth10 Battery earth on body shell11 Battery12 Ignition switch13 Front right/left cables connection14 Left number plate light15 Right number plate light16 Rear left lights cluster17 Rear right lights cluster18 Rear left earth19 Rear right earth20 Front left side repeater21 Front right side repeater22 Left dashboard earth23 Hazard lights switch unitA Hazard warning lights warning lampB Hazard warning lights switchC Hazard warning lights symbol light27 Contact assembly for rear connectionswith integrated boot light switch28 Dash./longitudinal cables connection29 Front/front fog lamps cables connection30 Front left fog lamp31 Front right fog lamp32 Front fog lamp relay33 20A fuse protecting front fog lamps34 Switch controls unit:A Anti-theft device "on" warning lightB Rear fog lights switchC Rear fog lights relayD Rear fog lamps warning lightE Heated rear window switchF Heated rear window warning lightG Switch controls unit symbol lightH Front fog lamps warning lightI Front fog lights switch40 Stop lights switch41 Additional stop light41A Additional stop light rear cables connection42 Right dashboard earth48 Radio with clock55 Front/fuel gauge control cables connection56 Fuel gauge control unitA Fuel level sensorB Electric fuel pumpCopyright Fiat Auto 37
57 Inertial switch58 Lighting brightness adjustment rheostat59 Courtesy light button on front left pillar60 Courtesy light button on front right pillar61 Courtesy light button on rear left pillar62 Courtesy light button on rear right pillar64 Glove compartment light with integratedswitch65 Boot light bulb/anti-theft device "on"69 Cigarette lighter70 Dashboard/front cables connection88 Low brake fluid level sensor89 left brake pad wear sensor89A Left brake pad wear sensor cables connection90 Handbrake on warning light switch94 5A fuse protecting anti-lock braking system(A.B.S.)95 Front/anti-lock braking system (A.B.S.)cables connection96 60A power fuse protecting electrical system100 Anti-theft electronic control unit107B Car interior courtesy light103 Diagnostic socket for anti-theft device114 Air Bag electronic control unit117 Air Bag/dashboard cables connection120 Air conditioner cables connection121 Three-stage pressure switch122 Engine cooling fan low speed relay123A Engine cooling fan high speed relay124 Air conditioner compressor relay127 Connection between front left cables/cable on relay carrier bracket128 Front/air conditioner cables connection129 50A power fuse protecting engine coolingfan130 Diagnostic socket for Air Bag131 Fiat-CODE electronic control unit136 Knock sensor137 Vehicle speed sensor138 Idle adjustment actuator139 Diagnostic socket for fuel injection141 Heated Lambda probe142 Low oil pressure warning light switch143 Alternator144 Rpm and T.D.C. sensor145 Starter motor146 Potentiometer on throttle valve147 Compressor for air conditioner148 Earth for electronic fuel injection150 Fuel injection relay154 Engine cooling fan155 Ignition coils assembly156 Spark plugs159 Reversing lights switch162 Fuel injector (1st)163 Fuel injector (2nd)164 Fuel injector (3rd)165 Fuel injector (4th)170 Engine cooling fan limiting resistor171 Heater174 Power earth for anti-lock braking system(A.B.S.)176 Diagnostic socket for anti-lock brakingsystem (A.B.S.)177 Sensor on front left wheel for anti-lockbraking system (A.B.S.)178 Sensor on rear left wheel for anti-lockbraking system (A.B.S.)179 Sensor on front right wheel for anti-lockbraking system (A.B.S.)180 Sensor on rear right wheel for anti-lockbraking system (A.B.S.)181 Electrohydraulic control unit for anti-lockbraking system (A.B.S.)194 Injection/injector flange cables connection195 Ignition/fuel injection electronic controlunit (1581)199 Aerial for Fiat CODE system202 Heater/air conditioner light bulbs203 Air conditioner controls:A Air conditioner recirculation switchB Air conditioner "on" switch204 Air conditioner fan 1st speed relay205 Air conditioner fan relay206 Heater/air conditioner fan207 Heater/air conditioner speed controlswitch208 Limiting resistor for heater/air conditioner209 External/recirculation air flap actuator210 Electronic thermostat cables connection211 Electronic thermostat (N.T.C.)232 Earth for compressor235 Air conditioner compressosr cables connection278 Integrated air temperature/pressure senderunit279 Engine coolant temperature double senderunit280 7.5A fuse protecting ignition switch281 30A fuse protecting Lambda probe/canistersolenoid282 7.5A fuse protecting Fiat-CODE/electronicfuel injection283 Front cable/resistor connection284 Engine cooling fan relay285 25A fuse protecting headlamp washer/compressor286 Short-circuiting connection287 Short-circuiting connection288 Short-circuiting connection289 Short-circuiting connectionCable colour codesABCGHLMNRSVZABAGANARAVBGBLBNBRBVBZCACBCNLight blueWhiteOrangeYellowGreyBlueBrownBlackRedPinkGreenPurpleLight blue-WhiteLight blue-YellowLight blue-BlackLight blue-RedLight blue-GreenWhite-YellowWhite-BlueWhite-BlackWhite-RedWhite-GreenWhite-PurpleOrange-Light blueOrange-WhiteOrange-BlackGNGLGRGVHGHNHRHVLBLGLNLRLVMBMNNZRBRGRNRVSNVBVNVRZBYellow-BlackYellow-BlueYellow-RedYellow-GreenGrey-YellowGrey-BlackGrey-RedGrey-GreenBlue-WhiteBlue-YellowBlue-BlackBlue-RedBlue-GreenBrown-WhiteBrown-BlackBlack-PurpleRed-WhiteRed-YellowRed-BlackRed-GreenPink-BlackGreen-WhiteGreen-BlackGreen-RedPurple-White
<strong>Bravo</strong>- <strong>Brava</strong>98 rangepageElectrical equipmentIndex55.pagePROTECTION AND SAFETY DEVICESProtection and safety devicesLOCATION OF COMPONENTS ON VEHICLELocation of relays and fuses on vehicle(1242-1581 engine bay) 3Location of relays and fuses on vehicle(1998 engine bay) 4Location of relays and fuses on vehicle(1910 JTD engine bay) 5Location of relays and fuses on vehicle(SX version passenger compartment)- Location of control units and testerconnections (petrol version enginebay) 8Location of control units and testerconnections (diesel version enginebay) 9Location of control units and testerconnections (passenger compartament)10JUNCTION UNITJunction unit 11List of fuses and main circuits protected12Junction unit internal connectiondiagram 13- Description of leads and connectors 14Removing-refitting junction unit andguard 16CONTROL PANEL- Control panel for SX-GT outfits 17- Control panel for ELX-HLX outfits 20- Control panel for HGT outfits 21- Control panel for SX-ELX C.A. outfits24Fuel gauge 28Coolant temperature gauge 28- Warning lights 29Speed indicator for automatictransmission 31- Odometer 31- Outdoor temperature 31Removing-refitting 32LIGHTING- Removing-refitting rearlight and changing bulbcourtesyVARIOUS DEVICESLocation of additional fuses-relays- Power steering pump sensor- Control buttons on faciaEngine oil level control unit13334353535RADIO SYSTEM- Cassette-radio AD 182 H2 36General description 37Operation 38Switching on radio 38- PAUSE function 39- Bass and treble adjustment 39Adjusting balance between rightand left speakers 39Adjusting balance between frontand rear speakers 40- LOUDNESS function 40- MUTE function 40- RADIO function 40- DX function 42TP (Traffic Program) function 43EON (Enhanced other network)function 45- PTY function 45- AUDIOCASSETTE player 47Dolby B function 49- CD player function 50Setting the time 55- Activating/deactivating LNR 56-Automatic programme change (regional)56- BOOSTER deactivation delay(BDLY) 56Anti-theft protection 57Technical information 59- Cassette-radio model AD 182 M 61- General description 62Operation 63Switching on radio • 63- PAUSE function 63- Adjusting the VOLUME 64Adjusting bass and treble 64- Adjusting balance between rightand left speakers 64Adjusting balance between frontand rear speakers (fader) 65- MUTE function 65- RADIO function 65TP (Traffic Programme) function 67- EON function 69- PTY function 69Alternative frequencies (AF function)70Audiocassette player 71Setting the time 73Activating/deactivating LNR 73Automatic programme change (re-, gional) 74- L0C function 74- MONO function 74- LOUDNESS function 75- RADER function 75Copyright Fiat Auto
Electrical equipment<strong>Bravo</strong>-<strong>Brava</strong>Index -' ,'■'•-, '■' . , ; ; ^ ,. - 98 range55.page- Delayed BOOSTER activation / deactivation(BDLY) 76- Technical information 76FIAT CODE- Storing engine ignition keys (1920JTD version) 79SERVICE CONTROL UNIT- Integrated service electronic controlunit 83- Operating the front electric windows 84- Door lock/release 84- Central door locking/release 85- Door open/close remote control unit 85- Receiver 85- Simplified programming 86- Protected programming 86- Opening the memory and storing anew remote control unit 86- Timed passenger compartmentlighting 87- Timed heated rear window operation 88Publication no. 506.670/20
<strong>Bravo</strong>-<strong>Brava</strong>98 rangeElectrical equipmentProtection and safety devices55.PROTECTION AND SAFETY DEVICESAll the vehicle fuel lines have been designed taking into account the most up to date directives dealingwith safety and protection, especially the risk of fire.There are two main types of protection:- active protection, aimed at reducing possible causes of problems "at the source";- passive protection, aimed at keeping the effects of a possible problem to a minimum.The first category includes care design of the cables, their positioning and securing along appropriatelyshielded and protected routes.Suitable modifications have been made to the alternator and starter motor cables, with the adoption ofprotective covers; a protective outer sheath has also been adopted for some sections of cable which areparticularly exposed.The passive protection includes all operations, which have always been adopted on vehicles, to reducehigh currents (overloading or short circuits).The size of all the system fuses is based on the nominal absorption of the simultaneous loads and is designedto guarantee operation in the case of a short circuit.Through the adoption of a fuse box containing four maxi fuses, plus other located outside, it is possibleto protect all the supplies, with the sole exception of the cable which connectrs the battery to the startermotor and the one which connects the latter to the alternator; these cables are protected by an additionalouter casing."MAXI" fuse box A:EFI: electronic injection fuse (petrol)GLOW: heater plugs fuse (diesel)IGN: ignition switch fuseJ/B2: general supply fuseJ/B1: general supply fusenext to the box:B: fan fuse (see table)ENGINE242 16v - 1581 16v/C.A.1747-1998 20V1910 TD SOFT1910 JTDVERSIONHeatedAir conditionedHeatedAir conditionedHeatedAir conditionedHeatedAir conditionedAMP3040405040405040C: 40A fuse for air conditioning for 1910 JTDonlyD: 60A fuse for ABS* petrol versions** Diesel versionsP4A01HL01Copyright by Fiat Auto XI-98 - Cancels and replaces 1
Electrical equipmentProtection and safety devices55.<strong>Bravo</strong>-<strong>Brava</strong>98 rangeDiagram showing device with hot cables3. Power fuse box10. Earth for battery on bodyshell11. Battery96. 60A power fuse protecting electrical equipment129. Power fuse protecting engine cooling fan (See air conditioning - engine cooling wiring diagramsfor relevant engine types)143. Alternator145. Starter motor201. Heater plugs control unit238. Power fuse protecting engine cooling fan (See air conditioning - engine cooling wiring diagramsfor relevant engine types)Exists only for the Turbo Diesel versions60A fuse for Turbo Diesel versions2 XI-98 - Cancels and replaces Print no. 506.670/17
<strong>Bravo</strong>-<strong>Brava</strong>98 rangeElectrical equipmentLocation of components on vehicle55.LOCATION OF RELAYS AND FUSES ON VEHICLE (Engine compartment 1242 16v - 1581 16v)3. Power fuse box96. A.B.S. system protective power fuse98. Preparation for headlamp washer intermittent device122. Engine cooling fan low speed relay123A. Engine cooling fan high speed relay124. Air conditioning compressor relay129. Power fuse protecting engine cooling fan150. Injection system relay feed290. Electric fuel pump relay feed307. I.E. system protective fuse (1242 1 6v)308. 15A fuse protecting canister solenoid valve335. 1 5A fuse protecting Lambda sensorCopyright by Fiat Auto XI-98 - Cancels and replaces 3
Electrical equipmentLocation of components on vehicle55.<strong>Bravo</strong>-<strong>Brava</strong>98 rangeLOCATION OF RELAYS AND FUSES ON VEHICLE (Engine compartment 1998 20v)3. Power fuse box93. Electrically operated sun roof control unit (all versions and engine types)96. Power fuse protecting A.B.S. system98. Preparation for headlamp washer intermittent device122. Engine cooling fan low speed relay123A. Engine cooling fan high speed relay124. Air conditioning compressor relay129. Power fuse protecting engine cooling fanP4A04HL014 XI-98 - Cancels and replaces Print no. 506.670/17
<strong>Bravo</strong>-<strong>Brava</strong>98 rangeElectrical equipmentLocation of components on vehicle55.LOCATION OF RELAYS AND FUSES ON VEHICLE (Engine compartment 1910 JTD)3. Power fuse box96. A.B.S. system protective power fuse98. Preparation for headlamp washer intermittentdevice122. Engine cooling fan low speed relay123. Engine cooling fan high speed timer123A. Engine cooling fan high speed relay124. Air conditioning compressor relay129. 50A protective power fuse for enginecooling fan238. Protective power fuse for 2nd enginecooling fan239. Diesel preheating protective relay(1910 JTD)240. Diesel pre-heating protective fuse(1910 JTD)282. Fiat CODE- I.E. control unit 30A protectivefuse350. Passenger compartment coolant heatingrelay351. Passenger compartment coolant heatingsafety relay352. Passenger compartment coolant heatingrelay353. 70A fuse protecting passenger compartmentcoolant heater plugsCopyright by Fiat Auto XI-98 - Cancels and replaces 5
Electrical equipmentLocation of components on vehicle55.<strong>Bravo</strong>-<strong>Brava</strong>98 rangeLOCATION OF RELAYS AND FUSES ON VEHICLE (Passenger compartment SX version)4. Junction unit32. Fog lights relay71. Electric front windows control unit91. Power relay controlled by the ignition112. Central door locking control unit293. Fuse carrier base on dashboard cableA 7.5A fuse protecting switch panellight, radio phone, radio, electric mirrorsB 15A fuse protecting fog lamps maintenancerelayC SpareD 25A fuse protecting central lockingcontrol unitE 20A protective fuse current socket,cigar lighter, electric seatsF 10Afuse protecting EURO-BAG296. Fuse carrier base on front cableA 7.5A fuse protecting cooling system/I.E.,alarm, automatic transmissionB 20A fuse protecting windscreenwiperC 7.5A fuse protecting Fiat-CODE,cooling system/I.E.D 10A fuse protecting anti-lock brakingsystem (A.B.S.)E 7.5A fuse protecting climate controlsystemF 7.5A fuse protecting electronic injection31 3. Relay for reversing air conditioning signal317. Main beam headlamps maintenance relay6 XI-98 - Cancels and replaces Print no. 506.670/17
<strong>Bravo</strong>-<strong>Brava</strong>98 rangeElectrical equipmentLocation of components on vehicle55.LOCATION OF RELAYS AND FUSES ON VEHICLE (Passenger compartment GT-ELX-HSX-HGT4. Junction unit32. Fog lights relay91. Power relay controlled by the ignition150. Injection system relay feed290. Electric fuel pump relay feed293. Fuse carrier base on dashboard cableA 7.5A fuse protecting switch panel light, radipphone, radio, electric mirrorsB 15A fuse protecting fog lamps maintenancerelayC 25A fuse protecting electric windowsD 25A fuse protecting A.B.I, control unitE 20A fuse protecting current socket, cigarlighter, electric seats, electrically operatedsunroofF 10Afuse protecting EUROBAG296. Fuse carrier base on front cableA 7.5A fuse protecting cooling system/I.E.,alarm, automatic transmission307.308.315.317.330.B 20A fuse protecting windscreen wiperC 7.5A fuse protecting Fiat-CODE, cooling system/I.E.D 10A fuse protecting anti-lock braking system(A.B.S.)E 7.5A fuse protecting climate control systemF 7.5A fuse protecting electronic injection/Fiat-CODE15A fuse protecting injection system15A fuse protecting canister solenoid valve7.5A fuse protecting electronic injection controlunit 1910TD JTDMain beam headlamps maintenance relayA.B.I, control unit. (Alzacristalli Bloccaporte Integrato- Integrated Central locking electric windows)349. Engine oil control unit357. Passenger compartmentcontrol unitcoolant heater plugsCopyright by Fiat Auto IXI-98 - Cancels and replaces 7
Electrical equipmentLocation of components on vehicle55.<strong>Bravo</strong>-<strong>Brava</strong>98 rangeLOCATION OF CONTROL UNITS AND DIAGNOSTIC SOCKETS (Engine compartment- petrol versions)Engine J^S| JTD100. Alarm device electronic control unit103. Diagnostic socket for alarm139. Diagnostic socket for injection system1 76. Diagnostic socket for anti-lock brakingsystem (A.B.S.)181. Electro-hydraulic control unit for anti-lockbrakes (A.B.S.)190. Injection/ignitionunit (1998) 20v195. Injection/ignitionunit (1581) 16v294. Injection/ignitionunit (1242) 16velectronicelectronicelectroniccontrolcontrolcontrol8 XI-98 - Cancels and replaces Print no. 506.670/17
<strong>Bravo</strong>-<strong>Brava</strong>Electrical equipment98 range Location of components on vehicle557LOCATION OF CONTROL UNITS AND DIAGNOSTIC SOCKETS (Engine compartment Diesel versions)100. Alarm device electronic control unit 181. Electro-hydraulic control unit for an-103. Diagnostic socket for alarm ti-lock brakes (A.B.S.)139. Diagnostic socket for injection system 201. Heater plugs control unit (1910 JTD)(1910 JTD)176. Diagnostic socket for anti-lock brakingsystem (A.B.S.)Copyright by Fiat Auto XI-98 - Cancels and replaces 9
Electrical equipmentLocation of components on vehicle55.<strong>Bravo</strong>-<strong>Brava</strong>98 rangeLOCATION OF CONTROL UNITS AND DIAGNOSTIC SOCKETS (Passenger compartment)114. EURO-Bag electronic control unit130. Diagnostic socket for EURO-Bag131. Fiat CODE electronic control unit160. Injection/ignition electronic controlunit 1747 16v272. Automatic transmission diagnosticsocket273. Automatic transmission control unit295.297.299.330.349.357.Injection/ignition electronic controlunit 1910 JTDClimate control control unitDiagnostic socket for climate controlsystemA.B.I, control unit (Alzacristalli BloccaporteIntegrato - Inegrated Centrallocking electric windows)Engine oil control unitPassenger compartment coolant heaterplugs control unit10 XI-98 - Cancels and replaces Print no. 506.670/17
<strong>Bravo</strong>-<strong>Brava</strong>98 rangeElectrical equipmentControl units55.JUNCTION UNITFront view of the junction unitand identification of fusesThe connectors cannot be connected incorrectly as they are each a particular shape. The identificationletters for the connectors are the same as those used in the wiring diagramsoy —\Ju12 6 1 9,-'^iir0 E2i/■ *1 4- - \^TL4H^ ^10E358 n=-^^4-it—Ji14llfj^ 1D~" E1'0—0n-5-1B^Rear view of the junction unitand Location of relaysE1. Ignition discharge relay duringstartingE2. Heated rear windscreen relayE3. Horn relayCopyright by Fiat Auto XI-98 - Cancels and replaced 11
Electrical equipmentControl units55.<strong>Bravo</strong>-<strong>Brava</strong>98 rangeList of fuses and main circuits protectedFuseNo.Amp.IdeogramCircuit protectedFuseNo.Amp.IdeogramCircuit protected110SERVIZISERVICESReversing lights -Brakelights - Additional brakelight (if fitted) - Directionrepeater - Instrument panelsupply - Check supply(where fitted) - Control forelectric mirrors (where fitted)- Radio supply - Remotecontrol (+ signal controlledby the ignition).678910102010IDID0*ARight main beam headlamp.Left main beam headlamp -Main beam headlampswarning light.Rear fog lamps.Hazard warning lights flasher.210-00-Right front side light - Leftrear side light - Right no.plate light - Radio lights -Instrument lights and sidelight warning light - Cigarlighter light - Switch panellight.10111030SERVIZISERVICESmInterior light - Luggagecompartment light - Clocksupply - Remote control receiversupply (where fitted)- Radio supply - Glove compartmentlight - Anti-theftdevice (+ signal from battery).Heated rear windscreen -Heated rear windscreenwarning light - Mirror defrosting(where fitted).1230ftEngine fan (versions with airconditioning).345101010-00-- v v «.IDIDLeft front side light - Heating/airconditioning controlslight - Right rear sidelight - Left no. plate light.Left dipped headlamp.Right dipped headlamp -Headlamp alignment.131415202020hyV
<strong>Bravo</strong>-<strong>Brava</strong>98 rangeElectrical equipmentControl units55.Additional fusesTo gain access to these fuses, the junctionunit shield must be removed, following theinstructions given on page 16.The fuses are:293. Fuse carrier base on dashboard cableA 7.5A fuse protecting switch panellight, radio phone, radio, electricmirrorsB 15A fuse protecting fog lamps maintenancerelayC SpareD 25A fuse protecting central lockingcontrol unitE 20A fuse protecting current socket,cigar lighter, electric seatsF 10A fuse protecting EURO-BAGFEDCBA17.5 SMI17.5 Si IMo oil17.5 Si |120 03117.5 Si|110 Oil120 0Z|125 S3||25 S!|115 SH17.5 SYI296 293296 293296. Fuse carrier base on front cableA 7.5A fuse protecting cooling system/I.E.,alarm, automatic transmissionB 20A fuse protecting windscreen wiperC 7.5A fuse protecting Fiat-CODE,cooling system/I.E.D 10A fuse protecting anti-lock braking system(A.B.S.)E 7.5A fuse protecting climate control systemF 7.5A fuse protecting electronic injectionDIAGRAM SHOWING CONNECTIONS INSIDE THE JUNCTION UNITB'TTTTTTT'-¥- 4f ■TTTTTTTTTTTTTTTTTT'1 2 3 4 5 6 7 8 9 101112131415161718UJ1 2 3 1 5 69 10 11 12 13 14 15LJ LJ LJ LElCSE2L5E3/,*}n12 3 4 5 6 7 8 9 1011121314llllllilllllllllntiE1. Ignition discharge relay during startingE2. Horn relaym-12 3 4 5 6 7 8 9 101112 1 2 3 4 5 6 7 8 9 10n1 2 3 4 5 6 ? B 91011121314 1 2 3 4 5 6 7 B 9101112ill ill—iiiiiimimi—ii 11111111 ii iiiiiiuiiiiiiii iiiiiiiiiiuiim LJ] mE3. Heated rear windscreen relay P4A13HL02Copyright by Fiat Auto XI-98 - Update 13
Electrical equipmentControl units<strong>Bravo</strong>-<strong>Brava</strong>98 rangeDESCRIPTION OF CABLES AND CONNECTORSCONNECTOR ACONNECTOR BTerm.No.1CablecolourRCircuit concerned+30 supply from fuse boxTerm.No.1CablecolourRCircuit concernedServices supply (OPT)2BR+30 supply from fuse boxCONNECTOR DTerm.No.1CablecolourRCONNECTOR CCircuit concernedCar interior fan supply (with air conditioning),air conditioning control unitTerm.No.12CablecolourGGCircuit concernedLeft headlamp alignmentRight headlamp alignment2MBElectric fuel pump operation, inertiaswitch34GANHeadlamp alignment controlFront and left side direction indicator34567ANHHNVNVHeating/air conditioning systemspeed control switchRight dipped headlampLeft dipped headlamp, headlampwasher go ahead.Left main beam headlampRight main beam headlamp5678ARHBHRHBBrake lights operationLeft headlamp alignement supplyHeadlamp alignment supply - Headlampwash/wipeRight headlamp alignment supplyCONNECTOR E9BReversing lights operationTerm.No.CablecolourCircuit concerned1011ZZHornsHorns12345RN-RGMNMBRight rear brake light (versions withCheck Panel)N.C.Left rear brake light (versions withCheck Panel)Rearscreen supplyElectric fuel pump, inertia switch1213141516-GRARAGNN.C.Right front side lightEngine oil level control unitFront and right side direction indicatorHeater unit/air conditioning lights6789101112AGAN-GRGR-RGMulti-purpose switch for electric mirrorsLeft rear direction indicatorN.C.Right rear side light (without CheckPanel)Left no. plate light (without Check Panel)N.C.Left brake light (without Check Panel)1718Term.No.12GNRNCablecolourH-Heater unit/air conditioning controlslightBrake lights operationCONNECTOR FCircuit concernedMain beam headlamps maintenance relayN.C.13RNRight brake light (without Check Panel)34LRLRMain beam h/lamps op. (st. col. switch unit)Headlamp alignment go ahead14RAdditional brake light5GIgnition switch14 XI-98 - Update Print no. 506.670/17
<strong>Bravo</strong>-<strong>Brava</strong>98 rangeElectrical equipmentControl units5iTCONNECTOR GCONNECTOR HTerm.No.CablecolourCircuit concernedTerm.No.CablecolourCircuit concerned1GNLeft rear side light1ARight direction indicator warning light2GVMulti-purpose switch for electric mirrors2CZCentral door locking control unit3456789101112--ABBGNRNRNRNRNN.C.N.C.Right rear direction indicatorLeft reversing lightRight reversing lightRight no. plate lightSupply for rear courtesy lightSupply for lug. comp. courtesy lightSupply for front courtesy lightSupply for rear courtesy light345678910ARNANANANABRMBHazard warning lights operationInstrument panel (device signallingbrake lights failure)Right direction indicator controlHazard warning lights controlLeft direction indicator warning lightLeft direction indicator controlInstrument panel (device signallingbrake lights failure)Safety switch for electric mirrorsCONNECTOR 1CONNECTORJTerm.No.1234567891011Cablecolour---CBCNNLN/RANAGAGRGN.C.N.C.N.C.Ignition switchCircuit concernedSteering column switch unitEarthHorns signal+ 15 supply from key (excluding starting)Right external rear view mirrorLeft external rear view mirrorHazard warning lights switch unitTerm.No.123456789CablecolourRG/GNRVGNHM/HVR/LRVNRRRCircuit concernedLeft brake light (versions with CheckPanel)Alarm supplySide lights warning light, switch panellight, auto, trans, controls lightHeated rear windscreen controlControl for rear fog lamps, electricwindow supply, rear view mirrors, radio,central lockingMain beam headlamps warning light,main beam headlamps relayInstrument panelGlove compartment light supplyInstrument panel supply121314ARARARSupply for instrument panelHazard warning lights switch unitSupply for instrument panel101112GNGNG R/GNRadio with clockSwitch control unitCigar lighter light - Instrument panellight dimmerCopyright by Fiat Auto XI-98 - Upejdte 15
Electrical equipmentControl units55.<strong>Bravo</strong>-Btava98 rangeREMOVING-REFITTING JUNCTION UNITAND SHIELDRemoving control unit shield1. Undo the bolts (A) using the ignition keyor a suitable screwdriver; exert slight pressureon the left side of the shield in the directionshown by the arrows to facilitatethe release of the two side retaining tabs,then remove the shield.2. After having removed the shield, disconnectthe connectors from the front of thecontrol unit and undo the bolts fixing thecontrol unit to the dashboard. Move thecontrol unit aside, disconnect the connectorsfrom the rear and remove the controlunit from the dashboard.Suitably reverse the operations carriedout for the removalRefitting control unit shield3. Position the shield in the housing in thedashboard, inserting the centering tabs locatedon the lower part.4. Turn the shield upwards, until it is contactwith the dashboard.Complete the refitting, proceeding as follows(see figure 1):- position the two bolts (A) in their housingsand tighten them by several turns;- taking great care, exert slight pressure onthe left side of the shield (at both the sideand the front) so that the two side retainingtabs are fully inserted in the dashboard;- tighten the bolts (A).P4A16HL0416 XI-98 - Update Print no. 506.670/17
<strong>Bravo</strong>- <strong>Brava</strong>1998 rangeElectrical equipmentControl panel55.VEGLIA BORLETTI CONTROL PANEL TURBO DIESEL VERSION FOR OUTFITS: SX, (75CVSOFT), SX, GT, HSX (105BHP JTD)4 5 6 7 8 9 10 11 1219 18 1716 15 20 14 13VEGLIA BORLETTI CONTROL PANEL PETROL VERSIONS FOR OUTFITS: SX, GT, HSXFront side of control panel1. Fuel gauge2. Fuel reserve warning light3. Speedometer4. A.B.S. failure warning light5. Brake pad wear warning light6. Left direction indicator warning light7. Side lights warning light8. Right direction indicator warning light9. Main beam headlamps warning light10. Handbrake applied/insufficient brakelevel warning light11. Rev counter12. Engine coolant temperature gauge13. EURO BAG system failure warning lightfluid14. Odometer15. Low engine oil pressure warning light16. Battery recharging warning light17. Injection system failure warning light (notpresent for 1910 SOFT TD)18. FIAT CODE system failure warning light19. Glow plug warning light (only for TD versions)20. Insufficient engine oil level warning light(only for JTD versions)Copyright Fiat Auto 17
Electrical equipmentControl panel<strong>Bravo</strong>-<strong>Brava</strong>1998 range55.Wiring diagram for outfits PETROL SX, GT, HSX and TURBO DIESEL SX, GT, HSX (105BHPJTD)* Present for Turbo Diesel JTD versions6. Instrument panel:A Battery recharging warning lightB Low engine oil pressure warning lightB1 Insufficient engine oil level warning light(only for 1910 JTD)C Left direction indicator warning lightD Right direction indicator warning lightE Side lights warning lightF Instrument panel ideogram lightG Main beam headlamps warning lightH EURO BAG system failure warning lightI Anti-lock brakes failure warning lightJ1 Fuel reserve warning lightK Fuel gaugeL Fiat-CODE failure warning lightM Petrol/Diesel injection system failure warninglight0 Glow plug warning light (only for 1910 JTD)Q Front brake pad wear warning lightR Handbrake applied/insufficient brake fluidlevel warning lightV1 SpeedometerW Rev counterX Engine coolant temperature gaugeY Electronic moduleZ Milometer/trip meter displayZ1 Trip meter zeroing buttonZ2 Z2 Trip counter display light18 ;..V>< : 93. SiifJcrsfife'^'rei/ious- version. '" Publication n° 506.670/21
<strong>Bravo</strong>-<strong>Brava</strong>Electrical equipment1998 range Control panel55.Wiring diagram for TURBO DIESEL SX outfits (75 bhp SOFT)'Present for Turbo Diesel versions (75 bhp SOFT)4A18HL026. Instrument panel:A Battery recharging warning lightB Low engine oil pressure warning lightC Left direction indicator warning lightD Right direction indicator warning lightE Side lights warning lightF Instrument panel ideogram lightG Main beam headlamps warning lightH EURO BAG system failure warning lightI Anti-lock brakes failure warning lightJ1 Fuel reserve warning lightK Fuel gaugeL Fiat-CODE failure warning lightM Petrol/Diesel injection system failure warninglightO Glow plug warning lightQ Front brake pad wear warning lightR Handbrake applied/insufficient brake fluidlevel warning lightV1 SpeedometerW Rev counterX Engine coolant temperature gaugeY Electronic moduleZ Milometer/trip meter displayZ1 Trip meter zeroing buttonZ2 Trip counter display lightCopyright Fiat Auto 18/1
Electrical equipmentControl panel<strong>Bravo</strong>- <strong>Brava</strong>1998 range55.VEGLIA BORLETTI CONTROL PANEL TURBO DIESEL VERSION FOR OUTFITS: ELX (105CVJTD)3 4 56789 10 11 1221 20 1918 17 22 16 15 14 13VEGLIA BORLETTI CONTROL PANEL PETROL VERSIONS FOR OUTFITS: ELX3 4 56789 10 11 1220 19 18 17 16 15 14 13Control panel front side1. Fuel gauge2. Fuel reserve warning light3. Speedometer4. A.B.S. failure warning light5. Brake pad wear warning light6. Left direction indicator warning light7. Side lights warning light8. Right direction indicator warning light9. Main beam headlamps warning light10. Handbrake applied/insufficient brakelevel warning light11. Rev counter12. Engine coolant temperature gauge13. EURO BAG system failure warning light14. Brake lights failure warning lightfluid15. Doors open warning ilght16. Odometer17. Low engine oil pressure warning light18. Battery recharging warning light19. Injection system failure warning light20. Fiat CODE system failure warning light21. Glow plug warning light (only for JTD versions)22. Insufficient engine oil level warning light(only for JTD versions)18/2 - \- X^-'-tiijda!?;' Publication n° 506.670/21
<strong>Bravo</strong>- <strong>Brava</strong>1998 rangeElectrical equipmentControl panel55.Wiring diagram for PETROL ELX and TURBO DIESEL (105bhp JTD) ELX outfits'Present for Turbo Diesel 1910 JTD versionsPresent only for Turbo Diesel versions(105bhpJTD)6. Instrument panel:A Battery recharging warning lightB Low engine oil pressure warning lightB1 Insufficient engine oil level warning light(only for JTD)C Left direction indicator warning lightD Right direction indicator warning lightE Side lights warning lightF Instrument panel symbol lightG Main beam headlamps warning lightH EURO BAG system failure warning lightI Anti-lock brakes failure warning lightJ1 Fuel reserve warning lightK Fuel gaugeL Fiat-CODE failure warning lightM Petrol/Diesel injection system failure warninglightO Glow plug warning light (only for JTD)Q Front brake pad wear warning lightR Handbrake applied/insufficient brake fluidlevel warning lightS Brake lights failure electronic moduleT Brake lights failure warning lightU Doors open warning ilghtV1 SpeedometerW Rev counterX Engine coolant temperature gaugeY Electronic moduleZ Milometer/trip meter displayZ1 Trip meter zeroing buttonZ2 Z2 Trip counter display lightCopyright Fiat Auto 18/3
Electrical equipmentControl panel55.Operations to be carried out when replacing control panel<strong>Bravo</strong>- <strong>Brava</strong>1998 rangeNew instrument panels come with caps in pi ace of the ABS and AIR-BAG device warning lights. Thecaps must therefore be replaced with the releavnt warning lights if one or both devices are present.Location of caps on VEGLIA BORLETTI instrument panelLocation of caps on NSI instrument panelLocation of caps on VEGLIA BORLETTI instrument panel with automatic transmission18/4 x^s ■ ■ppdie,' ■ ■:' -■ Publication n° 506.670/21
<strong>Bravo</strong>- <strong>Brava</strong>1998 rangeElectrical equipmentControl panel55.nv i / /Rear side (connector seats are shown)BConnector A on left front leadNo.pin123456789101112131415161718WiringcoloursMBNBRCLMNLNHNHGVGRV-HLRCNHBSBHMLCircuit involvedElectronic brake disributor failure(EBD)Brake fluid levelBrake lining wearGlow plug preheating (Turbo Dieselversions)Fiat CODEInjection failure (not present forTurbo Diesel 75 BHP SOFT versions)GeneratorLow engine oil pressureLow engine oil level (1910 JTDversions)ABS system failureNot connectedSpeedometer signal+ 30 batterySpeedometer generator supplyEngine coolant temperatureOutdoor temperature serial signalSpeedometer signalRev counter signalConnector B on facia leadNo.pin1234567891011121314151617181920212223242526WiringcolourRGBRLG--ANAGNVNBNRN--GRNHRVBARNZ-HMCircuit involvedLeft car brake light failureBrake lightNot connectedEuro-bag device failureNot connectedNot connectedNot connectedLeft turn signalRight turn signalNot connectedSide lightsMain beam headlampsHandbrake onRight car brake light failureNot connectedNot connectedNot connectedInstrument panel lightEarth (lighting)Fuel levelOutdoor temperature display+ 15Electronic earthNot connectedSpeedometer signalNot connected
Electrical equipmentControl panel<strong>Bravo</strong>-<strong>Brava</strong>1998 range55.TURBO DIESEL VERSION NSI CONTROL PANEL FOR OUTFITS: SX, (75BHP SOFT), SX, GT,HSX (105C V JTD)4 5 6 7 8 9 10 11 1219 18 1716 15 20 14 13PETROL VERSION NSI CONTROL PANEL FOR OUTFITS: SX, GT, HSX4 5 6 7 8 9 10 11 1218 1716 15 14 13Control panel front side1. Fuel level gauge2. Fuel reserve warning light3. Speedometer4. A.B.S. failure warning light5. Brake pad wear warning light6. Left direction indicator warning light7. Side lights warning light8. Right direction indicator warning light9. Main beam headlamps warning light10. Handbrake applied/insufficient brake fluidlevel warning light11. Rev counter12. Engine coolant temperature gauge13. EURO BAG system failure warning light14. Odometer15. Low engine oil pressure warning light16. Battery recharging warning light17. Injection system failure warning light (notpresent for 1910 SOFT TD)18. Fiat CODE system failure warning light19. Glow plug warning light (only for TD versions)20. Insufficient engine oil level warning light(only for JTD versions)20 X-99 ■- Sufietefides previous version Publication n° 506.670/21
<strong>Bravo</strong>- <strong>Brava</strong>1998 rangeElectrical equipmentControl panel55.Wiring diagram for outfits PETROL SX, GT, HSX and TURBO DIESEL SX (75BHP SOFT), SX,GT, HSX (105BHP JTD)^ \'f f f 'f 'f f | 'f f f - | y ip ^ i|ry^ it'.n It » a 'fl 1' | a B B B ^ » I V f tf y a 'tf12 3 4 5 6 7 8 9101112131415161718 12 3 4 5 6 7 8 91011121314151617181920212223242526zip■ ol l I II I I Iyi11 I I I IBBBBBBKM 55fffl* Present for Turbo Diesel versions (75BHPSOFT)Present only for Turbo(105BHP JTD)Dieselversions6. Instrument panel:A Battery recharging warning lightB Low engine oil pressure warning lightB1 Low engine oil pressure warning lightC Left direction indicator warning lightD Right direction indicator warning lightE Side lights warning lightF Instrument panel ideogram lightG Main beam headlamps warning lightH EURO BAG system failure warning lightI Anti-lock brakes failure warning lightJ1 Fuel reserve warning lightK Fuel gaugeL Fiat-CODE failure warning lightM Injection system failure warning lightO Glow plug warning light (only for Turbo Diesel)Q Front brake pad wear warning lightR Handbrake applied/insufficient brake fluidlevel warning lightV1 SpeedometerW Rev counterX Engine coolant temperature gaugeY Electronic moduleY1 Speed control moduleZ Milometer/trip meter displayZ1 Trip meter zeroing buttonZ2 Trip counter display lightCopyright Fiat Auto"--•■w■.'ill 1 : ■"■-'• _i'''■"!"-■■"HK-r-■!■;,.-•!,■ ■ .1..-.,--v• ii.iiTfi'y"'.!;"21
Electrical equipmentControl panel55.PETROL VERSION NSI CONTROL PANEL FOR OUTFITS: ELX<strong>Bravo</strong>- <strong>Brava</strong>1998 range20 19 18 17 15 14 13PETROL VERSION NSI CONTROL PANEL FOR OUTFITS: HGT20 19 18 17 15 14 13Control panel front side1. Fuel gauge2. Fuel reserve warning light3. Speedometer4. A.B.S. failure warning light5. Brake pad wear warning light6. Left direction indicator warning light7. Side lights warning light8. Right direction indicator warning light9. Main beam headlamps warning light10. Handbrake applied/insufficient brakelevel warning light11. Rev counterfluid12. Engine coolant temperature gauge13. EURO BAG system failure warning light14. Brake lights failure warning light15. Doors open warning ilght16. Odometer17. Low engine oil pressure warning light18. Battery recharging warning light19. Injection system failure warning light20. Fiat CODE system failure warning light22 j ■'• 3C-99 . Sl'ipBtsedes previous' yitfsUin Print n° 506.670/21
<strong>Bravo</strong>- <strong>Brava</strong>1998 rangeTURBO DIESEL VERSION NSI CONTROL PANEL FOR OUTFIT:ELX (105BHP JTD)Electrical equipmentControl panel55.21 20 1918 17 22 16 15 14 13Control panel front sideKey1. Fuel gauge2. Fuel reserve warning light3. Speedometer4. A.B.S. failure warning light5. Brake pad wear warning light6. Left direction indicator warning light7. Side lights warning light8. Right direction indicator warning light9. Main beam headlamps warning light10. Handbrake applied/insufficient brakelevel warning light11. Rev counter12. Engine coolant temperature gaugefluid13. EURO BAG system failure warning light14. Brake lights failure warning light15. Doors open warning ilght16. Odometer17. Low engine oil pressure warning light18. Battery recharging warning light19. Injection system failure warning light20. Fiat CODE system failure warning light21. Glow plug warning light22. Engine oil warning lightCopyright Fiat Auto ■" X-99 - Upctate 22/1
Electrical equipmentControl panel55.Wiring diagram for SX - GT outfits<strong>Bravo</strong>- Btava1998 rangeAw 'i' * ip ip a- 'j i' i- i- a »■» •it it fYW\ j'f 'f f V f E a 'f 'f m 'f 'f 'f f f m * 'f 'f 'f r Bf f 'f Tft12 3 4 5 6 7 8 910111213141516171812 3 4 5 6 7 8 91011121314151617181920212223242526 cM ■ bv. v.2 Y' o11111BBBBBBKM 5555Present for 1910 JTD versions6. Instrument panel:A Battery recharging warning lightB Low engine oil pressure warning lightB1 Insufficient engine oil level warning light(only forJTD versions)C Left direction indicator warning lightD Right direction indicator warning lightE Side lights warning lightF Instrument panel ideogram lightG Main beam headlamps warning lightH EURO BAG system failure warning lightI Anti-lock brakes failure warning lightJ1 Fuel reserve warning lightK Fuel gaugeL Fiat-CODE failure warning lightM Petrol/Diesel injection system failure warninglight0 Glow plug warning light (only for JTD versions)Q Front brake pad wear warning lightR Handbrake applied/insufficient brake fluidlevel warning lightS Brake lights failure electronic moduleT Brake lights failure warning lightU Doors open warning ilghtV1 SpeedometerW Rev counterX Engine coolant temperature gaugeY Electronic moduleY1 Speed control moduleZ Milometer/trip meter displayZ1 Trip meter zeroing buttonZ2 Trip counter display light22/2 X-99- Update Publication n° 506.670/21
<strong>Bravo</strong>- <strong>Brava</strong>1998 rangeElectrical equipmentControl panel55.Rear side (connector sockets are shown)Connector A on left front leadNo.pin123456789101112131415161718WiringColourMBNBRCLMNLNHNHGVGRV-HLRCNHBSBHMLCircuit involvedElectronic brakeforce distributor(EBD) failureBrake fluid levelBrake lining wearGlow plug preheating (Turbo Dieselversions)Fiat CODEInjection failure (Not present forTurbo Diesel 75 BHP SOFT versions)GeneratorInsufficient engine oil pressureInsufficient engine oil level (notpresent for HGT)ABS failureNot connectedSpeedometer signal+ 30 batterySpeedometer generator power supplyEngine coolant temperatureOutdoor temperature serial signalSpeedometer signalRev counter signalConnector B on facia leadNo.pin1234567891011121314151617181920212223242526WiringColourRGBR-LGBL--ANA-GNVNBNRNBHNR-GRNHRVBARNZ-HM-Circuit involvedLeft car brake light failureBrake lightNot connectedEuro-Bag device failurePassenger Euro-bag deactivatedNot connectedNot connectedLeft turn signalRight turn signalNot connectedSide lightsMain beam headlampsHandbrake onRight car brake light failureDoors openBoot open (not present for ELX)Not connectedInstrument panel lightEarth (lighting)Fuel levelOutdoor temperature display+ 15Electronic earthNot connectedSpeedometer signalNot connectedCopyright Fiat Autom&mp^3*>Z&>>23
Electrical equipmentControl panel55.PETROL VERSION VEGLIA BORLETTI CONTROL PANEL FOR OUTFIT:SX, ELX (1581 WITH AUTOMATIC TRANSMISSION)<strong>Bravo</strong>- <strong>Brava</strong>1998 range22 2120 19 18 17 16 15 14 1312 1110 94A24HL01Front side of control panelsKey1. Fuel reserve warning light2. Fuel gauge3. Rev counter4. Left direction indicator warning light5. Right direction indicator warning light6. Odometer7. Speedometer8. Engine coolant temperature gauge9. A.B.S. failure warning light10. Fiat CODE system failure warning light11. Brake pad wear warning light12. Handbrake applied/insufficient brakelevel warning lightfluid13. Doors open warning ilght14. Brake lights failure warning light15. Automatic transmission warning light16. Low engine oil pressure warning light17. Battery recharging warning light18. Injection system failure warning light19. Main beam headlamps warning light20. Side light failure warning light21. EURO BAG system failure warning light22. Automatic transmission system failurewarning light24 ;--' X,9S . S»Jp B rseti6S3-pfWJoUs«ef«on Publication n° 506.670/21
<strong>Bravo</strong>- <strong>Brava</strong>1998 rangeElectrical equipmentControl panel55.Wiring diagram for PETROL version, SX, ELX (1581 with AUTOMATIC TRANSMISSION)\M \'jt '1' 'it ' t . m 'If * a a 'J 'it 'if 'if '1''1' m'ifm] gJ W |' '| N a 'tf a 1' 'if a tf 'tf 'tf 'it 'It a Y Y 'if iIcj| y f y E 4 ? f E12 3 4 5 6 7 8 9 1011121314151617181920 12 3 4 5 6 7 8 91011121314151617181920 12 3 4 5 6 7BBBBBB -rKM fflffflfft,(§PIn6. Instrument panel:A Battery recharging warning lightB Low engine oil pressure warning lightC Left turn signal warning lightD Right turn signal warning lightE Side lights warning lightF Instrument panel ideogram lightG Main beam headlamps warning lightH EURO BAG system failure warning lightI Anti-lock brakes failure warning lightJ Fuel reserve circuit control moduleJ1 Fuel reserve warning lightK Fuel gaugeL Fiat-CODE failure warning lightM Petrol injection system failure warning lightP Automatic transmission failure warning lightP1 Automatic transmission circuit control moduleQ Front brake pad wear warning lightR Handbrake applied/insufficient brake fluidlevel warning lightS Brake lights failure warning device electronicmoduleT Brake lights failure warning lightU Doors open warning ilghtV Speedometer control moduleV1 SpeedometerW Rev counterX Engine coolant temperature gaugeZ Milometer/trip meter displayZ1 Trip meter zeroing button
Electrical equipmentControl module55.<strong>Bravo</strong>- <strong>Brava</strong>1998 rangePresent only for ELX versionRear side (connector sockets are shown)Connector A on left front leadNo.pin1234567891011121314151617181920WiringColourHNBNLNR--BRMN--HGHMCNLHBRVCircuit involvedGeneratorBrake fluid levelInjection failure+30 batteryNot connectedNot connectedNot connectedBrake lining wearFiat CODENot connectedNot connectedInsufficient engine oil pressureSpeedometer signalNot connectedSpeedometer generator powersupplyRev counter signalEngine coolant temperatureNot connectedABS system failureNot connected26 ' X 9D Supersedes previous versionPublication n° 506.670/21
<strong>Bravo</strong>- <strong>Brava</strong>1998 range1020. \ n n n nn n n nmn n £Tti n\Zx +++ u +++++ u +++ /I++++ +++++J1i_7Electrical equipmentControl panel55.Connector B on facia leadNo.pinWiringColourCircuit involvedNo.pinWiringColourCircuit involved123456789VNGRGN-BN-NHG-Main beam headlampsInstrument panel lightSide lightsNot connectedHandbrake onNot connectedEarthSpeedometer output 1Not connected1011121314151617181920ANA-ZNNZ-HRARLG--Left turn signalRight turn signalNot connectedAutomatic transmission signalElectronic earthNot connectedFuel level+ 15Euro-bag device failureNot connectedNot connectedConnector CNo.pin12345678WiringColourBHRGRNARNBRCircuit involvedBoot openLeft brake light failureRight brake light failure+ 15 batteryElectronic earthNot connectedBrake lightNot connectedCopyright Fiat Auto X-d9-~:St]p0rsede& pwious iiqisfon 27
Electrical equipmentControl panel<strong>Bravo</strong>- <strong>Brava</strong>1998 range55.The following tables contain values for checking the various gauge positions: fuel level and coolant levelFUEL GAUGEValues for checking settingsPointer position' 4/4 (F)1/2Start of reserve0(E)Value in Ohms16 ± 6140 ±5240 ± 5292.5 ± 9NHRElectrical operating diagramFuel gauge1. Left dashboard earth2. Junction unit3. Instrument panel4. Fuel gauge5. Fuel gauge control module6. Fuel reserve warning light7. Fuel level gauge8. Right rear earthN9i)1AR2 *112-• rh« 1+15 LJT YB22 B23a^ 4. B20rNZ-HRC3LfCOOLANT TEMPERATURE GAUGEENGINE COOLANTTemperatureofCoolant (°C)5080- 100130SensorValue (Ohms)820 ± 36273-143 *"62 ± 4Pointerposition0°45°90°28 X*9& ■■ Sutiufsctlcs tKeviotis vftfStofl Publication n° 506.670/21
<strong>Bravo</strong>- <strong>Brava</strong>1998 rangeWARNING LIGHTSElectrical equipmentControl panelWarning lights for Turbo Diesel and petrol versions with outfits: SX; HSX; GT.155.CODEo2 / -,DQr =D4 5 6 " 10 11 12 N 13 v1. Glow plug warning light (only for turbodiesel 7.versions) 8.2. Fiat-CODE failure warning light 9.3. Injection system failure warning light 10.4. Battery recharging warning light 11.5. Low engine oil pressure warning light6. Insufficient engine oil level warning light 12.(only for JTD versions) 13.9Brake pad wear warning lightSide lights warning lightMain beam headlamps warning lightA.B.S. failure warning lightHandbrake applied/insufficient brakelevel warning lightLeft direction indicator warning lightRight direction indicator warning lightfluid14. Passenger side EURO BAG system failurewarning lightWarning lights for turbo diesei and petrol versions with outfit: ELX.v uCODE1 2 /(O) 3** BD (0) (®) O Q4 5 6 *7 8 9 10 11 12 ^ 13 v1. Glow plug warning light (only for turbodiesel 7.versions) 8.2. Fiat-CODE failure warning light 9.3. Injection system failure warning light 10.4. Battery recharging warning light 11.5. Low engine oil pressure warning light6. Insufficient engine oil level warning light 12.(only for JTD versions) 13.Brake pad wear warning lightSide lights warning lightMain beam headlamps warning lightA.B.S. failure warning lightHandbrake applied/insufficient brakelevel warning lightLeft direction indicator warning lightRight direction indicator warning lightfluidISTOPI15 16914. Brake lights failure warning light15. Doors open warning ilght16. EURO BAG system failure warning lightCopyright Fiat Auto X-i39'- .SJipeisetkai previous-vetsloiti 29
Electrical equipmentControl panel55.Warning lights for petrol version with outfit: HGT<strong>Bravo</strong>- Btava1998 range•
<strong>Bravo</strong>-<strong>Brava</strong>98 rangeElectrical equipmentInstrument panel55.AUTOMATIC TRANSMISSION GEARS INDICATOROn versions with automatic transmission itindicates the gear engaged and the selctionmodeMILOMETERf Q 0 0 Q 0 0 'y y y y y y0 0 O 01 am y y ujy JWith the ignition ON, the milometer displaysthe total or partial mileage (by pressing thespecial button).If the button is pressed for longer than 0.7seconds, the trip meter is zeroedOUTSIDE TEMPERATUREOn versions fitted with climate control it ispossible, by pressing the button in the consolefor at least 1 second, to display the outsidetemperature (in °C), which is shown forabout 10 seconds; the instrument automaticallyreturns to the milometer function.If the outside temperature is below +3°C, it isdisplayed FLASHING for about 10 secondsin order to attract the driver's attention to thepossibility of it being icy.When the 10 seconds have elapsed, the dispay automatically returns to the milometer state for 20 secondsand then the outside temperature is flashed for 10 seconds.The sequence described above is known as the "warning cycle".This takes place only once after the detection of an outside temperature below +3 °C and can only be repeatedafter the outside temperature goes above 6 °C and then below 3 °C.With the ignition ON and the outside temperature below 3 °C the instrument displays the "warning cycle"for the first 10 seconds.If, during the first 10 seconds after the ignition is switched on, the outside temperature button ispressed, the "warning cycle" does not take place and the switching tothe outside temperature state isimmediate.Pressing the zeroing button during the warning cycle has the following effect:Pressing the button for 1 second whilst the temperature is displayed causes the "warning cycle" to stop;pressing it for 1 second during the 20 seconds when the mileage is displayed causes the zeroing of thetrip meter, but does not interrupt the "warning cycle".The milometer display is also used to carry out a fault diagnosis of the thermostaticallyair conditioning electronic system (see group 50)adjustedCopyright by Fiat Auto XI-98 - Update 31
Electrical equipmentInstrument panel55.<strong>Bravo</strong>-<strong>Brava</strong>98 rangeTFTT^Z7T7REMOVING-REFITTINGRemove the steering column upper and lowercovers and then proceed as described below:1. Remove the protective cover for the junctionunit. Undo the outer bolt fixing theinstrument panel frame.2. Undo the outer bolts fixing the instrumentpanel frame.3. Extract the frame from the dashboard afterhaving disconnected the connector for theheadlamp dimmer (shown by the arrow).4. Undo the bolts fixing the instrument panelto the dashboard.5. Disconnect the two electrical connectionsfor the instrument panel and remove itfrom the vehicle.32 XI-98 - Update Print no. 506.670/17
<strong>Bravo</strong>-<strong>Brava</strong>98 rangeElectrical equipmentLighting55.REMOVING-REFITTING REAR COURTESY LIGHT AND REPLACING BULBUsing a screwdriver in the side slit, removethe courtesy light from its housing;P4A33HL02disconnect the connector and remove thecourtesy light;P4A33HL03release the bulb from the flexible tabs andremove it.Copyright by Fiat Auto XI-98 - Update 33
Electrical equipmentVarious devices55.<strong>Bravo</strong>-Btava98 rangeLOCATION OF ADDITIONAL FUSES - RELAYS (dashboard - passenger side)1. Undo the bolts shown in the diagram andextract the glove compartment from itshousing;2^ - f 3 ] ) -V'm.'0 \_fi$// / /l2. disconnect the electrical connector andremove the glove compartment from thevehicle, behind which the additional relaysand fuses are located.INERTIA SWITCH3. The inertia switch is located inside the vehicleunder the dashboard on the driver'ssidePOWER ASSISTED STEERINGPUMP SENSOR4. Location of power assisted steering pumpsensor (valid for 1242 versions only)34 XI-98 - Update Print no. 506.670/17
<strong>Bravo</strong>-<strong>Brava</strong>98 rangeElectrical equipmentVarious devices55.CONTROL BUTTONS IN THE DASHBOARD1. Front fog lights (where fitted);2. Rear fog lamps;3. LED signalling "alarm on" (where fitted);4. Button for switching heated rear windscreenon/off;5. Button for outside temperature display6. Button for switching hazard warninglights on/offENGINE OIL LEVEL CONTROL UNITPINNo.12345678910111212 way connectorKey+ BatteryGNDSensor earthSensor positiveOutlet for warning lightSpareTestMagneti Marelli TestSpareSpareSpareThe 1919 JTD version is fitted with a warning light signalling the engine oil level operated by a controlunit located behind the glove compartment.The warning lights in the instrument panel carry out a self-test lasting about 2 seconds when the ignitionis switched on.If the engine oil level is below the minimum level, the electronic control unit switches on the warninglight for 30 seconds at a frequency of 2 Hz.In the case of a sensor short circuit or open circuit, there will be a signal consisting of 2 flashes at a frequencyof 2 Hz, a pause of 2 seconds and 2 flashes at 2 Hz with the cycle repeated 10 times in 30 seconds.With the voltage below 8.5 V, the control unit displays the engine oil level memorized at the last readingvia the warning light.With the engine oil level below the minimum level, the warning light remains on constantly for 30 seconds.Copyright by Fiat Auto XI-98 - Updit
Electrical equipmentRadio equipment<strong>Bravo</strong>-<strong>Brava</strong>98 rangeAD 182 H2 RADIO CASSETTE PLAYER4. VOL control: switching on/off of radio, adjustment of high/low tones and Balance/Fader functions2. Cassette eject button3. MODE button: selection of Radio, Audiocassette player and CD player functions; temporary pausein listening to audiocassette4. AUDIO-MUTE control: selection of Bass, Treble, Balance and Fader functions; MUTE fuction5. BAND button: selection of FM1, FM2, FM3, MW and LW bands; change side of audiocassette;section of AUTOSTORE function6. Audiocassette housing7.8. Buttons for recalling contents of IS memory; RDS transmitter searth; manual transmitter search; TPfunction volume setting; selection of PTY programmes; changing of audiocassette or CD track; fastforward/rewind of CD or audiocassette; sections of EXPERT control level adjustements9. TP button: selection of Traffic Program (TP) function and Types of programmes function (PTY);selection of Alternative Frequencies (AF) function10. Switch for programming station N1: selection of TRACK REPEAT function11. Switch for programming station N2: CD player TRACK REPEAT function12. Switch for programming station N3: selecting TRACK RANDOM function; setting time (hour); introducingsecret code figures13. Switch for programming station N4: selecting TP function volume; setting minutes; deactivatingclock syncrhonization with R DS Tl M ER signals; selecting LN R function; setting on volume; selectingradio suppressing function when "HANDS-FREE" phone is fitted; adjusting telephone inputsensitivity; keying in secret code figures; switching off BOOSTER delay14. Switch for programming station N5: selecting TP function volume; selecting previous CD; activatingsynchronization of clock with RDS TIMER signals; switching off LNR function; setting on volume;switching on BOOSTER delay; deactivating audio suppressing function when HANDS-FREEsystem is fitted; selecting telephone input sensitivity; keying in secret code15. Switch for programming station N6: selecting previous CD16. DOLBY function button17. LOUDNESS function on/off button18. Button for setting sensitivity for radiophone station search.19. SCAN/MSS button: activating/deactivating of audiocassette player MSS function; activating/deactivatingof CD player SCAN function20. IS button: tuning and automatic "intelligent" search21. EXP button: activating EXPERT control level36 XI-98 - Update Print no. 506.670/17
<strong>Bravo</strong>-<strong>Brava</strong>98 rangeElectrical equipmentRadio equipment55.GENERAL DESCRIPTIONThe vehicle is available, on request, with a radio system consisting of the following main components:- radio cassette player (which cannot be removed) model AD 1 82 H2 fitted in place of the previous versionin the centre of the instrument panel. The personalized front section is fully integrated with theline of the dashboard;- six speakers, two of which are located at the sides in the upper part of the dashboard, two positionedas in the previous system in the inner panels of the front doors and, lastly, two located at the sides ofthe rear parcel shelf;- aerial located in the front centre section of the roof.- cable for connection with compact disc player (CD), if fitted;The AD 182 H2 radio cassette player contains the following functions:Radio section- PLL tuning with FM/MW/LW frequencybands- RDS (Radio Data System) with TP (TrafficProgram) - EON functions- Automatic / manual station tuning- Manual programming of 6 stations onFM1, FM2, FM3 bands and MW and LWbands- Automatic programming of transmittersthrough Autostore function at buttons1,2,3,4,5,6 on FM1, FM2, FM3, MW andLW bands- DX automatic function (Distant: maximumsensitivity in searching for radio stations)- Automatic programming (Autostore)Audiocassette functionAutoreverseTape fast forward or rewindMusic Search System function (automaticsearch for previous / next track)DOLBY B (noise reduction circuit) (*)Compact Disc section (if a CD player is fitted)- Disc selection (Disc No.)- Track selection (forwards / backwards)- Track scanning (SCAN function)- Fast forward or rewind (TRACK FASTfunction)- Track repetition (TRACK REPEAT)- Track repetition (REPEAT function)- Track repetition in random order (TRACKRANDOM function)Audio sectionLoudness FunctionMute FunctionPause FunctionSeparate adjustment of high / low tonesRight / left and front / rear channels balanceRadio on / off logic selectionTP function volume level pre-settingClock section- Adjustment of hours / minutes- Expert control level section- Anti-theft protection(*) The DOLBY noise reduction circuit is manufacturered, under licence, by Dolby Laboratories LicensingCorporation. DOLBY and the double D symbol are the registered trade marks.Copyright by Fiat Auto XI-08* Update 37
Electrical equipmentRadio equipment55.<strong>Bravo</strong>-<strong>Brava</strong>98 rangeOPERATIONSwitching on the radioPress the VOL control (1) once: the radioshould come on. If the radio is on when theengine is switched off, it switches off automaticallyafter about 20 minutes.iGn on3 1/on OFFSwitching on/off with engine started up-/switched offThe radio contains a switching on logicwhich, if activated, allows the radio to beswitched on/off at the same time as the engineis started up/switched off.If the logic is activated: when the engine isstarted up/switched off, the radio is autoamticallyswitched on/off;If the logic is not activated: the switchingon/off of the engine takes place independentlyof the switching on/off of the radio.To activate this logic, keep the button 5 forselecting stations (1) with the radio switchedoff pressed until the words "IGN ON" appearon the display, then switch on the radio usingthe VOL control (2).The logic is only activated whenthe radio isswitched on via the VOL control.To deactivate this logic, keep the button 4 forselecting stations (3) with the radio switchedoff pressed until the message "IGN OFF" appearson the display.Selecting radio/audiocassette/CompactDisc functionsPress the MODE button (1) repeatedly tocyclically select one of the following functions:- RADIO, the displays will temporarily showthe message "RADIO"- AUDIOCASSETTE (if switched on previously),the display will temporarily showthe message "TAPE A" or "TAPE B"- COMPACT DISC (if a Compact Disc playeris fitted), the display will show the message"MCD"NOTE The functions which cannot be selectedare automatically excluded.38 Xl-98 4 Update Print no. 506.670/17
<strong>Bravo</strong>-<strong>Brava</strong>98 rangeElectrical equipmentRadio equipment55.Pause functionIf another function (such as for example theradio) is selected whilst listening to an audiocassetteor a Compact Disc, the reproductionis halted and on returning to the "Audiocassette"or "Compact Disc" mode it continuesfrom where it left off. If another functionis selected whilst listening to the radio, whenreturning to the "Radio" mode, the last stationselected is tuned into.Adjusting the VOLUMEThe desired volume is adjusted using theVOL control (1).The volume level, between "VOL 00" and"VOL 31" is shown on the display during theadjustment.Adjustment of LOW and HIGH tones (BASSand TREB)Select the "BASS" or "TREB" function bypressing the AUDIO button (2) briefly onceor more.Having selected the function, adjust the desiredsound using the VOL control (1).To restore the basic adjustment, press theAUDIO button (2) for about 3 seconds untilthe message "00" or"--" appears on the display.Adjusting the BALANCE between the leftand right speakersBflL L-RThe balance is the "volume ratio" betweenthe left and right speakers.The adjustment is possible by pressing theAUDIO button (2) briefly several times to selectthe "BALANCE" function. The displaywill show the message "BAL L- -R". The desiredbalance can be obtained by regulatingthe VOL control (1).The values which can be selected range from®ctd)e$S)re the basic setting, press the AUDIObutton (2) for about 3 seconds until the message"00" or "- -" appears on the display.Copyright by Fiat Auto XI-98 - Update 39
Electrical equipmentRadio equipment55!<strong>Bravo</strong>-<strong>Brava</strong>9ft rangeAdjustment of balance between front andrear speakers (FADER)By selecting the FADER function it is possibleto modify the "distribution of the volume"between the front and rear speakers.The FADER function is selected by pressingthe AUDIO button (1) once or more until themessage "FAD 0" appears on the display.The VOL control (2) is used to adjust the intensityof the sound, accentuating the soundcoming from the front speakers or from therear speakers.P4A40HL01LOUDP4A40HL02LOUDNESS functionThe LOU DIM ESS function involves improvingthe sound with the volume turned down.By pressing the LOUD button (1) this functionis activated and the message "LOUD"appears on the display.To deactivate the function activated previously,simply press the LOUD button (1)again.MUTE functionBy pressing the AUDIO button (1) for about3 seconds, the MUTE function is selectedand the message "MUTE ON" appears on thedisplay (diagram below).To deactivate this function, the AUDIO buttonhas to be pressed again. The message"MUTE OFF" will appear on the display.When the Mute function is selected, the radiono longer sends any signals to the speakers.RADIO functionReception conditions vary constantlywhilst driving. Receptioncan be interefered with by the presenceof mountains, buildingsorbridges, especially when the transmitteris far away.P4A40HL03IMOTE When the "RADIO" function is activated,the last station listened to beforeswitching off is received.40 XI-98 - Update Print no. 506.670/17
<strong>Bravo</strong>-<strong>Brava</strong>98 rangeElectrical equipmentRadio equipment55.Selecting a functionRADIOAs soon as the system is switched on, the radiois played. To select the Radio functionwhilst listening to a cassette or a CompactDisc, press the MODE button (1) repeatedlyuntil the word "RADIO" appears on the display.Selecting a bandBy pressing the BAND button (1) briefly severaltimes it is possible to select the availablebands. The display shows the message forthe band selected. The possible messagesare:"FM1 FM2", "FM3" for FM frequencybands"MW", medium wave, 'LW", long wave,for AM bands.Automatic intelligent turning (IS function)I
Electrical equipmentRadio equipment<strong>Bravo</strong>-<strong>Brava</strong>98 rangeAutomatic tuning into RDS transmittersSelect the FM or AM frequency desired usingthe BAND control (1).The IS function should not be activated forthis type of selection. If the IS function isswitched on, press one of the "A" "T" buttons(2,3) for about 3 seconds until the message"IS - -" and then "IS OFF" appears onthe display.Pressing one of the "A" "T" buttons (2,3)briefly starts the automatic search.When an (RDS) transmitter with an identificationcode is found, it can be seen on thedisplay.DX FunctionThe DX function makes it possible to choosethe sensitivity with which to search for radiotransmitters. With the DX function activated,the radio only selects stations above a certainpower level. With the DX function deactivated,radio stations with lower power levels arealso selected. To activate the DX function,press the button (1); the function is then deactivatedif the same button is pressed again.Automatic memorizing of transmitters(AUTOSTORE Function)Select the frequency desired using the BAN Dcontrol (1). The message on the display willshow the frequency range selected.Press the BAN D control for about 6 seconds.The display will show firstly the message"AS" and then the scanning of the frequencies.When the scanning of the frequency range isover, the six most powerful transmitters areavailable with the buttons (1,2,3,4,5,6).P4A42HL0342 Update Print no. 506.670/17
<strong>Bravo</strong>-<strong>Brava</strong>98 rangeElectrical equipmentRadio equipment55.Manual programming of a transmitterSelect the frequency by repeatedly pressingthe BAND control (1). The display will showthe band selected: "FM1", "FM2", "FM3","MW" or "LW".Press one of the buttons "A" "▼" (2,3) forabout 6 seconds until the message "MAN"appears on the display and the radio frequencyis tuned in. It is possible to alter the tuningfrequency using the "A" "T" buttons.The station being listened to can be memorizedin the frequency range selected usingthe frequency selection buttons(1,2,3,4,5,6). To programme it press thepre-selected frequency selection button untilthe radio can be heard once again.The manual tuning can be concluded at anytime by pressing one of the frequency selectionbuttons or if no buttons are pressed forsixty seconds.Listening to programmed stationsSRCProceed as follows:1. Select the desired band using the BANDcontrol (1).2. Briefly press one of the frequency selectionbuttons (1,2,3,4,5,6).The display will show the button pressed andthe transmitter code if it is an RDS transmitter.If the transmitter selected offers an RDS serviceand the reception is not good, the radiowill search for an alternative frequency. Thedisplay will show "SRC" during the search.TP Function (TRAFFIC PROGRAM)Several stations beloning to RDS1, RDS2 bands also broadcast traffic news. With the TP (Traffic Program)function it is possible to:a) search for RDS stations only broadcasting traffic news;b) receive traffic news even if the cassette player or Compact Disc player are working;c) receive traffic news at a pre-set quiet volume even with radio volume at zero.Copyright by Fiat Auto XI-98 - Update 43
Electrical equipmentRadio equipment55.<strong>Bravo</strong>-<strong>Brava</strong>98 rangeNOTE Below are the instructions for carryingout each of the operations illustratedin points a), b) and c) mentionedpreviously.TPPoint a)To select a transmitter with a traffic news service,press the TP button (1) briefly. Themessage "TP" will appear on the display.If the transmitter is not enabled to providetraffic news, the radio will automatically tuneinto the nearest enabled transmitter andbroadcast it.Several transmitters, providing a traffic news service, can be programmed using the station selectionbuttons. Follow the instructions in the "Tuning into and programming a transmitter" paragraph, pressingthe TP button at the beginning to activate the TP function.As an alternative to the manual programming, it is possible to follow the instructions in the "Automatictransmitter programming (AUTOSTORE)" paragraph, pressing the TP button at the beginning to activatethe TP function.Point b)If you wish to receive traffic news, before inserting the audio cassette or Compact Disc, tune into anRDS TP transmitter. If, whilst listening to a cassette or a Compact Disc, there is a traffic news flash, thereproduction of the tape or the Compact Disc will be temporarily halted and then resumed automaticallyafterwards.Point c)It is possible to receive traffic news even when not listening to the radio. After having tuned into anRDS TP transmitter and set the volume level at zero, if this transmitter broadcasts traffic news, it can beheard at a pre-set low volume.In some countries there are radiostations which, even though the TPfunction is activated, do not transmittraffic news.EXPERTTR VQLSetting TP function volume level (TrafficProgram)To select the volume for the traffic news,press the EXP button (1) until the message"EXPERT" appears on the display. Thenpress the "A" (2), "T" (3) buttons until thedisplay shows the message "TA VOL..". Usingbuttons 4 (4) and 5 (5) it is possible toselect the desired volume. The volume canvary from 5 to 31.44 %l-9§ -ilpjiaii Print no. 506.670/17
<strong>Bravo</strong>-<strong>Brava</strong>98 rangeElectrical equipmentRadio equipment55.EON Function (ENHANCED OTHER NETWORK)In some countries there are networks whichgroup together several transmitters enabledto broadcast traffic news.In these cases listening to an RDS TP stationprogramme will be temporarily interrupted toreceive traffic news each time it is transmittedby one of the broadcasters on the same network.To exclude this function (EON), press the"TP" button (1) briefly; the LED under thebutton will go out.PTY FunctionSeveral transmitters offer the "Types of programme"(PTY) service in the FM range. ThePTY function can be used to automaticallyselect a transmitter offering a certain type ofprogramme, for example, classical music.PTY automatic searchPTy onThe search can be carried out by allocating 6types of programmes, selected at will, to thestation selection buttons (1,2,3,4,5,6) or byselecting the type of programme from the listmemorized and then starting the search.For further details, refer to the paragraphs below.Programming desired types of programmes using the station selection buttonsPress the TP button (1, in the diagram above) for about 6 seconds until the display shows the message"PTY ON". Select the type of programme desired using the " k" (2), "T" (3) buttons.Having identified the type of programme desired, for example, classical music "CLASSICS", press thestation selection button (1,2,3,4,5,6) desidered for more than 2 seconds. The type of programme selectedwill be associated with the button pressed.Each station selection button makes it possible to listen to a particular type of programme by repeatingthe procedure described above.To start the automatic search for a transmitter broadcasing a certain type of programme, press the TPbutton (1) again for about 6 seconds.The display will show the message "PTY ON". The press the station selection button for the type of programmedesired. The display will show the type of programme selected. The automatic search can beinitiated by pressing one of the " k" (2), "T"(3) buttons for about 2 seconds. The search is interruptedwhen a transmitter broadcasting the type of programme desired is found.Copyright by Fiat Auto XI-98 - Update 45
Electrical equipmentRadio equipment55.<strong>Bravo</strong>-Btava98 rangeList of types of programme availableP4A46HL01The types of programme offered by a radiostation can change according to the programmebroadcast.NEWS News and current eventsAFFAIRS Politics and current affairsINFO Special information programmesSPORT SportEDUCATE EducationDRAMA Drama and literatureCULTURE Culture, church and religionSCIENCE ScienceVARIED VarietyPOP Pop music (hits)ROCK M Rock musicEASY M Light musicLIGHT M Light classical musicCLASSICS Classical musicOTHER M Music programmes which cannotbe classified (e.g. folk)Tuning into the type of programme usingthe listActivate the PTY function by pressing the TP(1) button for about 6 seconds until the displayshows the message "PTY ON".By repeatedly pressing one of the "A" "T"(2,3) buttons, the display will graduallyshow the types of programme available fromthe list. Having identified the type of programmedesired, press one of the " " " " buttonsfor about 2 seconds to start the automaticsearch. The search stops when the radiotunes into a transmitter broadcasting thetype of programme selected. The display willshow the type of programme, for example"CLASSICS".WEATHER Weather forecastsFINANCE Financial newsCHILDREN Childrens broadcastsSOCIAL A Social informationRELIGION Religion/philosophy broadcastsPHONE IN Phone insTRAVEL Travel informationLEISURE Leisure, hobby and pastimesJAZZ Jazz musicCOUNTRY Country musicNATIONAL National broadcastsOLDIES Golden OldiesFOLK M Folk musicDOCU Special servicesNO PTY No identification code for the typeof programmeAlternative frequencies (AF)If an RDS programme is being received,which is broadcast by several transmitters atdifferent frequencies, the radio will automaticallyswitch to the frequency with the best reception.To activate the AF function, press the TP button(1) until the display shows the message"AF ON".To deactivate the AF function, press the TPbutton (1) until the display shows the message"AF OFF".46 XI-98 - Update Print no. 506.670/17
<strong>Bravo</strong>-<strong>Brava</strong>98 rangeElectrical equipmentRadio equipment55.AUDIO CASSETTE PLAYERI OKUTM.STEREOActivating the audio cassette playerTAPE RTAPE BThe radio is fitted with an audio cassetteplayer which can be activated by introducinga cassette directly or, when a cassette is alreadyinserted, by repeatedly pressing theMODE button (1) until the display shows themessage "TAPE A" or "TAPE B".Both sides of the tape can be listened towithout having to extract it (AUTOREVERSEfunction).Inserting an audio cassetteOpen the protective flap for the cassette playerby pressing the button (1).Fully insert the audio cassette, by hand, untilthe radio automatically switches to playing it.To close the audio cassette housing, pressthe button (1) vertically, closing the flap untilthe retaining spring can be heard clicking.Changing the side of the tape listened toWhen the audio cassette housing contains acassette and message "TAPE A" or "TAPE B"appears on the display, press the BAND (1)control briefly. When the end of the tape isreached the side is automatically switched.The messages "TAPE A" and "TAPE B" referto the upper and lower sides of the cassette,respectively.Copyright by Fiat Auto XI-98 - Update 47
Electrical equipmentRadio equipment55.<strong>Bravo</strong>-<strong>Brava</strong>98 rangeFast forward/rewindWhilst listening, briefly press the "A" (1) or"T" (2) button to fast forward or rewind thetape. During this operation the display willshow the message "WIND»" or "«WIND".To interrupt this function, briefly press the"A" (1) or "T" (2) button. Having interruptedthe function, the cassette player willautomtaically start the reproduction of thecassette.When the rewinding or forwarding of thetape is complete, the player will be ready forthe automatic reproduction of the same sideor the other side of the cassette.Search for previous/next tractSEARCH SYSTEM function)(MUSICThis makes it possible to skip or repeat one ormore music tracks when there are pauses ofat least three seconds between them.To activate this function, press the MSS button(1) during operation of the cassette. Themessage "MSS ON" will appear on the display.To move onto the next track, press the "A"(2) button, whilst to move to the previoustrack, press the "T" (3) button.By pressing the " A " button or the " T" buttonrepeatedly, the same number of tracks as thenumber of times the buttons has beenpressed are skipped.To deactivate the MSS function, press the"MSS" button (1) whilst listening to the cassette.The message "MSS OFF" will appearon the display.The search for previous/next track function may not be correctly activated with the followingtypes of tape:- tapes recorded at low levels (for example, weak sound and imperfect recording);- tapes with conversations;- tapes with blank sections of tape lasting less than 3 seconds;- tapes with long periods of silence in the recording;- tapes which do not have blank sections of tape (for example, live recordings);- tapes with a lot of background noise in the blank sections.48 XI-98 - Update Print no. 506.670/17
<strong>Bravo</strong>-<strong>Brava</strong>98 rangeElectrical equipmentRadio equipment55.DOLBY B FunctionPress the button (1) to activate / deactivatethe Dolby B function (noise limited deviceproduced under licence by the "Dolby LaboratoriesLicensing Corporation") (*).When the Dolby function is activated thesymbol appears on the display.(*) Dolby and the (double D symbol) are theregistered trade marks of the above company.Audio cassette ejectionTo eject the cassette from the housing, slide the control (2) to the right until the exit.- After ejection, the word "TAPE" appears on the display and the radio operates, tuned into the last stationlistened to.The audio cassette cannot be ejected with the radio switchedoff.Temporary halt whilst listening to a cassetteIt is possible to temporarily stop listening to a cassette by pressing the MODE button; listening to a cassettecan be resumed by pressing it again.Never expose audio cassettes to heat or direct sunlight, always store them in their container afteruse.It is advisable to use good quality tapes not longer than C-90 in order to ensure optimum reproduction.Impurities on the head caused by tapes can, in time, cause a deterioration in the high tones duringreproduction, therefore it is advisable to clean the head periodically using a special, nonabrasive, cleaner.Copyright by Fiat Auto XI-98 - Update 49
Electrical equipmentRadio equipment55.<strong>Bravo</strong>-<strong>Brava</strong>98 rangeCOMPACT DISC PLAYER FUNCTIONVehicles equipped with AD 182 H2 radios, have the preparation for the installation of a Compact Disc(CD) player, which consists of a multi-polar cable ending in the luggage compartment on the left side.A kit is available from Linea Accessori FIAT which includes a Compact Disc player, an additional multi--polar connecting cable and a mounting bracket.The player is supplied with a special loader which can hold up to 6 Compact Discs.Filling the Compact Disc loader- Extract a support for each Compact Discthat you wish to play;insert the Compact Disc with the label orthe printed section facing the support.P^H If the Compact Disc has been posi-Zfl^ tioned incorrectly, it cannot beplayed.Inserting the loader in the Compact DiscplayerNOTEThe player cannot play 8 cm CompactDiscs (unless a special adaptor,available from HI-FI shops, is fitted).To insert the loader in the Compact Discplayer, proceed as described below:- slide the flap A towards the right, as illustratedin the diagram, until it is not locked;- check that the switch B is in position "1";50 XI-98 - Update Print no. 506.670/17
<strong>Bravo</strong>-<strong>Brava</strong>98 rangeElectrical equipmentRadio equipment55.insert the loader C in the Compact Discplayer with the side with the label (see arrow)facing upwards;®J?3 ^
Electrical equipmentRadio equipment55.<strong>Bravo</strong>-<strong>Brava</strong>98 rangePossible error messagesIf the loader has not been introduced or has not been inserted correctly in the Compact Disc player, theword "MAGAZINE" will appear on the display.If the loader does not contain any Compact Discs, the words "NO CD" will appear on the display.If a Compact Disc is damaged or has been introduced incorrectly into the loader, the word "SURFACE"will appear on the display.If there is a break in the connection with the Compact Disc player, the words "NO COMMU" will appearon the display.In the case of a mechanical fault with the CD player, the word "MECHANIC" will appear on the display.If the Compact Disc player has overheated, the words "TOO HOT" will appear on the display// the last condition mentioned above occurs, it is advisable to switch off the CD player for awhile.Disc selectionPress the station selection button 5 (1) or 6(2) briefly and repeatedly until the number ofthe desired CD appears on the display.Using station selection button 6 it is possibleto move on to the next CD, whilst button 5locates the previous one.Track search (forwards/backwards)Press button "A" (1) or "T" (2) repeatedlyuntil the number of the desired track appearson the display.Button "A" is used for selecting the nexttrack, whilst button "T" is used for listeningto the same track again or, if pressed repeatedly,for selecting previous tracks.52 XI-98 - Update Print no. 506.670/17
<strong>Bravo</strong>-<strong>Brava</strong>98 rangeElectrical equipmentRadio equipment55.Scanning tracks on CD selected (SCANfunction)By pressing the SCAN button (1) briefly, thedisplay shows the "SCAN ON" message andthe player plays all the tracks on the CD selectedfor 10 seconds each.To disable the SCAN function, switched onpreviously, press the SCAN button (1)briefly. The display shows the message"SCAN OFF".Fast forward and rewind (TRACK FASTfunction)To listen during the track fast function at alower volume, press button "A" (2) forwinding forward or button "T" (3) forrewinding, and keep it pressed.Track repeat (TRACK REPEAT function).DIGITAL.STEREOTo repeat the track being listened to, pressthe station selection button (1). The message"TRK ON" will appear on the display.By pressing the station selection button 1 (1)again, the TRACK REPEAT function selectedpreviously will be disabled.The message "TRK OFF" will appear on thedisplay.TRfiOfl TRK OFFDiamu- STEREORepeating tracks from the CD selected(REPEAT function)To repeat the CD being listened to, press thestation selection button 2 (1). The message"RPT CD" will appear on the display.To end the repetition of the CD, press the stationselection button 2 (1) again. The message"RPT MAG" will appear on the display.The reproduction of the CD ends when theplayer plays the last track of the CD.RflD On RtiO OFFRepetition of tracks in a random sequence(TRACK RANDOM function)To start the search for the random sequenceof tracks, press station selection button 3 (2)briefly. The message "RND ON" will appearon the display.To end the serach for the random track sequence,press the station selection button 3(2). The message "RND OFF" will appear onthe display.Copyright by Fiat Auto XI-98 - Update 53
Electrical equipmentRadio equipment55.<strong>Bravo</strong>-<strong>Brava</strong>98 rangeOnce all the tracks have been played, anotherCompact Disc is selected and so on. Once allthe discs have been played, the random reproductionstarts again in the same way.NOTEIf the "CD Repeat" mode has beenselected previously, only the randomreproduction of all the tracks on thedisc selected will take place.End of CD player operationBy pressing the MODE button (1) listeningto the CD player and the radio is ended andthe RADIO configuration is restored.Display of the CD player stateBy pressing the EXP button (1) briefly, anyspecial function activated, for example "TRKON", is displayed.Never expose discs to sources of heat or direct sunlight, always place them back in their containerafter use.Compact Discs should be protected from dust and the surface of the discs should never be fingeredor the sound will be adversely affected.If the surface of a disc is dirty, it should be cleaned using a dry cloth, working from the centreoutwards. Do not insert damaged or distorted discs in the magazine.54 XI-98 - Update Print no. 506.670/77
<strong>Bravo</strong>-<strong>Brava</strong>Electrical equipment98 range Radio equipment55.EXPERT control levelIt is possible, using the EXPERT additional level, to carry out various adjustments which may be requiredonly once (for example setting the exact time) or occasional adjustments (for example the minimum volumeadjustment for listening to the traffic news).List of possible EXPERT adjustmentsThe following adjustments can be carried out through the EXPERT control level:1. Setting the time2. Switching the clock RDS synchronization on/off3. Minimum volume for traffic news4. LRN on/off5. Switching automatic change of regional programme on/off6. Limiting on volume7. BDLY delay for switching Booster connected on/off8. Switching on/off via the vehicle ignition switch9. Suppressing the audio function during car phone operation10. Telephone input sensitivity11. SCV12. Code adjustmentP4A55HL01Selecting and modifying adjustments viathe EXPERT control levelPremere il tasto EXP (1) fino a quando il displayvisualizza il messaggio "EXPERT".Selezionare mediante i tasti "A" "T" (2,3) laregolazione che si desidera effettuare.Premendo i tasti opportuni di selezione dellefrequenze, e possibile impostare il livello desiderateI tasti di selezione delle frequenze interessatidipendono dalla regolazione che si desideraeffettuare.Per la loro identificazione si rimanda ai paragrafisuccessivi relativi alle singole regolazionipossibili.Per concludere la regolazione premere nuovamenteil tasto "A." (2) o "▼" (3) oppure iltasto EXP (1), per circa 3 secondi.Setting the TIMEThe frequency selection buttons needed for adjusting the time are:Buttons 2 and 3 for setting the hourButtons 4 and 5 for setting the minutesTo start the clock precisely, press the EXP button briefly.Synchronizing the clockThe clock can be synchronized with the RDS TIMER signals emmited by the transmitters.The necessary frequency selection buttons are;button 5 for activating the synchronizationbutton 4 for deactivating the synchronizationBy pressing frequency selection button 5 the display will show the message "SYNC ON", whilst pressingfrequency selection button 4 afterwards, will produce the message "SYNC OFF" on the display.Copyright by Fiat Auto XI-98 - Update 55
Electrical equipmentRadio equipment5JT<strong>Bravo</strong>-<strong>Brava</strong>98 rangeMinimum listening volume for traffic newsThe desired level can be set using the frequencyselection buttons 4 (1) and 5 (2) toincrease or decrease the volume, respectively.During the adjustment, the message "TAVOLYY" will appear on the display where YYrefers to the level of the volume set.P4A56HL01Switching LIMR function on/off (RADIO function)This allows the search for RDS transmitters broadcasting traffic news to be switched on or off.The frequency selection buttons for the switching on and off are buttons 4 (1) and 5 (2), respectively.The messages "LRN ON" and "LRN OFF", respectively appear on the display when the function isswitched on or off (see diagram).Automatic programme change (REGIONAL)When the RDS programme consists of different regional transmissions, the radio may switch betweenthese transmissions, selecting the one with the strongest signal.The frequency selection buttons needed are button 5 (1) for switching the function on and button 4 (2)for switching it off.The messages displayed are "RES ON" when the function is switched on and "RES OFF" when thefunction is switched on (see diagram).Limiting the switching on volumeIt is possible to select the level of the volume when the radio is switched on using frequency selectionbuttons 4 (1) and 5 (2), respectively, for increasing or decreasing the volume.When buttons 4 or 5 are pressed the message "ONVOL xx" appears on the display where the level of thevolume set appears in place of xx (see diagram).Delay in switching on/off for BOOSTER (BDLY)To switch the Booster delay on or off, press frequency selection buttons 4 (1) and 5 (2), respectively.The message on the display will be "BDLY ON" or "BDLY OFF" (see diagram).Switching on/off using the vehicle ignition switchSee "Switching on radio" paragraph.56 XI-98 - Update Print no. 506.670/17
<strong>Bravo</strong>-<strong>Brava</strong>gamma 98Electrical equipmentRadio equipment55.Suppression of audio function during car phone operationTo switch the radio function on or off, when a radio phone system is fitted in the vehicle, press frequencyselection buttons 4 and 5, respectively.The messages "PHONE OFF" and "PHONE ON", respectively, will appear on the display when the functionis on or off.When the function is on and a phonecall is received, the radio will automatically be deactivated and thedialogue will be reproduced via the speakers.Telephone input sensitivityThe telephone input sensitivity can be regulated using frequency selection button 4 or 5.The messages "PHONE 00" or "PHONE 03", respectively will appear on the display for low or high sensitivity.Adjusting the volume according to the speedFor safety reasons, this adjustment should be carried out by suitably trained personnel.Activating the codeSee paragraphs dealing with anti-theft protectionANTI-THEFT PROTECTIONThe radio is equipped with an anti-theft protectionsystem consisting of a 4 digit secretcode.The protection system makes it impossible touse the radio after it has been extracted fromthe dashboard if it is stolen.Secret codeP4A57HL01Entering the secret code for the first timeThe 4 digit secret code is on the "SecurityCode Card" which is given at the same timeas the "Fiat Code Card". The secret codeshould be kept in a safe place (for example,together with the vehicle documents), butnot in the vehicle.Switch on the radio by pressing the VOL control (1).Press the EXP button (2) and press the "A" "T" (3,4) buttons until the message "SAFE" or "CODE" appearson the display (SAFE if the code is activated, CODE if it is deactivated).Introduce the code using the frequency selection buttons 2,3,4,5.If, for example, the code is 1703, press the frequency selection buttons as follows:- press button 2 once for digit 1, the display will show "1 "- press button 3 seven times for digit 7, the display will show "17 - -- press button 4 once for digit zero, the display will show "170 - "- press button 5 three times for digit 3, the display will show the entire code.Having set the code in the display, confirm it by pressing the EXP button (2) until the message "SAFE"appears on the display. The code should be activated.To switch off the EXPERT function, press the EXP button (2) for about 3 seconds until the message"EXIT" appears on the display.Copyright by Fiat Auto XI-98 - Update 57
Electrical equipmentRadio equipment55.<strong>Bravo</strong>-<strong>Brava</strong>98 rangeDeactivating the codeThe code has to be deactivated before removingthe radio.To deactivate the code, proceed as describedbelow:Press the EXP button (1) and press the "A""T" buttons (2,3) until the message "SAFE"appears on the display.Briefly press the frequency selection button 2(4); the message "I " will appear on thedisplay.Key in the code following the instructions inthe earlier example.Confirm the code by pressing the EXP buttonbriefly until the message "CODE" appears onthe display.The code is no longer activated.If an incorrect code has been entered, themessage "SAFE" will appear on the display;the entire procedure should be repeated todeactivate the code.£E7 \s/am'// SCA W"[[_!S ll EXpJJRestoring the operation of the radio by enteringthe codeWhen the radio is disconnected from thepositive supply, with the safety code activated,it is electronically protected. In order tobe used again, the code must be introducedfollowing the procedure described below:Switch on the radio using the VOL control(1); the message "SAFE" will appear on thedisplay followed by "I ".Key in the code following the previous example.Confirm the code by briefly pressing the EXPbutton (2).After around 3 seconds the radio will start towork.If an incorrect code is introduced, the message"SAFE" will appear on the display again. To enter thecorrect code, repeat the procedure from the beginning, following the waiting periods.After each failed attempt the radio logic introduces a waiting period during which the radio does not respondto the commands. These waiting periods are:1st attempt waiting period 21 seconds2nd attempt waiting period 1.5 minutes3rd attempt waiting period 5.5 minutes4th attempt waiting period 22 minutes5th attempt waiting period 1.5 hours6th attempt waiting period 6.0 hours7th attempt waiting period 24 hours8th attempt waiting period 24 hoursThe radio should not be switched on during the waiting period.58 XI-98 - Update Print no. 506.670/17
<strong>Bravo</strong>-<strong>Brava</strong>98 rangeElectrical equipmentRadio equipment55.TECHNICAL INFORMATIONAerialThe vehicle is fitted with an aerial located in the roof.Electrically operated aerial and external amplifier (available on request)The radio is prepared for an automatic electric aerial (which comes out the moment the radio is switchedon and goes back in when it is switched off) and an external amplifier.The switching voltage for the aerial is at contact 5 (connector "A") of the radio and the switching voltagefor the amplifier is at contact 3 (connector "A").The switching voltage for both outputs is + 12 V with a maximum current of 0.5 A.Speakers for radio equipmentThe acoustic equipment consists of:- 2 elliptical diffusers 130 x 180 mm with a power of 30 W max. each;- 2 tweeter-dome fluid-iron diffusers with a power of 40 W max. each;- 2 130 mm diffusers with a power of 30 W max. each.FusesThe radio has a 10 A protective fuse.ConnectionsThis paragraph describes the connector at the rear of the radio.B-^ A r, ^12 15 18I \ \ I2| \ | |I I l2 ! "I 6 | 8 i17 20|-T10ASupply voltagesContacts at blade A:A8 Connection for earthConnect to terminal 31 (earth) of the vehicle.A7 Connection for 12V supply voltageConnect to terminal 30 (continuous positive)of the vehicle.A6 Connection for instrument lightsContact not connected: no lights with radioswitched off if the instrument lights areswitched on.A5 12 V switching voltage output (max 0.5A)Present at the contact at blades A5 when theradio is on.For automatic aerial (extension/retraction),aerial amplifier (supply voltage) etc.A4 Connection for ignition voltage of +12VConnect to terminal 15 of the vehicle, if theradio is going to be switched on and off bythe ignition.Connection A4 may also not be wired. In thiscase, the radio should come on and off viathe VOL control.With the engine switched off the equipmentswitches off after about 20 minutesA2 Phone-Mute connection for car phoneor receiver/transmitterThe radio audio function is deactivated duringthe operation of the car phone or receiver/transmitter.The message "PHONE" appears on the display.Contact A2 should be earthed from the telephone/receiver-transmittermute outletA1 SCV ( + ) connection "for adjusting volumeaccording to the speed.Copyright by Fiat Auto XI-98 - Update 59
Electrical equipmentRadio equipment55!<strong>Bravo</strong>-<strong>Brava</strong>98 rangeSpeakersBlade contacts BMaximum power at speakers 4 : 4 x 20 W.Front speaker:B3 right +B4 right -B5 left +B6 left -Rear speaker:B1 right +B2 right -B7 left +B8 left -0The connections for the speakers should not be electrically connected to each other and shouldnot be earthed!Additional connectionsBlade contacts CLine outputPossibility of connection for power amplifier (Booster) or activated speaker.C1 Left rear speaker +C2 Right rear speaker +C3 Earth -C4 Left front speaker -C5 Right front speaker -C6 Switching voltage for power amplifier: on/off (max 0.3 A)Steering remote control:C8 EarthC9 Remote controlTelephone input:Possibility of connection for car phone or receiver-transmitter (listening through radio).C7 Telephone NFC12 Telephone earth NFDisc change connections: +C13 CD bus control lineC15 CD bus earthC16 Supply voltage of +12 V for disc changerC17 Switching voltage for disc changerC18 CD earth NFC19 CD NFon the leftC20 CD NF on the right60 XI-98 - Update Print no. 506.670/17
<strong>Bravo</strong>-<strong>Brava</strong>98 rangeElectrical equipmentRadio equipment55.RADIO CASSETTE PLAYER AD 182 Mr umroHATmo STKKBOf Ai/rmnevBRSB9-101. VOL control: radio on/off, level adjustment Bass, Treble, Balance, Fader.2. AUD-MUTE button: function selection Bass, Treble, Balance, Fader, MUTE activation.3. N1 station programming button.4. N2 station programming button, for setting the time.5. N3 station programming button, for setting the hour.6781112131415Audio cassette fast rewind button.Audio cassettet fast forward button.BN button: for selecting FM1, FM2, FM3, MW, LW frequencies; for starting IS automatic search,for selecting AUTOSTORE function.For recalling IS memory, for RDS transmitters automatic search, for manual tuning into transmitters,for setting the type of programme, for selecting the type of adjustment from the EXPERTmenu.TP button: for selecting the TP function, for selecting AF alternative frequencies, for acting thePTY function.N4 station programming button, for altering EXPERT adjustments.N5 station programming button, for altering EXPERT adjustments.EXP button: for activating EXPERT control level.Audio cassette housing.Copyright by Fiat Auto XI-98 - Update 61
Electrical equipmentRadio equipment55.<strong>Bravo</strong>-<strong>Brava</strong>98 rangeGENERAL DESCRIPTIONThe vehicle is available, on request, with a radio system, consisting of the following main components:- radio cassette player (which cannot be removed) model AD 182 M which is fitted in place of the previousversion in the centre of the instrument panel with the personalized front section completely integratedwith the line of the dashboard.- four speakers, two of which are located at the sides in the top part of the instrument panel, with theother two in the same position as on the previous system, in the front doors;- aerial in the centre front section of the roof.The AD 182 M radio cassette player features the following functions:Radio section- PLL turning with FM/MW/LW bands- RDS (Radio Data System) with TP (Traffic Program) - EON functions- Automatic/manual station tuning- Manual programming of 5 stations on FM1, FM2, FM3 bands and MW and LW band- Automatic programming of transmitters via the AUTOSTORE function with buttons 1,2,3,4,5 on theFM1, FM2, FM3, MW and LW bands- Automatic IS search tuningAudio cassettte section- Autoreverse- Tape fast forward and rewindAudio section- Loudness function- Mute function- Pause function- Separate low/high tone adjustment- Right/left and front/rear channel balancing- Radio on/off logic selection- Pre-setting of TP function volume level.Clock section- Adjustment of hours/minutesEXPERT control level section- Setting of time- RDS synchronization of the time- Traffic news minimum volume- LRN- Regional programme automatic change- LOC function- MONO function- LOUDNESS function- FADER function- Volume limitation- BDLY function- On/off through ignition- Audio mute during operation of car phone- Telephone input sensitivity62 XI-98 - Update Print no. 506.670/17
<strong>Bravo</strong>-<strong>Brava</strong>98 rangeElectrical equipmentRadio equipment55.OPERATION/ VOL/ /$/ w1 ON / OFF//E/ c_bMUTEk__Tu3h +I ^w ummafukrmD STEREOW AirrORmVERSE,Switching on the radioPress the VOL control (1) once: the radioshould come on. If the radio is on when theengine is switched off, it will switch off automaticallyabout 20 minutes later.Switching on/off when the engine is switched on/offThe radio possesses a switching on logic which, if activated, allows the radio to be turned on/off at thesame time as the engine is started up/switched off.If the logic is activated: when the engine is started up/switched off, the radio is automatically turnedon/off;If the logic is not activated: the radio will switch on/off irrespective of whether the engine is switchedon/off.Press the EXP button (1) for about 3 secondsuntil the message "EXPERT" appears on thedisplay.Select the on/off adjustment via the ignitionswitch using the "A" (2) and"V" (3) buttons.Press frequency selection button 5 (4) to activatethe function or, if activated previously,press frequency selection button 4 (5) to deactivateit.The messages "IGN ON" and "IGN OFF", respectivelywill appear on the display whenthe function is activated or deactivated.NOTE The procedure described above should be carried out with the ignition switched on.If you wish to turn on the radio after it has been switched off using the ignition switch, press the VOLcontrol.Pause functionIf the "Radio" function is selected whilst listening to a cassette, the reproduction is interrupted and onreturning to the "Audio cassette" mode it is resumed from where it left off. If the "Audio cassette" functionis selected whilst listening to the radio, on returning to the "Radio" mode, the last station selected istuned into.Copyright by Fiat Auto XI-98 - Update 63
Electrical equipmentRadio equipment55.<strong>Bravo</strong>-<strong>Brava</strong>98 rangeVOLUME adjustmentThe volume can be adjusted via the VOL control(1).The volume level, between "VOL 00" and"VOL 31" is displayed during the adjustment.Adjustment of LOW and HIGH tones (BASSand TREBLE)Select the "Bass" or "Treb" function bypressing the AUD button (1) briefly.Having selected the function, adjust thesound via the VOL control (2).To restore the basic adjustment, press theAUD button for about 3 seconds until themessage "00" or "--" appears on the display.Adjustment of balance between left andright speakers (BALANCE)The balance is the "volume ratio" betweenthe left and right speakers. The adjustmentcan be made by pressing the AUD button (1)several times briefly to select the "BALANCE" function. The message "BAL L- -R"will appear on the display. The VOL control(2) can be used to adjust the balance levels.The values which can be selected range fromOto 15.To restore the basic adjustment, press theAUDIO button for about 3 seconds until themessage "00" or "- -" appears on the display.64 XI-98 - Update Print no. 506.670/17
<strong>Bravo</strong>-<strong>Brava</strong>98 rangeElectrical equipmentRadio equipment55.Adjusting the balance between the front and rear speakers (FADER)Consultthe "EXPERT control level" section and the pointdealing with the "FADER function" for the adjustment.Loudness functionConsult the "EXPERT control level" section and the point dealing with the"LOUDNESS function" forthe adjustment.MUTE functionDUTE OH flUTE OFFBy pressing the AUD button (1) for about 3seconds the MUTE function is selected andthe message "MUTE ON" appears on the display.To deactivate this function the AUD buttonmust be pressed again. The message "MUTEOFF" will appear on the display.When the Mute function is selected, the radiono longer sends any signals to the speakers.RADIO FUNCTIONK M Reception conditions vary constantly whilst driving. Reception can be interfered with by the^Q^ presence of mountains, buildings or bridges, especially when the broadcasing transmitter is far^■ away.NOTE When the "RADIO" function is activated, the last station listened to before switching off is received.Function selectionAs soon as the radio is switched on, the radiois heard.Selecting the bandBy pressing the BN button (1) briefly severaltimes it is possible to select the frequencybands available. The message for the rangeselected will appear on the display. The possiblemessages are:"FM1", "FM2", "FM3" for FM frequencyranges"MW", medium wave, "LW", long wave, forAM rangesCopyright by Fiat Auto XI-98 - Update 65
Electrical equipmentRadio equipment55.<strong>Bravo</strong>-<strong>Brava</strong>98 rangeAutomatic intelligent search tuningfunction)(ISP4A66HL01Using the BN button (1), select the "FM1","FM2" or "FM3" band.Press the BN button (1) for about 3 secondsto activate the saerch; the message "LEARN"will appear on the display.At the end of the search first the RDS programmesand then the transmitters accordingto their transmission power in the radio ISmemory are programmed. The IS memorycan store up to 30 transmitters.If no reception is possible, the reception doesremain continuously activated; to interrupt it,press one of the station selection buttons(1,2,3,4,5,).To recall transmitters programmed in the IS memory, select the IS operating mode by pressing one of the"A" "T" buttons (2,3) for about 3 seconds until the message "IS - -" appears on the display, followedby "IS ON". By pressing one of the "A" "▼" buttons briefly it is possible to recall the transmitters programmed.To deactivate the IS function, press one of the " A "" T" buttons briefly until the message "IS OFF" appearson the display.RDS transmitters automatic search tuningSelect the FM or AM frequency desired usingthe BN button (1).The IS function should not be activated forthis type of selection.If the IS function is switched on, press eitherbutton "A" (2) or "▼" (3) for about 3 secondsuntil the message "IS - -" appears onthe display followed by "IS OFF".Pressing one of the buttons "A" (2) or "T"(3) briefly starts the automatic search. Whena transmitter with an identification code isfound (RDS transmitter) it is shown on thedisplay. If the transmitter is going to be programmedin a selector button (1,2,3,4,5),press the pre-selected button for about 2 seconds.The radio audio function will be interrupteduntil the programming has been completed.66 XI-98 - Update Print no. 506.670/77
<strong>Bravo</strong>-<strong>Brava</strong>98 rangeElectrical equipmentRadio equipment55.Manual transmitter tuning and programmingSelect the frequency range by pressing the BAND (1) button repeatedly. The message on the displaywill depend on the band selected "FM1", "FM2", "FM3", "MW" or "LW".Having selected the band, press one of the"A" "T" buttons (2,3) for about 6 secondsuntil the message "MAN" and the frequencytuned into appears on the display. Using the"A" "T" buttons it is now possible to alterthe tuning frequency in 50 Hz steps for FMranges and 1khz for AM frequencies.The station being listened to can be programmedin the frequency range selected usingthe frequency selection buttons. At theend of the programming, press the selectionbutton for the frequency until the sound canbe heard once again. 'The manual tuning can be ended at any timeby pressing one of the frequency selectionbuttons or if none of the buttons has beenpressed for 60 seconds.Listening to programmed stationsSelect the desired band using the BN button(1). Press one of the frequency selection buttonsbriefly.The display will show the button pressed andthe transmitter code if it is an RDS transmitter.If the transmitter selected offers an RDS serviceand the reception is not good, the radiowill search for an alternative frequency. Duringthe search for the alternative frequencythe display will show "SRC".TP function (Traffic Program)Several stations on RDS1, RDS2 bands also broadcast traffic news.With the TP function (Traffic Program) it is possible to:a) carry out the search for RDS stations only transmitting traffic news;b) receive traffic news even if the cassette player is working;c) receive traffic news at a pre-set minimum volume even with the radio volume control at zero.IMOTE Below are the instructions for carrying out each of the operations illustrated in points a), b) andc) previously.Copyright by Fiat Auto XI-98 - Update 67
Electrical equipmentRadio equipment55.<strong>Bravo</strong>-<strong>Brava</strong>98 rangePoint a)To select a transmitter with a traffic news service,press the TP (1) button briefly. Themessage "TP" will appear on the display.If the transmitter is not enabled to providetraffic news, the radio will automatically tuneinto the closed enabled broadcaster andtransmit it.Several transmitters, providing a traffic newsservice, can be programmed using the stationselection buttons. Follow the instructions inthe "Transmitter manual tuning and programming"paragraph, initially pressing the TPbutton to activate the TP function.As an alternative to the manual programming,it is possible to follow the instructions in the"Transmitter automatic programmein (AU-TOSTORE)" paragraph.Point b)If you wish to receive traffic news, before inserting the audio cassette, tune into an RDS TP transmitter.If traffic news is broadcast whilst listening to a cassette, the reproduction of the tape will be temporarilyhalted and resumed automatically when the news flash is over.Point c)Even when not listening to the radio it is possible to receive traffic news. After having tuned into anRDS TP transmitter and set the volume at zero, if this transmitter broadcasts traffic news it can be heardat a pre-set minimum volume.In some countries there are radio stations which, even if the TP functiontransmit traffic news.is activated, do notPre-setting volume level for TP function(Traffic Program)To select the volume for listening to trafficnews, press the EXP button (1) until themessage "EXPERT" appears on the display.Then press the "A" "T" buttons (2,3) untilthe message "TA VOL" appears on the display.Using buttons 4 (4) and 5 (5) it is possibleto select the desired volume. The volumeranges between 5 and 31.68 XI-98 - Update Print no. 506.670'/'77
<strong>Bravo</strong>-Bmva98 rangeElectrical equipmentRadio equipment55.EON function (Enhanced Other Network)In some countries there are networks which group together several transmitters able to broadcast trafficnews.In these cases, when listening to a programme on an RDS TP station, it will be temporarily interrupted toreceive traffic news flashes each time one of the broadcasters on the same network transmit them.To exclude this function (EON), press the "TP" button briefly (the LED under the button will go out).PTY functionSeveral transmitters in the FM range offer a "Type of Programme" service (PTY). The PTY function canbe used to automatically select a transmitter offering a certain type of programme, for example classicalmusic.PTY autoamtic searchThe search can be carried out by allocating 5 types of programme, selected at will, to the station selectionbuttons 1,2,3,4,5 or by selecting the type of programme from the list memorized and then startingthe search.For more details, see the paragraphs below.Programming the types of programme desiredin the station selection buttonsPress the TP button (1) for about 6 secondsuntil the message "PTY ON" appears on thedisplay. Select the type of programme desiredusing buttons " k" "T" (2,3).Having identified the type of programme desired,for example classical music "CLASSIC", press the station selection button(1,2,3,4,5) desidered for more than 2 seconds.The type of programmed selected isassociated with the button.Each selection button can be associated with a particular type of programme by repeating the proceduredescribed above.To start the automatic search for a transmitter broadcasting a certain type of programme, press the TPbutton again for about 6 seconds. The message "PTY ON" will appear on thedisplay. Then press thestation selection button for the type of programme desired. The display will show the type of programmeselected. The automatic search can be started by pressing one of the buttons "A" "T" again forabout 2 seconds. The search is interrupted when the first transmitter broadcasting the type of programmedesired is found.Copyright by Fiat Auto XI-98 - Update 69
Electrical equipmentRadio equipment55.<strong>Bravo</strong>-<strong>Brava</strong>98 rangeTuning into the type of programme usingthe listActivate the PTY function by pressing the TPbutton (1) for about 6 seconds until the message"PTY ON" appears on the display.By repeatedly pressing one of the "A" "▼"buttons (2,3) the display will show the typesof programme contained in the list. Havingidentified the type of programme desired,press one ofthe "A" "▼" buttons for about 2seconds to start the automatic search. Thesearch is halted whtn the radio tunes into atransmitter broadcasting the type of programmeselected.List of types of programme availableNEWS News and current eventsAFFAIRS Politics and current affairsINFO Special information programmesSPORT SportEDUCATE EducationDRAMA Drama and literatureCULTURE Culture, the church and religionSCIENCE ScienceVARIED VarietyPOP Pop music (hits)ROCK M Rock musicEASY M Light musicLIGHT M Light classical musicCLASSICS Classical musicOTHER M Music programmes which cannotbe classified (e.g. folk)WEATHER Weather forecastsFINANCE Financial newsCHILDREN Childrens programmesSOCIAL A Social informationRELIGION Religion and philosophy programmesPHONE IN Phone insTRAVEL Travel newsLEISURE Leisure, hobbies and pastimesJAZZ Jazz musicCOUNTRY Country musicNATIONAL National broadcastsOLDIES Golden OldiesFOLK M Folk musicDOCU Special servicesNO PTY No identification code for the typeof programmeAlternative frequencies (AF function)If an RDS programme is received, which isbroadcast by several transmitters on differentfrequencies, the radio will automaticallyswitch to the frequency with the best reception.The function is activated at the time of supply.To deactivate the AF function, press theTP button (1) for about 3 seconds until themessage "AF - - " followed by "AF OFF" appearson the display. To activate the AF functionagain, press the TP button until themessage "AF OFF" followed by "AFF ON"appears on the display.70 XI-98 - Update Print no. 506.670/17
<strong>Bravo</strong>-<strong>Brava</strong>98 rangeElectrical equipmentRadio equipment55.AUDIO CASSETTE PLAYERActivating the audio cassette player.The radio system is fitted with an audio cassette player which can be activated by introducing an audiocassette directly into the special housing.Both sides of the tape can be listened to without extracting the cassette and turning it over.To start playing an audio cassette, insert it in the special housing, pushing it by hand until it goes in autoamticallyand starts playing.Changing the side of the cassette being listenedto.When there is a cassette in the housing andthe message "TAPE A" or "TAPE B" appearson the display, briefly press buttons (1) and(2) simultaneously.The player will play the other side of the tape.The messages "TAPE A" and "TAPE B" meanthe upper side and the lower side of the audiocassette, respectively.P4A71HL01Fast forward and rewindingWhilst listening, briefly press button (1) or(2) to fast forward or rewind the audio cassette,respectiv ely. The message on the displayduring this operation will be "Wl N D". Tointerrupt this function, briefly press button(1) or (2). Having interrupted the function,the audiocassette player will automatic resumethe reproduction of the cassettte.When the tape has been fast forwarded or rewound,the player will resume the automatic reproductionof the same side or the other side.Copyright by Fiat Auto Xi-98 - Update 71
Electrical equipmentRadio equipment55.<strong>Bravo</strong>-<strong>Brava</strong>98 rangeEjecting the cassette.To eject the cassette from the audiocassettehousing, briefly press buttons 1 and 2 simultaneously.After the audio cassette has been ejected, themessage "TAPE" will appear on the displayand the radio will operated, tuned into the lasttransmitter listened to.EXPERT control levelUsing the EXPERT additional level it is possible to carry out different adjustments which may only benecessary once, for example, setting the exact time, or occasional adjustments such as, for example, theadjustment of the minimum volume for traffic news.List of possible EXPERT adjustmentsThe following adjustments can be carried 6ut using the EXPERT control level:1. Setting the time2. Switching the clock RDS tuning on/off3. Traffic news minimum volume4. LRN on/off5. Regional programme automatic changeon/off6. LOC on/off7. MONO on/off8. LOUDNESS on/off9. FADER on/off10. Limiting volume when switching on11. BDLY delay in switching BOOSTERconnected on/off12. Switching on/off via ignition13. Audio mute during operation of carphone14. Telephone input sensitivitySelecting and modifying the adjustmentsusing the EXPERT control level.Press the EXP button (1) until the message"EXPERT" appears on the display.Using buttons "A" (2) and "T" (3) selectthe desired adjustment.By pressing the frequency selection buttonsit is possible to set the desired level.The frequency selection buttons involved dependon the desired adjustment.For their identification, refer to the paragraphswhich follow dealing with the individualpossible adjustments.To end the adjustment, press the EXP buttonfor about 3 seconds.72 XI-98 - Update Print no. 506.670/17
<strong>Bravo</strong>-<strong>Brava</strong>98 rangeElectrical equipmentRadio equipment55.Setting the TIMEThe frequency selection buttons required forthe adjustment of the hour are:Buttons 2 and 3 for setting the hourButtons 4 and 5 for setting the minutesTo start the clock with precision, press theEXP button (1) briefly.ISbffiC3 2 1Offl ISHHC OFFSynchronizing the clockThis allows the clock to be synchronized withthe RDS TIMER signals transmitted by thebroadcaster.By pressing frequency selection button 5 (2)the message on the display will be "SYNCON", whilst if frequency selection button 4(3) is pressed the message "SYNCH OFF"will appear on the display.Minimum volume for listening to trafficnewsThe desired level can be set using frequencyselection buttons 4 (1) and 5 (2) to increaseor decrease the volume, respectively.During the adjustment, the message "TAVOLYY" will appear on the display where YY refersto the volume level set.Switching LIMR on/off (radio function)This makes it possible to switch the searchfor RDS traffic new broadcasters on or off.The frequency selection buttons for switchingit on and off are buttons 4 (1) and 5 (2),respectively.The messages "LRN ON" and "LRN OFF" respectively,will appear on the display whenthe function is switched on or off.P4A73HL03Copyright by Fiat Auto XI-98 - Update 73
Electrical equipmentRadio equipment55.<strong>Bravo</strong>-<strong>Brava</strong>98 rangeAutomatic programme change (REGIONAL)When the RDS programme consists of variousregional broadcasts, the radio mayswitch between transmitters, selecting theone with the most powerful signal.The frequency selection buttons required arebutton 5 (1) for switching the function onand button 4 (2) for switching it off.The messages displayed will be "RES ON"when the function is switched on and "RESOFF" when the function is switched off.LOC functionThis makes it possible to search for FM frequenciesaccording to their transmissionpower.With the LOC function selected, the radiosystem searches for the most power broadcastingstations whilst if the function is notselected the search is also extended to lesspowerful transmissions.To activate the LOC function, press the frequencyselection button 5 (1) until the message"LOC ON" appears on the display. Todeactivate the function selected previously,press frequency selection button 4 (2) untilthe message "LOC OFF" appears on the display.MONO functionThe MONO function makes it possible to setthe radio equipment to stereo or mono reproduction.In the case of a stereo broadcast,there are two different channels, whilst in thecase of a MONO broadcast there is one channelonly. For good quality sound, the settingshould correspond to the type of transmission(Stereo or MONO).To select the MONO function, press frequencyselection button 5 (1) until the message"MONO ON" appears on the display. To deactivatethe MONO function, press the frequencyselection button (2) until the message"MONO OFF" appears on the display.74 XR-9&; UpdAe Print no. 506.670/17
<strong>Bravo</strong>-<strong>Brava</strong>98 rangeElectrical equipmentRadio equipment55.Limiting the volume on switching onIt is possible to select the volume at whichthe radio is switched on using frequency selectionbuttons 5 (1) and 4 (2), respectivelyto increase or reduce the volume.By pressing buttons 4 or 5 the message "ONVOL xx" will appear on the display where thelevel of the volume set will appear in place ofxx.LOUDNESS functionThe LOUDNESS function makes it possibleto improve the quaility of the sound at a reducedvolume.To activate the LOUDNESS function, pressfrequency selection button tasto 5 (1) untilthe message "LOUD ON" appears on the display.To deactivate the LOUDNESS function,activated previously, press frequencyselection button 4 (2).FADER functionBy selecting the "FADER" function it is possibleto alter the distribution of the volumebetween the front and rear speakers.To select the FADER function, press frequencyselection button 5 (1) until the message"FADER ON" appears on the display. To deactivatethe function, press frequency selectionbutton 4 (2). The VOL control (3) isused to regulate the intensity of the sound,emphasizing the sound coming from thefront speakers or from the rear speakers.FRDERONCopyright by Fiat Auto XI-98 - Update 75
Electrical equipmentRadio equipment55.<strong>Bravo</strong>-<strong>Brava</strong>98 rangeDelay in switching BOOSTER on/off (BD-LY)P4A76HL01To switch the Booster delay on or off, pressfrequency selection buttons 5 (1) and 4 (2),respectively.The message "BOLY ON" or "BOLY OFF"will appear on the display.Switching on and off via the ignitionSee paragraph on "Switching on radio".Audio mute function during the operation of the car phoneTo switch the radio on or off, when the vehicle is equipped with a car phone system, press frequency selectionbuttons 4 and 5, respectively.The messages "PHONE OFF" and "PHONE ON", respectively will appear on the display when the functionis off or on.When the function is switched on and a telephone call is received, the radio is automatically deactivatedand the conversation is relayed through the speakers.Telephone input sensitivityThe telephone input sensitivity can be adjusted using frequency selection button 4 or 5.The messages "PHONE 00" or "PHONE 03", respectively are displayed for lesser or greater sensitivity.TECHNICAL INFORMATIONAerialThe vehicle has an aerial located on the roof.Electrically operated aerial and external amplifier (available on request)The radio is prepared for an automatic electrically operated aerial (it is raised the moment the radio isswitched on and is lowered when it is switched off) and an external amplifier.The switching voltage for the aerial is at contact 5 of connector "A" for the radio and the switching voltagefor the amplifier is at contact 3 of connector "A".The switching voltage for both outlets is + 12 V with a maximum current of 0.5 A.Speakers for AD182H radio equipmentThe acoustic system consists of:- 2 ferro-fluid tweeter-dome diffusers with a power of 40 W max. each;- 2 130 mm diffusers with a power of 30 W max. each.FusesThe radio has a 10 A protective fuse.76 XI-98 -Update* Print no. 506.670/17
<strong>Bravo</strong>-<strong>Brava</strong>98 rangeElectrical equipmentRadio equipment55.ConnectionsThis paragraph contains the connect at the rear of the radio equipment.c-B-J ft A^^3 62 5Li-i *|
Electrical equipmentRadio equipment55.sBtavo-<strong>Brava</strong>98 rangeThe connections for the speakers should not be electrically connected to each other or earthed!Additional connectionsBlade contacts CLine outputPossibility of connection for power amplifier (Booster) or speaker activated.C1 Left rear speaker +C2 Right rear speaker +C3 Earth -C4 Left front speaker -C5 Right front speaker -C6 Switching voltage for power amplifier:on/off (max 0.3 A)Steering remote control:C8 EarthC9 Remote controlTelephone input:Possibility of connection for car phone or receiver-transmitter (listening through the radio).C7 Telephone NF78 XI-98 - Update Print no. 506.670/77
<strong>Bravo</strong>-<strong>Brava</strong> @i JTD98 rangeElectrical equipmentFiat CODE55.PROGRAMMING IGNITION KEYS (only on 1910 JTD version)For anything not dealt with in the pages which follow, refer to the Fiat CODE system described inthe Fiat <strong>Bravo</strong>-<strong>Brava</strong> Service Manual 11° volume (print no. 506.670/01)On the version in question, as a result of a differenti CODE system software configuration,specific procedure described below must be followed.At least two main keys are required in addition to the MASTER key.theInsert the (wine) MASTER key in the ignitionswitch in the OFF position.Turn the MASTER key to the ON position( + 15), the CODE warning light should comeon for 0.7 sees.Copyright by Fiat Auto XI-98 - Update 79
Electrical equipmentFiat CODE55.<strong>Bravo</strong>-<strong>Brava</strong> ^JTD98 rangeWhen the CODE warning light goes out, turnthe MASTER key to the OFF position and extractit.Within 10 seconds:- insert a new key (1) in the ignition and turnit to the ON position (+15), the CODEwarning light should come on for 0.7 sees.- When the CODE warning light goes out,turn the key (1) to the OFF position andextract it.Repeat the operations, as for the key (1), forthe second key and for all the keys to be programmed.Within 10 seconds:- insert the MASTER key once again in theignition and turn it to the ON position( + 15), the CODE warning light shouldcome on for 0.7 sees.80 XI-98 - Update Print no. 506.670117
<strong>Bravo</strong>-<strong>Brava</strong> !@| JTD98 rangeElectrical equipmentFiat CODE55.When the CODE warning light goes out, turnthe MASTER key to the OFF position, leavingit in this position for between 4 to 9 sees.Do not leave the MASTER key inthe OFF position for longer than 10sees because all the codes programmedwill be cancelled.Turn the MASTER key to the ON position( + 15), the CODE warning light should comeon for 0.7 sees.When the CODE warning light goes out, turnthe MASTER key to the OFF position.Repeat the two previous operations until,when the MASTER key is turned to the ONposition, the CODE warning light rather thancoming on for 0.7 seconds remains on constantly.Copyright by Fiat Auto XI-98 - Update 81
Electrical equipmentFiat CODE55.<strong>Bravo</strong>-<strong>Brava</strong> $JTD98 rangePlace the MASTER key in the OFF position,extract it and return it, the key programmingprocedure is over.If the procedure has been carried out correctly, i.e. as far as the timing and operations are concerned, ifthe ignition key is placed in the ON position, the CODE warning light will go out after coming on initi -cally for 0.7 seconds, otherwise it will start to flash in rapidly (1.6 Hz); if this is the case, the programmingprocedure must be repeated.If a mistake is made (at any time) during the programming procedure, place the ignition key inthe ON position for longer than 2 seconds or in the OFF position for longer than 10 seconds,then start the key programming procedure again.82 XI-98 - Update Print no. 506.670/17
<strong>Bravo</strong>- <strong>Brava</strong>98 rangeINTEGRATED SERVICES ELECTRONIC CONTROL UNITElectrical equipmentServices control unit55.A single electronic control unit known as the ABI (Alzacristalli Bloccaporte Integrati - Integrated electricwindow and door lock) located beneath the right facia trim controls a set of functions and controls thatare normally controlled by several different components.The various functions are as follows:Front electric window operation;Door lock/release;- Timed passenger compartment lighting;- Timed activation of heated rear window and door mirror demisters.Location of ABI control unitControl unit signalsConnector A:1 Supply to passenger side window motor - raise2 Passenger side window motor control - lower3 Supply to passenger side window motor -lower4 Passenger side window earth5 Passenger side window control from driver'sside - lower6 Passenger side window motor control - raise7 N.C.8 Supply to driver side window motor - raise9 Supply to driver side window motor - lower10 Driver side window motor control - raise11 Driver side window motor control - lower12 Lock control from remote control unit13 Release control from remote control unit14 N.C.15 Power supply (+30)16 Power supply (+30)17 N.C.18 Passenger side window control from driver'sside - raise19 N.C.20 Driver's side window earthConnector B:1 Timed ear courtesy light power supply2 Driver side front door switch for interior lights3 Passenger side front door switch for interiorlights4 Door lock motor power supply (release)5 Door lock motor power supply (lock)6 N.C.7 Power supply ( + 15)8 Power supply (+30)9 Heated rear window relay power supply10 Timed front courtesy light power supply11 Outlet for heated rear window warning light12 Driver side rear door switch for interior lights13 Electronic earth and door lock14 Heated rear window control15 Lock command from front locks (from key orswitches)16 Release command from front locks (from key orswitches)17 Heated rear window control from climate controlsystem (MAX DEF)Passenger side rear door switch for interior lightsCopyright Fiat Auto 83
Electrical equipmentService control unit<strong>Bravo</strong>- <strong>Brava</strong>98 rangeFRONT ELECTRIC WINDOW OPERATIONOperation is automatic for window raise andlower on the driver side, but only for lowering onthe passenger side.Operation is manual when key operating time isfrom 60 to 300 milliseconds.Operation is automatic when key operating timeexceeds 300 milliseconds.The window stops when the key is operated inthe opposite direction.Safety systemsThe window stops (i.e. motor electrical supply is cut off) when the glass reaches the upper or lower endstop or if an obstacle gets in the way and blocks the glass. This is regulated by controlling the selfadaptivemotor direct current.The electronic control unit behaves as follows:- If the motor control signal cuts out during operation, the control unit deactivates the system within amaximum time of 500 milliseconds. This interruption occurs when the controlled current taken up bythe electric window motor drops to less than 0.8 A.- If the control buttons are faulty (short-circuit or keys stuck down), control operation is inhibited at thetime of control unit activation until the defect disappears (or the key is released) for longer than 60milliseconds;- if the buttons are pressed for longer than 12 seconds, motor operation is inhibited; if the descendingkey is short-circuited or pressed for longer than 30 seconds, the control is inhibited so that the glasscan be closed.DOOR LOCK/RELEASEThe locks are operated simultaneously upon acontrol from the key, the front door switches(knobs) or via the remote control (see nextpage).NOTE Locking takes place only with the doorsproperly closed and the locks locked.Conversely, release takes place with thedoors properly closed and the doorslocked.P4A048HL0184 Publication n° 506.670/20
<strong>Bravo</strong>-<strong>Brava</strong>Electrical equipment98 range Services control unitCENTRAL DOOR LOCKING/OPENINGSoftware in the electronic control unit runs a series of safety checks:- It reads switch position at the end of each operation. If this position does not agree with the actioncarried out, a repulsion takes place. Everything is as normal if it agrees with the action carried out. Repulsiontakes place after a locking manoeuvre and after a release manoeuvre.- If the motors are commanded to lock and the operation is not carried out together, i.e. the commandsdo not agree or a door is open (in the case of the lock manoeuvre alone, the circuit carries out an oppositemanoevre to attempt to realign the lock;- if the control unit records several consecutive, complete lock/unlock manoeuvres, the system cuts in tooperate the manoeuvre limiter. The system therefore remains inhibited in released position for 30 seconds.- the system cuts off operation if battery voltage drops below 9 V.DOOR OPENING/CLOSURE REMOTE CONTROLNOTE The remote control, not available as standard,is built into the ignition key.Whenever the control button (1) is pressed, thesender unit sends a radio code with action radiusof about 10 metres to the receiver in the courtesylight.1. Control button2. Repeater led3. Password code card4. Transponder (used by invisible Fiat CODE)4PA83HL01NOTE Each key with remote control unit has a plate (3) with a 4-figure password to protect against unauthorisedprogramming (protected programming). The Dealer must remove the plate at the timeof sale and place it on the back of the Code Card (refer to the Fiat CODE chapter). If the platesare lost, the remote control can still be used but NEW REMOTE CONTROL UNITS cannot bestored (see next page), if this is necessary, replace the receiver on the courtesy light and the keys(to obtain the plates).RECEIVERThe receiver, built into the courtesy light, is an electronic device that receives a signal from the remotecontrol. This performs door opening/closure functions. Each receiver may be programmed with one ormore remote controls (up to eight) and store the relevant codes. A green led (1) on the receiver lights upwhen the signal is received, while a button (2) is used to store the code. When fitted in the cars, receiverscontain a UNIVERSAL code that is used to carry out end of production line tests using a remote controlunit with a universal code. When the car is delivered to the customer, the receiver must be personalisedby replacing the UNIVERSAL code with codes for remote control units provided with the car (seePROGRAMMING on the next page).Copyright Fiat Auto 85
Electrical equipmentService control unit55.1. Green led2. Store button<strong>Bravo</strong>- <strong>Brava</strong>98 rangeEOSReceiver connector1. Not connected2. Provision for alarm system3. Positive from battery (+30)4. Earth5. Door release6. Door lock7. Ingition-operated positive ( + 15)8. Not connectedSIMPLIFIED PROGRAMMINGA remote control unit must always bestored with the ignition key remove or in STOPor PARK positionWith this programming system, any number ofremote control codes are recognised but only thelast 8 remain stored by the alarm system as follows:1. press and hold down button (5) on the receiverbuilt into the courtesy lightl. The adjacentLED (4) should flash.2. Hold button (5) down and press remotecontrol unit key (3).3. Then release key (3) when the light of led(4) on the receiver should become fixed.4. Then release button (5) on the courtesy lightat the end of the cycle.5. The remote conrol unit is now programmed.NOTE Repeat the operations below to store thenext remote control units.1. Red LED on remote control unit2. Password code, 4-figure3. Control button on sender unit4. Green LED on courtesy light5. Programming button6. If the receiver led stops flashing and goes off(when the remote control ke is pressed), thereceiver memory is closed. Use PROTECTEDPROGRAMMING to store the remote controlunit code.PROTECTED PROGRAMMINGIf the memory is closed, further remote control codes can be entered onlly after opening the memory.OPENING MEMORY AND STORING A NEW REMOTE CONTROL UNITOpening the memoryTo open the memory, carry out the following operations in rapid succession:1. Press button (5) on the receiver for about 1 second. LED (4) flashes as long as the button is pressed.2. Release the button; after about 3 seconds, the LED emits a short flash to indicate that the first figureof the password can be entered.86 Publication no. 506.670/20
<strong>Bravo</strong>- <strong>Brava</strong>98 rangeElectrical equipmentServices control unit55.Press button (5) as many times as is indicated bythe first figure of the Password (e.g, if the Passwordis 5.2.0.3, press 5 times). Whenever thebutton is operated, LED (4) lights up briefly togive visual confirmation.1. Red LED on remote control unit2. Password code (4-figure)3. Control button on remote control unit4. Green LED on courtesy light5. Programming button4. About 3 seconds after the last press on the button (the fifth in this case), the LED emits anotherflash to ask for the next figure to be entered.5. Repeat the process from poen 3 to enter all four figures (do not press if the figure is "0" but wait forthe next request).6. If the Password has been correctly entered (memory open) the LED begins to flash (for about 10seconds). If it comes on with a fixed light (for about 10 seconds), repeat the cycle from point 1.Storing a new remote control unit.7. While LED (4) is flashing, press and hold down button (5). Led (40 continues to flash.8. Press key (3) of the new remote control unit until the light on the green LED (4) on the courtesylight becomes fixed.9. Then release key (3) of the remote control unit when the light on LED (4) on the courtesy light becomesfixed;10. then release button (5) on the courtesy light when the programming cycle is concluded.11. The remote control unit is then programmed.The memory closes again after storing the new remote control unit.TIMED PASSENGER COMPARTMENT LIGHTINGWhen the door is released by key or remote control unit, both front and rear passenger compartmentlights are operated on a timer as follows:- after any of the doors is opened (i.e. door open switches operated), a door release command is givenor the ignition key is removed, timers are enabled that come on that gradually turn on all car courtesylights from zero to maximum intensity within 3 seconds. At the end of the timed period, all car courtesylights are turned off gradually from maximum intensity to zero within 3 seconds. Whenever adoor is open, the current timer is re-initialised.Timers are as follows:- 6 seconds from door release by means of a key from outside the car, by remote control unit or viasafety button inside the passenger compartment. This timer does not work with the ignition key on.Copyright Fiat Auto 87
Electrical equipmentService control unit55.•o\o'< 6 OP 6 )A13B2B16B3'■o\e\ tIH<strong>Bravo</strong>-<strong>Brava</strong>98 range- 6-second when the door is reclosed to allowthe driver to enter the car and turn the ignitionkey on;- 6 seconds when the door is reclosed to allowthe driver to enter the car and insert the ignitionkey. The timer locks when the ignition isturned on;- 6 seconds when the ignition key is taken out;- 3 minutes to prevent the battery charging ifthe door is accidentally left open.NOTE When any of the doors is opened, thetimer begins again from zero.TEMP.TIMED OPERATION OF THE HEATED REARWINDOW (and door mirrors)pr^|-^iB1B12 B18■o|0-/V—/The control unit operates the heated rear window(and the door mirrors demister coils) on a timeras follows:- key turned ON;- an activation signal is received from the switchon the facia;- an activation signal is received from the airconditioner (MAX DEF)The power supply ceases if:- the key is turned to STOP or taken out- a deactivation signal is received from theswitch on the facia;- a MAX DEF function deactivation signal is received.If one of these two signals is not received, the timer keeps the coils activated for 20 MINUTES, but a specificsystem is applied:- the power supply stays on AT ALL TIMES for the first 10 MINUTES;- During the SUBSEQUENT TEN MINUTES, the power is cut off if battery voltage drops below 11.6 V(and is restored if voltage rises to more than 13V).Once the first 20 minutes of operation have elapsed, the heated rear window relay control working cycle is2 minutes active and 2 minutes deactive until the heated rear window control switch is turned off. Duringthe active stage, battery voltage affects operation as described previously. When the rear window remainsactive, the warning light is turned on.NOTE A command from the facia switch always takes priority over the MAX DEF function, i.e. if the rearwindow is turned on using the MAX DEF command and the facia switch is pressed, the heatedrear window will go off.88 Publication no. 506.670/20
Chapter 1Click here to choose chapter[intro & TachDatajEngine[Braking system.Auxiliary Unttsi Electrical Equipment]I Bodywork 1Sackfile:///D|/Volume%203/rhdrive.htm08/07/2006 16:53:11
<strong>Bravo</strong>-<strong>Brava</strong>WarningThis supplement contains the main rules to be followed for the repair and maintenance of the right handdrive version of Fiat <strong>Bravo</strong> and Fiat <strong>Brava</strong> cars.For further information, consult the left hand drive version of the Fiat <strong>Bravo</strong> and Fiat <strong>Brava</strong> manual.COMPOSITION OF RIGHT HAND DRIVE VERSIONPublication no.SectionsNumberof pagesNotes101 - 45 - 71370 12v engine fuel system1910 TD 75 engine fuel system181 -8Components and operation1370 12 clutch operation508.876339 - 111 - 1213 - 171910 TD 75 clutch operation1370 12v clutch operation1910 TD 75 clutch operation411 - 7Operation501 - 4Heater with manual controls551 - 7Removal and refitting701 - 15Removal and refittingCopyright Fiat Auto
<strong>Bravo</strong>-<strong>Brava</strong>Graphic representations and symbolsRemoveDisconnect■eIntakeH□DE21EDEl &fE0Ban^nP?n^^afRefitConnectDisassembleDismantleRefitComposeTighten to torqueTighten to torqueplus angleFully tightenStake nutAdjustRegulateVisual checkCheckAttentionLubricateDampChangeOriginal partsBleed brakingsystem airSurfaces to be machinedAfter machiningInterferencePress-fitDimension to measureMeasurement - CheckThickness - ClearanceRolling torque83©."^^^T"^o4—OQaExhaustOperationToleranceWeight differencePreloadRotateCompressionratioSelectcategoriesOversizedUndersized**"*> Oversized to ....
EngineContents10.<strong>Bravo</strong>-BtavapageFUEL SYSTEMiQl 12v- Removing-refitting accelerator cable 1- Removing-refitting accelerator pedal 3!0|TD75- Removing-refitting accelerator cable 5- Removing-refitting accelerator pedal 7Copyright Fiat Auto
<strong>Bravo</strong>-<strong>Brava</strong> ^ 12vEngineFuel system10.REMOVING-REFITTINGCABLEP4A01DA02ACCELERATORDisconnect the battery negative terminal,then proceed as follows:1. In the engine bay, turn the throttle valvecontrol lever and release the acceleratorcable. Remove the clip, then withdrawthe cable from the bracket.2. Working from inside the car, remove theleft foot rest, then disconnect the controlcable from the anchorage on the acceleratorpedal.3. Remove the pipe connecting the air cleanerto the butterfly valve case.4. Remove the relay unit protective cover.5. Unscrew the relay bracket retaining boltsand position unit to one side.P4A01DA03H- ■— —BI 1 ^~ -^si c=> ujrmi^^^/y^^^^^^^^^ i>P4A01DA04P4A01DA06Copyright Fiat Auto 1
EngineFuel system10.<strong>Bravo</strong>-<strong>Brava</strong> ^ 12vP4A02DA011. Remove the stud shown in the figure andmove the lining of the bulkhead betweenengine bay and passenger compartmentto one side.2. Unscrew the bolt retaining the acceleratorcable ducting device, on the bulkhead betweenengine bay and passenger compartment.Also remove the underlyingrubber block in order to free the hole andallow removal of the cable.3. Release the accelerator cable from the retainingclip located beneath the injectioncontrol unit.4. Withdraw the cable through the hole inthe bulkhead between engine bay andpassenger compartment and remove fromthe engine bay.When refitting, adjust the cable asdescribed in the paragraph "Adjustingthrottle cable"in Section 10 "Fuelsystem" for the left hand drive version.P4A02DA042 Publication no. 508.876
<strong>Bravo</strong>-<strong>Brava</strong> @i 12vEngineFuel system10.REMOVING-REFITTINGPEDALDisconnect the batterythen proceed as follows:ACCELERATORnegative terminal,1. In the engine bay, turn the throttle valvelever and release the accelerator cable. Removethe clip and withdraw the cable fromthe bracket. This operation is necessary tofacilitate removal of the accelator cablefrom the control pedal.2. Working from inside the car, remove theleft foot rest by undoing the retainingbolts shown in the figure.3. Disconnect the control cable from the anchorageon the accelerator pedal.4. Disconnect the clutch pedal reactionspring (attached to the accelerator pedalbracket) by removing the roll pin indicated.P4A03DA02Copyright Fiat Auto 3
EngineFuel system10.<strong>Bravo</strong>-<strong>Brava</strong> @ii2vP4A04DA01P4A04DA021 -2. Unscrew both nuts retaining the acceleratorpedal bracket, then remove fromthe car.4 Publication no. 508.876
<strong>Bravo</strong>-<strong>Brava</strong> !Q)i TD7SEngineFuel system10.P4A05DA02REMOVING-REFITTINGCABLEACCELERATORDisconnect the battery negative terminal,then proceed as follows:1. Remove the upper cam cover protection.2. In the engine bay, release the acceleratorcable by taking out retaining clip (1) andunscrewing nut (2).P4A05DA033. Working from inside the car, remove theleft foot rest and unscrew the bracket retainingthe air hose shown. Disconnectthe pipe from below to allow access to thecable anchorage on the accelerator pedal.4. Disconnect the control cable from its anchorageon the accelerator pedal.P4A01DA02Copyright Fiat Auto 5
EngineFuel system10.<strong>Bravo</strong>-<strong>Brava</strong> ^ TD7S1. Remove the trim shown in the figure byundoing the retaining bolts and releasingthe diesel lines from the retaining clip.2. Remove the bolt retaining the bracketjoining the fuel lines.3. Disconnect the connector of the brake andclutch fluid level sensor, then remove thestud retaining the lining of the bulkhead betweenengine bay and cabin, and move thelining to one side.4.5.Unscrew the bolts retaining the diesel filterbracket, disconnect the connections shownand position the bracket to one side.Move the lining of the bulkhead betweenengine bay and cabin further to one side,then unscrew the nut retaining the acceleratorcable to the bulkhead, remove theunderlying rubber guide and withdraw theaccelerator cable.P4A06DA046 Publication no. 506.876
<strong>Bravo</strong>-<strong>Brava</strong> ^TD 75 EngineFuel system10.REMOVING-REFITTINGCONTROL PEDALACCELERATOR1. Proceed as described for the 1370 12v en -gine, but remove the air pipe bracketshown in the figure in order to release thepipe and gain access to the accelerator cableanchorage on the pedal.Copyright Fiat Auto 7
<strong>Bravo</strong>-<strong>Brava</strong>ClutchContents18.pageCOMPONENTS AND OPERATION- Clutch with hydraulic release mechanism1CLUTCH OPERATION- Removing-refitting clutch pedal 2- Removing-refitting clutch pump 3- Removing-refitting pipe connectingclutch pump-slave cylinder 6- Removing-refitting master cylinder 7- Bleeding 8J ^ ,TD7SRemoving-refitting clutch pump 9Removing-refitting pipe connectingclutch pump-slave cylinder 10Removing-refitting slave cylinder 11Copyright Fiat Auto
<strong>Bravo</strong>-<strong>Brava</strong>ClutchComponents and operation18.CLUTCH WITH HYDRAULIC RELEASE MECHANISMRight hand drive versions are fitted with a hydraulic clutch release device. This device consists of areservoir shared with the braking system (1), a pump (2) fastened to the pedal assembly and a slavecylinder (3) fastened to the clutch bell housing.This hydraulic device is more efficient and reliable than the mechanical device. Clutch operation is alsosmoother and less jerky, particularly when high torques are transmitted.The car is more comfortable to drive, because fewer vibrations are transmitted to the power unit due tothe damping effect of the fluid.The adoption of this device eliminates the need for periodic adjustment because play is eliminated andwear on the driven plate is taken up automatically.The clutch is single, dry plate type, with a hydraulic release device and thrust bearing constantly in touchwith the thrust spring. The driven plate is controlled by pressure exercised by a diaphragm spring.4A09DACopyright Fiat Auto 1
ClutchClutch operation18.<strong>Bravo</strong>-<strong>Brava</strong>REMOVING-REFITTING CLUTCH PEDALBefore removing the clutch pedal, removethe accelerator pedal as describedin "Section 10 - Fuel system".1. Remove the roll pin retaining the clutchpump rod to the pedal.2. Remove the car brake light switch to facilitateaccess to the clutch and brake pedalretaining bolt.3. Unscrew the bolt retaining the clutch andbrake pedal, withdraw in the arrowed directionuntil the clutch pedal is released.If brake pedal removal is not required,do not take the bolt retaining theclutch and brake pedal any furtherout.4. Release the clutch pedal from the clutchpump rod and remove from the pedal unit.2 Publication no. 508.876
<strong>Bravo</strong>-<strong>Brava</strong> !g| 12vClutchClutch operation18.Components of clutch pedal1. Pedal unit2. Clutch pedal3. Clutch pedal return spring4. Roll pin and bush retaining spring toclutch pedal5. Bush6. Clutch pump7. Roll pin and washer retaining clutchpump rod to pedalREMOVING-REFITTING CLUTCH PUMPP4A01 DA031. Remove pipe connecting air cleaner tobutterfly valve case by undoing the fasteningsshown in the figure.Copyright Fiat Auto 3
ClutchClutch operation<strong>Bravo</strong>-<strong>Brava</strong> ^ ^1. Remove the relay protective cover.2. Unscrew both nuts retaining the relaybracket, disconnect the connection indicatedand position the bracket to one side.3. Remove the stud retaining the lining ofthe bulkhead betweenlining to one side.4. Drain the brake and clutch fluid from thereservoir after disconnecting the levelgauge connector and removing the reservoircap.5. Disconnect the central line connected tothe clutch pump, marked "FRIZ", from thereservoir.4A12DAP4A12DA064 Publication no. 508.876
<strong>Bravo</strong>-<strong>Brava</strong> ^ 12vClutchClutch operation18.3Ontf^V i*MWff/ly&ffl i^1. Release the injection wiring bundle fromthe retaining clip to allow access to the fittingof the pipe connected to the slavecylinder on the clutch pump.2. Disconnect the fitting of the pipe connectingclutch pump - slave cylinder.3. Working from inside the car, remove theroll pin retaining the clutch pump rod tothe pedal.4. Unscrew the nuts retaining the clutchpump to the body take out slightly in orderto release the rod from the clutch pedal,then remove complete with connectionpipe leading to the reservoir.5. Working on the bench, separate the clutchpump from the pipe connected to thereservoir.Reverse disassembly instrutions toassemble. To refit the pump connectionline to the reservoir, first positionthe rubber fitting over the hole in thebody, and then thread the pipe frominside the car into the engine bay.P4A13DA03Copyright Fiat Auto 5
ClutchClutch operation18.<strong>Bravo</strong>-Btava Itti 12vP4A13DA02REMOVING-REFITTING PIPE CONNECTING CLUTCH PUMP - SLAVE CYLINDERWorking inside the engine bay, removethe same parts as removed todisconnect the dutch pump to gainaccess to the fitting of the line connectedto the slave cylinder on thepump.1. Unscrew the fitting of the line connectingthe pump to the slave cylinder on theclutch pump.2. Disconnect the leads from the batterynegative terminals, then remove by unscrewingthe nut securing the retainingbracket.3. Remove the relay box cover, then unscrewthe nut retaining the box to the batterycradle and position to one side.4. Release the electrical leads shown in thefigure from their retaining clips, then removethe battery cradle by undoing the retainingbolts indicated.6 Publication no. 508.876
<strong>Bravo</strong>-<strong>Brava</strong> ^ 12vClutchClutch operation18.1. Release the pipe connecting clutch pump- slave cylinder from the retaining clipshown in the figure.2. Disconnect the pipe fitting on the slavecylinder and then remove the pipe.REMOVING-REFITTING SLAVE CYLINDERRemove: battery, relay box, battery cradle asdescribed for removal of the clutch pumpconnection pipe - slave cylinder. Also disconnectthe pipe connecting clutch pump -slave cylinder on the slave cylinder.3-4. Unscrew the bolts retaining the slavecylinder and remove from the enginebay.Copyright Fiat Auto 7
ClutchClutch operation18.<strong>Bravo</strong>-<strong>Brava</strong> $ 12vNOTEProceed as described for the left handdrive version to remove the reverse inhibitor,Note, however, that the bolt retainingthe inhibitor also secures theclutch slave cylinder; remove the latterwithout disconnecting the fittings. It willnow be possible to disconnect the reverseinhibitor as shown in the figure.1ti£=?MtjLidv3kllSS ""T§§P--"-' /;*?i j8--^___x^%JTjfj y//^>SSLw 7 'O'/^BLEEDINGConnect the end of a hose to the clutch slavecylinder bleed screw and insert the oppositeend in a suitable container. Fill the brake andclutch fluid reservoir, then bleed the clutchsystem by loosening the bleed screw on theslave cylinder. Simultaneously press downthe clutch pedal and allow it to return slowly.Repeat the operation until all air bubbleshave been removed. With the clutch pedalpressed to the floor, tighten the bleed screwand remove the pipe.P4A16DA02During the bleeding operation, keep the fluid level in the tank above the MlN mark. Do not reusefluid drained during the disassembly and bleed stages.Top up the fluid level in the reservoir and refit the cap. Lastly, check the efficiency of the hydraulic clutchsystem.8 Publication no. 508.876
<strong>Bravo</strong>-<strong>Brava</strong> ty TO 75ClutchClutch operation18.P4A17DA01REMOVING-REFITTING CLUTCH PUMP1. After removing the upper cam cover protectionand the guard in front of the brakeand clutch fluid reservoir, unscrew thebolts retaining the diesel filter bracket, disconnectthe connectors indicated and positionthe bracket to one side without disconnectingthe diesel lines.2. Drain the brake and clutch fluid from thereservoir.3. Disconnect the pipe connected to theclutch pump from the brake and clutchfluid reservoir.4. Disconnect the fitting of the line connectedto the slave cylinder from the clutch pump.5. From inside the car, remove the left footrest and disconnect the air pipe from thepoints indicated, then position to oneside.4 v>%z1fA// /M\P4A17DA03Copyright Fiat Auto 9
ClutchClutch operation18.<strong>Bravo</strong>-<strong>Brava</strong> ^ TD 75P4A13DA031. Working from inside the car, remove theroll pin retaining the clutch pump rod tothe pedal.2. Unscrew the bolts retaining the clutchpump to the body, remove slightly to releasethe rod from the clutch pedal, thenremove complete with pipe connected tothe reservoir. At the bench, separate theclutch pump from the pipe connected tothe reservoir.REMOVING-REFITTING PIPE CONNECTING CLUTCH PUMP TO SLAVE CYLINDERRemove the upper cam cover protectionand the guard in front of thebrake and clutch fluid reservoir, thenunscrew the bolts retaining the dieselfilter bracket and drain the brake andclutch fluid from the reservoir, as describedin the previous paragraph.3. Unscrew the fitting of the pipe connectingthe pump to the slave cylinder on theclutch pump.4. Disconnect the battery terminal leads andremove the battery from the engine bay afterdetaching from the bracket. Also removethe relay box cover.10 Publication no, 508.876
<strong>Bravo</strong>-<strong>Brava</strong> ty TD 75Clutch1 -\3?11Iffcj^^ss&yII (p§Clutch operation18.3/ L^sk ©pC;380^i§Jo ^jT/f1. Release the relay box from the battery cradleby undoing the retaining bolts. Thenremove the cradle by undoing the bolts indicatedand disconnecting the wiringbundle.2. Unscrew the fitting of the pipe connectedto the clutch pump on the slave cylinder,detach the pipe from the retaining clipsand remove from the car.REMOVING-REFITTING SLAVE CYLINDERDrain the brake and clutch fluid, removethe battery, the cradle and therelay box as described in the previousparagraph.Undo nuts retaining bracket (1) and remove;disconnect the clips indicated andremove the flow meter in order to gain accessto the underlying slave cylinder.Disconnect the fitting of the pipe connectedto the clutch pump, then unscrewthe slave cylinder retaining bolts and removefrom the car.flyBleeding clutch systemCopyright Fiat Auto 11
Braking systemContents33.<strong>Bravo</strong>-<strong>Brava</strong>pageHYDRAULIC OPERATION- Components of hydraulic brakingsystem- Removing-refitting brake pedal12l^^Si t2vBrake-clutch fluid reservoirRemoving-refitting brake pumpRemoving-refitting servo brakeRemoving-refitting pedal unitRemoving-refitting brake servo vacuuminlet pipeRemoving-refitting one-way valve34610121210k TO 75Brake-clutch fluid reservoirRemoving-refitting brake pumpRemoving-refitting servo brakeRemoving-refitting brake servo vacuuminlet pipe and one-way valve13141517Copyright Fiat Auto
<strong>Bravo</strong>-<strong>Brava</strong>Braking systemHydraulic operation33.COMPONENTS OF HYDRAULIC BRAKING SYSTEM1. Brake fluid reservoir2. Pipe connecting brake fluid reservoir topump3. Brake pump4. Brake servo vacuum pipe5. Servo brake6. Complete pedal mountAccording to the version, the brake fluid reservoir may be connected to the pump by pipes or may be fitteddirectly to the brake pump.Copyright Fiat Auto 1
Braking systemHydraulic operation33.<strong>Bravo</strong>-<strong>Brava</strong>REMOVIIMG-REFITTING BRAKE PEDALBefore removing the brake pedal, remove the clutch pedal as described in "Section 18" of theright hand drive supplement.1. Remove the roll pin retaining the brakeservo rod transmission on the brake pedal.2. Remove clutch and brake pedal retainingbolt completely and then remove the pedalfrom the car.Brake pedal fastening details1. Pedal unit2. Brake pedal3. Brake servo rodP4A22DA034. Transmission connecting brake pedal -brake servo rod5. Device for anchoring brake servo rod andtransmission to brake pedal2 Publication no. 508.876
<strong>Bravo</strong>-<strong>Brava</strong> iQ| 12vBraking systemHydraulic operation33.BRAKE-CLUTCH FLUID RESERVOIRChecking low brake fluid warning lightNOTE At intervals, check warning light operationby pressing down on the top edge ofthe reservoir cover (arrowed). The brakesystem warning light should come onwhen the ignition is turned to MAR.Removing-refittingProceed as follows to remove the brake fluidreservoir:1. Disconnect the connector of the fluid levelsensor and remove the reservoir cap, thendrain the brake fluid from the reservoir usinga syringe.2. Disconnect both brake pipes and the hydraulicclutch pipe from the reservoir.3. Unscrew the bolt retaining the reservoir tothe body and remove from the vehicle.Take care the fluid remaining in thereservoir does not leak out.NOTECarry out removal operations in reverseorder to refit the brake and clutch reservoir.2Bjfl Before filling the tank, ensure it is extremelyclean.flyBleeding hyrdaulic brake and clutchsystem^ ^ ^/>^5l^=*J^T^Copyright Fiat Auto 3
Braking systemHydraulic operation33.<strong>Bravo</strong>-<strong>Brava</strong> l§i 12vP4A01 DA03P4A01 DA04REMOVING-REFITTING BRAKE PUMPProceed as follows to remove the brakepump:1. Disconnect the pipe connecting air cleanerto butterfly valve cause by undoing thefastenings indicated in figure.2. Remove the relay cover.3. Remove the relay bracket by undoing thebolts retaining it to the body, disconnectconnector indicated and move the bracketto one side.4. Remove the retaining stud of the lining ofthe bulkhead betweenlining to one side.P4A01 DAOB5. Remove the cap from the brake and clutchfluid reservoir after disconnecting the fluidlevel sensor connector. Then drain the fluidfrom the reservoir.P4A02DA014 Publication no. 508.876
<strong>Bravo</strong>-<strong>Brava</strong> @ 12vBraking systemHydraulic operation33.1. Disconnect the brake fluid inlet pipes fromthe reservoir from the brake pump.2. Use wrench 1856132000 to disconnectthe brake pipe fittings from the brakepump.f-^ Bleeding brake system3. Unscrew both nuts retaining the brakepump to the brake servo, then remove thepump from the car.P4A25DA02Reverse removal instructions to refit,making sure that the brake pump isproperly fitted to the brake servo rodand washer.P4A25DA03P4A26DA04Copyright Fiat Auto 5
Braking systemHydraulic operation33.<strong>Bravo</strong>-<strong>Brava</strong> l@t ^P4A01DA052^== V ==:11 ^—'-~L if|i—-TIMjy==bxj—,i^SH%$&22^^i^> ^Q f§§3>^n nl§/ /^Jt^TTefis? / i fS^3 1 jIWffil^ife/i' /~~^P4A01 DA04REMOVING-REFITTING SERVO BRAKEOn right hand drive vehicles, thebrake servo is positioned inside thecabin under the pedal unit. To takeout, remove the facia trim as describedin Section 70, then proceedas follows.Working from the engine bay, remove thesleeve connecting air cleaner and butterflyvalve case.Remove the protective relay cover locatedortteu I kh ealdetweeen g i rteaeyrda b ibyn d o i ntip ebolt indicated.Remove the relay bracket by undoing thebolts retaining it to the body, disconnectconnector indicated and move the bracketto one side.Remove the retaining stud and move thelining of the bulkhead between enginebay and cabin to oneside.5. Undo both nuts retaining the brake pumpto the brake servo.P4A26DA016 Publication no. 508.876
<strong>Bravo</strong>-<strong>Brava</strong> 101 12vBraking systemHydraulic operation33.1. Remove the brake pump without disconnectingthe connected brake lines, in orderto release the brake servo rod from thepump.2. Release the injection wiring bundle fromthe retaining clip, then disconnect the vacuumintake line from the brake servo.3. Working from inside the cabin, remove theleft foot rest, located beside the clutchpedal.4. Remove the bolt retaining the lower steeringcolumn to the power steering box pinion.5. Remove the steering column reinforcementbar by unscrewing the retainingbolts indicated in the figure.Copyright Fiat Auto 7
Braking systemHydraulic operation33.<strong>Bravo</strong>-<strong>Brava</strong>P4A28DA011. Disconnect electrical connection from the ignition,then unscrew the bolts fastening thesteering column and remove from the car.2. Disconnect the braking light switch connector.3. Unscrew both nuts retaining the acceleratorpedal retaining bracket and release theclutch pedal return spring from the bracket.4. Disconnect the control cable from its anchorageon the accelerator pedal, then removethe accelerator pedal from the vehicle.5. Remove rubber fitting (1) from the bonnetopening lever and then release the end ofthe opening cable from its seat and takeout through the housing hole of rubber fitting(1).P4A28DA048 Publication no. 508.876
<strong>Bravo</strong>-<strong>Brava</strong>Braking systemHydraulic operation33.P4A29DA01P4A29DA021. Remove the roll pin retaining the clutchpump rod on the control pedal.2. Release the electrical connector shown inthe figure from the pedal mount.3. Remove the roll pin retaining the brakeservo rod to the control pedal transmission.4. Remove nuts retaining the pedal unit tothe body, then remove the pedal unit andservo brake from the body by releasing theclutch pedal from the clutch pump rod.5. At the bench, unscrew the four bolts retainingthe brake servo to the pedal unit.P4A29DA03P4A29DA05Copyright Fiat Auto 9
Braking systemHydraulic operation33.<strong>Bravo</strong>-<strong>Brava</strong>1. Separate the brake servo from the pedal unitby releasing the brake servo rod from thetransmission on the control pedal.Refitting2. Reverse removal instructions to refit. Takecare to position the control rod and washerin their correct place on the brake servo,to ensure that they do not come out ofplace when fitting the brake pump.REMOVIIMG-REFITTING PEDAL UNITP4A30DA03Proceed as described for the brakeservo removal to remove the pedalunit. Note that the brake pump neednot be removed from the brake servoand vacuum intake pipe. Before removingthe pedal assembly, unscrewthe nuts retaining the brake servo tothe pedal mount as shown in the figure.3. Unscrew nuts retaining the brake servo tothe pedal mount and remove the roll pinsecuring the brake servo rod to the brakepedal transmission.4. Undo nuts securing the pedal mount andremove from the car after releasing thebrake servo rod from the transmission onthe control pedal.10 Publication no. 508.876
<strong>Bravo</strong>-<strong>Brava</strong>Braking systemHydraulic operation33.P4A31DA023|^^^X^^jg^
Braking systemHydraulic operation33.<strong>Bravo</strong>-<strong>Brava</strong> @i 12vREMOVING-REFITTINGVACUUM INPUT PIPEBRAKE SERVORemove the pipe connecting the aircleaner to the butterfly valve case, therelay cover and the relay bracket,move the lining of the bulkhead betweenengine bay and cabin, as describedfor removal of the brake servo,then proceed as follows.1. Release the injection wiring bundle fromthe retaining clip, then disconnect the vacuumintake pipe from the brake servo.2. Unscrew clip retaining the vacuum intakepipe to the engine and remove the pipe.4JREMOVING-REFITTINGVALVEONE-WAY3. Remove the pipe connecting air cleaner atbutterfly valve case by undoing the clip indicatedin figure.4. Remove the one-way valve from bothparts of the brake servo vacuum intakepipe.■KM When fitting a new one-way valve,|M^ take care to position properly with^ l " the engine end arrow turned towardthe engine.12 Publication no. 508.876
<strong>Bravo</strong>-Btava ^ TO 75BrakingsystemHydraulic operation33.BRAKE-CLUTCH FLUID RESERVOIRRemoving - ref itti ng1. Remove the upper cam cover protection.2. Release the diesel lines from the retainingclip, then remove the trim shown in thefigure by undoing the retaining bolts.3. Disconnect fluid level sensor connectorand remove the reservoir cap, then drainthe brake fluid from the reservoir using asyringe.4. Disconnect the hydraulic clutch line fromthe reservoir, then separate the reservoirfrom the brake pump and lift out.Ensure fluid remaining in the reservoirdoes not leak out.NOTECarry out brake and clutch fluid reservoirremoval operations in reverse order to refit.|MI Ensure the reservoir is**^ clean before filling.5^extremelyBleeding hydraulic brake and clutchsystemCopyright Fiat Auto 13
Braking systemHydraulic operation33.<strong>Bravo</strong>-<strong>Brava</strong> ^ TO 75REMOVING-REFITTING BRAKE PUMPCarry out operations described for removalof the brake and clutch fluidrervoir (1910 TD), but without disconnectingthe hydraulic clutch andplacing the reservoir to one side.Use wrench 1856132000 to disconnectthe brake line fittings from the brakepump.u^ Bleeding brake system2-3. Unscrew both nuts retaining the brakepump to the brake servo, then removethe pump from the car.Reverse removal instructions to refit,taking care to fit the brake pumpproperly to the brake servo rod andwasher.14 Publication no. 508.876
<strong>Bravo</strong>-<strong>Brava</strong> ^ TD75Braking systemHydraulic operation33.REMOVING-REFITTING SERVO BRAKE1. Remove the upper cam cover protection.2. Release the diesel lines from the retainingclip, then remove the trim shown in thefigure by undoing the retaining bolts.3. Unscrew bolts retaining the diesel line retainingbracket.4. Disconnect the brake and clutch fluid levelsensor, then remove the stud retaining thelining of the bulkhead between engine bayand cabin, then move the lining to oneside.5. Unscrew the bolts fastening the diesel filterbracket, disconnect the connectionsshown and position the bracket to oneside.Copyright Fiat Auto 15
Braking systemHydraulic operation33.<strong>Bravo</strong>-<strong>Brava</strong> ty TO 75ni=?=A(S
<strong>Bravo</strong>-<strong>Brava</strong> !(p TO 75Brakingr~/UsS^^systemHydraulic operation33.P4A36DA02REMOVING-REFITTING BRAKE SERVOVACUUM INLET PIPE AND ONE-WAYVALVEProceed as described for the brakeservo inside the engine bay, but withoutdisconnecting the brake pumpfrom the brake servo.1. Disconnect the vacuum inlet pipe from thebrake servo.P4A37DA022. Disconnect the clip retaining the vacuuminlet pipe from the vane vacuum pump.3. Disconnect the pipe indicated in the figurefrom vacuum inlet pipe, then remove thepipe.4. Separate the one-way valve from the vacuuminlet pipe. When refitting, positionthe valve with the wording LATO MO-TORE turned toward the engine.P4A37DA03Copyright Fiat Auto 17
<strong>Bravo</strong>-<strong>Brava</strong>SteeringContents41.pageOPERATION- Steering wheel - Removing-refitting 1- Stalk unit release - Removing-refitting 1- Steering column - Removing-refitting 2- Rack and pinon power steering box -Removing-refitting 3- Components of power steering system 6IP*TD75- Components of power steering system 7Copyright Fiat Auto
<strong>Bravo</strong>-<strong>Brava</strong>SteeringOperation41.STEERING WHEElRemoving-refittingRemove the air bag module from thesteering wheel as described in Section55.Unscrew the nut retaining the steeringwheel to the steering column, the disconnectthe horn electrical connection and removethe steering wheel.Mark the positions of the steering wheelhub and steering columns and remove thesteering wheel.During the operation, take care NOTTO STRIKE THE STEERING WHEEL.The clock spring is fitted with a safetyclip to pre went the lower and upperplates turning in relation to one anotherwhen the steering wheel is notfitted in the car. This is achieved bysprings (1), which close as shown inthe figure.Remove the clock spring as describedin Section 55.STALK UNIT-RELEASERemoving-refittingRemove the stalk unit-release as follows:3. Use a socket wrench to loosen the bolt ofthe stalk unit-release retaining collar andwithdraw.4. Disconnect electrical connectors from thestalk unit-release and remove.Copyright Fiat Auto 1
SteeringOperation<strong>Bravo</strong>-<strong>Brava</strong>STEE RING COLUMNRemoving-refittingProceed as follows to remove the steeringcolumn:1. Remove the left foot rest located besidethe clutch pedal.2. Unscrew bolt retaining the lower steeringcolumn shaft to the power steering boxpinion.3. Disconnect the ignition connector.4. Remove the lower junction unit protection.5. Remove the steering column reinforcementbar by unscrewing the retainingbolts indicated in figure.2 Publication no. 508.876
<strong>Bravo</strong>-<strong>Brava</strong>SteeringOperation41.1 -2. Unscrew the bolts fastening the steeringcolumn mount to the body and removethe steering column together withthe lower shaft.RACK AND PINION POWER STEERING BOXRemovi ng - ref itti ng3. Disconnect the negative battery terminallead, position the car on a lift, then drainthe power steering fluid from the reservoirusing an appropriate syringe.4. Remove the left foot rest located alongsidethe clutch pedal.5. Unscrew bolt retaining the lower steeringshaft to the power steering box pinion.Copyright Fiat Auto 3
SteeringOperation<strong>Bravo</strong>-Btava1. Remove the front wheels, then unscrewthe bolts retaining the steering link heads(right and left) to the pillars and removefrom the pilars using extractor1847038000.2. Release the reverse inhibition lead fromthe retaining clip, then lift clip (1) and disconnectthe gear selection bowden cablehead.3. Disconnect electrical connection of thelambda probe.4. Remove the bracket retaining the first exhaustpipe section to the crankcase.5. Unscrew bolts retaining the first exhaustpipe section to the catalytic converter.4A42DAP4A42DA04Publication no. 508.876
<strong>Bravo</strong>-<strong>Brava</strong>SteeringOperation41.Position a hydraulic jack beneath the engineand then unscrew the bolts retainingthe central engine mount and remove.Prise off the head anchoring the gear leverto the transmission mount, working fromthe lower rear of the engine bay.Unscrew the nuts and bolt shown in thefigure, which retain the power steeringfluid return line brackets to the reservoir.Disconnect the fitting for the inlet line forfluid under pressure from the pump andthe fitting of the fluid return line to thereservoir.Unscrew the bolts fastening the powersteering box to the front beam.P4A43DA04P4A43DA0BCopyright Fiat Auto 5
SteeringOperation41.<strong>Bravo</strong>-<strong>Brava</strong>P4A44DA011. Remove the power steering box from thevehicle, by moving the entire assembly towardthe gearbox end and taking out fromthe middle as shown in the figure.P4A44DA022. Power steering box1. Fitting for pipe carrying fluid underpressure from the pump2. Fitting for fluid return line to reservoirCOMPONENTS OF POWER STEERING SYSTEMi^^9l 12v1. Pump2. Fluid delivery line to pump3. Power steering fluid reservoir4. Fluid return line to reservoir5. Power steering box6. Pipe carrying fluid underpressure from pumpP4A44DA036 Publication no. 508.876
<strong>Bravo</strong>-<strong>Brava</strong>COMPONENTS OF POWER STEERING SYSTEMSteeringOperation41.|^^mt TO 751. Pump2. Fluid delivery line to pump3. Power steering fluid reservoir4. Fluid return line to reservoir5. Power steering box6. Pipe carrying fluid underpressure from pumpCopyright Fiat Auto 7
Auxiliary unitsContents50.<strong>Bravo</strong>-<strong>Brava</strong>pageHEATER WITH MANUAL CONTROLS- Distributor heater assembly - Removing-refitting1- Removing-refitting cabin fan 3Copyright Fiat Auto
<strong>Bravo</strong>-<strong>Brava</strong>Auxiliary unitsHeater with manual controls50.3DISTRIBUTOR HEATER ASSEMBLY_JZjf^—sr^/ 0 /9v^Wj CrfifO))
Auxiliary unitsHeater with manual controls50.<strong>Bravo</strong>-<strong>Brava</strong>Unscrew bolts indicated in figure which secure the heater-distributor assembly to the body, then removethe assembly from the car.2 Publication no. 508.876
<strong>Bravo</strong>-<strong>Brava</strong>Auxiliary unitsHeater with manual controls50.View of the heater-distributor unitREMOVING-REFITTING CABIN FAN1. Disconnect the battery negative terminal,then work from the lower left part of thefacia to disconnect the supply connectorand remove the fan cover retaining bolt.Copyright Fiat Auto 3
Auxiliary unitsHeater with manual controls50.<strong>Bravo</strong>-<strong>Brava</strong>P4AS0DA011. Remove the cabin fan from the lower lefthand side of the facia.4A50DA4 Publication no. 508.876
<strong>Bravo</strong>-<strong>Brava</strong>Electrical equipmentContents55.pageLOCATION OF WIRING- Perspective view of facia wiring 1INSTRUMENT PANEL- Instrument panel 3- Removing-refitting 4AIR BAG- Removing-refitting driver's air bag 5- Removing-refitting clock spring 6Copyright Fiat Auto
<strong>Bravo</strong>-<strong>Brava</strong>Electrical equipmentLocation of wiring55.PERSPECTIVE VIEW OF FACIA WIRING1. Front left door lock2. Left front window motor3. Push button for electric front windowson left armrest4. Left external rear wiew mirror5. Front courtesy light6. Dashboard/front left doorcables connection7. Fuses bracket under glove box8. Passenger's Air Bag9. A.B.S. cables10. Front left speaker (Tweeter)11. Front left cable12. Front right/left cables connection13. Hazard warning lights switch unit4A51 DA14. Drivers Air Bag15. Stalk unit16. Instrument panel17. Front right speaker (tweeter)18. Fiat CODE electronic control unit19. Dashboard/front cables connection20. Front right cable21. Courtesy lights front right switch22. Dashboard/front right door cable connection23. Front right door cable24. Right dashboard earth25. Dashboard/rear cables connection26. Fuse and relay unit27. Fuses on auxiliary bracket28. Stop lights switch29. Fiat CODE antenna30. Ignition switch31. Rear cables/driver's heated seat connection32. Rear cable33. Hand brake on warning light switch34. Push button unit for electrically-adjustableexternal rear view mirrors35. Inertial switch36. Rear cables/passenger's heated seat connection37. Loud speaker on front left door38. Courtesy lights front left switch39. Left dashboard earth40. Switch control assembly41. Cigarette lighter42. Air Bag electronic control unitCopyright Fiat Auto 1
<strong>Bravo</strong>-<strong>Brava</strong>Electrical equipmentInstrument panel55.INSTRUMENT PANEL1 6<strong>Bravo</strong>-<strong>Brava</strong> 1370 12v<strong>Bravo</strong>-<strong>Brava</strong> 1910 TD 751. Fuel reserve warning light2. Fuel level gauge3. Rev counter4. Turn signal warning lights5. Speedometer and dual mileometer (totaland trip counter)6. Coolant temperature gauge7. Warning lightsCopyright Fiat Auto 3
Electrical equipmentInstrument panel55.<strong>Bravo</strong>-<strong>Brava</strong>REMOVING-REFITTING1. Disconnect the battery negative terminal,then remove the lower steering columntrim by undoing the bolts indicated in thefigure.2. Remove the upper steering column trim inorder to allow removal of the lower controlpanel frame screws.3. Unscrew the bolts fastening the outside ofthe control panel frame.4. Remove the junction unit protective cover.Unscrew the outer control panel frameretaining screw. Remove the frame fromthe facia and disconnect the lighting dimmerand headlamp beam alignment connectors.4 Publication no. 508.876
<strong>Bravo</strong>-<strong>Brava</strong>Electrical equipmentInstrument panel55.1. Unscrew screws fastening control panelto facia.2. Disconnect electrical connections for theinstrument panel and remove from the car.NOTE Reverse order of removal operationsto refit.REMOVING-REFITTINGAIR BAGDRIVER'S SIDEThe air bag modules must be removedand refitted with the ignitionkey turned to "STOP" and removed,and the battery positive and negativeterminal and properly insulated. Waitfor 10 minutes before continuing.P4AB6DA03TAKE CARE TO OBSERVE ALL THESAFETY RULES SET OUT IN THECHAPTER ON "AIR BAG And PRE-TENSIONERS" IN THE MANUALFOR THE LEFT HAND DRIVE VERSIONUnscrew both hexagonal-headed socketscrews indicated. Turn the steering wheelto gain access to each screw.Copyright Fiat Auto 5
Electrical equipmentAir Bag55.<strong>Bravo</strong>-<strong>Brava</strong>Move the air bag module slightly. Carefullydisconnect connector indicated, takingcare nto to pull by the wire but by the connectorcase. Then remove the air bagmodule and rest on the work bench withthe cover uppermost.NOTE For safety reasons, when the moduleconnecter is disconnected the twoterminals automatically short circuit;a special spring-loaded device keepsboth terminals connected.2. Replace the module in the appropriatecabinet. The diagram shows how themodule should be positioned.NOTECarry out removal operations in reverseorder to refit.DO NOT CONNECT THE BATTERYUNTIL INSTALLATION IS COMPLETENOTE After the operation, check the systemusing a Fiat/Lancia Tester.REMOVING-REFITTING CLOCK SPRINGRemove the driver's air bag as describedon the previous page and observingthe SAFETY REGULATIONSdescribed.All the following operations must becarried out with the WHEELSALIGNED WITH THE LONGITUDINAL ACCESS OF THE VEHICLE(wheels straight). Secure the steeringwheel if necessary.3. Remove the horn connector from its seatand disconnect, then unscrew the bolt retainingthe steering wheel to the steeringcolumn.Publication no. 508.876
<strong>Bravo</strong>-<strong>Brava</strong>Electrical equipmentAir Bag55.1. Mark the respective positions of the steeringwheel hub and steering column, andremove the steering wheel._ A _ During the operation, take care NOTfm TO STRIKE THE STEERING WHEEL.P4A39DA02The device is fitted with a safetycatch to prevent the upper and lowerplates turning in relation to one anotherwhen the steering wheel is notfitted in the car. To achieve this,springs (1) close as shown in the figure.2. Unscrew the bolts fastening the upper andlower steering column guards.3. Disconnect the connection connectingthe clock spring to the Air Bag lead (yellow).Undo the three clock spring boltsand then remove.Once the steering wheel has been removed,the clock spring is blocked sothat the lower and upper plates cannotturn..If the upper plate of the clock springshould turn in relation to the lowerfor any reason, so that the positionupon removal is lost, the CLOCKSPRING MUST BE REPLACED.Once the clock spring has been removed,carefully secure the device toprevent the two plates from turningaccidentally.Reverse order of removal operationsto refit. When refitting the steeringwheel, tighten the nut securing it tothe steering column to a torque of 5daNm.Copyright Fiat Auto 7
<strong>Bravo</strong>-<strong>Brava</strong>BodyworkContents707INTERIOR TRIMpage- Dashboard - General exploded view1- General view of retainers 2- Removing-refitting dashboard 312vRemoving-refitting bonnet openingcable 11TD7SRemoving-refitting bonnet openingcable 13Copyright Fiat Auto
<strong>Bravo</strong>-<strong>Brava</strong>BodyworkInterior trim70.DASHBOARD - GENERAL EXPLODED VIEW1. Speaker grille2. Speaker3. Instrument facia4. Stalk unit5. Horn/air bag protection6. Steering wheel7. Halves8. Glove compartment9. Car radio10. Central panel11. Hazard warning switch12. Switch unit13. Panels14. Fan control knob15. Ashtray/cigar lighter unit16. Control panel frame17. Protecting18. Gear lever boot19. Handbrake lever boot20. Tunnel cover console21. Instrument panel22. Junction unit protection23. Door sill trims)24. Left ventilation outlet25. Upper grilleCopyright Fiat Auto 1
BodyworkInterior trim70.<strong>Bravo</strong>-<strong>Brava</strong>GENERAL VIEW OF RETAINERS2 Publication no. 508.876
<strong>Bravo</strong>- <strong>Brava</strong>BodyworkInterior trim70.EMOVING-REFITTING DASHBOARDDisconnect the battery negative terminal, thenremove the stalk unit from the car as describedin section 41 - Steering.1. Prise up the protective gear lever boot.2. Lift the luggage compartment trim shownin the figure and unscrew the bolt underneath.3. Remove the rear ashtray by lifting out andunscrew the underlying central tunnel retainingbolts.4. Undo the retaining tabs to lift the doormirror control panel.5. Disconnect supply connector for the electricdoor mirrors and remove the panel.P4A61DA03Copyright Fiat Auto 3
BodyworkInterior trim70.<strong>Bravo</strong>-<strong>Brava</strong>P4A62DA021. Remove the clips, unscrew the boltsshown and remove the tunnel trim fromthe car. Lift the parking brake lever fully toallow removal of the trim.2. Remove the junction unit protection byundoing the fastenings shown in the figure.3. Working from inside the junction unithousing compartment, unscrew screw retainingthe instrument panel frame.4. Unscrew the bolts indicated, then movethe instrument panel slightly to one side,disconnect the headlamp alignment adjusterand instrument light dimmer connectionsand then remove the frame.P4A62DA034 Publication no. 508.876
<strong>Bravo</strong>-<strong>Brava</strong>BodyworkInterior trim70.1. Unscrew the retaining bolts indicated,disconnect the connectors on the rear ofthe instrument panel, then remove removefrom the instrument facia.2. Remove the car radio with the aid of tools1860897000.Tool 1860897000 is made up of a lefthand part and a right hand part,marked L and R respectively. The correctiondirection of use of each part isindicated by means of an arrow (TOP).It is advisable to work from the passengerside to facilitate removal operations.Move the car radio slightly to the left andcarefully fit right hand part (R) of tool1860897000 until it clicks into the radioclips. Use right hand part (R) to pull outthe right hand side of the radio slightly,move it to the right and carefully fit the lefthand part (L) of tool 1860897000 until itclicks into the radio clips. Grasp both sidesof the tool and pull the radio out partly,then release both parts of tool1860897000 from the radio.Do NOT remove the radio by pullingfrom the glove compartment, but onlyby using both parts of tool1860897000 and following the proceduredescribed previously.Protect the area of the instrument faciabelow the radio using a cloth, pull out theradio fully and disconnect the supplyleads and aerial lead.Copyright Fiat Auto 5
BodyworkInterior trim70.<strong>Bravo</strong>-<strong>Brava</strong>P4A64DA01P4A64DA02P4A64DA031. Unscrew the lower screws securing theashtray to the instrument facia.2. Unscrew bolts indicated in figure, disconnectconnector for the cigar lighter/lightingand remove the ashtray.3. Use a screwdriver to prise up panel (1).Unscrew screws (2) and pull switch unit(3) out slightly.4. Disconnect connectors (1) and removethe switch unit. Proceed as described inthe figure to remove hazard warning lightswitch (2) and disconnect both connectors.5. Unscrew the bolts fastening the heaterand control panel.P4A64DA04P4A64DA056 Publication no. 508.876
<strong>Bravo</strong>-<strong>Brava</strong>BodyworkInterior trim70.1. Remove the central fan control knob, unscrewthe underlying screw and disconnectthe heater and switch control panelby disconnect the underlying supply connector.2. Unscrew the bolts fastening the instrumentfacia, located in the ashtray compartment.3. Unscrew the bolts fastening the instrumentfacia to the heater and screw (1).4. Work from inside the glove compartmentto undo clips (1) and remove the compartmentlining.5. Unscrew the bolts indicated, which retainthe glove compartment, and pull outslightly.P4A65DA034 Vn1^_®___^-^-Tfl^\vV^ \P4A65DA04Copyright Fiat Auto 7
BodyworkInterior trim70.<strong>Bravo</strong>-<strong>Brava</strong>1. Disconnect connector of the glove compartmentlight, then remove the light fromthe car.2. Unscrew the bolts fastening the left ventilationoutlet, then remove.3. Unscrew the screw indicated, which securesthe left hand side of the instrumentfacia.4. Unscrew the screw indicated and movethe door sill trim away on both sides of thecar.5. Unscrew the lower bolt retaining the instrumentfacia to the body on both sides.8 Publication no. 508.876
<strong>Bravo</strong>-<strong>Brava</strong>BodyworkInterior trim70.P4A67DA021. Undo the retaining tabs and remove theleft and right speaker grilles on the facia.2. Disconnect the right and left speakers byunscrewing the retaining bolts and disconnectingthe connectors.3. Unscrew screw located in the right andleft speaker compartment, which securesthe instrument facia to the body.4. Remove the bolt retaining the instrumentfacia to the body, on the left side.5. Remove the central bolt securing the instrumentfacia to the body.P4A67DA05Copyright Fiat Auto 9
BodyworkInterior trim70.<strong>Bravo</strong>-<strong>Brava</strong>1. Unscrew the bolts fastening instrumentfacia to the front beam.2. Unscrew screw retaining the facia, locatednear the steering wheel adjustment lever.3. Remove the instrument facia retainingscrew on the rihgt hand side near thejunction unit.4. Loosen the bolt retaining the steeringwheel adjustment lever in order to facilitateremoval of the instrument facia.5. Remove the instrument facia with the aidof a second operator.Reverse removal operations to refit.P4A68DA03P4A68DA0410 Publication no. 508.876
<strong>Bravo</strong>-<strong>Brava</strong> @i 12vBodyworkInterior trim70.2= = *= =_ _ ^ lc 3TJL. Hf1 JjJ r^m^^^^^ V^P4A69DA01P4A69DA02REMOVING-REFITTING BONNET OPENING CABLE1. Remove the pipe connecting air cleaner tobutterfly valve case.2. Remove the relay unit protective cover.3. Unscrew the bolts fastening the relaybracket and position to one side.4. Remove the stud shown in figure andmove the lining of the bulkhead betweenengine bay and cabin to one side.5. Unscrew nut retaining the bonnet openingcable to the bulkhead between enginebay and passenger compartment. Removethe underlying guide block.P4A69DA03P4A69DA04P4A69DA05Copyright Fiat Auto 11
BodyworkInterior trim70.<strong>Bravo</strong>-<strong>Brava</strong> @i 12vDisconnect bonnet opening cable (1)from the seats of fastenings (2) and (3)and from the retaining clip (4).2. Release the bonnet opening cable fromthe retaining clip located beneath the injectioncontrol unit.3. Working from beneath the steering wheel,remove cap (A) from bonnet openinglever (B), then release the end (C) of theopening cable from seat (D).Release opening cable fastener (E) fromseat (F) on the body.Fasten the opening cable to a probein order to facilitate refitting throughthe bulkhead between engine bayand cabin.Withdraw and disconnect the bonnetopening cable.NOTE Reverse order of removal operations torefit.P4A70DA0312 Publication no. 508.876
<strong>Bravo</strong>-<strong>Brava</strong>BodyworkInterior trim70.REMOVING-REFITTING BONNET OPENING CABLE1. Remove the upper cam cover protection.2. Remove the trim shown in the figure byundoing the retaining bolt and releasingthe diesel lines from the retaining clip.3. Remove the bolt retaining the fuel lineconnection bracket.4. Disconnect connector of the brake andclutch fluid level sensor, then remove thestud retaining the lining of the bulkheadbetween engine bay and cabin, then movethe trim to one side.5. Unscrew the bolts fastening the diesel filterbracket, disconnect connections shownand place the bracket to one side.Copyright Fiat Auto 13
BodyworkInterior trim70.<strong>Bravo</strong>-<strong>Brava</strong>P4A72DA021. Move the lining of the bulkhead betweenengine bay and cabin further, then removethe nut retaining the bonnect opening cableto the above bulkhead.2. Remove the air duct by undoing the fastenersindicated in figure.3. Disconnect the bonnect opening cablefrom the retainer seats and the retainingclip.4. Disconnect the air sleeve from the filter.5. Open the cable duct and remove the bonnetopening cable.P4A72DA03P4A72DA0S14 Publication no. 508.876
<strong>Bravo</strong>-<strong>Brava</strong>BodyworkInterior trim70.Working from beneath the steering wheel,remove plug (A) from bonnet openinglever (B) , then disconnect end (C) of theopening cable from seat (D).Release opening cable fastener (E) fromseat (F) on the body.Fasten the opening cable to a probein order to facilitate refitting throughthe bulkhead between engine bayand passenger compartment.Withdraw and disconnect the bonnetopening cable by releasing from theretaining clip.NOTE Reverse order of removal operations torefit.Copyright Fiat Auto 15